
DR-MV80B - DVD player JVC - Free user manual and instructions
Find the device manual for free DR-MV80B JVC in PDF.
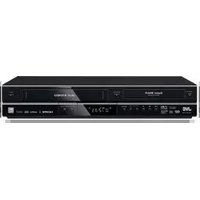


| Product Type | DVD Video Recorder with VHS (Combo Unit) |
| Model | JVC DR-MV80B |
| Brand | JVC |
| Playable Discs | DVD-Video, DVD-R/RW, DVD+R/RW, DVD-RAM, Video CD, Audio CD, CD-R/RW (MP3, WMA, JPEG, DivX) |
| Recording Discs | DVD-R/RW, DVD+R/RW, DVD-RAM |
| VCR Format | VHS (Hi-Fi Stereo, SQPB) |
| Video Outputs | HDMI (1080p/1080i/720p/480p/480i), Component (Y/Pb/Pr), S-Video, Composite |
| Audio Outputs | HDMI (up to 5.1), Digital Optical, Digital Coaxial, Analog Stereo (L/R) |
| Inputs | Composite (AV1, AV2), S-Video (AV2), DV (IEEE 1394), USB |
| Dimensions (W x H x D) | Approx. 430 x 75 x 275 mm (16.9 x 3.0 x 10.8 inches) |
| Weight | Approx. 4.2 kg (9.3 lbs) |
| Power Supply | AC 120 V, 60 Hz |
| Power Consumption | Approx. 45 W (standby: <1 W) |
| Special Features | Simultaneous Play and Record, Timer Recording, Timer-Link Recording, Dubbing (DVD to VCR and VCR to DVD), Chapter Marker Insertion, Title Editing, CPRM Compatible |
| Remote Control Code | User-selectable A/B/C/D to control multiple JVC units |
| Maintenance | Clean discs from center outward; avoid solvents; allow condensation to evaporate before use |
| Safety | Class 2M laser; do not open; avoid exposure to rain/moisture; unplug during storms |
Frequently Asked Questions - DR-MV80B JVC
User questions about DR-MV80B JVC
0 question about this device. Answer the ones you know or ask your own.
Ask a new question about this device
Download the instructions for your DVD player in PDF format for free! Find your manual DR-MV80B - JVC and take your electronic device back in hand. On this page are published all the documents necessary for the use of your device. DR-MV80B by JVC.
USER MANUAL DR-MV80B JVC
DVD VIDEO RECORDER
DR-MV80B


INSTRUCTIONS
For Customer Use:
Enter below the Model No. and Serial No. which are located on the rear of the cabinet. Retain this information for future reference.
Model No.
Serial No.
LVT2013-001A
[J]

CAUTION
RISK OF ELECTRIC SHOCK DO NOT OPEN

CAUTION: TO REDUCE THE RISK OF ELECTRIC SHOCK
DO NOT REMOVE COVER (OR BACK) NO USER-SERVICEABLE PARTS INSIDE REFER SERVICING TO QUALIFIED SERVICE PERSONNEL.

This lightning flash with arrowhead symbol within an equilateral triangle is intended to alert the user to the presence of uninsulated dangerous voltage within the product's enclosure that may be of sufficient magnitude to constitute a risk of electric shock to persons.

The exclamation point within an equilateral triangle is intended to alert the user to the presence of important operating and maintenance (servicing) instructions in the literature accompanying the product.
WARNING: TO REDUCE THE RISK OF FIRE OR ELECTRIC SHOCK, DO NOT EXPOSE THIS APPARATUS TO RAIN OR MOISTURE AND OBJECTS FILLED WITH LIQUIDS, SUCH AS VASES, SHOULD NOT BE PLACED ON THIS APPARATUS.
CAUTION:
Do not block any ventilation openings. Install in accordance with the manufacturer's instructions.
Slots and openings in the cabinet are provided for ventilation and to ensure reliable operation of the product and to protect it from overheating. The openings should never be blocked by placing the product on a bed, sofa, rug, or other similar surface. This product should not be placed in a built-in installation such as a bookcase or rack unless proper ventilation is provided or the manufacturer's instructions have been adhered to.

CAUTION:
This product employs a Laser System.
To ensure proper use of this product, please read this owner's manual carefully and retain it for future reference. Should the unit require maintenance, contact an authorized service center.
Performing controls, adjustments, or carrying out procedures other than those specified herein may result in hazardous radiation exposure.
To prevent direct exposure to laser beam, do not try to open the enclosure. Visible laser radiation when open. DO NOT STARE INTO BEAM.
CAUTION: The apparatus should not be exposed to water (dripping or splashing) and no objects filled with liquids, such as vases, should be placed on the apparatus.
CAUTION: VISIBLE AND INVISIBLE CLASS 2M LASER RADIATION WHEN OPEN. DO NOT VIEW DIRECTLY WITH OPTICAL INSTRUMENTS.

As an ENERGY STAR® Partner, JVC has determined that this product or product models meet the ENERGY STAR® guidelines for energy efficiency.
FCC WARNING: This equipment may generate or use radio frequency energy. Changes or modifications to this equipment may cause harmful interference unless the modifications are expressly approved in the instruction manual. The user could lose the authority to operate this equipment if an unauthorized change or modification is made.
REGULATORY INFORMATION: FCC Part 15
This equipment has been tested and found to comply with the limits for a Class B digital device, pursuant to Part 15 of the FCC Rules. These limits are designed to provide reasonable protection against harmful interference when the product is operated in a residential installation. This product generates, uses, and can radiate radio frequency energy and, if not installed and used in accordance with the instruction manual, may cause harmful interference to radio communications. However, there is no guarantee that interference will not occur in a particular installation. If this product does cause harmful interference to radio or television reception, which can be determined by turning the product off and on, the user is encouraged to try to correct the interference by one or more of the following measures:
- Reorient or relocate the receiving antenna.
- Increase the separation between the product and receiver.
- Connect the product into an outlet on a circuit different from that to which the receiver is connected.
- Consult the dealer or an experienced radio/TV technician for help.
CAUTION concerning the Power Cord
Most appliances recommend they be placed upon a dedicated circuit;
That is, a single outlet circuit which powers only that appliance and has no additional outlets or branch circuits. Check the specification page of this owner's manual to be certain.
Do not overload wall outlets. Overloaded wall outlets, loose or damaged wall outlets, extension cords, frayed power cords, or damaged or cracked wire insulation are dangerous. Any of these conditions could result in electric shock or fire. Periodically examine the cord of your appliance, and if its appearance indicates damage or deterioration, unplug it, discontinue use of the appliance, and have the cord replaced with an exact replacement part by an authorized servicer.
Protect the power cord from physical or mechanical abuse, such as being twisted, kinked, pinched, closed in a door, or walked upon. Pay particular attention to plugs, wall outlets, and the point where the cord exits the appliance.
To disconnect power from the mains, pull out the mains cord plug. When installing the product, ensure that the plug is easily accessible.
IMPORTANT SAFETY INSTRUCTIONS
- Read these instructions.
- Keep these instructions.
- Heed all warnings.
- Follow all instructions.
- Do not use this apparatus near water.
- Clean only with dry cloth.
- Do not block any ventilation openings. Install in accordance with the manufacturer's instructions.
- Do not install near any heat sources such as radiators, heat registers, stoves, or other apparatus (including amplifiers) that produce heat.
- Do not defeat the safety purpose of the polarized or grounding-type plug. A polarized plug has two blades with one wider than the other. A grounding type plug has two blades and a third grounding prong. The wide blade or the third prong are provided for your safety. If the provided plug does not fit into your outlet, consult an electrician for replacement of the obsolete outlet.
- Protect the power cord from being walked on or pinched particularly at plugs, convenience receptacles, and the point where they exit from the apparatus.
- Only use attachments/accessories specified by the manufacturer.
- Use only with the cart, stand, tripod, bracket, or table specified by the manufacturer, or sold with the apparatus. When a cart is used, use caution when moving the cart/apparatus combination to avoid injury from tip-over.

- Unplug this apparatus during lightning storms or when unused for long periods of time.
- Refer all servicing to qualified service personnel. Servicing is required when the apparatus has been damaged in any way, such as power-supply cord or plug is damaged, liquid has been spilled or objects have fallen into the apparatus, the apparatus has been exposed to rain or moisture, does not operate normally, or has been dropped.
INTRODUCTION
About the Symbol Display .....2
Symbol Used in this Manual .....2
Notes on Discs .....2
Moisture Condensation....2
Recordable and Playable Discs .....3
Recommended recordable DVD discs .....3
Playable Discs ....4
Regional Code 4
Restrictions on video recording .....5
What is 'CPRM'? 5
Copyright....5
Notice for Progressive Scan Use ....5
Front Panel 6
Remote Control 7
About the Remote Control .....7
Remote Control Function ....8
Rear Panel 9
HOOKUP AND SETTINGS
Connections to your TV ....10
HDMI connection .....11
Connection to an Amplifier .....12
Cable/Satellite box Connection to unit .....13
Accessory Audio/Video (A/V)
Connections to Recorder ....13
Connecting a Digital Camcorder .....13
Initial Setup Wizard .....14
Using the Home Menu ....14
Initial Settings 15
General Settings .....15
Language Settings ....16
Audio Settings ....16
Recording Settings .....17
Disc Settings .....17-18
General Explanation of On-Screen Display .19
Displaying Information While Watching AV input source 19
Displaying Disc Information on-screen .....19
PLAYBACK
Playing a Tape .....20
Playing a DVD .....20
VCR Playback Options .....20
DVD or Video CD Playback Features . . . .21-22
Special Playback Options .....23
Playing a DivX Movie File .....24
Playing an Audio CD or MP3/WMA files ....25
Viewing a JPEG files .....26-27
RECORDING
About DVD recording .....28
Notes for recording .....28
Recording time and picture quality .....28
Basic Recording (One-Touch Recording) . . .29
Instant Timer Recording .....29
Simultaneous Play and Record .....29
Timer-Link Recording
(External Timer Recording)....30
Timer Recording ....31
Timer Recording Troubleshooting .....31
Dubbing from DVD to VCR .....32
Dubbing from VCR to DVD ....32
Recording from DV Input ....33
EDITING
Title List and Chapter List Menu Overview .34
VR Mode: Original and Playlist Editing ....35
Adding Chapter Markers .....35
Changing the Title Thumbnails .....35
Making a New Playlist ....36
Adding Additional Title/Chapters to the
Playlist ....36
Deleting an Original or Playlist Title/
Chapter 37
Deleting a Part ....37
Naming a Title ....38
Time Search ....38
Moving a Playlist Chapter ....39
Hide a Chapter/Title ....39
Protect a Title ....39
Divide One Titles Into Two ....40
Combining Two Chapters Into One .....40
Overwriting Recording ....41
Viewing Title List menu displayed on other
DVD Recorders or Players .....41
Playing Your Recordings on Other DVD
Players (Finalizing a Disc) .....41
REFERENCE
Language Code List ....42
Troubleshooting .....43-45
Resetting the Recorder .....45
Specifications .....46-47
Index 48
Warranty 49
Introduction
To ensure proper use of this product, please read this owner's manual carefully and retain for future reference.
About the Symbol Display
" may appear on your TV display during operation and indicates that the function is not permitted by this unit or specific media.
Symbol Used in this Manual
Note: Indicates special notes and operating features.
Tip: Indicates tips and hints for making the task easier.
A section whose title has one of the following symbols are applicable only to those discs represented by the symbol.
DVD ALL All DVD discs listed below.
-RW VR DVD-RW with VR recording mode
-RWVideo DVD-RW with Video recording mode
RAM DVD-RAM disc
+RW DVD+RW disc
-R DVD-R disc
+R DVD+R disc
DVD DVD-Video disc
DivX DivX files
VCD Video CDs
ACD Audio CDs
MP3 MP3 files
WMA WMA files
JPEG JPEG files
Notes on Discs
Handling Discs
Do not touch the playback side of the disc. Hold the disc by the edges so that fingerprints do not get on the surface. Never stick paper or tape on the disc.


Storing Discs
After playing, store the disc in its case. Do not expose the disc to direct sunlight or sources of heat and never leave it in a parked car exposed to direct sunlight.
Cleaning Discs
Fingerprints and dust on the disc can cause poor picture quality and sound distortion. Before playing, clean the disc with a clean cloth. Wipe the disc from the center out.

Do not use strong solvents such as alcohol, benzine, thinner, commercially available cleaners, or anti-static spray intended for older vinyl records.
Moisture Condensation
Never operate this product immediately after moving it from a cold location to a warm location. Leave it for two or three hours without operating it. If you use this product in such a situation, it may damage discs/tapes and internal parts.
Recordable and Playable Discs

DVD-RW (DVD - ReWritable)
- DVD-RW discs can be formatted for VR mode recording or Video mode recording.
- These discs can be recorded on repeatedly. Recordings can be erased, then you can record again on the same disc. Recordings can be extensively edited.
- Playable only on VR mode compatible players (after finalization)
- Playable on regular DVD players (after finalization)
- Limited editing features
[VR mode]
[Video mode]
![JVC DR-MV80B - [Video mode] - 1](/content/2026/05/920910/images/6c90a6a9713289978316de4de5594e7e4d1486c0c4c0e0d1218f359fe0024a8b.jpg)
DVD-R (DVD - Recordable)
- These discs can be recorded only once. After you finalize a DVD-R, you cannot record on it or edit it. DVD-R discs can only be formatted in Video mode.
- Playable on regular DVD players (after finalization).
- Limited editing features.

DVD-RAM (DVD - Random Access Memory)
- DVD-RAM discs can be formatted for VR mode recording.
- These discs can be recorded on repeatedly. Recordings can be erased, then you can record again on the same disc.
- Playable on DVD-RAM compatible players. Recordings can be extensively edited.
- Only DVD-RAM standard Version 2.0, 2.1, and 2.2 discs can be used in this unit.
- You cannot use the cartridge-type DVD-RAM disc in this unit.

DVD+RW (DVD + ReWritable)
- These discs can be recorded on repeatedly. Recordings can be erased, then you can record again on the same disc.
- Playable on DVD+RW compatible players (automatic finalization).
- The edited contents are playable on DVD+RW compatible players only after finalization. Recordings can be edited.

DVD+R (DVD + Recordable)
- These discs can be recorded only once. After you finalize a DVD+R, you cannot record on it or edit it any more.
- Playable on DVD+R compatible players (after finalization).
- Any edited contents are not compatible on DVD+R compatible players. (Hide, chapter combine, added chapter mark, etc.)
- Limited title/chapter editing features.
Recommended recordable DVD discs
| DVD-R | DVD+R | DVD-RW | DVD+RW | DVD-RAM |
| Mitsubishi(8x,16x) | Mitsubishi(8x,16x) | Mitsubishi(4x) | Mitsubishi(4x) | Mitsubishi(3x) |
| Verbatim(8x,16x) | Verbatim(8x,16x) | Verbatim(4x) | HP(4x) | Maxell(5x) |
| JVC(8x,16x) | JVC(8x,16x) | JVC(6x,4x) | Verbatim(4x) | JVC(3x) |
| - | - | Maxell(4x) | Ricoh(4x) | - |
Playable discs

DVD (8 cm / 12 cm disc)
Discs such as movies that can be purchased or rented


Video CD (VCD) (8 cm / 12 cm disc)
VIDEO CDs or CD-Rs/CD-RWs in VIDEO CD/Super VIDEO CD format

Audio CD (8 cm / 12 cm disc)
Music CDs or CD-Rs/CD-RWs in music CD format that can be purchased

CD-R/CD-RW (8 cm / 12 cm disc)
CD-R/CD-RW discs that contain audio titles, MP3, WMA or JPEG files.
Notes:
- Depending on the conditions of the recording equipment or the CD-R/RW (or DVD±R/RW) disc itself, some CD-R/RW (or DVD±R/RW) discs cannot be played on the unit.
- Do not attach any seal or label to either side (the labeled side or the recorded side) of a disc.
- Do not use irregularly shaped CDs (e.g., heart-shaped or octagonal). Doing so may result in malfunctions.
- Depending on the recording software and the finalization, some recorded discs (CD-R/RW or DVD±R/RW) may not be playable.
- DVD-R/RW, DVD+R/RW and CD-R/RW discs recorded using a personal computer or a DVD or CD Recorder may not play if the disc is damaged or dirty, or if there is dirt or condensation on the Recorder's lens.
- If you record a disc using a personal computer, even if it is recorded in a compatible format, there are cases in which it may not play because of the settings of the application software used to create the disc. (Check with the software publisher for more detailed information.)
- This recorder requires discs and recordings to meet certain technical standards in order to achieve optimal playback quality. Pre-recorded DVDs are automatically set to these standards. There are many different types of recordable disc formats (including CD-R containing MP3 or WMA files) and these require certain pre-existing conditions (see above) to ensure compatible playback.
- Customers should note that permission is required in order to download MP3 / WMA files and music from the Internet. Our company has no right to grant such permission. Permission should always be sought from the copyright owner.
Regional Code
This unit has a regional code printed on the rear of the unit. This unit can play only DVD discs labeled same as the rear of the unit or "ALL".
Notes on Regional Codes
- Most DVD discs have a globe with one or more numbers in it clearly visible on the cover. This number must match your unit's regional code or the disc cannot play.
- If you try to play a DVD with a different regional code from the unit, the message “Incorrect region code. Can’t play back” appears on the TV screen.
Restrictions on video recording
- You cannot record copy-protected video using this recorder. Copy-protected video includes DVD-Video discs and some satellite broadcasts. If copy-protected material is encountered during a recording, recording will pause or stop automatically and an error message will be displayed on-screen.
- Video that is 'copy-once only' can only be recorded using a DVD-RW disc in VR mode or DVD-RAM disc with CPRM (see below).
What is 'CPRM'?
CPRM is a copy protection system (with scramble system) only allowing the recording of 'copy once' broadcast programs. CPRM stands for Content Protection for Recordable Media.
This Recorder is CPRM compatible, which means that you can record copy-once broadcast programs, but you cannot then make a copy of those recordings. CPRM recordings can only be made on DVD-RW discs formatted in VR mode or DVD-RAM discs. Both types of discs must be CPRM compatible. CPRM recordings can only be played on players that are specifically compatible with CPRM. This unit does not support a DVD-R disc with CPRM.
Copyright
- Recording equipment should be used only for lawful copying and you are advised to check carefully what is lawful copying in the area in which you are making a copy. Copying of copyright material such as films or music is unlawful unless permitted by a legal exception or consented to by the rights owner.
- This product incorporates copyright protection technology that is protected by method claims of certain U.S. patents and other intellectual property rights owned by Macrovision Corporation and other rights owners. Use of this copyright protection technology must be authorized by Macrovision Corporation, and is intended for home and other limited viewing uses only, unless otherwise authorized by Macrovision corporation. Reverse engineering or disassembly is prohibited.
Notice for Progressive Scan Use
CONSUMERS SHOULD NOTE THAT NOT ALL HIGH DEFINITION TELEVISION SETS ARE FULLY COMPATIBLE WITH THIS PRODUCT AND MAY CAUSE ARTIFACTS TO BE DISPLAYED IN THE PICTURE. IN CASE OF 525 PROGRESSIVE SCAN PICTURE PROBLEMS, IT IS RECOMMENDED THAT THE USER SWITCH THE CONNECTION TO THE 'STANDARD DEFINITION' OUTPUT. IF THERE ARE QUESTIONS REGARDING YOUR TV SET COMPATIBILITY WITH THIS MODEL 525p DVD+VCR RECORDER, PLEASE CONTACT OUR CUSTOMER SERVICE CENTER.
Front Panel
1 Disc Tray (DVD deck)
Insert a disc here.
2 ▲ OPEN/CLOSE
Opens or closes the disc tray.
3 Cassette Compartment (VCR deck)
Insert a video cassette here.
4 △EJECT
Ejects the tape in the VCR deck.
5 STANDBY/ON (⏻/I)
Switches the Recorder ON and OFF.
6 ▶ / II (PLAY / PAUSE)
Starts playback.
Pause playback or recording temporarily, press again to exit pause mode.
7 ■ (STOP)
Stops playback
8 ● (REC)
Starts recording. Press repeatedly to set the recording time. Press ● (REC) for more than 3 seconds to set the unit to standby mode for Timer-Link recording.
9 ◀◀/▶▶ (BACKWARD / FORWARD)
- DVD: Search backward or forward.
- VCR: Rewinds/Advances the tape during the STOP mode, for fast reverse/ forward picture search.
10 DUBBING
Press to copy DVD to VCR (or VCR to DVD).
DVD ▶ VCR
or
Lights when recorder is dubbing.
DVD ◀ VCR
11 Display window
Shows the current status of the Recorder.

Lights when a disc is in the DVD deck.
DVD The DVD deck is selected.
▶ Lights when the Recorder is in playing mode or flashes when search mode.
VCR The VCR deck is selected.
Indicates when the recorder is in timer recording or a timer recording is programmed. This indicator will flash when the unit is set to standby mode for Timer-Link recording.
A VHS tape is inserted in the VCR deck.
REC The Recorder is recording.
PM Indicates PM time. (AM is not displayed.)
18:00:00
Indicates total playing time, elapsed time, remaining time or current deck status (Playback, Pause, etc).
12 Remote Sensor
Point the recorder Remote Control here.
13 DVD/VCR
Toggles control between the DVD deck and the VCR deck.
14 OUTPUT STATUS
Sets the output resolution for HDMI and COMPONENT OUTPUT jacks.
- HDMI: 1080p, 1080i, 720p, 480p, 480i
- COMPONENT: 480p, 480i
15 DV IN
Connect the DV output of a digital camcorder.
16 AVIN 2 (VIDEO /AUDIO (Left/Right))
Connect the audio/video output of an external source (Audio system, TV/ Monitor, VCR, Camcorder, etc.).
Remote Control

1
2
3
4
1
STANDBY/ON (⏻/I)
Turns Recorder ON and OFF.
DVD
Select the Recorder's function mode to DVD.
VCR
Select the Recorder's function mode to VCR.
EJECT, OPEN/CLOSE (▲)
- Opens and closes the disc tray. - Ejects the tape in the VCR deck.

Skips 30 seconds forward during playback.
AUX
Changes the input to use for recording (AV1, AV2, or DV IN).
0-9 numerical buttons
Selects numbered options in a menu.
JVC TV Control Buttons
- TV STANDBY/ON: Turns the TV on or off.
- INPUT: Selects the TV's source.
- CH +/-: Selects TV's channel.
- VOL +/-: Adjusts TV's volume.
2
BACKWARD / FORWARD
(◀◀/▶▶)
- DVD: Search backward or forward.
- VCR: Rewinds/Advances the tape during the STOP mode, for fast reverse/forward picture search.
SKIP (I ◀◀ / ▶▶▶ I)
Go to next chapter or track. Returns to beginning of current chapter or track or go to previous chapter or track.
PAUSE/STEP (II)
Pause playback or recording temporarily. Press repeatedly for frame-by-frame playback.
PLAY (▶)
Starts playback.
STOP (■)
Stops playback or recording.
3
HOME
Accesses or removes the HOME menu.
DISC MENU/LIST
Accesses menu on a DVD disc, Title List or Playlist menu.
TRACKING (+ / -)
Adjusts manually the tape's picture onscreen.
◀ ▶ ▲ ▼ (left/right/up/down)
Selects menu options.
ENTER (◎)
Confirms menu selections.
DISPLAY
Accesses On-Screen Display. Displays information of current status.
RETURN (○)
Removes the menu.
4
AUDIO
Selects an audio language or an audio channel.
SUBTITLE
Selects a subtitle language.
ZOOM
Enlarges DVD video image.
CHAPTER
Inserts a chapter marker when playing/recording.
● REC
Starts recording. Press repeatedly to set the recording time.
REC MODE
Selects the recording mode:
- DVD: XP, SP, LP or EP.
- VCR: SP or SLP.
TITLE
Displays the disc's Title menu, if available.
THUMBNAIL
Selects a thumbnail picture for the current title for use in the Title List menu.
PLAY MODE
Selects play mode.
MARKER
Marks any point during playback.
SEARCH
Displays Marker Search menu.
CLEAR
Removes a mark on the Marker Search menu.
DUBBING
Press to copy DVD to VCR (or VCR to DVD).
*: Feature is not available.
About the Remote Control
Operation Range
Point the Remote Control at the Remote Sensor and press the buttons.
Distance: About 23 ft (7 m) from the front of the Remote Sensor.
Angle: About 30 degrees in each direction of the front of the Remote Sensor.
Battery installation (See page 8)

Detach the battery cover on the rear of the Remote Control, and insert two (R03/AAA size) batteries with + and - aligned correctly.

Do not mix old and new batteries and never mix different types of batteries such as standard, alkaline, etc.
Remote Control Function (Refer to page 7)
Remote Control A/B/C/D Code Switching
The remote control is capable of controlling four JVC video units independently. Each of the units can respond to one of four codes (A, B, C or D). The remote control is preset to send C code signals because your unit is initially set to respond to C code signals. You can easily modify your unit to respond to A, B or D code signals.

- Press STANDBY/ON (☐/I) on the unit to turn off the unit with no video tape inserted.
- Press the number key "1" for A, "2" for B, "3" for C or "4" for D while pressing ENTER (◎) down on the remote control.
- Press ▶/II on the unit for over 5 seconds while the unit is turned off. The current code appears on the display window.
- Press STOP (■) on the remote control, the current code on the display window changes to new code and blinks for approximately 10 seconds.
- The new code setup on unit and remote is done.
Note:
If you change the batteries of the Remote Control with A, B or D code, the remote control code is set to C automatically. In this case, you should reset the remote control code described above.
Rear Panel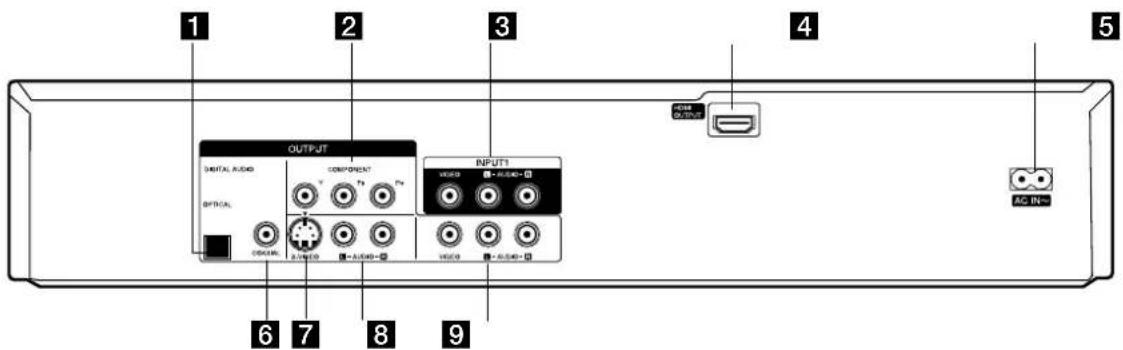
1 OPTICAL (DIGITAL AUDIO OUTPUT)
Connect to digital (optical) audio equipment.
2 COMPONENT OUTPUT (Y PB PR)
Connect to a TV with Y PB PR inputs
3 INPUT 1 (VIDEO/AUDIO (Left/Right))
Connect the audio/video output of an external source (Cable/Satellite box, Audio system, TV/Monitor, VCR, Camcorder).
4 HDMI OUTPUT
HDMI output providing a high quality interface for digital audio and video.
5 AC Power Cord
Plug into the power source.
6 COAXIAL (DIGITAL AUDIO OUTPUT)
Connect to digital (coaxial) audio equipment.
7 S-VIDEO OUTPUT
Connect to a S-Video Input on TV.
8 AUDIO OUTPUT (Left/Right)
Connect to a TV or other equipment with audio inputs.
9 VIDEO/AUDIO OUTPUT (Left/Right)
Connect to a TV with video and audio inputs.
Caution:
Do not touch the inner pins of the jacks on the rear panel.
Electrostatic discharge may cause permanent damage to the unit.
Hookup and Settings
Depending on your TV and other equipment there are various ways you can connect the recorder. Please refer to the manuals of your TV, VCR, Stereo System or other devices as necessary for additional connection information.
Notes:
- Make sure the Recorder is connected directly to the TV and tune the TV to the correct video input channel.
- Do not connect the Recorder's AUDIO OUTPUT jack to the phono in jack (record deck) of your audio system.
- Do not connect the Recorder via another VCR. The DVD image could be distorted by the copy protection system.
- The picture and sound of a nearby TV, VCR, or radio may be distorted during playback. Position the units away from each other or turn off the unit after removing the disc.
Connections to your TV
Make one of the following connections, depending on the capabilities of your TV.
Video connection
Connect the VIDEO OUTPUT jack on the Recorder to the video in jack on the TV using the video cable supplied (V).
Note:
If you use this connection, set the TV's source selector to VIDEO.
S-Video connection
Connect the S-VIDEO OUTPUT jack on the Recorder to the S-Video in jack on the TV using the optional S-Video cable (S).
Component Video connection
If your television is a high-definition or “digital ready” television, you may take advantage of the Recorder's progressive scan output for the highest video resolution possible.
Connect the COMPONENT OUTPUT jacks on the Recorder to the corresponding in jacks on the TV using an optional Y PB PR cable (C).
Notes:
- Set the resolution to 480p using OUTPUT STATUS button on the front panel for progressive signal.
- Progressive Scan does not work with the Video or S-Video connections.
- If your TV does not accept the Progressive Scan format, the picture will appear scrambled.
- If the resolution is set to 720p, 1080i or 1080p, the COMPONENT OUTPUT connections are not available.
Audio connection
Connect the Left and Right AUDIO OUTPUT jacks on the Recorder to the audio left/right in jacks on the TV using the supplied audio cables (A1 or A2).

HDMI connection
If you have a HDMI TV or monitor, you can connect it to this recorder using a HDMI cable.
- Connect the HDMI OUTPUT jack on the recorder to the HDMI INPUT jack on a HDMI compatible TV or monitor (H).
- Set the TV's source to HDMI (refer to TV's Owner's manual).
Notes:
- This unit will only provide up-converted SD resolutions when an HD resolution has been selected for the HDMI output.
- If your TV is NOT capable of handling 96 kHz sampling frequency, set the [Sampling Freq.] option to [48 kHz] on the setup menu (See page 16). When this choice is made, this unit will automatically convert any 96 kHz signals to 48 kHz so your system can decode them.
- If your TV is not equipped with Dolby Digital and MPEG decoder, set the [Dolby Digital] and [MPEG] options to [PCM] on the setup menu (See page 16).
- If your TV is not equipped with DTS decoder, set the [DTS] options to [OFF] on the setup menu (See page 16). To enjoy DTS multi-channel surround, you must connect this recorder to a DTS-compatible receiver via one of this recorder's digital audio outputs.
- The arrow on the cable connector body should face up for correct alignment with the connector on the recorder.
(Type A)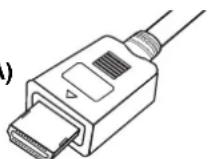
- If there is noise or lines on the screen, please check the HDMI cable.
- Not all HDCP-compatible DVI devices will work with this recorder.
Tip:
When you use HDMI connection, you can change the resolution (480i, 480p, 720p, 1080i or 1080p) for the HDMI output using the OUTPUT STATUS button on the front panel.
Caution:
- Changing the resolution when the recorder is connected with HDMI connector may result in malfunctions. To solve the problem, turn off the recorder and then turn it on again.
- If your TV does not accept your resolution setting, abnormal picture appears on the screen. Please read TV's owner's manual then set the resolution that your TV can accept.
About HDMI
HDMI (High Definition Multimedia Interface) supports both video and audio on a single digital connection for use with DVD players, set-top boxes, and other AV devices.
HDMI was developed to provide the technologies of HDCP (High Definition Content Protection). HDCP is used to protect digital content transmitted and received.

HDMI has the capability to support standard, enhanced, or high-definition video plus standard to multi-channel surround-sound audio. HDMI features include uncompressed digital video, a bandwidth of up to 5 gigabytes per second, one connector (instead of several cables and connectors), and communication between the AV source and AV devices such as DTVs.
HDMI, the HDMI logo, and High-Definition Multimedia Interface are trademarks or registered trademarks of HDMI Licensing LLC.
Additional Information for HDMI
- When you connect a HDMI or DVI compatible device, make sure of the following:
- Try switching off the HDMI/DVI device and this recorder. Next, switch on the HDMI/DVI device and leave it for around 30 seconds, then switch on this recorder.
- The connected device's video input is set correctly for this unit.
- The connected device is compatible with 720(1440)x480i, 720x480p, 1280x720p, 1920x1080i, or 1920x1080p video input.
- Not all HDCP-compatible DVI devices will work with this recorder.
- It is impossible to copy protected DVD titles for playback on non-HDCP devices.
- For best performance, directly connect the HDMI output to an HDMI input on your TV. If connecting to some device other than a TV or monitor, such as a home theater receiver with an HDMI input, check the following to make sure the HDMI signal will be received correctly:
- Check the operating instructions of the connected device to make sure that the HDMI input of the device complies with HDMI-HDCP specifications.
- Check that the HDMI setup menu of any non-display device is set to "pass-through" so that HDMI signals received are not changed in any way (such as changing the video or audio format).


- DVD VIDEO RECORDER
- DR-MV80B
- FOR CUSTOMER USE
- CAUTION
- REGULATORY INFORMATION: FCC PART
- CAUTION CONCERNING THE POWER CORD
- MOST APPLIANCES RECOMMEND THEY BE PLACED UPON A DEDICATED CIRCUIT
- IMPORTANT SAFETY INSTRUCTIONS
- INTRODUCTION
- HOOKUP AND SETTINGS
- PLAYBACK
- RECORDING
- EDITING
- REFERENCE
- ABOUT THE SYMBOL DISPLAY
- SYMBOL USED IN THIS MANUAL
- NOTES ON DISCS
- HANDLING DISCS
- STORING DISCS
- CLEANING DISCS
- MOISTURE CONDENSATION
- RECORDABLE AND PLAYABLE DISCS
- DVD-RW (DVD - REWRITABLE)
- [VR MODE]
- [VIDEO MODE]
- DVD-R (DVD - RECORDABLE)
- DVD-RAM (DVD - RANDOM ACCESS MEMORY)
- DVD+RW (DVD + REWRITABLE)
- DVD+R (DVD + RECORDABLE)
- PLAYABLE DISCS
- NOTES
- REGIONAL CODE
- NOTES ON REGIONAL CODES
- RESTRICTIONS ON VIDEO RECORDING
- WHAT IS 'CPRM
- COPYRIGHT
- NOTICE FOR PROGRESSIVE SCAN USE
- REMOTE CONTROL
- STANDBY/ON (⏻/I)
- DVD
- VCR
- EJECT, OPEN/CLOSE (▲)
- AUX
- NUMERICAL BUTTONS
- JVC TV CONTROL BUTTONS
- BACKWARD / FORWARD
- (◀◀/▶▶)
- SKIP (I ◀◀ / ▶▶▶ I)
- PAUSE/STEP (II)
- PLAY (▶)
- STOP (■)
- HOME
- DISC MENU/LIST
- TRACKING (+ / -)
- ◀ ▶ ▲ ▼ (LEFT/RIGHT/UP/DOWN)
- ENTER (◎)
- DISPLAY
- RETURN (○)
- AUDIO
- SUBTITLE
- ZOOM
- CHAPTER
- ● REC
- REC MODE
- TITLE
- THUMBNAIL
- PLAY MODE
- MARKER
- SEARCH
- CLEAR
- DUBBING
- ABOUT THE REMOTE CONTROL
- OPERATION RANGE
- BATTERY INSTALLATION (SEE PAGE 8)
- REMOTE CONTROL FUNCTION (REFER TO PAGE 7)
- REMOTE CONTROL A/B/C/D CODE SWITCHING
- NOTE
- CONNECTIONS TO YOUR TV
- VIDEO CONNECTION
- S-VIDEO CONNECTION
- COMPONENT VIDEO CONNECTION
- AUDIO CONNECTION
- HDMI CONNECTION
- TIP
- ABOUT HDMI
- ADDITIONAL INFORMATION FOR HDMI
Brand : JVC
Model : DR-MV80B
Category : DVD player