
KW-V350BT - DVD player JVC - Free user manual and instructions
Find the device manual for free KW-V350BT JVC in PDF.


| Product Type | DVD Receiver with Bluetooth |
| Model | KW-V350BT |
| Brand | JVC |
| Dimensions (W x H x D) | 7 x 2 x 6.1 inches (178 x 50 x 155 mm) |
| Weight | 1.8 kg (4 lbs) |
| Power Supply | 14.4V DC (11-16V allowable) |
| Power Output | 50W x 4 (max) |
| Bluetooth | Hands-free calling and audio streaming |
| Playback Media | DVD, DVD±R/RW, CD, CD-R/RW, USB (MP3/WMA/WAV/FLAC) |
| Radio | AM/FM tuner with RDS |
| Display | 6.1-inch touchscreen (QVGA) |
| Audio Inputs | Front AUX, rear RCA inputs (2-ch) |
| Video Output | Rear camera input (RCA), composite video output |
| Subwoofer Output | Yes (RCA, mono) |
| Steering Wheel Controls | Compatible (adapter required) |
| Parking Brake Bypass | Required for video playback while driving |
| Maintenance | Clean front panel with soft, dry cloth; avoid solvents |
| Spare Parts | Remote control (RM-RK53), mounting sleeve, wiring harness |
| Repairability | Limited; consult professional installer for internal repairs |
| Security | Detachable faceplate; PIN code protection available |
Frequently Asked Questions - KW-V350BT JVC
User questions about KW-V350BT JVC
0 question about this device. Answer the ones you know or ask your own.
Ask a new question about this device
Download the instructions for your DVD player in PDF format for free! Find your manual KW-V350BT - JVC and take your electronic device back in hand. On this page are published all the documents necessary for the use of your device. KW-V350BT by JVC.
USER MANUAL KW-V350BT JVC
KW-V250BT (Region 1 – DVD Region Code 1 Area)
KW-V25BT (Region 1 – DVD Region Code 1 Area)
KW-V350BT (Region 1 – DVD Region Code 1 Area)
KW-V350BT (Region 4 – DVD Region Code 4 Area)
This instruction manual is used to describe the models listed above. Model availability and features (functions) may differ depending on the country and sales area.
B5A-2613-20 (K/R)
Important Notice
To ensure proper use, please read through this manual before using this product. It is especially important that you read and observe WARNINGS and CAUTIONS in this manual. Please keep the manual in a safe and accessible place for future reference.
WARNINGS
To prevent accidents and damages
- DO NOT install any unit or wire any cable in a location where;
- it may obstruct the steering wheel and gearshift lever operations.
- it may obstruct the operation of safety devices such as air bags.
- it may obstruct visibility.
- DO NOT raise the volume level too much, as this will make driving dangerous by blocking outside sounds, and may cause hearing loss.
- DO NOT operate the unit while driving. If you need to operate the unit while driving, be sure to look around carefully.
- Stop the car before performing any complicated operations. • The driver must not watch the monitor while driving.
CAUTIONS
To care for the unit
- If you have parked the car for a long time in hot or cold weather, wait until the temperature in the car becomes normal before operating the unit.
To care for the monitor
- The monitor built into this unit has been produced with high precision, but it may have some ineffective dots. This is inevitable and is not considered defective.
- Do not expose the monitor to direct sunlight.
- Do not operate the touch panel using a ball-point pen or similar tool with a sharp tip. Touch the keys on the touch panel with your finger directly (if you are wearing a glove, take it off).
- When the temperature is very cold or very hot...
- Chemical changes occur inside, causing malfunction.
- Pictures may not appear clearly or may move slowly. Pictures may not be synchronized with the sound or picture quality may decline in such environments.
On the volume setting
- Digital devices produce very little noise compared with other sources. Lower the volume before playing these digital sources to avoid damaging the speakers by sudden increase of the output level.
For KW-V350BT Region 4:
CLASS 1 LASER PRODUCT
The marking of products using lasers
The label is attached to the chassis/case and says that the component uses laser beams that have been classified as Class 1. It means that the unit is utilizing laser beams that are of a weaker class. There is no danger of hazardous radiation outside the unit.
For KW-V250BT/KW-V25BT/KW-V350BT Region 1:
CAUTION
Use of controls or adjustments or performance of procedures other than those specified herein may result in hazardous radiation exposure. In compliance with Federal Regulations, the following are reproductions of labels on, or inside the product relating to laser product safety.
JVC KENWOOD Corporation 2967-3, ISHIKAWA-MACHI, HACHIOJI-SHI, TOKYO, JAPAN THIS PRODUCT COMPLIES WITH DHHS RULES 21CFR SUBCHAPTER J IN EFFECT AT DATE OF MANUFACTURE.
Location: Top plate
For KW-V250BT/KW-V25BT/KW-V350BT Region 1:
CAUTION
This equipment complies with FCC/IC radiation exposure limits set forth for an uncontrolled environment and meets the FCC radio frequency (RF) Exposure Guidelines and RSS-102 of the IC radio frequency (RF) Exposure rules. This equipment has very low levels of RF energy that is deemed to comply without maximum permissive exposure evaluation (MPE). But it is desirable that it should be installed and operated keeping the radiator at least 20 cm or more away from person's body.
- Contains Transmitter Module FCC ID: ZWY8811X
- Contains Transmitter Module IC: 12033A-8811X
For KW-V250BT/KW-V25BT/KW-V350BT Region 1: IC (Industry Canada) Notice
This device complies with Industry Canada's licence-exempt RSSs. Operation is subject to the following two conditions:
(1) This device may not cause interference; and (2) This device must accept any interference, including interference that may cause undesired operation of the device.
For KW-V250BT/KW-V25BT/KW-V350BT Region 1: FCC WARNING
This equipment may generate or use radio frequency energy. Changes or modifications to this equipment may cause harmful interference unless the modifications are expressly approved in the instruction manual. The user could lose the authority to operate this equipment if an unauthorized change or modification is made.
FCC NOTE
This equipment has been tested and found to comply with the limits for a Class B digital device, pursuant to Part 15 of the FCC Rules. These limits are designed to provide reasonable protection against harmful interference in a residential installation. This equipment may cause harmful interference to radio communications, if it is not installed and used in accordance with the instructions. However, there is no guarantee that interference will not occur in a particular installation. If this equipment does cause harmful interference to radio or television reception, which can be determined by turning the equipment off and on, the user is encouraged to try to correct the interference by one or more of the following measures
- Reorient or relocate the receiving antenna.
- Increase the separation between the equipment and receiver.
- Connect the equipment into an outlet on a circuit different from that to which the receiver is connected.
- Consult the dealer or an experienced radio/TV technician for help.
This transmitter must not be co-located or operated in conjunction with any other antenna or transmitter.
Supplier's Declaration of Conformity
Trade Name: JVC
Products: MONITOR WITH DVD RECEIVER
Model Name: KW-V250BT/KW-V25BT/KW-V350BT Region 1
Responsible Party: JVCKENWOOD USA CORPORATION 2201 East Dominguez Street,
Long Beach, CA 90810, U.S.A.
PHONE: 310 639-9000
THIS DEVICE COMPLIES WITH PART 15 OF THE FCC RULES. OPERATION IS SUBJECT TO THE FOLLOWING TWO CONDITIONS:
(1) THIS DEVICE MAY NOT CAUSE HARMFUL INTERFERENCE, AND (2) THIS DEVICE MUST ACCEPT ANY INTERFERENCE RECEIVED, INCLUDING INTERFERENCE THAT MAY CAUSE UNDESIRED OPERATION.
About this manual
The displays and panels shown in this manual are examples used to provide clear explanations of the operations. For this reason, they may be different from the actual displays or panels.
Illustrations of KW-V250BT/KW-V25BT are mainly used for explanation.
The region code of a particular model will only be stated if only one of the regions supports the particular feature with the same model name.
This manual mainly explains operations using the buttons on the monitor panel and keys on the touch panel. For operations using the remote controller, see page 50.
< > indicates the various screens/menus/operations/settings that appear on the touch panel.
[ ] indicates the keys on the touch panel.
Indication language: English indications are used for the purpose of explanation. You can select the indication language from the menu. (Page 40)
Contents
Component Names and Operations ....3
Basic Operations ....3
How to reset your unit 3
Turning on the power 3
Turning off the power 4
Turning off the AV source 4
Turning off the screen and button illumination .....4
Adjusting the volume 4
Attenuating the sound 4
Getting Started ....5
Initial settings 5
Clock settings 5
Various Screens and Operations ....6
Home screen 6
Source control screen 7
List/setting screen....9
Disc....10
Video....11
USB....13
Android....15
iPod/iPhone....15
Tuner....16
SiriusXM® Satellite Radio ....18
Pandora® 25
iHeartRadio....27
Spotify ....30
Other External Components ....32
AV-IN....32
Rear view camera 32
Using an external component via ADS adapter—Maestro....33
Bluetooth® 34
Information 34
Preparation....34
Connection....34
Bluetooth mobile phone 36
Bluetooth audio player 38
Bluetooth settings 39
Settings 40
Audio settings 40
Display settings 43
Input settings 46
System settings....47
Key settings 49
Remote Controller 50
Preparation....50
Basic operations 51
Searching for an item directly 51
JVC Remote App 52
Installation and Connection ....52
Before installation 52
Installing the unit....54
Connecting external components 54
Wiring connection 55
References 56
Maintenance 56
More information 56
Troubleshooting....59
Specifications....63
Trademarks and licenses 65
Component Names and Operations Basic Operations
KW-V250BT/KW-V25BT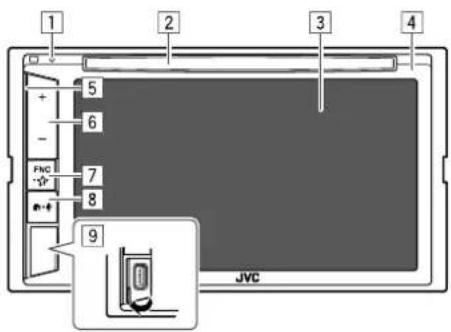
1 Reset button 2 Loading slot 3 Screen (touch panel) 4 Monitor panel 5 Illumination bar
The brightness of the illumination changes according to the music level. (Page 44)
6 Volume +/- buttons 7 FNC - button
- FNC (Press, blink once): Pops up the short-cut menu. (Page 8)
- (Hold, blink twice): Enters favorite setting. Default: Displays screen. (Page 41)
8 -button
• (Press): Turns on the power. • (Press): Displays the Home screen while the power is on. • (Hold): Activates the voice dialing.
9 USB input terminal
KW-V350BT
1 button
• (Press) Turns on the power. • (Hold) Turns off the power. • (Press) Pops up the short-cut menu while the power is on.
2 Reset button 3 Loading slot 4 Screen (touch panel) 5 Monitor panel 6 HOME/button
• HOME (Press): Displays the Home screen. • (Hold): Activates the voice dialing.
7 button
• (Press) Displays the current source control screen. • (Hold) Turns off/on the screen.
8 Volume +/- buttons
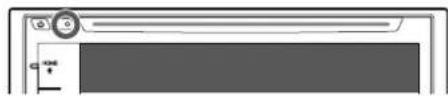
How to reset your unit
If the unit fails to operate properly, press the reset button.
KW-V250BT/KW-V25BT
KW-V350BT
Turning on the power
KW-V250BT
KW-V25BT
KW-V350BT

Basic Operations
Turning off the power
KW-V250BT/KW-V25BT

KW-V350BT

Turning off the AV source
1 Display the source/option selection screen.
On the Home screen, touch as follows:

2 Turn off the AV source.
On the source/option selection screen, touch as follows:

Turning off the screen and button illumination
On the monitor panel (only for KW-V350BT)

To turn on the screen and button illumination: Press on the monitor panel or touch the screen.
On the pop-up short-cut menu (only for KW-V250BT/KW-V25BT)
1 Display the pop-up short-cut menu.

2 On the pop-up short-cut menu, touch as follows:

To turn on the screen and button illumination: Press FNC on the monitor panel or touch the screen.
Adjusting the volume
KW-V250BT KW-V25BT
KW-V350BT


You can adjust the volume (00 to 35) by pressing + to increase and pressing - to decrease.
- Holding + increases the volume continuously to level 15.
Attenuating the sound (only for KW-V350BT)
On the source control screen, touch as follows:

[becomes blue.
To cancel attenuation: Touch [ ] again. ([ ] becomes white.)
Getting Started
Initial settings
When you power on the unit for the first time or reset the unit, the screen appears.
Perform the initial settings.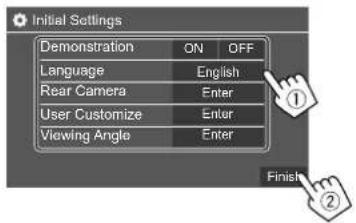
E.g. Initial settings screen for KW-V250BT/KW-V25BT
Once completed, Home screen appears.
• ON (Initial): Activates the display demonstration. • OFF: Deactivates the display demonstration.
(Language>
- For external monitors, only English/Spanish/French/German/Italian/Dutch/Russian/Portuguese are available. If another language has been selected, the text language for external monitors will be set to English.
- GUI Language (Local (the language selected above) (Initial)/English): Selects the language used for displaying operation keys and menu items.
(Page 46)
Make the settings to display the picture from the connected rear view camera.
(Page 43)
Change the display design.
(Page 46)
Select the viewing angle in relation to the monitor to make the image on the screen easier to see.
• Under 0° (Initial)/5°/10°/15°/20°
Clock settings
1 Display the Home screen.
KW-V250BT KW-V25BT
KW-V350BT

2 Display the screen.
On the Home screen, touch as follows:

Then, on the screen, touch as follows: [System] → : [Enter]
- You can also display the screen by touching the clock area on the Home screen.
3 Set the clock time.
E.g. Clock settings screen for KW-V250BT/KW-V25BT
- Radio Data System (Initial): Synchronizes the clock time with FM RBDS.
- Off: Sets the clock manually. Touch [▲]/[▼] to adjust the hour, then minute.
- Touching [Reset] will set the minute to "00".
Various Screens and Operations
You can display or change to other screens at any time to show information, change the AV source, change the settings, etc.
Home screen
- You can customize the Home screen. (Pages 7 and 45) • To display the Home screen from other screens, press

KW-V250BT/KW-V25BT
KW-V350BT
Touching the operation keys performs the following actions:
1 Selects or changes the playback source. 2 Displays all playback sources and options. 3 Displays the screen. 4 Displays the screen. 5 Only for KW-V250BT/KW-V25BT: Displays the current playing source control screen. 6 Only for KW-V250BT/KW-V25BT: Displays the phone control screen. 7 Only for KW-V350BT: Ejects the disc. 8 Only for KW-V350BT: Displays the Customize screen.
Available playback sources and options
Touch 2 to display the source/option selection screen.

E.g. Source/option selection screen for KW-V250BT/KW-V25BT
Touching the operation keys performs the following actions:
[Tuner] Switches to the radio broadcast.
[Disc] Plays a disc.
[USB] Plays files on a USB device.
[iPod] Plays an iPod/iPhone.
[Android™] Plays an Android device.
[AV-IN] Switches to an external component connected to the AV-IN input terminal.
[BT Audio] Plays a Bluetooth audio player.
[Spotify] Switches to the Spotify application.
[Pandora]*1 Switches to the Pandora broadcast.
[iHeartRadio]*1 Switches to the iHeartRadio broadcast.
[SiriusXM]*1 Switches to the SiriusXM® radio broadcast.
[Maestro]*2 Switches to the source connected via ADS adapter.
[AV Off] Turns off the AV source.
[Home]*3 Displays the Home screen.
[Setup]*3 Displays the screen.
[Power Off]*3 Turns off the power.
[Camera] Switches to the camera connected to the rear view camera input.
[Now Playing]*3 Displays the source currently played back.
[Phone]*4 Displays the phone control screen.
To return to the Home screen
Touch [Home] or [→] on the source/option selection screen.
*1 Only for KW-V250BT/KW-V25BT/KW-V350BT Region 1. *2 Only for KW-V350BT Region 1. *3 Only for KW-V250BT/KW-V25BT. *4 Only for KW-V350BT Region 1/KW-V350BT Region 4.
Customizing the Home screen
For KW-V250BT/KW-V25BT
See on page 45.
For KW-V350BT
1 Select an item to replace.
On the Home screen, touch and hold the icon you want to replace.
The item selection screen is displayed.
2 Select an item (①) you want to display in the selected position, then touch [→] (②).
Repeat the procedure to customize your Home screen.

E.g. Item selection screen for KW-V350BT Region 1
- Only selectable sources are shown.
- You cannot locate [Camera] on the Home screen.
Source control screen
You can perform the playback operation from the source control screen during playback.
- The operation keys and information displayed vary depending on the selected source/disc type/file type being played.
- If the operation keys are not displayed on the screen, touch the screen to show them.
E.g. Common audio playback source screen:
KW-V250BT/KW-V25BT
KW-V350BT
1 Playback source or media type 2 Picture/artwork (shown if the file contains the information) 3 Track/file/song/video information
- Touching [◀] scrolls the text if not all of the text is shown.
4 Clock display 5 Current playback item information (folder no./file no./track no./total track no./ playback file type) 6 Displays/hides other available operation keys* 7 Operation keys* 8 IN indicator (lights up while a disc is inserted) 9 Playing time/playback status 10 Playback mode indicator (Repeat/Random) 11 File type indicator 12 Only for KW-V350BT:
[▲]: Ejects the disc.
Attenuates/restores the sound. 13 Only for KW-V350BT: Playback source items shown on the Home screen.
- Touching the playback source item changes the playback source.
* See "Common operation keys on source control screen" on page 8.
Various Screens and Operations
Common operation keys on source control screen
- The following explanations state the operation keys for KW-V250BT/KW-V25BT, unless stated otherwise.
- The appearance of the operation keys may differ, however the similar operation keys have the same operations. • Available operation keys differ depending on the selected source or connected device.
Touching the operation keys performs the following actions:
6
| [▶] | Displays other available operation keys besides those shown on 7 .• To hide the window, touch [◀]. |

Selects a folder.

Selects repeat playback mode.*

Stops playback.
[MODE] Displays the setting screen of the current playback source.
7
| [###] | For KW-V250BT/KW-V25BT:Displays thescreen.(Page 40) |
| [FNC ▲] | For KW-V350BT:Displays the pop-up short-cut menu.· To close the menu, touch [▼] |
| [Q] | Displays the folder list/track list/audio menu/video menu. |
| [◀◀]/[▶▶] | · (Touch) Selects an item (chapter/folder/track/audio file/video file).· (Hold) Reverses/forwards search.· (Hold) Plays in slow-motion while paused for video playback. |
Starts/pauses playback.
[▶ III]
Selects random playback mode.*
* About playback mode:
- Available playback mode differs depending on the source, disc type, connected device, etc.
- You cannot activate repeat playback mode and random playback mode at the same time. — To cancel the playback mode, touch repeatedly until the indicator disappears.
Using gesture control
You can also control playback by moving your finger on the touch panel as follows (for some sources, the gesture control is not available).
![graph TD A["Start"] --> B{Click} B -->|Yes| C["Next Step"] B -->|No| D["End"]](/content/2026/06/1350525/images/d30169427ef8f12146374d2a1e1e065d0b63596231144a8f56264f8784782e6e.jpg)
- Sliding the finger up/down: Selects a folder.
- Sliding the finger left/right: Selects an item (chapter/track/audio file/video file).
- Moving your finger clockwise/counterclockwise: Increases/decreases the volume.
Using the pop-up short-cut menu
While displaying the source control screen, you can jump to another screen by touching the operation keys on the pop-up short-cut menu.
1 Display the pop-up short-cut menu.
KW-V25BT


2 Select an item to jump to by touching as follows.
For KW-V250BT/KW-V25BT:
| [▲] | Ejects the disc from loading slot. |
| (Touch) Switches the screen.(Hold) Turns off the screen. | |
| Displays thescreen.(Page 40) | |
| Displays thescreen and you can change the background design. (Page 44) | |
| Displays thescreen. (Page 46) | |
| Displays the picture from the connected rear view camera. |
Various Screens and Operations
For KW-V350BT:
| [▼] | To close the pop-up menu |
| [√] | Displays the phone control screen. |
| [★]* | Displays thescreen.(Page 40) |
| [■]* | Displays thescreen.(Page 42) |
| [□]* | Displays thescreen.(Page 46) |
| [■.]* | Displays thescreen.(Page 40) |
To close the pop-up menu
- KW-V250BT/KW-V25BT: Press FNC on the monitor panel.
- KW-V350BT: Touch [▼] or touch the screen anywhere other than the pop-up short-cut menu. * You can customize these pop-up short-cut menu. For details, see on page 49.
■ Using touch screen operation during playback
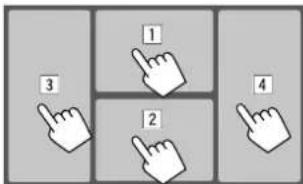
Touching the areas performs the following actions:
1 Displays the video control menu while playing a video. 2 While playing a video: Displays the source control screen. While playing an audio file: Displays the playback operation keys. 3 Goes to the previous chapter/track.* 4 Goes to the next chapter/track.* * Not available for video from an external component (AV-IN).
List/setting screen
Below are the common operation keys which appear on the list/setting screen.
- The appearance of the operation keys may differ, however the similar operation keys have the same operations. • Available operation keys differ depends on the setting screens. Not all these operation keys are shown on every screen.

Touching the operation keys performs the following actions:
1 Enters alphabet search* to list the items in alphabetical order. When a keypad appears, touch the first letter you want to search for. - For "USB" source, you can switch between the folder list and file list by touching [■] or [♪]. Then, touch [OK] to start searching. 2 Returns to the root folder. 3 Returns to the upper layer. 4 Closes the current screen. 5 Exits from the current screen or returns to the previous screen. 6 Changes the page to display more items.
* Alphabet search is not available: - For Android source - When the playlist is selected
Disc
- If a disc does not have a disc menu, all tracks on it will be played repeatedly until you change the source or eject the disc.
- For playable disc types, file types and other information, see pages 56 and 57.
- If "N" appears on the screen, the unit cannot accept the operation you have tried to do.
- In some cases, without showing "∅", operations will not be accepted.
- When playing back a multi-channel encoded disc, the multi-channel signals are downmixed.
Inserting a disc
E.g. Inserting a disc for KW-V250BT/KW-V25BT
The source changes to "DISC" and playback starts. - The IN indicator lights up while a disc is inserted.
Ejecting a disc
For KW-V250BT/KW-V25BT:
Display the pop-up short-cut menu, then eject the disc.

For KW-V350BT:
On the Home screen or source control screen, touch as follows:

- When removing a disc, pull it out horizontally.
- You can eject a disc while playing another AV source.
- If the ejected disc is not removed within 15 seconds, the disc is automatically inserted again into the loading slot to protect it from dust.
Playback operations
Audio playback information and key operation
- For playback information, see "Source control screen" on page 7.
- For key operations on the touch panel, see "Common operation keys on source control screen" on page 8.
Selecting a folder/track on the list
1 Display the folder/track list.
On the source control screen, touch as follows:

2 Select the folder (①), then the item (②) in the selected folder.

Select an item in each layer until you reach and select the desired file.
Settings for disc playback
• Available items shown on the screen differ depending on the type of disc/file being played back. 1 Display the screen.
On the source control screen, touch as follows:

Disc
2 Make the settings.

x 1
Select the initial disc menu language. (Initial: English)
*1
Select the initial subtitle language or turn subtitles off (Off). (Initial: English)
*1
Select the initial audio language. (Initial: English)
You can change the dynamic range while playing Dolby Audio encoded discs.
- Wide: Reproduces powerful sound at a low volume level with its full dynamic range. • Normal: Reduces the dynamic range a little.
- Dialog (Initial): Reproduces movie dialog more clearly.
When playing back a multi-channel disc, this setting affects the signals reproduced through the front and/or rear speakers.
- Dolby Surround: Reproduces multi-channel surround sound by connecting an amplifier compatible with Dolby Surround.
- Stereo (Initial): Reproduces stereo playback sound.
Select the monitor type to watch a wide screen picture on the external monitor.
16:9 (Initial) 4:3 LB 4:3 PS

4
Select the playback file type when a disc contains different types of files.
• Audio: Plays back audio files. - Still image: Plays back still picture files. • Video: Plays back video files. - Audio&Video (Initial): Plays back audio files and video files.
*1 For list of language codes, see page 57.
*2 For playable file types, see page 56.
If the disc contains no files of the selected type, the existing files are played in the following priority: audio, video, then still picture. You can change these settings only while playback is stopped.
Video
Playback operations
■ Video playback information on the source control screen

E.g. Video playback source control screen for KW-V250BT/KW-V25BT
1 Media type 2 Playback status 3 Current playback item information (title no./chapter no./folder no./file no./track no.) 4 Playing time 5 IN indicator (lights up while a disc is inserted) 6 Playback mode indicator (Repeat/Random) 7 File type indicator
Video
Video menu control operations
You can display the video menu control during video playback.
• Available operation keys differ depending on the selected disc type and file type.
Video playback except VCD
E.g. Video menu control screen for KW-V250BT/KW-V25BT
Touching the operation keys performs the following actions:


Displays the picture size selection screen.
① Touch [+] Zoom] to change the magnification level of the picture (Zoom1, Zoom2, Zoom3, Full: Initial).
② Touch [▲] [▼] [◀] [▶] to move the zooming frame.

Displays the aspect ratio selection screen.
Touch [■Aspect] to select the aspect ratio.
x : For 16:9 original pictures 4:3 signal 16:9 signal


: For viewing 4:3 pictures naturally on the wide screen 4:3 signal 16:9 signal


* 2: For 4:3 original pictures 4:3 signal 16:9 signal


: For "DISC" source and "USB" source only: The aspect ratio is automatically selected to match the incoming signals.

Displays the picture adjustment screen.
① Touch [DIM ON] or [DIM OFF] to turn on or off the dimmer.
② Touch [+]/[-] to adjust the other items.
• : Adjusts the brightness (-15 to +15).
- : Adjusts the contrast (-10 to +10).
- : Adjusts the blackness (-10 to +10).
• : Adjusts the color (-10 to +10).
• : Adjusts the tint (-10 to +10).
- : Adjusts the sharpness (-2 to +2).

Selects the audio type.

Selects the subtitle type.

Selects the view angle.
*1 When ←→ is set to or , the picture is zoomed with the aspect ratio of the setting. This feature may not be used for some video sources.
*2 Only for KW-V350BT Region 4: While DivX is played back with set to [16:9] (Page 11 for discs/Page 14 for USB), the aspect ratio may not be set correctly.
Video
USB
2
[OMENU]
Displays the disc menu (DVD).
[T MENU] Displays the disc menu (DVD).

Switches to the direct disc menu mode. Touch the target item to select.

Displays the menu/scene selection screen.
• [▲] [▼] [◀] [▶]: Selects an item.
• [Enter]: Confirms the selection.
- [Return]: Returns to the previous screen.
Video playback for VCD
E.g. Video menu control screen for KW-V250BT/KW-V25BT
Touching the operation keys performs the following actions:
1


Refer to "Video playback except VCD" on page 12.

2
[MENU]
Displays the disc menu.
[ODD]
Selects the audio channel (ST: stereo, L: left, R: right).
[ ]
Displays or hides the direct selection buttons.
① Touch [DIR/CLR] to select a track directly on a VCD.
② Touch the numbers ([0], [1] to [9]) to select the desired track.
③ Touch [Enter] to confirm.
To delete the last entry, touch [DIR/CLR].
[Return] Displays the previous screen or menu.
* You need to stop playback to deactivate the PBC function when playing a VCD with PBC activated.
You can connect a USB mass storage class device such as a USB memory, digital audio player, etc. to the unit.
- For playable file types and other information, see pages 56 and 58.
- You cannot connect a PC or portable HDD to the USB input terminal.
- You cannot connect a USB device via a USB hub.
Connecting a USB device
USB device (commercially available)
The source changes to "USB" and playback starts. - All tracks in the USB device will be played repeatedly until you change the source or disconnect the USB device.
USB
Playback operations
■ Playback information and key operation
- For playback information, see "Source control screen" on page 7.
- For key operations on the touch panel, see "Common operation keys on source control screen" on page 8.
Selecting the file type to play
You can specify the file type to play.
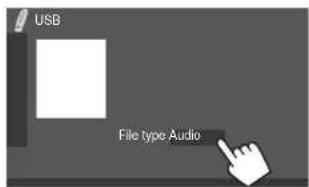
E.g. USB source control screen for KW-V250BT/KW-V25BT
Select the file type as follows:
[Audio] Plays back audio files.
[Video] Plays back video files.
[Photo] Plays back still picture files.
If the USB contains no files of the selected type, the existing files are played in the following priority: audio, video, then still picture. You can change these settings only while playback is stopped.
Selecting a folder/track on the list
1 Display the folder/track list.
On the source control screen, touch as follows:

2 Select the folder (①), then the item (②) in the selected folder.

E.g. USB list screen for KW-V250BT/KW-V25BT
Select an item in each layer until you reach and select the desired file.
■ Selecting a folder/track using alphabet search
(Applicable only for audio file type)
You can search for a folder or an audio file by entering the first letter you want to search for.
1 Select the list (folder or track) to search.
On the USB list screen, touch as follows:

• [ ] : Folder list • [♪]: Track list
2 Enter the alphabet to search.
Touch the first letter you want to search for, then touch [OK].
Settings for USB playback
1 Display the screen.
On the source control screen, touch as follows:

2 Make the settings.

Select the monitor type to watch a wide screen picture on the external monitor.
16:9 (Initial) 4:3 LB 4:3 PS
- Next: Switch between internal memory and the memory source of the connected device (such as a mobile phone).
Android
iPod/iPhone
Connecting an Android device
This unit supports Android OS 4.1 and above.
![graph TD A["Android (commercially available)"] --> B["USB cable (commercially available)"] B --> C["KW-V250BT/KW-V25BT: On the monitor panel"] C --> D["KW-V350BT: On the rear panel"] D --> E["Ground"]](/content/2026/06/1350525/images/470e0dac7647bc5a3cffa6a2f533728fcbb4b5b71d252991705fdd0898478757.jpg)
When connecting an Android device, "AUDIO MODE" is shown. You can control Android device using a media player application installed in the Android device.
Playback operations
■ Playback information and key operation

E.g. Android source control screen for KW-V250BT/KW-V25BT
Touching the operation keys performs the following actions:

Selects an audio file.

Starts/pauses playback.
Connecting an iPod/iPhone
- For playable iPod/iPhone types and other information, see page 58.
- You cannot watch video.
Wired connection
iPod/iPhone
Lightning model
iPod/iPhone 30-pin
connector model
(commercially available)
(commercially available)
![graph TD A["Mobile Device"] -->|USB Audio cable for iPod/iPhone: KS-U62 (optional accessory)| B["Switch"] C["Mobile Device"] -->|30-pin to USB cable (accessory of iPod/iPhone)| D["Switch"] E["KW-V250BT/ KW-V25BT: On the monitor panel"] --> F["Monitor Panel"] G["KW-V350BT: On the rear panel"] --> F](/content/2026/06/1350525/images/fcc88fab8c4c561a3714854804e92ea5079103a217ca7d05b9f7838e5995c7d3.jpg)
The source changes to "iPod" and playback starts.
iPod/iPhone
Bluetooth connection
Pair the iPod/iPhone with this unit via Bluetooth. (Page 34)
Selecting the playback device via the connection method
See on page 47 for more information.
Playback operations
■ Playback information and key operation
- For playback information, see "Source control screen" on page 7.
- For key operations on the touch panel, see "Common operation keys on source control screen" on page 8.
Additional keys operations. Touching the operation keys performs the following actions:
[0] / .S
Switches the device on screen. (Page 47)
- Selecting an audio file from the menu
1 Display the audio menu.
On the source control screen, touch as follows:

2 Select a category (①), then select a desired item (②).

Select an item in each layer until you reach and select the desired file.
• Available categories differ depending on the type of iPod/iPhone.
Settings for iPod/iPhone playback
1 Display the screen.
On the source control screen, touch as follows:

2 Make the settings.

- ON (Initial): Shows the artworks of the playing files. • OFF: Hides the artworks of the playing files.
Tuner
Listening to the radio
The unit switches to FM alarm scene automatically when receiving an alarm signal from FM broadcast.
■Playback information on the source control screen
KW-V250BT/KW-V25BT
KW-V350BT
Tuner
1 Selects the band (AM/FM1/FM2/FM3) |2| Text information - Touching [◀] scrolls the text if not all of the text is shown. - Touching [Radio Text] switches the information between Radio Text, Radio Text Plus and PTY code. 3 Current station frequency 4 Displays the preset stations window (Page 18) • To hide the window, touch [▶]/[☐]. 5 [P1] - [P5] - (Touch) Selects a preset station. • (Hold) Presets the current station. |6| Displays/hides other available operation keys* 7 TI indicator |8| ST/MONO indicator The ST indicator lights up when receiving an FM stereo broadcast with sufficient signal strength. |9| Seek mode indicator 10 Operation keys* [11] Only for KW-V350BT: Playback source items shown on the Home screen. - Touching the playback source item changes the playback source.
* See the following "Operation keys on source control screen".
Operation keys on source control screen
• The following explanations state the operation keys for KW-V250BT/KW-V25BT, unless stated otherwise. - The appearance of the operation keys may differ, however the similar operation keys have the same operations. - See also "Common operation keys on source control screen" on page 8.
Touching the operation keys performs the following actions:
6
[SSM] * (Hold) Presets stations automatically.
[MONO]* Activates monaural mode for better FM
reception (stereo effect will be lost).
- The MONO indicator lights up while monaural mode is activated. • To deactivate, touch [MONO] again.
[TI]* (For FM RBDS features)
Activates TI standby reception mode.
- When TI is activated, the unit is ready to switch to traffic information if available. The TI indicator lights up in white.
- If the TI indicator lights up in orange, tune into another station providing Radio Broadcast Data System signals. • The volume adjustment for Traffic Information is automatically memorized. The next time the unit switches to Traffic Information, the volume is set to the memorized level. • To deactivate, touch [TI] again.
10
[PTY]* (For FM RBDS features)
Enters PTY search mode.
① Touch [PTY].
② Touch and hold a PTY code to search for.
If there is a station broadcasting a program of the same PTY code as you have selected, that station is tuned in.
[SEEK] Changes the seek mode for [1◄◄]/[►►].
• AUTO1 (Initial): Auto search • AUTO2: Tunes in preset stations one after another • MANU: Manual search
[◀◀]/[▶▶] Searches for a station. • The search method differs according to the selected seek mode (see above).
* Appears only when FM is selected as the source.
Tuner
Presetting stations in the memory
You can preset five stations for each band.
Automatic presetting — SSM (Strong-station Sequential Memory) (for FM only)
On the source control screen, touch as follows:

The local stations with the strongest signals are found and stored automatically.
Manual presetting
1 Tune in to a station you want to preset.
2 Select a preset number to store into.

E.g. Tuner source control screen for KW-V250BT/KW-V25BT
The station selected in step 1 is stored into the preset number [P1] to [P5] you have selected.
Selecting a preset station
1 Select the band, then display the preset station window.
On the source control screen, touch as follows:

2 Select a preset station.

E.g. Preset station window for KW-V250BT/KW-V25BT
To hide the window: Touch [▶] or [☐].
SiriusXM® Satellite Radio
(Only for KW-V250BT/KW-V25BT/KW-V350BT Region 1)
Only SiriusXM® brings you more of what you love to listen to, all in one place. Get over 140 channels, including commercial-free music plus the best sports, news, talk, comedy and entertainment. Welcome to the world of satellite radio. A SiriusXM Connect Vehicle Tuner and subscription are required.
For more information, visit .
Preparation
Connecting the SiriusXM Connect Vehicle Tuner
Perform this installation when you install the unit for the first time.

Activating subscription
1 Check your Radio ID.
The SiriusXM Satellite Radio ID is required for activation and can be found by tuning to Channel 0 as well as on the label found on the SiriusXM Connect Vehicle Tuner and its packaging.
• The Radio ID does not include the letters I, O, S or F.
2 Activate the subscription.
For users in the U.S.A:
• Online: Visit • Phone: Call SiriusXM Listener Care at 1-866-635-2349 For users in Canada: • Online: Visit • Phone: Call XM Customer Care at 1-877-438-9677
3 Confirm the activation.
A confirmation message appears. Touch [Return].
Listening to the SiriusXM® Satellite Radio
■ Playback information on the source control screen
KW-V250BT/KW-V25BT

KW-V350BT

1 Displays/hides other available operation keys* 2 Selects the band (SXM1/SXM2/SXM3/SXM4) 3 Channel number 4 Text information
- Touching [◀] scrolls the text if not all of the text is shown.
- Touching [Song Title]/[Info]/[Category] switches the information.
5 Displays the preset channel window (Page 21)
• To hide the window, touch [▶]/[图标].
6 [P1] - [P5]
- (Touch) Selects a preset channel. • (Hold) Presets the current channel.
7 Playback status and time code for the buffered data and replay mode
- The time code shows you the point in the Replay buffer you are listening to. (E.g. “-5:00” means that you are listening to audio that is 5 minutes behind the current broadcast.)
8 Replay time bar for replay mode
- Black: The remaining capacity
- Red (for KW-V250BT/KW-V25BT) / Blue (for KW-V350BT): The amount of buffered contents
9 Signal strength indicator 10 Seek mode indicator 11 Operation keys* 12 Only for KW-V350BT: Playback source items shown on the Home screen. - Touching the playback source item changes the playback source.
SiriusXM® Satellite Radio
Operation keys on source control screen
- The following explanations state the operation keys for KW-V250BT/KW-V25BT, unless stated otherwise.
- The appearance of the operation keys may differ, however the similar operation keys have the same operations.
- See also "Common operation keys on source control screen" on page 8.
Touching the operation keys performs the following actions:
1
| [MODE] Displays thescreen. | |
| [+] | (Hold) Registers the current artist to the alert contents. |
| [♪+] | (Hold) Registers the current song to the alert contents. |
| [▶] | Activates or deactivates the content alert for traffic and weather. |
| [SEEK] | Changes the seek mode for [CH▲]/[CH▼].SEEK1 (Initial): Skips to another available channel.SEEK2: Skips to another preset channel. |
| [SCAN] Starts TuneScan". | |
| [◀◀]/[▶▶]/[Live] | Performs playback operations during content replay. |
| [≡≡] | Changes the page in the window to display other operation keys. |
11
| [Q] | Displays thescreen. |
| [▶/II] | Starts/pauses the content replay. |
| [CH▲]/[CH▼] | Selects the channel.To select a channel, make sure "SEEK1" is selected as the seek mode.To select a preset channel, make sure "SEEK2" is selected as the seek mode. |

Selecting a channel on the list
You can obtain information on channels or select a channel to listen to.
1 Display the screen.
On the source control screen, touch as follows:

2 Select a category (①), and then select a channel (②).

• To list all the channels, touch [All Channels]. - Touch the info change key above the list ([Channel]/[Artist]/[Song Title]/[Info]) to display other information in the following order: Channel, Artist, Song Title, Content Info.
Presetting channels in the memory
You can preset five channels for each band.
1 Tune in to a channel you want to preset.

2 Select a preset number to store into.

E.g. SiriusXM source control screen for KW-V250BT/KW-V25BT
The channel selected in step 1 is stored into the preset number [P1] to [P5] you have selected.
Selecting a preset channel
1 Select the band, then display the preset channel window.
On the source control screen, touch as follows:

2 Select a preset channel.

E.g. Preset station window for KW-V250BT/KW-V25BT
- You can also select a preset channel by touching [P1] - [P5].
To hide the window: Touch [▶] or [☐].
3 Select "SEEK2" as the seek mode to jump to the selected preset channel.
Replaying content
You can pause, rewind and replay the contents from the currently tuned channel.
• The SiriusXM Connect Vehicle Tuner continually buffers up to 60 minutes of audio. - If you change to another channel during playback, the buffered contents will be lost. • The time code is updated every second.
1 Display the operation keys for replay.
On the source control screen, touch as follows:

2 Perform the replay operations.
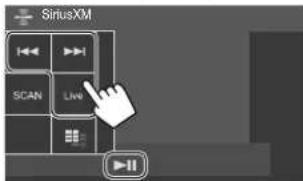
E.g. Replay operation keys window for KW-V250BT/KW-V25BT
[▶/■] Starts/pauses playback.
[◀◀]/[▶▶] Skips the current track/segment.
- Touching [◀◀] within 2 seconds of the beginning of the current track/segment returns to the previous track.
- Touching [◀◀] after 2 seconds or more of the current track returns to the beginning of the track.
(Hold) Reverses/forwards search.
[Live] Returns to the live position.
SiriusXM Satellite Radio features
SmartFavorites
User stored channels (P1 to P5) of the current band are recognized as SmartFavorites channels. SiriusXM Connect Vehicle Tuner automatically buffers their broadcast content in the background. When you select a SmartFavorite channel, you can rewind and replay up to 30 minutes of any of the missed news, talk, sports or music content.
- SmartFavorites is available only when you connect an SXV200 or later SiriusXM Connect Vehicle Tuner.
- If you change to another band, the buffered content is cleared and new channels in the current band will start buffering.
TuneStart™
When you select a SmartFavorites channel, you can listen to the current song from the beginning.
1 Display the screen.
On the source control screen, touch as follows:

2 Activate TuneStart™.
On screen, touch as follows: : [ON]
To deactivate TuneStart: Touch [OFF] in step 2.
TuneScan™
You can get a short preview of the songs you have missed on each of your SmartFavorites music channels and the currently tuned music channel. Activate TuneScan™ to start scanning the first 6 seconds of the recorded music contents.
On the source control screen, touch as follows:
![graph LR A["▶"] --> B["×"] B --> C["SCAN"]](/content/2026/06/1350525/images/8a9760a87ff9367c03db5c2c023ccdcba75a069b5acaea1fca7c3ac085b696bb.jpg)
The unit starts scanning.
- To select the previous/next content, touch [◀◀] or [▶▶]. • To end scanning and continue listening to the current song/content, touch [SCAN] again. • To exit scanning, touch and hold [SCAN].
Content Alert
The unit informs you when receiving the content you are interested in, such as music, information about a sports team, weather and traffic information.
Registering items for Contents Alert
You can register your favorite artists, songs or teams. Up to 50 contents can be registered.
For artists/songs
While listening to your favorite artist/song:
On the source control screen, touch as follows:

Touching the operation keys performs the following actions:
(Hold) Registers the artist of the current song.
[♪+] (Hold) Registers the current song.
For teams
1 Display the screen. On the source control screen, touch as follows:

Then, on the screen, touch as follows: : [Enter]
2 Select the league (①) and the team (②), then register into the content alert (③).

Selecting items for Content Alert
You can select items (artists/songs/teams) from the registered items on the list to inform you once the unit receives the information.
For artists/songs/teams
1 Display the screen.
On the source control screen, touch as follows:
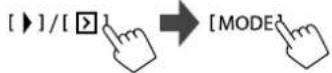
Then, on the screen, touch as follows:
: [Set]
2 Select the category (①), then the item (②).

A check mark appears beside the selected item.
• To show the details of the item, touch [◀] or [<].
To delete the registered items: Touch and hold the item you want to delete in step 2.
The [icon] icon and a check mark appear beside the selected item. Touch the [icon] icon to delete.
To delete all registered contents: Touch and hold [All Clear ↓] for in step 1.
For traffic and weather information
1 Display the screen.
On the source control screen, touch as follows:

2 Select the city you desire traffic and weather information for.

- When traffic and weather broadcast is received, the unit automatically switches the channel.
Activating Content Alert
For artists/songs/teams
1 Display the screen.
On the source control screen, touch as follows:

2 Activate Content Alert.
On screen, touch as follows: : [ON]
To deactivate Content Alert: Touch [OFF] in step 2.
For traffic and weather information
Make sure is set to [ON], then on the source control screen, touch as follows:

- When a traffic and weather broadcast for the selected city is received, the unit automatically switches the channel.
To deactivate the Content Alert: Touch [💡] again.
Switching to registered content
When an artist/song/team registered for Content Alert is being broadcasted, an alert appears on the screen.
Touch [Jump], then select the item to jump to on the screen.

• To show the details of the item, touch [◀] or [<].
Setting reception restrictions
You can limit access to SiriusXM channels, such as those with mature content.
Setting or changing the parental code
• The initial setting is "0000". - Changing the code does not change the / settings.
1 Display the screen.
On the source control screen, touch as follows:

Then, on the screen, touch as follows:
: [Change]
2 Enter the initial four-digit code (0000) (①), and then touch [Enter] (②) to confirm.

• To clear the last entry, touch [Clear]. • To cancel setting the code, touch [Cancel].
3 Enter a new four-digit code, then touch [Enter] to confirm.
4 Repeat step 3 above to confirm the new code.
Activating parental control
You can set the parental control feature to lock any SiriusXM channels or automatically lock all channels classified as "mature" by SiriusXM®.
1 Display the screen.
On the source control screen, touch as follows:

2 Select the desired mode for .
[OFF] Deactivates parental control.
[Mature] Locks channels classified as "mature" by SiriusXM®.
[User] Locks selected channels.
3 Enter the parental code to confirm your selection.
Parental Lock channel selection
This option allows you to manually select the channels to be locked by the parental control feature.
• You can only change the setting if
is set to [User].
1 Display the screen.
On the source control screen, touch as follows:

Then, on the screen, touch as follows:
: [SET]
2 Enter the parental code.
The screen appears.
3 Select a category (①), then a channel (②). A check mark appears beside the selected channel.

• To list all the channels, select [All Channels].
4 Repeat step 3 to set the parental lock on multiple channels.
To deactivate parental lock for all locked channels: Select [All Clear] for in step 1, then enter the parental code.
■ Skipping unwanted channels
If you do not want to receive some channels, you can skip them.
1 Display the screen.
On the source control screen, touch as follows:

Then, on the screen, touch as follows:
: [SET]
2 Select a category (①), then a channel (②). A check mark appears beside the selected channel.
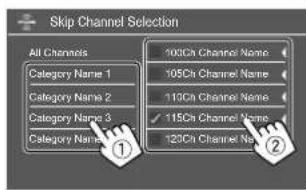
• To list all the channels, select [All Channels].
3 Repeat step 2 to skip multiple channels.
To clear the channel skipping for all skipped channels: Touch and hold [All Clear ↓] in step 1.
Resetting the SiriusXM Satellite Radio settings
You can reset all the SiriusXM settings you made and restore the initial settings.
1 Display the screen. On the source control screen, touch as follows:

2 Reset the setting. On the screen, touch and hold as follows: : [Reset]
Pandora®
(Only for KW-V250BT/KW-V25BT/KW-V350BT Region 1)
You can stream Pandora from iPhone/iPod touch or Android devices.
- Pandora is only available in certain countries. For more information, visit .
- Because Pandora is a third-party service, the specifications are subject to change without prior notice. Accordingly, compatibility may be impaired or some or all of the services may become unavailable. • Some functions of Pandora cannot be operated from this unit.
- For issues using the application, contact Pandora at pandora-support@pandora.com .
Preparation
Installing the application
Your smartphone must has built in Bluetooth and the following profiles must be supported:
• SPP (Serial Port Profile)
• A2DP (Advanced Audio Distribution Profile) Establish an Internet connection using LTE, 3G, EDGE, or WiFi.
Ensure you are logged in to your smartphone application. If you do not have a Pandora account, you can create one for free from your smartphone or at .
Pandora®
Install the latest version of the Pandora application on your smartphone.
- For Android devices: Search for "Pandora" in Google Play to find and install the most recent version.
- For iPhone/iPod touch: Search for "Pandora" in the Apple iTunes App Store to find and install the most recent version.
Connecting the device
For Android devices
Pair the Android device with this unit via Bluetooth. (Page 34)
For iPhone/iPod touch
- Via USB input terminal: Connect iPhone/iPod touch with the cable. (Page 15)
- For Lightning models: Use KS-U62 (optional accessory).
- For 30-pin connector models: Use 30-pin to USB cable (accessory of iPod/iPhone).
- Via Bluetooth: Pair the iPhone/iPod touch with this unit. (Page 34)
Selecting the device
For selecting the playback device via the connection method to use, see page 47.
Playback operations
■ Playback information and key operation
KW-V250BT/KW-V25BT

KW-V350BT
You can also operate Pandora with the optional remote controller, RM-RK258.
You can only control play, pause, and skip with the remote controller.
1 Displays/hides other available operation keys* 2 Picture data 3 Track information - Touching [◀] scrolls the text if not all of the text is shown. 4 Operation keys* 5 Playing time/playback status 6 Only for KW-V350BT: Playback source items shown on the Home screen. - Touching the playback source item changes the playback source.
* See the following "Operation keys on source control screen".
Operation keys on source control screen
• The following explanations state the operation keys for KW-V250BT/KW-V25BT, unless stated otherwise. - The appearance of the operation keys may differ, however the similar operation keys have the same operations. - See also "Common operation keys on source control screen" on page 8.
Touching the operation keys performs the following actions:
1
| [8+] | Adds the current artist to the station list. |
| [5+] | Adds the current track to the station list. |
| [5-] | Bookmarks the current track. |
| [1/] | Switches the device onscreen. (Page 47) |
Pandora®
4
[Q]
Displays the list selection screen.
[7]
Thumbs down to the current track and skips to the next track.
[↓]
Registers the current track as a favorite.
[▶ III]
Starts/pauses playback.
[▶▶]
Skips the current track.
- Not available when the Pandora skip reaches its limit.

Selecting a station from the list
1 Display the list selection screen.
On the source control screen, touch as follows:

2 Select the list type.

[Station List] Selects from the station names.
[Genre List] Selects from the genres.
3 Select a station from the list.
On the station list:

• To play all the songs in the registered stations randomly, touch [Shuffle]. - To sort the list in reverse chronological order, touch [By Date]. - To sort the list in alphabetical order, touch [By Name]. - The 🖱️ Indicator appears on the right of the item when the station is shared.
On the genre list:

① Select a genre. ② Select a station. The selected station is added to the station list.
iHeartRadio
(Only for KW-V250BT/KW-V25BT/KW-V350BT Region 1)
iHeartRadio is a free, all-in-one digital radio service that lets you listen to your favorite live stations or create commercial-free, all-music custom stations featuring songs from the artists you select and similar music.
You can stream iHeartRadio from iPhone/iPod touch or Android devices.
- Because iHeartRadio is a third-party service, the specifications are subject to change without prior notice. Accordingly, compatibility may be impaired or some or all of the services may become unavailable.
- Some functions of iHeartRadio cannot be operated from this unit.
- For issues using the application, contact iHeartRadio at http://www.iheart.com/ .
Preparation
Installing the application
Your smartphone must have built-in Bluetooth and the following profiles must be supported:
• SPP (Serial Port Profile) • A2DP (Advanced Audio Distribution Profile) Establish an Internet connection using LTE, 3G, EDGE, or WiFi.
Ensure you are logged in to your smartphone application. If you do not have an iHeartRadio account, you can create one for free from your smartphone or at http://www.iheart.com/.
iHeartRadio
Install the latest version of the iHeartRadio application on your smartphone.
- For Android devices: Search for "iHeartRadio for Auto" in Google Play to find and install the most recent version.
- For iPhone/iPod touch: Search for "iHeartRadio for Auto" in the Apple iTunes App Store to find and install the most recent version.
Connecting the device
For Android devices
Pair the Android device with this unit via Bluetooth. (Page 34)
For iPhone/iPod touch
• Via USB input terminal: Connect iPhone/iPod touch with the cable. (Page 15) - For Lightning models: Use KS-U62 (optional accessory). - For 30-pin connector models: Use 30-pin to USB cable (accessory of iPod/iPhone). - Via Bluetooth: Pair the iPhone/iPod touch with this unit. (Page 34)
Selecting the device
For selecting the playback device via the connection method to use, see page 47.
Playback operations
■ Playback information and keys operation KW-V250BT/KW-V25BT

KW-V350BT
You can also operate iHeartRadio with the optional remote controller, RM-RK258.
You can only control play, pause, and skip with the remote controller.
1 Displays/hides other available operation keys* 2 Picture data 3 Track information - Touching [◀] scrolls the text if not all of the text is shown. 4 Operation keys* 5 Playback status 6 Only for KW-V350BT: Playback source items shown on the Home screen. - Touching the playback source item changes the playback source.
* See the following "Operation keys on source control screen".
Operation keys on source control screen
• The following explanations state the operation keys for KW-V250BT/KW-V25BT, unless stated otherwise. - The appearance of the operation keys may differ, however the similar operation keys have the same operations. - See also "Common operation keys on source control screen" on page 8.
Touching the operation keys performs the following actions:
1
| [+] | Creates a custom station from the currently playing track content information. |
| [♥] | Saves the current station to thelist. |
| [+]*1 | Displays the variety level selection screen. |
| [1/1] | Switches the device onscreen. (Page 47) |
iHeartRadio
4
| [Q] | Displays thescreen or the station list. |
| [I■] | Dislikes the currently playing content. |
| [◀] | Likes the currently playing content. |
| [▶■]*2 | Starts/stops playback. |
| [▶II]*1 | Starts/pauses playback. |
| [SCAN]*2 | Scans stations randomly. |
| [▶▶]*1 | Skips the current track. |
*1 Appears only for the custom station screen. *2 Appears only for the live station screen.
Selecting the variety level for your custom station
1 Display the variety level selection screen.
On the source control screen, touch as follows:

2 Select the variety type.
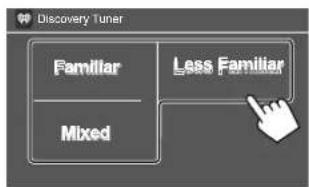
| [Familiar] | Distributes well-known tracks. |
| [Mixed] | Distributes a mix of artists and track names. |
| [Less Familiar] | Distributes a wide variety of tracks including lesser-known ones. |
Searching for a station
1 Display the screen.
On the source control screen, touch as follows:
2 Select a station.
- The items displayed on the screen differ depending on the information sent from iHeartRadio.

• To return to the top layer, touch [ ] • To return to the upper layer, touch [↑]
Editing the list
1 Display the screen.
On the source control screen, touch as follows:

Then, on the screen, touch as follows:
2 Select stations (①), then delete the selected stations (②).
• A check mark appears beside the selected station.

• To return to the top layer, touch [ ] • To return to the upper layer, touch [↑]
Spotify
With Spotify, your music is everywhere. Working out, partying or relaxing, the right music is always at your fingertips. There are millions of songs on Spotify—from old favorites to the latest hits. Just choose the music you love, or let Spotify surprise you.
You can stream Spotify from iPhone/iPod touch or Android devices.
- Because Spotify is a third-party service, the specifications are subject to change without prior notice. Accordingly, compatibility may be impaired or some or all of the services may become unavailable.
- Some functions of Spotify cannot be operated from this unit.
- For issues using the application, contact Spotify at .
Preparation
Installing the application
Your smartphone must have built-in Bluetooth and the following profiles must be supported: • SPP (Serial Port Profile) • A2DP (Advanced Audio Distribution Profile) Establish an Internet connection using LTE, 3G, EDGE, or WiFi.
Ensure you are logged in to your smartphone application. If you do not have a Spotify account, you can create one for free from your smartphone or at .
Install the latest version of the Spotify application on your smartphone.
- For Android devices: Search for "Spotify" in Google Play to find and install the most recent version.
- For iPhone/iPod touch: Search for "Spotify" in the Apple iTunes App Store to find and install the most recent version.
Connecting the device
For Android devices
Pair the Android device with this unit via Bluetooth. (Page 34)
For iPhone/iPod touch
- Via USB input terminal: Connect iPhone/iPod touch with the cable. (Page 15) -For Lightning models: Use KS-U62 (optional accessory). -For 30-pin connector models: Use 30-pin to USB cable (accessory of iPod/iPhone). • Via Bluetooth: Pair the iPhone/iPod touch with this unit. (Page 34)
Selecting the device
For selecting the playback device via the connection method to use, see on page 47.
Playback operations
■Playback information and key operation
KW-V250BT/KW-V25BT

KW-V350BT
You can also operate Spotify with a remote controller, RM-RK258*1.
You can only control play, pause and skip with the remote controller.
Spotify
1 Displays/hides other available operation keys*2 |2| Picture data 3 Track information - Touching [◀] scrolls the text if not all of the text is shown. - Touching [4]/[1] changes the displayed information between artist (4) and album (1). 4 Operation keys*2 5 Playing time/playback status 6 Progress bar [7] Only for KW-V350BT: Playback source items shown on the Home screen. - Touching the playback source item changes the playback source.
*1 For KW-V250BT/KW-V25BT/KW-V350BT Region 1: Purchase optional remote controller, RM-RK258.
*2 See the following "Operation keys on source control screen".
Operation keys on source control screen
- The following explanations state the operation keys for KW-V250BT/KW-V25BT, unless stated otherwise.
- The appearance of the operation keys may differ, however the similar operation keys have the same operations.
- See also "Common operation keys on source control screen" on page 8.
Touching the operation keys performs the following actions:

| [1] | Thumbs down to the current track and skips to the next track. |
| [2]*1 | Registers the current track as a favorite. |
| [3]*2 *3 | Activates/deactivates the shuffle playback mode. |
| [4]*2 | Repeats all tracks/cancels the repeat playback. |
| [5]*2 *3 | Repeats the current track/cancels the repeat playback. |
| [(+)] | Creates a new station. |
| [6]/[7] | Switches the device onscreen. (Page 47) |

| [≡ | Displays the Spotify menu screen. |
| [◀]3 [▶] | Selects a track. |
| [▶][▶] | Starts (▶)/pauses (▶) playback. |
| [+] | Saves the current track/artist to |
*1 Not available for tracks in a playlist. *2 Not available for tracks in the Radio. *3 Available only for premium account users.
Creating your station (Start Radio)
Start Radio is to start a radio channel based on the currently played track.
Create your station.
On the source control screen, touch as follows:
Station is created and playback starts automatically.
- You can personalize your station using thumb up
([👍]) or thumb down ([👎]).
-You cannot thumb up or down while playing tracks in a playlist.
–Personalizing stations may not be available depending on the track.
Spotify
Other External Components
Selecting a track
1 Display the Spotify menu screen.
On the source control screen, touch as follows:

2 Select the list type, then select a desired item.
- The list types displayed differ depending on the information sent from Spotify.

• To return to the top layer, touch [↑]. • To return to the upper layer, touch [↑].
AV-IN
■ Connecting an external component
See page 54 for more information.
Starting playback
1 Select "AV-IN" as the source. 2 Turn on the connected component and start playing the source.
Changing the AV-IN name
You can change the AV-IN name displayed on the source control screen. - This setting does not affect the source name displayed on the Home screen.
1 Display the screen.
On the source control screen, touch as follows:
2 Select an AV-IN name

Rear view camera
Install the rear view camera (separately purchased) in the appropriate position according to the instructions supplied with the rear view camera.
Connecting a rear view camera
See page 54 for more information.
• To use the rear view camera, a reverse lead (REVERSE) connection is required. (Page 55)
Using the rear view camera
- For rear camera settings, see on page 46.
To display the rear view camera screen
The rear view screen is displayed by shifting the gear to the reverse (R) position when is set to [ON]. (Page 46)
- A caution message appears on the screen. To remove the caution message, touch the screen.
You can also display the picture from the rear view camera manually without shifting the gear to the reverse (R) position.
For KW-V250BT/KW-V25BT: On the pop-up shortcut menu, touch as follows:

For KW-V350BT: On the Home screen, touch as follows:

Other External Components
Operations while the camera screen is displayed
To adjust the picture
Touch the area shown below.

The video menu control is shown. For details, see "Video menu control operations" on page 12.
- To exit video menu control, touch the same area again.
To display parking guide line
Set to [ON] (page 46) or touch the area shown below.

- To close the parking guidelines, touch the same area again.
To exit the camera screen
Press HOME on the monitor panel or touch the area shown below.

Using an external component via ADS adapter—Maestro
(Only for KW-V350BT Region 1)
By connecting this unit to the vehicle's bus system using iDataLink (commercially available), this unit can access the satellite radio source provided for the vehicle, and vehicle information can be displayed on this unit.
- Displayable screens, button names, and screen names vary depending on the type of connected iDataLink and the model of the vehicle.
- For details, visit .
Connecting an ADS adapter
See page 54 for more information.
■ Using an external component via an ADS adapter
- For settings to use an ADS adapter, see page 48.
1 Select "Maestro" as the source.
On the Home screen, touch as follows:

2 Turn on the connected component and start playing the source.
| [Satellite Radio] | Displays the control screen of the satellite radio source provided for the vehicle. |
| [Media Player] | Displays the control screen of the media player source provided for the vehicle. |
| [TEL] Displays the control screen of the Bluetooth Hands Free function provided for the vehicle. | |
| [BT Streaming] | Displays the control screen of the Bluetooth streaming function provided for the vehicle. |
| [Gauges] Displays the information about the instruments such as a speedometer. | |
| [Climate] Displays the information about the air conditioner of the vehicle. | |
| [Parking Assist] | Displays the information about the Parking Distance Sensor of the vehicle. |
| [Vehicle Info] Displays the information about the tire pressures of the vehicle. | |
| [Radar Detector] | Displays the information about the Radar Detector. |
Bluetooth®
Information
Bluetooth is a short-range wireless radio communication technology for mobile devices such as mobile phones, portable PCs, and other devices. Bluetooth devices can be connected without cables and communicate with each other.
Note
- While driving, do not perform complicated operations such as dialing numbers, using the phone book, etc. When you perform these operations, stop your car in a safe place.
- Some Bluetooth devices may not connect to this unit depending on the Bluetooth version of the device.
- This unit may not work for some Bluetooth devices.
- Connecting conditions may vary depending on your environment.
- For some Bluetooth devices, the device is disconnected when the unit is turned off.
- If your mobile phone supports PBAP (Phone Book Access Profile), you can display the following items on the touch panel when the mobile phone is connected.
- Phone book – Dialed calls, received calls, and missed calls (up to 10 entries in total)
Preparation
Connect and install the microphone beforehand. For details, see page 55.
Connection
When you connect a Bluetooth device to the unit for the first time:
① Register the device by pairing the unit and the device. ② Connect the device to the unit. (Page 35)
Registering a new Bluetooth device
Pairing allows Bluetooth devices to communicate with each other.
- The pairing method differs depending on the Bluetooth version of the device. - For devices with Bluetooth 2.1:
You can pair the device and the unit using SSP (Secure Simple Pairing) which only requires confirmation.
- For devices with Bluetooth 2.0: You need to enter a PIN code both on the device and unit for pairing.
- Once the connection is established, it is registered in the unit even if you reset the unit. Up to five devices can be registered in total.
- Two devices for Bluetooth phone and one for Bluetooth audio can be connected at a time. However, when "BT Audio" is selected as the source, you can connect up to five Bluetooth audio devices and switch between these five devices. • To use the Bluetooth function, you need to turn on the Bluetooth function of the device.
Auto pairing
When is set to [ON] (page 39), iOS (such as iPhone) devices are automatically paired when connected via USB.
Pairing a Bluetooth device using SSP (for Bluetooth 2.1)
When the Bluetooth device is compatible with Bluetooth 2.1, a pairing request is sent from the available device.
1 Search for the unit ("JVC KW-V") from your Bluetooth device.
2 Confirm the request both on the device and the unit.
On the device:

On the unit:

To reject the request: Touch [Cancel].
Bluetooth®
Pairing a Bluetooth device using a PIN code (for Bluetooth 2.0)
1 Display the screen.
On the Home screen, touch as follows:

Then, on the screen, touch as follows: [System] → [Enter]
On the screen, touch as follows:
[0000]
2 Change the PIN code.
If you wish to skip changing the PIN code, go to step 3.

• To delete the last entry, touch [Clear]. • To delete the PIN code, touch and hold [Clear].
3 Search for the unit ("JVC KW-V") from your Bluetooth device.
4 Select the unit ("JVC KW-V") on your Bluetooth device.
- If a PIN code is required, enter "0000" (initial) or the new PIN code you have entered in step 2.
- When pairing is completed, the device is registered on the screen.
Note
• The PIN code is initially set to "0000". • The maximum number of digits in the PIN code is 15.
Connecting/disconnecting a registered Bluetooth device
1 Display the screen.
On the Home screen, touch as follows:

Then, on the screen, touch as follows: [System] → : [Enter]
On the screen, touch as follows:
: [Enter]
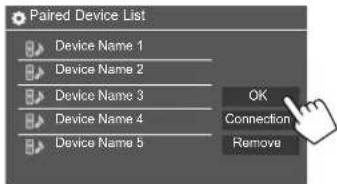
2 Select the device (①) you want to connect, then select [Connection] (②).

3 Select the device (①) to connect, then return to the (②).
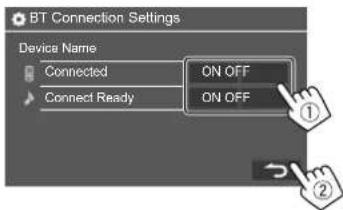
Select [ON] (to connect) or [OFF] (to disconnect).
: Mobile phone : Audio device
4 Connect the selected device.
Bluetooth®
• The status is shown as follows: : Connection is in progress. : A connection has been established. : A connection can be established. : Disconnection is in progress. : No connection is established. - When a Bluetooth mobile phone is connected, the signal strength and battery level are displayed when the information is acquired from the device.
To delete the registered device: Perform step 1, select the device you want to delete in step 2, then touch [Remove].
• A confirmation message appears. Touch [Yes].
Bluetooth mobile phone
When a call comes in...
Touching the operation keys performs the following actions:

Answers a call.

Rejects a call.
- Call information is displayed if acquired.
- Phone operation is not available while the picture from the rear view camera is displayed.
During a call...

Touching the operation keys performs the following actions:
| Ends a call. | |
| Switches between handsfree mode and phone mode. |
[DTMF] Enters DTMF (Dual Tone Multi Frequency), then sends text using the keypad.
| NR LEVEL[-]/[+] | Adjusts the noise reduction level.(-5 to 5) |
| EC LEVEL[-]/[+] | Adjusts the echo volume level.(-5 to 5) |
| MIC LEVEL[-]/[+] | Adjusts the volume level of themicrophone. (-10 to 10) |
- Press volume +/− buttons on the monitor panel to adjust the volume of the call or earpiece.
Making a call
1 Display the phone control screen.
On the Home screen, touch as follows:
For KW-V250BT/KW-V25BT:

For KW-V350BT:

2 Select a method to make a call.

[1] From the call history* (missed calls/received calls/dialed calls) 2 From the phone book* 3 From the preset list (Page 37) 4 Use direct number entry 5 Use voice dialling
* Applicable only for mobile phone compatible with PBAP (Phone Book Access Profile).
Bluetooth®
3 Select a contact (①), then make a call (②). When item 1, 2 or 3 is selected in step 2:

To use alphabet search in the phone book
① Touch [QA-Z].
② Touch the first letter you want to search for on the keypad.
To search for a number, touch [1,2,3...].
③ Select a contact you want to call from the list.
Phone book search results:
"Sort order", "display order" or any other equivalent settings of the phone may affect and show different search results (page display) of the phone book shown on the main unit.
To display other phone numbers in the same contact
You can store up to 10 phone numbers per contact.
① Touch [>].
② Select a contact you want to call from the list.
When item 4 is selected in step 2:
Enter the phone number (①), then make a call (②).

• To enter "+" touch and hold [0/+].
• To delete the last entry, touch [X].
When item 5 is selected in step 2:
Say the name of the person you want to call.
• Available only when the connected mobile phone has a voice recognition system. - If the unit cannot find the target, "Please speak into the microphone" appears. Touch [Start], then say the name again. • To cancel voice dialling, touch [Cancel].
Switching between two connected devices
You can change the device to use when 2 devices are connected.
On the phone control screen:
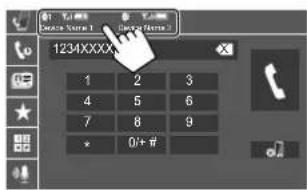
The active device is highlighted.
Presetting phone numbers
You can preset up to five phone numbers.
1 Display the phone control screen.
On the Home screen, touch as follows:
For KW-V250BT/KW-V25BT:

For KW-V350BT:

Bluetooth®
2 Select call history or phone book calling method (①), then select a contact (②) to preset.

3 Select a preset number to store into.

To delete the contact in the preset number: Touch [icon] besides the contact on the preset list.
Bluetooth audio player
JVC Streaming DJ
When "BT Audio" is selected as the source, you can connect up to five Bluetooth audio devices at the same time. You can easily switch between these five devices by playing music from the device.

KW-V250BT/KW-V25BT
KW-V350BT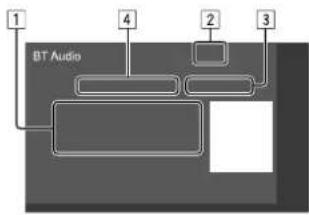
1 Tag data* (current track title/artist name/album title) - Pressing [◀] scrolls the text if not all of the text is shown. 2 Signal strength and battery level (Appear only when the information is acquired from the device.) 3 Playing time*/ playback status* 4 Connected device name • Touching the device name switches to another connected Bluetooth audio device. * Available only for devices compatible with AVRCP 1.3.
■Playback information and key operation
- For playback information, see "Source control screen" on page 7. - For key operations on the touch panel, see "Common operation keys on source control screen" on page 8.
Additional keys operations. Touching the operation keys performs the following actions:

Displays screen.
Bluetooth®
Selecting an audio file from the menu
1 Display the audio menu.
On the source control screen, touch as follows:

2 Select a category (①), then select a desired item (②).

Select an item in each layer until you reach and select the desired file.
Bluetooth settings
You can change various settings for using Bluetooth devices on the screen.
1 Display the screen.
On the Home screen, touch as follows:

Then, on the screen, touch as follows: [System] → : [Enter]
2 Make the settings.

Display the list of registered devices. You can connect a device or delete registered devices.
Change the PIN code of the unit.
Show the device name of this unit to be displayed on the Bluetooth device — JVC KW-V.
Show the device address of the unit.
- ON (Initial): Automatically establishes a connection with the last connected Bluetooth device when the unit is turned on.
- OFF: Cancels.
Select the speakers used for Bluetooth mobile phones and Bluetooth audio players.
- Front Only: Front speakers only.
• All (Initial): All speakers.
• ON: The unit answers incoming calls automatically after 5 seconds.
- OFF (Initial): The unit does not answer calls automatically. Answer calls manually.
- ON (Initial): Automatically pairs with the iOS device (such as iPhone) connected via USB. (Auto pairing may not work for some devices depending on the iOS version.)
- OFF: Cancels.
Touch and hold [Enter] to reset all settings you have made for using Bluetooth mobile phones and Bluetooth audio players.
Settings
Audio settings
Display the screen.
On the Home screen, touch as follows:

Then, on the screen, touch [Audio].

E.g. Audio settings screen for KW-V250BT/KW-V25BT
You cannot change the screen in the following situations:
- When the AV source is turned off.
- When the Bluetooth phone is used (making or receiving a call, during a call, or while voice dialling).
The following adjustments are memorized for each source until you adjust the sound again. If the source is a disc, the adjustments are stored for each of the following categories.
• DVD/VCD • CD - DivX*1/MPEG1/MPEG2/MP3/WMA/WAV/AAC/FLAC You cannot adjust the sound when the unit is in standby.
Selecting a preset sound mode
Select a preset sound mode on the screen. - Flat (Initial)/Hard Rock/Pop/Hip Hop/R&B/Jazz/Classical/drvn 3/drvn 2/drvn 1/User

- To apply the adjusted equalizer to all playback sources, touch [ALL SRC], then touch [OK] to confirm.
Store your own sound adjustments
1 Select a preset sound mode.
2 Select a band (①) and adjust the level (②), then adjust the sound (③).

Adjust the sound as follows:
Adjusts the width of the frequency.
• 1.35/1.5 (Initial)/2.0
Activates/deactivates bass. - ON/OFF (Initial)
Adjusts the subwoofer level.*2
- -50 to +10 (Initial: 0)
• To clear the adjustment, touch [EQ INIT].
3 Repeat step 2 to adjust the level of other bands.
*1 Only for KW-V350BT Region 4. *2 Not adjustable when is selected for subwoofer on the screen. (Page 42)
Settings
Adjust the sound effect.
Adjusts loudness.
- OFF (Initial)/Low/High
Selects the bass boost level.
- OFF (Initial)/Level 1/Level 2/Level 3/Level 4/Level 5
Reduces the driving noise by raising the bandwidth.
- OFF (Initial)/ON
*1
Virtually enhances the sound space using the Digital Signal Processor (DSP) system. Select the enhance level.
• OFF (Initial)/Small/Medium/Large
#2
Restores the sound lost due to audio compression to a realistic sound.
- OFF/ON (Initial)
Virtually makes the sound more realistic using the Digital Signal Processor (DSP) system. Select the sound level.
• OFF (Initial)/Level 1/Level 2/Level 3
Moves the center of the sound to the lower or higher point. Select the height.
• OFF (Initial)/Low/Middle/High
*1 You cannot change the setting when "Tuner" is selected as the source.
*2 This function works only when "DISC"/"USB"/"iPod"/"Android™" is selected as the source.
Touch [▲]/[▼]/[◀]/[▶] or drag the ✝ mark to adjust.
Adjusts the front and rear speaker output balance. When using a two-speaker system, set the fader to the center (0).
• F15 to R15 (Initial: 0)
Adjusts the left and right speaker output balance.
• L15 to R15 (Initial: 0)
To clear the adjustment: Touch [Center].
Preparation:
Before making the adjustment for , select the appropriate crossover network mode according to the speaker system (2-way speaker system or 3-way speaker system).
1 Turn off the AV source.
On the Home screen, touch as follows:

2 Display the screen.
On the monitor panel, press the following buttons at the same time:
- For KW-V250BT/KW-V25BT: and volume -
- For KW-V350BT: and
3 Select the crossover network mode.
[2way] Select this when 2-way system speakers are used (front/rear).
[3way] Select this when 3-way system speakers are used (tweeter/mid range/woofer).
A confirmation message appears. Touch [Yes].
Settings
Setting the speakers and crossover frequency
1Select a car type (①), select the location of the speakers (②)*, then display the screen (③).
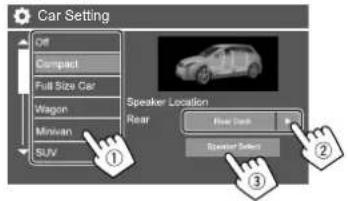
* Speaker location selection is available only when is set to [2way].
2 Select the speaker type (①), select the size of the selected speaker (②), then display the screen (③).
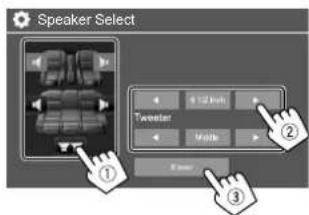
- If a speaker is not connected, select .
- When setting the front speakers, also select the speaker size for .
3 Adjust the crossover frequency of the selected speaker.
- Adjustable items vary depending on the selected speaker type/speaker size/crossover settings.
/
Adjusts the output volume of the tweeter (left/right).
Adjusts the crossover frequency for the tweeter.
Adjusts the output volume of the selected speaker.
Adjusts the crossover frequency for the front or rear speakers (high pass filter).
Adjusts the crossover frequency for the speaker (low pass filter).
Adjusts the crossover slope.
Selects the phase for the speaker.
Make fine adjustments to the delay time of the speaker output to create a more suitable environment for your car.
Select the listening position (①), select [Distance] or Gain to make an adjustment, then adjust each speaker setting (③).

① Select from , , or *. ② Select an item to adjust.
[Distance] Adjusts the digital time alignment value.
[Gain] Adjusts the output volume of the selected speaker.
③ To determine the adjustment value, see the following "Determining the value for adjustment".
To initialize the setting value: Touch [Initialize].
* is selectable only when is set to [2way].
Settings
Determining the value for adjustment
If you specify the distance from the center of the currently set listening position to every speaker, the delay time will be automatically computed and set.
① Determines the center of the currently set listening position as the reference point. ② Measures the distances from the reference point to the speakers. ③ Calculates the differences between the distance of the furthest speaker and other speakers. ④ Sets the DTA value calculated in step ③ for individual speakers. ⑤ Adjusts gain for individual speakers.
E.g. When is selected as the listening position
Adjust and store the auto-adjustment volume level for each source. If the source is a disc, the adjustment is stored for each of the following categories:
• DVD/VCD • CD - DivX*/MPEG1/MPEG2/MP3/WMA/WAV/AAC/FLAC The volume level will automatically increase or decrease when you change the source. - -15 to +6 (Initial: 00)
* Only for KW-V350BT Region 4.
Display settings
Display the screen.
On the Home screen, touch as follows:

Then, on the screen, touch [Display].
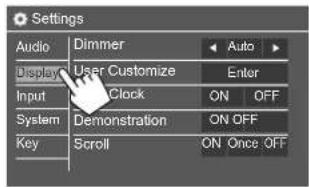
E.g. Display settings screen for KW-V250BT/KW-V25BT
- Auto (Initial): Dims the screen and button illumination when you turn on the headlights.
- Connection to the car light control switch is required. (Page 55) • ON: Activates dimmer. • OFF: Deactivates dimmer.
You can change the display design. While playing a video or picture, you can capture an image and use the captured image as a background.
- You cannot capture copyrighted content and images.
- When using a JPEG file as the background, make sure that the resolution is 800 x 480 pixels.
- The color of the captured image may look different from that of the actual scene.
Settings
For KW-V250BT/KW-V25BT
1 Change the background design
Display the background design selection screen (①), select the dimmer setting (②) (☐) dimmer on or
[★ dimmer off), then select the background design (③).

When one of these is selected, you can change the background color.
|2| Change the illumination color of the background design
Display the background color selection screen (①), then select the background color (②).

- You can also adjust the color yourself. Touch [Adjust] to display the color adjustment screen, then adjust the color. The adjustment is saved on [User].

3 Activate Music Synchronize Effect
By activating the Music Synchronize Effect, the brightness of illumination bar on the monitor panel changes according to the music level.
Display the music synchronize setting screen (①), then select [ON] (②).

To deactivate, touch [OFF].
For KW-V350BT
1 Change the background design
Display the background design selection screen (①), select the dimmer setting (②) ([ ]): dimmer on or
[★] dimmer off, then select the background design (③).
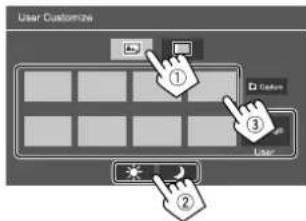
2 Change the illumination color of the buttons on the monitor panel
Display the illumination color selection screen (①), select the dimmer setting (②) ([ ]): dimmer on or [★] dimmer off, then select the illumination color (③).

* Only for KW-V350BT Region 1: Displayed only when an ADS adapter is connected.
Settings
- Skip step (②) if you select [Scan] or [User] in step (③).
- Selecting [Scan] changes the illumination color gradually.
- Selecting [Music Synchronize] changes the illumination color according to music level.
- Selecting [Car Color] changes the illumination color by following the setting made for [Illumination] using ADS adapter.
- You can also adjust the color yourself if [User] is selected. Touch [Edit] to display the color adjustment screen, then adjust the color. The adjustment is saved on [User].

■ Storing your own scene for the background image
1 While playing a video or picture, display the screen. On the screen, touch as follows: : [Enter]
2 Display the background design selection screen, then touch [Capture].
3 Adjust the image (①), then capture the image (②).

E.g. Image adjustment screen for KW-V250BT/KW-V25BT
| [▲][▼][◀][▶] | Moves the zooming frame. |
| [⊕] | Magnifies the scene.// |
| [▶■]* | Starts/pauses playback. |
| [|▶]* | Advances scenes frame by frame. |
A confirmation message appears. Touch [Yes] to store the newly captured image. (The existing image is replaced with the new one.)
• To return to the previous screen, touch [No]. • To cancel the capture, touch [Cancel].
* Not displayed when playing an external component connected to the AV-IN input terminal.
- ON: Displays the clock while a video source is playing. • OFF (Initial): Cancels.
• ON (Initial): Activates the display demonstration. • OFF: Deactivates the display demonstration.
• ON: Scrolls the displayed information repeatedly. - Once (Initial): Scrolls the displayed information once. - OFF: Cancels.
Touching [◀] scrolls the text regardless of this setting.
(Only for KW-V250BT/KW-V25BT)
Selects the playback source to display on the Home screen.
Select an item to replace (①), then select an item (②) you want to display in the selected position.
Repeat the procedure to customize your Home screen.

- Only selectable sources are shown.
- You cannot locate [Camera] on the Home screen.
- Touching and holding the playback source icon on the Home screen can also display the item selection screen.
Settings
Adjust the brightness and blackness of the screen. Select [DIM ON] (dimmer on) or [DIM OFF] (dimmer off), then change the following settings:
Adjusts brightness.
- -15 to +15 (Initial: 0 for dimmer on, +15 for dimmer off)
Adjusts blackness.
- -10 to +10 (Initial: 0)
Select the color system of the external monitor.
- NTSC (Initial)/PAL
"Please Power Off" appears when the setting is changed. Turn off the power, then turn on to enable the change.
Select the viewing angle in relation to the monitor to make the image on the screen easier to see. - Under 0° (Initial)/5°/10°/15°/20°
Input settings
Display the screen.
On the Home screen, touch as follows:

Then, on the screen, touch [Input].

E.g. Input settings screen for KW-V250BT/KW-V25BT
Configure the rear view camera settings.
- ON (Initial): Displays the picture from the rear view camera when you shift the gear to the reverse (R) position.
- A caution message appears on the screen. To remove the caution message, touch the screen. • OFF: Select this when no camera is connected.
• ON (Initial): Displays the parking guidelines. • OFF: Hides the parking guidelines.
Adjust the parking guidelines according to the size of the car, parking space and so on.
When adjusting the parking guidelines, make sure to use the parking brake to prevent the car from moving.
Select the park (①), then adjust the position of the selected park (②).
![graph TD A["A"] --> B["B"] B --> C["C"] C --> D["D"] D --> A style A fill:#f9f,stroke:#333 style B fill:#ccf,stroke:#333 style C fill:#cfc,stroke:#333 style D fill:#fcc,stroke:#333 note right of B: Initiizes note left of B: ②](/content/2026/06/1350525/images/3a014ccc42ee3448bf70b403613400fc95c265c87b523cf7b037f608bd584eee.jpg)
Make sure that Ⓐ and Ⓑ are horizontally parallel, and that Ⓐ and ⒭ are the same length.
- Touch and hold [Initialize ▼] for 2 seconds to set all the marks to the initial default position.
(Only for KW-V350BT Region 1)
Configure settings for using the ADS adapter.
When an ADS adapter is connected, you can display information about obstacles around the car.
• ON: Always displays information. - Dyn. (Initial): Displays information when the sensor detects obstacles. - OFF: Cancels.
Settings
Select where information about obstacles is displayed on the screen.
- Left/Right (Initial)
System settings
Display the screen.
On the Home screen, touch as follows:

Then, on the screen, touch [System].

E.g. System settings screen for KW-V250BT/KW-V25BT
(Language>
Select the text language used for on-screen information. For details, see "Initial settings" on page 5.
"Please Power Off" appears when the setting is changed. Turn off the power, then turn on to enable the change.
Set the clock. For details, see "Clock settings" on page 5.
Specify the connection method of Android/iPod/iPhone.
1 Select the device type (①), then touch [Change] (②).

2 Select the connection method (①), then confirm the selection ([OK] or [Next]) (②). If [iPod/iPhone] is selected in step 1:

[USB 1 Wire] Select this when the device is connected via the USB input terminal (on the monitor panel or cable from the rear panel).
[Bluetooth] Select this when the device is connected via Bluetooth. (Go to step 3.)
If [Android/Other] is selected in step 1:

The screen appears. Go to step 3.
3 When selecting [Bluetooth] as the connection method: Select the device (①), then press [OK] (②) to connect.
- If the device is already connected, skip step ①.

Settings
Configure settings for using a Bluetooth device, such as connection and other general operations. For details, see "Bluetooth settings" on page 39.
(Only for KW-V350BT Region 1)
Get information, and change the settings for using the ADS adapter.
This setting is available only when 2-way speaker system is selected. (Page 41)
• ON (Initial): Activates the key-touch tone. • OFF: Deactivates the key-touch tone.
Memorize, recall, or clear the settings you have made. • The memorized settings are kept even when the unit is reset.
Touch [Yes] to display the setting screen, then select an operation:
- Recall: Recalls the memorized settings. • Memory: Memorizes the current settings.
- Clear: Clears the currently memorized settings and return to the factory (initial) settings.
- Cancel: Cancels.
A confirmation message appears. Touch [Yes].
(Only for KW-V350BT Region 4)
This unit has its own Registration Code. Once you have played back a file with the Registration Code recorded, this unit's Registration Code is overwritten for copyright protection.
- Touch [Enter] to display the information. • To return to the previous screen, touch [OK].
Initialize all settings you have made. Touch and hold [Enter] to initialize the settings.
- After initializing the settings, adjust the settings on the screen.
(Only for KW-V350BT Region 1)
Displays the serial number.
Adjust the touch positions of the buttons on the screen.
Touch the center of the marks at the upper left (①), the lower center (②), then the upper right (③) as instructed.
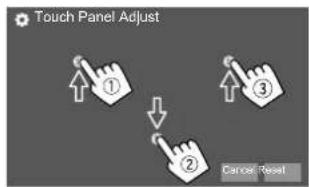
• To reset the touch position, touch [Reset]. • To cancel the current operation, touch [Cancel].
(Only for KW-V350BT Region 4)
Assign functions to the keys of the remote controller on the steering wheel.
- This function is available only when your car is equipped with the electrical steering remote controller.
- You can only register/change the functions while you are parked.
- If your steering remote controller is not compatible, learning may not be completed and an error message may appear. 1 Touch [Set] to display the setting screen. 2 Press and hold a button on the steering remote controller to register or change. 3 Select a function to assign to the selected button.

Settings
4 Repeat steps 2 and 3 to register other buttons.
5 Touch [Done] to finish the procedure.
- The unit can register/change all of the buttons' functions at the same time. To do this, press all buttons in turn and after pressing all of them, touch [Done] on the screen. However, new functions cannot be learned after this operation.
- When changing the functions already learned, touch the assigned function you want to change in step 3 and then touch to select the new function from the function list.
- Confirm the contents of the settable functions in the function list. You cannot edit the function list.
To initialize the setting: Touch [Initialize] for .
- A confirmation message appears. Touch [Yes].
- To cancel the initialization, touch [No].
Update the system by connecting a USB device containing an update file. • To obtain the update file, visit http://www.jvc.net/cs/car/ .
Connect a USB device with the update file to the unit.

Updates the system application.
Updates the system.
- If you turned the power off then on or turn the ignition switch off then on after selecting , the unit will reset.
Updates the DVD system application.
The system update starts. It may take a while. If the update has been completed successfully, "Update Completed" appears, then reset the unit. - Do not disconnect the USB device while updating. - If the update has failed, perform the following, then retry the update: KW-V250BT/KW-V25BT: Turn the ignition switch off then on. KW-V350BT: Turn the power off then on.
Shows the Open Source Licenses.
Key settings
Display the screen.
On the Home screen, touch as follows:

Then, on the screen, touch [Key].

E.g. Key settings screen for KW-V250BT/KW-V25BT
You can customize the pop-up short-cut menu (page 8).
- For KW-V250BT/KW-V25BT, you can also customize the (favorite) button.
1 Select the menu to customize.

• To customize the favorite button, touch the icon under favorite instead.
Settings
2 Select an item (①) you want to display in the selected menu, then touch [×] to set (②).

3 Repeat steps 1 and 2 to replace the other menus.
Remote Controller
Remote controller RM-RK258 is supplied for KW-V350BT Region 4.
- For KW-V250BT/KW-V25BT/KW-V350BT Region 1: To use the remote controller, purchase optional remote controller, RM-RK258. Refer to the instruction manual supplied with the remote controller.
- For KW-V350BT Region 4: The unit is equipped with a steering wheel remote control function. (Page 48)
- See page 55 for connection.
– Operations may differ depending on the type of steering wheel remote control.


* DO NOT expose the remote sensor to bright light (direct sunlight or artificial lighting).
RM-RK258
Preparation
Removing the battery sheet
Pull the battery sheet out from the remote controller to activate the battery.

Changing the battery of the remote controller
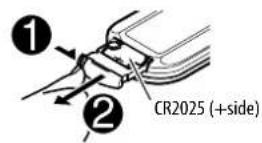
- Use a commercially available button battery (CR2025).
- Insert the battery with the + and - poles aligned properly.
- If the effectiveness of the remote controller decreases, replace the battery.
CALIFORNIA, USA ONLY
This product contains a CR Coin Cell Lithium Battery which contains Perchlorate Material — special handling may apply. See .
WARNINGS
- Do not ingest the battery, as it presents a chemical burn hazard
The remote controller supplied with this product contains a coin/button cell battery.
If the coin/button cell battery is swallowed, it can cause severe internal burns in just 2 hours and can lead to death.
Keep new and used batteries away from children.
If the battery compartment does not close securely, stop using the product and keep it away from children.
If you think batteries might have been swallowed or placed inside any part of the body, seek immediate medical attention.
CAUTION
- Do not leave the battery near fire or under direct sunlight. A fire, explosion or excessive heat generation may result.
- Do not set the remote controller in hot places such as on the dashboard.
- Danger of explosion if Lithium battery is incorrectly replaced. Replace only with the same or equivalent type.
Basic operations
ATT Attenuates/restores the sound.
DISP Displays the current source control screen.

- Selects the band.
- Selects a title/item/folder.

- Tuner:
- Searches for stations automatically. (Press)*1
- Searches for stations manually. (Hold)*1
• SiriusXM Satellite Radio*2 : -Selects a channel. (Press) -Selects a channel rapidly. (Hold) - Selects a track. (Press)
• SiriusXM Satellite Radio*2: - Selects a channel. (Press) - Selects a channel rapidly. (Hold) - Selects a track. (Press)
SRC Selects the source.
• Starts/pauses playback. - Changes the seek mode (AUTO1, AUTO2, MANU).

• Starts/pauses playback. - Changes the seek mode (AUTO1, AUTO2, MANU).

0 - 9 Enters a number. 1 - 5 Enters a preset station number.
0 - 9 Enters a number. 1 - 5 Enters a preset station number.
ASPECT Changes the aspect ratio.
ASPECT Changes the aspect ratio.
• To check the current aspect ratio setting, operate on the touch panel. (Page 12)
ENT Confirms selection.
DIRECT Enters direct search mode.
CLR Erases the misentry.
*1 The search method differs according to the selected seek mode. *2 Only for KW-V250BT/KW-V25BT/KW-V350BT Region 1.
Searching for an item directly
While listening to the Tuner or during disc playback, you can search for a station frequency/chapter/title/folder/file/track directly using the number buttons.
• To search for a track from the VCD menu, perform during PBC playback.
1 Press DIRECT to enter the search mode.
• Each time you press DIRECT, the item to search for changes.
2 Press a number button to select a desired item (station frequency/chapter/title/folder/file/track).
• To erase a misentry, press CLR.
3 Press ENT to confirm.
To exit the search mode: Press DIRECT.
JVC Remote APP
JVC Remote is an application that connects and controls compatible JVC car receivers via Bluetooth® like a wireless remote control.
You can also operate this unit from a Smartphone using JVC Remote APP.
This application can display the source information of this unit on the smartphone's screen, and enables the user to make an audio setting using the graphic user interface of this application.
This application also works as a free standalone music player application, when your Smartphone is not connected to this unit.
- For details, visit .
⚠️ WARNINGS
- DO NOT connect the ignition wire (red) and the battery wire (yellow) to the car chassis (ground), you may cause a short circuit, that in turn may start a fire.
- DO NOT cut out the fuse from the ignition wire (red) and the battery wire (yellow). The power supply must be connected to the wires via the fuse. • Always connect the ignition wire (red) and the battery wire (yellow) to the power source running through the fuse box.
CAUTIONS
• Install this unit in the console of your car. - Do not touch the metal parts of this unit during and shortly after the use of the unit. Metal parts such as the heat sink and enclosure become hot. - When parking at a low ceiling area, turn off the unit to store the antenna. As when the unit is installed in the car with the function of auto antenna; the radio antenna extends automatically when you turn on the unit with the antenna control wire (ANT. CONT) connected. (Page 55)
Before installation
■Precautions on installation and connection
- Mounting and wiring this product requires skills and experience. For best safety, leave the mounting and wiring work to professionals.
- Mount the unit so that the mounting angle is 30° or less.
- Make sure to ground the unit to a negative 12 V DC power supply.
- Do not install the unit in a location exposed to direct sunlight or excessive heat or humidity. Also avoid places with too much dust or the possibility of water splashing.
- Do not use your own screws. Use only the screws provided. If you use the wrong screws, you could damage the unit. • After the unit is installed, check whether the brake lamps, blinkers, wipers, etc. on the car are working properly.
- Do not press hard on the panel surface when installing the unit to the car. Otherwise scratches, damage, or failure may result.
- If the power is not turned on ("Miswiring DC Offset Error", "Warning DC Offset Error" is displayed), the speaker wire may have a short circuit or have touched the chassis of the car and the protection function may have been activated. In this case, the speaker wire should be checked.
- Keep all cables away from heat dissipating metal parts.
Installation and Connection
- If your car's ignition does not have an ACC position, connect the ignition wires to a power source that can be turned on and off with the ignition key. If you connect the ignition wire to a power source with a constant voltage supply, such as with battery wires, the battery may be drained.
- If the fuse blows, first make sure the wires are not touching to cause a short circuit, then replace the old fuse with one with the same rating.
- Insulate unconnected wires with vinyl tape or other similar material. To prevent a short circuit, do not remove the caps and do not let the cable out at the ends of the unconnected wires or the terminals.
- Secure the wires with cable clamps and wrap vinyl tape around the wires that comes into contact with metal parts to protect the wires and to prevent short circuit.
- Connect the speaker wires correctly to the terminals to which they correspond. The unit may be damaged or fail to work if you share the wires or ground them to any metal part in the car.
- When only two speakers are being connected to the system, connect both connectors either to the front output terminals or to the rear output terminals (do not mix front and rear). For example, if you connect the connector of the left speaker to a front output terminal, do not connect the connector to a rear output terminal.
Parts list for installation
Note: This parts list does not include all the package contents.
1 Wiring harness (× 1) 2 Extension wire, 2 m (× 1) 3 Flat head screws, M5 × 8 mm (× 6) 4 Round head screws, M5 x 8 mm (× 6) 5 Microphone, 3 m (× 1)
Only for KW-V350BT Region 4
6 Trim plate (× 1)
7 Steering remote cable (× 1)
Installation procedure
1 Remove the key from the ignition and disconnect the ⊖ battery. 2 Make the proper input and output wire connections for each unit. 3 Connect the speaker wires of the wiring harness. 4 Connect the wires of the wiring harness in the following order: ground, battery, ignition. 5 Connect the wiring harness to the unit. 6 Install the unit in your car. Make sure that the unit is installed securely in place. If the unit is unstable, it may malfunction (e.g., the sound may skip). 7 Reconnect the ⊖ battery. 8 Press the reset button on the monitor panel. (Page 3) 9 Configure . (Page 5)
Installing the unit
Installing the unit using the mounting bracket removed from the car

Note: Select the appropriate screws (supplied) for the mounting bracket.
Installing the trim plate
(Only for KW-V350BT Region 4)
Connecting external components

1 Expansion port for connecting SiriusXM Connect Vehicle Tuner (EXT I/F) (commercially available)*1 ② iDatalink input for connecting an ADS adapter (commercially available)*2 3 Steering wheel remote controller input (REMO-IN)*3
- Connect to the car's steering remote harness using the steering remote cable (7). Contact your JVC dealer for details.
4 Microphone input (MIC) (Page 55) 5 Audio video input (AV-IN)
Connect the following type of 4-pole mini plug:
①③ ① Left audio ② Right audio ③ Ground ④ Composite video
6 Video output (V-OUT)
7 Rear view camera input (R-CAM) 8 Output terminals*4
- Left output (White) • Right output (Red)
REAR: Rear speaker preouts
FRONT: Front speaker preouts
SW: Subwoofer preouts
For 3-way crossover:
REAR: Tweeter preouts
FRONT: Mid range speaker preouts
SW: Woofer preouts
*1 Only for KW-V250BT/KW-V25BT/KW-V350BT Region 1. *2 Only for KW-V350BT Region 1. *3 Only for KW-V350BT Region 4. *4 When connecting an external amplifier, connect its ground wire to the chassis of the car; otherwise the unit may be damaged.
Installation and Connection
Wiring connection![graph TD A["10 A fuse"] --> B["USB input terminal (1 m)*4"] B --> C["Connect the antenna cord to the antenna terminal"] C --> D["To the car's reverse lamp harness when using the optional rear view camera"] D --> E["Extension wire (2)"] E --> F["To the car's parking brake detection switch harness (Fo…](/content/2026/06/1350525/images/253101d0ee2d81ecdd6114f66657b35e7e7b845587331e57264f19bc2664e504.jpg)
References
Maintenance
Cleaning the unit
- Do not use any solvent (for example, thinner, benzine, etc.), detergent, or insecticide. This may damage the monitor or the unit. • Gently wipe the panel with a soft, dry cloth.
Handling discs
- Do not touch the recording surface of the disc.
- Do not stick tape etc. on the disc, or use a disc with tape stuck on it.
- Do not use any accessories for the disc.
- Clean from the center of the disc and move outward.
- Clean the disc with a dry silicone or soft cloth. Do not use any solvents.
- When removing discs from this unit, pull them out horizontally.
- Remove burrs from the center hole and disc edge before inserting a disc.
More information
About playable files
Audio files
- This unit can play back the following files with the following codec and extension code: - For disc: MP3 (.mp3), WMA (.wma), WAV (.wav), AAC (.m4a) - For USB mass storage class device: MP3 (.mp3), WMA (.wma), WAV (.wav), AAC (.aac, .m4a), FLAC (.flac)
- This unit can play back files that meet the conditions below:
- Bit rate:
MP3: 8 kbps - 320 kbps
WMA: For disc: 5 kbps - 320 kbps
For USB: 32 kbps - 192 kbps
AAC: 16 kbps - 320 kbps
- Sampling frequency:
MP3: 16 kHz - 48 kHz
WMA: 8 kHz - 48 kHz
WAV: 44.1 kHz
AAC: 32 kHz - 48 kHz
FLAC: 8 kHz - 96 kHz
- Files recorded in VBR (variable bit rate) may have a
discrepancy in elapsed time indication.
• This unit can show or display the following:
-Tag:
MP3: ID3 Tag (version 1.0/1.1/2.2/2.3/2.4)
WMA Tag
WAV Tag
AAC Tag
FLAC Tag
-Jacket picture:
Picture size: 32 × 32 to 1,232 × 672 resolution
Data size: less than 500 KB
File type: JPEG
- This unit cannot play back the following files: - MP3 files encoded with MP3i and MP3 PRO format.
-MP3 files encoded with Layer 1/2.
-WMA files encoded with lossless, professional, and voice format.
-WMA files which are not based upon Windows
Media® Audio.
-WMA/AAC files copy-protected with DRM.
-AAC files copy-protected with FairPlay (except those stored on an iPod/iPhone).
-Files which have data such as AIFF, ATRAC3, etc.
Video files
- This unit can play back the following files with following codec and extension code: -DivX* (.divx, .div, .avi) regardless of the letter case—upper/lower -MPEG1/MPEG2 (.mpg, .mpeg)
- Streams that conform to: -DivX*: Audio: MP3 or Dolby Audio -MPEG1/MPEG2: Audio: MPEG1 Audio Layer-2 or Dolby Audio Video: MPEG system/program stream
- Other playable conditions: -Video file size: Less than 2 GB -DivX*: Bit rate: 8 Mbps (maximum for average video signals) -MPEG1/MPEG2: File format: MP@ML (Main Profile at Main Level)/SP@ML (Simple Profile at Main Level)/MP@LL (Main Profile at Low Level)
- This unit cannot play back the following files: -DivX files encoded in the interlaced scanning mode. * Only for KW-V350BT Region 4.
References
Picture files
- This unit can play back the following files with following codec and extension code:
- JPEG (.jpg, .jpeg)
- Other playable conditions:
- Resolution: 32 x 32 to 8192 x 7680 (It may take time to display the file depending on its resolution.)
- Baseline JPEG files
- This unit cannot play back the following files:
- Progressive JPEG files
- Lossless JPEG files
About disc playback
Playable disc types
• CD-DA: Audio CD, CD Text • DVD Video: Region code: 1 or 4 (depending on the country and sales area) - Dual Disc: DVD side • VCD: Video CD (PBC compatible) - DVD Recordable/Rewritable (DVD-R/-RW, +R/+RW) - DVD Video: UDF bridge - ISO 9660 level 1, level 2, Romeo, Joliet - Other playable formats: DVD-R recorded in multi-border format (except for dual layer discs) Finalized +R/+RW (Video format only) - CD Recordable/Rewritable (CD-R/-RW): ISO 9660 level 1, level 2, Romeo, Joliet - Other information: While playing a DVD Video, DTS sound cannot be reproduced or emitted from this unit.
- This unit can recognize a total of 5,000 files and 250 folders (a maximum of 999 files per folder) in a recordable/rewritable disc.
- Use only "finalized" recordable/rewritable discs.
- This unit can play back multi-session recordable/rewritable discs; however, unclosed sessions will be skipped while playing.
Unplayable disc types and formats
• DVD-Audio/DVD-ROM discs • SVCD (Super Video CD), CD-ROM, CD-I (CD-I Ready), DTS-CD • MPEG4/DivX*/AAC (.aac)/FLAC/MKV/DVD-VR/DVD+VR/DVD-RAM recorded on DVD-R/RW or +R/+RW • MPEG4/DivX*/AAC (.aac)/FLAC/MKV recorded on CD-R/RW • DVD-RW dual layer discs • +RW double layer discs • Non-DVD side of a "DualDisc" which does not comply with the "Compact Disc Digital Audio" standard • Discs that are not round. • Discs with coloring on the recording surface or discs that are dirty. • Recordable/Rewritable discs that have not been finalized. • 3 inch discs. Attempting to insert these discs using an adapter may cause a malfunction. • Some recordable/rewritable discs or files may not be played back due to their characteristics or recording conditions.
* Only for KW-V250BT/KW-V25BT/KW-V350BT Region 1.
Language codes (for DVD language selection)
| AA Afar GD Scots Gaelic | |||
| AB Abkhazian GL Galician | |||
| AF Afrikaans GN Guarani | |||
| AM Ameharic GU Gujarati | |||
| AR Arabic HA Hausa | |||
| AS Assamese HI Hindi | |||
| AY | Aymara | HR Croatian | |
| AZ Azerbaijani | HU | Hungarian | |
| BA Bashkir | HY | Armenian | |
| BE Byelorussian | IA | Interlingua | |
| BG Bulgarian IE Interlingue | |||
| BH Bihari | IK | Inupiak | |
| BI | Bislama | IN | Indonesian |
| BN Bengali, Bangla | IS | Icelandic | |
| BO Tibetan | IW Hebrew | ||
| BR | Breton | JA | Japanese |
| CA | Catalan | JI | Yiddish |
| CO | Corsican | JW | Javanese |
| CS | Czech | KA Georgian | |
| CY Welsh KK Kazakh | |||
| DZ | Bhutani | KL | Greenlandic |
| EL | Greek | KM Cambodian | |
| EO | Esperanto KN Kannada | ||
| ET | Estonian | KO Korean (KOR) | |
| EU | Basque | KS | Kashmiri |
| FA Persian | KU Kurdish | ||
| FI | Finnish | KY Kirghiz | |
| FJ | Fiji | LA Latin | |
| FO Faroese | LN | Lingala | |
| FY | Frisian | LO Lapthian | |
| GA Irish | LT | Lithuanian | |
References
| LV Latvian, Lettish SM Samoan | |||
| MG Malagasy SN Shona | |||
| MI Maori SO Somali | |||
| MK Macedonian SQ Albanian | |||
| ML Malayalam SR Serbian | |||
| MN Mongolian SS Siswati | |||
| MO Moldavian ST Sesotho | |||
| MR Marathi SU Sundanese | |||
| MS Malay (MAY) SW Swahili | |||
| MT Maltese TA Tamil | |||
| MY Burmese TE Telugu | |||
| NA Nauru TG Tajik | |||
| NE Nepali TH Thai | |||
| NO Norwegian TI Tigrinya | |||
| OC Occitan TK Turkmen | |||
| OM (Afan) Oromo TL Tagalog | |||
| OR Oriya TN Setswana | |||
| PA Panjabi TO Tonga | |||
| PL Polish TR Turkish | |||
| PS Pashto, Pushto TS Tsonga | |||
| QU Quechua TT Tatar | |||
| RM Rhaeto-Romance TW Twi | |||
| RN Kirundi UK Ukrainian | |||
| RO Rumanian UR Urdu | |||
| RW Kinyarwanda UZ Uzbek | |||
| SA Sanskrit VI Vietnamese | |||
| SD Sindhi VO Volapuk | |||
| SG Sangho WO Wolof | |||
| SH Serbo-Croatian XH Xhosa | |||
| SI Singhalese YO Yoruba | |||
| SK Slovak ZU Zulu | |||
| SL Slovenian |
About USB playback
Important
Make sure all important data has been backed up to avoid losing the data.
We bear no responsibility for any loss of data stored in the devices while using this unit.
Playable files on a USB device
- This unit can play the following types of files stored in a USB mass storage class device.
- JPEG/DivX#/MPEG1/MPEG2/MP3/WMA/WAV/AAC (.aac/.m4a)/FLAC
• This unit can recognize:
- A total of 5,000 files
- 250 folders for video files and a maximum of 999 files per folder
- 250 folders for photo files and a maximum of 999 files per folder
- 999 folders for audio files and a maximum of 999 files per folder
- The maximum number of characters (when the characters are 1 byte):
- Folder names: 50 characters
- File names: 50 characters
* Only for KW-V350BT Region 4.
Notes on using a USB device
- Avoid using the USB device if it might affect driving safety.
- When connecting with a USB cable, use a USB 2.0 cable.
- Electrostatic shock at connecting a USB device may cause abnormal playback of the device. In this case, disconnect the USB device then reset this unit and the USB device.
- Do not pull out and connect the USB device repeatedly while "Reading" is shown on the screen. • Operation and power supply may not work as intended for some USB devices.
- Do not leave a USB device in the car, or expose to direct sunlight or high temperatures to prevent deformation or damage to the device.
Unplayable USB device
- This unit may not play back files in a USB device properly when using a USB extension cable.
- USB devices equipped with special functions such as data security functions cannot be used with the unit.
- Do not use a USB device with 2 or more partitions.
- Depending on the shape of the USB devices and connection ports, some USB devices may not be attached properly or the connection might be loose.
- This unit may not recognize a memory card inserted into a USB card reader.
About iPod/iPhone
Important
Make sure all important data has been backed up to avoid losing the data.
We bear no responsibility for any loss of data stored in the devices while using this unit.
References
iPod/iPhone that can be connected
• Via the USB terminal:
Made for
- iPod nano (7th Generation)
- iPod touch (5th and 6th Generation)
- iPhone 4S, 5, 5C, 5S, 6, 6 Plus, 6S, 6S Plus, SE, 7, 7 Plus, 8, 8 Plus, X
- Via Bluetooth:
Made for
- iPod touch (5th and 6th Generation)
- iPhone 4S, 5, 5C, 5S, 6, 6 Plus, 6S, 6S Plus, SE, 7, 7 Plus, 8, 8 Plus, X
Notes on using an iPod/iPhone
- When operating an iPod/iPhone, some operations may not be performed correctly or as intended. In this case, visit the following JVC web site: http://www.jvc.net/cs/car/
- When you turn on this unit, the iPod/iPhone is charged through the unit.
- The text information may not be displayed correctly.
- For some iPod/iPhone models, the performance may be abnormal or unstable during operation. In this case, disconnect the iPod/iPhone device, then check its condition.
If the performance is not improved or slow, reset your iPod/iPhone.
Troubleshooting
What appears to be trouble is not always serious. Check the following points before calling a service center.
- For operations with external components, refer also to the instructions supplied with the adapters used for connection (as well as the instructions supplied with the external components).
General
No sound comes out of the speakers.
→ Adjust the volume to the optimum level. → Check the cords and connections.
No picture is displayed on the screen.
→ Turn on the screen. (Page 4)
The unit does not work at all.
→ Reset the unit. (Page 3)
The remote controller*1 does not work.
→ Replace the battery.
"No Signal"/"No Video Signal" appears.
→ Start playback on the external component connected to the AV-IN input terminal. → Check the cords and connections. → Signal input is too weak.
"Miswiring DC Offset Error"/"Warning DC Offset Error" appears.
→ A speaker cord has shorted or it has come into contact with the car chassis. Wire or insulate the speaker cord as appropriate, then reset the unit.
"Parking off" appears.
→ No playback picture is shown when the parking brake is not engaged.
"Learning Process Failed" appears.*2
→ Your steering remote controller is not compatible, learning may not be completed. Consult your car audio dealer for details.
*1 For KW-V250BT/KW-V25BT/KW-V350BT Region 1: Purchase optional remote controller, RM-RK258.
*2 Only for KW-V350BT Region 4.
Discs
Recordable/Rewritable discs cannot be played back.
→ Insert a finalized disc. → Finalize the discs with the component which you used for recording.
Tracks on the Recordable/Rewritable discs cannot be skipped.
→ Insert a finalized disc. → Finalize the discs with the component which you used for recording.
Playback does not start.
→ The format of files is not supported by the unit.
No picture appears on the external monitor.
→ Connect the video cord correctly. → Select the correct input on the external monitor.
Troubleshooting
DivX*/MPEG1/MPEG2/MP3/WMA/WAV/AAC discs cannot be played back.
→ Record the tracks using a compatible application on the appropriate discs. (Page 57) → Add appropriate extension codes to the file names.
* Only for KW-V350BT Region 4.
Tracks on the recordable/rewritable discs are not played back as you have intended them to play.
→ Playback order may differ from the one played back using other players.
"Region Code Error" appears.
→ You have inserted a DVD Video disc of an incorrect region code. Insert a correct region code disc.
USB
"Reading" does not disappear from the screen.
→ Turn the power off and on again.
While playing a track, sound is sometimes interrupted.
→ The tracks are not properly copied into the USB device. Copy the tracks again, and try again.
Tracks are not played back as you have intended them to play.
→ Playback order may differ from the one played back using other players.
The source does not change to "USB" when you connect a USB device while listening to another source or "USB Device Error" appears when you connect a USB device.
→ The USB port is drawing more power than the design limit. → Turn the power off and unplug the USB device. Then, turn on the power and reattach the USB device. → If the above does not solve the problem, turn the power off and on (or reset the unit) before replacing with another USB device.
Android
Sound cannot be heard during playback.
→ Reconnect the Android device. → Launch any media player application on the Android device and start playback.
Sound output only from the Android device.
→ Use another media player application. → Restart the Android device. → If this does not solve the problem, the connected Android device is unable to route the audio signal to unit. → If USB connection does not work, connect the Android device via Bluetooth or through the AV-IN jack on the rear panel.
"NO DEVICE" or "READING" keeps flashing.
→ Reconnect the Android device. → If USB connection does not work, connect the Android device via Bluetooth or through the AV-IN jack on the rear panel.
iPod/iPhone
No sound comes out of the speakers.
Disconnect the iPod/iPhone, then connect it again. Select another source, then reselect "iPod".
The iPod/iPhone does not turn on or does not work.
Check the connection. Update the firmware version. Charge the battery. Reset the iPod/iPhone.
Sound is distorted.
Deactivate the equalizer either on this unit or the iPod/iPhone.
A lot of noise is generated.
Turn off (uncheck) "VoiceOver" on the iPod/iPhone. For details, visit http://www.apple.com.
No operations are available when playing back a track containing artwork.
Operate the unit after the artwork has loaded.
"Authorization Error" appears.
Check whether the connected iPod/iPhone is compatible with this unit. (Page 59)
Tuner
SSM automatic presetting does not work.
Store stations manually. (Page 18)
Static noise while listening to the radio.
→ Connect the antenna firmly.
Troubleshooting
AV-IN
No picture appears on the screen.
→ Turn on the video component if it is not on. → Connect the video component correctly.
Pandora*/iHeartRadio*/Spotify
The application does not work.
→ The application on your iPod touch/iPhone/Android is not the latest version. Update the application.
"Please update Pandora App" appears.
→ The Pandora application on your iPod touch/iPhone/Android is not the latest version. Update the application.
"Please check device." appears.
→ The Pandora application on your iPod touch/iPhone/Android has not started up. → The Pandora application is not installed on the connected device. → An error has occurred on the Pandora application.
"Login Error" appears. → You have not been signed into Pandora. "No skips remaining" appears. → No more songs can be skipped. "Failed to save your thumb rating" appears. → Thumb-up/down is prohibited. "No Station" appears. → No station is available.
"No Active Station" appears. → No station is being played. "Station limit reached" appears. → The station list is full and no more stations can be registered. "Failed to save your bookmark" appears. → The unit has failed to save a bookmark. Try the operation again. "Limited Connectivity" appears. → The connection with the Pandora application cannot be established. "Pandora not available" appears. → You cannot use the Pandora application from the area where you are currently trying to access Pandora. "Try again later" appears. → The Pandora server is under maintenance. "Station does not exist" appears. → The selected station has been deleted by another device or has expired. "Cannot create a Station" appears. → You cannot create a station during the read-only mode or when network connection is not established. * Only for KW-V250BT/KW-V25BT/KW-V350BT Region 1.
SiriusXM Satellite Radio*
"SXM No Signal" appears.
→ Make sure the SiriusXM Satellite Radio antenna is mounted outside the car. Move the car to an area with a clear view of the sky.
"SXM Check Antenna" appears.
→ Check the SiriusXM Satellite Radio antenna connection, and make sure the antenna is firmly attached to the tuner. → Check whether the SiriusXM Satellite Radio antenna cable is bent or broken. If it is damaged, replace the whole antenna unit.
"SXM Check Tuner" appears.
→ Make sure the SiriusXM Connect Vehicle Tuner is connected to the unit.
"SXM Chan Unavailable" appears.
(Appears on the screen for about 5 seconds, then returns to the previous channel):
→ The selected channel is no longer available. Select another channel or continue listening to the previous channel.
"SXM Ch Unsubscribed" appears.
(Appears on the screen for about 5 seconds, then returns to the previous channel)
→ The selected channel is not part of your current subscription plan. Call 1-866-635-2349 to subscribe.
"SXM Subscription Updated – Press Return to Continue" appears.
→ Your subscription has been updated. Press the appropriate button to continue.
Troubleshooting
"SXM Channel Locked" appears.
→ The selected channel has been locked by the parental controls. Enter the unlock code when prompted.
"SXM Incorrect Lock Code" appears.
→ The selected channel is a mature or parental lock channel, and is locked by the parental lock or user lock code. Enter the correct lock code.
* Only for KW-V250BT/KW-V25BT/KW-V350BT Region 1.
Bluetooth
Phone sound quality is poor.
→ Reduce the distance between the unit and the Bluetooth mobile phone. → Move the car to a place where you can get a better signal reception.
The sound is interrupted or skipped while using a Bluetooth audio player.
→ Reduce the distance between the unit and the Bluetooth audio player. Disconnect the device connected for Bluetooth phone. → Turn off, then turn on the unit. (If the sound is not yet restored) connect the player again.
The connected audio player cannot be controlled.
→ Check whether the connected audio player supports AVRCP (Audio/Video Remote Control Profile).
The Bluetooth device does not detect the unit.
→ Search from the Bluetooth device again.
The unit does not pair with the Bluetooth device.
→ For devices compatible with Bluetooth 2.1: Register the device using a PIN code. (Page 35) → For devices compatible with Bluetooth 2.0: Enter the same PIN code for both the unit and target device. If the PIN code of the device is not indicated in its instructions, try "0000" or "1234." → Turn off, then turn on the Bluetooth device.
Echo or noise occurs.
→ Adjust the microphone unit position. → Adjust the echo volume or noise reduction volume. (Page 36)
The unit does not respond when you try to copy the phone book to the unit.
→ You may have tried to copy the same entries (as stored) to the unit.
"Connection Error" appears.
→ The device is registered but the connection has failed. Connect the registered device. (Page 35)
"Please Wait..." appears.
→ The unit is preparing to use the Bluetooth function. If the message does not disappear, turn off and turn on the unit, then connect the device again (or reset the unit).
"No Voice Device" appears.
→ The connected mobile phone does not have a voice recognition system.
"No Data" appears.
→ No phone book data is contained in the connected Bluetooth phone.
"Initialize Error" appears.
→ The unit has failed to initialize the Bluetooth module. Try the operation again.
"Dial Error" appears.
→ Dialing has failed. Try the operation again.
"Hung Up Error" appears.
→ The call has not ended yet. Park your car, and use the connected mobile phone to end the call.
"Pick Up Error" appears.
→ The unit has failed to receive a call.
The Bluetooth connection between the Bluetooth device and the unit is unstable.
→ Delete the unused registered Bluetooth device from the unit. (Page 36)
Specifications
Monitor section
| Picture Size (W × H) 6.2 inches (diagonal) wide |
| 137.5 mm × 77.2 mm |
| (5-7/16" × 3-1/16") |
Display System Transparent TN LCD panel
Drive System TFT active matrix system
Number of Pixels 1 152 000
(800H × 480V × RGB)
Effective Pixels 99.99%
Pixel Arrangement RGB striped arrangement
Back Lighting LED
USB interface section
| USB Standard USB 2.0 Full Speed/High Speed |
Compatible Device Mass Storage Class
File System FAT 16/32
| Maximum Power Supply Current | DC 5 V = 1.5 A |
D/A Converter 24 bit
| Audio Decoder MP3/WMA/AAC (.aac/.m4a)/WAV/FLAC |
Video Decoder DivX*/MPEG1/MPEG2/JPEG
| Frequency Response | 96 kHz Sampling:20 Hz to 20 000 Hz48 kHz Sampling:20 Hz to 20 000 Hz44.1 kHz Sampling:20 Hz to 20 000 Hz |
| Total Harmonic Distortion | 0.01% (1 kHz) |
| Signal to Noise Ratio | 90 dB |
| Dynamic Range | 90 dB |
* Only for KW-V350BT Region 4.
DVD player section
| D/A Converter 24 bit | |
| Audio Decoder Linear PCM/Dolby Audio/MP3/WMA/WAV/AAC (.m4a) | |
| Video Decoder DivX*/MPEG1/MPEG2/JPEG | |
| Wow & Flutter | Below Measurable Limit |
| Frequency Response | 96 kHz Sampling:20 Hz to 22 000 Hz48 kHz Sampling:20 Hz to 22 000 Hz44.1 kHz Sampling:20 Hz to 20 000 Hz |
| Total Harmonic Distortion | 0.010% (1 kHz) |
| Signal to Noise Ratio | 90 dB |
| Dynamic Range | 90 dB |
| Disc Format | DVD-Video/VIDEO-CD/CD-DADVD-R/DVD-RW/DVD+R/+RW/CD-R/-RW |
| Sampling Frequency | 44.1 kHz/48 kHz/96 kHz |
| Quantifying Bit Number | 16 bit/20 bit/24 bit |
* Only for KW-V350BT Region 4.
Bluetooth section
| Technology | Bluetooth V3.0 |
| Frequency | 2.402 GHz to 2.480 GHz |
| RF Output Power (E.I.R.P.) | +4 dBm (MAX), Power Class 2 |
| Maximum Communication Range | Line of sight approx. 10 m (32.8 ft) |
| Audio Codec SBC/AAC | |
| Multi Profile Support | Multi Profile |
| Profile | HFP (Hands Free Profile) 1.6A2DP (Advanced Audio Distribution Profile) 1.3AVRCP (Audio/Video Remote Control Profile) 1.5GAP (Generic Access Profile)PBAP (PhoneBook Access Profile) 1.2SDP (Service Discovery Profile)SPP (Serial Port Profile) 1.2 |
Specifications
DSP section
| Equalizer 13 Band |
| Band Frequency (Hz) (BAND1 - 13): |
| 62.5/100/160/250/400/630/1k/1.6k/2.5k/4k/6.3k/10k/16k |
| Level: |
| -09 to +09 (-9 dB to +9 dB) |
| Q: 1.35/1.5/2.0 |
| HPF (High Pass Filter) Frequency (Hz): |
| Through/30/40/50/60/70/80/90/100/120/150/180/220/250 |
| Slope (dB/Oct.): |
| -6/-12/-18/-24 |
| Gain (dB): |
| -8/-7/-6/-5/-4/-3/-2/-1/0 |
| LPF (Low Pass Filter) Frequency (Hz): |
| 30/40/50/60/70/80/90/100/120/150/180/220/250/ |
| Through |
| Slope (dB/Oct.): |
| -6/-12/-18/-24 |
| Gain (dB): |
| -8/-7/-6/-5/-4/-3/-2/-1/0 |
FM tuner section
| Frequency Range KW-V250BT/KW-V25BT/ KW-V350BT Region 1: 87.9 MHz to 107.9 MHz (200 kHz) KW-V350BT Region 4: 87.5 MHz to 108.0 MHz (50 kHz) | |
| Usable Sensitivity (S/N: 30 dB, Dev 22.5 kHz) | 7.2 dBf (0.63 μV/75 Ω) |
| Quieting Sensitivity (S/N: 46 dB, Dev 22.5 kHz) | 15.2 dBf (1.58 μV/75 Ω) |
| Frequency Response (±3.0 dB) | 30 Hz to 15 kHz |
| Signal to Noise Ratio 68 dB (MONO) | |
| Selectivity (±400 kHz) > 80 dB | |
| Stereo Separation | 40 dB (1 kHz) |
AM tuner section
| Frequency Range 530 kHz to 1 700 kHz (10 kHz) | |
| Usable Sensitivity | 29 dBμ |
| Video section | |
| Color System of External Video Input | NTSC/PAL |
| External Video Input Level (RCA jack)/(mini jack) | 1 Vp-p//5 Ω |
| External Audio Input Level (mini jack) | 1 Vp-p/75 Ω |
| Video Output Level (RCA jack) | 1 Vp-p/75 Ω |
Audio section
| Maximum Power(Front & Rear) | 50 W × 4 |
| Full BandwidthPower (Front & Rear) | 22 W × 4 (at less than 1%THD) |
| Preout Level KW-V250BT/KW-V25BT: | |
| 2.5 V/10 kΩ | |
| KW-V350BT Region 1/ | |
| KW-V350BT Region 4: | |
| 4 V/10 kΩ | |
Precut Impedance ≤ 600 Ω
Speaker Impedance 4 Ω to 8 Ω
General
| Operating Voltage 12 V DC car battery | |
| Installation Dimensions(W × H × D) | 178 mm × 100 mm × 162 mm(7-1/16" × 3-15/16" × 6-7/16") |
| Weight (Main Unit) KW-V250BT/KW-V25BT/KW-V350BT Region 1:1.7 kg (3.8 lbs)KW-V350BT Region 4:1.8 kg (4.0 lbs)(including trim plate) | |
Design and specifications are subject to change without notice.
Trademarks and licenses
- Dolby, Dolby Audio and the double-D symbol are trademarks of Dolby Laboratories.
- "DVD Logo" is a trademark of DVD Format/Logo Licensing Corporation registered in the US, Japan and other countries. • The "AAC" logo is a trademark of Dolby Laboratories.
- Microsoft and Windows Media are either registered trademarks or trademarks of Microsoft Corporation in the United States and/or other countries.
- Use of the Made for Apple badge means that an accessory has been designed to connect specifically to the Apple product(s) identified in the badge and has been certified by the developer to meet Apple performance standards. Apple is not responsible for the operation of this device or its compliance with safety and regulatory standards. Please note that the use of this accessory with an Apple product may affect wireless performance.
- Apple, iPhone, iPod, iPod nano, iPod touch, iTunes, and Lightning are trademarks of Apple Inc., registered in the U.S. and other countries.
- IOS is a trademark or registered trademark of Cisco in the U.S. and other countries and is used under license.
- This item incorporates copy protection technology that is protected by U.S. patents and other intellectual property rights of Rovi Corporation. Reverse engineering and disassembly are prohibited. • Font for this product is designed by Ricoh. • Android is a trademark of Google LLC.
- The Bluetooth® word mark and logos are registered trademarks owned by the Bluetooth SIG, Inc. and any use of such marks by JVC KENWOOD Corporation is under license. Other trademarks and trade names are those of their respective owners.
- THIS PRODUCT IS LICENSED UNDER THE AVC PATENT PORTFOLIO LICENSE FOR THE PERSONAL USE OF A CONSUMER OR OTHER USES IN WHICH IT DOES NOT RECEIVE REMUNERATION TO (i) ENCODE VIDEO IN COMPLIANCE WITH THE AVC STANDARD ("AVC VIDEO") AND/OR (ii) DECODE AVC VIDEO THAT WAS ENCODED BY A CONSUMER ENGAGED IN A PERSONAL ACTIVITY AND/OR WAS OBTAINED FROM A VIDEO PROVIDER LICENSED TO PROVIDE AVC VIDEO. NO LICENSE IS GRANTED OR SHALL BE IMPLIED FOR ANY OTHER USE. ADDITIONAL INFORMATION MAY BE OBTAINED FROM MPEG LA, L.L.C. SEE HTTP://WWW.MPEGLA.COM
- Sirius, XM and all related marks and logos are trademarks of Sirius XM Radio Inc. All rights reserved.
- Pandora, the Pandora logo, and the Pandora trade dress are trademarks or registered trademarks of Pandora Media, Inc., used with permission.
- SPOTIFY and the Spotify logo are among the registered trademarks of Spotify AB.
- iHeartRadio® and iHeartAuto™ are trademarks owned by iHeartMedia, Inc. All uses are authorized under license.
- libFLAC
Copyright (C) 2000-2009 Josh Coalson Copyright (C) 2011-2013 Xiph.Org Foundation Redistribution and use in source and binary forms, with or without modification, are permitted provided that the following conditions are met:
- Redistributions of source code must retain the above copyright notice, this list of conditions and the following disclaimer.
- Redistributions in binary form must reproduce the above copyright notice, this list of conditions and the following disclaimer in the documentation
and/or other materials provided with the distribution. - Neither the name of the Xiph.org Foundation nor the names of its contributors may be used to endorse or promote products derived from this software without specific prior written permission. THIS SOFTWARE IS PROVIDED BY THE COPYRIGHT HOLDERS AND CONTRIBUTORS "AS IS" AND ANY EXPRESS OR IMPLIED WARRANTIES, INCLUDING, BUT NOT LIMITED TO, THE IMPLIED WARRANTIES OF MERCHANTABILITY AND FITNESS FOR A PARTICULAR PURPOSE ARE DISCLAIMED. IN NO EVENT SHALL THE FOUNDATION OR CONTRIBUTORS BE LIABLE FOR ANY DIRECT, INDIRECT, INCIDENTAL, SPECIAL, EXEMPLARY, OR CONSEQUENTIAL DAMAGES (INCLUDING, BUT NOT LIMITED TO, PROCUREMENT OF SUBSTITUTE GOODS OR SERVICES; LOSS OF USE, DATA, OR PROFITS; OR BUSINESS INTERRUPTION) HOWEVER CAUSED AND ON ANY THEORY OF LIABILITY, WHETHER IN CONTRACT, STRICT LIABILITY, OR TORT (INCLUDING NEGLIGENCE OR OTHERWISE) ARISING IN ANY WAY OUT OF THE USE OF THIS SOFTWARE, EVEN IF ADVISED OF THE POSSIBILITY OF SUCH DAMAGE.
• DIVX
- This DivX Certified® device can play DivX® Home Theater video files up to 576p (including .avi, .divx). Download free software at www.divx.com to create, play and cast digital videos.
- DivX®, DivX Certified® and associated logos are trademarks of DivX, LLC and are used under license.
For updated information (the latest Instruction Manual, system updates, new functions, etc.), please visit the following website:
http://www.jvc.net/cs/car/
pandora®
iHeartRADIO
Spotify®
DIVX


((Siriusxm)) READY

Made for
iPhone | iPod
DOLBY AUDIO™
Bluetooth®


- IMPORTANT NOTICE
- WARNINGS
- TO PREVENT ACCIDENTS AND DAMAGES
- CAUTIONS
- TO CARE FOR THE UNIT
- TO CARE FOR THE MONITOR
- ON THE VOLUME SETTING
- THE MARKING OF PRODUCTS USING LASERS
- CAUTION
- FOR KW-V250BT/KW-V25BT/KW-V350BT REGION 1: IC (INDUSTRY CANADA) NOTICE
- FOR KW-V250BT/KW-V25BT/KW-V350BT REGION 1: FCC WARNING
- FCC NOTE
- SUPPLIER'S DECLARATION OF CONFORMITY
- ABOUT THIS MANUAL
- CONTENTS
- COMPONENT NAMES AND OPERATIONS BASIC OPERATIONS
- HOW TO RESET YOUR UNIT
- TURNING ON THE POWER
- BASIC OPERATIONS
- TURNING OFF THE POWER
- TURNING OFF THE AV SOURCE
- TURNING OFF THE SCREEN AND BUTTON ILLUMINATION
- ADJUSTING THE VOLUME
- ATTENUATING THE SOUND (ONLY FOR KW-V350BT)
- GETTING STARTED
- INITIAL SETTINGS
- (LANGUAGE
- (PAGE 46)
- (PAGE 43)
- UNDER 0° (INITIAL)/5°/10°/15°/20°
- CLOCK SETTINGS
- DISPLAY THE HOME SCREEN
- DISPLAY THE SCREEN
- VARIOUS SCREENS AND OPERATIONS
- HOME SCREEN
- AVAILABLE PLAYBACK SOURCES AND OPTIONS
- TO RETURN TO THE HOME SCREEN
- CUSTOMIZING THE HOME SCREEN
- SELECT AN ITEM TO REPLACE
- SELECT AN ITEM (①) YOU WANT TO DISPLAY IN THE SELECTED POSITION, THEN TOUCH [→] (②)
- SOURCE CONTROL SCREEN
- COMMON OPERATION KEYS ON SOURCE CONTROL SCREEN
- USING GESTURE CONTROL
- USING THE POP-UP SHORT-CUT MENU
- DISPLAY THE POP-UP SHORT-CUT MENU
- SELECT AN ITEM TO JUMP TO BY TOUCHING AS FOLLOWS
- TO CLOSE THE POP-UP MENU
- USING TOUCH SCREEN OPERATION DURING PLAYBACK
- LIST/SETTING SCREEN
- DISC
- EJECTING A DISC
- PLAYBACK OPERATIONS
- AUDIO PLAYBACK INFORMATION AND KEY OPERATION
- SELECTING A FOLDER/TRACK ON THE LIST
- SETTINGS FOR DISC PLAYBACK
- MAKE THE SETTINGS
- X
- (INITIAL) 4:3 LB 4:3 PS
- VIDEO
- VIDEO PLAYBACK INFORMATION ON THE SOURCE CONTROL SCREEN
- VIDEO MENU CONTROL OPERATIONS
- USB
- CONNECTING A USB DEVICE
- PLAYBACK INFORMATION AND KEY OPERATION
- SELECTING THE FILE TYPE TO PLAY
- DISPLAY THE FOLDER/TRACK LIST
- SELECT THE FOLDER (①), THEN THE ITEM (②) IN THE SELECTED FOLDER
- SELECTING A FOLDER/TRACK USING ALPHABET SEARCH
- SELECT THE LIST (FOLDER OR TRACK) TO SEARCH
- ENTER THE ALPHABET TO SEARCH
- SETTINGS FOR USB PLAYBACK
- ANDROID
- IPOD/IPHONE
- CONNECTING AN ANDROID DEVICE
- CONNECTING AN IPOD/IPHONE
- WIRED CONNECTION
- BLUETOOTH CONNECTION
- SELECTING THE PLAYBACK DEVICE VIA THE CONNECTION METHOD
- SELECTING AN AUDIO FILE FROM THE MENU
- DISPLAY THE AUDIO MENU
- SELECT A CATEGORY (①), THEN SELECT A DESIRED ITEM (②)
- SETTINGS FOR IPOD/IPHONE PLAYBACK
- TUNER
- LISTENING TO THE RADIO
- PLAYBACK INFORMATION ON THE SOURCE CONTROL SCREEN
- OPERATION KEYS ON SOURCE CONTROL SCREEN
- PRESETTING STATIONS IN THE MEMORY
- AUTOMATIC PRESETTING — SSM (STRONG-STATION SEQUENTIAL MEMORY) (FOR FM ONLY)
- MANUAL PRESETTING
- SELECTING A PRESET STATION
- SIRIUSXM® SATELLITE RADIO
- PREPARATION
- CONNECTING THE SIRIUSXM CONNECT VEHICLE TUNER
- ACTIVATING SUBSCRIPTION
- CHECK YOUR RADIO ID
- ACTIVATE THE SUBSCRIPTION
- CONFIRM THE ACTIVATION
- LISTENING TO THE SIRIUSXM® SATELLITE RADIO
- [P1] - [P5]
- SELECTING A CHANNEL ON THE LIST
- SELECT A CATEGORY (①), AND THEN SELECT A CHANNEL (②)
- PRESETTING CHANNELS IN THE MEMORY
- TUNE IN TO A CHANNEL YOU WANT TO PRESET
- SELECT A PRESET NUMBER TO STORE INTO
- SELECTING A PRESET CHANNEL
- SELECT THE BAND, THEN DISPLAY THE PRESET CHANNEL WINDOW
- SELECT A PRESET CHANNEL
- SELECT "SEEK2" AS THE SEEK MODE TO JUMP TO THE SELECTED PRESET CHANNEL
- REPLAYING CONTENT
- DISPLAY THE OPERATION KEYS FOR REPLAY
- PERFORM THE REPLAY OPERATIONS
- [▶/■] STARTS/PAUSES PLAYBACK
- [◀◀]/[▶▶] SKIPS THE CURRENT TRACK/SEGMENT
- SIRIUSXM SATELLITE RADIO FEATURES
- SMARTFAVORITES
- TUNESTART™
- ACTIVATE TUNESTART™
- TUNESCAN™
- CONTENT ALERT
- REGISTERING ITEMS FOR CONTENTS ALERT
- FOR ARTISTS/SONGS
- FOR TEAMS
- SELECTING ITEMS FOR CONTENT ALERT
- FOR ARTISTS/SONGS/TEAMS
- FOR TRAFFIC AND WEATHER INFORMATION
- ACTIVATING CONTENT ALERT
- SWITCHING TO REGISTERED CONTENT
- SETTING RECEPTION RESTRICTIONS
- SETTING OR CHANGING THE PARENTAL CODE
- ENTER THE INITIAL FOUR-DIGIT CODE (0000) (①), AND THEN TOUCH [ENTER] (②) TO CONFIRM
- ENTER A NEW FOUR-DIGIT CODE, THEN TOUCH [ENTER] TO CONFIRM
- REPEAT STEP 3 ABOVE TO CONFIRM THE NEW CODE
- ACTIVATING PARENTAL CONTROL
- SELECT THE DESIRED MODE FOR
- ENTER THE PARENTAL CODE TO CONFIRM YOUR SELECTION
- PARENTAL LOCK CHANNEL SELECTION
- ENTER THE PARENTAL CODE
- RESETTING THE SIRIUSXM SATELLITE RADIO SETTINGS
- PANDORA®
- CONNECTING THE DEVICE
- FOR ANDROID DEVICES
- FOR IPHONE/IPOD TOUCH
- SELECTING THE DEVICE
- SELECTING A STATION FROM THE LIST
- DISPLAY THE LIST SELECTION SCREEN
- SELECT THE LIST TYPE
- SELECT A STATION FROM THE LIST
- IHEARTRADIO
- INSTALLING THE APPLICATION
- PLAYBACK INFORMATION AND KEYS OPERATION KW-V250BT/KW-V25BT
- SELECTING THE VARIETY LEVEL FOR YOUR CUSTOM STATION
- DISPLAY THE VARIETY LEVEL SELECTION SCREEN
- SELECT THE VARIETY TYPE
- SEARCHING FOR A STATION
- SELECT A STATION
- EDITING THE LIST
- SELECT STATIONS (①), THEN DELETE THE SELECTED STATIONS (②)
- SPOTIFY
- CREATING YOUR STATION (START RADIO)
- CREATE YOUR STATION
- OTHER EXTERNAL COMPONENTS
- SELECTING A TRACK
- DISPLAY THE SPOTIFY MENU SCREEN
- SELECT THE LIST TYPE, THEN SELECT A DESIRED ITEM
- AV-IN
- CONNECTING AN EXTERNAL COMPONENT
- STARTING PLAYBACK
- CHANGING THE AV-IN NAME
- SELECT AN AV-IN NAME
- REAR VIEW CAMERA
- CONNECTING A REAR VIEW CAMERA
- USING THE REAR VIEW CAMERA
- TO DISPLAY THE REAR VIEW CAMERA SCREEN
- OPERATIONS WHILE THE CAMERA SCREEN IS DISPLAYED
- TO ADJUST THE PICTURE
- TO DISPLAY PARKING GUIDE LINE
- TO EXIT THE CAMERA SCREEN
- USING AN EXTERNAL COMPONENT VIA ADS ADAPTER—MAESTRO
- CONNECTING AN ADS ADAPTER
- USING AN EXTERNAL COMPONENT VIA AN ADS ADAPTER
- SELECT "MAESTRO" AS THE SOURCE
- BLUETOOTH®
- INFORMATION
- NOTE
- CONNECTION
- REGISTERING A NEW BLUETOOTH DEVICE
- AUTO PAIRING
- PAIRING A BLUETOOTH DEVICE USING SSP (FOR BLUETOOTH 2.1)
- SEARCH FOR THE UNIT ("JVC KW-V") FROM YOUR BLUETOOTH DEVICE
- CONFIRM THE REQUEST BOTH ON THE DEVICE AND THE UNIT
- BLUETOOTH MOBILE PHONE
- DURING A CALL
- MAKING A CALL
- DISPLAY THE PHONE CONTROL SCREEN
- SELECT A METHOD TO MAKE A CALL
- TO USE ALPHABET SEARCH IN THE PHONE BOOK
- PHONE BOOK SEARCH RESULTS
- TO DISPLAY OTHER PHONE NUMBERS IN THE SAME CONTACT
- SAY THE NAME OF THE PERSON YOU WANT TO CALL
- SWITCHING BETWEEN TWO CONNECTED DEVICES
- PRESETTING PHONE NUMBERS
- BLUETOOTH AUDIO PLAYER
- JVC STREAMING DJ
- BLUETOOTH SETTINGS
- OFF: CANCELS
- SETTINGS
- AUDIO SETTINGS
- SELECTING A PRESET SOUND MODE
- STORE YOUR OWN SOUND ADJUSTMENTS
- SELECT A PRESET SOUND MODE
- SELECT A BAND (①) AND ADJUST THE LEVEL (②), THEN ADJUST THE SOUND (③)
- REPEAT STEP 2 TO ADJUST THE LEVEL OF OTHER BANDS
- OFF (INITIAL)/LOW/MIDDLE/HIGH
- TURN OFF THE AV SOURCE
- SELECT THE CROSSOVER NETWORK MODE
- SETTING THE SPEAKERS AND CROSSOVER FREQUENCY
- ADJUST THE CROSSOVER FREQUENCY OF THE SELECTED SPEAKER
- DETERMINING THE VALUE FOR ADJUSTMENT
- DISPLAY SETTINGS
- STORING YOUR OWN SCENE FOR THE BACKGROUND IMAGE
- ADJUST THE IMAGE (①), THEN CAPTURE THE IMAGE (②)
- SELECT AN ITEM TO REPLACE (①), THEN SELECT AN ITEM (②) YOU WANT TO DISPLAY IN THE SELECTED POSITION
- INPUT SETTINGS
- SYSTEM SETTINGS
- REPEAT STEPS 2 AND 3 TO REGISTER OTHER BUTTONS
- TOUCH [DONE] TO FINISH THE PROCEDURE
- TO INITIALIZE THE SETTING: TOUCH [INITIALIZE] FOR
- KEY SETTINGS
- SELECT THE MENU TO CUSTOMIZE
- REMOTE CONTROLLER
- REMOVING THE BATTERY SHEET
- CHANGING THE BATTERY OF THE REMOTE CONTROLLER
- CALIFORNIA, USA ONLY
- DO NOT INGEST THE BATTERY, AS IT PRESENTS A CHEMICAL BURN HAZARD
- SEARCHING FOR AN ITEM DIRECTLY
- JVC REMOTE APP
- ⚠️ WARNINGS
- BEFORE INSTALLATION
- PRECAUTIONS ON INSTALLATION AND CONNECTION
- INSTALLATION AND CONNECTION
- PARTS LIST FOR INSTALLATION
- INSTALLATION PROCEDURE
- INSTALLING THE UNIT
- INSTALLING THE UNIT USING THE MOUNTING BRACKET REMOVED FROM THE CAR
- INSTALLING THE TRIM PLATE
- CONNECTING EXTERNAL COMPONENTS
- FOR 3-WAY CROSSOVER
- REFERENCES
- MAINTENANCE
- CLEANING THE UNIT
- HANDLING DISCS
- MORE INFORMATION
- ABOUT PLAYABLE FILES
- AUDIO FILES
- VIDEO FILES
- PICTURE FILES
- ABOUT DISC PLAYBACK
- PLAYABLE DISC TYPES
- UNPLAYABLE DISC TYPES AND FORMATS
- ABOUT USB PLAYBACK
- IMPORTANT
- PLAYABLE FILES ON A USB DEVICE
- NOTES ON USING A USB DEVICE
- UNPLAYABLE USB DEVICE
- ABOUT IPOD/IPHONE
- IPOD/IPHONE THAT CAN BE CONNECTED
- NOTES ON USING AN IPOD/IPHONE
- TROUBLESHOOTING
- GENERAL
- NO SOUND COMES OUT OF THE SPEAKERS
- NO PICTURE IS DISPLAYED ON THE SCREEN
- THE UNIT DOES NOT WORK AT ALL
- THE REMOTE CONTROLLER*1 DOES NOT WORK
- NO SIGNAL"/"NO VIDEO SIGNAL" APPEARS
- MISWIRING DC OFFSET ERROR"/"WARNING DC OFFSET ERROR" APPEARS
- PARKING OFF" APPEARS
- LEARNING PROCESS FAILED" APPEARS
- DISCS
- RECORDABLE/REWRITABLE DISCS CANNOT BE PLAYED BACK
- TRACKS ON THE RECORDABLE/REWRITABLE DISCS CANNOT BE SKIPPED
- PLAYBACK DOES NOT START
- NO PICTURE APPEARS ON THE EXTERNAL MONITOR
- PANDORA*/IHEARTRADIO*/SPOTIFY
- SIRIUSXM SATELLITE RADIO
- SXM CHANNEL LOCKED" APPEARS
- SXM INCORRECT LOCK CODE" APPEARS
- BLUETOOTH
- PHONE SOUND QUALITY IS POOR
- THE SOUND IS INTERRUPTED OR SKIPPED WHILE USING A BLUETOOTH AUDIO PLAYER
- THE CONNECTED AUDIO PLAYER CANNOT BE CONTROLLED
- THE BLUETOOTH DEVICE DOES NOT DETECT THE UNIT
- THE UNIT DOES NOT PAIR WITH THE BLUETOOTH DEVICE
- ECHO OR NOISE OCCURS
- THE UNIT DOES NOT RESPOND WHEN YOU TRY TO COPY THE PHONE BOOK TO THE UNIT
- CONNECTION ERROR" APPEARS
- PLEASE WAIT..." APPEARS
- NO VOICE DEVICE" APPEARS
- NO DATA" APPEARS
- INITIALIZE ERROR" APPEARS
- DIAL ERROR" APPEARS
- HUNG UP ERROR" APPEARS
- PICK UP ERROR" APPEARS
- THE BLUETOOTH CONNECTION BETWEEN THE BLUETOOTH DEVICE AND THE UNIT IS UNSTABLE
- SPECIFICATIONS
- TRADEMARKS AND LICENSES
- DIVX
Brand : JVC
Model : KW-V350BT
Category : DVD player