
HR-XVC33U - DVD player JVC - Free user manual and instructions
Find the device manual for free HR-XVC33U JVC in PDF.


| Product Type | DVD Player / VCR Combo |
| Brand | JVC |
| Model | HR-XVC33U |
| Dimensions (W x H x D) | 17.1 x 3.5 x 10.6 inches (435 x 88 x 270 mm) |
| Weight | 6.6 lbs (3.0 kg) |
| Power Supply | AC 120V, 60 Hz |
| Power Consumption | 17 W (standby: 2 W) |
| Disc Playback Formats | DVD-Video, DVD-R/RW, CD, CD-R/RW, VCD, SVCD |
| VCR Features | Hi-Fi stereo, S-VHS playback, auto head cleaning |
| Video Outputs | Composite, S-Video, Component (Y/Pb/Pr) |
| Audio Outputs | Stereo RCA, Coaxial digital audio |
| Other Connections | RF antenna input/output, front A/V input |
| Remote Control | IR remote with dedicated buttons for DVD and VCR |
| Timer Recording | Yes, VCR timer recording up to 8 events |
| Audio D/A Converter | 24-bit/96 kHz |
| Playback Control | Zoom, slow motion, repeat, A-B repeat |
| Maintenance | Clean lens with dry cloth; do not use solvents. VCR head cleaning recommended every 6 months. |
| Safety | Do not expose to moisture, avoid placing on soft surfaces, ensure proper ventilation. |
| Spare Parts & Repairability | Remote control (RM-...) and AC cord available. Repairs should be done by qualified service personnel. |
| General Information | User manual available in PDF format (192 pages). |
Frequently Asked Questions - HR-XVC33U JVC
User questions about HR-XVC33U JVC
0 question about this device. Answer the ones you know or ask your own.
Ask a new question about this device
Download the instructions for your DVD player in PDF format for free! Find your manual HR-XVC33U - JVC and take your electronic device back in hand. On this page are published all the documents necessary for the use of your device. HR-XVC33U by JVC.
USER MANUAL HR-XVC33U JVC
Hi-Fi
VHS
SQPB





INSTRUCTIONS
For Customer Use:
Enter below the Model No. and Serial No. which are located on the rear of cabinet. Retain this information for future reference.
Model No.
Serial No.
Dear Customer,
Thank you for purchasing the JVC DVD player & VHS video cassette recorder. Before use, please read the safety information and precautions to ensure safe use of your new unit.
CAUTIONS

CAUTION
RISK OF ELECTRIC SHOCK DO NOT OPEN

CAUTION: TO REDUCE THE RISK OF ELECTRIC SHOCK. DO NOT REMOVE COVER (OR BACK). NO USER-SERVICEABLE PARTS INSIDE. REFER SERVICING TO QUALIFIED SERVICE PERSONNEL.

The lightning flash with arrowhead symbol, within an equilateral triangle, is intended to alert the user to the presence of uninsulated "dangerous voltage" within the product's enclosure that may be of sufficient magnitude to constitute a risk of electric shock to persons.

The exclamation point within an equilateral triangle is intended to alert the user to the presence of important operating and maintenance (servicing) instructions in the literature accompanying the appliance.
WARNING:
TO PREVENT FIRE OR SHOCK HAZARD, DO NOT EXPOSE THIS UNIT TO RAIN OR MOISTURE.
CAUTION:
This unit should be used with AC 120V~, 60Hz only. To prevent electric shocks and fire hazards, DO NOT use any other power source.
CAUTION:
TO PREVENT ELECTRIC SHOCK, MATCH WIDE BLADE OF PLUG TO WIDE SLOT, FULLY INSERT.
ATTENTION:
TO PREVENT ELECTRIC SHOCK, INSERT THE WIDE BLADE OF THE PLUG INTO THE CORRESPONDING WIDE SLOT AND PUSH FULLY IN.
Note to CATV system installer:
This reminder is provided to call the CATV system installer's attention to Article 820-40 of the NEC that provides guidelines for proper grounding and, in particular, specifies that the cable ground shall be connected to the grounding system of the building, as close to the point of cable entry as practical.
CAUTION:
Changes or modifications not approved by JVC could void user's authority to operate the equipment.
CAUTION:
THIS PRODUCT USES A LASER SYSTEM.
USE OF CONTROLS OR ADJUSTMENTS OR PERFORMANCE OF PROCEDURES OTHER THAN THOSE SPECIFIED HEREIN MAY RESULT IN HAZARDOUS RADIATION EXPOSURE.
DO NOT OPEN COVERS AND DO NOT REPAIR YOURSELF. REFER SERVICING TO QUALIFIED PERSONNEL.
CLASS 1 LASER PRODUCT
REPRODUCTION OF LABELS
WARNING LABEL INSIDE OF THE UNIT
CAUTION -VISIBLE OR INVISIBLE LASER RADIATION WHEN OPEN. DO NOT STARE INTO BEAM.
CAUTION -VISIBLE OR INVISIBLE LASER RADIATION WHEN OPEN. DO NOT STARE INTO BEAM. LP41077-002A
Declaration of Conformity
Model Number: HR-XVC33U
Trade Name: JVC
Responsible Party: JVC Americas Corp.
Address: 1700 Valley Road Wayne, N.J. 07470
Telephone Number: 973-317-5000
This device complies with Part 15 of FCC Rules.
Operation is subject to the following two conditions:
(1) This device may not cause harmful interference, and (2) this device must accept any interference received, including interference that may cause undesired operation.
This equipment has been tested and found to comply with the limits for a Class B digital device, pursuant to Part 15 of the FCC Rules. These limits are designed to provide reasonable protection against harmful interference in a residential installation. This equipment generates, uses, and can radiate radio frequency energy and, if not installed and used in accordance with the instructions, may cause harmful interference to radio communications. However, there is no guarantee that interference will not occur in a particular installation. If this equipment does cause harmful interference to radio or television reception, which can be determined by turning the equipment off and on, the user is encouraged to try to correct the interference by one or more of the following measures:
Reorient or relocate the receiving antenna. Increase the separation between the equipment and receiver.
Connect the equipment into an outlet on a circuit different from that to which the receiver is connected. Consult the dealer or an experienced radio/TV technician for help.
Use only discs marked with the following.

DVD (8 cm /12 cm disc)

Video CDs (8 cm /12 cm disc)

Audio CDs (8 cm /12 cm disc)

SVCD (8 cm /12 cm disc)
DSS is an official trademark of DIRECTV, Inc., a unit of GM Hughes Electronics. DISH Network is a trademark of Echostar Communications Corporation.



SQPB HQ
●Manufactured under license from Dolby Laboratories. "Dolby" and the double-D symbol are trademarks of Dolby Laboratories. ●“DTS” and “DTS Digital Out” are trademarks of Digital Theater Systems, Inc. ●Cassettes marked "VHS" (or "S-VHS") can be used with this unit. However, S-VHS recording is not possible with this model. ●This model is equipped with SQPB (S-VHS QUASI PLAYBACK) that makes it possible to play back S-VHS recordings with regular VHS resolution. ●HQ VHS is compatible with existing VHS equipment. ●This product incorporates copyright protection technology that is protected by method claims of certain U.S. patents and other intellectual property rights owned by Macrovision Corporation and other rights owners. Use of this copyright protection technology must be authorized by Macrovision Corporation, and is intended for home and other limited viewing users only unless otherwise authorized by Macrovision Corporation. Reverse engineering or disassembly is prohibited.
When the equipment is installed in a cabinet or a shelf, make sure that it has sufficient space on all sides to allow for ventilation (10 cm or more on both sides, on top and at the rear.)
When discarding batteries, environmental problems must be considered and the local rules or laws governing the disposal of these batteries must be followed strictly.
Failure to heed the following precautions may result in damage to the unit, Remote or video cassette.
1. DO NOT place the unit —
— in an environment prone to extreme temperatures or humidity. — in direct sunlight. — in a dusty environment. — in an environment where strong magnetic fields are generated. — on a surface that is unstable or subject to vibration.
2. DO NOT block the unit's ventilation openings or holes.
(If the ventilation openings or holes are blocked by a newspaper or cloth, etc., the heat may not be able to get out.)
- DO NOT place heavy objects on the unit or Remote.
- DO NOT place anything which might spill on top of the unit or Remote. (If water or liquid is allowed to enter this equipment, fire or electric shock may be caused.)
- DO NOT expose the apparatus to dripping or splashing.
- DO NOT use this equipment in a bathroom or places with water. Also DO NOT place any containers filled with water or liquids (such as cosmetics or medicines, flower vases, potted plants, cups, etc.) on top of this unit.
- DO NOT place any naked flame sources, such as lighted candles, on the apparatus.
- AVOID violent shocks to the unit during transport.
MOISTURE CONDENSATION
Moisture in the air will condense on the unit when you move it from a cold place to a warm place, or under extremely humid conditions—just as water droplets form in the surface of a glass filled with cold liquid. Moisture condensation on the head drum will cause damage to the tape. In conditions where condensation may occur, keep the unit turned on for a few hours to let the moisture dry.
ATTENTION
To mobile phone users:
Using a mobile phone in the vicinity of the unit may cause picture vibration on the TV screen or change the screen to a blue back display.
On placing the unit:
Some TVs or other appliances generate strong magnetic fields. Do not place such appliances on top of the unit as it may cause picture disturbance.
IMPORTANT PRODUCT SAFETY INSTRUCTIONS
Electrical energy can perform many useful functions. But improper use can result in potential electrical shock or fire hazards. This product has been engineered and manufactured to assure your personal safety. In order not to defeat the built-in safeguards, observe the following basic rules for its installation, use and servicing.
ATTENTION
Follow and obey all warnings and instructions marked on your product and its operating instructions. For your safety, please read all the safety and operating instructions before you operate this product and keep this booklet for future reference.
INSTALLATION
1. Grounding or Polarization
(A) Your product may be equipped with a polarized alternating-current line plug (a plug having one blade wider than the other). This plug will fit into the power outlet only one way. This is a safety feature. If you are unable to insert the plug fully into the outlet, try reversing the plug. If the plug should still fail to fit, contact your electrician to replace your obsolete outlet. Do not defeat the safety purpose of the polarized plug. (B) Your product may be equipped with a 3-wire grounding-type plug, a plug having a third (grounding) pin. This plug will only fit into a grounding-type power outlet. This is a safety feature. If you are unable to insert the plug into the outlet, contact your electrician to replace your obsolete outlet. Do not defeat the safety purpose of the grounding-type plug.
2. Power Sources
Operate your product only from the type of power source indicated on the marking label. If you are not sure of the type of power supply to your home, consult your product dealer or local power company. If your product is intended to operate from battery power, or other sources, refer to the operating instructions.
3. Overloading
Do not overload wall outlets, extension cords, or integral convenience receptacles as this can result in a risk of fire or electric shock.
4. Power Cord Protection
Power supply cords should be routed so that they are not likely to be walked on or pinched by items placed upon or against them, paying particular attention to cords at plugs, convenience receptacles, and the point where they exit from the product.
5. Ventilation
Slots and openings in the cabinet are provided for ventilation. To ensure reliable operation of the product and to protect it from overheating, these openings must not be blocked or covered.
- Do not block the openings by placing the product on a bed, sofa, rug or other similar surface.
- Do not place the product in a built-in installation such as a bookcase or rack unless proper ventilation is provided or the manufacturer's instructions have been adhered to.
6. Wall or Ceiling Mounting
The product should be mounted to a wall or ceiling only as recommended by the manufacturer.
ANTENNA INSTALLATION INSTRUCTIONS
1. Outdoor Antenna Grounding
If an outside antenna or cable system is connected to the product, be sure the antenna or cable system is grounded so as to provide some protection against voltage surges and built-up static charges. Article 810 of the National Electrical Code, ANSI/NFPA 70, provides information with regard to proper grounding of the mast and supporting structure, grounding of the lead-in wire to an antenna discharge unit, size of grounding connectors, location of antenna discharge unit, connection to grounding electrodes, and requirements for the grounding electrode.
2. Lightning
For added protection for this product during a lightning storm, or when it is left unattended and unused for long periods of time, unplug it from the wall outlet and disconnect the antenna or cable system. This will prevent damage to the product due to lightning and power-line surges.
3. Power Lines
An outside antenna system should not be located in the vicinity of overhead power lines or other electric light or power circuits, or where it can fall into such power lines or circuits. When installing an outside antenna system, extreme care should be taken to keep from touching such power lines or circuits as contact with them might be fatal.
EXAMPLE OF ANTENNA GROUNDING AS PER NATIONAL ELECTRICAL CODE, ANSI/NFPA 70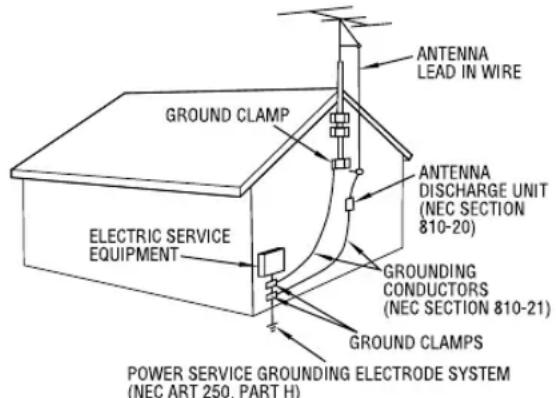
NEC – NATIONAL ELECTRICAL CODE
USE
1. Accessories
To avoid personal injury:
- Do not place this product on an unstable cart, stand, tripod, bracket, or table. It may fall, causing serious injury to a child or adult, and serious damage to the product.
- Use only with a cart, stand, tripod, bracket, or table recommended by the manufacturer or sold with the product.
- Use a mounting accessory recommended by the manufacturer and follow the manufacturer's instructions for any mounting of the product.
- Do not try to roll a cart with small casters across thresholds or deep-pile carpets.
2. Product and Cart Combination
A product and cart combination should be moved with care. Quick stops, excessive force, and uneven surfaces may cause the product and cart combination to overturn.
PORTABLE CART WARNING (Symbol provided by RETAC)
3. Water and Moisture
Do not use this product near water—for example, near a bath tub, wash bowl, kitchen sink or laundry tub, in a wet basement, or near a swimming pool and the like.
4. Object and Liquid Entry
Never push objects of any kind into this product through openings as they may touch dangerous voltage points or short-out parts that could result in a fire or electric shock. Never spill liquid of any kind on the product.
5. Attachments
Do not use attachments not recommended by the manufacturer of this product as they may cause hazards.
6. Cleaning
Unplug this product from the wall outlet before cleaning. Do not use liquid cleaners or aerosol cleaners. Use a damp cloth for cleaning.
7. Heat
The product should be situated away from heat sources such as radiators, heat registers, stoves, or other products (including amplifiers) that produce heat.
SERVICING
1. Servicing
If your product is not operating correctly or exhibits a marked change in performance and you are unable to restore normal operation by following the detailed procedure in its operating instructions, do not attempt to service it yourself as opening or removing covers may expose you to dangerous voltage or other hazards. Refer all servicing to qualified service personnel.
2. Damage Requiring Service
Unplug this product from the wall outlet and refer servicing to qualified service personnel under the following conditions:
a. When the power supply cord or plug is damaged.
b. If liquid has been spilled, or objects have fallen into the product.
c. If the product has been exposed to rain or water.
d. If the product does not operate normally by following the operating instructions. Adjust only those controls that are covered by the operating instructions as an improper adjustment of other controls may result in damage and will often require extensive work by a qualified technician to restore the product to its normal operation.
e. If the product has been dropped or damaged in any way.
f. When the product exhibits a distinct change in performance—this indicates a need for service.
3. Replacement Parts
When replacement parts are required, be sure the service technician has used replacement parts specified by the manufacturer or which have the same characteristics as the original part. Unauthorized substitutions may result in fire, electric shock or other hazards.
4. Safety Check
Upon completion of any service or repairs to this product, ask the service technician to perform safety checks to determine that the product is in safe operating condition.
HOW TO USE THIS INSTRUCTION MANUAL
- All major sections and subsections are listed in the Table Of Contents on page 6. Use this when searching for information on a specific procedure or feature.
- The Index on pages 10 – 13 lists frequently-used terms, and the number of the page on which they are used or explained in the manual. This section also illustrates the controls and connections on the front and rear panel, the front display panel and the remote control.
- The mark signals a reference to another page for instructions or related information.
- Operation buttons necessary for the various procedures are clearly indicated through the use of illustrations at the beginning of each major section.
BEFORE YOU INSTALL YOUR NEW UNIT ...
... please read the sections/literature listed below.
- "CAUTIONS" on page 2
- "IMPORTANT PRODUCT SAFETY INSTRUCTIONS" on pages 4 – 5
DISC INFORMATION 7
About Discs 7
INDEX 10
INSTALLING YOUR NEW UNIT 14
Basic Connections ...... 14
S-VIDEO Connection (DVD deck only) 15
Component Video Connection (DVD deck only) 16
INITIAL SETTINGS 17
Plug & Play Set 17
Monitor Set (DVD deck) 18
Language 20
Clock Set 24
Tuner Set 26
OPERATIONS ON VCR DECK 28
Basic Playback 28
Playback Features 29
Basic Recording 33
Recording Features 34
Express Timer Programming 36
Satellite Auto Recording 41
OPERATIONS ON DVD DECK 42
Basic Playback 42
Playback Features 43
Using the on-screen bar 48
Parental Lock 58
About MP3 Disc 62
MP3 Playback 63
About JPEG Disc 65
JPEG Playback 66
EDITING (VCR DECK) 68
Edit From A Camcorder 68
Edit To Or From Another Video Recorder 69
Dubbing (from DVD to VCR) 70
EDITING (DVD DECK) 71
Digital Audio Dubbing 71
REMOTE 72
Remote Control Functions 72
Connecting To A Dolby Digital Decoder or An Amplifier With A Built-in DTS (DVD deck only) 74
SUBSIDIARY SETTINGS 75
Mode Set (VCR deck) 75
Mode Set (DVD deck) 78
Child Lock 82
Scan Mode Set (DVD deck) 82
TROUBLESHOOTING 83
QUESTIONS AND ANSWERS 88
SPECIFICATIONS 89
LIST OF TERMS 90
FOR SERVICING (Only in U.S.A.) 92
WARRANTY (Only in U.S.A.) 93
About Discs
Playable Discs
You can use the discs with the following logos for playback only.
| DVD VIDEO Video CD/Super Video CD | |
 |   |
Audio CD CD-DAfiles CD-DAfiles |   |
The following discs also can be played back.
- DVD-R/RW discs recorded in DVD VIDEO format and finalized
- CD-R/RW discs recorded in Super Video CD, Video CD or Audio CD format and finalized.
- CD-R/RW discs recorded in MP3 format in accordance with the "ISO 9660" format. (See page 62 for details.)
- CD-R/RW discs recorded in JPEG format in accordance with the "ISO 9660" format. (See page 65 for details.)
Discs other than the above cannot be played back. Operation and audio quality of this unit are not guaranteed for discs that do not conform to the Compact Disc specification (CD-DA).
Before you play back a CD, check for the CD logo and read the notes on the package to confirm that it conforms to the Compact Disc specification.
- Depending on the intentions of the author of the software, recording conditions of DVD discs and Video CD discs may be restricted. Since this unit plays back discs according to the intentions of the author of the software as indicated on the disc, some functions may not operate as commanded.
- When switching from the first layer to the second layer of double-layered DVD VIDEO discs, the image and sound may be momentarily distorted. This is not a malfunction.
Unplayable Discs
The following types of discs cannot be played using this unit. Do not attempt to play back any kind of disc that is damaged (cracked, warped, or repaired with adhesive tape) or discs in unusual shapes (heart-shaped, octagonal, or other forms). If such discs are accidentally played back, it may cause noise that can lead to speaker damage.
- CD-ROM discs (including PHOTO-CD) ●DVD AUDIO discs ●Super Audio CDs (SACD) ●DVD-RW discs recorded in VR format •DVD-RAM ●Discs which have a region number other than "1"
Region Number
The world is divided into 6 regions for DVD VIDEO discs. DVD VIDEO discs are assigned a region number to indicate which region they may be played back in. A disc cannot be played back on this unit unless the region number of the disc matches that of the unit. The region number for this unit is "1". Only discs whose region number includes "1" can be played back such as shown below.
Examples of DVD VIDEO labels which can be played back using this unit.


Marks of discs in this instruction manual

Allows operation with a DVD VIDEO disc.

Allows operation with a CD-R/RW disc.

Allows operation with a Video CD disc.

Allows operation with a SVCD disc.

Allows operation with a disc including MP3 files.

Allows operation with a disc including JPEG files.

Allows operation with a Audio CD disc.
DVD VIDEO Marks
Sometimes marks are printed on a DVD disc and/or on its packaging to indicate information regarding the contents and functions of a disc. Check marks indicating the contents and functions of a disc. Note, however, that in some cases a disc may not include a mark even for a function it supports.
Marks related to video
| Mark Description | |
 | Number of subtitles |
 | Number of angles |
 | Recorded under the standard 4:3 aspect ratio |
 | Screen includes black bands at top and bottom of image which has a standard 4:3 aspect ratio (letter box) |
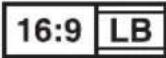 | Video playback is in Wide video mode (16:9) on wide televisions, but in letter box on televisions with standard 4:3 aspect ratio. |
 | Video playback is in Wide video mode (16:9) on wide televisions, but pan and scan is used on televisions with standard 4:3 aspect ratio (either the left or right side of the image is cut-out). |
Marks related to audio
| Mark Description | |
 | Number of audio tracks |
 DIGITAL DIGITAL | Dolby Digital markDolby Laboratories has developed a digital surround system for the home. This mark indicates that you may enjoy 5.1-channel audio (front left and right, center, rear left and right, and a channel for LFE (Low-Frequency Effects)). |
 | DTS (Digital Theater System)You can enjoy DTS audio if you connect the amplifier with a built-in DTS decoder to the DIGITAL AUDIO OUT connector of the unit. |
File Structure of Discs
DVD VIDEO
Typically, DVD VIDEO discs are made up of larger units called "titles". Each title has a number (title number) that can be used to select desired titles. Titles are further divided into units called "chapters". Each chapter has a number (chapter number) that can also be used to select desired chapters. Note that some discs are not divided into titles and chapters.
![graph LR A["Title 1 Title 2"] --> B["Chapter 1"] A --> C["Chapter 2"] A --> D["Chapter 3"] A --> E["Chapter 1"] A --> F["Chapter 2"]](/content/2026/06/1341529/images/5734fc422e5ec1869891b93dbd2939b912d34b0d7a3b60a57a1b52fd53d00694.jpg)
Audio CD/Video CD
Typically, Audio CD discs are divided into separate tracks each containing one song. Each track is assigned a number. For example, the third track is Track 3. The same is true for Video CD discs.

NOTE:
Video CD discs that support Playback Control (PBC)
The still image or motion image which follows a menu screen is called a "scene". Each scene has a scene number.
For more details, refer to "Locating a desired scene using the menu of the Video CD with PBC" (pg. 43).
Placing a Disc
1 Open the disc tray.
Press OPEN/CLOSE (▲) on the DVD deck to open the disc tray.
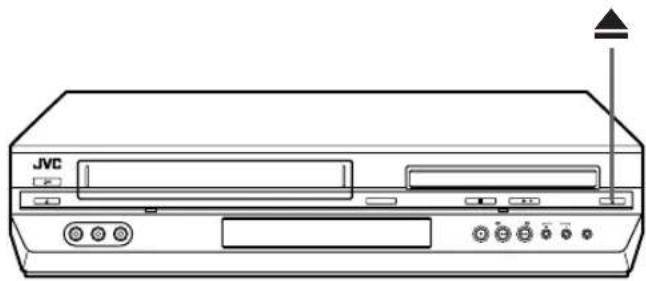
- Pressing the button again closes the disc tray.
- Do not block the disc tray with your hand while it is opening or closing as this may result in hardware failure.
- Do not place unplayable discs or any object other than a disc in the disc tray.
- Do not press down strongly on the disc tray or place any heavy objects on it.
2 Place the disc.
Place the disc in the disc tray with the label side facing up.
- Since disc size changes depending on the disc to be played back, be sure to correctly align the disc with the grooves for its size. If the disc is not in its groove, it may be scratched or otherwise damaged.
- To insert an 8 cm disc, place it according to the inner groove.

Care and Handling of Discs
How to handle discs
When handling a disc, do not touch the surface of the disc. Since discs are made of plastic, they are easily damaged. If a disc gets dirty, dusty, scratched or warped, the images and sound will not be picked up correctly, and such a disc may cause t

Label side
Do not damage the label side, stick paper to or use any adhesive on its surface.
Storage
Make sure that discs are kept in their cases. If discs are piled on top of one another without their protective cases, they can be damaged. Do not put discs in a location where they may be exposed to direct sunlight, or in a place where the humidity or temperature is high. Avoid leaving discs in your car!
Maintenance of discs
If there are fingerprints or other dirt adhering to a disc, wipe with a soft dry cloth, moving from the center outwards. If a disc is difficult to clean, wipe with a cloth moistened with water. Never use record cleaners, petrol, alcohol or any anti-static agents.

CAUTION
Sometimes during playback, noise or images may be garbled. This is sometimes due to the disc. (It may not be up to industry standards.) These symptoms are caused by the discs, not by the malfunction of the unit.
FRONT VIEW

① Power Button (POWER ⏻/l) pg. 18 ② VCR Indicator Ⅲ pg. 28, 33 ③ VHS Cassette Loading Slot ④ VCR/DVD Button ☐ pg. 28, 33, 42 ⑤ Disc Tray ⑥ Stop Button (STOP (■)) 📋 pg. 28, 33, 42 ⑦ DVD Indicator 📄 pg. 42 ⑧ Play Button (PLAY ▶) 1→ pg. 28, 42 ⑨ DVD Open/Close Button (OPEN/CLOSE (▲)) pg. 42 ⑩ VHS Eject Button (EJECT (▲)) 137 pg. 28, 33
⑪ Video/Audio Input Connectors (VIDEO/AUDIO) 17 pg. 68 ⑫ Remote Sensor 13 Front Display Panel pg. 11 14 Record Button (REC (●)) pg. 33 ⑮ Rewind Button (REW (◀◀)) □ pg. 28, 29, 44 16 Fast Forward Button (FF (▶▶)) pg. 28, 29, 44 ⑰ Channel Button (CH +/-) 📋 pg. 33 18 Progressive Scan Button (PROGRESSIVE SCAN) pg. 82
REAR VIEW

① Region Number Label ☐ pg. 7 ② AC Power Cord 17 pg. 14 3 S-video Output Connector (S VIDEO OUTPUT)* pg. 15 * This connector is only for DVD deck only. 4 Audio/Video Output Connectors (AUDIO/VIDEO OUTPUT) pg. 14, 15, 16, 69 ⑤ Antenna Input Connector (VHF/UHF IN) pg. 14
6 Digital Audio Output Connector (DIGITAL AUDIO OUT) pg. 71 ⑦ Audio Output Connectors (AUDIO OUTPUT (L/R))* * These are analogue audio output connectors for DVD deck only. ⑧ Component Video Output Connectors (COMPONENT VIDEO OUT) 📋 pg. 16 9 Antenna Output Connector (VHF/UHF OUT) pg. 14
FRONT DISPLAY PANEL
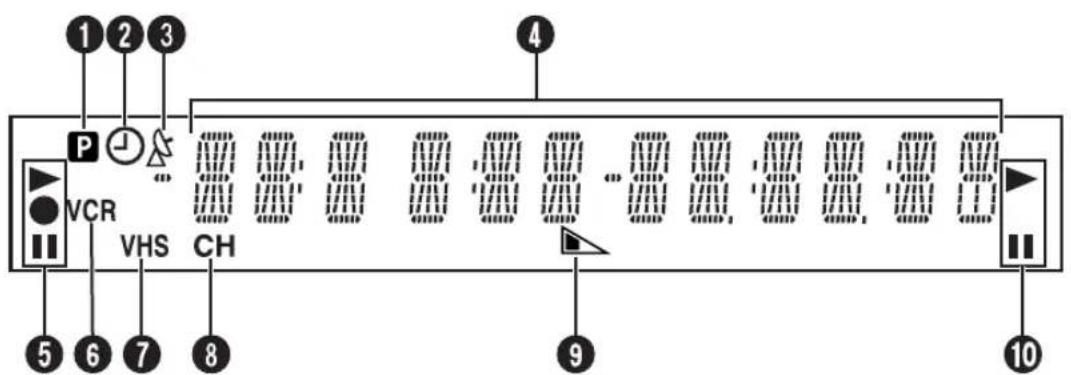
① Progressive Mode Indicator 17 pg. 82 ② "Timer" Indicator (VCR deck only) ☐ pg. 37 ③ Satellite Auto Recording Indicator ( Δ ) (VCR deck only) ☐ pg. 41 ④ Channel/Clock
Mode Display (F-1) (VCR deck only)
Counter Display (VCR deck)
Tape Speed (SP/EP) (VCR deck only)
Multi-information window* (DVD deck)
* The current group/title/track/chapter number(s), time, and status information.
⑤ VCR Mode Indicator ⑥ VCR Indicator 📋 pg. 34 ⑦ Cassette Type Indicator (VCR deck only) ⑧ Channel Mode Indicator (CH) ⑨ Remain Display □ pg. 35 ⑩ DVD Mode Indicator
ON-SCREEN DISPLAY (VCR deck)
If you press DISPLAY on the Remote when "SUPERIMPOSE" is set to "ON" (pg. 76), various operational indicators appear on the TV screen.
For On-screen display for DVD deck, refer to "Using the on-screen bar" (pg. 48).

① Operation Mode Indicators ② Tape Speed (SP/EP) ③ Tape Position Indicator
The tape position indicator appears on the TV screen when you press REW (◀◀) or FF (▶▶) from the Stop mode or perform an Index Search. (17 pg. 30) The position of "I" in relation to "0" (beginning) or "+" (end) shows you where you are on the tape.

NOTE:
Depending on the type of tape being used, the tape position indicator may not appear correctly.
④ Index number ☐ pg. 30 ⑤ Tape Remaining Time Indicaton pg. 35 6 Counter Display ⑦ Audio Mode Display 📋 pg. 32 ⑧ SAP Indicator ☐ pg. 35 ⑨ Stereo Program Indicator 📄 pg. 35 ⑩ Day/Clock Display ⑪ Channel Position Number/Auxiliary Input Indicator (F-1) ⑫ "Cassette Loaded" Mark
To recall an indication
1 Press DISPLAY.
- All indications corresponding to the current status are displayed for 5 seconds. After that, the counter information and RECORD/PAUSE if in the Record Pause mode, remain on the screen.
2 Press DISPLAY again to clear the display.
● The RECORD/PAUSE indication remains on the screen.
REMOTE

Buttons with a small dot on the left side of the name can also be used to operate your TV. (37 pg. 73)
① VCR Button ☐ pg. 28, 33 ② TV/VCR/DVD switch ☐ pg. 18 ③ Menu Button (MENU) ☐ pg. 43 ④ SP/EP Button ☐ pg. 33
Top Menu Button (TOP MENU) 17 pg. 43
⑤ Stop Time Button (STOP +/-) □ pg. 36
Display Button (PLAY SETUP) ☐ pg. 48
Title Button (TITLE) ☐ pg. 64
6 Start Time Button (START +/-) pg. 36
Repeat Button (REPEAT) pg. 50, 64, 67
Zooming Button (ZOOM) 17 pg. 45
⑦ Number Keys ☐ pg. 27, 33, 64
⑧ Daily Button (DAILY) pg. 37
⑨ Reset Button (C.RESET) ☐ pg. 35
Cancel Button (CANCEL) ☐ pg. 39
10 Button
⑩ Play Button (PLAY ▶) page 28, 42 ⑪ Rewind Button (REW (◀◀)) page 28, 29, 44 ⑫ Stop Button (STOP (■)) page 28, 33, 42 13 Record Button (REC (●)) page 33
14 Reverse Skip/Index Button (SKIP/INDEX (I◀◀)) page 30, 43 Review Button (REVIEW)
15 △▽ Button page 18 TV/VCR Channel Button (TV/VCR CH +/-) page 73
16 Set Up Menu Button (SET UP MENU) page 18
17 3D-Phonic Button (3D-PHONIC) page 46
18 TV Volume Button (TV VOL+/-) page 73
19 DVD Button page 42
20 Power Button (POWER (⏻/|)) page 18
21 TV Muting Button (MUTE) page 73
Audio Monitor Button (A.MONITOR)
page 32, 56, 57
22 TV/VCR Button page 34
23 Date Button (DATE +/-) page 36
Subtitle Button (SUB TITLE) page 54
Angle Button (ANGLE) 17 pg. 55
* With this button, you can also adjust the brightness of the front display panel.
+: brightens the display -: darkens the display
24 Channel Button (CH +/-) pg. 33 25 Programming Button (PROG.) 17 pg. 36 26 Timer Button (TIMER) ☐ pg. 37 27 Weekly Button (WEEKLY) 137 pg. 37 28 Program Check Button (PROG. CHECK) pg. 38 Return Button (RETURN) ☐ pg. 43 29 Satellite Auto Recording Button (REC LINK) pg. 41 30 +10 Button 31 Auxiliary Button (AUX) ☐ pg. 68 32 Fast Forward Button (FF (▶▶)) pg. 28, 29, 44 33 Pause Button (PAUSE 11)) pg. 29, 33 34 Forward Skip/Index Button (SKIP/INDEX (▶▶I)) pg. 30, 43 35 OK Button ☐ pg. 18 36◀ ▷ Button ☐ pg. 18 37 Display Button (DISPLAY) pg. 35 38 Skip Search Button (SKIP SEARCH) ☐ pg. 30 DVD Picture Button (DVD PICTURE) ☐ pg. 47
How To Use
Before use, insert two AA size batteries into the Remote with the polarity (and) matched correctly as indicated on the battery compartment or on the lid.
The Remote can operate most of your unit's functions, as well as basic functions of TV sets of JVC and other brands. (137 pg. 73)
- Point the Remote toward the remote sensor.
- The maximum operating distance of the remote control is about 8 m.
NOTE:
If the Remote doesn't work properly, remove its batteries, wait a short time, replace the batteries and then try again.
Basic Connections
![graph TD A["Antenna or Cable"] --> B["Coaxial cable"] B --> C["Flat feeder"] C --> D["Matching transformer (not supplied)"] D --> E["AC Outlet"] E --> F["AC Power Cord"] F --> G["Back of unit"] G --> H["Video OUTPUT"] H --> I["AUDIO OUTPUT"] I --> J["VHF/UHF IN"] J --> K["VHF/UHF OUT"] K --> L["RF c…](/content/2026/06/1341529/images/c8f06673cc481f162c86b62069f5d425f5488b5be1c1bb9412edecfa3235acd6.jpg)
It's essential that your unit be properly connected.
THESE STEPS MUST BE COMPLETED BEFORE ANY VIDEO OPERATION CAN BE PERFORMED.
1 Check the contents.
Make sure the package contains all of the accessories listed in "SPECIFICATIONS" on page 89.
2 Situate the unit.
Place the unit on a stable, horizontal surface.
3 Connect the unit to TV.
The connection method you use depends on the type of TV you have.
RF Connection
■ To connect to a TV with NO AV input connectors —
1 Disconnect the TV antenna from the TV. 2 Connect the TV antenna cable to the VHF/UHF IN connector on the rear panel of the unit. 3 Connect the supplied RF cable between the VHF/UHF OUT connector on the rear panel of the unit and the TV's antenna terminal.
AV Connection
■ To connect to a TV with AV input connectors —
1 Connect the antenna, unit and TV as per "RF Connection". 2 Connect an optional audio/video cable between the AUDIO/VIDEO OUTPUT connectors on the rear panel of the unit and the TV's audio/video input connectors.
- Set your TV to AV mode.
- For switching the TV's mode, refer to the instruction manual of your television.
- To obtain high-quality pictures, you can also use the S-VIDEO connection or Component Video Connection. (DVD deck only) (77 pg. 15, 16)
4 Connect the unit to power source.
Plug the end of the AC power cord into an AC outlet. This unit performs Plug & Play Set automatically. (3) pg. 17
●The clock and tuner channels will automatically be set when the antenna is connected and when the AC power cord is first connected to an AC outlet. (If "AUTO" and the channel indicator are displayed on the front display panel before the unit is powered on, the clock and tuner channels are being set automatically. Wait for the time to be displayed on the front display panel before turning on the unit.)
5 Set the VCR channel.
The VCR channel is the channel on which you can watch the picture from the unit on the TV when only using RF connection.
With RF connection, set the VCR channel to "3 CH" or "4 CH".
●The VCR channel is preset to "3 CH". Set to "4 CH" if the Channel 3 is used for broadcasting in your area. With AV connection, set the VCR channel to "-CH" (off). To set the VCR channel, perform the following steps:
☐ Press POWER (☐/☐) to turn off the unit, then press STOP (☐) on the unit for more than 5 seconds. "3 CH" appears on the front display panel.
2 Press CH +/- on the Remote to select "3 CH", "4 CH" or "-CH" (off), then press OK.
S-VIDEO Connection
(DVD deck only)
ATTENTION
Be sure to connect the unit's VIDEO OUTPUT (DVD/VCR) connector to the TV's VIDEO input connector.
![graph TD A["Antenna or Cable"] --> B["Coaxial cable"] B --> C["Flat feeder"] C --> D["Matching transformer (not supplied)"] D --> E["AC outlet"] D --> F["S VIDEO OUTPUT"] D --> G["AUDIO OUTPUT"] E --> H["Back of unit"] F --> I["AC power cord"] G --> J["VIDEO OUTPUT"] H --> K["S-Video cable (not supp…](/content/2026/06/1341529/images/1044834c46036121bf25d56156ce08640b1d9dfcbc02c138a80c8acf319125c4.jpg)
■ To connect to a TV with S-VIDEO/AUDIO input connectors ...
1 Connect the unit to TV.
Connect the antenna, unit and TV as per "AV Connection". (pg. 14) 2 Connect the unit's S VIDEO OUTPUT (DVD) connector to the TV's S-VIDEO input connector.
2 Connect the unit to power source.
Plug the end of the AC power cord into an AC outlet. This unit performs Plug & Play Set automatically. (pg. 17)
●The clock and tuner channels will automatically be set when the antenna is connected and when the AC power cord is first connected to an AC outlet. (If "AUTO" and the channel indicator are displayed on the front display panel before the unit is powered on, the clock and tuner channels are being set automatically. Wait for the time to be displayed on the front display panel before turning on the unit.)
3 Set the VCR channel to off.
☐ Press POWER (☐/☐) to turn off the unit, then press STOP (☐) on the unit for more than 5 seconds. "3 CH" appears on the front display panel. 2 Press CH +/- on the Remote to select “-CH” (off), then press OK.
NOTES:
●You can obtain high-quality S-VHS pictures. - If your TV is not stereo-capable, use the unit's AUDIO OUTPUT connectors to connect to an audio amplifier for Hi-Fi stereo sound reproduction. - To operate the unit with your TV using the S-VIDEO connection, set your TV to its AV mode. You can also use the TV/VCR button on the unit's Remote to set your TV to the AV mode. (☐ pg. 73) - For switching the TV's mode, refer to the instruction manual of your television.
Component Video Connection
(DVD deck only)
ATTENTION
Be sure to connect the unit's VIDEO OUTPUT (DVD/VCR) connector to the TV's VIDEO input connector.
![graph TD A["Antenna or Cable"] --> B["Coaxial cable"] B --> C["Flat feeder"] C --> D["Matching transformer (not supplied)"] D --> E["AC outlet"] E --> F["AC power cord"] F --> G["Back of unit"] G --> H["Component Video cable (not supplied)"] H --> I["Video OUT"] I --> J["AUDIO OUTPUT"] J --> K["VHF/…](/content/2026/06/1341529/images/35712d60eee89e71a6ba318369e7260aeb7619e163b842e87f915e152ed8f1a9.jpg)
■ To connect to a TV with component video input connectors ...
1 Connect the unit to TV.
Connect the aerial, unit and TV as per "AV Connection". (pg. 14) 2 Connect the unit's COMPONENT VIDEO OUT connectors to the TV's component video input connectors.
2 Connect the unit to power source.
Plug the end of the AC power cord into an AC outlet. This unit performs Plug & Play Set automatically. (See page 17)
The clock and tuner channels will automatically be set when the antenna is connected and when the AC power cord is first connected to an AC outlet. (If "AUTO" and the channel indicator are displayed on the front display panel before the unit is powered on, the clock and tuner channels are being set automatically. Wait for the time to be displayed on the front display panel before turning on the unit.)
3 Set the VCR channel to off.
Press POWER (☐/☐) to turn off the unit, then press STOP (■) on the unit for more than 5 seconds. "3 CH" appears on the front display panel.
2 Press CH +/- on the Remote to select "-CH" (off), then press OK.
NOTES:
You can obtain high-quality component video pictures. - If your TV is not stereo-capable, use the unit's AUDIO OUTPUT connectors to connect to an audio amplifier for Hi-Fi stereo sound reproduction. - To operate the unit with your TV using the Component Video connection, set your TV to its AV mode. You can also use the TV/VCR button on the unit's Remote to set your TV to the AV mode. (See page 73) - For switching the TV's mode, refer to the instruction manual of your television.
Plug & Play Set Auto Clock Set/Auto Tuner Set
ATTENTION
- If you use a cable box, Plug&Play will not function; set the clock and tuner channels separately. (See pages 24–27)
- Depending on areas or reception conditions, the unit may not receive the Auto clock setting data from the PBS channel. If this function is taking a considerable amount of time, it may be necessary to perform the Semiauto or Manual Clock Set procedure.

This unit sets the clock and tuner channels automatically when AC power cord is first connected to an AC outlet. The antenna cable must be connected for the Plug & Play setting.
The time and date can be set automatically by the clock setting data transmitted from one of the regular TV broadcast channels. We call this TV channel the "host channel" and it is a PBS channel in your area.
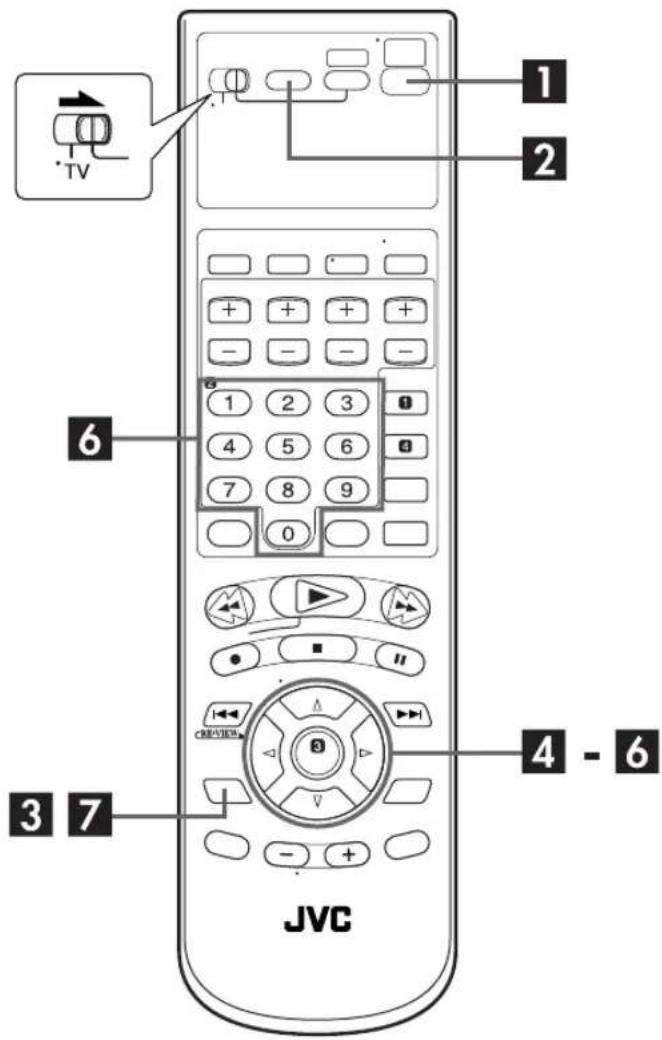
1 Perform Plug & Play setup.
Connect the antenna cable to the unit. (See page 14) Then connect the AC power cord to an AC outlet. Do not turn on the unit.
The clock and tuner channels will be set automatically.
NOTES:
- Auto Clock Set is performed first. "AUTO" blinks on the front display panel during Auto Clock Set.
- Auto Channel Set is performed next. Auto Channel Set scans all the channels that are receivable by your unit. During Auto Channel Set, the channel numbers are displayed as they are scanned and set.
- When Plug & Play setting has been completed successfully, the correct clock time is displayed. If you perform Plug & Play setting successfully, there is no need to perform "Clock Set" (see page 24) and "Tuner Set" (see page 26). If, however, you want to add or delete channels, refer to "Manual Channel Set" (see page 27).

During Initial Auto Clock Set "AUTO" blinks.

During Auto Channel Set, the channel numbers are displayed as they are scanned and set.
Plug & Play Completed: The current time is displayed.
* If an incorrect clock time or "--:--" appears on the front display panel, see "What to do if Plug & Play setting failed" below.
INFORMATION
- If "AUTO CLOCK" is set to "ON" (see page 25), the clock will be adjusted automatically by the host channel every hour (except 11:00 PM, midnight, 1:00 AM, and 2:00 AM) using the incoming PBS channel clock setting data. (This automatic clock adjustment can only be performed when the unit is turned off. The clock will be adjusted just on these hours — on the time displayed on the front display panel, not on the actual real time.) The default setting of "AUTO CLOCK" is "ON" (see page 25).
- If the memory backup fails, because a power outage occurs or because the AC power cord is unplugged, Plug & Play will be performed when power is restored to the unit.
What to do if Plug & Play setting failed
- If an incorrect time is displayed on the front display panel, you may be receiving the clock setting data of a PBS channel from an adjacent time zone, or an incorrect PBS channel from a cable TV system. In this case, perform "Semiauto Clock Set" (see page 25) or "Manual Clock Set" (see page 25).
- If "--:--" appears on the front display panel, your antenna cable may not be connected to the unit or there may not be a Host PBS signal available in your area. Ensure that the antenna cable is connected correctly. Then turn on and off the unit; the Plug & Play setting will be automatically reactivated. If Plug & Play setting is not performed though the antenna cable is connected correctly, perform "Manual Clock Set" (see page 25) and "Auto Channel Set" (see page 26) or "Manual Channel Set" (see page 27).
Monitor Set
(DVD deck)
You can select the monitor type depending on the TV used when you play back DVD VIDEO discs recorded for wide-screen TVs.
- Turn on the TV and select the VCR channel (or AV mode).
- Slide the TV/VCR/DVD switch to the right.

1 Turn on the unit.
Press POWER (⏻/l).
2 Select the DVD deck.
On the unit
Press VCR/DVD repeatedly so that the DVD indicator lights up.
On the Remote
Press DVD so that the DVD indicator lights up.
3 Access the DVD Set Up menu screen.
1 Press SET UP MENU. 2 Press ◀ ▷ to select
"PICTURE".

4 Select the mode.
Press △▽ to move ✉ to "MONITOR TYPE", then press OK.

5 Select the mode setting.
Press △▽ to select the desired setting, then press OK.
6 Return to the normal screen.
Press SET UP MENU.
* The default setting is bold in the table below.
■MONITOR TYPE
16:9 NORMAL (Wide television conversion):
Select this when the aspect ratio of your TV is 16:9 (wide TV).
16:9 AUTO (Wide television conversion):
Select this when the aspect ratio of your TV is fixed to 16:9 (wide TV). The unit automatically adjusts the screen width of the output signal correctly when playing back a picture whose aspect ratio is 4:3.
4:3 LB (Letter Box conversion):
Select this when the aspect ratio of your TV is 4:3 (conventional TV). While viewing a wide screen picture, the black bars appear on the top and the bottom of the screen.
4:3 PS (Pan&Scan):
Select this when the aspect ratio of your TV is 4:3 (conventional TV). While viewing a wide screen picture, the black bars do not appear; however, the left and right edges of the pictures will not be shown on the screen.
Pan&Scan/Letter Box
In general, DVD VIDEO discs are produced for a wide-screen TV with 16:9 aspect ratio.
Material with this ratio will not fit to a TV with 4:3 aspect ratio. There are two styles to display the image, "Pan&Scan" (PS) and "Letter Box" (LB).
Pan&Scan
The right and left side of the image are cut off. The image fills the screen.
Letter Box
Black bands appear at the top and bottom of the image. The image itself appears in 16:9 aspect ratio.


Language
- Turn on the TV and select the VCR channel (or AV mode).
- Slide the TV/VCR/DVD switch to the right.

On-screen Language Set (VCR deck)
This VCR deck offers you the choice to view on-screen messages in 3 different languages.
1 Turn on the unit.
Press POWER (⏻/l).
2 Select the VCR deck.
On the unit
Press VCR/DVD repeatedly so that the VCR indicator lights up.
On the Remote
Press VCR so that the VCR indicator lights up.
3 Access the Main Menu screen.
Press SET UP MENU.
4 Access the Initial Set screen.
Press △▽ to move the highlight bar (arrow) to "INITIAL SET", then press OK or ▷.

5 Select the language.
Press △▽ to move the highlight bar (arrow) to "LANGUAGE", then press OK or ▷ repeatedly until the desired language is selected.
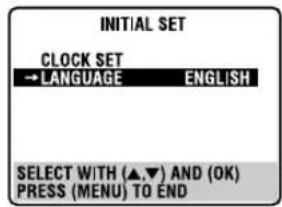
6 Return to the normal screen.
Press SET UP MENU.

On-screen Language Set (DVD deck)
This DVD deck offers you the choice to view on-screen messages in 3 different languages. You can change the language setting manually as required.
1 Turn on the unit.
Press POWER (⏻/l).
2 Select the DVD deck.
On the unit
Press VCR/DVD repeatedly so that the DVD indicator lights up.
On the Remote
Press DVD so that the DVD indicator lights up.
3 Access the DVD Set Up menu screen.
1 Press SET UP MENU. 2 Press ◀ ▷ to select "LANGUAGE".

4 Select the mode.
Press △▽ to move ☒ to "ON SCREEN LANGUAGE", then press OK.

5 Select the mode setting.
Press △▽ to select the desired setting, then press OK.
6 Return to the normal screen.
Press SET UP MENU.

Menu/Audio/Subtitle Language Set (DVD deck only)
Some DVD discs contain the DVD menu display, audio, subtitle in the multiple languages. With these discs, you can set the default language as you like.
- The procedure shows how to set "MENU LANGUAGE" on the DVD Set Up menu screen as an example.
1 Turn on the unit.
Press POWER (⏻/l).
2 Select the DVD deck.
On the unit
Press VCR/DVD repeatedly so that the DVD indicator lights up.
On the Remote
Press DVD so that the DVD indicator lights up.
3 Access the DVD Set Up menu screen.
1 Press SET UP MENU. 2 Press ◀ ▷ to select "LANGUAGE".

4 Select the mode.
Press △▽ to move ☒ to "MENU LANGUAGE", then press OK.

5 Select the mode setting.
Press △ ▽ to select the desired setting, then press OK.
- See "Language Code List" (L ² pg. 23).
6 Return to the normal screen.
Press SET UP MENU.
NOTE:
When the selected language is not available on the disc, the disc's default menu language is played back.
Language Code List
| AA | Afar |
| AB | Abkhazian |
| AF | Afrikaans |
| AM | Ameharic |
| AR | Arabic |
| AS | Assamese |
| AY | Aymara |
| AZ | Azerbaijani |
| BA | Bashkir |
| BE | Byelorussian |
| BG | Bulgarian |
| BH | Bihari |
| BI | Bislama |
| BN | Bengali, Bangla |
| BO | Tibetan |
| BR | Breton |
| CA | Catalan |
| CO | Corsican |
| CS | Czech |
| CY | Welsh |
| DA | Danish |
| DZ | Bhutani |
| EL | Greek |
| EO | Esperanto |
| ET | Estonian |
| EU | Basque |
| FA | Persian |
| FI | Finnish |
| FJ | Fiji |
| FO | Farocse |
| FY | Frisian |
| GA | Irish |
| GD | Scots Gaelic |
| GL | Galician |
| GN | Guarani |
| GU | Gujarati |
| HA | Hausa |
| HI | Hindi |
| HR | Croatian |
| HU | Hungarian |
| HY | Armenian |
| IA | Interlingua |
| IE | Interlingue |
| IK | Inupiak |
| IN | Indonesian |
| IS | Icelandic |
| IW | Hebrew |
| JI | Yiddish |
| JW | Javanese |
| KA | Georgian |
| KK | Kazakh |
| KL | Greenlandic |
| KM | Cambodian |
| KN | Kannada |
| KO | Korean (KOR) |
| KS | Kashmiri |
| KU | Kurdish |
| KY | Kirghiz |
| LA | Latin |
| LN | Lingala |
| LO | Laothian |
| LT | Lithuanian |
| LV | Latvian, Lettish |
| MG | Malagasy |
| MI | Maori |
| MK | Macedonian |
| ML | Malayalam |
| MN | Mongolian |
| MO | Moldavian |
| MR | Marathi |
| MS | Malay (MAY) |
| MT | Maltese |
| MY | Burmese |
| NA | Nauru |
| NE | Nepali |
| NL | Dutch |
| NO | Norwegian |
| OC | Occitan |
| OM | (Afan) Oromo |
| OR | Oriya |
| PA | Panjabi |
| PL | Polish |
| PS | Pashto, Pushto |
| PT | Portuguese |
| QU | Quechua |
| RM | Rhaeto-Romance |
| RN | Kirundi |
| RO | Rumanian |
| RU | Russian |
| RW | Kinyarwanda |
| SA | Sanskrit |
| SD | Sindhi |
| SG | Sangho |
| SH | Serbo-Croatian |
| SI | Singhalese |
| SK | Slovak |
| SL | Slovenian |
| SM | Samoan |
| SN | Shona |
| SO | Somali |
| SQ | Albanian |
| SR | Serbian |
| SS | Siswati |
| ST | Sesotho |
| SU | Sundanese |
| SV | Swedish |
| SW | Swahili |
| TA | Tamil |
| TE | Telugu |
| TG | Tajik |
| TH | Thai |
| TI | Tigrinya |
| TK | Turkmen |
| TL | Tagalog |
| TN | Setswana |
| TO | Tonga |
| TR | Turkish |
| TS | Tsonga |
| TT | Tatar |
| TW | Twi |
| UK | Ukrainian |
| UR | Urdu |
| UZ | Uzbek |
| VI | Vietnamese |
| VO | Volapuk |
| WO | Wolof |
| XH | Xhosa |
| YO | Yoruba |
| ZU | Zulu |
Clock Set
- Turn on the TV and select the VCR channel (or AV mode).
- Slide the TV/VCR/DVD switch to the right.

Perform clock setting only if the clock has not been set correctly by the Plug&Play setting.
Preparations
1 Turn on the unit.
Press POWER (⏻/l).
2 Select the VCR deck.
On the unit
Press VCR/DVD repeatedly so that the VCR indicator lights up.
On the Remote
Press VCR so that the VCR indicator lights up.
3 Access the Main Menu screen.
Press SET UP MENU.
4 Access the Initial Set screen.
Press △▽ to move the highlight bar (arrow) to "INITIAL SET", then press OK or ▷.

5 Access the Clock Set screen.
Press △▽ to move the highlight bar (arrow) to "CLOCK SET", then press OK or ▷.

Semiauto Clock Set
You can change the host channel/D.S.T. (Daylight Saving Time)/time zone setting manually. First follow steps 1 to 5 in "Preparations" (☐ pg. 24), then go to the following steps.
NOTE:
The time set previously will be erased when "AUTO CLOCK", "HOST CH", "D.S.T." or "TIME ZONE" setting is changed.
1 Set "AUTO CLOCK" to "ON".
Press OK or ▷ repeatedly to move the highlight bar to "AUTO CLOCK", then press △▽ so that "ON" is selected.

2 Select the host channel.
You can either select "AUTO" or enter a PBS channel number.
Press OK or ▷ to move the highlight bar to "HOST CH", then press △▽ repeatedly until "AUTO" or the desired PBS channel number is selected.
NOTE:
Some PBS channels do not transmit clock setting data.
3 Select the D.S.T. mode.
Press OK or ▷ to move the highlight bar to "D.S.T.", then press △▽ repeatedly until the desired setting is selected.
AUTO: Select if you want to adjust your VCR's clock automatically by the incoming signal from the host channel. Be sure to select the correct time zone manually in step 4.
ON: Adjustment will be made by the built-in clock itself.
OFF: Select when Daylight Saving Time does not apply to you.
4 Select the time zone.
Press OK or ▷ to move the highlight bar to "TIME ZONE", then press △▽ repeatedly until "AUTO" or the desired time zone is selected. Each time you press the button, the time zone changes as follows:
AUTO ATLANTIC EASTERN CENTRAL MOUNTAIN PACIFIC ALASKA HAWAII (back to the beginning)
NOTE:
If an incorrect time is displayed by the Plug & Play function, you may be receiving the clock setting data of a PBS channel from an adjacent time zone or from an incorrect PBS channel from a cable TV system. If you selected "AUTO" for the host channel in step 2, be sure to select the correct time zone manually.
5 Complete the Semiauto Clock Set.
Press SET UP MENU to return to normal screen.
IMPORTANT
Turn off the unit after performing Semiauto Clock. "AUTO" will appear on the front display panel while the clock is being set. The current clock time will appear automatically when the clock setting is complete.
AUTO DAYLIGHT SAVING TIME
This function enables automatic adjustment of the unit's clock at the start and end of Daylight Saving Time.
With Auto DST activated, —
— on the first Sunday of April at 2:00 AM, the clock is adjusted to 3:00 AM. — on the last Sunday of October at 2:00 AM, the clock is adjusted to 1:00 AM.
Manual Clock Set
First follow steps 1 to 5 in "Preparations" (13) pg. 24), then go to the following steps.
1 Set time, date and year.
Press until the desired time appears, then press OK or . Set the date and year in the same way.
- Holding changes the time in 30-minute intervals, or changes the date in 15-day intervals.

2 Select D.S.T. mode.
Press OK or ▷ to move the highlight bar to "D.S.T.", then press △▽ to select the desired setting.
ON: Adjustment will be made by the built-in clock itself.
OFF: Select when Daylight Saving Time does not apply to you.

3 Start clock.
Press SET UP MENU and normal screen appears.
To make corrections any time during the process
Press OK or ▷ repeatedly until the item you want to change blinks, then press △▽.
Tuner Set
- Turn on the TV and select the VCR channel (or AV mode).
- Slide the TV/VCR/DVD switch to the right.

INFORMATION
The unit selects the correct band (TV or CATV) automatically during Auto Channel Set. The selected band will be displayed on the right side of "BAND" on the Tuner Set screen.
Auto Channel Set
Perform Auto Channel Set only if channels have not been set correctly by the Plug&Play setting.
1 Turn on the unit.
Press POWER (⏻/l).
2 Select the VCR deck.
On the unit
Press VCR/DVD repeatedly so that the VCR indicator lights up.
On the Remote
Press VCR so that the VCR indicator lights up.
3 Access the Main Menu screen.
Press SET UP MENU.
4 Access the Tuner Set screen.
Press △▽ to move the highlight bar (arrow) to "TUNER SET", then press OK or ▷.

5 Perform Auto Channel Set.
Press △▽ to move the highlight bar (arrow) to "AUTO CHANNEL SET", then press OK or ▷. You can automatically set the receivable channels in your area in the order of their frequencies.
- When Auto Channel Set is complete, "SCAN COMPLETED" appears on the TV screen.
- If the scan was unsuccessful, "SCAN COMPLETED—NO SIGNAL—" appears on screen. Check the connections and start again.
![graph TD A["TUNER SET"] --> B["BAND"] B --> C["--AUTO CHANNEL SET"] C --> D["MANUAL CHANNEL SET"] D --> E["SELECT WITH (▲▼) AND (OK) PRESS (MENU) TO END"] F["AUTO CHANNEL SET"] --> G["SCANNING..."] G --> H["PRESS (MENU) TO END"]](/content/2026/06/1341529/images/0296b41627f5bc6dab3eb6b871983c5c8513d41ee0085ac3746f9b87850734ce.jpg)
6 Return to the normal screen.
Press SET UP MENU.
Manual Channel Set
You can add the channels you want or delete the channels you do not want manually.
1 Turn on the unit.
Press POWER (⏻/1).
2 Select the VCR deck.
On the unit
Press VCR/DVD repeatedly so that the VCR indicator lights up.
On the Remote
Press VCR so that the VCR indicator lights up.
3 Access the Main Menu screen.
Press SET UP MENU.
4 Access the Tuner Set screen.
Press △▽ to move the highlight bar (arrow) to "TUNER SET", then press OK or ▷.
5 Access the Manual Channel Set screen.
Press △▽ to move the highlight bar (arrow) to "MANUAL CHANNEL SET", then press OK or ▷.

6 Add or skip the desired channels.
To add channels
1 Press the number keys to input a channel number you want to add. 2 Press OK or ▷ to set to "ADD". 3 Repeat 1 to 2 to add other channels.

To skip channels
1 Press △▽ or the number keys to select a channel number you want to skip. 2 Press OK or ▷ to set to "SKIP". 3 Repeat 1 and 2 to skip other channels.
7 Return to the normal screen.
Press SET UP MENU.
Basic Playback
- Turn on the TV and select the VCR channel (or AV mode).
- Slide the TV/VCR/DVD switch to the right.


Clean the video heads using a dry cleaning cassette — ECL-3F — when:
- Rough, poor picture appears while a tape is played back.
- The picture is unclear or no picture appears.
- "USED CLEANING CASSETTE" appears on the screen (only with "SUPERIMPOSE" set to "ON"). (LFP pg. 76)
NOTE:
The heads get dirty in the following cases: - in an environment prone to extreme temperature or humidity - in a dusty environment - flaw, dirt or mold on video tapes • continuous usage for a long time
1 Load a cassette.
Make sure the window side is up, the rear label side is facing you and the arrow on the front of the cassette is pointed toward the unit.
- Do not apply too much pressure when inserting.
- If the record safety tab has been removed, playback begins automatically. Although the DVD deck is selected, the VCR deck is selected automatically if the DVD deck is in stop mode.
- The unit's power comes on automatically and the counter is reset to 0:00:00.
2 Select the VCR deck.
On the unit
Press VCR/DVD repeatedly so that the VCR indicator lights up.
On the Remote
Press VCR so that the VCR indicator lights up.
3 Find the program start point.
If the tape is advanced past the start point, press REW (◀◀). To go forward, press FF (▶▶).
4 Start playback.
Press PLAY (▶).
5 Stop playback.
Press STOP (■). Then press EJECT (▲) on the VCR deck to remove the cassette.
Usable cassettes
Full-Size VHS
T-30 (ST-30**)
T-60 (ST-60**)
T90
T-120 (ST-120**)
T-160 (ST-160**)
ST-210**

Compact VHS*
TC-20 (ST-C20**)
TC-30 (ST-C30**)
TC-40 (ST-C40**)
* Compact VHS camcorder recordings can be played on this unit. Simply place the recorded cassette into a VHS Cassette Adapter and it can be used just like any full-sized VHS cassette.
** This unit can record on regular VHS and Super VHS cassettes. However, it will record regular VHS signals only.
- S-VHS recording is not possible with this unit.
***This unit is equipped with SQPB (S-VHS QUASI PLAYBACK) that lets you watch tapes recorded in the S-VHS format and the SP mode with regular VHS resolution.
- SQPB does not deliver Super VHS resolution.
Playback Features
- Turn on the TV and select the VCR channel (or AV mode).
- Slide the TV/VCR/DVD switch to the right.

ATTENTION
In the search, still, slow-motion or frame-by-frame playback mode,
●the picture will be distorted. ●the noise bars will appear. ●there may be a loss of colour. - you cannot hear the sound.
Still Picture/Frame-By-Frame Playback
1 Pause during playback.
Press PAUSE (II).
- If there is vertical jitter, press CH+/- on the Remote to correct the picture.
2 Activate frame-by-frame playback.
Press PAUSE (II) to advance a still picture.
Slow Motion
1 Pause during playback.
Press PAUSE (II).
2 Activate slow motion playback.
Press and hold PAUSE (II) for 2 seconds, then release. Press PAUSE (II) and release again to return to still picture.
●The speed changes for each direction by pressing REW (◀◀) and FF (▶▶) repeatedly.
NOTE:
During slow motion playback, some noise may appear on the TV screen. Press CH + or - on the Remote to eliminate the noises.
High-Speed (Turbo) Search
During playback, press FF (▶▶) for forward high-speed search, or REW (◀◀) for reverse high-speed search.
- The speed changes for each direction by pressing REW (◀◀) and FF (▶▶) repeatedly.
When pressing FF (▶▶):
(SP): +5x↔+7x
(EP): +11x ↔ +21x
When pressing REW (◀◀):
Once REW (◀◀) is pressed, reverse search starts at -1x normal playback speed. After this, each press of REW (◀◀) changes the search speed between -5x and -7x in SP mode, and -11x and -21x in EP mode.
(SP): -1x → -5x ↔ -7x
(EP): -1x → -11x ↔ -21x
To resume normal playback, press PLAY (▶).

Skip Search
During playback, press SKIP SEARCH 1 to 6 times to skip over unwanted sections.
Each press initiates a 30-second period of fast-motion playback. Normal playback resumes automatically.
To resume normal playback during a Skip Search, press PLAY (▶).
Index Search
Your unit automatically marks index codes at the beginning of each recording. This function gives you quick access to any one of 9 index codes in either direction.
NOTE:
Before starting, make sure the unit is in the Stop mode.

Activate Index Search.
Press INDEX (1◄◄) or INDEX (►►). "INDEX -1" or "INDEX 1" is displayed on the TV screen and search begins in the corresponding direction.
- To access index codes 2 through 9, press INDEX (I◀◀) or INDEX (▶▶) repeatedly until the correct index number is displayed.
Example:
To locate the beginning of B from the current position, press INDEX (I◀◀) twice.
To locate the beginning of D from the current position, press INDEX (▶▶) once.

Index number
- When the specified index code is located, playback begins automatically.
Instant ReView
Simply by pressing a single button, the unit power comes on, rewinds, and begins playback of the last timer-recorded program. If you have several programs recorded, you can easily access any of them.
NOTE:
Before starting, make sure that the unit is off and that the Timer mode is disengaged.
Activate Instant ReView.
Press the unit power comes on and the unit searches for the index code indicating the start of the last timer-recorded program. Once it's found, playback begins automatically.
●To watch the first of the 3 programs, press down times. The unit searches and begins playback automatically. You can access a program as far as 9 index codes away from the current tape position.

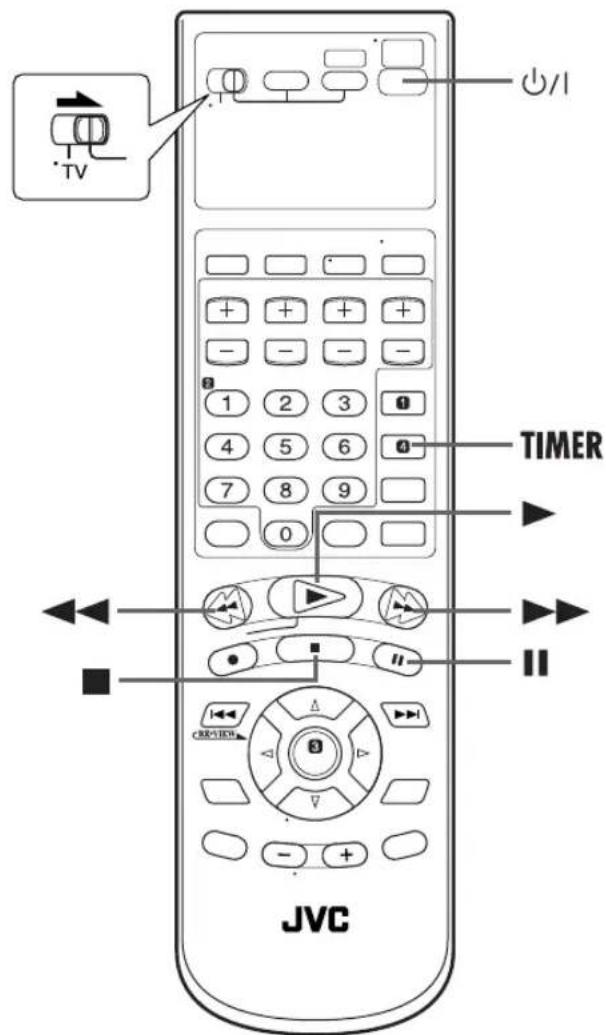
Next Function Memory
The Next Function Memory "tells" the unit what to do after rewinding. Before continuing, make sure the unit is in Stop mode.
a- For Automatic Start Of Playback Press REW (◀◀), then press PLAY (▶) within 2 seconds. b- For Automatic Power Off Press REW (◀◀), then press POWER (○/1) within 2 seconds. c- For Automatic Timer Standby Press REW (◀◀), then press TIMER within 2 seconds. d- For Automatic Cassette Ejection After Tape Rewind Press REW (◀◀), then press EJECT (▲) within 2 seconds.
Repeat Playback
Your unit can automatically play back the whole tape 100 times repeatedly.
1 Start playback.
Press PLAY (▶).
2 Activate Repeat Playback.
Press PLAY (▶) and hold for over 5 seconds, then release.
- The Play indicator (▷) on the front display panel blinks slowly.
● After playing back a tape 100 times, the unit stops automatically.
3 Stop Repeat Playback.
Press STOP (■) at any time.
- Pressing PLAY (▶), REW (◀◀), FF (▶▶) or PAUSE (■) also stops Repeat Playback.

Manual Tracking
Your unit is equipped with automatic tracking control. During playback, you can override this and adjust the tracking manually by pressing the CH buttons.

1 Override automatic tracking.
During playback, press SP/EP on the Remote.
2 Adjust the tracking manually.
Press CH + or - on the Remote.
- Press SP/EP again to return to automatic tracking.
NOTE:
When a new tape is inserted, the unit enters the automatic tracking mode automatically.
Soundtrack Selection
Your unit is capable of recording three soundtracks (HI-FI L, HI-FI R and NORM) and will play back the one you select.
During Playback
Pressing A.MONITOR changes the soundtrack as follows:
- You can also select the soundtrack on the Function Set screen. (pg. 77)
| TRACK | USE |
| On-Screen Display | |
| H I-F I Hi-Fi sound is played back | |
| H I-F I L | Sound on the left Hi-Fi channel is played back |
| H I-F I R | Sound on the right Hi-Fi channel is played back |
| NORM | Sound on the normal track is played back |
| NORM H I-F I | Both sounds on the Hi-Fi track and normal track are mixed and played back |
NOTES:
- "HIFI" should normally be selected. In this mode, Hi-Fi stereo tapes are played back in stereo, and the normal audio track is played back automatically for tapes with only normal audio.
- "SUPERIMPOSE" must be set to "ON" or the on-screen displays will not appear. (☐ pg. 76)
Basic Recording
- Turn on the TV and select the VCR channel (or AV mode).
- Slide the TV/VCR/DVD switch to the right.


Recording Resume Function
If there is a power outage during recording, Instant Timer Recording or timer recording (1-2 pg. 33, 34, 36), the recording will resume automatically when power is restored to the unit unless the unit's memory backup has expired.
1 Load a cassette.
Insert a cassette with the record safety tab intact.
- The unit's power comes on automatically and the counter is reset to 0:00:00.
2 Select the VCR deck.
On the unit
Press VCR/DVD repeatedly so that the VCR indicator lights up.
On the Remote
Press VCR so that the VCR indicator lights up.
3 Choose a program.
Press CH +/- or the number keys to select the channel you wish to record.
4 Set the tape speed.
Press SP/EP. The current setting appears on the front display panel or TV screen. Press SP/EP again to change the setting while the tape speed is displayed on the TV screen.
5 Start recording.
Press and hold REC (●) and press PLAY (▶) on the Remote, or press REC (●) on the unit.
6 Pause/Resume recording.
Press PAUSE (II). Press PLAY (▶) to resume recording. - You can select channel during the Record Pause mode.
7 Stop recording.
Press STOP (■). Then press EJECT (▲) on the VCR deck to remove the cassette.
Recording Features
- Turn on the TV and select the VCR channel (or AV mode).
- Slide the TV/VCR/DVD switch to the right.


Accidental erasure prevention
To prevent accidental recording on a recorded cassette, remove its safety tab. To record on it later, cover the hole with adhesive tape.

Record One Program While Watching Another
If your unit is connected to the TV via the AV connection, press TV/VCR. The unit's VCR indicator and the TV broadcast being recorded disappear.
Once recording is in progress, all you need to do is to set the channel controls on the TV for the station you wish to view.
- The program selected with the TV's channel controls appears on the TV screen, while the one selected with the unit's CH buttons is recorded on the tape.
NOTE:
You can also use the DVD deck in the following cases. Before use, be sure to turn on the unit and select the DVD deck.
- During recording • During timer recording • During timer standby mode
Instant Timer Recording (ITR)
This easy method lets you record for from 30 minutes to 6 hours (selectable in 30-min. increments), and shuts the unit off after recording is finished.
1 Start recording.
Press REC (●) on the unit.
2 Engage the ITR mode.
Press REC (●) again. "○" blinks and "0:30" appears on the front display panel.
3 Set the recording duration.
If you want to record for more than 30 minutes, press REC (●) to extend the time. Each press extends recording time by 30 minutes.
NOTES:
- You can only perform ITR using the REC (●) button on the unit's front panel.
- Still picture playback stops automatically after 5 minutes to protect the heads.
- When the end of the tape is reached during timer recording, the unit stops and "○" and "▷" blink on the front display panel.
- When the end of the tape is reached during timer recording or Instant Timer Recording, the unit is turned off and "○" and "▷" blink on the front display panel.
- During Instant Timer Recording, any other timer programmed recording won't start even if their start time has come. In such a case, the timer programmed recording starts (if the end time of the timer programmed recording is set after the end of Instant Timer Recording) after the Instant Timer Recording finishes.

Elapsed Recording Time Indication
1 Set the counter display.
Press DISPLAY until a counter reading appears on the front display panel.

2 Reset the counter.
Press C.RESET before starting recording or playback.
●The counter is reset to "0:00:00" and shows the exact elapsed time as the tape runs. You can check the exact time of a recording or playback.
Tape Remaining Time
Press DISPLAY until the time remaining on the tape appears.
- The front display panel shows the tape remaining time with "▲" displayed.

- By pressing the DISPLAY button, you can change display to show the clock time, counter reading or tape remaining time.
NOTES:
- When you press DISPLAY, the on-screen display appears on the TV screen for 5 seconds, then the displays other than the counter disappear. To clear the counter display, press DISPLAY.
- Depending on the type of tape being used, the tape remaining time reading may not appear right away, or may not be correct. "--:--" may sometimes appear, or the display may blink on occasion.
Second Audio Recording
This unit's built-in MTS decoder enables reception of Multichannel TV Sound broadcast. To record a SAP program received, set "2ND AUDIO RECORD" to "ON". (LFP pg. 77)
NOTE:
When the channel is changed on the unit:
●The "STEREO" indicator appears on the screen for about 5 seconds if the program is a stereo broadcast.
●The "SAP" indicator appears on the screen for about 5 seconds if the program is a SAP broadcast.
●Both indicators appear when a stereo program is accompanied by SAP sound.
Express Timer Programming
Before performing Express Timer Programming:
- Make sure that the unit's built-in clock is set properly.
- Insert a cassette with the safety tab in place. The unit will come on automatically.
- Turn on the TV and select the VCR channel (or AV mode).
- Slide the TV/VCR/DVD switch to the right.

Example: To timer-record the program from 8:00 to 10:00 on 24th December, on channel 12.
1 Select the VCR deck.
On the unit
Press VCR/DVD repeatedly so that the VCR indicator lights up.
On the Remote
Press VCR so that the VCR indicator lights up.
2 Access the Program screen.
Press PROG., (If you're just starting out, "P1" appears.)

3 Enter the program start time.
Press START +/- to enter the time you want recording to start.
- Press and hold START +/- to move in 30-minute increments, or press and release repeatedly to move 1 minute at a time.

4 Enter the program stop time.
Press STOP +/- to enter the time you want recording to stop.
- Press and hold STOP +/- to move in 30-minute increments, or press and release repeatedly to move 1 minute at a time.
5 Enter the program date.
Press DATE +/- .
- The current date appears on the TV screen. The date you enter appears in its place.

Enter the channel position.
Press CH +/-.

Set the tape speed.
Press SP/EP.

Return to the normal screen.
Press PROG. or OK. "PROGRAM COMPLETED" appears on the TV screen for about 5 seconds, then the normal screen appears. If "PROGRAM NOT COMPLETED PROGRAM OVERLAP" appears on the TV screen, see page 40.
- Repeat steps 2 - 8 for each additional program.

Engage the unit's timer mode.
Press TIMER. The unit turns off automatically and “⊖” appears on the front display panel.
- To disengage the timer mode, press TIMER again.
To Timer-Record Weekly Or Daily Serials:
— anytime during steps 3 through 7, press WEEKLY (number key "9") for weekly serials or DAILY (number key "8") for daily serials (Monday – Friday). Either "WEEKLY" or "DAILY" appears on the TV screen. Pressing the button again makes the corresponding indication disappear.
NOTES:
- You can program this unit to timer-record as many as 8 programs. If you try to program the unit to record a ninth, "PROGRAM FULL" appears on the TV screen. To record the extra program, you must first cancel any unnecessary programs. (17) pg. 39)
- In case of a power failure after programming, the unit's memory backup keeps your selections for approximately 5 seconds.
- Programs that start after midnight must have the next day's date.
Cable Box or DBS Receiver Users
To timer-record a satellite broadcast using Express Timer Programming:
1 Perform steps 1 - 9. Enter "F-1" for the channel position in step 6. 2 Set the DBS receiver to the appropriate channel before the selected program begins. 3 Leave the DBS receiver's power on.

Check, cancel and change programs
1 Disengage the timer mode.
Press TIMER, then press POWER (☐/I).
2 Access the Program Check screen.
Press PROG.CHECK.

3 Access the Program screen.
Press PROG.CHECK again to check more information.
Each time you press
PROG.CHECK, the next program's information appears.
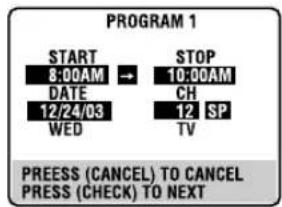

To cancel or change a program
4 Cancel or change a program.
Press CANCEL to cancel a program. To change program settings, press the appropriate button: START +/-, STOP +/-, DATE +/-, CH +/-, DAILY (number key "8"), WEEKLY (number key "9") and/or SP/EP.
5 Return to the normal screen.
Press PROG. CHECK as many times as necessary. If there are still some programs remaining, go on to step 6.
6 Return to the timer mode.
Press TIMER.

ATTENTION
If there is a conflict in the timer schedule and one program overlaps with another, only the parts shown below in gray will be recorded.
Pattern 1: The program with the lower program number will be recorded.

Pattern 2: The program starting earlier will be recorded.

Pattern 3: The program starting earlier will be recorded, followed by the remaining portion of the other program.

When programs overlap each other
If "PROGRAM NOT COMPLETED PROGRAM OVERLAP" appears, you have another program overlapping the program you have just made.
The Program Check screen appears and conflicting programs will start blinking.
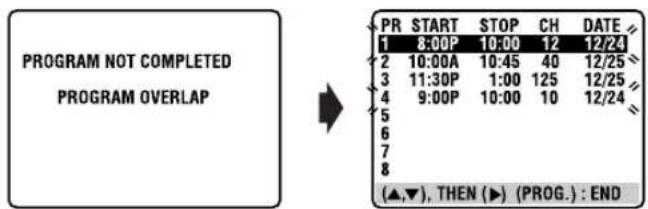
Example: Program 1 (you have just made) and Program 4 overlap each other.
1 Confirm the overlapping programs.
Overlapping programs blink on the TV screen.
2 Select the program to modify.
Press , then press OK or .
●You can only select one of the overlapping programs.
NOTE:
If you do not mind this overlap, press PROG. to finish the timer program setting. The program with the lower program number will be recorded and the other one will not be recorded correctly. If no changes are made for approximately 1 minute, the unit will return to the normal screen.
3 Cancel or change program setting.
To cancel a program, press CANCEL when the Program screen you do not want is shown. "PROGRAM COMPLETED" appears on the TV screen for about 5 seconds, then the normal screen appears.
To change a program, press the appropriate button: START +/-, STOP +/-, DATE +/-, CH +/-, DAILY (number key "8"), WEEKLY (number key "9") and/or SP/EP when the Program screen on which you want to make changes is shown, then press OK. "PROGRAM COMPLETED" appears on the TV screen for about 5 seconds, then the normal screen appears.
NOTE:
If the overlap is not yet solved, or another overlap occurs with the timer program setting after making the last correction on a program, the conflicting programs will be shown on the Program Check screen again. Repeat the above steps again until the overlap is solved.
Satellite Auto Recording
This function allows you to automatically record a satellite program which is timer-programed on your external DBS receiver. Connect a DBS receiver to the unit's AUDIO/VIDEO input (F-1) connector and program the timer on the DBS receiver. The unit starts or stops recording by the signals input from the DBS receiver. After recording, the unit's power shuts off automatically.
- You can also connect the cable box if it has a timer.

ATTENTION
- Be sure not to turn on the DBS receiver before the program is executed; otherwise, the unit will start recording when the DBS receiver's power is turned on.
- If you have connected another appliance other than a DBS receiver to the AUDIO/VIDEO input (F-1) connector, be sure not to engage the Satellite Auto Recording mode; otherwise, the unit will start recording when the connected appliance's power is turned on.
- Satellite Auto Recording and timer-recording cannot be done at the same time.
Before performing the following steps:
- Make sure the DBS receiver is connected to the unit's AUDIO/VIDEO input (F-1) connector. ● Program the timer on the DBS receiver.
- Insert a cassette with the safety tab in place.
- Slide the TV/VCR/DVD switch to the right.
1 Select the VCR deck.
On the unit
Press VCR/DVD repeatedly so that the VCR indicator lights up.
On the Remote
Press VCR so that the VCR indicator lights up.
2 Set the tape speed.
Press SP/EP.
3 Engage the Satellite Auto Recording mode.
Press and hold REC LINK for about 2 seconds. The “A” and “Θ” indicators light up and the unit turns off automatically.
NOTES:
- To disengage the Satellite Auto Recording mode, press REC LINK. The "A" indicator goes off.
- If the unit's power is off, it is not possible to engage the Satellite Auto Recording mode.
- In step 3, if the "A" indicator does not light but instead blinks quickly even though your DBS receiver's power is off, Satellite Auto Recording will not work properly with that DBS receiver*. If this is the case, perform "Express Timer Programming" (17 pg. 36) to timer-record a satellite program. * Some DBS receivers output signals even if the power is off. Satellite Auto Recording is not possible with those DBS receivers.
● The "A" indicator blinks while Satellite Auto Recording is in progress.
● For timer programming of the DBS receiver, refer to the instruction manual of the DBS receiver.
● Satellite Auto Recording is not possible if your DBS receiver does not have a timer.
- Pressing the unit's POWER (↓/↓) button while Satellite Auto Recording is in progress turns off the unit's power and disengages the Satellite Auto Recording mode.
- If there are more than one satellite programs you wish to record with Satellite Auto Recording, it is not possible to set different tape speeds for each program.
- Depending on the type of DBS receiver, the unit may not record a slight portion of the beginning of the program or may record slightly longer than the actual length of the program.
- If you engage the Satellite Auto Recording mode when the DBS receiver's power is on, the unit will not start Satellite Auto Recording even though the “A” and “Θ” indicators blink. When the DBS receiver shuts off once and is turned back on again, the unit starts recording.
● You can also record a program from your cable system in the same way if the system has a timer.
Basic Playback

- Turn on the TV and select the VCR channel (or AV mode).
- Slide the TV/VCR/DVD switch to the right.


ATTENTION
- You cannot use the DVD deck when the VCR deck is in the Automatic Satellite Recording standby and recording mode.
- You can use the DVD deck when the VCR deck is in the timer standby mode.
To play back an MP3/JPEG disc, see pages 62-67.
1 Load the disc.
Press OPEN/CLOSE (▲) on the DVD deck to open the disc tray.
- The unit's power comes on automatically. 2 Place the disc in the disc tray.
- For details, refer to "Placing a Disc" (I) pg. 9). 3 Press OPEN/CLOSE (▲) on the DVD deck to close the disc tray.
- Pressing PLAY (▶) also closes the disc tray.
- Playback begins automatically if the auto-playback DVD disc is loaded. Although the VCR deck is selected, the DVD deck is selected automatically if the VCR deck is in stop mode.
2 Select the DVD deck.
On the unit
Press VCR/DVD repeatedly so that the DVD indicator lights up.
On the Remote
Press DVD so that the DVD indicator lights up.
3 Start playback.
Press PLAY(▶).
Example: DVD VIDEO

- It may take a few seconds to start playback.
- If you load a DVD disc whose region code does not match the DVD deck, "REGION CODE ERROR!" appears on the TV screen. For details, refer to "Region Number" (C7 pg. 7).
- With Video CD discs with PBC control or some DVD discs, the menu display may appear on the TV screen after starting playback. In this case, select an item which you want to play back from the menu. Otherwise, the playback cannot go forward. Refer to "Locating a desired scene using the menu of the Video CD with PBC" (17 pg. 43) or "Locating a desired scene using the DVD menu" (27 pg. 43).
4 Pause playback.
Press PAUSE (II).
●To resume normal playback, press PLAY (▶).
5 Stop playback.
Press STOP (■). Press OPEN/CLOSE (▲) on the DVD deck to open the disc tray, then remove the disc.
- Pressing PLAY (▶) resume playback from the position where you stop playback. For details, see "Resume Function" on page 45.
NOTE:
When you press OPEN/CLOSE (▲) while the unit is turned off, the unit's power comes on and the disc tray opens automatically.
Playback Features
- Turn on the TV and select the VCR channel (or AV mode).
- Slide the TV/VCR/DVD switch to the right.
Playback Control (PBC) Function — Locating a desired scene using the menu of the Video CD with PBC


Some Video CD discs support the PBC function. PBC is an abbreviation of "Playback Control." A Video CD disc recorded with PBC has its own menus, such as a list of the songs of the disc. You can locate a specific scene by using the menu.
1 Access the PBC menu.
In stop mode
Press PLAY (▶).
- Depending on a disc, PBC menu may automatically appear on the TV screen by simply loading a disc on the unit.

During playback
Press RETURN.
●"PBC" appears on the front display panel.

2 Start playback.
Press the appropriate number keys.
●The unit starts playback of the selected item. - When "NEXT" or "PREVIOUS" appears on the TV screen: Pressing SKIP (▶▶▶) advances to the next page. Pressing SKIP (◀◀◀) returns to the previous page. - You can return to the menu by pressing RETURN. ●The method of the operation is different depending on the disc.
NOTES:
- If you want to playback a PBC-compatible Video CD disc without activating the PBC function, start playback by using the number keys instead of the PLAY (▶) button.
- To activate the PBC function when a PBC-compatible Video CD disc is being played back without the PBC function, press TOP MENU or MENU, or press STOP (■) (press twice when "RESUME" is set to "ON") then press PLAY (▶).
Locating a desired scene using the DVD menu


DVD VIDEO discs may have two types of the menus; top menu and disc menu.
Top menu
DVD discs generally have their own menus which show the disc contents. These menus contain various items such as titles of a movie, names of songs, or artist information. You can locate a desired scene by using the top menu displayed on the TV screen. Press TOP MENU to access the top menu.
Disc menu
DVD discs have the disc menu to select subtitle and audio language etc. for each title.
Press MENU to access the disc menu.
1 Access the DVD menu.
Press TOP MENU or MENU.

Example:
2 Start playback.
Press △▽◀▶ to select a desired item, then press OK. ●It may be possible to select the desired item using the number keys depending on the disc.
NOTES:
- When “ ○ ” appears on the TV screen in step 1, the disc does not have a top menu or disc menu.
- Top menu or disc menu may not appear depending on the discs even if it is recorded in DVD VIDEO format and finalized. In that case, press STOP (■) to display the total number of titles on a disc, then press the appropriate number keys to select the desired title.

Locating the start point of the item or skip the item

Press SKIP (|◀◀) or SKIP (▶▶) during playback.
Example:
To locate the beginning of item B from the current position, press SKIP (◀◀) twice.
To locate the beginning of item D from the current position, press SKIP (▶▶) once.

- When the specified item is located, playback begins automatically.
High-Speed Search

During playback, press FF (▶▶) for forward high-speed search, or REW (◀◀) for reverse high-speed search.
●The more times you press, the faster the playback picture moves. ●To resume normal playback, press PLAY (▶).
OR
During playback, press and hold SKIP (▶▶) for forward high-speed search, or press and hold SKIP (◀◀) for reverse high-speed search.
● While you press and hold the button, the image is played back at 5x speed. ● To resume normal playback, release SKIP (◀◀) or SKIP (▶▶).
NOTES:
- Actual speed may be different from that displayed on the TV screen depending on the discs.
- Playback sound is not heard in any High-Speed search mode other than in 1.5x speed search mode. ● During 1.5x speed search of a DVD VIDEO disc, you can hear the played back audio converted into Linear PCM format in stereo. In such a case, the pitch and sound quality may change depending on the disc.
- In case of DVD VIDEO discs formatted in DTS format, SVCD or Audio CD discs, playback sound is not heard during 1.5x speed search.
- When switching to 1.5x speed search during high-speed search, first press PLAY (▶) to return to normal playback, then press FF (▶▶).
Still Picture/Frame-By-Frame Playback

1 Pause during playback.
Press PAUSE (II).
2 Activate frame-by-frame playback.
Press PAUSE (II) to advance a still picture.
● To resume normal playback, press PLAY (▶).
Slow Motion

During playback, press PAUSE (II), then press REW (◀◀) for reverse slow motion playback, or FF (▶▶) for forward slow motion playback.
●Each press of FF (▶▶) changes the playback speed as follows: 1/32→1/16→1/4→1/2
●Each press of REW (◀◀) changes the playback speed as follows (only for DVD VIDEO discs): -1/32→-1/16→-1/4→-1/2
●To resume normal playback, press PLAY (▶).
NOTES:
●Reverse slow motion playback is possible only with DVD VIDEO discs.
●This function may not work for some Video CDs or SVCDs.
Resume Function

It is possible to memorize the position where you stop playback and resume playback from that position.
- Be sure to set "RESUME" to "ON" or "DISC RESUME". (☐) pg. 81)
1 Memorize the resume point.
Press STOP (■) during playback.
●"RESUME STOP" appears on the front display panel.

●The unit enters Resume Stop mode and memorizes the position where you stop playback as the resume point.
●The unit retains a memory of the resume points of the last 30 discs played back, even though they have been ejected, if "RESUME" is set to "DISC RESUME". (17 pg. 81)
●To clear the resume point:
When "RESUME" is set to "ON":
- Press STOP (■) in stop mode.
- Press POWER (↓/1) to turn off the unit.
- Eject the disc.
When "RESUME" is set to "DISC RESUME":
- Set "RESUME" to "OFF". (See page 81)
- Press STOP (■) in stop mode.
2 Resume playback.
Press PLAY (▶). The unit starts playback from the resume point.
● "RESUME PLAY" appears on the front display panel.

NOTES:
- The Resume function does not work on Audio CDs. It may also not work depending on the disc.
- If you stop playback of a disc for which a resume point has already been memorized, the memory will be updated with the new resume point.
● After the unit has memorized the resume point for 30 discs, remembering a new resume point will cause the unit to delete the oldest memorized point. Stopping playback of a disc for which a resume point is already stored may change the order in which the points are stored. This may potentially change the order in which points are deleted.
- When the unit memorizes a resume point for a disc, it also remembers audio language, subtitle, and angle settings.
This function may not work for some Video CDs or SVCDs.
Zooming

Press ZOOM during playback or while paused.
Each press of ZOOM changes the magnification as follows: 1.8x → 4x → 8x → 16x → 32x → 64x.
When a 16:9 aspect picture source is displayed on a 4:3 aspect TV (conventional TV) in Letter Box conversion mode, the black margins shown on the top and bottom of the TV screen will be cropped by selecting 1.8x magnification. In such a case, note that both left and right side parts of the picture will also be cropped.
While zoomed, the picture may look coarse or distorted.
Current magnification


Zoomed-in area

Press △ ▽ ◀ ▶ to move the zoomed-in scene.

To resume normal playback, press OK.

Each time you press ◀ ▶, the setting changes as follows: NONE → ACTION → DRAMA → THEATER → (Back to the beginning).
NONE: No effect.
ACTION: Suitable for action movies and sports programs in which sounds dynamically move.
DRAMA: Provides natural and warm sound. You can enjoy movies in a relaxed mood.
THEATER: You can enjoy sound effects like in a major theater.
● The selection menu disappears automatically if you do not change the selection for 10 seconds.
3 Select the effect level.
Press to select the desired effect level. (level 1 to 5)
● To resume normal playback, press 3D-PHONIC.
NOTES:
- The 3D Phonic function works correctly only when playing back a DVD VIDEO disc recorded in the Dolby Digital format. With other sources, you cannot get any effect if you activate 3D Phonic function.
- When playing back a DVD VIDEO disc recorded with the Dolby Digital that does not contain the rear signal, you cannot get a correct 3D Phonic sound even if you activate 3D Phonic function.
- The 3D Phonic function does not affect the Dolby Digital bitstream signal from the DIGITAL AUDIO OUT connector.
- When 3D Phonic function is activated, Analog Down Mix and D. Range Control functions are disabled. (L→ pg. 80)
3D Phonic


3D Phonic function allows you to get a simulated surround effect from your stereo system. You can enjoy the vertical surround sound with your 2-channel stereo system.
1 Access the selection menu.
Press 3D-PHONIC during playback.
- The current setting appears on the right bottom corner of the TV screen.
2 Select the mode.
Press ◀ ▷ repeatedly, then press OK.

Selected mode Effect level
VFP function
— Adjusting the picture quality


The VFP (Video Fine Processor) function enables you to adjust the picture character according to the type of programming, picture tone or personal preference.
NOTE:
Before you start operation;
The VFP setting screen disappears if no operations are done for more than about 10 seconds. If the setting screen disappears before you finish, start from step 1 again.
1 Access the VFP setting menu.
Press DVD PICTURE during playback.
●The current setting appears on the TV screen.

2 Select the VFP mode.
Press ◀ ▷ repeatedly.
- Each time you press ◀, the VFP mode changes as follows: NORMAL→CINEMA→USER 1→USER 2→(Back to the beginning)
NORMAL: Select this normally.
CINEMA: Suitable for movie.
USER 1/ You can adjust parameters that affect picture appearance and store settings. Go to step 3.
NOTE:
You cannot adjust the parameters of "NORMAL" and "CINEMA".
To adjust picture appearance manually
3 Access USER menu.
Press ◀ ▷ repeatedly to select "USER 1" or "USER 2".

4 Select the parameter.
Press △▽ repeatedly to select a parameter you want to adjust, then press OK.
- Adjust gradually and confirm picture appearance results are as preferred.
GAMMA (-4 to +4): Controls brightness of neutral tints while maintaining brightness of dark and bright portions.
BRIGHTNESS Controls screen brightness. (-16 to +16):
CONTRAST Controls screen contrast. (-16 to +16):
SATURATION Controls screen color depth. (-16 to +16):
TINT Controls screen tint. (-16 to +16):
SHARPNESS Controls screen sharpness. (+0 to +3):
Y DELAY Controls screen color gap. (-2 to +2):
●VFP menu disappears and the following pop-up window appears on the TV screen.
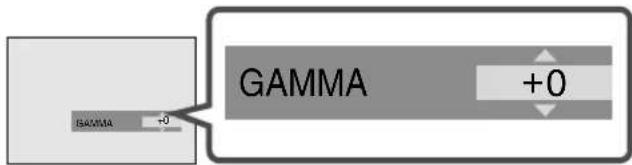
5 Adjust the parameter.
Press repeatedly to change the setting, then press OK.
●The current VFP settings appear again.
6 Adjust the other parameters.
Repeat steps 4 and 5 to adjust other parameters.
To return to the normal screen
Press DVD PICTURE.
To activate your setting
Press DVD PICTURE, then press ◀ ▷ repeatedly to select "USER 1" or "USER 2" that you have changed the parameters.
Using the on-screen bar

You can check disc information while the disc is loaded and you can use some functions using the on-screen bar. The on-screen bar allows you the various playback operations.

How to Access the on-screen bar
Press PLAY SETUP twice whenever a disc is loaded.
Example: During DVD VIDEO playback

Example: During Video CD playback

Contents of the on-screen bar during playback
DVD
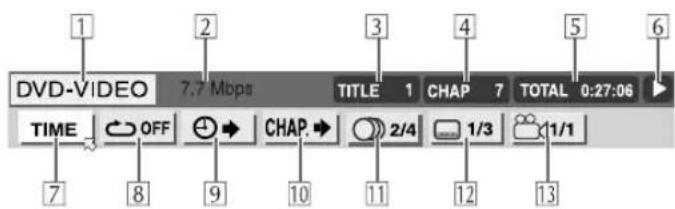
Video CD
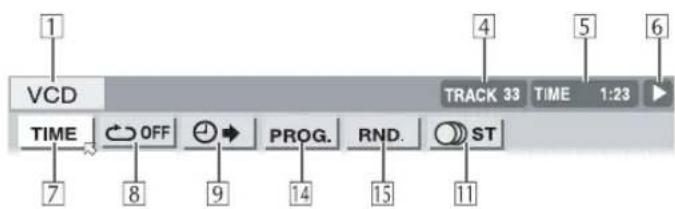
1 Disc type 2 Current transfer rate (Megabits per second) 3 Current title (for DVD) 4 Current chapter number (for DVD) or track number (for other type of discs) 5 Time information (see pg. 49) 6 Playback status
: appears during playback. / : appears during fast forward/reverse. / appears during playback in forward slow-motion/reverse slow-motion. II: appears when paused. □: appears when stopped.
7 Select this to change time information. (See 5 in the illustration above) (see pg. 49)
8 Select this for Repeat Playback. (see pg. 50) 9 Select this for time search function. (see pg. 51) 10 Select this for chapter search function. (see pg. 52) 11 Select this to change audio language or channel. (see pg. 56, 57) 12 Select this to change subtitle language. (see pg. 54) 13 Select this to change view angle. (see pg. 55) 14 Select this for Program Playback. (see pg. 53) 15 Select this for Random Playback. (see pg. 53)
Basic operation on the on-screen bar
Example: When selecting the Repeat mode of DVD
During playback or while stopped

Access the on-screen bar.
Press PLAY SETUP twice. The on-screen bar appears on the TV screen.
- The currently selected item is highlighted.


Select menu item.
Press ◀ to move ✉ to ⬇ then press OK. The pop-up window appears under the selected item.
● The current setting appears.


Select the option.
Press △▽ to select the desired option, then press OK.
• Each time you press △▽, the options change.
To clear the on-screen bar, press PLAY SETUP.
NOTE:
See the corresponding pages for details on each function.
Change the time information


You can change the time information in the on-screen bar on the TV screen and the front display panel of the unit.
During playback or while stopped

Access the on-screen bar.
Press PLAY SETUP twice. The on-screen bar appears on the TV screen.

Select menu item.
Press ◀ ▷ to move ≈ to ,then press OK.
- Each time you press OK, the time information changes as follows;
Example: During DVD playback


TIME: Elapsed playing time of current chapter/track
REM: Remaining time of current chapter/track
TOTAL: Elapsed time of title/disc
T.REM : Remaining time of title/disc
To clear the on-screen bar Press PLAY SETUP.
NOTES:
- While playing a Video CD, Audio CD or SVCD, the hour digit indication does not appear.
- While a DVD is stopped, “--:--” appears in the time information display.

Repeat Playback


You can repeat playback as you like according to the type of disc.
DVD VIDEO: during playback
Audio CD: during playback or in stop mode
Video CD/SVCD: in stop mode or during playback with PBC deactivated
When using the on-screen bar

Access the on-screen bar.
Press PLAY SETUP twice. The on-screen bar appears on the TV screen.

Select menu item.
Press ◀ ▷ to move ☑ to ⬇ then press OK.
●The following pop-up window appears under the selected item.


Select the repeat mode.
Press ▲▼ repeatedly to select the Repeat mode, then press OK.
●The mode changes as follows:
DVD VIDEO
CHAPTER→TITLE→A-B→OFF→(Back to the beginning)
| CHAPTER: The current chapter is played back repeatedly. | |
| TITLE: The current title is played back repeatedly. | |
| A-B: | The desired part is played back repeatedly. (37 pg, 51) |
| OFF: | Each title and chapter is played back once. |
Video CD/SVCD/CD
TRACK→ALL→A-B→OFF→(Back to the beginning)
| TRACK: | The current track is played back repeatedly. |
| ALL: | All tracks are played back repeatedly. |
| A-B: | The desired part is played back repeatedly. (37 pg. 51) |
| OFF: | Each track is played back once. |
● "A-B" cannot be selected while stopped.
To clear the on-screen bar
Press PLAY SETUP.
To cancel Repeat Playback
Repeat from step 1, select "OFF" in step 3, then press OK.
When using the REPEAT button:

Access the repeat mode.
Press REPEAT during playback of the item you want to repeat.
- Repeat mode is displayed on the TV.

Select the repeat mode.
Press REPEAT repeatedly to select the desired repeat mode, then press OK.
● To stop Repeat Playback, press STOP (■).
● To cancel Repeat Playback, press REPEAT repeatedly until "OFF" appears on the TV screen, then press OK.
NOTES:
- Repeat Playback is not possible with a Video CD and SVCD with PBC function.
- Repeat Playback may not work properly depending on the type of disc being used. ●You cannot select A-B Repeat Playback by pressing REPEAT.
A-B Repeat Playback


You can repeat the desired part.

Access the on-screen bar.
Press PLAY SETUP twice. The on-screen bar appears on the TV screen.

Select menu item.
Press ◀ ▷ to move ☑ to , then press OK.
●The following pop-up window appears under the selected item.


Select the repeat mode.
Press repeatedly to select "A-B".

Select the start point.
Press OK at the beginning of the part you want to repeat (point A).
●The following display appears in the on-screen bar.


Select the end point
Press OK at the end of the part you want to repeat (point B).
● A-B Repeat Playback starts. The selected part of the disc (between point A and point B) is played repeatedly.
To cancel A-B Repeat Playback
Repeat from step 1, select "OFF" in step 3, then press OK.
- You can also cancel Repeat Playback by pressing SKIP (◀◀◀) or SKIP (▶▶◀).
To clear the on-screen bar
Press PLAY SETUP.
NOTES:
● A-B Repeat Playback may not work properly depending on the type of disc being used. ● The subtitles recorded around the A-B point may not appear. ● The end of the item will be set as "B" point if the end of the item is reached before you set the "B" point. - When playing back a DVD, A-B Repeat Playback is possible only within the same title. ● "A-B" cannot be selected during Program and Random Playback. ● "A-B" cannot be selected while stopped.
Time Search


You can play back a disc from the desired point by specifying the elapsed time from the beginning of the current title (for DVD VIDEO) or the disc (for Audio CD/Video CD) using the Time Search.
When a PBC-compatible Video CD is played back, be sure to inactivate the PBC function before you perform Time Search by pressing the number keys instead of the PLAY (▶) button when you start playback.

Access the on-screen bar.
Press PLAY SETUP twice. The on-screen bar appears on the TV screen.

Select menu item.
Press ◀ to move ≌ to ⏱ then press OK.
●The following pop-up window appears under the selected item.


Select the time.
Press the number keys (0-9) to enter the time, then press OK.
Example:
To play back from a point 2 (hours): 34 (minutes): 08 (seconds) elapsed
![graph LR A["TIME _:__:__"] --> B["TIME 2:__:__"] B --> C["Press 2"] D["TIME 2:3_:__"] --> E["TIME 2:34:__"] E --> F["Press 4"] G["TIME 2:34:0_"] --> H["TIME 2:34:08"] H --> I["Press 8"]](/content/2026/06/1341529/images/945d9a0f6406c0635fa3a633cd9cd52fa094d028be37b81b18d8ab2278972797.jpg)
If you have specified a wrong selection,
Press ◀ repeatedly until the wrong number is erased, then press number keys to enter the correct numbers.
●The unit starts playback from the specified time.
To clear the on-screen bar
Press PLAY SETUP.
NOTES:
- When " ⊗" is displayed on the TV screen in step 3, you have selected a point that exceeds the recording time of the disc.
- Some DVD VIDEO discs do not contain time information, and it is not possible to use the Time Search function. In such a case, "S" is displayed on the TV screen as well. ●Time Search does not work while you play back the Video CD or SVCD with the PBC Function.
Reactivate the Playback Control (PBC) Function
You can reactivate the PBC function when you play back a PBC-compatible Video CD disc without PBC function.
- Press TOP MENU during playback.

Chapter Search


You can start playback of the desired chapter using the on-screen bar.

Access the on-screen bar.
Press PLAY SETUP twice. The on-screen bar appears on the TV screen.

Select menu item.
Press ◀ to move ≈ to CHAP→ press OK.
- The following pop-up window appears under the selected item.


Select the chapter.
Press the number keys (0-10) to enter the desired chapter number, then press OK.
● The unit starts playback from the selected chapter.
Examples:
To select track 5, press the number key "5".
To select track 15, press the number key "1" and "5".
To select track 25, press number key "2" and "5".
- It is not possible to use the number key "+10".
If you have specified a wrong selection
Enter the appropriate number keys again.
To clear the on-screen bar
Press PLAY SETUP.
NOTES:
- When “∅” is displayed on the TV screen in step 3, the chapter you have selected is not contained in the disc, or chapter search does not work on the disc.
- Chapter Search starts automatically when you select the desired chapter in step 3 depending on the disc.
Program Playback


You can play back up to 99 tracks in the desired order.

Access the on-screen bar.
Press PLAY SETUP twice in stop mode.

Select the menu item.
Press ◀ ▷ to move ☑ to PHOG press OK.
●The program table appears under the on-screen bar.


Select the tracks in the desired order.
Press the appropriate number keys to select the tracks.

Examples:
● To select track 5, press the number key "5". ● To select track 15, press the number key "+10" and "5". ● To select track 25, press number key "+10" twice, then "5".
If you have specified a wrong selection
Press STOP (■). The last selection programmed is erased.

Start playback.
Press PLAY (▶). Playback starts in the selected order.
- When all of the programmed tracks have been played back, Program Playback stops, but the programmed information remains. ● To stop Program Playback, press STOP (■).
- To clear all the programmed tracks, press STOP (■) to stop playback and press PLAY SETUP to clear the program table, then press STOP (■) again. ● During Program Playback, pressing SKIP (▶▶) skips to the next selection of the program. Pressing SKIP (◀◀) returns to the beginning of the current selection.
To clear the program table, press PLAY SETUP.
NOTE:
Program Playback is not possible depending on the type of disc.
Random Playback


You can play back all the tracks on the disc in random order.

Access the on-screen bar.
Press PLAY SETUP twice in stop mode.

Select the menu item.
Press ◀ ▷ to move ☑ to ,RNDn press OK.
●Playback starts in random order.

●To stop and quit Random Playback, press STOP (■). ●To cancel Random playback, repeat step 2 during Random Playback. Normal playback resumes at the current point.
To clear the on-screen bar Press PLAY SETUP.
NOTES:
●The same track will not be played back more than once during Random Playback. ●Random playback is canceled when all the tracks have been played back.

Subtitle Selection


You can select subtitle language.
- During playback
When using the on-screen bar

Access the on-screen bar.
Press PLAY SETUP twice. The on-screen bar appears on the TV screen.

Select menu item.
Press ◀ ▷ to move ☑ to 📄 then press OK.
● The following pop-up window appears under the selected item.
Example (DVD): "ENGLISH" is selected out of 3 subtitle languages recorded.


Select the subtitle language.
Press △▽ repeatedly to select the desired subtitle language, then press OK.
● Each time you press the button, the subtitle language changes.
To clear the on-screen bar
Press PLAY SETUP.
NOTES:
- For DVD VIDEO
Some subtitle languages are abbreviated in the pop-up window. See "Language Code List" (LFP pg. 23).
- For SVCD
SVCD can contain up to four subtitles. Pressing SUB TITLE changes the subtitles regardless of whether the subtitles are recorded or not. (Subtitles will not change if no subtitle is recorded.)
- When "⊗" appears on the TV screen in step 3, subtitle language is not recorded.
When using the SUB TITLE button:

Access the menu.
Press SUB TITLE.
● The following pop-up window appears on the TV screen.
Example (DVD): "ENGLISH" is selected out of 3 subtitle languages recorded.


Select the subtitle language.
Press △▽ or SUB TITLE repeatedly to select the desired subtitle language, then press OK.
● Each time you press the button, the subtitle language changes. - The pop-up window disappears if no operation is done for about 5 seconds.
NOTE:
When "⊗" appears on the TV screen in step 2, subtitle language is not recorded.
Angle Selection


You can enjoy a variety of scene angles if the DVD VIDEO disc contains "multi-angle" parts, where multiple cameras were used to shoot the same scene from different angles.
If the disc contains "multi-angle" parts, " 🔍" appears on the TV screen at the beginning of the "multi-angle" part when "ON SCREEN GUIDE" is set to "ON".
- During playback
When using the on-screen bar

Access the on-screen bar.
Press PLAY SETUP twice. The on-screen bar appears on the TV screen.

Select menu item.
Press ◀ to move ✉ to 📞, then press OK.
- The following pop-up window appears under the selected item.
Example: The first view angle is selected out of 3 view angles recorded.


Select the view angle.
Press ▲▼ repeatedly to select the desired view angle, then press OK.
- Each time you press the button, the angle of the scene changes.
To clear the on-screen bar, press PLAY SETUP.
NOTE:
When “∅” appears on the TV screen in step 3, the current scene is not recorded from multiple angles.
When using the ANGLE button:

Access the menu.
Press ANGLE.
- The following pop-up window appears on the TV screen.
Example: The first view angle is selected out of 3 view angles recorded.


Select the view angle.
Press ▲▼ or ANGLE repeatedly to select the desired view angle, then press OK.
● Each time you press the button, the angle of the scene changes.
- The pop-up window disappears if no operation is done for about 5 seconds.
Example:
1/3→2/3→3/3→(Back to the beginning)
![graph TD A["Car at top"] --> B["Car at side"] B --> C["Car at right"] C --> D["Car at bottom"]](/content/2026/06/1341529/images/018d6b187e5b62389d9d9e427911d414d78c38214ae1745795d26a46461464fd.jpg)

Audio Language Selection


Some DVD discs contain multiple audio tracks. You can select the audio language of movies (DVD VIDEO). - During playback
When using the on-screen bar

Access the on-screen bar.
Press PLAY SETUP twice. The on-screen bar appears on the TV screen.

Select menu item.
Press ◀ to move ☒ to ⚡ then press OK. ● The following pop-up window appears under the selected item.
Example: "ENGLISH" is selected out of 4 audio languages recorded.


Select the audio language.
Press △▽ repeatedly to select the desired audio language, then press OK.
● Each time you press the button, the audio language changes.
To clear the on-screen bar, press PLAY SETUP.
NOTES:
- Some audio languages are abbreviated in the pop-up window. See "Language Code List" (I 7 pg. 23)
- If "⊗" appears on the TV, the current scene does not contain plural audio languages.
When using the A.MONITOR button:

Access the menu.
Press A.MONITOR.
- The following pop-up window appears on the TV screen. Example: "ENGLISH" is selected out of 3 audio languages recorded.
![graph TD A["1/3 ENGLISH"] --> B["1/3"] B --> C["ENGLISH"] C --> D["Output Arrow"]](/content/2026/06/1341529/images/6efcfef219486ce636e487a87d8908f449e654ac2490c84c485ed25fe8f32462.jpg)

Select the audio language.
Press △▽ or A.MONITOR repeatedly to select the desired audio language, then press OK.
● Each time you press the button, the audio language changes. - The pop-up window disappears if no operation is done for about 5 seconds.
NOTE:
Some audio languages are abbreviated in the pop-up window. See "Language Code List" (LFP pg. 23).
Audio Channel Selection

When you play certain karaoke (DVD/Video CD/SVCD), you can enjoy karaoke by selecting the audio channel to play.
- The sound of each audio channel depends on the contents of the disc.
- During playback
When using the on-screen bar
1 Access the on-screen bar.
Press PLAY SETUP twice. The on-screen bar appears on the TV screen.
2 Select menu item.
Press ◀ ▷ to move ☑ to ○ when press OK.
- The following pop-up window appears under the selected item.
Example: "ST" (stereo) is selected.

3 Select the audio channel.
Press ▲▼ repeatedly to select the desired audio channel, then press OK.
● Each time you press the button, the audio channel changes.
To clear the on-screen bar, press PLAY SETUP.
When using the A.MONITOR button:
1 Access the menu.
Press A.MONITOR.
- The following pop-up window appears on the TV screen. Example: "ST" (stereo) is selected out of 3 audio channels recorded.
![graph TD A["Input"] --> B["1/3"] B --> C["ST"] C --> D["Output"]](/content/2026/06/1341529/images/7d19a9aaf063f5cb7cc15d26c57b663b151744a374b72cd6979fb35095477fa2.jpg)
2 Select the audio channel.
Press △▽ or A.MONITOR repeatedly to select the desired audio channel, then press OK.
● Each time you press the button, the audio channel changes.
- The pop-up window disappears if no operation is done for about 5 seconds.
For Video CD
ST→L→R→(Back to the beginning)
ST: To listen to normal stereo playback. L: To listen to L (left) audio channel only. R: To listen to R (right) audio channel only.
For SVCD
ST 1/ST 2: To listen to normal stereo playback of ST 1 or ST 2 channel.
L 1/L 2: To listen to the L (left) 1 or 2 audio channel.
R 1/R 2: To listen to the R (right) 1 or 2 audio channel.
Parental Lock
This function restricts playback of DVD VIDEO discs which contain violent (and other) scenes according to the level set by the user. For example, if a movie which includes violent scenes supports the parental lock feature, such scenes which you do not want to let children view can be cut or replaced with other scenes.
- Turn on the TV and select the VCR channel (or AV mode).
- Slide the TV/VCR/DVD switch to the right.

To set Parental Lock for the first time
1 Turn on the unit.
Press POWER (⏻/ı).
2 Select the DVD deck.
On the unit
Press VCR/DVD repeatedly so that the DVD indicator lights up.
On the Remote
Press DVD so that the DVD indicator lights up.
3 Access the DVD Set Up menu.
1 Press SET UP MENU. 2 Press ◀ to select "OTHERS".
4 Access the "PARENTAL LOCK" menu.
Press △▽ repeatedly to move ☒ to "PARENTAL LOCK", then press OK.
- The "PARENTAL LOCK" sub-menu appears on the TV screen.
- It is possible to access the "PARENTAL LOCK" menu only in the stop mode when a DVD disc is loaded on the unit.

5 Access the country code menu.
Press OK, then press △▽ repeatedly to move ☑ to "COUNTRY CODE", then press OK.

6 Select the country code.
Press △▽ repeatedly to move ☒ to select the country code, then press OK.
- See "Country/Area Code List for Parental Lock" (pg. 60).
- The ☒ moves to "SET LEVEL".

7 Select the Level.
Press OK, then press △▽ repeatedly to move ☑ to select the level of restriction, then press OK.
- The ☒ moves to "PASSWORD". ● The smaller the value of level is, the more restrictive the Parental Lock level is.
- Select "NONE" to cancel this function.

8 Enter the password.
Press the number keys to enter a four-digit number as your password, then press OK.
- The ☒ moves to "EXIT".

9 Return to the OTHERS menu screen.
Press OK.
- The " OTHERS" menu resumes.
To return to the normal screen
Press SET UP MENU.
NOTE:
Remember your password, or make a note of it.
To change the settings
You can change the Parental lock settings later.
1 Access the Parental Lock screen.
1 Press SET UP MENU.
2 Press ◀ ▷ to select "OTHERS".
3 Press △▽ repeatedly to move ☑ to "PARENTAL LOCK", then press OK.
- The "PARENTAL LOCK" sub-menu appears on the TV screen.
- You can only move ☑ to "PASSWORD" or to "EXIT" before you enter your password.
2 Enter the password.
Press the appropriate number keys to enter 4-digit password, then press OK. If you enter the wrong password, "WRONG! RETRY..." appears at the bottom of the TV screen. Enter the correct password.

3 Change the country code.
Press △▽ to select the country code, then press OK.
- See "Country/Area Code List for Parental Lock" (pg. 60).
- When you change the country code, you must select the level.
4 Change the level.
Press △▽ to select the desired level, then press OK.
5 Enter your new password.
Press the appropriate number keys to enter 4-digit password, then press OK.
- The password entered in this step becomes the new password. If you do not change the password, enter the same password as in step 2.
- Even if you want to change only the country code and/or level, do not forget to enter the password after changing the country code and/or the level. Otherwise, the new country code and/or level will not become effective.
6 Return to the normal screen.
Press SET UP MENU.
NOTES:
- When you enter the wrong password more than 3 times in step 2 on the left column, the arrow moves to "EXIT" automatically and the arrow keys do not work.
- If you forget your password, enter "8888" in step 2.
To temporarily release the Parental Lock
When you set the parental level strictly, some discs may not be played back at all. When you insert such a disc and try to play it back, the following Parental Lock screen appears on the TV screen, asking you whether you want the Parental Lock to be temporarily released or not.
1 Access the password screen.
Place the disc in the disc tray.
- If the disc is rated higher than the selected level, the following screen appears.
2 Press the up/down arrow keys to move the cursor to "TEMPORARY RELEASE", then press OK.
- If you select "NOT RELEASE", you cannot play back that disc.

2 Enter the password.
Press the appropriate number keys to enter the 4-digit password, then press OK.
- If you enter the wrong password, "WRONG! RETRY..." appears on the TV screen. Enter the correct password.
- If you enter the correct password, the Parental lock is released and the unit starts playback.
NOTES:
- When you enter the wrong password more than 3 times in step 2 above, the arrow moves to "NOT RELEASE" automatically and the triangle and nabla buttons do not work. In such a case, press OK, then press OPEN/CLOSE (▲) to remove the disc.
- If you forget your password, enter "8888" in step 2.
Country/Area Code List for Parental Lock
| AD | Andorra |
| AE | United Arab Emirates |
| AF | Afghanistan |
| AG | Antigua and Barbuda |
| AI | Anguilla |
| AL | Albania |
| AM | Armenia |
| AN | Netherlands Antilles |
| AO | Angola |
| AQ | Antarctica |
| AR | Argentina |
| AS | American Samoa |
| AT | Austria |
| AU | Australia |
| AW | Aruba |
| AZ | Azerbaijan |
| BA | Bosnia and Herzegovina |
| BB | Barbados |
| BD | Bangladesh |
| BE | Belgium |
| BF | Burkina Faso |
| BG | Bulgaria |
| BH | Bahrain |
| BI | Burundi |
| BJ | Benin |
| BM | Bermuda |
| BN | Brunei Darussalam |
| BO | Bolivia |
| BR | Brazil |
| BS | Bahamas |
| BT | Bhutan |
| BV | Bouvet Island |
| BW | Botswana |
| BY | Belarus |
| BZ | Belize |
| CA | Canada |
| CC | Cocos (Keeling) Islands |
| CF | Central African Republic |
| CG | Congo |
| CH | Switzerland |
| CI | Côte d’Ivoire |
| CK | Cook Islands |
| CL | Chile |
| CM | Cameroon |
| CN | China |
| CO | Colombia |
| CR | Costa Rica |
| CU | Cuba |
| CV | Cape Verde |
| CX | Christmas Island |
| CY | Cyprus |
| CZ | Czech Republic |
| DE | Germany |
| DJ | Djibouti |
| DK | Denmark |
| DM | Dominica |
| DO | Dominican Republic |
| DZ | Algeria |
| EC | Ecuador |
| EE | Estonia |
| EG | Egypt |
| EH | Western Sahara |
| ER | Eritrea |
| ES | Spain |
| ET | Ethiopia |
| FI | Finland |
| FJ | Fiji |
| FK | Falkland Islands (Malvinas) |
| FM | Micronesia (Federated States of) |
| FO | Faroe Islands |
| FR | France |
| FX | France, Metropolitan |
| GA | Gabon |
| GB | United Kingdom |
| GD | Grenada |
| GE | Georgia |
| GF | French Guiana |
| GH | Ghana |
| GI | Gibraltar |
| GL | Greenland |
| GM | Gambia |
| GN | Guinea |
| GP | Guadeloupe |
| GQ | Equatorial Guinea |
| GR | Greece |
| GS | South Georgia and the South Sandwich Islands |
| GT | Guatemala |
| GU | Guam |
| GW | Guinea-Bissau |
| GY | Guyana |
| HK | Hong Kong |
| HM | Heard Island and McDonald Islands |
| HN | Honduras |
| HR | Croatia |
| HT | Haiti |
| HU | Hungary |
| ID | Indonesia |
| IE | Ireland |
| IL | Israel |
| IN | India |
| IO | British Indian Ocean Territory |
| IQ | Iraq |
| IR | Iran (Islamic Republic of) |
| IS | Iceland |
| IT | Italy |
| JM | Jamaica |
| JO | Jordan |
| JP | Japan |
| KE | Kenya |
| KG | Kyrgyzstan |
| KH | Cambodia |
| KI | Kiribati |
| KM | Comoros |
| KN | Saint Kitts and Nevis |
| KP | Korea, Democratic People's Republic of |
| KR | Korea, Republic of |
| KW | Kuwait |
| KY | Cayman Islands |
| KZ | Kazakhstan |
| LA | Lao People's Democratic Republic |
| LB | Lebanon |
| LC | Saint Lucia |
| LI | Liechtenstein |
| LK | Sri Lanka |
| LR | Liberia |
| LS | Lesotho |
| LT | Lithuania |
| LU | Luxembourg |
| LV | Latvia |
| LY | Libyan Arab Jamahiriya |
| MA | Morocco |
| MC | Monaco |
| MD | Moldova, Republic of |
| MG | Madagascar |
| MH | Marshall Islands |
| ML | Mali |
| MM | Myanmar |
| MN | Mongolia |
| MO | Macau |
| MP | Northern Mariana Islands |
| MQ | Martinique |
| MR | Mauritania |
| MS | Montserrat |
| MT | Malta |
| MU | Mauritius |
| MV | Maldives |
| MW | Malawi |
| MX | Mexico |
| MY | Malaysia |
| MZ | Mozambique |
| NA | Namibia |
| NC | New Caledonia |
| NE | Niger |
| NF | Norfolk Island |
| NG | Nigeria |
| NI | Nicaragua |
| NL | Netherlands |
| NO | Norway |
| NP | Nepal |
| NR | Nauru |
| NU | Niue |
| NZ | New Zealand |
| OM | Oman |
| PA | Panama |
| PE | Peru |
| PF | French Polynesia |
| PG | Papua New Guinea |
| PH | Philippines |
| PK | Pakistan |
| PL | Poland |
| PM | Saint Pierre and Miquelon |
| PN | Pitcairn |
| PR | Puerto Rico |
| PT | Portugal |
| PW | Palau |
| PY | Paraguay |
| QA | Qatar |
| RE | Réunion |
| RO | Romania |
| RU | Russian Federation |
| RW | Rwanda |
| SA | Saudi Arabia |
| SB | Solomon Islands |
| SC | Seychelles |
| SD | Sudan |
| SE | Sweden |
| SG | Singapore |
| SH | Saint Helena |
| SI | Slovenia |
| SJ | Svalbard and Jan Mayen |
| SK | Slovakia |
| SL | Sierra Leone |
| SM | San Marino |
| SN | Senegal |
| SO | Somalia |
| SR | Suriname |
| ST | Sao Tome and Principe |
| SV | El Salvador |
| SY | Syrian Arab Republic |
| SZ | Swaziland |
| TC | Turks and Caicos Islands |
| TD | Chad |
| TF | French Southern Territories |
| TG | Togo |
| TH | Thailand |
| TJ | Tajikistan |
| TK | Tokelau |
| TM | Turkmenistan |
| TN | Tunisia |
| TO | Tonga |
| TP | East Timor |
| TR | Turkey |
| TT | Trinidad and Tobago |
| TV | Tuvalu |
| TW | Taiwan, Province of China |
| TZ | Tanzania, United Republic of |
| UA | Ukraine |
| UG | Uganda |
| UM | United States Minor Outlying Islands |
| US | United States |
| UY | Uruguay |
| UZ | Uzbekistan |
| VA | Vatican City State (Holy See) |
| VC | Saint Vincent and the Grenadines |
| VE | Venezuela |
| VG | Virgin Islands (British) |
| VI | Virgin Islands (U.S.) |
| VN | Viet Nam |
| VU | Vanuatu |
| WF | Wallis and Futuna Islands |
| WS | Samoa |
| YE | Yemen |
| YT | Mayotte |
| YU | Yugoslavia |
| ZA | South Africa |
| ZM | Zambia |
| ZR | Zaire |
| ZW | Zimbabwe |
About MP3 Disc
This unit can playback CD discs recorded in the MP3 format (we refer to those discs as MP3 discs in this manual).
Operations for MP3 discs are similar to those for Audio CD discs, though there are some restrictions and differences.
What is MP3?
MP3 is the abbreviation of "MPEG1 Audio Layer 3." MPEG Audio is a compression specification that compresses the audio portion only. This image compression method is used in DVD or Video CD, etc. The audio data has been compressed to about 1/10 of its original size.
On an MP3 disc, each material (song) is recorded on each Track (file), which usually belongs to a Group (folder).
![graph TD A["MP3 disc"] --> B["Track Amp3"] A --> C["Track B.mp3"] A --> D["Track C.mp3"] B --> E["Group 2"] C --> E D --> E E --> F["Group 4"] F --> G["Track D.mp3"] F --> H["Track E.mp3"] F --> I["Track F.mp3"] F --> J["Group 3"] style A fill:#f9f,stroke:#333 style B fill:#ccf,stroke:#333 style C f…](/content/2026/06/1341529/images/1840f57872b49b6219ba936c1e7c99797ffb911312590297da23894bfc9d9ab1.jpg)
This unit can recognize up to 99 Groups and up to 150 Tracks per Group.
If a disc includes more than the Tracks above limit, the unit stops detecting Tracks when the number of detected Tracks reaches the limit and ignores the subsequent Tracks. The unit also ignores any non-MP3 file on the disc.
NOTES for making a private MP3 disc using a CD-R/CD-RW disc:
- Select "ISO9660" as the disc format.
- Finalize the disc.
NOTES:
- Because of the disc characteristics or recording condition, some discs may not be played back or it takes time to start playback.
- The unit does not support "packet writing" discs.
- If there are any Tracks (files) which are stored on a disc directly and do not belong to any Group (directory), the unit recognized them as belonging to an independent Group. ● The unit does not output a digital audio signal from DIGITAL AUDIO OUT connector when playing back an MP3 disc.
- The unit plays back Groups/Tracks on an MP3 disc in the alphabetical order.
- For example, if there are three title Groups [one], [two] and [three] on a disc, the playback order is [one], [three] then [two]. Tracks in a Group are played back in the same way.
- Therefore, an MP3 disc on the market may be played back in the different order from the order printed on its sleeve.
MP3 control display
The MP3 control display appears on the TV screen and playback starts when an MP3 disc is loaded.
![graph TD A["MP3 CONTROL\nGroup: 01/03"] --> B["Blue\nRed\nGreen"] C["Current track number"] --> D["Time: 00:00:14 *"] E["Track: 01/14 Total 41"] --> F["01-Cloudy\n02-Fair\n03-Fog\n04-Hail\n05-Indian summer\n06-Rain\n07-Shower\n08-Snow\n09-Thunder\n10-Typhoon\n11-Wind\n12-Winter sky"] G["Total track…](/content/2026/06/1341529/images/043144981f2817ac5aefea006018092041119869c3e2c360f4f35776d368281b.jpg)
* Elapsed playing time of current track Elapsed playing time is only shown during playback.
MP3 Playback
MP3
You can search and play back desired groups and tracks using the MP3 control display.
- Turn on the TV and select the VCR channel (or AV mode).
- Slide the TV/VCR/DVD switch to the right.
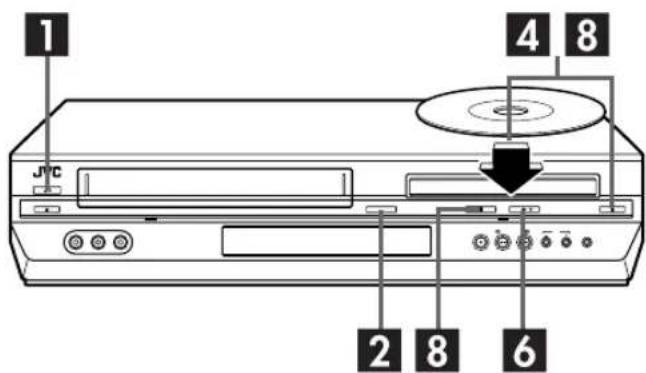

NOTES:
- PLAY (▶), STOP (■), PAUSE (■), SKIP (|◀◀) and SKIP (▶▶) buttons function the same as with Audio CD discs, however, REW (◀◀) and FF (▶▶) buttons do not function for MP3 playback.
- Resume playback, Program playback or Random playback also does not function for MP3 playback.
Using the MP3 control display
1 Turn on the unit.
Press POWER (⏻/l).
2 Select the DVD deck.
On the unit
Press VCR/DVD repeatedly so that the DVD indicator lights up.
On the Remote
Press DVD so that the DVD indicator lights up.
3 Select the mode.
Be sure to set "MP3/JPEG" to "MP3" before loading a disc. (177 pg. 79)
- You cannot access the DVD Set Up screen and Ⓧ" appears on the TV screen if a disc is already placed.
4 Load the disc.
☐ Press OPEN/CLOSE (▲) on the DVD deck to open the disc tray. 2 Place the MP3 disc in the disc tray. - For details, refer to "Placing a Disc" (137 pg. 9). 3 Press OPEN/CLOSE (▲) on the DVD deck to close the disc tray. - The MP3 control display appears on the TV screen when an MP3 disc is loaded. (L→ pg. 62)
5 Select the group.
Press ◀ ▷ to select the desired group.
6 Start playback.
Press △▽ to select the desired track, then press OK or PLAY (▶).
- You can skip a track across a group. Press SKIP (▶▶) to skip to the first track of the next group when the last track of the current group is selected.
7 Pause playback.
Press PAUSE (II).
- To resume normal playback, press PLAY (▶).
8 Stop playback.
Press STOP (■). Press OPEN/CLOSE (▲) on the DVD deck to open the disc tray, then remove the disc.

Group/track selection
To start playback by specifying the group/track number
1 Press TITLE. 2 Press the number keys (0-10, +10) to enter the group number. 3 Press the number keys (0-10, +10) to enter the track number.
Example:
To select 3: Press 3.
To select 14: Press +10, then 4.
To select 20: Press +10, then 10.
Or press +10 twice, then 0.
To select 24: Press +10, +10, then 4.
To select 110: Press +10 ten times, then 10.
- The entered number appears in the track number indication and playback starts from the track you have specified.
Repeat Playback
You can repeat playback of the current group, track or all groups.
● While MP3 control display is on the TV:
1 Access the repeat mode.
Press PLAY SETUP during playback.
● The current repeat mode is displayed on the MP3 control display.
2 Select the mode.
Press to select the desired repeat mode, then press OK.
- Each time you press REPEAT, the mode changes as follows: TRACK→GROUP→ALL→OFF (No indication)→(Back to the beginning)
| TRACK: | The current track is played back repeatedly. |
| GROUP: | All tracks of the current group are played back repeatedly. |
| ALL: | All tracks are played back repeatedly. |
| OFF (no indication): | Each track is played back once. |
- To stop Repeat Playback, press STOP (■).
- To cancel Repeat Playback, press REPEAT repeatedly until the repeat mode display disappears on the TV screen.
- You can also quit Repeat Playback in the following cases:
- Press OPEN/CLOSE (▲) to open the disc tray.
- Turn off the unit.
To return to the MP3 control display, press STOP (■).
About JPEG Disc
This unit can play back CD discs recorded in the JPEG format (we refer to those discs as JPEG discs in this manual).
Operations for JPEG discs are similar to those for Audio CD discs, though there are some restrictions and differences.
What is JPEG?
JPEG is the abbreviation of "Joint Photographic Expert Group." JPEG is a still-picture data compression system.
On a JPEG disc, each still picture is recorded as a file, which usually belongs to a Group (folder).
![graph TD A["JPEG disc"] --> B["File A.jpg"] A --> C["File B.jpg"] A --> D["File C.jpg"] B --> E["Group 2"] C --> E D --> E E --> F["Group 4"] F --> G["File D.jpg"] F --> H["File E.jpg"] F --> I["File F.jpg"] F --> J["Group 3"] style A fill:#f9f,stroke:#333 style E fill:#ccf,stroke:#333 style F fill:…](/content/2026/06/1341529/images/22ec414689a495e5d1f340189c4c30bf591e066698f84b594dd6fe15f24f6d5a.jpg)
This unit can recognize up to 99 Groups and up to 150 Files per Group.
If a disc includes more than the Files above limit, the unit stops detecting Files when the number of detected Files reaches the limit and ignores the subsequent Files. The unit also ignores any non-JPEG file in the disc.
NOTES for making a private JPEG disc using a CD-R/CD-RW disc:
- Select "ISO9660" as the disc format.
- Finalize the disc.
NOTES:
- We recommend to record a file at 640 x 480 resolution. (If a file has been recorded at a resolution of more than 640 x 480, it will take a longer time to be displayed.)
- This unit can only play back baseline JPEG files*. Progressive JPEG files* or lossless JPEG files* cannot be played back.
* Baseline JPEG format: Used for digital cameras, web, etc. Progressive JPEG format: Used for web.
Lossless JPEG format: An old type and rarely used now.
- Some files on a JPEG disc may be played back distortedly.
- Because of the disc characteristics or recording condition, some discs may not be played back or it takes time to start playback.
- The unit does not support "packet writing" discs.
- If there are any Files which are stored on a disc directly and do not belong to any Group (directory), the unit recognized them as belonging to an independent Group.
- The unit plays back Groups/Files on an JPEG disc in the alphabetical order.
- For example, if there are three title Groups [one], [two] and [three] on a disc, the playback order is [one], [three] then [two]. Files in a Group are played back in the same way.
- Therefore, a JPEG disc on the market may be played back in a different order from the order printed on its sleeve.
JPEG control display
The JPEG control display appears on the TV screen and playback starts when a JPEG disc is loaded.
![graph TD A["Total group number on disc"] --> B[" JPEG CONTROL Group : 01/03"] A --> C[" Current file number "] A --> D[" Total file number in current group "] B --> E[" Sea Mountain Sky "] C --> F[" File : 01/14 Total 41 "] D --> G[" Anemone fish "] E --> H[" Current group number "] F --> I[" Curren…](/content/2026/06/1341529/images/6e5b0a413e47a9306ef6dd8e3f8c10ac2a549da7531cf106a41f9a982df52224.jpg)
JPEG Playback
JPEG
You can search and play back desired groups and files using the JPEG control display.
- Turn on the TV and select the VCR channel (or AV mode).
- Slide the TV/VCR/DVD switch to the right.
- Turn on the TV and select the VCR channel (or AV mode).
- Slide the TV/VCR/DVD switch to the right.


NOTES:
- PLAY (▶), STOP (■), PAUSE (■), SKIP (I◀◀) and SKIP (▶▶) buttons function the same as with Audio CD discs, however, REW (◀◀) and FF (▶▶) buttons do not function for JPEG playback.
- Resume playback, Program playback or Random playback also does not function for JPEG playback.
Using the JPEG control display
1 Turn on the unit.
Press POWER (⏻/l).
2 Select the DVD deck.
On the unit
Press VCR/DVD repeatedly so that the DVD indicator lights up.
On the Remote
Press DVD so that the DVD indicator lights up.
3 Select the mode.
Be sure to set "MP3/JPEG" to "JPEG" before loading a disc. (pp. 79)
- You cannot access the DVD Set Up screen and “∅” appears on the TV screen if a disc is already placed.
4 Load the disc.
☐ Press OPEN/CLOSE (▲) on the DVD deck to open the disc tray. 2 Place the JPEG disc in the disc tray. - For details, refer to "Placing a Disc" (1→ pg. 9). 3 Press OPEN/CLOSE (▲) on the DVD deck to close the disc tray. - The JPEG control display appears on the TV screen when a JPEG disc is loaded. (13) pg. 65
5 Select the group.
Press ◀ ▷ to select the desired group.
6 Start playback.
Press △▽ to select the desired file, then press OK or PLAY (▶).
- You can skip a file across a group. Press SKIP (▶▶) to skip to the first file of the next group when the last file of the current group is selected.
The slide-show playback starts from the selected file.
- After selecting a file, press PLAY (▶) to start slide-show playback from the selected file, or press OK to show the selected file.
7 Pause playback.
Press PAUSE (II).
- To resume normal playback, press PLAY (▶).
8 Stop playback.
Press STOP (■). Press OPEN/CLOSE (▲) on the DVD deck to open the disc tray, then remove the disc.

Group/file selection
To start slide-show playback by specifying the group/file number
1 Press TITLE. 2 Press the number keys (0-10, +10) to enter the group number. 3 Press the number keys (0-10, +10) to enter the file number.
Example:
To select 3: Press 3.
To select 14: Press +10, then 4.
To select 20: Press +10, then 10.
Or press +10 twice, then 0.
To select 24: Press +10, +10, then 4.
To select 110: Press +10 ten times, then 10.
The slide-show playback starts from the file you have specified. - To display only the selected file, then press OK. To start slide-show playback from that file, press OK again.
Repeat Playback
You can repeat playback of the current group, file, or all groups.
While the JPEG control display is on the TV:
1 Access the repeat mode.
Press PLAY SETUP while the JPEG Control screen is displayed.
The current repeat mode is displayed on the JPEG control display.
2 Select the mode.
Press the up/down arrow keys to select the desired repeat mode, then press OK.
Each time you press REPEAT, the mode changes as follows: GROUP → ALL → OFF (no indication) → (back to the beginning).
GROUP: All files of the current group are played back repeatedly.
ALL: All files are played back repeatedly.
OFF (No indication): Each file is played back once.
3 Start playback.
Press PLAY (▶).
●To stop Repeat Playback, press STOP (■). - To cancel Repeat Playback, press REPEAT repeatedly until the repeat mode display disappears on the TV screen. ●You can also quit Repeat Playback in the following cases:
- Press OPEN/CLOSE (▲) to open the disc tray.
- Turn off the unit.
To return to the JPEG control display, press STOP (■).
Zooming
Press ZOOM during playback.
- When you want to zoom the picture during slide-show playback, first press PAUSE (II), then press ZOOM.
- For details, refer to "Zooming" (I 7 pg. 45).
Edit From A Camcorder

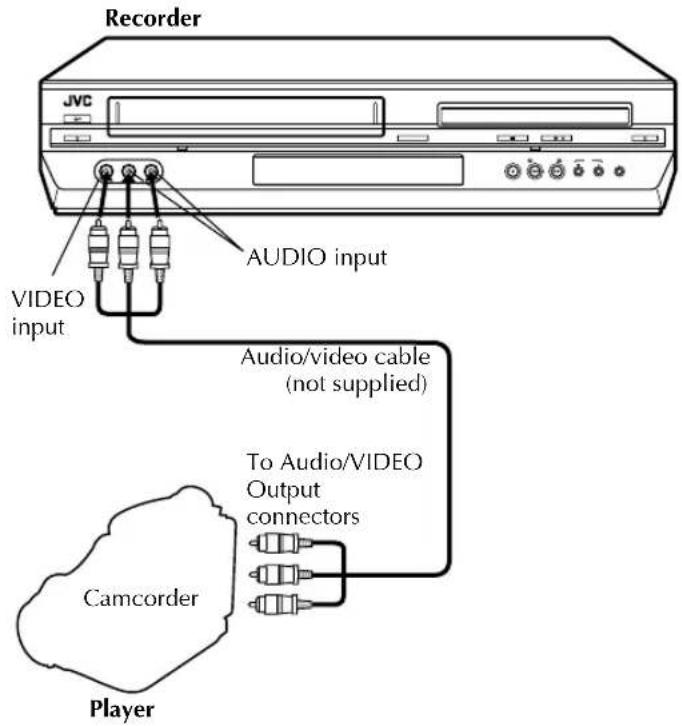
You can use a camcorder as the source player and your unit as the recording deck.
Slide the TV/VCR/DVD switch to the right.
1 Make connections.
Connect the camcorder's AUDIO OUT and VIDEO OUT connectors to the unit's front panel AUDIO and VIDEO input connectors.
- When using a monaural camcorder, connect its AUDIO OUT connector to the AUDIO L input connector on your unit.
2 Select the VCR deck.
On the unit
Press VCR/DVD repeatedly so that the VCR indicator lights up.
On the Remote
Press VCR so that the VCR indicator lights up.
3 Set the unit's input mode.
Press AUX (number key "0") and/or CH to select "F-1".
4 Set the edit mode.
See "PICTURE CONTROL" on page 76.
5 Engage the Record Pause mode.
Use PLAY (▶), REW (◀◀), or FF (▶▶) to locate the point where you start recording, then press and hold PAUSE (■) and press REC (●) to engage the Record Pause mode.
6 Start the camcorder.
Engage the Play mode of the camcorder.
7 Start the unit.
Press PLAY (▶) to engage the Record mode of the unit.
NOTES:
- All necessary cables can be obtained from your dealer.
- When you select "EDIT" to dub tapes in step 4, be sure to select "NORM" after you finish dubbing the tapes.
Edit To Or From Another Video Recorder

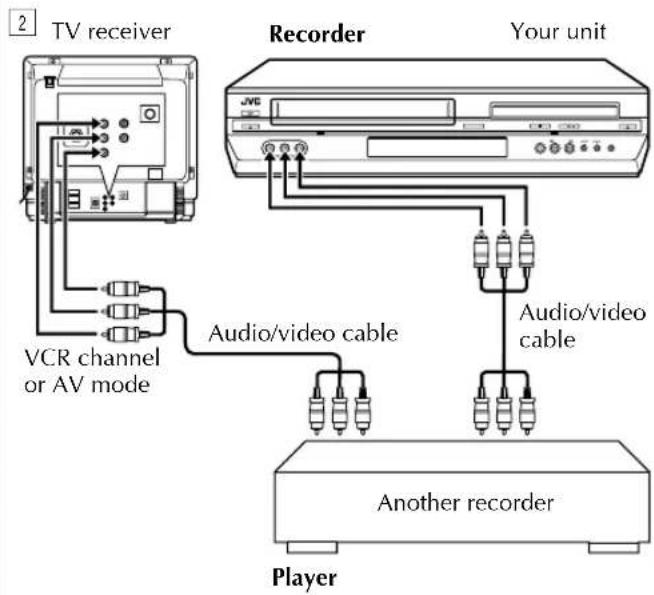
You can use your unit as the source player or as the recording deck.
Slide the TV/VCR/DVD switch to the right.
1 Make connections.
When using your unit as the source player ... ... connect its AUDIO/VIDEO OUTPUT connectors to the audio/video input connectors on another recorder. When using your unit as the recording deck ... ... connect its AUDIO/VIDEO input connectors to the audio/video output connectors on another recorder.
2 Select the VCR deck.
On the unit Press VCR/DVD repeatedly so that the VCR indicator lights up.
On the Remote Press VCR so that the VCR indicator lights up.
3 Set the input mode of recording deck.
With this video unit, press AUX (number key "0") and/or CH to select "F-1".
- When using another recorder as the recording deck, refer to its instruction manual.
4 Set the edit mode.
See "PICTURE CONTROL" on page 76.
5 Engage the Record Pause mode of the recording deck.
Locate the point where you start recording, then engage the Record Pause mode.
6 Start the source player.
Engage the Play mode of the source player.
7 Start the recording deck.
Engage the Record mode of the recording deck.
NOTES:
● All necessary cables can be obtained from your dealer. - When you select "EDIT" to dub tapes in step 4, be sure to select "NORM" after you finish dubbing the tapes. - When you use this unit as the source player for editing, be sure to set "SUPERIMPOSE" to "OFF" before starting. (1→ pg. 76)
Dubbing
(from DVD to VCR)
- Turn on the TV and select the VCR channel (or AV mode).
- Slide the TV/VCR/DVD switch to the right.

You can dub selected scenes from the DVD disc to a cassette, starting and stopping wherever you wish.
However, it is not possible to dub the copy-protected disc. In such case, "ERROR" appears on the front display panel.
1 Load a cassette and place a disc.
For the VCR deck
Insert a cassette with the record safety tab intact.
For the DVD deck
Press OPEN/CLOSE (▲) on the DVD deck to open the disc tray. 2 Place the disc in the disc tray. 3 Press OPEN/CLOSE (▲) on the DVD deck to close the disc tray.
2 Prepare the VCR deck for dubbing.
1 Press VCR. 2 Press SP/EP to select recording speed. 3 Search for the point where you want to start dubbing by pressing PLAY (▶), FF (▶▶) or REW (◀◀) then press STOP (■).
3 Prepare the DVD deck for dubbing.
1 Press DVD. 2 Search for the point where you want to start dubbing by pressing PLAY (▶), FF (▶▶) or REW (◀◀). 3 Press PAUSE (Ⅲ) to pause playback a little before the start point.
4 Start dubbing.
Press and hold REC (●), then press PLAY (▶) on the Remote.
- "DUB" lights on the front display panel.

5 End dubbing.
Press STOP (■).
- Be sure to press STOP (■) while the VCR indicator lights up on the unit.
- If you press STOP (■) or EJECT (▲) with the DVD deck selected, the dubbing stopped, but the opening screen is also recorded.
NOTES:
- You cannot start dubbing when the scan mode is set to the progressive mode. Set it to the interlace mode. (C) pg. 82)
- Set "ON SCREEN GUIDE" to "OFF" (pg. 81) if you do not want to record the on-screen display for DVD discs during dubbing.
- There may be a discrepancy of several seconds between where you intend editing to start, and where it actually starts.
- The superimposed indication during the operation or dubbing is not recorded.
- Set "PICTURE CONTROL" to "EDIT". (L3) pg. 76)
Digital Audio Dubbing
- Turn on the TV and select the VCR channel (or AV mode).
- Slide the TV/VCR/DVD switch to the right.

Note for connection: Remove the connector cover from the unit and remove the protection cap from the cable.
You can dub selected audio from the DVD or Audio CD disc to a MD etc. However, it is not possible to dub the copy-protected disc.
Example: Dubbing to a MD
1 Make connections.
Connect the optical cable between the unit and the digital audio device.
2 Place a disc and load a MD.
For the DVD deck
Press OPEN/CLOSE (▲) on the DVD deck to open the disc tray. 2 Place the disc in the disc tray. 3 Press OPEN/CLOSE (▲) on the DVD deck to close the disc tray.
For the digital audio device
Insert a MD.
3 Prepare the DVD deck for dubbing.
1 Press DVD and select the audio to be dubbed. 2 Search for the point where you want to start dubbing by pressing PLAY (▶), FF (▶▶) or REW (◀◀) then press STOP (■). 3 Press REW (◀◀) a little, then press PLAY (▶) to start playback. 4 Press PAUSE (II) to pause playback a little before the start point.
4 Prepare the audio device for dubbing.
Select the input mode.
5 Start dubbing.
1 Press PLAY (▶) to start playback on the DVD deck.
2 Start recording on the audio device.
6 End dubbing.
Stop recording on the audio device. Then press STOP (■) to stop playback on the DVD deck.
NOTES:
- There may be a discrepancy of several seconds between where you intend editing to start, and where it actually starts.
- You can also dub a Video CD or SVCD. Set "DIGITAL AUDIO OUTPUT" to "PCM ONLY". (17) pg. 79)
Remote Control Functions
Remote A/B/C/D Code Switching
The Remote is capable of controlling four JVC video units independently. Each of units can respond to one of four codes (A, B, C or D). The remote control is preset to send A code signals because your unit is initially set to respond to A code signals. You can easily modify your unit to respond to B, C or D code signals.
Before performing the following steps: Slide the TV/VCR/DVD switch to the right.


On the Remote
Keep pressing VCR down during steps 1 - 2.
1 Change the remote control code.
Press the number key "1" for A, "2" for B, "3" for C or "4" for D.
2 Set the remote control code.
Press OK to set the code.
On the unit
3 Turn off the unit.
Press POWER (⏻/l).
4 Display the code.
Press PLAY (▶) on the unit for over 5 seconds while the unit is turned off. The code currently set appears on the front display panel.
- If the code displayed on the front display panel is different from the code set on the Remote, go to step 5.
5 Change the unit's code.
Press STOP (■) on the Remote. The code currently set on the Remote will be applied to the unit.
NOTE:
Once you unplug the end of the mains power cord from the mains, the remote control code is back to A.
TV Multi-Brand Remote Control
Your Remote can operate the basic functions of your TV set. In addition to JVC TVs, other manufacturer's TVs can also be controlled.
Before performing the following steps:
- Turn off the TV using its Remote.
- Slide the TV/VCR/DVD switch to the left.

IMPORTANT
Although the supplied remote control unit is compatible with JVC televisions, as well as many other models, it may not work with your TV, or in some instances, may have limited function capability.
1 Set the TV brand code.
Keep pressing VCR down during step 1.
Enter your TV's brand code using the number keys, then press OK.
Press POWER (☐/☐) on the unit's Remote to turn on the TV and try operations (☐ step 2).
- Once you have set the remote control to operate the TV, you do not have to repeat this step until you replace your Remote's batteries.
- Some brands of TV have more than one code. If the TV does not function with one code, try entering another.
2 Operate the TV.
Press the corresponding button: POWER (☐/I), TV/VCR, TV/VCR CH +/-, TV VOL+/- (Volume), MUTE (TV Muting), number keys.
- For some brands of TV, you must press OK after having pressed the number keys.
| BRAND NAME CODE | |
| JVC | 01, 03 |
| HITACHI | 10 |
| MAGNAVOX | 02 |
| MITSUBISHI | 03 |
| PANASONIC | 04, 11 |
| RCA | 05 |
| SHARP | 06 |
| SONY | 07 |
| SAMSUNG | 12 |
| SANYO | 13 |
| SEARS | 13 |
| TOSHIBA | 08 |
| ZENITH | 09 |
Connecting To A Dolby Digital Decoder or An Amplifier With A Built-in DTS
(DVD deck only)
These instructions enable you to connect your unit to a Dolby Digital decoder or amplifier with a built-in DTS.

Make connections.
Connect the optical cable between the unit and the Dolby Digital decoder or amplifier with a built-in DTS.
NOTES:
- For Dolby Digital sound, set "DIGITAL AUDIO OUTPUT" to "DOLBY DIGITAL/PCM" (see page 79).
- For DTS sound, set "DIGITAL AUDIO OUTPUT" to "STREAM/PCM" (see page 79).
CAUTIONS:
- This unit has a dynamic range of more than 80 dB with regards to its Hi-Fi audio capability. It is recommended that you check the maximum level if you are going to listen to the Hi-Fi audio signals through a stereo amplifier. A sudden surge in the input level to the speakers may damage them.
- Some speakers and televisions are specially shielded to prevent television interference. If both are of the non-shielded type, do not place the speakers adjacent to the TV set as this can adversely affect the video playback picture.
Mode Set
(VCR deck)
- Turn on the TV and select the VCR channel (or AV mode).
- Slide the TV/VCR/DVD switch to the right.

You can change various mode settings on the Function Set screen by following the procedure described below. - For each mode setting, see pages 76 to 77.
1 Turn on the unit.
Press POWER (⏻/l).
2 Select the VCR deck.
On the unit Press VCR/DVD repeatedly so that the VCR indicator lights up.
On the Remote Press VCR so that the VCR indicator lights up.
3 Access the Main Menu screen.
Press SET UP MENU.
4 Access the Function Set screen.
Press △▽ to move the highlight bar (arrow) to "FUNCTION SET", then press OK or ▷.

5 Select the mode.
Press △▽ to move the highlight bar (arrow) to the item you want to change.

6 Select the mode setting.
Press OK or ▷.
7 Return to the normal screen.
Press SET UP MENU.
* The default setting is bold in the table below.
| ■ PICTURE CONTROLNORMEDITSOFTSHARP | This feature helps you to adjust the playback picture quality according to your preference. Normally select “NORM”.NORM: Picture quality is adjusted automatically.EDIT: Minimizes picture degradation during editing (recording and playback).SOFT: Reduces image coarseness when viewing overplayed tapes containing a lot of noise.SHARP Clearer, sharper-edged picture when viewing images with lots of flat, same-coloured surfaces such as cartoons.NOTES:When you select “EDIT”, “SOFT” or “SHARP”, the selected mode will not change until you select another mode.When you select “EDIT” to dub tapes, be sure to select “NORM” after you finish dubbing the tapes. |
| ■ SUPERIMPOSEONOFF | When this function is set to “ON”, various operational indicators appear on the TV screen. Messages appear in the selected language. (L3 pg. 20)NOTES:When you use this unit as the source player for editing, be sure to set “SUPERIMPOSE” to “OFF” before starting.During playback, the operation mode indicators may be disturbed depending on the type of tape being used. |
| ■ AUTO SP→EP TIMERONOFF | When this function is set to “ON”, the unit automatically switches to EP mode to allow complete recording if there is not enough tape to record the entire program while timer-recording in SP mode.For Example:Recording a program of 140 minutes in length onto a 120-minute tapeApproximately 110 minutes Approximately 30 minutesSP mode EP modeTotal 140 minutesMake sure you set this function to “ON”, before the timer-recording starts.NOTES:If you have programmed the unit to timer-record 2 or more programs, the second program and those thereafter may not fit on the tape if you set “AUTO SP→EP TIMER” to “ON”. In this case, make sure the mode is not engaged, then set the tape speed manually during timer programming.In order to ensure that the recording fits on the tape, this feature may leave a slight non-recorded section at the end of the tape.There may be some noise and sound disturbance at the point on the tape where the unit switches from SP to EP mode.The Auto SP→EP Timer feature is not available during ITR (Instant Timer Recording), and the feature will not work properly on the following tapes: T(ST)-30, T(ST)-60, T(ST)-90, and T(ST)-120 |
* The default setting is bold in the table below.
| ■VIDEO STABILIZERONOFF | When this function is set to “ON”, you can automatically correct vertical vibration in the picture when playing back unstable recordings made on another recorder.NOTES:When you finish viewing a tape, be sure to set this function to “OFF”.Regardless of the setting, this function has no effect during recording and during special effects playback.The on-screen display may jitter vertically when this function is set to “ON”.To watch recordings with close-caption, set this function to “OFF”. |
| ■BLUE BACKONOFF | When this function is set to “ON”, the TV screen becomes all blue when receiving a channel not in use.NOTE:When you want to receive an unstable channel with poor signals, set this function to “OFF”. |
| ■2ND AUDIO RECORDONOFF | When this function is set to “ON”;If a SAP program is received, the SAP audio is recorded on both the normal and Hi-Fi tracks. The main audio is not recorded.If a non-SAP program is received, the main audio is recorded on both the Hi-Fi and normal tracks.When this function is set to “OFF”, the SAP audio cannot be recorded.NOTES:When the channel is changed on the unit;The “STEREO” indicator appears on the screen for about 5 seconds if the program is a stereo broadcast.The “SAP” indicator appears on the screen for about 5 seconds if the program is a SAP broadcast.Both indicators appear when a stereo program is accompanied by SAP sound. |
| ■AUDIO MONITORHI-FIHI-FI LHI-FI RNORMMIX | This unit can record two sound tracks simultaneously (normal and Hi-Fi) on a Hi-Fi stereo tape. You can select the sound track(s) to listen to while playing back a Hi-Fi stereo tape. In addition, when playing back a prerecorded tape containing two separate audio programs on the Hi-Fi tracks, you can choose either one by selecting either “HI-FI L” or “HI-FI R”.HI-FI: Normally select this. Hi-Fi sound is played back.HI-FI L: Sound on the left Hi-Fi channel is played back.HI-FI R: Sound on the right Hi-Fi channel is played back.NORM: Sound on the normal track is played back.MIX: Both sounds on the Hi-Fi track and normal track are mixed and played back.NOTES:While playing back a monaural tape, sounds on the normal track will be heard regardless of this setting.You can also use the A.MONITOR button on the Remote to select the desired monitor sound. (17 pg. 32) |
| ■AUTO POWER OFF3HOFF | When this function is set to “3H”, the unit is turned off automatically if no operation is done within 3 hours. “AUTO POWER OFF IN 3 MIN” appears on the screen 3 minutes before the unit is turned off. |
Mode Set
(DVD deck)
- Turn on the TV and select the VCR channel (or AV mode).
- Slide the TV/VCR/DVD switch to the right.

You can change various mode settings on the Mode Set screen by following the procedure described below.
- For each mode setting, see pages 79 to 81.
| A LANGUAGE | MENU LANGUAGE (17 pg. 22)AUDIO LANGUAGE (17 pg. 22)SUBTITLE (17 pg. 22)ON SCREEN LANGUAGE (17 pg. 21) |
| PICTURE | MONITOR TYPE (17 pg. 18, 79)PICTURE SOURCE (17 pg. 79)SCREEN SAVER (17 pg. 79)MP3/JPEG (17 pg. 79) |
| AUDIO | DIGITAL AUDIO OUTPUT (17 pg. 79)ANALOG DOWN MIX (17 pg. 80)D. RANGE CONTROL (17 pg. 80)OUTPUT LEVEL (17 pg. 80) |
| OTHERS | RESUME (17 pg. 81)ON SCREEN GUIDE (17 pg. 81)PARENTAL LOCK (17 pg. 58) |
- The procedure shows how to set "RESUME" to "ON" on the DVD Set Up menu screen as an example.
1 Turn on the unit.
Press POWER (⏻/1).
2 Select the DVD deck.
On the unit
Press VCR/DVD repeatedly so that the DVD indicator lights up.
On the Remote
Press DVD so that the DVD indicator lights up.
3 Access the DVD Set Up menu screen.
1 Press SET UP MENU. 2 Press ◀ ▷ to select " OTHERS".
• Each time you press the button, the setup menus change as follows;

4 Select the mode.
Press △▽ to move ≌ to "RESUME", then press OK.
5 Select the mode setting.
Press △▽ to select "ON", then press OK.
6 Return to the normal screen.
Press SET UP MENU.
Picture Settings * The default setting is bold in the table below.
| ■MONITOR TYPE16:9 NORMAL16:9 AUTO4:3 LB4:3 PS | You can select the monitor type depending the TV used when you play back DVD VIDEO discs recorded for wide-screen TVs. For more details, refer to “Monitor Set (DVD deck)” (pg. 18) |
| ■PICTURE SOURCEVIDEO (NORMAL)VIDEO (ACTIVE)FILMAUTO | You can obtain optimal picture quality by selecting whether the content on the disc is processed by field (video source) or by frame (film source).Normally set to “AUTO”.VIDEO (NORMAL):Suitable for playing back a video source disc with relatively a few moments.VIDEO (ACTIVE):Suitable for playing back a video source disc with relatively a lot of movements.FILM: Suitable for playing back a film or progressive source disc.AUTO: Used to play back a disc containing both video and film source materials. This unit recognizes the picture type (film or video source) of the current disc according to the disc information.• If the playback picture is unclear or noisy, or the oblique lines of the picture are rough, try to change to other modes. |
| ■SCREEN SAVERONOFF | The TV screen may be burned out if a static picture is displayed for a long time. When this function is set to “ON”, the unit automatically activates the screen saver function if a static picture, such as an on-screen display or menu is displayed for over 5 minutes.NOTE:This function is not available for Audio CDs and MP3 discs. |
| ■MP3/JPEGMP3JPEG | You can select files to play back, when both MP3 files and JPEG files are recorded on a disc.MP3: Select this to play back MP3 files.JPEG: Select this to play back JPEG files.NOTE:You cannot access the DVD Set Up screen and “∅” appears on the TV screen if a disc is already placed. |
Audio Settings
* The default setting is bold in the table below.
| ■DIGITAL AUDIO OUTPUTPCM ONLYDOLBY DIGITAL/PCMSTREAM/PCM | Set to the appropriate mode according to the type of the device connected to DIGITAL AUDIO OUT connector on the rear of unit.It is not necessary to set this mode when you connect no device to DIGITAL AUDIO OUTconnector.PCM ONLY:Select this when you connect the unit's DIGITAL AUDIO OUT connector to the linear PCM digital input connector of other audio device.DOLBY DIGITAL/PCM:Select this when you connect the unit's DIGITAL AUDIO OUT connector to the digital input connector of a Dolby Digital decoder or an amplifier with a built-in Dolby Digital decoder.STREAM/PCM:Select this when you connect the unit's DIGITAL AUDIO OUT connector to the digital input connector of an amplifier with a built-in DTS, Dolby Digital, or MPEG multichannel decoder. | ||
| ■ANALOG DOWN MIXDOLBY SURROUNDSTEREO | Set to the appropriate mode according to your audio system when you play back a DVD VIDEO disc recorded with surround multichannel audio. This setting affects only the analogue audio output signal from the AUDIO OUTPUT connectors (DVD) when playing back a DVD VIDEO disc recorded with surround multichannel audio.DOLBY SURROUND:Select this when you enjoy multichannel surround audio by connecting the unit's analogue AUDIO OUTPUT connector (DVD) to a surround decoder or an internal amplifier.STEREO: Select this when you enjoy conventional 2-channel stereo audio by connecting the unit's analogue AUDIO OUTPUT connectors (DVD) to a stereo amplifier/receiver or TV, or when you dub audio of a DVD VIDEO disc recorded with surround audio to your MD, cassette, etc.NOTE:The "ANALOG DOWN MIX" function does not work when the 3D Phonic function is activated. (17 pg. 46) | ||
| ■D. RANGE CONTROLWIDE RANGENORMALTV MODE | The dynamic range (the difference between the loudest sound and the quietest one) can be compressed during playback of a program encoded in Dolby Digital format.This function takes effect when a DVD VIDEO disc recorded in Dolby Digital format is played back at low or middle volume.WIDE RANGE: Select this to inactivate this function when you enjoy wide dynamic range program.NORMAL: Normally select this setting to activate this function.TV MODE: Select this when you hear the sound through the TV's speaker(s).NOTES:This function works only when playing back a disc recorded with Dolby Digital format.The setting is not effective for other discs.This function does not work when the 3D Phonic function is activated. (17 pg. 46) | ||
| ■OUTPUT LEVELSTANDARDLOW | You can lower the output level of analog audio to accommodate the unit to the connected A/V equipment.STANDARD: Normally select this.LOW: The output level of analog audio is lowered. | ||
| Playback discs | Output | ||
| STREAM/PCM DOLBY | DIGITAL/PCM PCM ONLY | ||
| DVD VIDEO with 48 kHz, 16/20/24 bit linear PCM | 48 kHz, 16 bit linear PCM | ||
| DVD VIDEO with DTS DTS bitstream | 44.1 kHz, 16 bit stereo linear PCM | ||
| DVD VIDEO with Dolby Digital | Dolby Digital bitstream | 48 kHz, 16 bit stereo linear PCM | |
| Audio CD/Video CD 44.1 kHz, | 16 bit stereo linear PCM | ||
| Audio CD with DTS DTS bitstream | 44.1 kHz, 16 bit stereo linear PCM | ||
| MP3 disc Linear PCM | |||
NOTES:
- The unit is not equipped with the DTS decoding function.
- When you play back a DVD VIDEO or Audio CD disc with DTS, use a DTS decoder to get correct signals from your speakers. Never use the unit's analog output connectors, which output incorrect signals that may damage your speakers.
- If you connect the analog outputs and digital outputs simultaneously, be sure to select the source of the amplifier correctly, or set the level control of the amplifier connected to the analog outputs to minimum.
Others Settings
* The default setting is bold in the table below.
| ■RESUMEONOFFDISC RESUME | When this function is set to “ON”, you can use the resume function.(LFP pg. 45)ON: You can start playback from the resume point of the placed disc.OFF: You cannot use the resume function.DISC RESUME:The unit retains a memory of the resume points of the last 30 discs played back, even though they have been ejected.NOTE:This function is not available for Audio CDs and MP3 discs. |
| ■ON SCREEN GUIDEONOFF | When this function is set to “ON”, the unit can display “on-screen guide” icons or characters which shows the conditions of the unit or disc. |
Child Lock
- Turn on the TV and select the VCR channel (or AV mode).
- Slide the TV/VCR/DVD switch to the right.
You can disable the unit's operation.
1 Set the Child Lock.
Press and hold POWER (☐/☐) on the Remote for more than 10 seconds while the unit is turned on. The unit turns off, and "CL" appears on the front display panel.

- To release the child lock, press and hold POWER (☐/I) on the Remote until the unit turns on.
NOTES:
- When the child lock function is in use, keep the Remote out of the children's reach.
- Timer recording programs will be performed even if the child lock function activated.
Scan Mode Set
(DVD deck)
- Turn on the TV and select the VCR channel (or AV mode).
- Slide the TV/VCR/DVD switch to the right.
This unit supports the progressive scan system (e.g., 480p*) as well as the conventional interlaced scan system (e.g., 480i*).
If your TV is equipped with component video connectors and supports progressive video input, you can enjoy high-quality pictures by setting the progressive scan mode to active.
●Refer also to the instruction manuals supplied with your TV. - If your TV is equipped with component video connectors but does not support progressive video input, do not change the scan mode to "PROGRESSIVE". * 480p and 480i indicate the number of scanning lines and the scanning format of an image signal. - 480p indicates 480 scanning lines with progressive format. - 480i indicates 480 scanning lines with interlaced format.
1 Switch the mode.
During playback or while stopped, press and hold PROGRESSIVE SCAN on the unit or DVD on the Remote for more than 3 seconds to change the scan mode between Progressive and Interlace mode.
Before requesting service for a problem, use this chart and see if you can repair the trouble yourself. Small problems are often easily corrected, and this can save you the trouble of sending your unit off for repair.
POWER
| SYMPTOM POSSIBLE CAUSE CORRECTIVE ACTION | ||
| 1. No power is supplied to the unit. | ● The AC power cord is disconnected. Connect the AC power cord. | |
| 2. The Remote won’t function. | ● The batteries are discharged. Replace the dead batteries with new ones. | |
TAPE TRANSPORT (VCR deck)
| SYMPTOM POSSIBLE CAUSE CORRECTIVE ACTION | ||
| 1. During recording, the tape does not run. “○” lights up on the front display panel. | ● The unit is in the Record Pause mode. Press PLAY (▶) to resume recording. | |
| 2. The tape will not rewind or fast-forward. | ● The tape is already fully rewound or fast-forwarded. | Check the cassette. |
PLAYBACK (VCR deck)
| SYMPTOM POSSIBLE CAUSE CORRECTIVE ACTION | ||
| 1. The VCR deck can not be operated. | ● The VCR deck is not selected. | On the unitPress VCR/DVD repeatedly so that the VCR indicator lights up.On the RemotePress VCR so that the VCR indicator lights up. |
| 2. The playback picture does not appear while the tape is running. | ● If you are using the RF connection,— the TV receiver's channel selector is not set to the VCR channel.— the unit's VCR channel has not been correctly set.● If you are using the AV, S-VIDEO* or Component Video* connection, the TV receiver is not set to the AV mode.* (DVD deck only) | If you are using the RF connection,— set the TV receiver to the VCR channel.— perform “Set the VCR channel.”(⇨ pg. 14).If you are using the AV or S-VIDEO*, Component Video* connection, set the TV to its AV mode.* (DVD deck only) |
| 3. Noise appears during visual search. | ● This is normal. | |
| 4. Noise appears during normal playback. | ● The automatic tracking mode is engaged. | Try manual tracking. (⇨ pg. 32) |
| 5. The playback picture is blurred or interrupted while TV broadcasts are clear or “USE CLEANING CASSETTE” message appears on the screen. | ● The video heads may be dirty. Use a dry cleaning cassette ECL-3F, or consult your JVC dealer. | |
| 6. Breaks are noticeable in Hi-Fi soundtrack. | ● The automatic tracking mode is engaged. | Try manual tracking. (⇨ pg. 32) |
PLAYBACK (DVD deck)
| SYMPTOM POSSIBLE CAUSE CORRECTIVE ACTION | ||
| 1. The button do not work. | ● The operation is prohibited on the placed disc. | — |
| 2. The DVD deck can not be operated. | ● The DVD deck is not selected. | On the unitPress VCR/DVD repeatedly so that the DVD indicator lights up.On the RemotePress DVD so that the DVD indicator lights up. |
| 3. “ ” appears on the TV screen. | ● The operation is prohibited on the placed disc. | — |
| 4. “REGION CODE ERROR!” appears on the TV screen. | ● The disc’s region number does not match that of the unit. | Use the discs whose region number includes “ALL” or “1”. (pg. 7) |
| 5. The disc cannot be played back. | ● The disc’s region number does not match that of the unit.● This type of the disc cannot be played back.● The disc is not placed properly. Remove the disc, then place the disc properly in the disc tray. (pg. 9, “Placing a Disc”)● The Parental Lock is engaged, and the placed disc is rated higher than the set level. | Use the discs whose region number includes “ALL” or “1”. (pg. 7)See “Unplayable Discs” (pg. 7).the disc, then place the disc properly in the disc tray. (pg. 9, “Placing a Disc”)Release the Parental Lock temporarily (pg. 59), or change the set level (pg. 59). |
| 6. The language is not played back as you set. | ● The disc does not contain the language you set. | — |
| 7. Changing audio/subtitle language is not possible. | ● The disc does not contain the audio/ subtitle in the multiple languages. | With some discs, the language should be set on the top menu. (pg. 43) |
| 8. The subtitles do not appears on the TV screen. | ● The disc does not contain the subtitles. —● The subtitle display is set to off. Set the subtitles display to on. (pg. 54)● A-B Repeat Playback is in progress. (pg. 51) | The subtitles recorded around A-B point may not appear. |
| 9. Angle cannot be changed. | ● The scene is not recorded from the multiple angles. | — |
MP3 Playback (DVD deck)
| SYMPTOM POSSIBLE CAUSE CORRECTIVE ACTION | ||
| 1. A disc cannot be played. | No MP3 files are recorded to the disc. Replace the disc.MP3 files do not have the correct file extension in their file names.MP3 files are not recorded in a format compliant with ISO 9660 Level 1 or 2.The different types of files are recorded to the disc. | Add correct file extension (.mp3, .MP3 or any uppercase and lowercase combination such as ".Mp3") to their file names.Replace the disc. (Record MP3 files using a compliant application.)The disc which contains the different types of files may not be played because of its disc characteristics or recording conditions. |
| 2. Not MP3 files but JPEG files are played. | The MP3/JPEG setting is set to "JPEG". | When both MP3 files and JPEG files are recorded to a disc, set "MP3/JPEG" to "MP3" to play MP3 files. (17 pg. 79) |
| 3. The MP3 control display appears on the TV screen, but no operation can be performed. | No MP3 files or JPEG files are recorded to the disc, or the disc is an unplayable disc (such as CD-ROM). | Replace the disc. (17 pg. 9) |
JPEG Playback (DVD deck)
| SYMPTOM POSSIBLE CAUSE CORRECTIVE ACTION | ||
| 1. A disc cannot be played. | No JPEG files are recorded to the disc. Replace the disc.JPEG files do not have the correct file extension in their file names.JPEG files are not recorded in a format compliant with ISO 9660 Level 1 or 2. | Add correct file extension (.jpg, .jpeg, .JPG, .JPEG or any uppercase and lowercase combination such as “.Jpg”) to their file names.Replace the disc. (Record JPEG files using a compliant application.) |
| 2. Not JPEG files but MP3 files are played back. | The MP3/JPEG setting is set to “MP3”. | When both MP3 files and JPEG files are recorded to a disc, set “MP3/JPEG” to “JPEG” to play JPEG files. (☐ pg. 79) |
RECORDING (VCR deck)
| SYMPTOM POSSIBLE CAUSE CORRECTIVE ACTION | ||
| 1. Recording cannot be started. | ● There is no cassette loaded, or the cassette loaded has had its record safety tab removed. | Insert a cassette, or using adhesive tape, cover the hole where the tab was removed. |
| 2. TV broadcasts cannot be recorded. | ● “F-1” has been selected as the input mode. | Set to the desired channel. |
| 3. Tape-to-tape editing is not possible. | ● The source (another video recorder, camcorder) has not been properly connected.● All necessary power switches have not been turned on.● The input mode is not correct. | Confirm that the source is properly connected.Confirm that all units’ power switches are turned on.Set the input mode to “F-1”. |
| 4. Camcorder recording is not possible. | ● The camcorder has not been properly connected.● The input mode is not correct. | Confirm that the camcorder is properly connected.Set the input mode to “F-1”. |
| 5. “○” and “▷” on the front display panel won’t stop blinking. | ● The end of the tape was reached during recording. | The program may not have been recorded in its entirety. Next time make sure you have enough time on the tape to record the entire program. |
TIMER RECORDING (VCR deck)
| SYMPTOM POSSIBLE CAUSE CORRECTIVE ACTION | ||
| 1. Timer recording won't work. | ● The clock and/or the timer have been set incorrectly.● The timer is not engaged. Press | Re-perform the clock and/or timer settings.TIMERand confirm that “⊕” is displayed on the front display panel. |
| 2. Timer programing is not possible. | ● Timer recording is in progress. | Timer programing can't be performed while a timer recording is in progress. Wait until it finishes. |
| 3. “ ⊕” on the front display panel won't stop blinking. | ● The timer is engaged but there's no cassette loaded. | Load a cassette with the record safety tab intact. |
| 4. “ ⊕”, “○” and “▷” on the front display panel won't stop blinking. | ● The loaded cassette has had its record safety tab removed.● The end of the tape was reached during timer recording. | Remove the cassette and cover the hole with adhesive tape, or insert a cassette with the record safety tab intact.The program may not have been recorded in its entirety. Next time make sure you have enough time on the tape to record the entire program. |
| 5. “ ⊕” blinks for 10 seconds and the Timer mode is disengaged. | ● TIMER has been pressed when there are no programs in memory, or the timer record information has been programmed incorrectly. | Check the programmed data and re-program as necessary, then press TIMER again. |
| 6. “ ○” and “▷” on the front display panel won't stop blinking. | ● The end of the tape was reached during Instant Timer Recording. | The program may not have been recorded in its entirety. Next time make sure you have enough time on the tape to record the entire program. |
| 7. “ &”, “○” and “▷” on the front display panel won't stop blinking. | ● The loaded cassette has had its record safety tab removed.● The end of the tape was reached during Satellite Auto Recording. | Remove the cassette and cover the hole with adhesive tape, or insert a cassette with the record safety tab intact.The program may not have been recorded in its entirety. Next time make sure you have enough time on the tape to record the entire program. |
OTHER PROBLEMS
| SYMPTOM POSSIBLE CAUSE CORRECTIVE ACTION | ||
| 1. The image of TV broadcast appears distorted on the TV screen. | ● The unit leaves turned on and the DVD deck is selected. | Turn off the unit, or press VCR to select the VCR deck, then press TV/VCR so that the VCR indicator disappears from the front display panel. |
| 2. Whistling or howling is heard from the TV during camcorder recording. | ● The camcorder's microphone is too close to the TV.● The TV's volume is too high. | Position the camcorder so its microphone is away from the TV.Turn the TV's volume down. |
| 3. When scanning channels, some of them are skipped over. | ● Those channels have been designated to be skipped. | If you need the skipped channels, restore them. (I7 pg. 27) |
| 4. The channel cannot be changed. | ● Recording is in progress. Press | PAUSE (II) to pause the recording, change channels, then press PLAY (▶) to resume recording. |
| 5. Channel settings that were made manually seem to have changed or disappeared. | ● After the manual settings were made, Auto Channel Set was performed. | Perform manual setting again. |
| 6. Even though Auto or Semiauto Clock Set has been performed, the clock is incorrect. | ● The clock setting data received from the host channel is incorrect. | Select a different host channel during "Semiauto Clock Set" (I7 pg. 25), or perform "Manual Clock Set" (I7 pg. 25). |
WARNING
This unit contains microcomputers. External electronic noise or interference could cause malfunctioning. In such cases, switch the unit off and unplug the AC power cord. Then plug it in again and turn the unit on. Take out the cassette. After checking the cassette, operate the unit as usual.
PLAYBACK
Q. What happens if the end of the tape is reached during playback or search?
A. The tape is automatically rewound to the beginning.
Q. During search, slow, still and frame-by-frame playback, I can't hear any audio. What's the problem?
A. This is normal.
Q. Can the unit indefinitely remain in the still mode?
A. No. It stops automatically after 5 minutes to protect the heads.
Q. When returning from search to normal playback, the picture is disturbed. Should I be concerned about this?
A. No, it is normal.
Q. Noise bar appear during search. What's the problem?
A. This is normal.
Q. Sometimes, during Index Search, the unit can't find the program I want to see. Why not?
A. There may be index codes too close together.
RECORDING
Q. When I pause and then resume a recording, the end of the recording before the pause is overlapped by the beginning of the continuation of recording. Why does this happen?
A. This is normal. It reduces distortion at the pause and resume points.
Q. Can the unit indefinitely remain in the Record-Pause mode?
A. No. The unit goes to its Stop mode automatically after 5 minutes to protect the heads.
Q. What happens if the tape runs out during recording?
A. The unit stops recording, and "○" and "▷" on the front display panel won't stop blinking.
TIMER RECORDING
Q. “○” and “⊕” remain lit on the front display panel. Is there a problem?
A. No. This is a normal condition for a timer recording in progress.
Q. Can I program the timer while I'm watching a tape or a TV broadcast?
A. You won't see the picture as it is replaced by the on-screen menu, but the audio from the program or tape you're viewing can be heard.
GENERAL
Power requirement : AC 120 V~, 60 Hz
Power consumption
Power on : 27 W
Power off : 3.1 W
Temperature
Operating : 5°C to 40°C (41°F to 104°F)
Storage: -20°C to 60°C (-4°F to 140°F)
Operating position : Horizontal only
Dimensions (WxHxD)
: 435 mm x 93 mm x 272 mm
Weight : 4.4 kg
Format : VHS NTSC standard
Maximum recording time
(SP) : 210 min. with ST-210 video cassette
(EP) : 630 min. with ST-210 video cassette
VIDEO/AUDIO (VCR deck)
Signal system : NTSC colour signal and EIA
monochrome signal, 525 lines/60 fields
Recording system: DA4 (Double Azimuth) head helical
scan system
Signal-to-noise ratio: 45 dB
Horizontal resolution:
230 lines
Frequency range: 70 Hz to 10,000 Hz (Normal audio)
20 Hz to 20,000 Hz (Hi-Fi audio)
Input/Output: RCA connectors:
IN x 1, OUT x 1
VIDEO/AUDIO (DVD deck)
Signal system: NTSC
Applicable disc: DVD (12 cm, 8 cm)
CD (12 cm, 8 cm)
Audio characteristics
DVD: 4 Hz - 22 KHz
Frequency response
CD: 4 Hz - 20 KHz
S/N Ratio: 90 dB
Harmonic distortion
: 0.1 %
Wow and flutter: Below Measurable Level
Dynamic range: 90 dB
Output
Component-Y: (RCA) 1.0 Vp-p/75 ohm
Component- PB/PR
: (RCA) 0.7 Vp-p/75 ohm
Audio: (RCA) 2 Vrms, 1 Kohm
Digital Audio: (COAXIAL) 0.5 Vp-p/75 ohm
(OPTICAL) -21 dBm to -15 dBm
(peak)
TUNER
Tuning system: Frequency synthesized tuner
Channel coverage
VHF: Channels 2 – 13
UHF: Channels 14 – 69
CATV: 113 Channels
RF output: Channel 3 or 4 (switchable; preset
to Channel 3 when shipped)
75 ohms, unbalanced
TIMER
Clock reference: Quartz
Program capacity: 1-year programmable timer/
8 programs
Memory backup time
: Approx. 5 seconds
ACCESSORIES
Provided accessories
: RF cable,
Infrared remote control unit,
"AA" battery x 2
Specifications shown are for SP mode unless otherwise specified.
E.& O.E. Design and specifications subject to change without notice.
A
A-B Repeat Playback 51
About Discs
JPEG 65
MP3 62
Placing a Disc 9
Playable Discs 7
Region Number 7
Unplayable Discs 7
Angle Selection 55
Audio Channel Selection 57
Audio Language Selection 56
Auto Channel Set 26
C
Chapter Search 52
Check, cancel and change programs 38
Child Lock 82
Clock Set 24
Component Video Connection 16
Connecting To A Dolby Digital Decoder or An Amplifier With A Built-in DTS 74
D
Digital Audio Dubbing 71
Disc menu 43
Dubbing (from DVD to VCR) 70
E
EDITING (DVD DECK)
Digital Audio Dubbing 71
EDITING (VCR DECK)
Dubbing (from DVD to VCR) 70
EDITING (VCR)
Edit From A Camcorder 68
Edit To Or From Another Video Recorder 69
Elapsed Recording Time Indication 35
Express Timer Programming 36
G
Group/file selection 67
Group/track selection 64
H
High-Speed (Turbo) Search 29
High-Speed Search 44
I
INDEX 10
Index Search 30
Instant ReView 30
Instant Timer Recording (ITR) 34
J
JPEG control display 65
L
Language 20
Language Code List 23
Menu/Audio/Subtitle Language Set (DVD deck only) 22
On-screen Language Set (DVD deck) 21
On-screen Language Set (VCR deck) 20
Letter Box 19
Locating the start point of the item or skip the item ....44
M
Manual Channel Set 27
Manual Clock Set 25
Manual Tracking 32
Mode Set (DVD deck)
ANALOG DOWN MIX 80
AUDIO LANGUAGE 22
D. RANGE CONTROL 80
DIGITAL AUDIO OUT 79
MENU LANGUAGE 22
MONITOR TYPE 19,79
MP3/JPEG 79
ON SCREEN GUIDE 81
ON SCREEN LANGUAGE 21
OUTPUT LEVEL 80
PICTURE SOURCE 79
RESUME 81
SCREEN SAVER 79
SUBTITLE 22
Mode Set (VCR deck)
2ND AUDIO RECORD 77
AUDIO MONITOR 77
AUTO POWER OFF 77
AUTO SP→EP TIMER 76
BLUE BACK 77
PICTURE CONTROL 76
SUPERIMPOSE 76
VIDEO STABILIZER 77
MP3 control display 62
N
Next Function Memory 31
0
OPERATIONS ON DVD DECK 42-67
OPERATIONS ON VCR DECK 28-41
P
Pan&Scan 19
Parental Lock
Country/Area Code List 60
To change the settings 59
To set Parental Lock for the first time 58
To temporarily release the Parental Lock 59
Playback (DVD deck) 42-53
Playback (JPEG) 66-67
Playback (MP3) 63-64
Playback (VCR deck) 28-32
Playback Control (PBC) Function 43, 51
Plug&Play Set 17
Program Playback 53
R
Random Playback 53
Record One Program While Watching Another ..... 34
Recording 33-35
Recording Resume Function 33
Region Number 7
Remote Control Functions 72
Repeat Playback 31, 50, 64, 67
Resume Function 45
S
Satellite Auto Recording 41
Scan Mode Set (DVD deck) 82
Second Audio Recording 35
Semiauto Clock Set 25
Skip Search 30
Slow Motion 29,45
Soundtrack Selection 32
Still Picture/Frame-By-Frame Playback .....29, 45
Subtitle Selection 54
S-VIDEO Connection 15
T
Tape Position Indicator 12
Tape Remaining Time 35
Time Search 51
Timer Recording 36-41
Top menu 43
Tuner Set 26
V
VFP function 47
W
When programs overlap each other 40
Z
Zooming 45, 67
3D Phonic 46
HOW TO LOCATE YOUR JVC SERVICE CENTER
TOLL FREE: 1-800-537-5722
http://www.jvc.com
Dear Customer,
In order to receive the most satisfaction from your purchase, please read the instruction booklet before operating the unit. In the event that repair is necessary, or for the address nearest your location within the Continental United States, please call 1-800-537-5722 for your nearest authorized servicer or visit our website at www.JVC.com. Remember to retain your Bill of Sale for Warranty Service.
— JVC
JVC SERVICE & ENGINEERING COMPANY OF AMERICA
DIVISION OF JVC AMERICAS CORP.
Sophisticated electronic products may require occasional service. Just as quality is a keyword in the engineering and production of the wide array of JVC products, service is the key to maintaining the high level performance for which JVC is world famous. The JVC service and engineering organization stands behind our products.
NATIONAL HEADQUARTERS
JVC SERVICE & ENGINEERING COMPANY OF AMERICA
DIVISION OF JVC AMERICAS CORP.
10 New Maple Avenue
Pine Brook, NJ 07058-9641
ACCESSORIES Don't service the product yourself.
To purchase accessories for your JVC product, you may contact your local JVC Dealer.
From the 48 Continental United States call toll free:
1-800-882-2345 or on the web at www.JVC.com
CAUTION
To prevent electrical shock, do not open the cabinet.
There are no user serviceable parts inside.
Please refer to qualified service personnel for repairs.
LIMITED WARRANTY CONSUMER VIDEO 1-90
JVC COMPANY OF AMERICA warrants this product and all parts thereof, except as set forth below ONLY TO THE ORIGINAL PURCHASER AT RETAIL to be FREE FROM DEFECTIVE MATERIALS AND WORKMANSHIP from the date of original retail purchase for the period as shown below. ("The Warranty Period")
| PARTS1YR | LABOR90DAYS |
THIS LIMITED WARRANTY IS VALID ONLY IN THE FIFTY (50) UNITED STATES, THE DISTRICT OF COLUMBIA AND IN COMMONWEALTH OF PUERTO RICO.
WHAT WE WILL DO:
If this product is found to be defective, JVC will repair or replace defective parts at no charge to the original owner. Such repair and replacement services shall be rendered by JVC during normal business hours at JVC authorized service centers. Parts used for replacement are warranted only for the remainder of the Warranty Period. All products and parts thereof may be brought to a JVC authorized service center on a carry-in basis except for Television sets having a screen size 25 inches and above which are covered on an in-home basis.
WHAT YOU MUST DO FOR WARRANTY SERVICE:
Return your product to a JVC authorized service center with a copy of your bill of sale. For your nearest JVC authorized service center, please call toll free: (800) 537-5722.
If service is not available locally, box the product carefully, preferably in the original carton, and ship, insured, with a copy of your bill of sale plus a letter of explanation of the problem to the nearest JVC Factory Service Center, the name and location of which will be given to you by the toll-free number.
If you have any questions concerning your JVC Product, please contact our Customer Relations Department.
WHAT IS NOT COVERED:
This limited warranty provided by JVC does not cover:
- Products which have been subject to abuse, accident, alteration, modification, tampering, negligence, misuse, faulty installation, lack of reasonable care, or if repaired or serviced by anyone other than a service facility authorized by JVC to render such service, or if affixed to any attachment not provided with the products, or if the model or serial number has been altered, tampered with, defaced or removed;
- Initial installation and installation and removal for repair;
- Operational adjustments covered in the Owner's Manual, normal maintenance, video and audio head cleaning;
- Damage that occurs in shipment, due to act of God, and cosmetic damage;
- Signal reception problems and failures due to line power surge;
- Video Pick-up Tubes/CCD Image Sensor, Cartridge, Stylus (Needle) are covered for 90 days from the date of purchase;
- Accessories;
- Batteries (except that Rechargeable Batteries are covered for 90 days from the date of purchase);
There are no other express warranties except as listed above.
THE DURATION OF ANY IMPLIED WARRANTIES INCLUDING THE IMPLIED WARRANTY OF MERCHANTABILITY, IS LIMITED TO THE DURATION OF THE EXPRESS WARRANTY HEREIN.
JVC SHALL NOT BE LIABLE FOR THE LOSS OF USE OF THE PRODUCT, INCONVENIENCE, LOSS OR ANY OTHER DAMAGES, WHETHER DIRECT, INCIDENTAL OR CONSEQUENTIAL (INCLUDING, WITHOUT LIMITATION, DAMAGE TO TAPES, RECORDS OR DISCS) RESULTING FROM THE USE OF THIS PRODUCT, OR ARISING OUT OF ANY BREACH OF THIS WARRANTY. ALL EXPRESS AND IMPLIED WARRANTIES, INCLUDING THE WARRANTIES OF MERCHANTABILITY AND FITNESS FOR PARTICULAR PURPOSE, ARE LIMITED TO THE WARRANTY PERIOD SET FORTH ABOVE.
Some states do not allow the exclusion of incidental or consequential damages or limitations on how long an implied warranty lasts, so these limitations or exclusions may not apply to you. This warranty gives you specific legal rights and you may also have other rights which vary from state to state.
JVC COMPANY OF AMERICA
DIVISION OF JVC AMERICAS CORP.
1700 Valley Road
Wayne, New Jersey 07470
REFURBISHED PRODUCTS CARRY A SEPARATE WARRANTY, THIS WARRANTY DOES NOT APPLY. FOR DETAILS OF REFURBISHED PRODUCT WARRANTY, PLEASE REFER TO THE REFURBISHED PRODUCT WARRANTY INFORMATION PACKAGED WITH EACH REFURBISHED PRODUCT.
For customer use:
Enter below the Model No. and Serial No. which is located either on the rear, bottom or side of the cabinet. Retain this information for future reference.
Model No.: Serial No.:
Purchase date: Name of dealer:
JVC
VICTOR COMPANY OF JAPAN, LIMITED
Hi-Fi
SVHS
Super VHS ET







INSTRUCTIONS
For Customer Use:
Enter below the Model No. and Serial No. which are located on the rear of cabinet. Retain this information for future reference.
Model No.
Serial No.
Dear Customer,
Thank you for purchasing the JVC DVD player & S-VHS video cassette recorder. Before use, please read the safety information and precautions to ensure safe use of your new unit.
CAUTIONS

CAUTION
RISK OF ELECTRIC SHOCK DO NOT OPEN

CAUTION: TO REDUCE THE RISK OF ELECTRIC SHOCK. DO NOT REMOVE COVER (OR BACK). NO USER-SERVICEABLE PARTS INSIDE. REFER SERVICING TO QUALIFIED SERVICE PERSONNEL.

The lightning flash with arrowhead symbol, within an equilateral triangle, is intended to alert the user to the presence of uninsulated "dangerous voltage" within the product's enclosure that may be of sufficient magnitude to constitute a risk of electric shock to persons.

The exclamation point within an equilateral triangle is intended to alert the user to the presence of important operating and maintenance (servicing) instructions in the literature accompanying the appliance.
WARNING:
TO PREVENT FIRE OR SHOCK HAZARD, DO NOT EXPOSE THIS UNIT TO RAIN OR MOISTURE.
CAUTION:
This unit should be used with AC 120V~, 60Hz only. To prevent electric shocks and fire hazards, DO NOT use any other power source.
CAUTION:
TO PREVENT ELECTRIC SHOCK, MATCH WIDE BLADE OF PLUG TO WIDE SLOT, FULLY INSERT.
ATTENTION:
POUR ÉVITER LES CHOCS ÉLECTRIQUES, INTRODUIRE LA LAME LA PLUS LARGE DE LA FICHE DANS LA BORNE CORRESPONDANTE DE LA PRISE ET POUSSER JUSQU'AU FOND.
Note to CATV system installer:
This reminder is provided to call the CATV system installer's attention to Article 820-40 of the NEC that provides guidelines for proper grounding and, in particular, specifies that the cable ground shall be connected to the grounding system of the building, as close to the point of cable entry as practical.
CAUTION:
Changes or modifications not approved by JVC could void user's authority to operate the equipment.
CAUTION:
THIS PRODUCT USES A LASER SYSTEM.
USE OF CONTROLS OR ADJUSTMENTS OR PERFORMANCE OF PROCEDURES OTHER THAN THOSE SPECIFIED HEREIN MAY RESULT IN HAZARDOUS RADIATION EXPOSURE.
DO NOT OPEN COVERS AND DO NOT REPAIR YOURSELF. REFER SERVICING TO QUALIFIED PERSONNEL.
CLASS 1 LASER PRODUCT
REPRODUCTION OF LABELS
WARNING LABEL INSIDE OF THE UNIT
CAUTION - VISIBLE OR INVISIBLE LASER RADIATION WHEN OPEN. DO NOT STARE INTO BEAM.
CAUTION - VISIBLE OR INVISIBLE LASER RADIATION WHEN OPEN. DO NOT STARE INTO BEAM. LP41077-002A
Declaration of Conformity
Model Number: HR-XVS44U
Trade Name: JVC
Responsible Party: JVC Americas Corp.
Address: 1700 Valley Road Wayne, N.J. 07470
Telephone Number: 973-317-5000
This device complies with Part 15 of FCC Rules.
Operation is subject to the following two conditions:
(1) This device may not cause harmful interference, and (2) this device must accept any interference received, including interference that may cause undesired operation.
This equipment has been tested and found to comply with the limits for a Class B digital device, pursuant to Part 15 of the FCC Rules. These limits are designed to provide reasonable protection against harmful interference in a residential installation. This equipment generates, uses, and can radiate radio frequency energy and, if not installed and used in accordance with the instructions, may cause harmful interference to radio communications. However, there is no guarantee that interference will not occur in a particular installation. If this equipment does cause harmful interference to radio or television reception, which can be determined by turning the equipment off and on, the user is encouraged to try to correct the interference by one or more of the following measures:
Reorient or relocate the receiving antenna.
Increase the separation between the equipment and receiver.
Connect the equipment into an outlet on a circuit different from that to which the receiver is connected.
Consult the dealer or an experienced radio/TV technician for help.
Use only discs marked with the following.

DVD (8 cm /12 cm disc)

Video CDs (8 cm /12 cm disc)

Audio CDs (8 cm / 12 cm disc)

SVCD (8 cm / 12 cm disc)
DSS™ is an official trademark of DIRECTV, Inc., a unit of GM Hughes Electronics. DISH Network™ is a trademark of Echostar Communications Corporation.



- Manufactured under license from Dolby Laboratories. "Dolby" and the double-D symbol are trademarks of Dolby Laboratories.
- "DTS" and "DTS Digital Out" are trademarks of Digital Theater Systems, Inc.
- Cassettes marked "S-VHS" and "VHS" can be used with this unit. However, S-VHS recordings are possible only with cassettes marked "S-VHS".
By using the S-VHS ET function, it is possible to record and play back with S-VHS picture quality on VHS cassettes with this unit.
- This product incorporates copyright protection technology that is protected by method claims of certain U.S. patents and other intellectual property rights owned by Macrovision Corporation and other rights owners. Use of this copyright protection technology must be authorized by Macrovision Corporation, and is intended for home and other limited viewing users only unless otherwise authorized by Macrovision Corporation. Reverse engineering or disassembly is prohibited.
When the equipment is installed in a cabinet or a shelf, make sure that it has sufficient space on all sides to allow for ventilation (10 cm or more on both sides, on top and at the rear).
When discarding batteries, environmental problems must be considered and the local rules or laws governing the disposal of these batteries must be followed strictly.
Failure to heed the following precautions may result in damage to the unit, Remote or video cassette.
1. DO NOT place the unit —
— in an environment prone to extreme temperatures or humidity. — in direct sunlight. — in a dusty environment. — in an environment where strong magnetic fields are generated. — on a surface that is unstable or subject to vibration.
- DO NOT block the unit's ventilation openings or holes.
(If the ventilation openings or holes are blocked by a newspaper or cloth, etc., the heat may not be able to get out.)
- DO NOT place heavy objects on the unit or Remote.
- DO NOT place anything which might spill on top of the unit or Remote. (If water or liquid is allowed to enter this equipment, fire or electric shock may be caused.)
- DO NOT expose the apparatus to dripping or splashing.
- DO NOT use this equipment in a bathroom or places with water. Also DO NOT place any containers filled with water or liquids (such as cosmetics or medicines, flower vases, potted plants, cups, etc.) on top of this unit.
- DO NOT place any naked flame sources, such as lighted candles, on the apparatus.
- AVOID violent shocks to the unit during transport.
MOISTURE CONDENSATION
Moisture in the air will condense on the unit when you move it from a cold place to a warm place, or under extremely humid conditions—just as water droplets form in the surface of a glass filled with cold liquid. Moisture condensation on the head drum will cause damage to the tape. In conditions where condensation may occur, keep the unit turned on for a few hours to let the moisture dry.
ATTENTION
To mobile phone users:
Using a mobile phone in the vicinity of the unit may cause picture vibration on the TV screen or change the screen to a blue back display.
On placing the unit:
Some TVs or other appliances generates strong magnetic fields. Do not place such appliance on top of the unit as it may cause picture disturbance.
IMPORTANT PRODUCT SAFETY INSTRUCTIONS
Electrical energy can perform many useful functions. But improper use can result in potential electrical shock or fire hazards. This product has been engineered and manufactured to assure your personal safety. In order not to defeat the built-in safeguards, observe the following basic rules for its installation, use and servicing.
ATTENTION
Follow and obey all warnings and instructions marked on your product and its operating instructions. For your safety, please read all the safety and operating instructions before you operate this product and keep this booklet for future reference.
INSTALLATION
1. Grounding or Polarization
(A) Your product may be equipped with a polarized alternating-current line plug (a plug having one blade wider than the other). This plug will fit into the power outlet only one way. This is a safety feature. If you are unable to insert the plug fully into the outlet, try reversing the plug. If the plug should still fail to fit, contact your electrician to replace your obsolete outlet. Do not defeat the safety purpose of the polarized plug. (B) Your product may be equipped with a 3-wire grounding-type plug, a plug having a third (grounding) pin. This plug will only fit into a grounding-type power outlet. This is a safety feature. If you are unable to insert the plug into the outlet, contact your electrician to replace your obsolete outlet. Do not defeat the safety purpose of the grounding-type plug.
2. Power Sources
Operate your product only from the type of power source indicated on the marking label. If you are not sure of the type of power supply to your home, consult your product dealer or local power company. If your product is intended to operate from battery power, or other sources, refer to the operating instructions.
3. Overloading
Do not overload wall outlets, extension cords, or integral convenience receptacles as this can result in a risk of fire or electric shock.
4. Power Cord Protection
Power supply cords should be routed so that they are not likely to be walked on or pinched by items placed upon or against them, paying particular attention to cords at plugs, convenience receptacles, and the point where they exit from the product.
5. Ventilation
Slots and openings in the cabinet are provided for ventilation. To ensure reliable operation of the product and to protect it from overheating, these openings must not be blocked or covered.
- Do not block the openings by placing the product on a bed, sofa, rug or other similar surface.
- Do not place the product in a built-in installation such as a bookcase or rack unless proper ventilation is provided or the manufacturer's instructions have been adhered to.
6. Wall or Ceiling Mounting
The product should be mounted to a wall or ceiling only as recommended by the manufacturer.
ANTENNA INSTALLATION INSTRUCTIONS
1. Outdoor Antenna Grounding
If an outside antenna or cable system is connected to the product, be sure the antenna or cable system is grounded so as to provide some protection against voltage surges and built-up static charges. Article 810 of the National Electrical Code, ANSI/NFPA 70, provides information with regard to proper grounding of the mast and supporting structure, grounding of the lead-in wire to an antenna discharge unit, size of grounding connectors, location of antenna discharge unit, connection to grounding electrodes, and requirements for the grounding electrode.
2. Lightning
For added protection for this product during a lightning storm, or when it is left unattended and unused for long periods of time, unplug it from the wall outlet and disconnect the antenna or cable system. This will prevent damage to the product due to lightning and power-line surges.
3. Power Lines
An outside antenna system should not be located in the vicinity of overhead power lines or other electric light or power circuits, or where it can fall into such power lines or circuits. When installing an outside antenna system, extreme care should be taken to keep from touching such power lines or circuits as contact with them might be fatal.
EXAMPLE OF ANTENNA GROUNDING AS PER NATIONAL ELECTRICAL CODE, ANSI/NFPA 70
NEC - NATIONAL ELECTRICAL CODE
USE
1. Accessories
To avoid personal injury:
- Do not place this product on an unstable cart, stand, tripod, bracket, or table. It may fall, causing serious injury to a child or adult, and serious damage to the product.
- Use only with a cart, stand, tripod, bracket, or table recommended by the manufacturer or sold with the product.
- Use a mounting accessory recommended by the manufacturer and follow the manufacturer's instructions for any mounting of the product.
- Do not try to roll a cart with small casters across thresholds or deep-pile carpets.
2. Product and Cart Combination
A product and cart combination should be moved with care. Quick stops, excessive force, and uneven surfaces may cause the product and cart combination to overturn.
PORTABLE CART WARNING (Symbol provided by RETAC)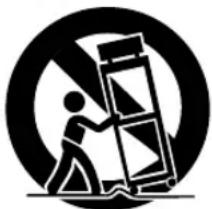
3. Water and Moisture
Do not use this product near water—for example, near a bath tub, wash bowl, kitchen sink or laundry tub, in a wet basement, or near a swimming pool and the like.
4. Object and Liquid Entry
Never push objects of any kind into this product through openings as they may touch dangerous voltage points or short-out parts that could result in a fire or electric shock. Never spill liquid of any kind on the product.
5. Attachments
Do not use attachments not recommended by the manufacturer of this product as they may cause hazards.
6. Cleaning
Unplug this product from the wall outlet before cleaning. Do not use liquid cleaners or aerosol cleaners. Use a damp cloth for cleaning.
7. Heat
The product should be situated away from heat sources such as radiators, heat registers, stoves, or other products (including amplifiers) that produce heat.
SERVICING
1. Servicing
If your product is not operating correctly or exhibits a marked change in performance and you are unable to restore normal operation by following the detailed procedure in its operating instructions, do not attempt to service it yourself as opening or removing covers may expose you to dangerous voltage or other hazards. Refer all servicing to qualified service personnel.
2. Damage Requiring Service
Unplug this product from the wall outlet and refer servicing to qualified service personnel under the following conditions:
a. When the power supply cord or plug is damaged.
b. If liquid has been spilled, or objects have fallen into the product.
c. If the product has been exposed to rain or water.
d. If the product does not operate normally by following the operating instructions. Adjust only those controls that are covered by the operating instructions as an improper adjustment of other controls may result in damage and will often require extensive work by a qualified technician to restore the product to its normal operation.
e. If the product has been dropped or damaged in any way.
f. When the product exhibits a distinct change in performance—this indicates a need for service.
3. Replacement Parts
When replacement parts are required, be sure the service technician has used replacement parts specified by the manufacturer or which have the same characteristics as the original part. Unauthorized substitutions may result in fire, electric shock or other hazards.
4. Safety Check
Upon completion of any service or repairs to this product, ask the service technician to perform safety checks to determine that the product is in safe operating condition.
HOW TO USE THIS INSTRUCTION MANUAL
- All major sections and subsections are listed in the Table Of Contents on page 6. Use this when searching for information on a specific procedure or feature.
- The Index on pages 10 – 13 lists frequently-used terms, and the number of the page on which they are used or explained in the manual. This section also illustrates the controls and connections on the front and rear panel, the front display panel and the remote control.
- The [5] mark signals a reference to another page for instructions or related information.
- Operation buttons necessary for the various procedures are clearly indicated through the use of illustrations at the beginning of each major section.
BEFORE YOU INSTALL YOUR NEW UNIT ... ... please read the sections/literature listed below.
- "CAUTIONS" on page 2
- "IMPORTANT PRODUCT SAFETY INSTRUCTIONS" on pages 4 – 5
DISC INFORMATION 7
About Discs 7
INDEX 10
INSTALLING YOUR NEW UNIT 14
Basic Connections ...... 14
S-VIDEO Connection 15
Component Video Connection (DVD deck only) 16
INITIAL SETTINGS 17
Plug & Play Set 17
Monitor Set (DVD deck) 18
Language 20
Clock Set 24
Tuner Set 26
OPERATIONS ON VCR DECK 28
Basic Playback 28
Playback Features 29
Basic Recording 32
Recording Features 33
Active Video Calibration 35
Express Timer Programming 36
Satellite Auto Recording 41
OPERATIONS ON DVD DECK 42
Basic Playback 42
Playback Features 43
Using the on-screen bar 48
Parental Lock 58
About MP3/WMA Disc 62
MP3/WMA Playback 63
About JPEG Disc 65
JPEG Playback 66
EDITING (VCR DECK) 68
Edit From A Camcorder 68
Edit To Or From Another Video Recorder 69
Dubbing (from DVD to VCR) 70
EDITING (DVD DECK) 71
Digital Audio Dubbing 71
REMOTE 72
Remote Control Functions 72
Connecting To A Dolby Digital Decoder or An Amplifier With A Built-in DTS (DVD deck only) ....74
SUBSIDIARY SETTINGS 75
Mode Set (VCR deck) 75
Mode Set (DVD deck) 80
Child Lock 84
Scan Mode Set (DVD deck) 84
TROUBLESHOOTING 85
QUESTIONS AND ANSWERS 90
SPECIFICATIONS 91
LIST OF TERMS 92
FOR SERVICING (Only in U.S.A.) 94
WARRANTY (Only in U.S.A.) 95
About Discs
Playable Discs
You can use the discs with the following logos for playback only.
| DVD VIDEO Video CD/Super Video CD | ||
 |  |  |
| Audio CDCOMPACT disc DIGITAL AUDIO CD-DA files | ||
● The following discs also can be played back.
- DVD-R/RW discs recorded in DVD VIDEO format and finalized
- CD-R/RW discs recorded in Super Video CD, Video CD or Audio CD format and finalized.
- CD-R/RW discs recorded in MP3/WMA format in accordance with the "ISO 9660" format. (See page 62 for details.)
- CD-R/RW discs recorded in JPEG format in accordance with the "ISO 9660" format. (See page 65 for details.)
● Discs other than the above cannot be played back. - Operation and audio quality of this unit are not guaranteed for discs that do not conform to the Compact Disc specification (CD-DA).
Before you play back a CD, check for the CD logo and read the notes on the package to confirm that it conforms to the Compact Disc specification.
- Depending on the intentions of the author of the software, recording conditions of DVD discs and Video CD discs may be restricted. Since this unit plays back discs according to the intentions of the author of the software as indicated on the disc, some functions may not operate as commanded.
- When switching from the first layer to the second layer of double-layered DVD VIDEO discs, the image and sound may be momentarily distorted. This is not a malfunction.
Unplayable Discs
The following types of discs cannot be played using this unit. Do not attempt to play back any kind of disc that is damaged (cracked, warped, or repaired with adhesive tape) or discs in unusual shapes (heart-shaped, octagonal, or other forms). If such discs are accidentally played back, it may cause noise that can lead to speaker damage.
- CD-ROM discs (including PHOTO-CD) • DVD AUDIO discs ● Super Audio CDs (SACD) • DVD-RW discs recorded in VR format • DVD-RAM
- Discs which have a region number other than "1"
Region Number
The world is divided into 6 regions for DVD VIDEO discs. DVD VIDEO discs are assigned a region number to indicate which region they may be played back in. A disc cannot be played back on this unit unless the region number of the disc matches that of the unit. The region number for this unit is "1". Only discs whose region number includes "1" can be played back, such as shown below.
Examples of DVD VIDEO labels which can be played back using this unit.


Marks of discs in this instruction manual

DVD VIDEO Marks
Sometimes marks are printed on a DVD disc and/or on its packaging to indicate information regarding the contents and functions of a disc. Check marks indicating the contents and functions of a disc. Note, however, that in some cases a disc may not include a mark even for a function it supports.
Marks related to video
| Mark Description | |
 | Number of subtitles |
 | Number of angles |
 | Recorded under the standard 4:3 aspect ratio |
 | Screen includes black bands at top and bottom of image which has a standard 4:3 aspect ratio (letter box) |
 | Video playback is in Wide video mode (16:9) on wide televisions, but in letter box on televisions with standard 4:3 aspect ratio. |
 | Video playback is in Wide video mode (16:9) on wide televisions, but pan and scan is used on televisions with standard 4:3 aspect ratio (either the left or right side of the image is cut-out). |
Marks related to audio
| Mark Description | |
 | Number of audio tracks |
 | Dolby Digital markDolby Laboratories has developed a digital surround system for the home. This mark indicates that you may enjoy 5.1-channel audio (front left and right, center, rear left and right, and a channel for LFE (Low-Frequency Effects)). |
 | DTS (Digital Theater System)You can enjoy DTS audio if you connect the amplifier with a built-in DTS decoder to the DIGITAL AUDIO OUT connector of the unit. |
File Structure of Discs
DVD VIDEO
Typically, DVD VIDEO discs are made up of larger units called "titles". Each title has a number (title number) that can be used to select desired titles. Titles are further divided into units called "chapters". Each chapter has a number (chapter number) that can also be used to select desired chapters. Note that some discs are not divided into titles and chapters.
![graph LR A["Title 1 Title 2"] --> B["Chapter 1"] A --> C["Chapter 2"] A --> D["Chapter 3"] A --> E["Chapter 1"] A --> F["Chapter 2"]](/content/2026/06/1341529/images/4ab4ff29d0cb1e95c29b7c2093a7f4bd023a0b565a1115cfd2b3da6d8a06264f.jpg)
Audio CD/Video CD
Typically, Audio CD discs are divided into separate tracks each containing one song. Each track is assigned a number. For example, the third track is Track 3. The same is true for Video CD discs.
![graph LR A["Track 1"] --> B["Track 2"] B --> C["Track 3"] C --> D["End"]](/content/2026/06/1341529/images/202510385a07b07d2b97e2f7927e5e6019fe410c5b243db0bbc6b1f64f9828a5.jpg)
NOTE:
Video CD discs that support Playback Control (PBC)
The still image or motion image which follows a menu screen is called a "scene". Each scene has a scene number. For more details, refer to "Locating a desired scene using the menu of the Video CD with PBC" (LPG pg. 43).
Placing a Disc
1 Open the disc tray.
Press OPEN/CLOSE (▲) on the DVD deck to open the disc tray.

- Pressing the button again closes the disc tray.
- Do not block the disc tray with your hand while it is opening or closing as this may result in hardware failure.
- Do not place unplayable discs or any object other than a disc in the disc tray.
- Do not press down strongly on the disc tray or place any heavy objects on it.
2 Place the disc.
Place the disc in the disc tray with the label side facing up.
- Since disc size changes depending on the disc to be played back, be sure to correctly align the disc with the grooves for its size. If the disc is not in its groove, it may be scratched or otherwise damaged.
- To insert an 8 cm disc, place it according to the inner groove.

Care and Handling of Discs
How to handle discs
When handling a disc, do not touch the surface of the disc. Since discs are made of plastic, they are easily damaged. If a disc gets dirty, dusty, scratched or warped, the images and sound will not be picked up correctly,
and such a disc may cause the unit to malfunction.

Label side
Do not damage the label side, stick paper to or use any adhesive on its surface.
Storage
Make sure that discs are kept in their cases. If discs are piled on top of one another without their protective cases, they can be damaged. Do not put discs in a location where they may be exposed to direct sunlight, or in a place where the humidity or temperature is high. Avoid leaving discs in your car!
Maintenance of discs
If there are fingerprints or other dirt adhering to a disc, wipe with a soft dry cloth, moving from the center outwards. If a disc is difficult to clean, wipe with a cloth moistened with water. Never use record cleaners, petrol, alcohol or any anti-static agents.

CAUTION
Sometimes during playback, noise or images may be garbled. This is sometimes due to the disc. (It may not be up to industry standards.)
These symptoms are caused by the discs, not by the malfunction of the unit.
FRONT VIEW

① Power Button (POWER ⏻/l)) □ pg. 18 ② VCR Indicator ☐ pg. 28, 32 ③ VHS Cassette Loading Slot ④ VCR/DVD Button 17 pg. 28, 32, 42 ⑤ Disc Tray 6 Stop Button (STOP (■)) pg. 28, 32, 42 ⑦ DVD Indicator 📋 pg. 42 8 Play Button (PLAY ▶)) pg. 28, 42 9 DVD Open/Close Button (OPEN/CLOSE (▲)) PP pg. 42 ⑩ VHS Eject Button (EJECT (▲)) kg. 28, 32
⑪ S-Video/Video/Audio Input Connectors (S-VIDEO/VIDEO/AUDIO) 📋 pg. 68 ⑫ Remote Sensor 13 Front Display Panel pg. 11 14 Record Button (REC (●)) 127 pg. 32 ⑮ Rewind Button (REW (◀◀)) 📋 pg. 28, 29, 44 16 Fast Forward Button (FF ▶▶) pg. 28, 29, 44 ⑰ Channel Button (CH +/-) pg. 32 18 Progressive Scan Button (PROGRESSIVE SCAN) 17 pg. 84
REAR VIEW

① Region Number Label ☐ pg. 7 ② AC Power Cord 📋 pg. 14 3 S-Video/Video/Audio Input Connectors (S-VIDEO/VIDEO/AUDIO INPUT (L-1)) pg. 41, 69 4 S-Video/Video/Audio Output Connectors (S-VIDEO/VIDEO/AUDIO OUTPUT) pg. 14, 15, 16, 69 ⑤ Antenna Input Connector (VHF/UHF IN) pg. 14
6 Digital Audio Output Connector (DIGITAL AUDIO OUT) pg. 71 ⑦ Audio Output Connectors (AUDIO OUTPUT (L/R))* * These are analogue audio output connectors for DVD deck only. ⑧ Component Video Output Connectors (COMPONENT VIDEO OUT) ☐ pg. 16 9 Antenna Output Connector (VHF/UHF OUT) pg. 14
FRONT DISPLAY PANEL
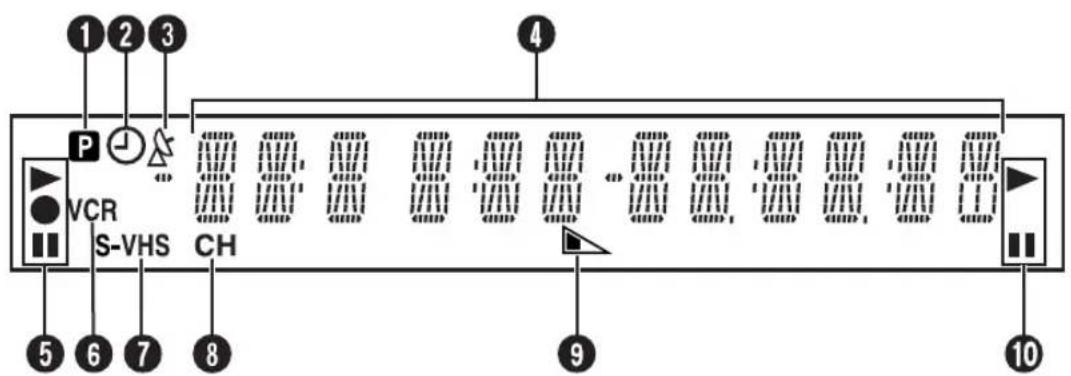
① Progressive Mode Indicator 17 pg. 84
② "Timer" Indicator (VCR deck only) 📋 pg. 37
3 Satellite Auto Recording Indicator (A) (VCR deck only) pg. 41
④ Channel/Clock Mode Display (F-1 or L-1) (VCR deck only) Counter Display (VCR deck)
Tape Speed (SP/EP) (VCR deck only) Multi-information window* (DVD deck)
* The current group/title/track/chapter number(s), time and status information.
⑤ VCR Mode Indicator ⑥ VCR Indicator 📋 pg. 33 ⑦ Cassette Type Indicator (VCR deck only) ⑧ Channel Mode Indicator (CH) ⑨ Remain Display 📋 pg. 34 10 DVD Mode Indicator
ON-SCREEN DISPLAY (VCR deck)
If you press DISPLAY on the Remote when "SUPERIMPOSE" is set to "ON" (17 pg. 77), various operational indicators appear on the TV screen.
For On-screen display for DVD deck, refer to "Using the on-screen bar" (L37 pg. 48).

① Operation Mode Indicators ② Tape Speed (SP/EP) ③ Tape Position Indicator
The tape position indicator appears on the TV screen when you press REW (◀◀) or FF (▶▶) from the Stop mode or perform an Index Search. (L3 pg. 30) The position of "1" in relation to "0" (beginning) or "+" (end) shows you where you are on the tape.

NOTE:
Depending on the type of tape being used, the tape position indicator may not appear correctly.
④ Index number pg. 30 ⑤ Tape Remaining Time Indicator pg. 34 ⑥ Counter Display ⑦ Audio Mode Display pg. 31 ⑧ SAP Indicator pg. 34 ⑨ Stereo Program Indicator pg. 34 ⑩ Day/Clock Display ⑪ Channel Position Number/Auxiliary Input Indicator (F-1 or L-1) ⑫ "Cassette Loaded" Mark
To recall an indication
1 Press DISPLAY.
- All indications corresponding to the current status are displayed for 5 seconds. After that, the counter information and RECORD/PAUSE if in the Record Pause mode, remain on the screen.
2 Press DISPLAY again to clear the display.
- The RECORD/PAUSE indication remains on the screen.
REMOTE

Buttons with a small dot on the left side of the name can also be used to operate your TV. (pg. 73)
① VCR Button pg. 28, 32 ② TV/VCR/DVD switch pg. 18 ③ Menu Button (MENU) pg. 43 ④ SP/EP Button pg. 32
Top Menu Button (TOP MENU) pg. 43
⑤ Stop Time Button (STOP +/-) pg. 36
Display Button (PLAY SETUP) pg. 48
Title Button (TITLE) pg. 64
⑥ Start Time Button (START +/-) pg. 36
Repeat Button (REPEAT) pg. 50, 64, 67
Zooming Button (ZOOM) pg. 45
Number Keys pg. 27, 32, 64
Daily Button (DAILY) pg. 37
Counter Reset Button (C.RESET) pg. 34
Cancel Button (CANCEL) pg. 39
10 Button
Play Button (PLAY ▶) pg. 28, 42; Rewind Button (REW ◀◀) pg. 28, 29, 44; Stop Button (STOP ■) pg. 28, 32, 42; Record Button (REC ●) pg. 32
Reverse Skip/Index Button (SKIP/INDEX ◀◀) pg. 30, 43; Review Button (REVIEW ▶) pg. 30; △▽ Button pg. 18; TV/VCR Channel Button (TV/VCR CH +/-) pg. 73; Set Up Menu Button (SET UP MENU) pg. 18; 3D-Phonic Button (3D-PHONIC) pg. 46; TV Volume Button (TV VOL+/-) pg. 73; DVD Button pg. 42; Power Button (POWER ⏻/l) pg. 18; TV Muting Button (MUTE) pg. 73; Audio Monitor Button (A.MONITOR) pg. 31, 56, 57; TV/VCR Button pg. 33; Date Button (DATE +/-) pg. 36; Subtitle Button (SUB TITLE) pg. 54
Angle Button (ANGLE) pg. 55
* With this button, you can also adjust the brightness of the front display panel.
+: brightens the display; -: darkens the display
Channel Button (CH +/-) pg. 32; Programming Button (PROG.) pg. 36; Timer Button (TIMER) pg. 37; Weekly Button (WEEKLY) pg. 37; Program Check Button (PROG. CHECK) pg. 38
Return Button (RETURN) pg. 43
Satellite Auto Recording Button (REC LINK) pg. 41; +10 Button; Auxiliary Button (AUX) pg. 68; Fast Forward Button (FF ▶▶) pg. 28, 29, 44; Pause Button (PAUSE II) pg. 29, 32; Forward Skip/Index Button (SKIP/INDEX ▶▶I) pg. 30, 43; OK Button pg. 18; ◀ ▷ Button pg. 18; Display Button (DISPLAY) pg. 34; Skip Search Button (SKIP SEARCH) pg. 30; DVD Picture Button (DVD PICTURE) pg. 47
How To Use
Before use, insert two AA size batteries into the Remote with the polarity (and) matched correctly as indicated on the battery compartment or on the lid.
The Remote can operate most of your unit's functions, as well as basic functions of TV sets of JVC and other brands. (137 pg. 73)
- Point the Remote toward the remote sensor.
- The maximum operating distance of the remote control is about 8 m.
NOTE:
If the Remote doesn't work properly, remove its batteries, wait a short time, replace the batteries and then try again.
Basic Connections
![graph TD A["Antenna or Cable"] --> B["Coaxial cable"] B --> C["Flat feeder"] C --> D["Matching transformer (not supplied)"] D --> E["AC Outlet"] E --> F["AC Power Cord"] F --> G["Back of unit"] G --> H["Audio/Video cable (not supplied)"] H --> I["To Audio/video input connectors"] I --> J["RF cable (…](/content/2026/06/1341529/images/c832514f554ffb5f80f0b17d917b57f836e308bc2abf2dd9c65cf512cd07e122.jpg)
It's essential that your unit be properly connected.
THESE STEPS MUST BE COMPLETED BEFORE ANY VIDEO OPERATION CAN BE PERFORMED.
1 Check the contents.
Make sure the package contains all of the accessories listed in "SPECIFICATIONS" on page 91.
2 Situate the unit.
Place the unit on a stable, horizontal surface.
3 Connect the unit to TV.
The connection method you use depends on the type of TV you have.
RF Connection
■ To connect to a TV with NO AV input connectors —
1 Disconnect the TV antenna from the TV.
2 Connect the TV antenna cable to the VHF/UHF IN connector on the rear panel of the unit.
3 Connect the supplied RF cable between the VHF/UHF OUT connector on the rear panel of the unit and the TV's antenna terminal.
AV Connection
■ To connect to a TV with AV input connectors —
1 Connect the antenna, unit and TV as per "RF Connection". 2 Connect an optional audio/video cable between the AUDIO/VIDEO OUTPUT connectors on the rear panel of the unit and the TV's audio/video input connectors.
- Set your TV to AV mode.
- For switching the TV's mode, refer to the instruction manual of your television.
- To obtain high-quality pictures, you can also use the S-VIDEO connection or Component Video Connection (DVD deck only). (☐ pg. 15, 16)
4 Connect the unit to power source.
Plug the end of the AC power cord into an AC outlet. This unit performs Plug & Play Set automatically. (23 pg. 17)
- The clock and tuner channels will automatically be set when the antenna is connected and when the AC power cord is first connected to an AC outlet. (If "AUTO" and the channel indicator are displayed on the front display panel before the unit is powered on, the clock and tuner channels are being set automatically. Wait for the time to be displayed on the front display panel before turning on the unit.)
5 Set the VCR channel.
The VCR channel is the channel on which you can watch the picture from the unit on the TV when only using RF connection.
With RF connection, set the VCR channel to "3 CH" or "4 CH".
●The VCR channel is preset to "3 CH". Set to "4 CH" if Channel 3 is used for broadcasting in your area.
With AV connection, set the VCR channel to "-CH" (off).
To set the VCR channel, perform the following steps:
Before performing the following steps:
● Make sure there is no cassette inserted in the unit. - Make sure the unit is turned on, then press VCR/DVD on the unit or VCR on the Remote so that the VCR indicator lights up.
① Press POWER (⏻/ı) to turn off the unit, then press STOP (■) on the unit for more than 5 seconds. "3 CH" appears on the front display panel.
2 Press CH +/- on the Remote to select "3 CH", "4 CH" or "-CH" (off), then press OK.
S-VIDEO Connection
![graph TD A["Antenna or Cable"] --> B["Coaxial cable"] B --> C["Flat feeder"] C --> D["Matching transformer (not supplied)"] D --> E["AC outlet"] D --> F["S VIDEO OUTPUT"] D --> G["AUDIO OUTPUT"] E --> H["Back of unit"] F --> I["AC power cord"] G --> J["Back of unit"] H --> K["S-Video cable (supplied…](/content/2026/06/1341529/images/58c646bb2e432b9260640952b33deacccb59c7473c5562fc5f1a7864a798fcfe.jpg)
■ To connect to a TV with S-VIDEO/AUDIO input connectors ...
1 Connect the unit to TV.
1 Connect the antenna, unit and TV as per "RF Connection". (L7 pg. 14) 2 Connect an optional audio cable between the AUDIO OUTPUT connectors on the rear panel of the unit and the TV's audio input connectors. 3 Connect the unit's S VIDEO OUTPUT connector to the TV's S-VIDEO input connector.
2 Connect the unit to power source.
Plug the end of the AC power cord into an AC outlet. This unit performs Plug & Play Set automatically. (pg. 17)
- The clock and tuner channels will automatically be set when the antenna is connected and when the AC power cord is first connected to an AC outlet. (If "AUTO" and the channel indicator are displayed on the front display panel before the unit is powered on, the clock and tuner channels are being set automatically. Wait for the time to be displayed on the front display panel before turning on the unit.)
3 Set the VCR channel to off.
Before performing the following steps:
● Make sure there is no cassette inserted in the unit. - Make sure the unit is turned on, then press VCR/DVD on the unit or VCR on the Remote so that the VCR indicator lights up.
☐ Press POWER (☐/☐) to turn off the unit, then press STOP (■) on the unit for more than 5 seconds. "3 CH" appears on the front display panel.
2 Press CH +/- on the Remote to select “-CH” (off), then press OK.
NOTES:
●You can obtain high-quality S-VHS pictures. - If your TV is not stereo-capable, use the unit's AUDIO OUTPUT (DVD/VCR) connectors to connect to an audio amplifier for Hi-Fi stereo sound reproduction. - To operate the unit with your TV using the S-VIDEO connection, set your TV to its AV mode. You can also use the TV/VCR button on the unit's Remote to set your TV to the AV mode. (L7 pg. 73) - For switching the TV's mode, refer to the instruction manual of your television.
Component Video Connection
(DVD deck only)
ATTENTION
Be sure to connect the unit's VIDEO OUTPUT (DVD/VCR) connector to the TV's VIDEO input connector.
![graph TD A["Antenna or Cable"] --> B["Coaxial cable"] B --> C["Flat feeder"] C --> D["Matching transformer (not supplied)"] D --> E["AC outlet"] D --> F["AC power cord"] D --> G["Back of unit"] G --> H["Component Video cable (not supplied)"] H --> I["Audio/Video cable (not supplied)"] I --> J["RF ca…](/content/2026/06/1341529/images/599a93aa600f79cc65a733c8f238f327145976107af30b1a727da651285be421.jpg)
■ To connect to a TV with component video input connectors ...
1 Connect the unit to TV.
1 Connect the aerial, unit and TV as per "AV Connection" (pg. 14). 2 Connect the unit's COMPONENT VIDEO OUT connectors to the TV's component video input connectors.
2 Connect the unit to power source.
Plug the end of the AC power cord into an AC outlet. This unit performs Plug & Play Set automatically. (3) pg. 17
- The clock and tuner channels will automatically be set when the antenna is connected and when the AC power cord is first connected to an AC outlet. (If "AUTO" and the channel indicator are displayed on the front display panel before the unit is powered on, the clock and tuner channels are being set automatically. Wait for the time to be displayed on the front display panel before turning on the unit.)
3 Set the VCR channel to off.
Before performing the following steps:
● Make sure there is no cassette inserted in the unit. - Make sure the unit is turned on, then press VCR/DVD on the unit or VCR on the Remote so that the VCR indicator lights up.
1 Press POWER (☐/☐) to turn off the unit, then press STOP (■) on the unit for more than 5 seconds. "3 CH" appears on the front display panel. 2 Press CH +/- on the Remote to select “-CH” (off), then press OK.
NOTES:
- You can obtain high-quality component video pictures when you play back discs on the DVD deck.
- If your TV is not stereo-capable, use the unit's AUDIO OUTPUT (DVD/VCR) connectors to connect to an audio amplifier for Hi-Fi stereo sound reproduction.
- To operate the unit with your TV using the Component Video connection, set your TV to its AV mode. You can also use the TV/VCR button on the unit's Remote to set your TV to the AV mode. (LFP pg. 73)
- For switching the TV's mode, refer to the instruction manual of your television.
Plug & Play Set Auto Clock Set/Auto Tuner Set
ATTENTION
- If you use a cable box, Plug&Play will not function; set the clock and tuner channels separately. (7) pg. 24–27)
- Depending on areas or reception conditions, the unit may not receive the Auto clock setting data from the PBS channel. If this function is taking a considerable amount of time, it may be necessary to perform the Semiauto or Manual Clock Set procedure.

This unit sets the clock and tuner channels automatically when AC power cord is first connected to an AC outlet. The antenna cable must be connected for the Plug & Play setting.
The time and date can be set automatically by the clock setting data transmitted from one of the regular TV broadcast channels. We call this TV channel the “host channel” and it is a PBS channel in your area.
1 Perform Plug & Play setup.
Connect the antenna cable to the unit. (L3) pg. 14) Then connect the AC power cord to an AC outlet. Do not turn on the unit.
The clock and tuner channels will be set automatically.
NOTES:
- Auto Clock Set is performed first. "AUTO" blinks on the front display panel during Auto Clock Set.
- Auto Channel Set is performed next. Auto Channel Set scans all the channels that are receivable by your unit. During Auto Channel Set, the channel numbers are displayed as they are scanned and set.
- When Plug & Play setting has been complete successfully, the correct clock time is displayed. If you perform Plug & Play setting successfully, there is no need to perform "Clock Set" (173 pg. 24) and "Tuner Set" (173 pg. 26). If, however, you want to add or delete channels, refer to "Manual Channel Set" (173 pg. 27).

During Initial Auto Clock Set "AUTO" blinks.

During Auto Channel Set The channel numbers are displayed as they are scanned and set.
Plug&Play Completed The current time is displayed.
* If an incorrect clock time or “--:-” appears on the front display panel, see “What to do if Plug & Play setting failed” below.
INFORMATION
- If "AUTO CLOCK" is set to "ON" (LFP pg. 25), the clock will be adjusted automatically by the host channel every hour (except 11:00 PM, midnight, 1:00 AM and 2:00 AM) using the incoming PBS channel clock setting data. (This automatic clock adjustment can only be performed when the unit is turned off. The clock will be adjusted just on these hours — on the time displayed on the front display panel, not on the actual real time.) The default setting of "AUTO CLOCK" is "ON". (LFP pg. 25)
- If the memory backup fails, because a power outage occurs or because the AC power cord is unplugged, Plug & Play will be performed when power is restored to the unit.
What to do if Plug & Play setting failed
- If an incorrect time is displayed on the front display panel, you may be receiving the clock setting data of a PBS channel from an adjacent time zone, or an incorrect PBS channel from a cable TV system. In this case, perform "Semiauto Clock Set" (LPG pg. 25) or "Manual Clock Set" (LPG pg. 25).
- If "--:-” appears on the front display panel, your antenna cable may not be connected to the unit or there may not be a Host PBS signal available in your area. Ensure that the antenna cable is connected correctly. Then turn on and off the unit; the Plug & Play setting will be automatically reactivated. If Plug & Play setting is not performed though the antenna cable is connected correctly, perform "Manual Clock Set" (C37 pg. 25) and "Auto Channel Set" (C37 pg. 26) or "Manual Channel Set" (C37 pg. 27).
Monitor Set
(DVD deck)
You can select the monitor type depending the TV used when you play back DVD VIDEO discs recorded for wide-screen TVs.
- Turn on the TV and select the VCR channel (or AV mode).
- Slide the TV/VCR/DVD switch to the right.

1 Turn on the unit.
Press POWER (⏻/l).
2 Select the DVD deck.
On the unit
Press VCR/DVD repeatedly so that the DVD indicator lights up.
On the Remote
Press DVD so that the DVD indicator lights up.
3 Access the DVD Set Up menu screen.
1 Press SET UP MENU. 2 Press ◀ ▷ to select "PICTURE".

4 Select the mode.
Press △▽ to move ⊗ to "MONITOR TYPE", then press OK.

5 Select the mode setting.
Press △▽ to select the desired setting, then press OK.
6 Return to the normal screen.
Press SET UP MENU.
* The default setting is bold in the table below.
■ MONITOR TYPE
16:9 NORMAL (Wide television conversion):
Select this when the aspect ratio of your TV is 16:9 (wide TV).
16:9 AUTO (Wide television conversion):
Select this when the aspect ratio of your TV is fixed to 16:9 (wide TV). The unit automatically adjusts the screen width of the output signal correctly when playing back a picture whose aspect ratio is 4:3.
4:3 LB (Letter Box conversion):
Select this when the aspect ratio of your TV is 4:3 (conventional TV). While viewing a wide screen picture, the black bars appear on the top and the bottom of the screen.
4:3 PS (Pan&Scan):
Select this when the aspect ratio of your TV is 4:3 (conventional TV). While viewing a wide screen picture, the black bars do not appear; however, the left and right edges of the pictures will not be shown on the screen.
Pan&Scan/Letter Box
In general, DVD VIDEO discs are produced for a wide-screen TV with 16:9 aspect ratio.
Material with this ratio will not fit to a TV with 4:3 aspect ratio. There are two styles to display the image, "Pan&Scan" (PS) and "Letter Box" (LB).
Pan&Scan
The right and left side of the image are cut off. The image fills the screen.
Letter Box
Black bands appear at the top and bottom of the image. The image itself appears in 16:9 aspect ratio.


Language
- Turn on the TV and select the VCR channel (or AV mode).
- Slide the TV/VCR/DVD switch to the right.

On-screen Language Set (VCR deck)
This VCR deck offers you the choice to view on-screen messages in 3 different languages.
1 Turn on the unit.
Press POWER (⏻/ı).
2 Select the VCR deck.
On the unit
Press VCR/DVD repeatedly so that the VCR indicator lights up.
On the Remote
Press VCR so that the VCR indicator lights up.
3 Access the Main Menu screen.
Press SET UP MENU.
4 Access the Initial Set screen.
Press △▽ to move the highlight bar (arrow) to "INITIAL SET", then press OK or ▷.

5 Select the language.
Press △▽ to move the highlight bar (arrow) to "LANGUAGE", then press OK or ▷ repeatedly until the desired language is selected.

6 Return to the normal screen.
Press SET UP MENU.

On-screen Language Set (DVD deck)
This DVD deck offers you the choice to view on-screen messages in 3 different languages. You can change the language setting manually as required.
1 Turn on the unit.
Press POWER (⏻/l).
2 Select the DVD deck.
On the unit
Press VCR/DVD repeatedly so that the DVD indicator lights up.
On the Remote
Press DVD so that the DVD indicator lights up.
3 Access the DVD Set Up menu screen.
1 Press SET UP MENU. 2 Press ◀ ▷ to select "LANGUAGE".

4 Select the mode.
Press △▽ to move ✉ to "ON SCREEN LANGUAGE", then press OK.

5 Select the mode setting.
Press △▽ to select the desired setting, then press OK.
6 Return to the normal screen.
Press SET UP MENU.

Menu/Audio/Subtitle Language Set (DVD deck only)
Some DVD discs contain the DVD menu display, audio, subtitle in the multiple languages. With these discs, you can set the default language as you like.
- The procedure shows how to set "MENU LANGUAGE" on the DVD Set Up menu screen as an example.
1 Turn on the unit.
Press POWER (⏻/l).
2 Select the DVD deck.
On the unit
Press VCR/DVD repeatedly so that the DVD indicator lights up.
On the Remote
Press DVD so that the DVD indicator lights up.
3 Access the DVD Set Up menu screen.
1 Press SET UP MENU. 2 Press ◀ ▷ to select "LANGUAGE".

4 Select the mode.
Press △▽ to move ☒ to "MENU LANGUAGE", then press OK.

5 Select the mode setting.
Press △▽ to select the desired setting, then press OK.
- See "Language Code List" (LFP pg. 23).
6 Return to the normal screen.
Press SET UP MENU.
NOTE:
When the selected language is not available on the disc, the disc's default menu language is played back.
Language Code List
| AA | Afar |
| AB | Abkhazian |
| AF | Afrikaans |
| AM | Ameharic |
| AR | Arabic |
| AS | Assamese |
| AY | Aymara |
| AZ | Azerbaijani |
| BA | Bashkir |
| BE | Byelorussian |
| BG | Bulgarian |
| BH | Bihari |
| BI | Bislama |
| BN | Bengali, Bangla |
| BO | Tibetan |
| BR | Breton |
| CA | Catalan |
| CO | Corsican |
| CS | Czech |
| CY | Welsh |
| DA | Danish |
| DZ | Bhutani |
| EL | Greek |
| EO | Esperanto |
| ET | Estonian |
| EU | Basque |
| FA | Persian |
| FI | Finnish |
| FJ | Fiji |
| FO | Faroese |
| FY | Frisian |
| GA | Irish |
| GD | Scots Gaelic |
| GL | Galician |
| GN | Guarani |
| GU | Gujarati |
| HA | Hausa |
| HI | Hindi |
| HR | Croatian |
| HU | Hungarian |
| HY | Armenian |
| IA | Interlingua |
| IE | Interlingue |
| IK | Inupiak |
| IN | Indonesian |
| IS | Icelandic |
| IW | Hebrew |
| JI | Yiddish |
| JW | Javanese |
| KA | Georgian |
| KK | Kazakh |
| KL | Greenlandic |
| KM | Cambodian |
| KN | Kannada |
| KO | Korean (KOR) |
| KS | Kashmiri |
| KU | Kurdish |
| KY | Kirghiz |
| LA | Latin |
| LN | Lingala |
| LO | Laothian |
| LT | Lithuanian |
| LV | Latvian, Lettish |
| MG | Malagasy |
| MI | Maori |
| MK | Macedonian |
| ML | Malayalam |
| MN | Mongolian |
| MO | Moldavian |
| MR | Marathi |
| MS | Malay (MAY) |
| MT | Maltese |
| MY | Burmese |
| NA | Nauru |
| NE | Nepali |
| NL | Dutch |
| NO | Norwegian |
| OC | Occitan |
| OM | (Afan) Oromo |
| OR | Oriya |
| PA | Panjabi |
| PL | Polish |
| PS | Pashto, Pushto |
| PT | Portuguese |
| QU | Quechua |
| RM | Rhaeto-Romance |
| RN | Kirundi |
| RO | Rumanian |
| RU | Russian |
| RW | Kinyarwanda |
| SA | Sanskrit |
| SD | Sindhi |
| SG | Sangho |
| SH | Serbo-Croatian |
| SI | Singhalese |
| SK | Slovak |
| SL | Slovenian |
| SM | Samoan |
| SN | Shona |
| SO | Somali |
| SQ | Albanian |
| SR | Serbian |
| SS | Siswati |
| ST | Sesotho |
| SU | Sundanese |
| SV | Swedish |
| SW | Swahili |
| TA | Tamil |
| TE | Telugu |
| TG | Tajik |
| TH | Thai |
| TI | Tigrinya |
| TK | Turkmen |
| TL | Tagalog |
| TN | Setswana |
| TO | Tonga |
| TR | Turkish |
| TS | Tsonga |
| TT | Tatar |
| TW | Twi |
| UK | Ukrainian |
| UR | Urdu |
| UZ | Uzbek |
| VI | Vietnamese |
| VO | Volapuk |
| WO | Wolof |
| XH | Xhosa |
| YO | Yoruba |
| ZU | Zulu |
Clock Set
- Turn on the TV and select the VCR channel (or AV mode).
- Slide the TV/VCR/DVD switch to the right.

Perform clock setting only if the clock has not been set correctly by the Plug&Play setting.
Preparations
1 Turn on the unit.
Press POWER (⏻/ı).
2 Select the VCR deck.
On the unit Press VCR/DVD repeatedly so that the VCR indicator lights up.
On the Remote Press VCR so that the VCR indicator lights up.
3 Access the Main Menu screen.
Press SET UP MENU.
4 Access the Initial Set screen.
Press △▽ to move the highlight bar (arrow) to "INITIAL SET", then press OK or ▷.
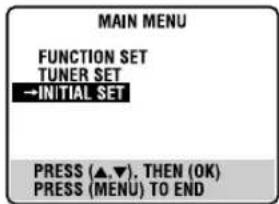
5 Access the Clock Set screen.
Press △▽ to move the highlight bar (arrow) to "CLOCK SET", then press OK or ▷.

Semiauto Clock Set
You can change the host channel/D.S.T. (Daylight Saving Time)/time zone setting manually. First follow steps 1 to 5 in "Preparations" (17 pg. 24), then go to the following steps.
NOTE:
The time set previously will be erased when "AUTO CLOCK", "HOST CH", "D.S.T." or "TIME ZONE" setting is changed.
1
Set "AUTO CLOCK" to "ON".
Press OK or ▷ repeatedly to move the highlight bar to "AUTO CLOCK", then press △▽ so that "ON" is selected.
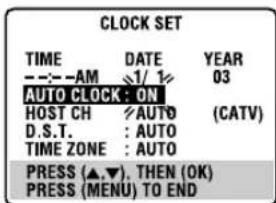
2
Select the host channel.
You can either select "AUTO" or enter a PBS channel number.
Press OK or ▷ to move the highlight bar to "HOST CH", then press △▽ repeatedly until "AUTO" or the desired PBS channel number is selected.
NOTE:
Some PBS channels do not transmit clock setting data.
3
Select the D.S.T. mode.
Press OK or ▷ to move the highlight bar to "D.S.T.", then press △▽ repeatedly until the desired setting is selected.
AUTO: Select if you want to adjust your VCR's clock automatically by the incoming signal from the host channel. Be sure to select the correct time zone manually in step 4.
ON: Adjustment will be made by the built-in clock itself.
OFF: Select when Daylight Saving Time does not apply to you.
4
Select the time zone.
Press OK or ▷ to move the highlight bar to "TIME ZONE", then press △▽ repeatedly until "AUTO" or the desired time zone is selected. Each time you press the button, the time zone changes as follows:
AUTO ATLANTIC EASTERN CENTRAL MOUNTAIN PACIFIC ALASKA HAWAII (back to the beginning)
NOTE:
If an incorrect time is displayed by the Plug & Play function, you may be receiving the clock setting data of a PBS channel from an adjacent time zone or from an incorrect PBS channel from a cable TV system. If you selected "AUTO" for the host channel in step 2, be sure to select the correct time zone manually.
5
Complete the Semiauto Clock Set.
Press SET UP MENU to return to normal screen.
IMPORTANT
Turn off the unit after performing Semiauto Clock. "AUTO" will appear on the front display panel while the clock is being set. The current clock time will appear automatically when the clock setting is complete.
AUTO DAYLIGHT SAVING TIME
This function enables automatic adjustment of the unit's clock at the start and end of Daylight Saving Time.
With Auto DST activated, —
— on the first Sunday of April at 2:00 AM, the clock is adjusted to 3:00 AM. — on the last Sunday of October at 2:00 AM, the clock is adjusted to 1:00 AM.
Manual Clock Set
First follow steps 1 to 5 in "Preparations" (pg. 24), then go to the following steps.
1
Set time, date and year.
Press △▽ until the desired time appears, then press OK or ▷. Set the date and year in the same way.
- Holding △▽ changes the time in 30-minute intervals, or changes the date in 15-day intervals.

2
Select D.S.T. mode.
Press OK or ▷ to move the highlight bar to "D.S.T.", then press △▽ to select the desired setting.
ON: Adjustment will be made by the built-in clock itself.
OFF: Select when Daylight Saving Time does not apply to you.

3
Start clock.
Press SET UP MENU and the normal screen appears.
To make corrections at any time during the process
Press OK or ▷ repeatedly until the item you want to change blinks, then press △▽.
Tuner Set
- Turn on the TV and select the VCR channel (or AV mode).
- Slide the TV/VCR/DVD switch to the right.

INFORMATION
The unit selects the correct band (TV or CATV) automatically during Auto Channel Set. The selected band will be displayed on the right side of "BAND" on the Tuner Set screen.
Auto Channel Set
Perform Auto Channel Set only if channels have not been set correctly by the Plug&Play setting.
1 Turn on the unit.
Press POWER (⏻/l).
2 Select the VCR deck.
On the unit
Press VCR/DVD repeatedly so that the VCR indicator lights up.
On the Remote
Press VCR so that the VCR indicator lights up.
3 Access the Main Menu screen.
Press SET UP MENU.
4 Access the Tuner Set screen.
Press △▽ to move the highlight bar (arrow) to "TUNER SET", then press OK or ▷.

5 Perform Auto Channel Set.
Press △▽ to move the highlight bar (arrow) to "AUTO CHANNEL SET", then press OK or ▷. You can automatically set the receivable channels in your area in the order of their frequencies.
- When Auto Channel Set is complete, "SCAN COMPLETED" appears on the TV screen.
- If the scan was unsuccessful, "SCAN COMPLETED—NO SIGNAL—" appears on screen. Check the connections and start again.
![graph TD A["TUNER SET"] --> B["BAND"] A --> C["→AUTO CHANNEL SET"] A --> D["MANUAL CHANNEL SET"] E["AUTO CHANNEL SET"] --> F["SCANNING..."] G["PRESS (MENU) TO END"] --> H["Press (MENU) TO END"] I["SELECT WITH (▲▼) AND (OK) PRESS (MENU) TO END"] --> J["Down arrow"]](/content/2026/06/1341529/images/0e0832cd3a24db156bad8d9455c1faf704c6b34f0eee748b6dc05a4b859ea25e.jpg)
6 Return to the normal screen.
Press SET UP MENU.
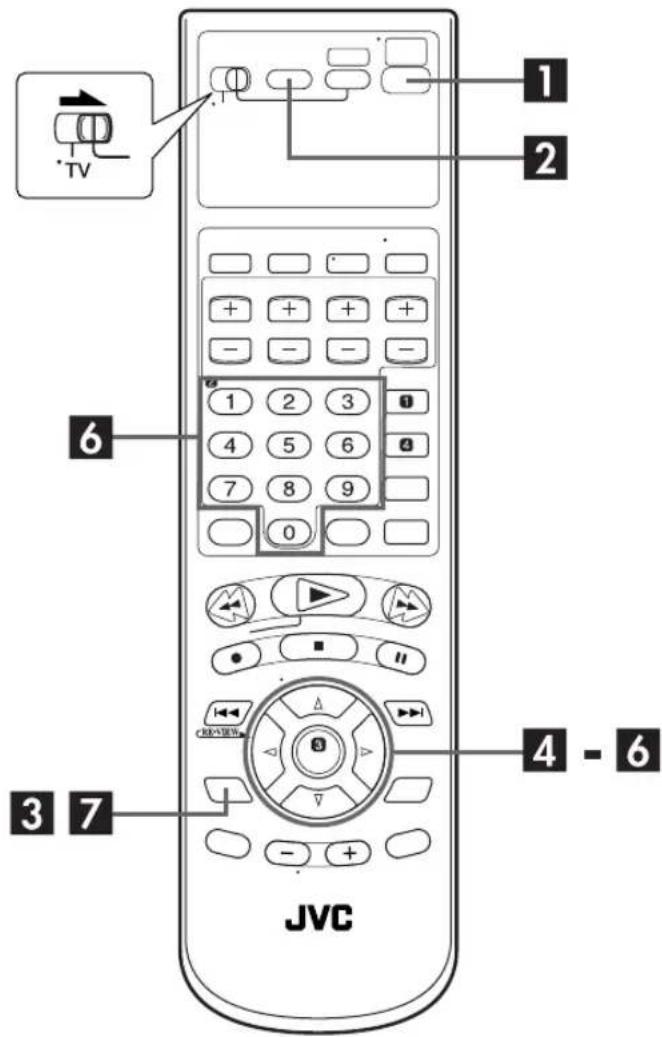
Manual Channel Set
You can add the channels you want or delete the channels you do not want manually.
1 Turn on the unit.
Press POWER (⏻/l).
2 Select the VCR deck.
On the unit
Press VCR/DVD repeatedly so that the VCR indicator lights up.
On the Remote
Press VCR so that the VCR indicator lights up.
3 Access the Main Menu screen.
Press SET UP MENU.
4 Access the Tuner Set screen.
Press △▽ to move the highlight bar (arrow) to "TUNER SET", then press OK or ▷.
5 Access the Manual Channel Set screen.
Press △▽ to move the highlight bar (arrow) to "MANUAL CHANNEL SET", then press OK or ▷.
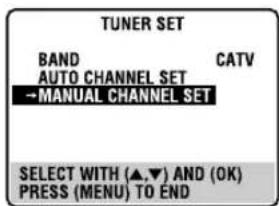
6 Add or skip the desired channels.
To add channels
1 Press the number keys to input a channel number you want to add. 2 Press OK or ▷ to set to "ADD". 3 Repeat 1 and 2 to add other channels.

To skip channels
Press △▽ or the number keys to select a channel number you want to skip. Press OK or ▷ to set to "SKIP". Repeat steps 1 and 2 to skip other channels.
Return to the normal screen.
Press SET UP MENU.
Basic Playback
- Turn on the TV and select the VCR channel (or AV mode).
- Slide the TV/VCR/DVD switch to the right.


Clean the video heads using a dry cleaning cassette — ECL-3F — when:
● Rough, poor picture appears while a tape is played back. - The picture is unclear or no picture appears. - "USE CLEANING CASSETTE" appears on the screen (only with "SUPERIMPOSE" set to "ON"). (pg. 77)
NOTE:
The heads get dirty in the following cases:
- in an environment prone to extreme temperature or humidity • in a dusty environment
- flaw, dirt or mold on video tapes • continuous usage for a long time
Load a cassette.
Make sure the window side is up, the rear label side is facing you and the arrow on the front of the cassette is pointed toward the unit.
- Do not apply too much pressure when inserting.
- If the record safety tab has been removed, playback begins automatically. Although the DVD deck is selected, the VCR deck is selected automatically if the DVD deck is in stop mode.
- The unit's power comes on automatically and the counter is reset to 0:00:00.
2 Select the VCR deck.
On the unit
Press VCR/DVD repeatedly so that the VCR indicator lights up.
On the Remote
Press VCR so that the VCR indicator lights up.
3 Find the program start point.
If the tape is advanced past the start point, press REW (◀◀). To go forward, press FF (▶▶).
4 Start playback.
Press PLAY (▶).
5 Stop playback.
Press STOP (■). Then press EJECT(▲) on the VCR deck to remove the cassette.
Usable cassettes
Full-Size VHS
T-30 (ST-30**)
T-60 (ST-60**)
T90
T-120 (ST-120**)
T-160 (ST-160**)
ST-210**
Compact VHS*
TC-20 (ST-C20**)
TC-30 (ST-C30**)
TC-40 (ST-C40**)
* Compact VHS camcorder recordings can be played on this unit. Simply place the recorded cassette into a VHS Cassette Adapter and it can be used just like any full-sized VHS cassette.
** This unit can record on regular VHS and Super VHS cassettes. While only VHS signals can be recorded on regular VHS cassettes, both VHS and Super VHS signals can be recorded and played back using Super VHS cassettes.
1) By using the S-VHS ET function, it is possible to record and play back with S-VHS picture quality on VHS cassettes with this unit.

Playback Features
- Turn on the TV and select the VCR channel (or AV mode).
- Slide the TV/VCR/DVD switch to the right.

ATTENTION
In the search, still, slow-motion or frame-by-frame playback mode,
• the picture will be distorted. • the noise bars will appear. • there may be a loss of colour. - you cannot hear the sound.
Still Picture/Frame-By-Frame Playback
1 Pause during playback.
Press PAUSE (II).
- If there is vertical jitter, press CH +/- on the Remote to correct the picture.
2 Activate frame-by-frame playback.
Press PAUSE (II) to advance a still picture.
Slow Motion
1 Pause during playback.
Press PAUSE (II).
2 Activate slow motion playback.
Press and hold PAUSE (II) for 2 seconds, then release. Press PAUSE (II) and release again to return to still picture.
- The speed changes for each direction by pressing REW (◀◀) and FF (▶▶) repeatedly.
NOTE:
During slow motion playback, some noise may appear on the TV screen. Press CH + or - on the Remote to eliminate the noises.
Variable Speed Search
During playback, press FF (▶▶) for forward variable speed search, or REW (◀◀) for reverse variable speed search.
- The speed changes for each direction by pressing REW (◀◀) and FF (▶▶) repeatedly.
When pressing FF (▶▶):
(SP): +5x↔+7x
(EP): +11x↔+21x
When pressing REW (◀◀):
Once REW (◀◀) is pressed, reverse search starts in -1x normal playback speed. After this process, each press of REW (◀◀) changes the search speed between -5x and -7x in SP mode, -11x and -21x in EP mode.
(SP): -1x→-5x←-7x
(EP): -1x → -11x ↔ -21x
To resume normal playback, press PLAY (▶).


Skip Search
During playback, press SKIP SEARCH 1 to 6 times to skip over unwanted sections.
Each press initiates a 30-second period of fast-motion playback. Normal playback resumes automatically.
To resume normal playback during a Skip Search, press PLAY (▶).
Index Search
Your unit automatically marks index codes at the beginning of each recording. This function gives you quick access to any one of 9 index codes in either direction.
NOTE:
Before starting, make sure the unit is in the Stop mode.

Activate Index Search.
Press INDEX (I◄◄) or INDEX (►►I). "INDEX -1" or "INDEX 1" is displayed on the TV screen and search begins in the corresponding direction.
- To access index codes 2 through 9, press INDEX (◀◀) or INDEX (▶▶) repeatedly until the correct index number is displayed.
Example:
To locate the beginning of B from the current position, press INDEX (|◀◀) twice.
To locate the beginning of D from the current position, press INDEX (▶▶) once.

- When the specified index code is located, playback begins automatically.
Instant ReView
Simply by pressing a single button, the unit power comes on, rewinds, and begins playback of the last timer-recorded program. If you have several programs recorded, you can easily access any of them.
NOTE:
Before starting, make sure that the unit is off and that the Timer mode is disengaged.
Activate Instant ReView.
Press the unit power comes on and the unit searches for the index code indicating the start of the last timer-recorded program. Once it's found, playback begins automatically.
- To watch the first of the 3 programs, press three times. The unit searches and begins playback automatically. You can access a program as far as 9 index codes away from the current tape position.
Next Function Memory
The Next Function Memory “tells” the unit what to do after rewinding. Before continuing, make sure the unit is in the Stop mode.
a- For Automatic Start Of Playback Press REW (◀◀), then press PLAY (▶) within 2 seconds. b- For Automatic Power Off Press REW (◀◀), then press POWER (⏻/l) within 2 seconds. c- For Automatic Timer Standby Press REW (◀◀), then press TIMER within 2 seconds. d- For Automatic Cassette Ejection After Tape Rewind Press REW (◀◀), then press EJECT (▲) within 2 seconds.
Repeat Playback
Your unit can automatically play back the whole tape 100 times repeatedly.
1 Start playback.
Press PLAY (▶).
2 Activate Repeat Playback.
Press PLAY (▶) and hold for over 5 seconds, then release.
- The Play indicator (▷) on the front display panel blinks slowly.
- After playing back a tape 100 times, the unit stops automatically.
3 Stop Repeat Playback.
Press STOP (■) at any time.
- Pressing PLAY (▶), REW (◀◀), FF (▶▶) or PAUSE (II) also stops Repeat Playback.
Manual Tracking
Your unit is equipped with automatic tracking control. During playback, you can override this and adjust the tracking manually by pressing the CH buttons.

1 Override automatic tracking.
During playback, press SP/EP on the Remote.
2 Adjust the tracking manually.
Press CH + or - on the Remote.
- Press SP/EP again to return to automatic tracking.
NOTE:
When a new tape is inserted, the unit enters the automatic tracking mode automatically.
Soundtrack Selection
Your unit is capable of recording three soundtracks (HI-FI L, HI-FI R and NORM) and will play back the one you select.
During Playback
Pressing A.MONITOR changes the soundtrack as follows:
- You can also select the soundtrack on the Function Set screen. (L7 pg. 75)
| TRACK | USE |
| On-Screen Display | |
| H I-F I Hi-Fi sound is played back | |
| H I-F I L | Sound on the left Hi-Fi channel is played back |
| H I-F I R | Sound on the right Hi-Fi channel is played back |
| NORM | Sound on the normal track is played back |
| NORM H I-F I | Both sounds on the Hi-Fi track and normal track are mixed and played back |
NOTES:
- "HIFI" should normally be selected. In this mode, Hi-Fi stereo tapes are played back in stereo, and the normal audio track is played back automatically for tapes with only normal audio.
- "SUPERIMPOSE" must be set to "ON" or the on-screen displays will not appear. (L→ pg. 77)
Basic Recording
● Turn on the TV and select the VCR channel (or AV mode). - Slide the TV/VCR/DVD switch to the right.


Recording Resume Function
If there is a power outage during recording, Instant Timer Recording or timer recording (CP pg. 32, 33, 36), the recording will resume automatically when power is restored to the unit unless the unit's memory backup has expired.
1 Load a cassette.
Insert a cassette with the record safety tab intact.
- The unit's power comes on automatically and the counter is reset to 0:00:00.
2 Select the VCR deck.
On the unit
Press VCR/DVD repeatedly so that the VCR indicator lights up.
On the Remote
Press VCR so that the VCR indicator lights up.
3 Choose a program.
Press CH +/- or the number keys to select the channel you wish to record.
4 Set the tape speed.
Press SP/EP. The current setting appears on the front display panel or TV screen. Press SP/EP again to change the setting while the tape speed is displayed on the TV screen.
5 Start recording.
Press and hold REC (●) and press PLAY (▶) on the Remote, or press REC (●) on the unit.
Video Calibration takes place at the beginning of both the first SP and the first EP recording after inserting the cassette. (17 pg. 35)
6 Pause/Resume recording.
Press PAUSE (II). Press PLAY (▶) to resume recording.
- You can select channel during the Record Pause mode.
7 Stop recording.
Press STOP (■). Then press EJECT (▲) on the VCR deck to remove the cassette.
Recording Features
- Turn on the TV and select the VCR channel (or AV mode).
- Slide the TV/VCR/DVD switch to the right.

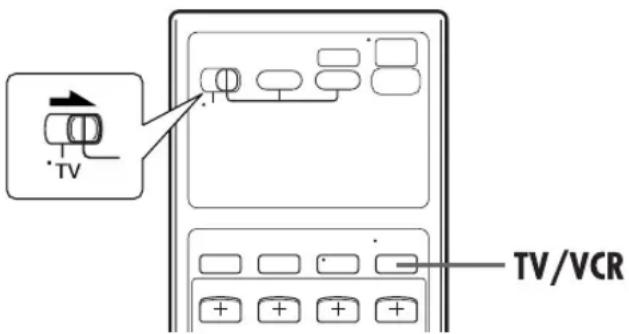
Accidental erasure prevention
To prevent accidental recording on a recorded cassette, remove its safety tab. To record on it later, cover the hole with adhesive tape.

Record One Program While Watching Another
If your unit is connected to the TV via the AV connection, press TV/VCR. The unit's VCR indicator on the front display panel and the TV broadcast being recorded disappear.
Once recording is in progress, all you need to do is to set the channel controls on the TV for the station you wish to view.
- The program selected with the TV's channel controls appears on the TV screen, while the one selected with the unit's CH buttons is recorded on the tape.
NOTE:
You can also use the DVD deck in the following cases. Before use, be sure to turn on the unit and select the DVD deck.
- During recording ● During timer recording ● During timer standby mode
Instant Timer Recording (ITR)
This easy method lets you record for from 30 minutes to 6 hours (selectable in 30-min. increments), and shuts the unit off after recording is finished.
1 Start recording.
Press REC (●) on the unit.
2 Engage the ITR mode.
Press REC (●) again. "○" blinks and "0:30" appears on the front display panel.
3 Set the recording duration.
If you want to record for more than 30 minutes, press REC (●) to extend the time. Each press extends recording time by 30 minutes.
NOTES:
- You can only perform ITR using the REC (●) button on the unit's front panel.
- Still picture playback stops automatically after 5 minutes to protect the heads.
- When the end of the tape is reached during timer recording, the unit stops and "○" and "▷" blink on the front display panel.
- When the end of the tape is reached during timer recording or Instant Timer Recording, the unit is turned off and “○” and “▷” blink on the front display panel.
- During Instant Timer Recording, any other timer programmed recording won't start even if their start time has come. In such a case, the timer programmed recording starts (if the end time of the timer programmed recording is set after the end of Instant Timer Recording) after the Instant Timer Recording finishes.

Elapsed Recording Time Indication
1 Set the counter display.
Press DISPLAY until a counter reading appears on the front display panel.

2 Reset the counter.
Press C.RESET before starting recording or playback.
- The counter is reset to "0:00:00" and shows the exact elapsed time as the tape runs. You can check the exact time of a recording or playback.
Tape Remaining Time
Press DISPLAY until the time remaining on the tape appears.
- The front display panel shows the tape remaining time with "◀" displayed.

- By pressing the DISPLAY button, you can change display to show the clock time, counter reading or tape remaining time.
NOTES:
- When you press DISPLAY, the on-screen display appears on the TV screen for 5 seconds, then the displays other than the counter disappear. To clear the counter display, press DISPLAY.
- Depending on the type of tape being used, the tape remaining time reading may not appear right away, or may not be correct. "--:--" may sometimes appear, or the display may blink on occasion.
Second Audio Recording
This unit's built-in MTS decoder enables reception of Multichannel TV Sound broadcast. To record a SAP program received, set "2ND AUDIO RECORD" to "ON". (☐ pg. 78)
NOTE:
When the channel is changed on the unit;
- The "STEREO" indicator appears on the screen for about 5 seconds if the program is a stereo broadcast.
- The "SAP" indicator appears on the screen for about 5 seconds if the program is a SAP broadcast.
- Both indicators appear when a stereo program is accompanied by SAP sound.
Active Video Calibration
The Video Calibration checks the condition of the tape in use during playback and recording, and compensates to provide the highest-possible playback and recording pictures. You can set "VIDEO CALIBRATION" to "ON" or "OFF" to your preference. (pg. 76)
Playback
The unit assesses the quality of the tape once you initiate playback.
- The unit adjusts the playback picture quality based on the quality of the tape in use.
- Video Calibration is active during automatic tracking. The Video Calibration screen appears blinking on the TV screen.
NOTES:
- When watching a tape recorded with "VIDEO CALIBRATION" set to "ON", it is recommended that you leave VIDEO CALIBRATION on during playback as well.
- When watching a rental tape or one recorded on another VCR, or when using this unit as the player for editing, set VIDEO CALIBRATION to your preference. (3) pg. 76)
- The Video Calibration only appears at the beginning of automatic tracking. Even though it doesn't appear after that, the VIDEO CALIBRATION function is operative.

Recording
The unit assesses the quality of the tape once you initiate recording.
● The unit spends approximately 7 seconds assessing the condition of the tape, then begins recording.
NOTES:
- The Video Calibration works for both SP and EP modes only after a tape has been inserted and the Record mode is first initiated. It does not work during recording.
- The Video Calibration does not work while Satellite Auto Recording is in progress. (17 pg. 41)
- In the case of timer recordings, the Video Calibration works before recording is initiated.
- Once the cassette is ejected, the Video Calibration data is cancelled. The next time the cassette is used for recording, Video Calibration is reperformed.
- Pressing the unit's REC (●) button while the Video Calibration is displayed does not start Instant Timer Recording. (▶ pg. 33)
ATTENTION
Since the Video Calibration works before recording actually starts, there is a delay of approximately 7 seconds after REC (●) and PLAY (▶) on the Remote are pressed, or REC (●) on the unit is pressed. To make sure you record the desired scene or program in its entirety, first perform the following steps:
☐ Press and hold PAUSE (II) and press REC (●) to engage the Record Pause mode. - The unit then automatically checks the condition of the tape and, after approximately 7 seconds, re-enters Record Pause mode. [2] Press PLAY (▶) to start recording. If you want to bypass the Video Calibration and begin recording immediately, set "VIDEO CALIBRATION" to "OFF". (L3) pg. 76)
DURING VIDEO CALIBRATION

Before performing Express Timer Programming:
- Make sure that the unit's built-in clock is set properly.
- Insert a cassette with the safety tab in place. The unit will come on automatically.
- Turn on the TV and select the VCR channel (or AV mode).
- Slide the TV/VCR/DVD switch to the right.

Example: To timer-record the program from 8:00 to 10:00 on 24th December, on channel 12.
1 Select the VCR deck.
On the unit
Press VCR/DVD repeatedly so that the VCR indicator lights up.
On the Remote
Press VCR so that the VCR indicator lights up.
2 Access the Program screen.
Press PROG.. (If you're just starting out, "P1" appears.)

3 Enter the program start time.
Press START +/- to enter the time you want recording to start.
- Press and hold START +/- to move in 30-minute increments, or press and release repeatedly to move 1 minute at a time.

4 Enter the program stop time.
Press STOP +/- to enter the time you want recording to stop.
- Press and hold STOP +/- to move in 30-minute increments, or press and release repeatedly to move 1 minute at a time.
5 Enter the program date.
Press DATE +/-.
The current date appears on the TV screen. The date you enter appears in its place.

Enter the channel position.
Press CH +/-.

Set the tape speed.
Press SP/EP.

Return to the normal screen.
Press PROG. or OK. "PROGRAM COMPLETED" appears on the TV screen for about 5 seconds, then the normal screen appears. If "PROGRAM NOT COMPLETED PROGRAM OVERLAP" appears on the TV screen, see page 40.
Repeat steps 2 - 8 for each additional program.

Engage the unit's timer mode.
Press TIMER. The unit turns off automatically and “⊕” appears on the front display panel.
To disengage the timer mode, press TIMER again.
To Timer-Record Weekly Or Daily Serials:
Anytime during steps 3 through 7, press WEEKLY (number key "9") for weekly serials or DAILY (number key "8") for daily serials (Monday – Friday). Either "WEEKLY" or "DAILY" appears on the TV screen. Pressing the button again makes the corresponding indication disappear.
NOTES:
- You can program this unit to timer-record as many as 8 programs. If you try to program the unit to record a ninth, "PROGRAM FULL" appears on the TV screen. To record the extra program, you must first cancel any unnecessary programs. (L) pg. 39)
- In case of a power failure after programming, the unit's memory backup keeps your selections for approximately 5 seconds.
- Programs that start after midnight must have the next day's date.
Cable Box or DBS Receiver Users
To timer-record a satellite broadcast using Express Timer Programming:
☐ Perform steps 1 – 9. In step 6, enter "F-1" or "L-1" for the channel position depending on the connector being used. 2 Set the DBS receiver to the appropriate channel before the selected program begins. 3 Leave the DBS receiver's power on.

Check, cancel and change programs
1 Disengage the timer mode.
Press TIMER, then press POWER (☐/I).
2 Access the Program Check screen.
Press PROG. CHECK.

3 Access the Program screen.
Press PROG. CHECK again to check more information.
Each time you press
PROG. CHECK, the next program's information appears.
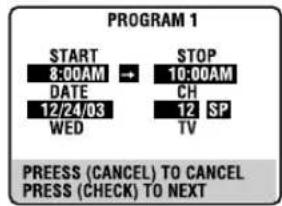
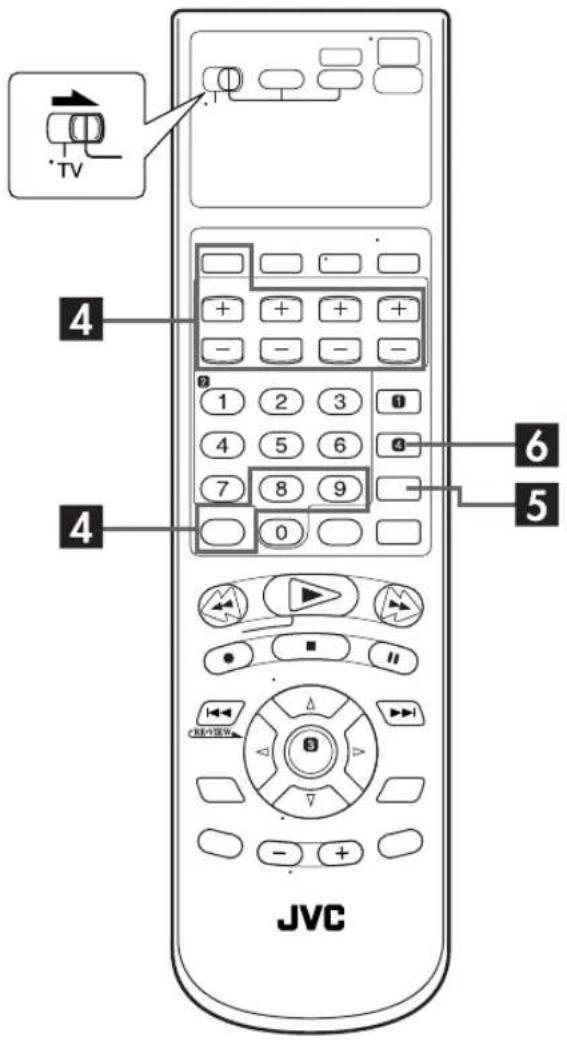
To cancel or change a program
4 Cancel or change a program.
Press CANCEL to cancel a program. To change program settings, press the appropriate button: START +/- STOP +/-, DATE +/-, CH +/-, DAILY (number key "8"), WEEKLY (number key "9") and/or SP/EP.
5 Return to the normal screen.
Press PROG. CHECK as many times as necessary. If there are still some programs remaining, go on to step 6.
6 Return to the timer mode.
Press TIMER.

ATTENTION
If there is a conflict in the timer schedule and one program overlaps with another, only the parts shown below in gray will be recorded.
Pattern 1: The program with the lower program number will be recorded.

Pattern 2: The program starting earlier will be recorded.

Pattern 3: The program starting earlier will be recorded, followed by the remaining portion of the other program.

When programs overlap each other
If "PROGRAM NOT COMPLETED PROGRAM OVERLAP" appears, you have another program overlapping the program you have just made.
The Program Check screen appears and conflicting programs will start blinking.
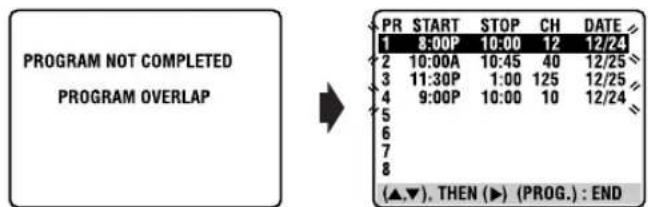
Example: Program 1 (you have just made) and Program 4 overlap each other.
1 Confirm the overlapping programs.
Overlapping programs blink on the TV screen.
2 Select the program to modify.
Press , then press OK or .
- You can only select one of the overlapping programs.
NOTE:
If you do not mind this overlap, press PROG. to finish the timer program setting. The program with the lower program number will be recorded and the other one will not be recorded correctly. If no changes are made for approximately 1 minute, the unit will return to the normal screen.
3 Cancel or change program setting.
To cancel a program, press CANCEL when the Program screen you do not want is shown. "PROGRAM COMPLETED" appears on the TV screen for about 5 seconds, then the normal screen appears.
To change a program, press the appropriate button: START +/-, STOP +/-, DATE +/-, CH +/-, DAILY (number key "8"), WEEKLY (number key "9") and/or SP/EP when the Program screen on which you want to make changes is shown, then press OK. "PROGRAM COMPLETED" appears on the TV screen for about 5 seconds, then the normal screen appears.
NOTE:
If the overlap is not yet solved, or another overlap occurs with the timer program setting after making the last correction on a program, the conflicting programs will be shown on the Program Check screen again. Repeat the above steps again until the overlap is solved.
Satellite Auto Recording
This function allows you to automatically record a satellite program that is timer-programmed on your external DBS receiver. Connect a DBS receiver to the unit's AUDIO/VIDEO INPUT (L-1) connectors and program the timer on the DBS receiver. The unit starts or stops recording based on the signals input from the DBS receiver. After recording, the unit's power shuts off automatically.
- You can also connect the cable box if it has a timer.


ATTENTION
- Be sure not to turn on the DBS receiver before the program is executed; otherwise, the unit will start recording when the DBS receiver's power is turned on.
- If you have connected another appliance other than a DBS receiver to the AUDIO/VIDEO INPUT (L-1) connectors, be sure not to engage the Satellite Auto Recording mode; otherwise, the unit will start recording when the connected appliance's power is turned on.
- Satellite Auto Recording and timer-recording cannot be done at the same time.
Before performing the following steps:
- Make sure the DBS receiver is connected to the unit's AUDIO/VIDEO INPUT (L-1) connectors.
- Program the timer on the DBS receiver.
- Insert a cassette with the safety tab in place.
- Slide the TV/VCR/DVD switch to the right.
1 Select the VCR deck.
On the unit
Press VCR/DVD repeatedly so that the VCR indicator lights up.
On the Remote
Press VCR so that the VCR indicator lights up.
2 Set the tape speed.
Press SP/EP.
3 Engage the Satellite Auto Recording mode.
Press and hold REC LINK for about 2 seconds. The “Δ” and “Θ” indicators light up and the unit turns off automatically.
NOTES:
- To disengage the Satellite Auto Recording mode, press REC LINK. The “Δ” indicator goes off.
- If the unit's power is off, it is not possible to engage the Satellite Auto Recording mode.
- In step 3, if the “Δ” indicator does not light but instead blinks quickly even though your DBS receiver's power is off, Satellite Auto Recording will not work properly with that DBS receiver*. If this is the case, perform “Express Timer Programming” (17 pg. 36) to timer-record a satellite program. * Some DBS receivers output signals even if the power is off. Satellite Auto Recording is not possible with those DBS receivers.
- The “Δ” indicator blinks while Satellite Auto Recording is in progress.
- For timer programming of the DBS receiver, refer to the instruction manual of the DBS receiver.
- Satellite Auto Recording is not possible if your DBS receiver does not have a timer.
- Pressing the unit's POWER (☐/i) button while Satellite Auto Recording is in progress turns off the unit's power and disengages the Satellite Auto Recording mode.
- If there are more than one satellite programs you wish to record with Satellite Auto Recording, it is not possible to set different tape speeds for each program.
- Depending on the type of DBS receiver, the unit may not record a slight portion of the beginning of the program or may record slightly longer than the actual length of the program.
- If you engage the Satellite Auto Recording mode when the DBS receiver's power is on, the unit will not start Satellite Auto Recording even though the "A" and "O" indicators blink. When the DBS receiver shuts off once and is turned back on again, the unit starts recording.
- You can also record a program from your cable system in the same way if the system has a timer.
Basic Playback

- Turn on the TV and select the VCR channel (or AV mode).
- Slide the TV/VCR/DVD switch to the right.


ATTENTION
- You cannot use the DVD deck when the VCR deck is in the Automatic Satellite Recording standby and recording mode.
- You can use the DVD deck when the VCR deck is in the timer standby mode.
To play back an MP3/WMA/JPEG disc, see pages 62 - 67.
1 Load the disc.
1 Press OPEN/CLOSE (▲) on the DVD deck to open the disc tray.
- The unit's power comes on automatically.
2 Place the disc in the disc tray.
- For details, refer to "Placing a Disc" (pg. 9).
3 Press OPEN/CLOSE (▲) on the DVD deck to close the disc tray.
- Pressing PLAY (▶) also closes the disc tray.
- Playback begins automatically if an auto-playback DVD disc is loaded. Although the VCR deck is selected, the DVD deck is selected automatically if the VCR deck is in stop mode.
2 Select the DVD deck.
On the unit
Press VCR/DVD repeatedly so that the DVD indicator lights up.
On the Remote
Press DVD so that the DVD indicator lights up.
3 Start playback.
Press PLAY (▶).
Example: DVD VIDEO

- It may take a few seconds to start playback.
- If you load a DVD disc whose region code does not match the DVD deck, "REGION CODE ERROR!" appears on the TV screen. For details, refer to "Region Number" (L37 pg. 7).
- With Video CD discs with PBC control or some DVD discs, the menu display may appear on the TV screen after starting playback. In this case, select an item which you want to play back from the menu. Otherwise, the playback cannot go forward. Refer to "Locating a desired scene using the menu of the Video CD with PBC" (pg. 43) or "Locating a desired scene using the DVD menu" (pg. 43).
4 Pause playback.
Press PAUSE (II).
● To resume normal playback, press PLAY (▶).
5 Stop playback.
Press STOP (■). Press OPEN/CLOSE (▲) on the DVD deck to open the disc tray, then remove the disc.
- Pressing PLAY (▶) resumes playback from the position where you stopped playback. For details, see "Resume Function" on page 45.
NOTE:
When you press OPEN/CLOSE (▲) while the unit is turned off, the unit's power comes on and the disc tray opens automatically.
Playback Features
- Turn on the TV and select the VCR channel (or AV mode).
- Slide the TV/VCR/DVD switch to the right.
Playback Control (PBC) Function — Locating a desired scene using the menu of the Video CD with PBC


Some Video CD discs support the PBC function. PBC is an abbreviation of "Playback Control." A Video CD disc recorded with PBC has its own menus, such as a list of the songs on the disc. You can locate a specific scene by using the menu.
1 Access the PBC menu.
In stop mode
Press PLAY (▶).
- Depending on the disc, the PBC menu may automatically appear on the TV screen by simply loading a disc into the unit.

During playback
Press RETURN.
- "PBC" appears on the front display panel.

2 Start playback.
Press the appropriate number keys.
- The unit starts playback of the selected item.
- When "NEXT" or "PREVIOUS" appears on the TV screen: Pressing SKIP (▶▶▶) advances to the next page. Pressing SKIP (◀◀◀) returns to the previous page.
- You can return to the menu by pressing RETURN.
- The method of the operation is different depending on the disc.
NOTES:
- If you want to playback a PBC-compatible Video CD disc without activating the PBC function, start playback by using the number keys instead of the PLAY (▶) button.
- To activate the PBC function when a PBC-compatible Video CD disc is being played back without the PBC function, press TOP MENU or MENU, or press STOP (■) (press twice when "RESUME" is set to "ON") then press PLAY (▶).
Locating a desired scene using the DVD menu


DVD VIDEO discs may have two types of the menus; top menu and disc menu.
Top menu
DVD discs generally have their own menus which show the disc contents. These menus contain various items such as titles of a movie, names of songs, or artist information. You can locate a desired scene by using the top menu displayed on the TV screen. Press TOP MENU to access the top menu.
Disc menu
DVD discs have the disc menu to select subtitle and audio language etc. for each title. Press MENU to access the disc menu.
1 Access the DVD menu.
Press TOP MENU or MENU.

Example:
2 Start playback.
Press to select a desired item, then press OK. It may be possible to select the desired item using the number keys depending on the disc.
NOTES:
- When “ ” appears on the TV screen in step 1, the disc does not have a top menu or disc menu.
- Top menu or disc menu may not appear depending on the discs even if it is recorded in DVD VIDEO format and finalized. In that case, press STOP (■) to display the total number of titles on a disc, then press the appropriate number keys to select the desired title.

Locating the start point of the item or skip the item

Press SKIP (I◄◄) or SKIP (►►I) during playback.
Example:
To locate the beginning of item B from the current position, press SKIP (|◀◀) twice.
To locate the beginning of item D from the current position, press SKIP (▶▶1) once.

- When the specified item is located, playback begins automatically.
Variable Speed Search

During playback, press FF (▶▶) for forward variable speed search, or REW (◀◀) for reverse variable speed search.
- The more times you press, the faster the playback picture moves.
- To resume normal playback, press PLAY (▶).
OR
During playback, press and hold SKIP (▶▶1) for forward variable speed search, or press and hold SKIP (|◀◀) for reverse variable speed search.
- While you press and hold the button, the image is played back at 5x speed.
- To resume normal playback, release SKIP (|◀◀) or SKIP (▶▶).
NOTES:
- Actual speed may be different from that displayed on the TV screen depending on the discs.
- Playback sound is not heard in any variable speed search mode other than in 1.5x speed search mode.
- During 1.5x speed search of a DVD VIDEO disc, you can hear the played back audio converted into Linear PCM format in stereo. In such a case, the pitch and sound quality may change depending on the disc.
- In case of DVD VIDEO discs formatted in DTS format, SVCD or Audio CD discs, playback sound is not heard during 1.5x speed search.
- When switching to 1.5x speed search during variable speed search, first press PLAY (▶) to return to normal playback, then press FF (▶▶).
Still Picture/Frame-By-Frame Playback

1 Pause during playback.
Press PAUSE (II).
2 Activate frame-by-frame playback.
Press PAUSE (II) to advance a still picture.
●To resume normal playback, press PLAY (▶).
Slow Motion

During playback, press PAUSE (II), then press REW (◀◀) for reverse slow motion playback, or FF (▶▶) for forward slow motion playback.
●Each press of FF (▶▶) changes the playback speed as follows: 1/32→1/16→1/4→1/2
●Each press of REW (◀◀) changes the playback speed as follows (only for DVD VIDEO discs): -1/32→-1/16→-1/4→-1/2
●To resume normal playback, press PLAY (▶).
NOTES:
- Reverse slow motion playback is possible only with DVD VIDEO discs.
●This function may not work for some Video CD or SVCD.
Resume Function

It is possible to memorize the position where you stop playback and resume playback from that position.
- Be sure to set "RESUME" to "ON" or "DISC RESUME". (L) pg. 83)
1 Memorize the resume point.
Press STOP (■) during playback.
●"RESUME STOP" appears on the front display panel.

●The unit enters Resume Stop mode and memorizes the position where you stop playback as the resume point.
●The unit retains a memory of the resume points of the last 30 discs played back, even though they have been ejected if "RESUME" is set to "DISC RESUME". (17 pg. 83)
●To clear the resume point:
When "RESUME" is set to "ON":
- Press STOP (■) in stop mode.
- Press POWER (↓/i) to turn off the unit.
- Eject the disc.
When "RESUME" is set to "DISC RESUME":
- Set "RESUME" to "OFF". (pg. 83)
- Press STOP (■) in stop mode.
2 Resume playback.
Press PLAY (▶). The unit starts playback from the resume point.
●"RESUME PLAY" appears on the front display panel.

NOTES:
- The Resume Function does not work on Audio CDs. It also may not work depending on the discs.
- If you stop playback of a disc for which a resume point has already been memorized, the memory will be updated with the new resume point.
●After the unit has memorized resume points for 30 discs, remembering a new resume point will cause the unit to delete the oldest memorized point. Stopping playback of a disc for which a resume point is already stored may change the order in which the points are stored. This may potentially change the order in which points are deleted.
- When the unit memorizes a resume point for a disc, it also remembers audio language, subtitle, and angle settings.
●This function may not work for some Video CDs or SVCDs.
Zooming

Press ZOOM during playback or while paused.
●Each press of ZOOM changes the magnification as follows: 1.8x→4x→8x→16x→32x→64x
- When a 16:9 aspect picture source is displayed on a 4:3 aspect TV (conventional TV) in Letter Box conversion mode, the black margins shown on the top and bottom of the TV screen will be cropped by selecting 1.8x magnification. In such a case, note that both left and right side parts of the picture will also be cropped.
●While zoomed, the picture may look coarse or distorted.
Current magnification

Zoomed-in area

Press to move the zoomed-in scene.

●To resume normal playback, press OK.
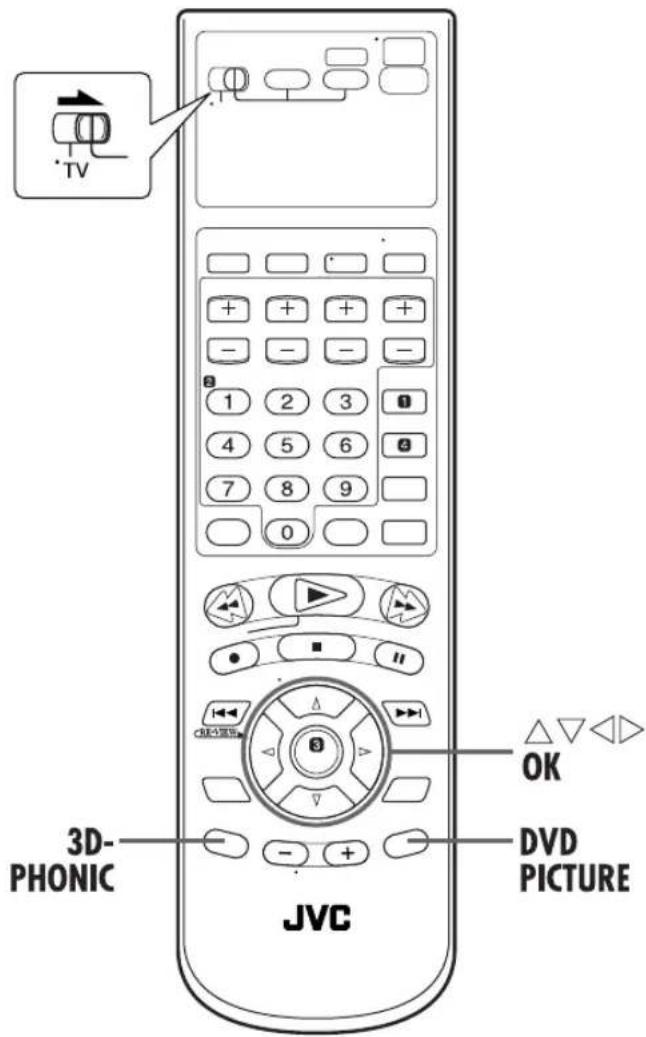
3D Phonic

Video CD

Audio CD
3D Phonic function allows you to get a simulated surround effect from your stereo system. You can enjoy the vertical surround sound with your 2-channel stereo system.
1 Access the selection menu.
Press 3D-PHONIC during playback.
- The current setting appears on the right bottom corner of the TV screen.
2 Select the mode.
Press ◀ ▷ repeatedly, then press OK.

Selected mode Effect level
- Each time you press ◀ ▷, the setting changes as follows: NONE→ACTION→DRAMA→THEATER→(Back to the beginning)
NONE: No effect
ACTION: Suitable for action movies and sports programs in which sounds dynamically move.
DRAMA: Provides the natural and warm sound. You can enjoy movies in a relaxed mood.
THEATER: You can enjoy sound effects like in a major theater.
- The selection menu disappears automatically if you do not change the selection for 10 seconds.
3 Select the effect level.
Press to select the desired effect level. (level 1 to 5)
- To resume normal playback, press 3D-PHONIC.
NOTES:
- The 3D Phonic function works correctly only when playing back a DVD VIDEO disc recorded in the Dolby Digital format. With other sources, you cannot get any effect if you activate 3D Phonic function.
- When playing back a DVD VIDEO disc recorded with the Dolby Digital that does not contain the rear signal, you cannot get a correct 3D Phonic sound even if you activate 3D Phonic function. ● The 3D Phonic function does not affect the Dolby Digital bitstream signal from the DIGITAL AUDIO OUT connector.
- When 3D Phonic function is activated, Analog Down Mix and D. Range Control functions are disabled. (pg. 82)
VFP function
— Adjusting the picture quality


The VFP (Video Fine Processor) function enables you to adjust the picture character according to the type of programming, picture tone or personal preference.
NOTE:
Before you start operation;
The VFP setting screen disappears if no operations are done for more than about 10 seconds. If the setting screen disappears before you finish, start from step 1 again.
1 Access the VFP setting menu.
Press DVD PICTURE during playback.
- The current setting appears on the TV screen.

2 Select the VFP mode.
Press ◀ ▷ repeatedly.
- Each time you press ◀, the VFP mode changes as follows: NORMAL→ CINEMA→USER 1→USER 2→(Back to the beginning)
NORMAL: Select this normally.
CINEMA: Suitable for movie.
USER 1/ You can adjust parameters that affect picture USER 2: appearance and store settings. Go to step 3.
NOTE:
You cannot adjust the parameters of "NORMAL" and "CINEMA".
To adjust picture appearance manually
3 Access USER menu.
Press ◀ ▷ repeatedly to select "USER 1" or "USER 2".

4 Select the parameter.
Press △▽ repeatedly to select a parameter you want to adjust, then press OK.
- Adjust gradually and confirm picture appearance results are as preferred.
GAMMA (-4 to +4): Controls brightness of neutral tints while maintaining brightness of dark and bright portions.
BRIGHTNESS Controls screen brightness. (-16 to +16):
CONTRAST Controls screen contrast. (-16 to +16):
SATURATION Controls screen color depth. (-16 to +16):
TINT Controls screen tint. (-16 to +16):
SHARPNESS Controls screen sharpness. (+0 to +3):
Y DELAY Controls screen color gap. (-2 to +2):
- VFP menu disappears and the following pop-up window appears on the TV screen.

5 Adjust the parameter.
Press △▽ repeatedly to change the setting, then press OK.
- The current VFP settings appear again.
6 Adjust the other parameters.
Repeat steps 4 and 5 to adjust other parameters.
To return to the normal screen
Press DVD PICTURE .
To activate your setting
Press DVD PICTURE, then press ◀ ▷ repeatedly to select "USER 1" or "USER 2" that you have changed the parameters.
Using the on-screen bar

You can check disc information while the disc is loaded and you can use some functions using the on-screen bar. The on-screen bar allows you the various playback operations.

How to Access the on-screen bar
Press PLAY SETUP twice whenever a disc is loaded.
Example: During DVD VIDEO playback

Example: During Video CD playback

Contents of the on-screen bar during playback
DVD
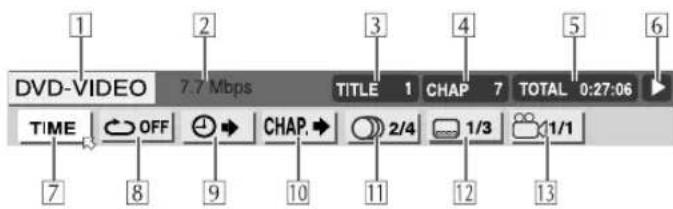
Video CD

1 Disc type 2 Current transfer rate (Megabits per second) 3 Current title (for DVD) 4 Current chapter number (for DVD) or track number (for other types of discs) 5 Time information (17 pg. 49) 6 Playback status
: appears during playback. / appears during fast forward/reverse. / / appears during playback in forward slow-motion/reverse slow-motion. II: appears when paused. ☐: appears when stopped.
7 Select this to change time information. (See 5 in the illustration above) (13 pg. 49)
8 Select this for Repeat Playback. (17 pg. 50) 9 Select this for time search function. (pg. 51) 10 Select this for chapter search function. (pg. 52) 11 Select this to change audio language or channel. ( page 56, 57) 12 Select this to change subtitle language. (C) pg. 54) 13 Select this to change view angle. (C-3) pg. 55) 14 Select this for Program Playback. (pg. 53) 15 Select this for Random Playback. (pg. 53)
Basic operation on the on-screen bar
Example: When selecting the Repeat mode of DVD
During playback or while stopped
1 Access the on-screen bar.
Press PLAY SETUP twice. The on-screen bar appears on the TV screen.
● The currently selected item is highlighted.

2 Select menu item.
Press ◀ ▷ to move ☑ to , then press OK. The pop-up window appears under the selected item.
● The current setting appears.

3 Select the option.
Press △▽ to select the desired option, then press OK.
• Each time you press △▽, the options change.
To clear the on-screen bar, press PLAY SETUP.
NOTE:
See the corresponding pages for details on each function.
Change the time information

You can change the time information in the on-screen bar on the TV screen and the front display panel of the unit.
During playback or while stopped
1 Access the on-screen bar.
Press PLAY SETUP twice. The on-screen bar appears on the TV screen.
2 Select menu item.
Press ◀ to move ✉ to , then press OK.
● Each time you press OK, the time information changes as follows:
Example: During DVD playback
→ TIME 0:25:58 → REM 0:18:14 → TOTAL 1:25:58
⇒ T.REM 0:45:41 → (Back to the beginning)
TIME: Elapsed playing time of current chapter/track
REM: Remaining time of current chapter/track
TOTAL: Elapsed time of title/disc
T.REM : Remaining time of title/disc
To clear the on-screen bar, press PLAY SETUP.
NOTES:
- While playing a Video CD, Audio CD, or SVCD, the hour digit indication does not appear.
- While a DVD is stopped, "--:--" appears in the time information display.

Repeat Playback


You can repeat playback as you like according to the type of disc.
DVD VIDEO: during playback
Audio CD: during playback or in stop mode
Video CD/SVCD: in stop mode or during playback with PBC deactivated
When using the on-screen bar
1 Access the on-screen bar.
Press PLAY SETUP twice. The on-screen bar appears on the TV screen.
2 Select menu item.
Press ◀ ▷ to move ☑ to , then press OK.
- The following pop-up window appears under the selected item.
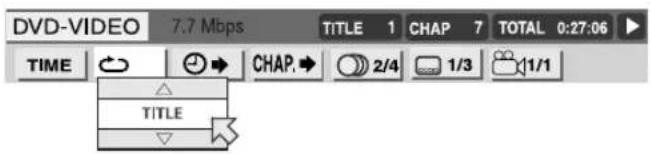
3 Select the repeat mode.
Press ▲▼ repeatedly to select the Repeat mode, then press OK.
• The mode changes as follows:
DVD VIDEO
CHAPTER→TITLE→A-B→OFF→(Back to the beginning)
CHAPTER: The current chapter is played back repeatedly.
TITLE: The current title is played back repeatedly.
A-B: The desired part is played back repeatedly. (pg. 51)
OFF: Each title and chapter is played back once.
Video CD/SVCD/CD
TRACK→ALL→A-B→OFF→(Back to the beginning)
TRACK: The current track is played back repeatedly.
ALL: All tracks are played back repeatedly.
A-B: The desired part is played back repeatedly. (pg. 51)
OFF: Each track is played back once.
- "A-B" cannot be selected while stopped.
To clear the on-screen bar
Press PLAY SETUP.
To cancel Repeat Playback
Repeat from step 1, select "OFF" in step 3, then press OK.
When using the REPEAT button:
1 Access the repeat mode.
Press REPEAT during playback of the item you want to repeat.
- Repeat mode is displayed on the TV.
2 Select the repeat mode.
Press REPEAT repeatedly to select the desired repeat mode, then press OK.
To stop Repeat Playback, press STOP (■).
To cancel Repeat Playback, press REPEAT repeatedly until "OFF" appears on the TV screen, then press OK.
NOTES:
- Repeat Playback is not possible with a Video CD and SVCD with PBC function.
- Repeat Playback may not work properly depending on the type of disc being used.
- You cannot select A-B Repeat Playback by pressing REPEAT.
A-B Repeat Playback


You can repeat the desired part.

Access the on-screen bar.
Press PLAY SETUP twice. The on-screen bar appears on the TV screen.

Select menu item.
Press ◀ ▷ to move ☑ to 📊 then press OK.
The following pop-up window appears under the selected item.


Select the repeat mode.
Press repeatedly to select "A-B".

Select the start point.
Press OK at the beginning of the part you want to repeat (point A).
● The following display appears in the on-screen bar.


Select the end point.
Press OK at the end of the part you want to repeat (point B).
● A-B Repeat Playback starts. The selected part of the disc (between point A and B) is played repeatedly.
To cancel A-B Repeat Playback:
Repeat from step 1, select "OFF" in step 3, then press OK.
- You can also cancel Repeat Playback by pressing SKIP (◀◀◀) or SKIP (▶▶▶▶).
To clear the on-screen bar:
Press PLAY SETUP.
NOTES:
- A-B Repeat Playback may not work properly depending on the type of disc being used. ● The subtitles recorded around A-B point may not appear.
- The end of the item will be set as "B" point if the end of the item is reached before you set the "B" point.
- When playing back a DVD, A-B Repeat Playback is possible only within the same title.
- "A-B" cannot be selected during Program and Random Playback.
- "A-B" cannot be selected while stopped.
Time Search


You can play back a disc from the desired point by specifying the elapsed time from the beginning of the current title (for DVD VIDEO) or the disc (for Audio CD/Video CD) using the Time Search.
When a PBC-compatible Video CD is played back, be sure to inactivate PBC function before you perform Time search by pressing the number keys instead of the PLAY (▶) button when you start playback.

Access the on-screen bar.
Press PLAY SETUP twice. The on-screen bar appears on the TV screen.

Select menu item.
Press ◀ to move ✉ to ☑ then press OK.
- The following pop-up window appears under the selected item.


Select the time.
Press the number keys (0-9) to enter the time, then press OK.
Example:
To play back from a point 2 (hours): 34 (minutes): 08 (seconds) elapsed
![graph LR A["TIME ::_:_"] --> B["TIME 2 ::_:_"] --> C["Press 2"] D["TIME 2:3_:_"] --> E["TIME 2:34:_"] --> F["Press 4"] G["TIME 2:34:0_"] --> H["TIME 2:34:08"] --> I["Press 8"]](/content/2026/06/1341529/images/9d0aafea3b153deb0c158badd0d0d790caeb1c25db3b022a191659d4f077007f.jpg)
If you have specified a wrong selection,
Press ◀ repeatedly until the wrong number is erased, then press number keys to enter the correct numbers.
● The unit starts playback from the specified time.
To clear the on-screen bar
Press PLAY SETUP.
NOTES:
- When “○” is displayed on the TV screen in step 3, you have selected a point that exceeds the recording time of the disc.
- Some DVD VIDEO discs do not contain time information, and it is not possible to use the Time Search function. In such a case, “☑” is displayed on the TV screen as well.
- Time Search does not work while you play back the Video CD or SVCD with the PBC Function.
Reactivate the Playback Control (PBC) Function
You can reactivate the PBC function when you play back a PBC-compatible Video CD disc without PBC function.
- Press TOP MENU during playback.

Chapter Search


You can start playback of the desired chapter using the on-screen bar.

Access the on-screen bar.
Press PLAY SETUP twice. The on-screen bar appears on the TV screen.

Select menu item.
Press ◀ to move ✉ to CHEN press OK.
● The following pop-up window appears under the selected item.


Select the chapter.
Press the number keys (0-10) to enter the desired chapter number, then press OK.
- The unit starts playback from the selected chapter.
Examples:
To select track 5, press the number key "5". To select track 15, press the number key "1" and "5". To select track 25, press number key "2" and "5". - It is not possible to use the number key "+10".
If you have specified a wrong selection
Enter the appropriate number keys again.
To clear the on-screen bar
Press PLAY SETUP.
NOTES:
- When "∅" is displayed on the TV screen in step 3, the chapter you have selected is not contained in the disc, or chapter search does not work on the disc.
- Chapter Search starts automatically when you select the desired chapter in step 3, depending on the disc.
Program Playback


You can play back up to 99 tracks in the desired order.

Access the on-screen bar.
Press PLAY SETUP twice in stop mode.

Select the menu item.
Press ◀ ▷ to move ✉ to P#CG, then press OK.
●The program table appears under the on-screen bar.


Select the tracks in the desired order.
Press the appropriate number keys to select the tracks.

Examples:
●To select track 5, press the number key "5". - To select track 15, press the number key "+10" and then "5". - To select track 25, press number key "+10" twice, then "5".
If you have specified a wrong selection
Press STOP (■). The last selection programmed is erased.

Start playback.
Press PLAY (▶). Playback starts in the selected order.
- When all of the programmed tracks have been played back, Program Playback stops, but the programmed information remains. ●To stop Program Playback, press STOP (■).
- To clear all the programmed tracks, press STOP (■) to stop playback and press PLAY SETUP to clear the program table, then press STOP (■) again. ●During Program Playback, pressing SKIP (▶▶▶) skips to the next selection of the program. Pressing SKIP (▶◀◀) returns to the beginning of the current selection.
To clear the program table, press PLAY SETUP.
NOTE:
Program Playback is not possible depending on the type of disc.
Random Playback


You can play back all the tracks on the disc in random order.

Access the on-screen bar.
Press PLAY SETUP twice in stop mode.

Select the menu item.
Press ◀ ▷ to move ≈ to Rhen press OK.
●Playback starts in random order.

●To stop and quit Random Playback, press STOP (■). ●To cancel Random playback, repeat step 2 during Random Playback. Normal playback resumes at the current point.
To clear the on-screen bar, press PLAY SETUP.
NOTES:
●The same track will not be played back more than once during Random Playback. ●Random playback is canceled when all the tracks have been played back.

Subtitle Selection


You can select subtitle language.
- During playback
When using the on-screen bar

Access the on-screen bar.
Press PLAY SETUP twice. The on-screen bar appears on the TV screen.

Select menu item.
Press ◀ ▷ to move ☑ to ☐ then press OK.
- The following pop-up window appears under the selected item.
Example (DVD): "ENGLISH" is selected out of 3 subtitle languages recorded.


Select the subtitle language.
Press △▽ repeatedly to select the desired subtitle language, then press OK.
● Each time you press the button, the subtitle language changes.
To clear the on-screen bar
Press PLAY SETUP.
NOTES:
- For DVD VIDEO
Some subtitle languages are abbreviated in the pop-up window. See "Language Code List" (C37 pg. 23).
- For SVCD
SVCD can contain up to four subtitles. Pressing SUB TITLE changes the subtitles regardless of whether the subtitles are recorded or not. (Subtitles will not change if no subtitle is recorded.)
- When "∅" appears on the TV screen in step 3, subtitle language is not recorded.
When using the SUB TITLE button:

Access the menu.
Press SUB TITLE.
- The following pop-up window appears on the TV screen.
Example (DVD): "ENGLISH" is selected out of 3 subtitle languages recorded.


Select the subtitle language.
Press △▽ or SUB TITLE repeatedly to select the desired subtitle language, then press OK.
• Each time you press the button, the subtitle language changes.
- The pop-up window disappears if no operation is done for about 5 seconds.
NOTE:
When “∅” appears on the TV screen in step 2, subtitle language is not recorded.
Angle Selection


You can enjoy a variety of scene angles if the DVD VIDEO disc contains "multi-angle" parts, where multiple cameras were used to shoot the same scene from different angles.
If the disc contains "multi-angle" parts, " 🔍" appears on the TV screen at the beginning of the "multi-angle" part when "ON SCREEN GUIDE" is set to "ON".
- During playback
When using the on-screen bar

Access the on-screen bar.
Press PLAY SETUP twice. The on-screen bar appears on the TV screen.

Select menu item.
Press ◀ ▷ to move ☑ to , then press OK.
- The following pop-up window appears under the selected item.
Example: The first view angle is selected out of 3 view angles recorded.


Select the view angle.
Press repeatedly to select the desired view angle, then press OK.
● Each time you press the button, the angle of the scene changes.
To clear the on-screen bar, press PLAY SETUP.
NOTE:
When “∅” appears on the TV screen in step 3, the current scene is not recorded from multiple angles.
When using the ANGLE button:

Access the menu.
Press ANGLE.
● The following pop-up window appears on the TV screen.
Example: The first view angle is selected out of 3 view angles recorded.


Select the view angle.
Press or ANGLE repeatedly to select the desired view angle, then press OK.
● Each time you press the button, the angle of the scene changes.
- The pop-up window disappears if no operation is done for about 5 seconds.
Example:
1/3→2/3→3/3→(Back to the beginning)
![graph TD A["Car at top"] --> B["Car at side"] B --> C["Car at side"] C --> D["Car at right"]](/content/2026/06/1341529/images/772b0c1f767a0feb40f0b1ed27f8c6fe6c2c823e0b461e5acb4c6f8e5431cf09.jpg)

Audio Language Selection


Some DVD discs contain multiple audio tracks. You can select the audio language for movies (DVD VIDEO).
During playback:

When using the on-screen bar:
Access the on-screen bar. Press PLAY SETUP twice. The on-screen bar appears on the TV screen.

Select menu item. Press ◀ to move ☑ to □ then press OK.
The following pop-up window appears under the selected item.
- The following pop-up window appears under the selected item.
Example: "ENGLISH" is selected out of 4 audio languages recorded.


Each time you press the button, the audio language changes.
Press △▽ repeatedly to select the desired audio language, then press OK.
• Each time you press the button, the audio language changes.
To clear the on-screen bar, press PLAY SETUP.
NOTES:
- Some audio languages are abbreviated in the pop-up window. See "Language Code List" (pg. 23).
- If "⊗" appears on the TV, the current scene does not contain plural audio languages.
When using the A.MONITOR button:

Access the menu.
Press A.MONITOR.
- The following pop-up window appears on the TV screen.
Example: "ENGLISH" is selected out of 3 audio languages recorded.
![graph TD A["Input: ENGLISH"] --> B["1/3"] B --> C["ENGLISH"] C --> D["Output"]](/content/2026/06/1341529/images/0c84f7670d81b4ed7aff5e002f2196bb0c4014d6472c1e0a83f3325c720f5638.jpg)

Select the audio language.
Press △▽ or A.MONITOR repeatedly to select the desired audio language, then press OK.
• Each time you press the button, the audio language changes. - The pop-up window disappears if no operation is done for about 5 seconds.
NOTE:
Some audio languages are abbreviated in the pop-up window. See "Language Code List" (pg. 23).
Audio Channel Selection


When you play certain karaoke (DVD/Video CD/SVCD), you can enjoy karaoke by selecting the audio channel to play.
● The sound of each audio channel depends on the contents of the disc. - During playback
When using the on-screen bar

Access the on-screen bar.
Press PLAY SETUP twice. The on-screen bar appears on the TV screen.

Select menu item.
Press ◀ ▷ to move ☑ to often press OK.
● The following pop-up window appears under the selected item.
Example: "ST" (stereo) is selected.


Select the audio channel.
Press repeatedly to select the desired audio channel, then press OK.
• Each time you press the button, the audio channel changes.
To clear the on-screen bar Press PLAY SETUP.
When using the A.MONITOR button:

Access the menu.
Press A.MONITOR.
- The following pop-up window appears on the TV screen. Example: "ST" (stereo) is selected out of 3 audio channels recorded.
![graph TD A["ST"] --> B["1/3"] B --> C["ST"] C --> D["Output"]](/content/2026/06/1341529/images/d34cf3b9561edf5b07c3f4fb3117a00cbda3f54d937be400524df5ee70f86ecd.jpg)

Select the audio channel.
Press △▽ or A.MONITOR repeatedly to select the desired audio channel, then press OK.
• Each time you press the button, the audio channel changes. - The pop-up window disappears if no operation is done for about 5 seconds.
For Video CD
ST→L→R→(Back to the beginning)
ST: To listen to normal stereo playback. L: To listen to L (left) audio channel only. R: To listen to R (right) audio channel only.
For SVCD
ST 1/ST 2: To listen to normal stereo playback of ST 1 or ST 2 channel.
L 1/L 2: To listen to the L (left) 1 or 2 audio channel.
R 1/R 2: To listen to the R (right) 1 or 2 audio channel.
Parental Lock
This function restricts playback of DVD VIDEO discs which contain violent (and other) scenes according to the level set by the user. For example, if a movie which includes violent scenes supports the parental lock feature, such scenes which you do not want to let children view can be cut or replaced with other scenes.
- Turn on the TV and select the VCR channel (or AV mode).
- Slide the TV/VCR/DVD switch to the right.

To set Parental Lock for the first time
1 Turn on the unit.
Press POWER (⏻/1).
2 Select the DVD deck.
On the unit
Press VCR/DVD repeatedly so that the DVD indicator lights up.
On the Remote
Press DVD so that the DVD indicator lights up.
3 Access the DVD Set Up menu.
1 Press SET UP MENU. 2 Press ◀ ▷ to select "OTHERS".
4 Access the "PARENTAL LOCK" menu.
Press △▽ repeatedly to move ☑ to "PARENTAL LOCK", then press OK.
- The "PARENTAL LOCK" sub-menu appears on the TV screen.
- It is possible to access the "PARENTAL LOCK" menu only in the stop mode when a DVD disc is loaded on the unit.

5 Access the country code menu.
Press △▽ repeatedly to move ☒ to "COUNTRY CODE", then press OK.

6 Select the country code.
Press △▽ repeatedly to move ☒ to select the country code, then press OK.
- See "Country/Area Code List for Parental Lock" (C37 pg. 60).
- The ☒ moves to "SET LEVEL".

7 Select the Level.
Press OK, then press △▽ repeatedly to move ☒ to select the level of restriction, then press OK.
- The ☒ moves to "PASSWORD".
- The smaller the value of level is, the more restrictive the Parental Lock level is.
- Select "NONE" to cancel this function.

8 Enter the password.
Press the number keys to enter a four-digit number as your password, then press OK.
- The ☒ moves to "EXIT".
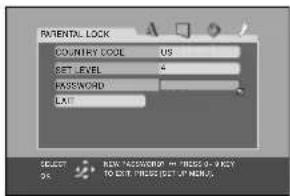
9 Return to the OTHERS menu screen.
Press OK.
- The "OTHERS" menu resumes.
To return to the normal screen, press SET UP MENU.
NOTE:
Remember your password, or make a note of it.
To change the settings
You can change the Parental Lock settings later.
1 Access the Parental Lock screen.
1 Press SET UP MENU.
2 Press ◀ ▷ to select "OTHERS".
3 Press △▼ repeatedly to move ✉ to "PARENTAL LOCK", then press OK.
- The "PARENTAL LOCK" sub-menu appears on the TV screen.
- You can only move ☑ to "PASSWORD" or to "EXIT" before you enter your password.
2 Enter the password.
Press the appropriate number keys to enter the 4-digit password, then press OK. If you enter the wrong password, "WRONG! RETRY..." appears at the bottom of the TV screen. Enter the correct password.

3 Change the country code.
Press ▲/▼ to select the country code, then press OK.
- See "Country/Area Code List for Parental Lock" (C pg. 60).
- When you change the country code, you must select the level.
4 Change the level.
Press ▲/▼ to select the desired level, then press OK.
5 Enter your new password.
Press the appropriate number keys to enter a 4-digit password, then press OK.
- The password entered in this step becomes the new password. If you do not change the password, enter the same password as in step 2.
- Even if you want to change only the country code and/or level, do not forget to enter the password after changing the country code and/or the level. Otherwise, the new country code and/or level will not become effective.
6 Return to the normal screen.
Press SET UP MENU.
NOTES:
- When you enter the wrong password more than 3 times in step 2 on the left column, the arrow moves to "EXIT" automatically and ▲/▼ does not work.
- If you forget your password, enter "8888" in step 2.
To temporarily release the Parental Lock
When you set the parental level strictly, some discs may not be played back at all. When you insert such a disc and try to play it back, the following Parental Lock screen appears on the TV screen, asking you whether you want the Parental Lock to be temporarily released or not.
1 Access the password screen.
Place the disc in the disc tray.
- If the disc is rated higher than the selected level, the following screen appears.
2 Press △▽ to move ✉ to "TEMPORARY RELEASE", then press OK.
- If you select "NOT RELEASE", you cannot play back that disc.

2 Enter the password.
Press the appropriate number keys to enter the 4-digit password, then press OK.
- If you enter the wrong password, "WRONG! RETRY..." appears on the TV screen. Enter the correct password.
- If you enter the correct password, the Parental Lock is released and the unit starts playback.
NOTES:
- When you enter the wrong password more than 3 times in step 2 above, the arrow moves to "NOT RELEASE" automatically and △▽ do not work. In such a case, press OK, then press OPEN/CLOSE (▲) to remove the disc.
- If you forget your password, enter "8888" in step 2.
Country/Area Code List for Parental Lock
| AD | Andorra |
| AE | United Arab Emirates |
| AF | Afghanistan |
| AG | Antigua and Barbuda |
| AI | Anguilla |
| AL | Albania |
| AM | Armenia |
| AN | Netherlands Antilles |
| AO | Angola |
| AQ | Antarctica |
| AR | Argentina |
| AS | American Samoa |
| AT | Austria |
| AU | Australia |
| AW | Aruba |
| AZ | Azerbaijan |
| BA | Bosnia and Herzegovina |
| BB | Barbados |
| BD | Bangladesh |
| BE | Belgium |
| BF | Burkina Faso |
| BG | Bulgaria |
| BH | Bahrain |
| BI | Burundi |
| BJ | Benin |
| BM | Bermuda |
| BN | Brunei Darussalam |
| BO | Bolivia |
| BR | Brazil |
| BS | Bahamas |
| BT | Bhutan |
| BV | Bouvet Island |
| BW | Botswana |
| BY | Belarus |
| BZ | Belize |
| CA | Canada |
| CC | Cocos (Keeling) Islands |
| CF | Central African Republic |
| CG | Congo |
| CH | Switzerland |
| CI | Côte d’Ivoire |
| CK | Cook Islands |
| CL | Chile |
| CM | Cameroon |
| CN | China |
| CO | Colombia |
| CR | Costa Rica |
| CU | Cuba |
| CV | Cape Verde |
| CX | Christmas Island |
| CY | Cyprus |
| CZ | Czech Republic |
| DE | Germany |
| DJ | Djibouti |
| DK | Denmark |
| DM | Dominica |
| DO | Dominican Republic |
| DZ | Algeria |
| EC | Ecuador |
| EE | Estonia |
| EG | Egypt |
| EH | Western Sahara |
| ER | Eritrea |
| ES | Spain |
| ET | Ethiopia |
| FI | Finland |
| FJ | Fiji |
| FK | Falkland Islands (Malvinas) |
| FM | Micronesia (Federated States of) |
| FO | Faroe Islands |
| FR | France |
| FX | France, Metropolitan |
| GA | Gabon |
| GB | United Kingdom |
| GD | Grenada |
| GE | Georgia |
| GF | French Guiana |
| GH | Ghana |
| GI | Gibraltar |
| GL | Greenland |
| GM | Gambia |
| GN | Guinea |
| GP | Guadeloupe |
| GQ | Equatorial Guinea |
| GR | Greece |
| GS | South Georgia and the South Sandwich Islands |
| GT | Guatemala |
| GU | Guam |
| GW | Guinea-Bissau |
| GY | Guyana |
| HK | Hong Kong |
| HM | Heard Island and McDonald Islands |
| HN | Honduras |
| HR | Croatia |
| HT | Haiti |
| HU | Hungary |
| ID | Indonesia |
| IE | Ireland |
| IL | Israel |
| IN | India |
| IO | British Indian Ocean Territory |
| IQ | Iraq |
| IR | Iran (Islamic Republic of) |
| IS | Iceland |
| IT | Italy |
| JM | Jamaica |
| JO | Jordan |
| JP | Japan |
| KE | Kenya |
| KG | Kyrgyzstan |
| KH | Cambodia |
| KI | Kiribati |
| KM | Comoros |
| KN | Saint Kitts and Nevis |
| KP | Korea, Democratic People's Republic of |
| KR | Korea, Republic of |
| KW | Kuwait |
| KY | Cayman Islands |
| KZ | Kazakhstan |
| LA | Lao People's Democratic Republic |
| LB | Lebanon |
| LC | Saint Lucia |
| LI | Liechtenstein |
| LK | Sri Lanka |
| LR | Liberia |
| LS | Lesotho |
| LT | Lithuania |
| LU | Luxembourg |
| LV | Latvia |
| LY | Libyan Arab Jamahiriya |
| MA | Morocco |
| MC | Monaco |
| MD | Moldova, Republic of |
| MG | Madagascar |
| MH | Marshall Islands |
| ML | Mali |
| MM | Myanmar |
| MN | Mongolia |
| MO | Macau |
| MP | Northern Mariana Islands |
| MQ | Martinique |
| MR | Mauritania |
| MS | Montserrat |
| MT | Malta |
| MU | Mauritius |
| MV | Maldives |
| MW | Malawi |
| MX | Mexico |
| MY | Malaysia |
| MZ | Mozambique |
| NA | Namibia |
| NC | New Caledonia |
| NE | Niger |
| NF | Norfolk Island |
| NG | Nigeria |
| NI | Nicaragua |
| NL | Netherlands |
| NO | Norway |
| NP | Nepal |
| NR | Nauru |
| NU | Niue |
| NZ | New Zealand |
| OM | Oman |
| PA | Panama |
| PE | Peru |
| PF | French Polynesia |
| PG | Papua New Guinea |
| PH | Philippines |
| PK | Pakistan |
| PL | Poland |
| PM | Saint Pierre and Miquelon |
| PN | Pitcairn |
| PR | Puerto Rico |
| PT | Portugal |
| PW | Palau |
| PY | Paraguay |
| QA | Qatar |
| RE | Réunion |
| RO | Romania |
| RU | Russian Federation |
| RW | Rwanda |
| SA | Saudi Arabia |
| SB | Solomon Islands |
| SC | Seychelles |
| SD | Sudan |
| SE | Sweden |
| SG | Singapore |
| SH | Saint Helena |
| SI | Slovenia |
| SJ | Svalbard and Jan Mayen |
| SK | Slovakia |
| SL | Sierra Leone |
| SM | San Marino |
| SN | Senegal |
| SO | Somalia |
| SR | Suriname |
| ST | Sao Tome and Principe |
| SV | El Salvador |
| SY | Syrian Arab Republic |
| SZ | Swaziland |
| TC | Turks and Caicos Islands |
| TD | Chad |
| TF | French Southern Territories |
| TG | Togo |
| TH | Thailand |
| TJ | Tajikistan |
| TK | Tokelau |
| TM | Turkmenistan |
| TN | Tunisia |
| TO | Tonga |
| TP | East Timor |
| TR | Turkey |
| TT | Trinidad and Tobago |
| TV | Tuvalu |
| TW | Taiwan, Province of China |
| TZ | Tanzania, United Republic of |
| UA | Ukraine |
| UG | Uganda |
| UM | United States Minor Outlying Islands |
| US | United States |
| UY | Uruguay |
| UZ | Uzbekistan |
| VA | Vatican City State (Holy See) |
| VC | Saint Vincent and the Grenadines |
| VE | Venezuela |
| VG | Virgin Islands (British) |
| VI | Virgin Islands (U.S.) |
| VN | Viet Nam |
| VU | Vanuatu |
| WF | Wallis and Futuna Islands |
| WS | Samoa |
| YE | Yemen |
| YT | Mayotte |
| YU | Yugoslavia |
| ZA | South Africa |
| ZM | Zambia |
| ZR | Zaire |
| ZW | Zimbabwe |
About MP3/WMA Disc
This unit can play back CD discs recorded in MP3/WMA format (referred to as MP3/WMA discs in this manual).
Operations for MP3/WMA discs are similar to those for Audio CD discs, though there are some restrictions and differences.
What is MP3?
MP3 is the abbreviation of "MPEG1 Audio Layer 3." MPEG Audio is a compression specification that compresses the audio portion only. This image compression method is used in DVD or Video CD, etc. The audio data has been compressed to about 1/10.
What is WMA?
WMA is an abbreviation of "Windows Media Audio", and is an audio data compression format developed by Microsoft Corporation. The sound quality of data compressed using WMA is the same as that of MP3, though the WMA file size is smaller than that of MP3.
On an MP3/WMA disc, each material (song) is recorded on each Track (file), which usually belongs to a Group (folder).
![graph TD A["MP3 disc"] --> B["Track A.mp3"] A --> C["Track B.mp3"] A --> D["Track C.mp3"] B --> E["Group 2"] C --> F["Group 4"] D --> G["Group 3"] E --> H["Track D.mp3"] E --> I["Track E.mp3"] E --> J["Track F.mp3"] F --> K["Group 4"] G --> L["Group 3"]](/content/2026/06/1341529/images/a549600ca1fe53d5271c5941a55519bea655594e6244540e924f16ac3f7c9ec8.jpg)
This unit can recognize up to 99 Groups and up to 150 Tracks per Group.
If a disc includes more than the Tracks above the limit, the unit stops detecting Tracks when the number of detected Tracks reaches the limit and ignores the subsequent Tracks. The unit also ignores any non-MP3/WMA file on the disc.
NOTES for making a private MP3/WMA disc using a CD-R/CD-RW disc:
- Select "ISO9660" as the disc format.
- Finalize the disc.
NOTES:
●Because of the disc characteristics or recording conditions, some discs may not be played back or it may take time to start playback. ●The unit does not support "packet writing" discs. - If there are any Tracks (files) which are stored on a disc directly and do not belong to any Group (directory), the unit recognizes them as belonging to an independent Group. ●The unit plays back Groups/Tracks on an MP3/WMA disc in alphabetical order. - For example, if there are three title Groups [one], [two] and [three] on a disc, the playback order is [one], [three] then [two]. Tracks in a Group are played back in the same way. ●Therefore, an MP3/WMA disc on the market may be played back in a different order from the order printed on its sleeve.
MP3/WMA control display
The MP3/WMA control display appears on the TV screen and playback starts when an MP3/WMA disc is loaded.
![graph TD A["MP3/WMA CONTROL Group: 01/03 Blue Red Green"] --> B["Current track number"] B --> C["Track number in current group: Time: 00:00:14 *"] B --> D["01-Cloudy: 02-Fair 03-Fog 04-Hail 05-Indian summer 06-Rain 07-Shower 08-Snow 09-Thunder 10-Typhoon 11-Wind 12-Winter sky"] A --> E["Total track…](/content/2026/06/1341529/images/6f4d90825774ada739ac49249bb3dc38538a71d17dcc1d21afa17ab66b22eb07.jpg)
* Elapsed playing time of current track Elapsed playing time is only shown during playback.
MP3/WMA Playback
MP3 WMA
You can search and play back desired groups and tracks using the MP3/WMA control display.
- Turn on the TV and select the VCR channel (or AV mode).
- Slide the TV/VCR/DVD switch to the right.


NOTES:
- PLAY (▶), STOP (■), PAUSE (■), SKIP (◀◀) and SKIP (▶▶) buttons function the same as with Audio CD discs, however, REW (◀◀) and FF (▶▶) buttons do not function for MP3/WMA playback.
- Resume playback, Program playback or Random playback also does not function for MP3/WMA playback.
Using the MP3/WMA control display
1 Turn on the unit.
Press POWER (⏻/ı).
2 Select the DVD deck.
On the unit
Press VCR/DVD repeatedly so that the DVD indicator lights up.
On the Remote
Press DVD so that the DVD indicator lights up.
3 Select the mode.
Be sure to set "MP3&WMA/JPEG" to "MP3&WMA" before loading a disc. (☐ pg. 81)
- You cannot access the DVD Set Up screen and “∅” appears on the TV screen if a disc is already placed.
4 Load the disc.
1 Press OPEN/CLOSE (▲) on the DVD deck to open the disc tray. 2 Place the MP3/WMA disc in the disc tray. - For details, refer to "Placing a Disc" (pg. 9). 3 Press OPEN/CLOSE (▲) on the DVD deck to close the disc tray. ● The MP3/WMA control display appears on the TV screen when an MP3/WMA disc is loaded. (pg. 62)
5 Select the group.
Press ◀ ▷ to select the desired group.
6 Start playback.
Press △▽ to select the desired track, then press OK or PLAY (▶).
- You can skip a track across a group. Press SKIP (▶▶) to skip to the first track of the next group when the last track of the current group is selected.
7 Pause playback.
Press PAUSE (II).
- To resume normal playback, press PLAY (▶).
8 Stop playback.
Press STOP (■). Press OPEN/CLOSE (▲) on the DVD deck to open the disc tray, then remove the disc.

Group/track selection
To start playback by specifying the group/track number
1 Press TITLE.
2 Press the number keys (0-10, +10) to enter the group number.
Press the number keys (0-10, +10) to enter the track number.
Example:
To select 3: Press 3.
To select 14: Press +10, then 4.
To select 20: Press +10, then 10.
Or press +10 twice, then 0.
To select 24: Press +10, +10, then 4.
To select 110: Press +10 ten times, then 10.
- The entered number appears in the track number indication and playback starts from the track you have specified.
Repeat Playback
You can repeat playback of the current group, track, or all groups.
- While MP3/WMA control display is on the TV:
1 Access the repeat mode.
Press PLAY SETUP during playback.
- The current repeat mode is displayed on the MP3/WMA control display.
2 Select the mode.
Press to select the desired repeat mode, then press OK.
- Each time you press REPEAT, the mode changes as follows: TRACK→GROUP→ALL→OFF (No indication)→(Back to the beginning)
| TRACK: | The current track is played back repeatedly. |
| GROUP: | All tracks of the current group are played back repeatedly. |
| ALL: | All tracks are played back repeatedly. |
| OFF (no indication): | Each track is played back once. |
- To stop Repeat Playback, press STOP (■).
- To cancel Repeat Playback, press REPEAT repeatedly until the repeat mode display disappears on the TV screen.
- You can also quit Repeat Playback in the following cases:
- Press OPEN/CLOSE(▲) to open the disc tray.
- Turn off the unit.
To return to the MP3/WMA control display, press STOP (■).
About JPEG Disc
This unit can play back CD discs recorded in the JPEG format (we refer to those discs as JPEG discs in this manual). Operations for JPEG discs are similar to those for Audio CD discs, though there are some restrictions and differences.
What is JPEG?
JPEG is the abbreviation of "Joint Photographic Expert Group." JPEG is a still-picture data compression system.
On a JPEG disc, each still picture is recorded as a file, which usually belongs to a Group (folder).
![graph TD A["JPEG disc"] --> B["File A.jpg"] A --> C["File B.jpg"] A --> D["File C.jpg"] B --> E["Group 2"] C --> E D --> E E --> F["Group 4"] F --> G["File D.jpg"] F --> H["File E.jpg"] F --> I["File F.jpg"] F --> J["Group 3"]](/content/2026/06/1341529/images/6d686efbcbf9983e2d5eda1e38647bbb13ec78950d249031e9a1945405b7ef37.jpg)
This unit can recognize up to 99 Groups and up to 150 Files per Group.
If a disc includes more than the Files above limit, the unit stops detecting Files when the number of detected Files reaches the limit and ignores the subsequent Files. The unit also ignores any non-JPEG file on the disc.
NOTES for making a private JPEG disc using a CD-R/CD-RW disc:
- Select "ISO9660" as the disc format.
- Finalize the disc.
NOTES:
- We recommend recording a file at 640 x 480 resolution. (If a file has been recorded at a resolution of more than 640 x 480, it will take a longer time to be displayed.)
- This unit can only play back baseline JPEG files*. Progressive JPEG files* or lossless JPEG files* cannot be played back.
* Baseline JPEG format: Used for digital cameras, web, etc. Progressive JPEG format: Used for web. Lossless JPEG format: An old type and rarely used now.
● Some files on a JPEG disc may be played back distortedly. - Because of the disc characteristics or recording condition, some discs may not be played back or it takes time to start playback. ● The unit does not support "packet writing" discs. - If there are any files which are stored on a disc directly and do not belong to any Group (directory), the unit recognizes them as belonging to an independent Group. ● The unit plays back Groups/Files on a JPEG disc in alphabetical order. - For example, if there are three title Groups [one], [two] and [three] on a disc, the playback order is [one], [three] then [two]. Files in a Group are played back in the same way. - Therefore, a JPEG disc on the market may be played back in a different order from the order printed on its sleeve.
JPEG control display
The JPEG control display appears on the TV screen and playback starts when a JPEG disc is loaded.
![graph TD A["Total group number on disc"] --> B[" JPEG CONTROL Group : 01/03"] A --> C[" Current file number "] A --> D[" Total file number in current group "] B --> E[" Sea Mountain Sky "] C --> F[" Anemone fish <br> - Bonito <br> - Butterfly fish <br> - Dolphin <br> - Garden eel <br> - Manta ray <b…](/content/2026/06/1341529/images/17692d94707d6e81a149df294d0c60672d07d9f8f70c4341cb9784744424497f.jpg)
JPEG Playback
JPEG
You can search and play back desired groups and files using the JPEG control display.
- Turn on the TV and select the VCR channel (or AV mode).
- Slide the TV/VCR/DVD switch to the right.
- Turn on the TV and select the VCR channel (or AV mode).
- Slide the TV/VCR/DVD switch to the right.


NOTES:
- PLAY (▶), STOP (■), PAUSE (■), SKIP (◀◀) and SKIP (▶▶) buttons function the same as with Audio CD discs, however, REW (◀◀) and FF (▶▶) buttons do not function for JPEG playback.
- Resume playback, Program playback or Random playback also does not function for JPEG playback.
Using the JPEG control display
1 Turn on the unit.
Press POWER (⏻/l).
2 Select the DVD deck.
On the unit
Press VCR/DVD repeatedly so that the DVD indicator lights up.
On the Remote
Press DVD so that the DVD indicator lights up.
3 Select the mode.
Be sure to set "MP3&WMA/JPEG" to "JPEG" before loading a disc. (pg. 81)
- You cannot access the DVD Set Up screen and "∅" appears on the TV screen if a disc is already placed.
4 Load the disc.
1 Press OPEN/CLOSE (▲) on the DVD deck to open the disc tray. 2 Place the JPEG disc in the disc tray. - For details, refer to "Placing a Disc" (pg. 9). 3 Press OPEN/CLOSE (▲) on the DVD deck to close the disc tray. ● The JPEG control display appears on the TV screen when a JPEG disc is loaded. (pg. 65)
5 Select the group.
Press ◀ ▷ to select the desired group.
6 Start playback.
Press △▽ to select the desired file, then press OK or PLAY (▶).
- You can skip a file across a group. Press SKIP (▶▶) to skip to the first file of the next group when the last file of the current group is selected.
The slide-show playback starts from the selected file.
- After selecting a file, press PLAY (▶) to start slide-show playback from the selected file, or press OK to show the selected file.
7 Pause playback.
Press PAUSE (II).
- To resume normal playback, press PLAY (▶).
8 Stop playback.
Press STOP (■). Press OPEN/CLOSE (▲) on the DVD deck to open the disc tray, then remove the disc.

Group/file selection
To start slide-show playback by specifying the group/file number
1 Press TITLE.
2 Press the number keys (0-10, +10) to enter the group number.
3 Press the number keys (0-10, +10) to enter the file number.
Example:
To select 3: Press 3.
To select 14: Press +10, then 4.
To select 20: Press +10, then 10.
Or press +10 twice, then 0.
To select 24: Press +10, +10, then 4.
To select 110: Press +10 ten times, then 10.
- The slide-show playback starts from the file you have specified.
- To display only the selected file, then press OK. To start slide-show playback from that file, press OK again.
Repeat Playback
You can repeat playback of the current group, file or all groups.
● While JPEG control display is on the TV:
1 Access the repeat mode.
Press PLAY SETUP while the JPEG Control screen is displayed.
- The current repeat mode is displayed on the JPEG control display.
2 Select the mode.
Press ▲▼ to select the desired repeat mode, then press OK.
● Each time you press REPEAT, the mode changes as follows: GROUP→ALL→OFF (No indication)→(Back to the beginning)
GROUP: All files of the current group are played back repeatedly.
ALL: All files are played back repeatedly.
OFF (No indication): Each file is played back once.
3 Start playback.
Press PLAY (▶).
● To stop Repeat Playback, press STOP (■).
- To cancel Repeat Playback, press REPEAT repeatedly until the repeat mode display disappears on the TV screen.
● You can also quit Repeat Playback in the following cases:
- Press OPEN/CLOSE (▲) to open the disc tray.
- Turn off the unit.
To return to the JPEG control display, press STOP (■).
Zooming
Press ZOOM during playback.
- When you want to zoom the picture during slide-show playback, first press PAUSE (II), then press ZOOM.
- For details, refer to "Zooming" (pg. 45).
Edit From A Camcorder
If the camcorder has no S-VIDEO output connector:
2 If the camcorder has an S-VIDEO output connector:
You can use a camcorder as the source player and your unit as the recording deck.
Slide the TV/VCR/DVD switch to the right.
1 Make connections.
If the camcorder has no S-VIDEO output connector: — connect the camcorder's AUDIO OUT and VIDEO OUT connectors to the unit's front panel AUDIO and VIDEO input connectors.
2 If the camcorder has an S-VIDEO output connector: — connect the camcorder's AUDIO OUT and S-VIDEO OUT connectors to the unit's front panel AUDIO and S-VIDEO input connectors.
- When using a monaural camcorder, connect its AUDIO OUT connector to the AUDIO L input connector on your unit.
2 Select the VCR deck.
On the unit
Press VCR/DVD repeatedly so that the VCR indicator lights up.
On the Remote
Press VCR so that the VCR indicator lights up.
3 Set the unit's input mode.
Press AUX (number key "0") and/or CH to select "F-1".
- When using S VIDEO connector, set "FRONT AUX INPUT" to "S-VIDEO". (137 pg. 79)
- When using VIDEO connector, set "FRONT AUX INPUT" to "VIDEO". (17 pg. 79)
4 Set the edit mode.
See "PICTURE CONTROL" on page 76.
5 Engage the Record Pause mode.
Use PLAY (▶), REW (◀◀), or FF (▶▶) to locate the point where you start recording, then press and hold PAUSE (■) and press REC (●) to engage the Record Pause mode.
6 Start the camcorder.
Engage the Play mode of the camcorder.
7 Start the unit.
Press PLAY (▶) to engage the Record mode of the unit.
NOTES:
●Dubbing is also possible using the rear panel connectors.
●All necessary cables can be obtained from your dealer.
- When you select "EDIT" to dub tapes in step 4, be sure to select "AUTO" (or "NORM" when "VIDEO CALIBRATION" is set to "OFF") after you finish dubbing the tapes.
Edit To Or From Another Video Recorder
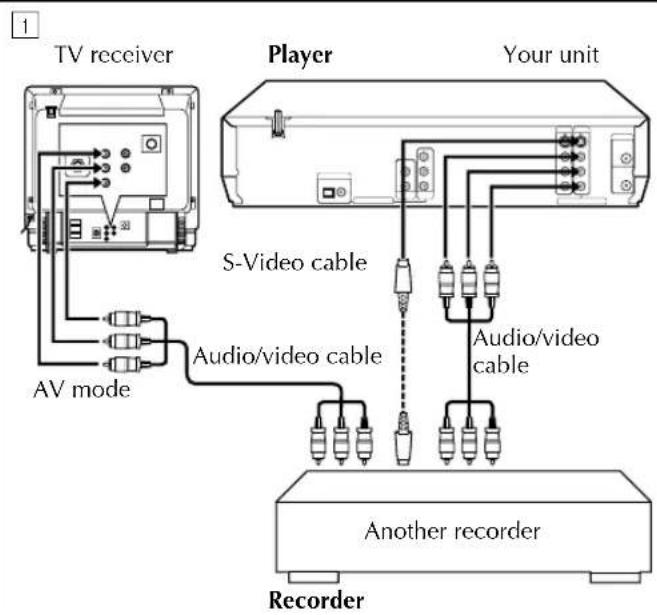
![graph TD A["Your unit"] --> B["Recorder"] B --> C["TV receiver"] C --> D["AV mode"] B --> E["S-Video cable"] B --> F["Audio/video cable"] B --> G["Another recorder"] H["Player"] --> I["Audio/video cable"]](/content/2026/06/1341529/images/29fbc111469af7abea3c93f3a397e2fcd734f558e039ebb0a6c961e17da2d2bf.jpg)
Advantages of S-VHS video recorders
You can edit from VHS to S-VHS, S-VHS to VHS, or from S-VHS to S-VHS.
- From VHS to S-VHS: Record VHS playback signals in the S-VHS mode. Although the picture quality is inherently limited by that of the original, the edited tape has better picture quality than those made by VHS-to-VHS editing. ●From S-VHS to VHS: Because the picture quality of the source material is very high, the edited tape has better picture quality than those made by VHS-to-VHS editing.
- From S-VHS to S-VHS: All signals will be transferred with minimum degradation.
You can use your unit as the source player or as the recording deck.
Slide the TV/VCR/DVD switch to the right.
1 Make connections.
When using your unit as the source player ... ... connect its AUDIO/VIDEO OUTPUT connectors to the audio/video input connectors on another recorder. 2 When using your unit as the recording deck ... ... connect its AUDIO/VIDEO INPUT connectors to the audio/video output connectors on another recorder. - If connecting a unit with an S-VIDEO input/output connector, it is recommended to use the supplied S-Video cable to minimize picture degradation while editing.
2 Select the VCR deck.
On the unit
Press VCR/DVD repeatedly so that the VCR indicator lights up.
On the Remote
Press VCR so that the VCR indicator lights up.
3 Set the input mode of the recording deck.
With this video unit, press AUX (number key "0") and/or CH to select "L-1".
- When using the S VIDEO connector, set "REAR AUX INPUT" to "S-VIDEO". (☐ pg. 79)
- When using the VIDEO connector, set "REAR AUX INPUT" to "VIDEO". (☐ pg. 79)
- When using another recorder as the recording deck, refer to its instruction manual.
4 Set the edit mode.
See "PICTURE CONTROL" on page 76.
5 Engage the Record Pause mode of the recording deck.
Locate the point where you start recording, then engage the Record Pause mode.
6 Start the source player.
Engage the Play mode of the source player.
7 Start the recording deck.
Engage the Record mode of the recording deck.
NOTES:
●All necessary cables can be obtained from your dealer. - When you select "EDIT" to dub tapes in step 4, be sure to select "AUTO" (or "NORM" when "VIDEO CALIBRATION" is set to "OFF") after you finish dubbing the tapes. - When you use this unit as the source player for editing, be sure to set "SUPERIMPOSE" to "OFF" before starting. (☐ pg. 77)
Dubbing
(from DVD to VCR)
- Turn on the TV and select the VCR channel (or AV mode).
- Slide the TV/VCR/DVD switch to the right.

You can dub selected scenes from the DVD disc to a cassette, starting and stopping wherever you wish.
However, it is not possible to dub the copy-protected disc. In such case, "ERROR" appears on the front display panel.
1 Load a cassette and place a disc.
For the VCR deck
Insert a cassette with the record safety tab intact.
For the DVD deck
1 Press OPEN/CLOSE (▲) on the DVD deck to open the disc tray. 2 Place the disc in the disc tray. 3 Press OPEN/CLOSE (▲) on the DVD deck to close the disc tray.
2 Prepare the VCR deck for dubbing.
1 Press VCR. 2 Press SP/EP to select recording speed. 3 Search for the point where you want to start dubbing by pressing PLAY (▶), FF (▶▶) or REW (◀◀) then press STOP (■).
3 Prepare the DVD deck for dubbing.
1 Press DVD. 2 Search for the point where you want to start dubbing by pressing PLAY (▶), FF (▶▶) or REW (◀◀). 3 Press PAUSE (II) to pause playback a little before the start point.
4 Start dubbing.
Press and hold REC (●), then press PLAY (▶) on the Remote.
- "DUB" lights on the front display panel.

5 End dubbing.
Press STOP (■).
- Be sure to press STOP (■) while the VCR indicator lights up on the unit.
- If you press STOP (■) or EJECT (▲) with the DVD deck selected, the dubbing stopped, but the opening screen is also recorded.
NOTES:
- You cannot start dubbing when the scan mode is set to the progressive mode. Set it to the interlace mode. (pg. 84)
- Set "ON SCREEN GUIDE" to "OFF" (pg. 83) if you do not want to record the on-screen display for DVD discs during dubbing.
- There may be a discrepancy of several seconds between where you intend editing to start, and where it actually starts.
- The superimposed indication during the operation or dubbing is not recorded.
- Set "PICTURE CONTROL" to "EDIT". (pg. 76)
Digital Audio Dubbing
- Turn on the TV and select the VCR channel (or AV mode).
- Slide the TV/VCR/DVD switch to the right.

Note for connection: Remove the connector cover from the unit and remove the protection cap from the cable.
You can dub selected audio from the DVD or Audio CD disc to a MD etc.
However, it is not possible to dub the copy-protected disc.
Example: Dubbing to a MD
1 Make connections.
Connect the optical cable between the unit and the digital audio device.
2 Place a disc and load a MD.
For the DVD deck
1 Press OPEN/CLOSE (▲) on the DVD deck to open the disc tray. 2 Place the disc in the disc tray. 3 Press OPEN/CLOSE (▲) on the DVD deck to close the disc tray.
For the digital audio device
Insert a MD.
3 Prepare the DVD deck for dubbing.
1 Press DVD and select the audio to be dubbed. 2 Search for the point where you want to start dubbing by pressing PLAY (▶), FF (▶▶) or REW (◀◀) then press STOP (■). 3 Press REW (◀◀) a little, then press PLAY (▶) to start playback. 4 Press PAUSE (II) to pause playback a little before the start point.
4 Prepare the audio device for dubbing.
Select the input mode.
5 Start dubbing.
1 Press PLAY (▶) to start playback on the DVD deck.
2 Start recording on the audio device.
6 End dubbing.
Stop recording on the audio device. Then press STOP (■) to stop playback on the DVD deck.
NOTES:
- There may be a discrepancy of several seconds between where you intend editing to start, and where it actually starts.
- You can also dub a Video CD or SVCD. Set "DIGITAL AUDIO OUTPUT" to "PCM ONLY". ( page 81)
Remote Control Functions
Remote A/B/C/D Code Switching
The Remote is capable of controlling four JVC video units independently. Each of units can respond to one of four codes (A, B, C or D). The remote control is preset to send A code signals because your unit is initially set to respond to A code signals. You can easily modify your unit to respond to B, C or D code signals.
Before performing the following steps: Slide the TV/VCR/DVD switch to the right.


On the Remote
Keep pressing VCR down during steps 1 - 2.
1 Change the remote control code.
Press the number key "1" for A, "2" for B, "3" for C or "4" for D.
2 Set the remote control code.
Press OK to set the code.
On the unit
3 Turn off the unit.
Press POWER (⏻/l).
4 Display the code.
Press PLAY (▶) on the unit for over 5 seconds while the unit is turned off. The code currently set appears on the front display panel.
- If the code displayed on the front display panel is different from the code set on the Remote, go to step 5.
5 Change the unit's code.
Press STOP (■) on the Remote. The code currently set on the Remote will be applied to the unit.
NOTE:
Once you unplug the end of the mains power cord from the mains, the remote control code is back to A.
TV Multi-Brand Remote Control
Your Remote can operate the basic functions of your TV set. In addition to JVC TVs, other manufacturer's TVs can also be controlled.
Before performing the following steps:
- Turn off the TV using its Remote.
- Slide the TV/VCR/DVD switch to the left.

IMPORTANT
Although the supplied remote control unit is compatible with JVC televisions, as well as many other models, it may not work with your TV, or in some instances, may have limited function capability.
1 Set the TV brand code.
Keep pressing VCR down during step 1.
Enter your TV's brand code using the number keys, then press OK.
Press POWER (☐/☐) on the unit's Remote to turn on the TV and try operations (☐/☐ step 2).
- Once you have set the remote control to operate the TV, you do not have to repeat this step until you replace your Remote's batteries.
- Some brands of TV have more than one code. If the TV does not function with one code, try entering another.
2 Operate the TV.
Press the corresponding button: POWER (☐/I), TV/VCR, TV/VCR CH +/-, TV VOL+/- (Volume), MUTE (TV Muting), number keys.
- For some brands of TV, you must press OK after having pressed the number keys.
| BRAND NAME CODE | |
| JVC | 01, 03 |
| HITACHI | 10 |
| MAGNAVOX | 02 |
| MITSUBISHI | 03 |
| PANASONIC | 04, 11 |
| RCA | 05 |
| SHARP | 06 |
| SONY | 07 |
| SAMSUNG | 12 |
| SANYO | 13 |
| SEARS | 13 |
| TOSHIBA | 08 |
| ZENITH | 09 |
Connecting to a Dolby Digital Decoder or an Amplifier with Built-in DTS
(DVD deck only)
These instructions enable you to connect your unit to a Dolby Digital decoder or an amplifier with built-in DTS.

Make connections.
Connect the optical cable between the unit and the Dolby Digital decoder or amplifier with built-in DTS.
NOTES:
- For Dolby Digital sound, set "DIGITAL AUDIO OUTPUT" to "DOLBY DIGITAL/PCM". (See page 81)
- For DTS sound, set "DIGITAL AUDIO OUTPUT" to "STREAM/PCM". (See page 81)
CAUTIONS:
- This unit has a dynamic range of more than 80 dB with regards to its Hi-Fi audio capability. It is recommended that you check the maximum level if you are going to listen to the Hi-Fi audio signals through a stereo amplifier. A sudden surge in the input level to the speakers may damage them.
- Some speakers and televisions are specially shielded to prevent television interference. If both are of the non-shielded type, do not place the speakers adjacent to the TV set as this can adversely affect the video playback picture.
Mode Set
(VCR deck)
- Turn on the TV and select the VCR channel (or AV mode).
- Slide the TV/VCR/DVD switch to the right.

You can change various mode settings on the Function Set screen by following the procedure described below. - For each mode setting, see pages 76 to 79.
1 Turn on the unit.
Press POWER (⏻/l).
2 Select the VCR deck.
On the unit Press VCR/DVD repeatedly so that the VCR indicator lights up.
On the Remote Press VCR so that the VCR indicator lights up.
3 Access the Main Menu screen.
Press SET UP MENU.
4 Access the Function Set screen.
Press △▽ to move the highlight bar (arrow) to "FUNCTION SET", then press OK or ▷.

5 Select the mode.
Press △▽ to move the highlight bar (arrow) to the item you want to change.

6 Select the mode setting.
Press OK or ▷.
7 Return to the normal screen.
Press SET UP MENU.
* The default setting is bold in the table below.
| ■S-VHS ETONOFF | You can record in SP mode on VHS cassettes with S-VHS picture quality. You can play back a tape recorded using the S-VHS ET function on most of S-VHS recorders and of VHS recorders equipped with SQPB (S-VHS QUASI PLAYBACK) function.(Notice some recorders are not compatible with the S-VHS ET function.)When this function is set to “ON”, the S-VHS indicator lights up on the front display panel.NOTES:·You can activate the S-VHS ET function only before you start recording on a VHS cassette.·Before recording, make sure that “VIDEO CALIBRATION” is set to “ON”. (□□ below)·You cannot activate the S-VHS ET function:— while recording is in progress.— while timer-recording or Instant Timer Recording (□□ pg. 33, 36) is in progress.— while Video Calibration (□□ pg. 35) is in progress.·The S-VHS ET function does not work with S-VHS cassettes.·To keep the highest quality recording and playback pictures over a long period of time,S-VHS recording on S-VHS cassettes is recommended.·Use of high grade tapes is recommended for S-VHS ET recordings. On some tapes, picture quality will not improve even if the S-VHS ET function is used. Check the recording quality before you start important recordings.·While playing back a tape recorded using the S-VHS ET function on some recorders, noise may appear. (If playback picture becomes blurred or interrupted, use a cleaning cassette.)·In the variable speed search, still, slow-motion or frame-by-frame playback modes(□□ pg. 29), noise may appear. If these modes are performed frequently on a tape recorded using the S-VHS ET function, the tape may be damaged and the picture may be deteriorated. |
| ■VIDEO CALIBRATIONONOFF | When this function is set to “ON”, this unit checks the condition of the tape in use during playback and recording, and compensates to provide the highest-possible pictures. This takes place whenever you play back a tape or start recording after inserting a tape. (□□ pg. 35) |
| ■PICTURE CONTROLAUTOEDITSOFTSHARP | This feature helps you to adjust the playback picture quality according to your preference. Normally select “AUTO”.AUTO:Provides the optimised picture benefits of the VIDEO CALIBRATION Picture System.EDIT:Minimizes picture degradation during editing (recording and playback).SOFT:Reduces image coarseness when viewing overplayed tapes containing a lot of noise.SHARPClearer, sharper-edged picture when viewing images with lots of flat,same-coloured surfaces such as cartoons.NOTES:·When you select “EDIT”, “SOFT” or “SHARP”, the selected mode will not change until you select another mode.·When you select “EDIT” to dub tapes, be sure to select “AUTO” after you finish dubbing the tapes.·When “VIDEO CALIBRATION” is “OFF”, “PICTURE CONTROL” switches automatically from “AUTO” to “NORM”. |
* The default setting is bold in the table below.
| SUPERIMPOSEONOFF | When this function is set to “ON”, various operational indicators appear on the TV screen. Messages appear in the selected language. (17 pg. 20)NOTES:When you use this unit as the source player for editing, be sure to set “SUPERIMPOSE” to “OFF” before starting.During playback, the operation mode indicators may be disturbed depending on the type of tape being used. |
| AUTO SP→EP TIMERONOFF | When this function is set to “ON”, the unit automatically switches to EP mode to allow complete recording if there is not enough tape to record the entire program while timer-recording in SP mode.For Example:Recording a program of 140 minutes in length onto a 120-minute tapeApproximately 110 minutes Approximately 30 minutesSP mode EP modeTotal 140 minutesMake sure you set this function to “ON”, before the timer-recording starts.NOTES:If you have programmed the unit to timer-record 2 or more programs, the second program and those thereafter may not fit on the tape if you set “AUTO SP→EP TIMER” to “ON”. In this case, make sure the mode is not engaged, then set the tape speed manually during timer programing.In order to ensure that the recording fits on the tape, this feature may leave a slight non-recorded section at the end of the tape.There may be some noise and sound disturbance at the point on the tape where the unit switches from SP to EP mode.The Auto SP→EP Timer feature is not available during ITR (Instant Timer Recording), and the feature will not work properly on the following tapes: T(ST)-30, T(ST)-60, T(ST)-90, and T(ST)-120 |
| VIDEO STABILIZERONOFF | When this function is set to “ON”, you can automatically correct vertical vibration in the picture when playing back unstable recordings made on another recorder.NOTES:When you finish viewing a tape, be sure to set this function to “OFF”.Regardless of the setting, this function has no effect during recording and during special effects playback.The on-screen display may jitter vertically when this function is set to “ON”.To watch recordings with close-caption, set this function to “OFF”. |
| BLUE BACKONOFF | When this function is set to “ON”, the TV screen becomes all blue when receiving a channel not in use.NOTE:When you want to receive an unstable channel with poor signals, set this function to “OFF”. |
* The default setting is bold in the table below.
| ■ 2ND AUDIO RECORDONOFF | ● When this function is set to “ON”;If a SAP program is received, the SAP audio is recorded on both the normal and Hi-Fi tracks. The main audio is not recorded.If a non-SAP program is received, the main audio is recorded on both the Hi-Fi and normal tracks.● When this function is set to “OFF”, the SAP audio cannot be recorded.NOTES:When the channel is changed on the unit;● The “STEREO” indicator appears on the screen for about 5 seconds if the program is a stereo broadcast.● The “SAP” indicator appears on the screen for about 5 seconds if the program is a SAP broadcast.● Both indicators appear when a stereo program is accompanied by SAP sound. |
| ■ AUDIO MONITORHI-FIHI-FI LHI-FI RNORMMIX | This unit can record two sound tracks simultaneously (normal and Hi-Fi) on a Hi-Fi stereo tape. You can select the sound track(s) to listen to while playing back a Hi-Fi stereo tape. In addition, when playing back a prerecorded tape containing two separate audio programs on the Hi-Fi tracks, you can choose either one by selecting either “HI-FI L” or “HI-FI R”.HI-FI: Normally select this. Hi-Fi sound is played back.HI-FI L: Sound on the left Hi-Fi channel is played back.HI-FI R: Sound on the right Hi-Fi channel is played back.NORM: Sound on the normal track is played back.MIX: Both sounds on the Hi-Fi track and normal track are mixed and played back.NOTES:● While playing back a monaural tape, sounds on the normal track will be heard regardless of this setting.● You can also use the A.MONITOR button on the Remote to select the desired monitor sound. (pg. 31) |
* The default setting is bold in the table below.
| ■ S-VHS MODEONOFF | Your unit can record in S-VHS (Super VHS), S-VHS ET or VHS.● To record in S-VHS:Set “S-VHS MODE” to “ON”. Then, insert a cassette marked “S-VHS”. The S-VHS indicator lights up on the front display panel.The S-VHS recording mode is selected.● To record in S-VHS ET on a VHS cassette:Set “S-VHS ET” to “ON”. (17 pg. 76) Then, insert a cassette marked “VHS”. The S-VHS indicator lights up on the front display panel.● To record in VHS:Insert a cassette marked “VHS”.Set “S-VHS ET” to “OFF”. (17 pg. 76)The VHS recording mode is automatically selected regardless of the “S-VHS MODE” setting.● To record in VHS on an S-VHS cassette:Insert a cassette marked “S-VHS”. The S-VHS indicator lights up on the front display panel. Then, set “S-VHS MODE” to “OFF”. The S-VHS indicator goes off.The VHS recording mode is selected.NOTE:When playing back a tape that has been recorded in S-VHS or S-VHS ET, the S-VHS indicator lights up on the front display panel regardless of the “S-VHS MODE” setting. |
| ■ FRONT AUX INPUTVIDEOS-VIDEO | Select the appropriate mode depending on the connector being used on the front panel.VIDEO:To use the VIDEO input connector on the front panel.S-VIDEO:To use the S-VIDEO input connector on the front panel. |
| ■ REAR AUX INPUTVIDEOS-VIDEO | Select the appropriate mode depending on the connector being used on the rear panel.VIDEO:To use the VIDEO input connector on the rear panel.S-VIDEO:To use the S-VIDEO input connector on the rear panel. |
| ■ AUTO POWER OFF3HOFF | When this function is set to “3H”, the unit is turned off automatically if no operation is done within 3 hours. “AUTO POWER OFF IN 3 MIN” appears on the screen 3 minutes before the unit is turned off. |
Mode Set
(DVD deck)
- Turn on the TV and select the VCR channel (or AV mode).
- Slide the TV/VCR/DVD switch to the right.

You can change various mode settings on the Mode Set screen by following the procedure described below.
- For each mode setting, see pages 81 to 83.
| A LANGUAGE | MENU LANGUAGE (17 pg. 22)AUDIO LANGUAGE (17 pg. 22)SUBTITLE (17 pg. 22)ON SCREEN LANGUAGE (17 pg. 21) |
| PICTURE | MONITOR TYPE (17 pg. 18, 81)PICTURE SOURCE (17 pg. 81)SCREEN SAVER (17 pg. 81)MP3&WMA/JPEG (17 pg. 81) |
| AUDIO | DIGITAL AUDIO OUTPUT (17 pg. 81)ANALOG DOWN MIX (17 pg. 82)D. RANGE CONTROL (17 pg. 82)OUTPUT LEVEL (17 pg. 82) |
| OTHERS | RESUME (17 pg. 83)ON SCREEN GUIDE (17 pg. 83)PARENTAL LOCK (17 pg. 58) |
- The procedure shows how to set "RESUME" to "ON" on the DVD Set Up menu screen as an example.
1 Turn on the unit.
Press POWER (⏻/1).
2 Select the DVD deck.
On the unit
Press VCR/DVD repeatedly so that the DVD indicator lights up.
On the Remote
Press DVD so that the DVD indicator lights up.
3 Access the DVD Set Up menu screen.
1 Press SET UP MENU.
2 Press ◀ ▷ to select " OTHERS".
● Each time you press the button, the setup menus change as follows;

A LANGUAGE→ □ PICTURE→ ◦ AUDIO → / OTHERS → (Back to the beginning)
4 Select the mode.
Press △▽ to move ≌ to "RESUME", then press OK.
5 Select the mode setting.
Press △▽ to select "ON", then press OK.
6 Return to the normal screen.
Press SET UP MENU.
Picture Settings * The default setting is bold in the table below.
| ■ MONITOR TYPE16:9 NORMAL16:9 AUTO4:3 LB4:3 PS | You can select the monitor type depending the TV used when you play back DVD VIDEO discs recorded for wide-screen TVs. For more details, refer to “Monitor Set (DVD deck)” (L) pg. 18) |
| ■ PICTURE SOURCEVIDEO (NORMAL)VIDEO (ACTIVE)FILMAUTO | You can obtain optimal picture quality by selecting whether the content on the disc is processed by field (video source) or by frame (film source).Normally set to “AUTO”.VIDEO (NORMAL):Suitable for playing back a video source disc with relatively a few moments.VIDEO (ACTIVE):Suitable for playing back a video source disc with relatively a lot of movements.FILM: Suitable for playing back a film or progressive source disc.AUTO: Used to play back a disc containing both video and film source materials. This unit recognizes the picture type (film or video source) of the current disc according to the disc information.• If the playback picture is unclear or noisy, or the oblique lines of the picture are rough, try to change to other modes. |
| ■ SCREEN SAVERONOFF | The TV screen may be burned out if a static picture is displayed for a long time. When this function is set to “ON”, the unit automatically activates the screen saver function if a static picture, such as an on-screen display or menu is displayed for over 5 minutes.NOTE:This function is not available for Audio CDs and MP3/WMA discs. |
| ■ MP3&WMA/JPEGMP3&WMAJPEG | You can select files to play back, when both MP3/WMA files and JPEG files are recorded on a disc.MP3&WMA: Select this to play back MP3/WMA files.JPEG: Select this to play back JPEG files.NOTE:You cannot access the DVD Set Up screen and “○” appears on the TV screen if a disc is already placed. |
Audio Settings
* The default setting is bold in the table below.
| ■ DIGITAL AUDIO OUTPUTPCM ONLYDOLBY DIGITAL/PCMSTREAM/PCM | Set to the appropriate mode according to the type of the device connected to DIGITAL AUDIO OUT connector on the rear of unit.It is not necessary to set this mode when you connect no device to DIGITAL AUDIO OUTconnector.PCM ONLY:Select this when you connect the unit’s DIGITAL AUDIO OUT connector to the linear PCM digital input connector of other audio device.DOLBY DIGITAL/PCM:Select this when you connect the unit’s DIGITAL AUDIO OUT connector to the digital input connector of a Dolby Digital decoder or an amplifier with a built-in Dolby Digital decoder.STREAM/PCM:Select this when you connect the unit’s DIGITAL AUDIO OUT connector to the digital input connector of an amplifier with a built-in DTS, Dolby Digital, or MPEG multichannel decoder. | ||
| ■ANALOG DOWN MIXDOLBY SURROUNDSTEREO | Set to the appropriate mode according to your audio system when you play back a DVD VIDEO disc recorded with surround multichannel audio. This setting affects only the analogue audio output signal from the AUDIO OUTPUT connectors (DVD) when playing back a DVD VIDEO disc recorded with surround multichannel audio.DOLBY SURROUND:Select this when you enjoy multichannel surround audio by connecting the unit's analogue AUDIO OUTPUT connector (DVD) to a surround decoder or an internal amplifier.STEREO: Select this when you enjoy conventional 2-channel stereo audio by connecting the unit's analogue AUDIO OUTPUT connectors (DVD) to a stereo amplifier/receiver or TV, or when you dub audio of a DVD VIDEO disc recorded with surround audio to your MD, cassette, etc.NOTE:The "ANALOG DOWN MIX" function does not work when the 3D Phonic function is activated. (17 pg. 46) | ||
| ■D. RANGE CONTROLWIDE RANGENORMALTV MODE | The dynamic range (the difference between the loudest sound and the quietest one) can be compressed during playback of a program encoded in Dolby Digital format.This function takes effect when a DVD VIDEO disc recorded in Dolby Digital format is played back at low or middle volume.WIDE RANGE: Select this to inactivate this function when you enjoy wide dynamic range program.NORMAL: Normally select this setting to activate this function.TV MODE: Select this when you hear the sound through the TV's speaker(s).NOTES:This function works only when playing back a disc recorded with Dolby Digital format.The setting is not effective for other discs.This function does not work when the 3D Phonic function is activated. (17 pg. 46) | ||
| ■OUTPUT LEVELSTANDARDLOW | You can lower the output level of analog audio to accommodate the unit to the connected A/V equipment.STANDARD: Normally select this.LOW: The output level of analog audio is lowered. | ||
| Playback discs | Output | ||
| STREAM/PCM DOLBY | DIGITAL/PCM PCM ONLY | ||
| DVD VIDEO with 48 kHz, 16/20/24 bit linear PCM | 48 kHz, 16 bit linear PCM | ||
| DVD VIDEO with DTS DTS bitstream 44.1 kHz, 16 bit stereo linear PCM | |||
| DVD VIDEO with Dolby Digital | Dolby Digital bitstream | 48 kHz, 16 bit stereo linear PCM | |
| Audio CD/Video CD 44.1 kHz, 16 bit stereo linear PCM | |||
| Audio CD with DTS DTS bitstream 44.1 kHz, 16 bit stereo linear PCM | |||
| MP3/WMA disc Linear PCM | |||
NOTES:
● The unit is not equipped with the DTS decoding function.
- When you play back a DVD VIDEO or Audio CD disc with DTS, use a DTS decoder to get correct signals from your speakers. Never use the unit's analog output connectors, which output incorrect signals that may damage your speakers.
- If you connect the analog outputs and digital outputs simultaneously, be sure to select the source of the amplifier correctly, or set the level control of the amplifier connected to the analog outputs to minimum.
Others Settings
* The default setting is bold in the table below.
| RESUMEONOFFDISC RESUME | When this function is set to “ON”, you can use the resume function.(pg. 45)ON: You can start playback from the resume point of the placed disc.OFF: You cannot use the resume function.DISC RESUMEThe unit retains a memory of the resume points of the last 30 discs played back, even though they have been ejected.NOTE:This function is not available for Audio CDs and MP3/WMA discs. |
| ON SCREEN GUIDEONOFF | When this function is set to “ON”, the unit can display “on-screen guide” icons or characters which shows the conditions of the unit or disc. |
Child Lock
- Turn on the TV and select the VCR channel (or AV mode).
- Slide the TV/VCR/DVD switch to the right.
You can disable the unit's operation.
1 Set the Child Lock.
Press and hold POWER (⏻/ı) on the Remote for more than 10 seconds while the unit is turned on. The unit turns off, and "CL" appears on the front display panel.

- To release the child lock, press and hold POWER (⏻) on the Remote until the unit turns on.
NOTES:
- When the child lock function is in use, keep the Remote out of the children's reach.
- Timer recording programs will be performed even if the child lock function is activated.
Scan Mode Set
(DVD deck)
- Turn on the TV and select the VCR channel (or AV mode).
- Slide the TV/VCR/DVD switch to the right.
This unit supports the progressive scan system (e.g., 480p*) as well as the conventional interlaced scan system (e.g., 480i*).
If your TV equipped with component video connectors supports the progressive video input, you can enjoy a high quality picture by setting the progressive scan mode to active.
- Refer also to the instruction manuals supplied with your TV.
- If your TV equipped with component video connectors does not support the progressive video input, do not change the scan mode to "PROGRESSIVE". * 480p and 480i indicate the number of scanning lines and scanning format of an image signal.
- 480p indicates 480 scanning lines with progressive format.
- 480i indicates 480 scanning lines with interlaced format.
1 Switch the mode.
During playback or while stopped, press and hold PROGRESSIVE SCAN on the unit or DVD on the Remote for more than 3 seconds to change the scan mode between Progressive and Interlace mode.
Before requesting service for a problem, use this chart and see if you can repair the trouble yourself. Small problems are often easily corrected, and this can save you the trouble of sending your unit off for repair.
POWER
| SYMPTOM POSSIBLE CAUSE CORRECTIVE ACTION | ||
| 1. No power is supplied to the unit. | ● The AC power cord is disconnected. Connect the AC power cord. | |
| 2. The Remote won’t function. | ● The batteries are discharged. Replace the dead batteries with new ones. | |
TAPE TRANSPORT (VCR deck)
| SYMPTOM POSSIBLE CAUSE CORRECTIVE ACTION | ||
| 1. During recording, the tape does not run. “○” lights up on the front display panel. | ● The unit is in the Record Pause mode. Press | PLAY (▶) to resume recording. |
| 2. The tape will not rewind or fast-forward. | ● The tape is already fully rewound or fast-forwarded. | Check the cassette. |
PLAYBACK (VCR deck)
| SYMPTOM POSSIBLE CAUSE CORRECTIVE ACTION | ||
| 1. The VCR deck can not be operated. | ● The VCR deck is not selected. | On the unitPress VCR/DVD repeatedly so that the VCR indicator lights up.On the RemotePress VCR so that the VCR indicator lights up. |
| 2. The playback picture does not appear while the tape is running. | ● If you are using the RF connection,— the TV receiver's channel selector is not set to the VCR channel.— the unit's VCR channel has not been correctly set.● If you are using the AV, S-VIDEO or Component Video connection, the TV receiver is not set to the AV mode. | If you are using the RF connection,— set the TV receiver to the VCR channel.— perform “Set the VCR channel.”(Lpg. 14).If you are using the AV or S-VIDEO Component Video connection, set the TV to its AV mode. |
| 3. Noise appears during visual search. | ● This is normal. | |
| 4. Noise appears during normal playback. | ● The automatic tracking mode is engaged. | Try manual tracking. (Lpg. 31) |
| 5. The playback picture is blurred or interrupted while TV broadcasts are clear or “USE CLEANING CASSETTE” message appears on the screen. | ● The video heads may be dirty. Use a dry cleaning cassette ECL-3F, or consult your JVC dealer. | |
| 6. Breaks are noticeable in Hi-Fi soundtrack. | ● The automatic tracking mode is engaged. | Try manual tracking. (Lpg. 31) |
PLAYBACK (DVD deck)
| SYMPTOM POSSIBLE CAUSE CORRECTIVE ACTION | ||
| 1. The button do not work. | ● The operation is prohibited on the placed disc. | — |
| 2. The DVD deck can not be operated. | ● The DVD deck is not selected. | On the unitPress VCR/DVD repeatedly so that the DVD indicator lights up.On the RemotePress DVD so that the DVD indicator lights up. |
| 3. “ ” appears on the TV screen. | ● The operation is prohibited on the placed disc. | — |
| 4. “REGION CODE ERROR!” appears on the TV screen. | ● The disc’s region number does not match that of the unit. | Use the discs whose region number includes “ALL” or “1”. (17 pg. 7) |
| 5. The disc cannot be played back. | ● The disc’s region number does not match that of the unit.● This type of the disc cannot be played back.● The disc is not placed properly. Remove the disc, then place the disc properly in the disc tray. (17 pg. 9, “Placing a Disc”)● The Parental Lock is engaged, and the placed disc is rated higher than the set level. | Use the discs whose region number includes “ALL” or “1”. (17 pg. 7)See “Unplayable Discs” (17 pg. 7).the disc, then place the disc properly in the disc tray. (17 pg. 9, “Placing a Disc”)Release the Parental Lock temporarily (17 pg. 59), or change the set level (17 pg. 59). |
| 6. The language is not played back as you set. | ● The disc does not contain the language you set. | — |
| 7. Changing audio/subtitle language is not possible. | ● The disc does not contain the audio/ subtitle in the multiple languages. | With some discs, the language should be set on the top menu. (17 pg. 43) |
| 8. The subtitles do not appears on the TV screen. | ● The disc does not contain the subtitles. —● The subtitle display is set to off. Set the subtitles display to on. (17 pg. 54)● A-B Repeat Playback is in progress. (17 pg. 51) | The subtitles recorded around A-B point may not appear. |
| 9. Angle cannot be changed. | ● The scene is not recorded from the multiple angles. | — |
MP3/WMA Playback (DVD deck)
| SYMPTOM POSSIBLE CAUSE CORRECTIVE ACTION | ||
| 1. A disc cannot be played. | No MP3/WMA files are recorded to the disc.MP3/WMA files do not have the correct file extension in their file names.MP3/WMA files are not recorded in a format compliant with ISO 9660 Level 1 or 2.The different types of files are recorded to the disc. | Replace the disc.Add correct file extension (.mp3, .MP3 or any uppercase and lowercase combination such as “.Mp3”) to their file names.Replace the disc. (Record MP3/WMA files using a compliant application.)The disc which contains the different types of files may not be played because of its disc characteristics or recording conditions. |
| 2. Not MP3/WMA files but JPEG files are played. | ● The MP3&WMA/JPEG setting is set to “JPEG”. | When both MP3/WMA files and JPEG files are recorded to a disc, set “MP3&WMA/JPEG” to “MP3&WMA” to play MP3/WMA files. (⇨ pg. 81) |
| 3. The MP3/WMA control display appears on the TV screen, but no operation can be performed. | ● No MP3/WMA files or JPEG files are recorded to the disc, or the disc is an unplayable disc (such as CD-ROM). | Replace the disc. (⇨ pg. 9) |
JPEG Playback (DVD deck)
| SYMPTOM POSSIBLE CAUSE CORRECTIVE ACTION | ||
| 1. A disc cannot be played. | No JPEG files are recorded to the disc. Replace the disc.JPEG files do not have the correct file extension in their file names.JPEG files are not recorded in a format compliant with ISO 9660 Level 1 or 2. | Add correct file extension (.jpg, .jpeg, .JPG, .JPEG or any uppercase and lowercase combination such as “.Jpg”) to their file names.Replace the disc. (Record JPEG files using a compliant application.) |
| 2. Not JPEG files but MP3/WMA files are played back. | The MP3&WMA/JPEG setting is set to “MP3&WMA”. | When both MP3/WMA files and JPEG files are recorded to a disc, set “MP3&WMA/ JPEG” to “JPEG” to play JPEG files.(13’ pg. 81) |
RECORDING (VCR deck)
| SYMPTOM POSSIBLE CAUSE CORRECTIVE ACTION | ||
| 1. Recording cannot be started. | ● There is no cassette loaded, or the cassette loaded has had its record safety tab removed. | Insert a cassette, or using adhesive tape, cover the hole where the tab was removed. |
| 2. TV broadcasts cannot be recorded. | ● “F-1” or “L-1” has been selected as the input mode. | Set to the desired channel. |
| 3. Tape-to-tape editing is not possible. | ● The source (another video recorder, camcorder) has not been properly connected.● All necessary power switches have not been turned on.● The input mode is not correct. | Confirm that the source is properly connected.Confirm that all units’ power switches are turned on.Set the input mode to “F-1” or “L-1”. |
| 4. Camcorder recording is not possible. | ● The camcorder has not been properly connected.● The input mode is not correct. | Confirm that the camcorder is properly connected.Set the input mode to “F-1” or “L-1”. |
| 5. “○” and “▷” on the front display panel won’t stop blinking. | ● The end of the tape was reached during recording. | The program may not have been recorded in its entirety. Next time make sure you have enough time on the tape to record the entire program. |
TIMER RECORDING (VCR deck)
| SYMPTOM POSSIBLE CAUSE CORRECTIVE ACTION | ||
| 1. Timer recording won't work. | The clock and/or the timer have been set incorrectly.The timer is not engaged. Press | Re-perform the clock and/or timer settings.TIMERand confirm that “ ” is displayed on the front display panel. |
| 2. Timer programing is not possible. | Timer recording is in progress. | Timer programing can't be performed while a timer recording is in progress. Wait until it finishes. |
| 3. “ ” on the front display panel won't stop blinking. | The timer is engaged but there's no cassette loaded. | Load a cassette with the record safety tab intact. |
| 4. “ ”, “ ” and “ ” on the front display panel won't stop blinking. | The loaded cassette has had its record safety tab removed.The end of the tape was reached during timer recording. | Remove the cassette and cover the hole with adhesive tape, or insert a cassette with the record safety tab intact.The program may not have been recorded in its entirety. Next time make sure you have enough time on the tape to record the entire program. |
| 5. “ ” blinks for 10 seconds and the Timer mode is disengaged. | TIMERhas been pressed when there are no programs in memory, or the timer record information has been programmed incorrectly. | Check the programmed data and re-program as necessary, then press TIMER again. |
| 6. “ ” and “ ” on the front display panel won't stop blinking. | The end of the tape was reached during Instant Timer Recording. | The program may not have been recorded in its entirety. Next time make sure you have enough time on the tape to record the entire program. |
| 7. “ & ”, “ ” and “ ” on the front display panel won't stop blinking. | The loaded cassette has had its record safety tab removed.The end of the tape was reached during Satellite Auto Recording. | Remove the cassette and cover the hole with adhesive tape, or insert a cassette with the record safety tab intact.The program may not have been recorded in its entirety. Next time make sure you have enough time on the tape to record the entire program. |
OTHER PROBLEMS
| SYMPTOM POSSIBLE CAUSE CORRECTIVE ACTION | ||
| 1. The image of TV broadcast appears distorted on the TV screen. | ● The unit leaves turned on and the DVD deck is selected. | Turn off the unit, or press VCR to select the VCR deck, then press TV/VCR so that the VCR indicator disappears from the front display panel. |
| 2. Whistling or howling is heard from the TV during camcorder recording. | ● The camcorder's microphone is too close to the TV.● The TV's volume is too high. | Position the camcorder so its microphone is away from the TV.Turn the TV's volume down. |
| 3. When scanning channels, some of them are skipped over. | ● Those channels have been designated to be skipped. | If you need the skipped channels, restore them. (pg. 27) |
| 4. The channel cannot be changed. | ● Recording is in progress. Press | PAUSE (II) to pause the recording, change channels, then press PLAY (▶) to resume recording. |
| 5. Channel settings that were made manually seem to have changed or disappeared. | ● After the manual settings were made, Auto Channel Set was performed. | Perform manual setting again. |
| 6. Even though Auto or Semiauto Clock Set has been performed, the clock is incorrect. | ● The clock setting data received from the host channel is incorrect. | Select a different host channel during “Semiauto Clock Set” (pg. 25), or perform “Manual Clock Set” (pg. 25). |
ATTENTION
This unit contains microcomputers. External electronic noise or interference could cause malfunctioning. In such cases, switch the unit off and unplug the AC power cord. Then plug it in again and turn the unit on. Take out the cassette. After checking the cassette, operate the unit as usual.
PLAYBACK
Q. What happens if the end of the tape is reached during playback or search?
A. The tape is automatically rewound to the beginning.
Q. During search, slow, still and frame-by-frame playback, I can't hear any audio. What's the problem?
A. This is normal.
Q. Can the unit indefinitely remain in the still mode?
A. No. It stops automatically after 5 minutes to protect the heads.
Q. When returning from search to normal playback, the picture is disturbed. Should I be concerned about this?
A. No, it is normal.
Q. Noise bar appear during search. What's the problem?
A. This is normal.
Q. Sometimes, during Index Search, the unit can't find the program I want to see. Why not?
A. There may be index codes too close together.
RECORDING
Q. When I pause and then resume a recording, the end of the recording before the pause is overlapped by the beginning of the continuation of recording. Why does this happen?
A. This is normal. It reduces distortion at the pause and resume points.
Q. Can the unit indefinitely remain in the Record-Pause mode?
A. No. The unit goes to its Stop mode automatically after 5 minutes to protect the heads.
Q. What happens if the tape runs out during recording?
A. The unit stops recording, and "○" and "▷" on the front display panel won't stop blinking.
TIMER RECORDING
Q. “○” and “◎” remain lit on the front display panel. Is there a problem?
A. No. This is a normal condition for a timer recording in progress.
Q. Can I program the timer while I'm watching a tape or a TV broadcast?
A. You won't see the picture as it is replaced by the on-screen menu, but the audio from the program or tape you're viewing can be heard.
GENERAL
Power requirement : AC 120 V d , 60 Hz
Power consumption
Power on : 28 W
Power off : 3.1 W
Temperature
Operating : 5°C to 40°C (41°F to 104°F)
Storage: -20°C to 60°C (-4°F to 140°F)
Operating position: Horizontal only
Dimensions (WxHxD)
: 435 mm x 93 mm x 272 mm
Weight: 4.4 kg
Format: S-VHS/VHS NTSC standard
Maximum recording time
(SP): 210 min. with ST-210 video cassette
(EP): 630 min. with ST-210 video cassette
VIDEO/AUDIO (VCR deck)
Signal system: NTSC colour signal and EIA monochrome signal, 525 lines/60 fields
Recording system: DA4 (Double Azimuth) head helical scan system
Signal-to-noise ratio: 45 dB
Horizontal resolution
: 230 lines (VHS)
400 lines (S-VHS)
Frequency range: 70 Hz to 10,000 Hz (Normal audio) 20 Hz to 20,000 Hz (Hi-Fi audio)
Input/Output: RCA connectors: IN x 2, OUT x 1 S-Video connectors: IN x 2, OUT x 1
VIDEO/AUDIO (DVD deck)
Signal system: NTSC
Applicable disc: DVD (12 cm, 8 cm)
CD (12 cm, 8 cm)
Audio characteristics
DVD: 4 Hz – 22 KHz
Frequency response
CD: 4 Hz - 20 KHz
S/N Ratio: 90 dB
Harmonic distortion
: 0.1 %
Wow and flutter: Below Measurable Level
Dynamic range: 90 dB
Output
Component-Y: (RCA) 1.0 Vp-p/75 ohm
Component-PB/PR
: (RCA) 0.7 Vp-p/75 ohm
Audio: (RCA) 2 Vrms, 1 kohm
Digital Audio: (COAXIAL) 0.5 Vp-p/75 ohm (OPTICAL) -21 dBm to -15 dBm (peak)
TUNER
Tuning system: Frequency synthesized tuner
Channel coverage
VHF: Channels 2 – 13
UHF: Channels 14 – 69
CATV: 113 Channels
RF output: Channel 3 or 4 (switchable; preset to Channel 3 when shipped) 75 ohms, unbalanced
TIMER
Clock reference: Quartz
Program capacity: 1-year programmable timer/8 programs
Memory backup time: Approx. 5 seconds
ACCESSORIES
Provided accessories
: RF cable, S-Video cable (4-pin), Infrared remote control unit, "AA" battery x 2
Specifications shown are for SP mode unless otherwise specified.
E.& O.E. Design and specifications subject to change without notice.
A
A-B Repeat Playback 51
About Discs
JPEG 65
MP3/WMA 62
Placing a Disc 9
playable Discs 7
Region Number 7
Unplayable Discs 7
Angle Selection 55
Audio Channel Selection 57
Audio Language Selection 56
Auto Channel Set 26
C
Chapter Search 52
Check, cancel and change programs 38
Child Lock 84
Clock Set 24
Component Video Connection 16
Connecting To A Dolby Digital Decoder or An Amplifier With A Built-in DTS 74
D
Digital Audio Dubbing 71
Disc menu 43
Dubbing (from DVD to VCR) 70
E
EDITING (DVD DECK)
Digital Audio Dubbing 71
EDITING (VCR DECK)
Dubbing (from DVD to VCR) 70
Edit From A Camcorder 68
Edit To Or From Another Video Recorder 69
Elapsed Recording Time Indication 34
Express Timer Programming 36
G
Group/file selection 67
Group/track selection 64
|
INDEX 10
Index Search 30
Instant ReView 30
Instant Timer Recording (ITR) 33
J
JPEG control display 65
L
Language 20
Language Code List 23
Menu/Audio/Subtitle Language Set (DVD deck only) 22
On-screen Language Set (DVD deck) 21
On-screen Language Set (VCR deck) 20
Letter Box 19
Locating the start point of the item or skip the item .... 44
M
Manual Channel Set 27
Manual Clock Set 25
Manual Tracking 31
Mode Set (DVD deck)
ANALOG DOWN MIX 82
AUDIO LANGUAGE 22
D. RANGE CONTROL 82
DIGITAL AUDIO OUT 81
MENU LANGUAGE....22
MONITOR TYPE 19,81
MP3&WMA/JPEG 81
ON SCREEN GUIDE 83
ON SCREEN LANGUAGE 21
OUTPUT LEVEL 82
PICTURE SOURCE 81
RESUME 83
SCREEN SAVER 81
SUBTITLE 22
Mode Set (VCR deck)
2ND AUDIO RECORD 78
AUDIO MONITOR 78
AUTO POWER OFF 79
AUTO SP→EP TIMER 77
BLUE BACK 77
FRONT AUX INPUT 79
PICTURE CONTROL 76
REAR AUX INPUT 79
SUPERIMPOSE 77
S-VHS ET 76
S-VHS MODE 79
VIDEO CALIBRATION 35,76
VIDEO STABILIZER 77
MP3/WMA control display 62
N
Next Function Memory 31
0
OPERATIONS ON DVD DECK 42-67
OPERATIONS ON VCR DECK 28-41
P
Pan&Scan 19
Parental Lock
Country/Area Code List 60
To change the settings 59
To set Parental Lock for the first time 58
To temporarily release the Parental Lock 59
Playback (DVD deck) 42-67
Playback (JPEG) 66-67
Playback (MP3/WMA) 63-64
Playback (VCR deck) 28-31
Playback Control (PBC) Function .....43, 51
Plug&Play Set 17
Program Playback 53
R
Random Playback 53
Record One Program While Watching Another ..... 33
Recording 32-35
Recording Resume Function 32
Region Number 7
Remote Control Functions 72
Repeat Playback 31,50,64,67
Resume Function 45
S
Satellite Auto Recording 41
Scan Mode Set (DVD deck) 84
Second Audio Recording 34
Semiauto Clock Set 25
Skip Search 30
Slow Motion 29,45
Soundtrack Selection 31
Still Picture/Frame-By-Frame Playback 29,45
Subtitle Selection 54
S-VHS 69
S-VIDEO Connection 15
T
Tape Position Indicator 12
Tape Remaining Time 34
Time Search 51
Timer Recording 36-41
Top menu 43
Tuner Set 26
V
Variable Speed Search 29,44
VFP function 47
W
When programs overlap each other 40
Z
Zooming 45,67
3D Phonic 46
HOW TO LOCATE YOUR JVC SERVICE CENTER
TOLL FREE: 1-800-537-5722
http://www.jvc.com
Dear Customer,
In order to receive the most satisfaction from your purchase, please read the instruction booklet before operating the unit. In the event that repair is necessary, or for the address nearest your location within the Continental United States, please call 1-800-537-5722 for your nearest authorized servicer or visit our website at www.JVC.com. Remember to retain your Bill of Sale for Warranty Service.
— JVC
JVC SERVICE & ENGINEERING COMPANY OF AMERICA
DIVISION OF JVC AMERICAS CORP.
Sophisticated electronic products may require occasional service. Just as quality is a keyword in the engineering and production of the wide array of JVC products, service is the key to maintaining the high level performance for which JVC is world famous. The JVC service and engineering organization stands behind our products.
NATIONAL HEADQUARTERS
JVC SERVICE & ENGINEERING COMPANY OF AMERICA
DIVISION OF JVC AMERICAS CORP.
10 New Maple Avenue
Pine Brook, NJ 07058-9641
ACCESSORIES Don't service the product yourself.
To purchase accessories for your JVC product, you may contact your local JVC Dealer.
From the 48 Continental United States call toll free:
1-800-882-2345 or on the web at www.JVC.com
CAUTION
To prevent electrical shock, do not open the cabinet.
There are no user serviceable parts inside.
Please refer to qualified service personnel for repairs.
LIMITED WARRANTY CONSUMER VIDEO 1-90
JVC COMPANY OF AMERICA warrants this product and all parts thereof, except as set forth below ONLY TO THE ORIGINAL PURCHASER AT RETAIL to be FREE FROM DEFECTIVE MATERIALS AND WORKMANSHIP from the date of original retail purchase for the period as shown below. ("The Warranty Period")
| PARTS1YR | LABOR90DAYS |
THIS LIMITED WARRANTY IS VALID ONLY IN THE FIFTY (50) UNITED STATES, THE DISTRICT OF COLUMBIA AND IN COMMONWEALTH OF PUERTO RICO.
WHAT WE WILL DO:
If this product is found to be defective, JVC will repair or replace defective parts at no charge to the original owner. Such repair and replacement services shall be rendered by JVC during normal business hours at JVC authorized service centers. Parts used for replacement are warranted only for the remainder of the Warranty Period. All products and parts thereof may be brought to a JVC authorized service center on a carry-in basis except for Television sets having a screen size 25 inches and above which are covered on an in-home basis.
WHAT YOU MUST DO FOR WARRANTY SERVICE:
Return your product to a JVC authorized service center with a copy of your bill of sale. For your nearest JVC authorized service center, please call toll free: (800) 537-5722.
If service is not available locally, box the product carefully, preferably in the original carton, and ship, insured, with a copy of your bill of sale plus a letter of explanation of the problem to the nearest JVC Factory Service Center, the name and location of which will be given to you by the toll-free number.
If you have any questions concerning your JVC Product, please contact our Customer Relations Department.
WHAT IS NOT COVERED:
This limited warranty provided by JVC does not cover:
- Products which have been subject to abuse, accident, alteration, modification, tampering, negligence, misuse, faulty installation, lack of reasonable care, or if repaired or serviced by anyone other than a service facility authorized by JVC to render such service, or if affixed to any attachment not provided with the products, or if the model or serial number has been altered, tampered with, defaced or removed;
- Initial installation and installation and removal for repair;
- Operational adjustments covered in the Owner's Manual, normal maintenance, video and audio head cleaning;
- Damage that occurs in shipment, due to act of God, and cosmetic damage;
- Signal reception problems and failures due to line power surge;
- Video Pick-up Tubes/CCD Image Sensor, Cartridge, Stylus (Needle) are covered for 90 days from the date of purchase;
- Accessories;
- Batteries (except that Rechargeable Batteries are covered for 90 days from the date of purchase);
There are no other express warranties except as listed above.
THE DURATION OF ANY IMPLIED WARRANTIES INCLUDING THE IMPLIED WARRANTY OF MERCHANTABILITY, IS LIMITED TO THE DURATION OF THE EXPRESS WARRANTY HEREIN.
JVC SHALL NOT BE LIABLE FOR THE LOSS OF USE OF THE PRODUCT, INCONVENIENCE, LOSS OR ANY OTHER DAMAGES, WHETHER DIRECT, INCIDENTAL OR CONSEQUENTIAL (INCLUDING, WITHOUT LIMITATION, DAMAGE TO TAPES, RECORDS OR DISCS) RESULTING FROM THE USE OF THIS PRODUCT, OR ARISING OUT OF ANY BREACH OF THIS WARRANTY. ALL EXPRESS AND IMPLIED WARRANTIES, INCLUDING THE WARRANTIES OF MERCHANTABILITY AND FITNESS FOR PARTICULAR PURPOSE, ARE LIMITED TO THE WARRANTY PERIOD SET FORTH ABOVE.
Some states do not allow the exclusion of incidental or consequential damages or limitations on how long an implied warranty lasts, so these limitations or exclusions may not apply to you. This warranty gives you specific legal rights and you may also have other rights which vary from state to state.
JVC COMPANY OF AMERICA DIVISION OF JVC AMERICAS CORP.
1700 Valley Road Wayne, New Jersey 07470
REFURBISHED PRODUCTS CARRY A SEPARATE WARRANTY, THIS WARRANTY DOES NOT APPLY. FOR DETAILS OF REFURBISHED PRODUCT WARRANTY, PLEASE REFER TO THE REFURBISHED PRODUCT WARRANTY INFORMATION PACKAGED WITH EACH REFURBISHED PRODUCT.
For customer use:
Enter below the Model No. and Serial No. which is located either on the rear, bottom or side of the cabinet. Retain this information for future reference.
Model No.: Serial No.:
Purchase date: Name of dealer:
JVC
VICTOR COMPANY OF JAPAN, LIMITED


- FOR CUSTOMER USE
- DEAR CUSTOMER
- CAUTIONS
- CAUTION
- WARNING
- TO PREVENT FIRE OR SHOCK HAZARD, DO NOT EXPOSE THIS UNIT TO RAIN OR MOISTURE
- ATTENTION
- NOTE TO CATV SYSTEM INSTALLER
- DECLARATION OF CONFORMITY
- USE ONLY DISCS MARKED WITH THE FOLLOWING
- SQPB HQ
- FAILURE TO HEED THE FOLLOWING PRECAUTIONS MAY RESULT IN DAMAGE TO THE UNIT, REMOTE OR VIDEO CASSETTE
- DO NOT PLACE THE UNIT
- DO NOT BLOCK THE UNIT'S VENTILATION OPENINGS OR HOLES
- MOISTURE CONDENSATION
- TO MOBILE PHONE USERS
- ON PLACING THE UNIT
- IMPORTANT PRODUCT SAFETY INSTRUCTIONS
- INSTALLATION
- GROUNDING OR POLARIZATION
- POWER SOURCES
- OVERLOADING
- POWER CORD PROTECTION
- VENTILATION
- WALL OR CEILING MOUNTING
- ANTENNA INSTALLATION INSTRUCTIONS
- OUTDOOR ANTENNA GROUNDING
- LIGHTNING
- POWER LINES
- USE
- ACCESSORIES
- PRODUCT AND CART COMBINATION
- WATER AND MOISTURE
- OBJECT AND LIQUID ENTRY
- ATTACHMENTS
- CLEANING
- HEAT
- SERVICING
- DAMAGE REQUIRING SERVICE
- REPLACEMENT PARTS
- SAFETY CHECK
- HOW TO USE THIS INSTRUCTION MANUAL
- BEFORE YOU INSTALL YOUR NEW UNIT
- DISC INFORMATION
- INSTALLING YOUR NEW UNIT
- INITIAL SETTINGS
- OPERATIONS ON VCR DECK
- OPERATIONS ON DVD DECK
- EDITING (VCR DECK)
- EDITING (DVD DECK)
- REMOTE
- SUBSIDIARY SETTINGS
- TROUBLESHOOTING
- QUESTIONS AND ANSWERS
- SPECIFICATIONS
- LIST OF TERMS
- FOR SERVICING (ONLY IN U.S.A.)
- WARRANTY (ONLY IN U.S.A.)
- ABOUT DISCS
- PLAYABLE DISCS
- UNPLAYABLE DISCS
- REGION NUMBER
- MARKS OF DISCS IN THIS INSTRUCTION MANUAL
- DVD VIDEO MARKS
- FILE STRUCTURE OF DISCS
- DVD VIDEO
- AUDIO CD/VIDEO CD
- NOTE
- PLACING A DISC
- OPEN THE DISC TRAY
- PLACE THE DISC
- CARE AND HANDLING OF DISCS
- HOW TO HANDLE DISCS
- LABEL SIDE
- STORAGE
- MAINTENANCE OF DISCS
- FRONT VIEW
- REAR VIEW
- FRONT DISPLAY PANEL
- ON-SCREEN DISPLAY (VCR DECK)
- TO RECALL AN INDICATION
- HOW TO USE
- BASIC CONNECTIONS
- CHECK THE CONTENTS
- SITUATE THE UNIT
- CONNECT THE UNIT TO TV
- RF CONNECTION
- TO CONNECT TO A TV WITH NO AV INPUT CONNECTORS
- AV CONNECTION
- TO CONNECT TO A TV WITH AV INPUT CONNECTORS
- CONNECT THE UNIT TO POWER SOURCE
- SET THE VCR CHANNEL
- S-VIDEO CONNECTION
- SET THE VCR CHANNEL TO OFF
- NOTES
- COMPONENT VIDEO CONNECTION
- PLUG & PLAY SET AUTO CLOCK SET/AUTO TUNER SET
- PERFORM PLUG & PLAY SETUP
- INFORMATION
- WHAT TO DO IF PLUG & PLAY SETTING FAILED
- MONITOR SET
- (DVD DECK)
- TURN ON THE UNIT
- SELECT THE DVD DECK
- ON THE UNIT
- ON THE REMOTE
- ACCESS THE DVD SET UP MENU SCREEN
- SELECT THE MODE
- SELECT THE MODE SETTING
- RETURN TO THE NORMAL SCREEN
- MONITOR TYPE
- PAN&SCAN/LETTER BOX
- PAN&SCAN
- LETTER BOX
- LANGUAGE
- ON-SCREEN LANGUAGE SET (VCR DECK)
- SELECT THE VCR DECK
- ACCESS THE MAIN MENU SCREEN
- ACCESS THE INITIAL SET SCREEN
- SELECT THE LANGUAGE
- ON-SCREEN LANGUAGE SET (DVD DECK)
- MENU/AUDIO/SUBTITLE LANGUAGE SET (DVD DECK ONLY)
- CLOCK SET
- PREPARATIONS
- ACCESS THE CLOCK SET SCREEN
- SEMIAUTO CLOCK SET
- SET "AUTO CLOCK" TO "ON
- SELECT THE HOST CHANNEL
- SELECT THE D.S.T. MODE
- SELECT THE TIME ZONE
- COMPLETE THE SEMIAUTO CLOCK SET
- IMPORTANT
- AUTO DAYLIGHT SAVING TIME
- MANUAL CLOCK SET
- SET TIME, DATE AND YEAR
- SELECT D.S.T. MODE
- START CLOCK
- TO MAKE CORRECTIONS ANY TIME DURING THE PROCESS
- TUNER SET
- AUTO CHANNEL SET
- ACCESS THE TUNER SET SCREEN
- PERFORM AUTO CHANNEL SET
- MANUAL CHANNEL SET
- ACCESS THE MANUAL CHANNEL SET SCREEN
- ADD OR SKIP THE DESIRED CHANNELS
- TO ADD CHANNELS
- TO SKIP CHANNELS
- BASIC PLAYBACK
- CLEAN THE VIDEO HEADS USING A DRY CLEANING CASSETTE — ECL-3F — WHEN
- LOAD A CASSETTE
- FIND THE PROGRAM START POINT
- START PLAYBACK
- STOP PLAYBACK
- USABLE CASSETTES
- FULL-SIZE VHS
- COMPACT VHS
- PLAYBACK FEATURES
- STILL PICTURE/FRAME-BY-FRAME PLAYBACK
- PAUSE DURING PLAYBACK
- ACTIVATE FRAME-BY-FRAME PLAYBACK
- SLOW MOTION
- ACTIVATE SLOW MOTION PLAYBACK
- HIGH-SPEED (TURBO) SEARCH
- SKIP SEARCH
- INDEX SEARCH
- ACTIVATE INDEX SEARCH
- EXAMPLE
- INSTANT REVIEW
- ACTIVATE INSTANT REVIEW
- NEXT FUNCTION MEMORY
- REPEAT PLAYBACK
- ACTIVATE REPEAT PLAYBACK
- STOP REPEAT PLAYBACK
- MANUAL TRACKING
- OVERRIDE AUTOMATIC TRACKING
- ADJUST THE TRACKING MANUALLY
- SOUNDTRACK SELECTION
- DURING PLAYBACK
- BASIC RECORDING
- RECORDING RESUME FUNCTION
- CHOOSE A PROGRAM
- SET THE TAPE SPEED
- START RECORDING
- PAUSE/RESUME RECORDING
- STOP RECORDING
- RECORDING FEATURES
- ACCIDENTAL ERASURE PREVENTION
- RECORD ONE PROGRAM WHILE WATCHING ANOTHER
- INSTANT TIMER RECORDING (ITR)
- ENGAGE THE ITR MODE
- SET THE RECORDING DURATION
- ELAPSED RECORDING TIME INDICATION
- SET THE COUNTER DISPLAY
- RESET THE COUNTER
- TAPE REMAINING TIME
- SECOND AUDIO RECORDING
- EXPRESS TIMER PROGRAMMING
- BEFORE PERFORMING EXPRESS TIMER PROGRAMMING
- ACCESS THE PROGRAM SCREEN
- ENTER THE PROGRAM START TIME
- ENTER THE PROGRAM STOP TIME
- ENTER THE PROGRAM DATE
- ENTER THE CHANNEL POSITION
- ENGAGE THE UNIT'S TIMER MODE
- TO TIMER-RECORD WEEKLY OR DAILY SERIALS
- CABLE BOX OR DBS RECEIVER USERS
- CHECK, CANCEL AND CHANGE PROGRAMS
- DISENGAGE THE TIMER MODE
- ACCESS THE PROGRAM CHECK SCREEN
- TO CANCEL OR CHANGE A PROGRAM
- CANCEL OR CHANGE A PROGRAM
- RETURN TO THE TIMER MODE
- WHEN PROGRAMS OVERLAP EACH OTHER
- CONFIRM THE OVERLAPPING PROGRAMS
- SELECT THE PROGRAM TO MODIFY
- CANCEL OR CHANGE PROGRAM SETTING
- SATELLITE AUTO RECORDING
- BEFORE PERFORMING THE FOLLOWING STEPS
- ENGAGE THE SATELLITE AUTO RECORDING MODE
- LOAD THE DISC
- PAUSE PLAYBACK
- PLAYBACK CONTROL (PBC) FUNCTION — LOCATING A DESIRED SCENE USING THE MENU OF THE VIDEO CD WITH PBC
- ACCESS THE PBC MENU
- IN STOP MODE
- LOCATING A DESIRED SCENE USING THE DVD MENU
- TOP MENU
- DISC MENU
- ACCESS THE DVD MENU
- LOCATING THE START POINT OF THE ITEM OR SKIP THE ITEM
- HIGH-SPEED SEARCH
- OR
- RESUME FUNCTION
- MEMORIZE THE RESUME POINT
- RESUME PLAYBACK
- ZOOMING
- SELECT THE EFFECT LEVEL
- D PHONIC
- ACCESS THE SELECTION MENU
- VFP FUNCTION
- ADJUSTING THE PICTURE QUALITY
- ACCESS THE VFP SETTING MENU
- SELECT THE VFP MODE
- TO ADJUST PICTURE APPEARANCE MANUALLY
- ACCESS USER MENU
- SELECT THE PARAMETER
- ADJUST THE PARAMETER
- ADJUST THE OTHER PARAMETERS
- TO RETURN TO THE NORMAL SCREEN
- TO ACTIVATE YOUR SETTING
- USING THE ON-SCREEN BAR
- HOW TO ACCESS THE ON-SCREEN BAR
- CONTENTS OF THE ON-SCREEN BAR DURING PLAYBACK
- BASIC OPERATION ON THE ON-SCREEN BAR
- ACCESS THE ON-SCREEN BAR
- SELECT MENU ITEM
- SELECT THE OPTION
- CHANGE THE TIME INFORMATION
- WHEN USING THE ON-SCREEN BAR
- SELECT THE REPEAT MODE
- VIDEO CD/SVCD/CD
- TO CLEAR THE ON-SCREEN BAR
- TO CANCEL REPEAT PLAYBACK
- WHEN USING THE REPEAT BUTTON
- ACCESS THE REPEAT MODE
- A-B REPEAT PLAYBACK
- SELECT THE START POINT
- SELECT THE END POINT
- TO CANCEL A-B REPEAT PLAYBACK
- TIME SEARCH
- SELECT THE TIME
- IF YOU HAVE SPECIFIED A WRONG SELECTION
- REACTIVATE THE PLAYBACK CONTROL (PBC) FUNCTION
- CHAPTER SEARCH
- SELECT THE CHAPTER
- EXAMPLES
- PROGRAM PLAYBACK
- SELECT THE MENU ITEM
- SELECT THE TRACKS IN THE DESIRED ORDER
- TO CLEAR THE PROGRAM TABLE, PRESS PLAY SETUP
- RANDOM PLAYBACK
- TO CLEAR THE ON-SCREEN BAR PRESS PLAY SETUP
- SUBTITLE SELECTION
- SELECT THE SUBTITLE LANGUAGE
- WHEN USING THE SUB TITLE BUTTON
- ACCESS THE MENU
- ANGLE SELECTION
- SELECT THE VIEW ANGLE
- AUDIO LANGUAGE SELECTION
- SELECT THE AUDIO LANGUAGE
- AUDIO CHANNEL SELECTION
- SELECT THE AUDIO CHANNEL
- TO CLEAR THE ON-SCREEN BAR, PRESS PLAY SETUP
- WHEN USING THE A.MONITOR BUTTON
- PRESS A.MONITOR
- FOR VIDEO CD
- FOR SVCD
- PARENTAL LOCK
- TO SET PARENTAL LOCK FOR THE FIRST TIME
- ACCESS THE DVD SET UP MENU
- ACCESS THE "PARENTAL LOCK" MENU
- ACCESS THE COUNTRY CODE MENU
- SELECT THE COUNTRY CODE
- SELECT THE LEVEL
- ENTER THE PASSWORD
- RETURN TO THE OTHERS MENU SCREEN
- TO CHANGE THE SETTINGS
- ACCESS THE PARENTAL LOCK SCREEN
- CHANGE THE COUNTRY CODE
- CHANGE THE LEVEL
- ENTER YOUR NEW PASSWORD
- TO TEMPORARILY RELEASE THE PARENTAL LOCK
- ACCESS THE PASSWORD SCREEN
- COUNTRY/AREA CODE LIST FOR PARENTAL LOCK
- ABOUT MP3 DISC
- WHAT IS MP
- NOTES FOR MAKING A PRIVATE MP3 DISC USING A CD-R/CD-RW DISC
- MP3 CONTROL DISPLAY
- MP3 PLAYBACK
- MP
- USING THE MP3 CONTROL DISPLAY
- SELECT THE GROUP
- GROUP/TRACK SELECTION
- ABOUT JPEG DISC
- WHAT IS JPEG
- NOTES FOR MAKING A PRIVATE JPEG DISC USING A CD-R/CD-RW DISC
- JPEG CONTROL DISPLAY
- JPEG PLAYBACK
- JPEG
- USING THE JPEG CONTROL DISPLAY
- GROUP/FILE SELECTION
- EDIT FROM A CAMCORDER
- MAKE CONNECTIONS
- SET THE UNIT'S INPUT MODE
- SET THE EDIT MODE
- ENGAGE THE RECORD PAUSE MODE
- START THE CAMCORDER
- START THE UNIT
- EDIT TO OR FROM ANOTHER VIDEO RECORDER
- SET THE INPUT MODE OF RECORDING DECK
- ENGAGE THE RECORD PAUSE MODE OF THE RECORDING DECK
- START THE SOURCE PLAYER
- START THE RECORDING DECK
- DUBBING
- (FROM DVD TO VCR)
- LOAD A CASSETTE AND PLACE A DISC
- FOR THE VCR DECK
- FOR THE DVD DECK
- PREPARE THE VCR DECK FOR DUBBING
- PREPARE THE DVD DECK FOR DUBBING
- START DUBBING
- END DUBBING
- PRESS STOP (■)
- DIGITAL AUDIO DUBBING
- PLACE A DISC AND LOAD A MD
- PREPARE THE AUDIO DEVICE FOR DUBBING
- REMOTE CONTROL FUNCTIONS
- REMOTE A/B/C/D CODE SWITCHING
- CHANGE THE REMOTE CONTROL CODE
- SET THE REMOTE CONTROL CODE
- TURN OFF THE UNIT
- DISPLAY THE CODE
- CHANGE THE UNIT'S CODE
- TV MULTI-BRAND REMOTE CONTROL
- SET THE TV BRAND CODE
- OPERATE THE TV
- CONNECTING TO A DOLBY DIGITAL DECODER OR AN AMPLIFIER WITH A BUILT-IN DTS
- MODE SET
- (VCR DECK)
- ACCESS THE FUNCTION SET SCREEN
- OTHERS SETTINGS
- CHILD LOCK
- SET THE CHILD LOCK
- SCAN MODE SET
- SWITCH THE MODE
- PLAYBACK
- RECORDING
- TIMER RECORDING
- GENERAL
- VIDEO/AUDIO (VCR DECK)
- VIDEO/AUDIO (DVD DECK)
- TUNER
- TIMER
- A
- C
- D
- E
- G
- H
- I
- J
- L
- M
- N
- P
- R
- S
- T
- V
- W
- Z
- HOW TO LOCATE YOUR JVC SERVICE CENTER
- JVC SERVICE & ENGINEERING COMPANY OF AMERICA
- LIMITED WARRANTY CONSUMER VIDEO
- WHAT WE WILL DO
- WHAT YOU MUST DO FOR WARRANTY SERVICE
- WHAT IS NOT COVERED
- JVC
- BEFORE YOU INSTALL YOUR NEW UNIT ... ... PLEASE READ THE SECTIONS/LITERATURE LISTED BELOW
- TO MAKE CORRECTIONS AT ANY TIME DURING THE PROCESS
- VARIABLE SPEED SEARCH
- ACTIVE VIDEO CALIBRATION
- NONE: NO EFFECT
- WHEN USING THE ANGLE BUTTON
- SELECT MENU ITEM. PRESS ◀ TO MOVE ☑ TO □ THEN PRESS OK
- EACH TIME YOU PRESS THE BUTTON, THE AUDIO LANGUAGE CHANGES
- ABOUT MP3/WMA DISC
- WHAT IS WMA
- NOTES FOR MAKING A PRIVATE MP3/WMA DISC USING A CD-R/CD-RW DISC
- MP3/WMA CONTROL DISPLAY
- MP3/WMA PLAYBACK
- MP3 WMA
- USING THE MP3/WMA CONTROL DISPLAY
- ADVANTAGES OF S-VHS VIDEO RECORDERS
- SET THE INPUT MODE OF THE RECORDING DECK
- CONNECTING TO A DOLBY DIGITAL DECODER OR AN AMPLIFIER WITH BUILT-IN DTS
Brand : JVC
Model : HR-XVC33U
Category : DVD player