
ECO E5 - Vacuum Cleaner IMETEC - Free user manual and instructions
Find the device manual for free ECO E5 IMETEC in PDF.


| Product Type | Vacuum Cleaner |
| Brand | Imetec |
| Model | ECO E5 |
| Bagless/Cyclonic | Bagless cyclonic technology |
| Power Rating | 800 W |
| Suction Power | 200 Air Watts |
| Dust Capacity | 0.8 L |
| Filtration System | HEPA washable filter |
| Power Cord Length | 6 m |
| Noise Level | 78 dB(A) |
| Weight | 4.5 kg |
| Dimensions (HxWxD) | 32 x 28 x 45 cm |
| Type of Surfaces | Hard floors and carpets |
| Attachments Included | Crevice tool, brush, upholstery tool |
| Motor Filter | Washable sponge filter |
| Dust Container Release | Press button release |
| Cord Rewind | Automatic rewind |
| Operating Radius | 8 m |
| Energy Class | A+ |
| Warranty | 2 years |
Frequently Asked Questions - ECO E5 IMETEC
User questions about ECO E5 IMETEC
0 question about this device. Answer the ones you know or ask your own.
Ask a new question about this device
Download the instructions for your Vacuum Cleaner in PDF format for free! Find your manual ECO E5 - IMETEC and take your electronic device back in hand. On this page are published all the documents necessary for the use of your device. ECO E5 by IMETEC.
USER MANUAL ECO E5 IMETEC
Operating instructions
![[B1] 1 3B 2 3A](/content/2026/05/920308/images/7244f0876ccc36ea55b4c1373c78e4635da183d4af6777b6460a9d8a780d488e.jpg)
![[C1] A 5 B 4](/content/2026/05/920308/images/c6e93bd469515748e46e2d56dc319c104920d9afe30caf898fa0f0a799314c8c.jpg)
![[C2] 25A](/content/2026/05/920308/images/a72ef842c9b7abb845deb1995b10481bc3e4b16c9a3501ab68a4d3390e5384b4.jpg)
![[D1] min 12— max](/content/2026/05/920308/images/38d1627fdf5293bda8324cd03ee4e12b87dc60cf6c6c20790fadebf934e48bb0.jpg)
![[D2] min max 2](/content/2026/05/920308/images/bbbe55b6450cc4e050839e3de95e5ccbad0b8f784115ee6eab1e1aa15723c973.jpg)
natural_image
Close-up of a mechanical device with a labeled part [D3] and an arrow pointing to a component (no readable text or symbols)![[E1] 16 24B 17](/content/2026/05/920308/images/0440df287b3dae9ab88785969c9b2b3173378f7c12dd3888d8434352f2b5bf78.jpg)
![[E2] 24A 24B](/content/2026/05/920308/images/bd5cc9916e8c3d4ded9ef4117f96477b66df0a149f98ca53ab1488eb25274d8d.jpg)
![[E3] 24B 24A 24B](/content/2026/05/920308/images/b3e08df1fd2d52afe0a27b930ebcccd700dcd9314ba98c88bd010f5c64762256.jpg)
![[E4] 24B 24A 24B](/content/2026/05/920308/images/6f14f713f4f64b7de3c34ed8e95984c07b2d8f876946f66d90643c4655b163e7.jpg)
![[E5] 24A 24B](/content/2026/05/920308/images/64fb10f65942bbf97a0eb1ed97b4952c369445672ae8f57c3d327ac9d149a393.jpg)
![[E6] 22 22](/content/2026/05/920308/images/ed06bcd0d9dd5bdc7722f1ab24f5292ff7cc0dcfd16cc67000e60665486d5464.jpg)
![[E7] 1 2 18 19](/content/2026/05/920308/images/a480b16a46506dcb42c2bf46d0fd45074b13ffd9c2dedecd1191b8db66242b13.jpg)
![[E8] 19 19A](/content/2026/05/920308/images/32f866e80b3eb67ef4490a2b82b5eb97db8e5b83a54f693c4262e1d27bf75993.jpg)
![[E9] 19 19A](/content/2026/05/920308/images/36c135e8fb5bef486cb418bdf1b4b2a8fbbdf85e09399fe3e5ca757ff77418ba.jpg)
[F]

natural_image
Simple line drawing of a square object with a circular hole and label '24B' (no other text or symbols)TYPE D4603
220-240 V 50 Hz 1200 W

CE

MANUALE DI ISTRUZIONI PER L'USO DELL'ASPIRAPOLVERE
Dear customer, IMETEC would like to thank you for purchasing this product. We are convinced that you will appreciate the quality and reliability of this appliance, which was developed and manufactured with customer satisfaction always in mind. These operating instructions were created based on the European standard EN 62079.
IMPORTANT!
Instructions and information for safe use

read these instructions completely and in particular the safety instructions before using your appliance and follow these instructions carefully. Keep these instructions in a convenient location for reference over the entire service life of your appliance and be sure to include it if you pass the appliance on to another user.
TABLE OF CONTENTS
Safety instructions page 6
Description of the appliance and accessories page 7
Assembly page 8
Accessories page 8
Usa page 8
Maintenance page 9
Disposal
page 10
Service and warranty
page 10
Image section
I-II
Spare parts, Technical data
III
SAFETY WARNINGS
- After removing the appliance from its packaging, check the appliance's integrity referring to the provided design and for any damage caused during transport. Should you have any doubts, do not use the appliance and take it to an authorised Service Centre.
- The packaging material is not suitable for children to play with! Keep the plastic bag out of the reach of children as there is risk of suffocation!
- Before connecting the appliance, check that the voltage indicated on the identification plate corresponds to that of the electrical mains supply available. The identification plate is on the appliance.
- This appliance must be used solely for the purpose for which it has been designed, that is as a vacuum cleaner for home use. Any other use is to be considered improper and therefore dangerous.
- This appliance should not be used by persons (including children) with reduced physical, sensorial or mental faculties, or persons without specific experience and knowledge, unless they have benefitted from the intervention or supervision of a person responsible for their safety or instructions on use of the appliance.
Children must be supervised so that they do not play with the appliance.
- DO NOT use the vacuum cleaner to vacuum:
- smouldering ashes, cigarette butts or similar objects;
- liquids, e.g. carpet detergents;
- sharp or hard objects, e.g. nails, large pieces of glass;
- fine powders, e.g. cement;
-
toner powder (for laser printers, photocopiers etc.)
-
[[NEVER]use[the]vacuum[without]inserting[the]dust[bag, [the]dust[container]or[the]filter.
- [[DO[NOT]use]the[appliance]with[wet]hands]or[with]bare]or[damp]feet;
- [[NEVER[pull[the[power[cord, [or[the[appliance[itself, [to[remove[the[plug[from[the[socket.
- [[DO[NOT]expose[the]appliance[to]humidity[or]weatherconditions.
- [[Always] disconnect[the] appliance[from] the[mains] supply[before] cleaning[or] maintenance[and] when] the] appliance[is] not[in] use.
- [[If[there]is[a]fault[and/or[the]appliance[operates]irregularly,[switch[it]off[and[do]not[tamper]with[it.
[[For[any]repairs,[only]contact[an]authorised[service]centre. - [[If[the]power[cord]is[damaged[it]must[be]replaced[by[a]technical[service[centre,so]as[to]prevent[all]risks.
- [[Never[pull[or[lift[the[vacuum[cleaner]up[by[the[cord.
- [[Never[immerse[the[appliance[in]water[or[any[other[liquid.
- [[Never[point]the[flexible]suction tube,[the[tube]or[any]other[accessory]directly[at[the]eyes[or[ears]or[inside]your[mouth]when[the]vacuum[cleaner]is[being]used.
- [[Do[not]use[the]appliance[without]the[motor]protection[filter[to]prevent[damage[to]both[the[motor]and[the]vacuum[cleaner
- [[Completely]unwrap[the]power[cord]to[avoid[dangerous]overheating.
DESCRIPTION[OF]THE[APPLIANCE]AND[ACCESSORIES
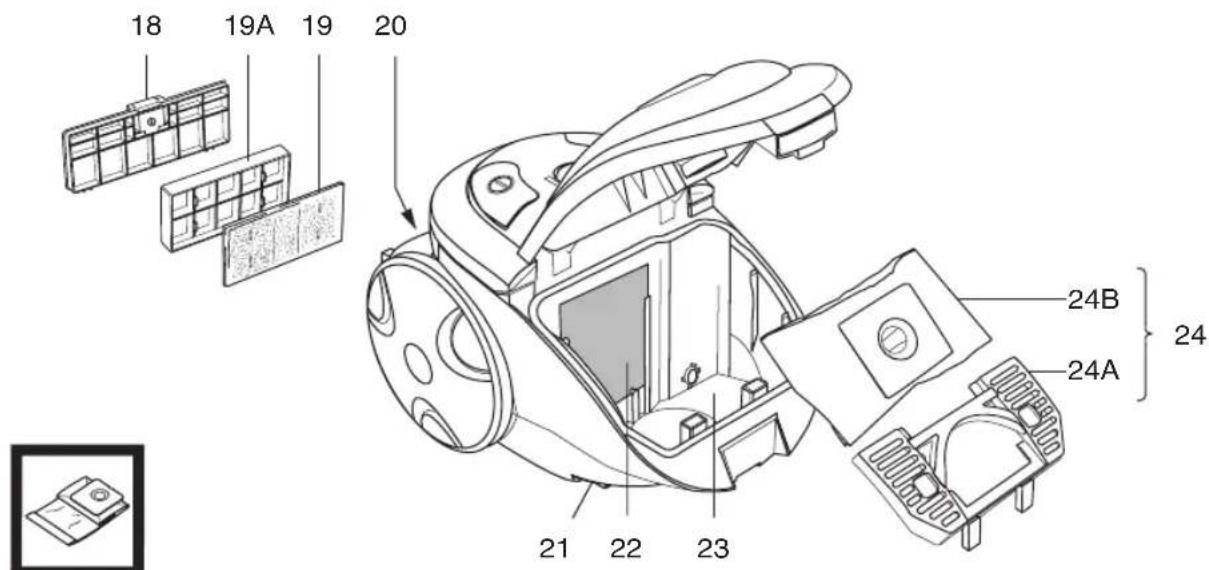
Please consult Figure [A] in the image section to check the equipment delivered with your appliance. All figures can be found on the inside pages of the cover.
1 Hand grip
2 Manual airflow regulator
3 Vacuum tube
3A Adjustable telescoping tube
3B Adjusting button for telescoping tube
4 Combination brush for carpet / bare floor
5 Brush setting switch
6 Flexible vacuum hose
7 Button for hose fastening
8 Fastening hook (storage)
9 Vacuum connection
10 Carry grip
11 ON/OFF switch
12 Electronic power regulation
13 Button for automatic cord winding
14 Level indicator of dust collection system
15 Power cord with plug
16 Appliance flap for dust collection system
17 Button for opening the appliance
18 Exhaust air screen
19 Exhaust air filter
19A Holder for exhaust air filter
20 Accessory compartment
21 Fastening slit (storage)
22 Motor protection filter
23 Compartment for dust collection system
24 Dust collection system
24A Holder for dust bag
24B Paper dust bag
25 Accessories
25A Crevice nozzle
25B Dust nozzle
25C Cushion brush
25D Parquet brush
Explanation[of[Symbols[in[Figure[[A]:
![IMETEC ECO E5 - Explanation[of[Symbols[in[Figure[[A]: - 1](/content/2026/05/920308/images/305e98c7608e69ba3471d32a5c619808a99d4360ef63af4473f7bff0295a107e.jpg)
appliance has a dust collection system with replaceable paper dust bags.
GB
ASSEMBLY
- Connect the flexible vacuum hose (6) with the vacuum connection (9) of the appliance. Make certain that the snapping mechanism is positioned correctly; the hose has been installed correctly if it snaps into place.
- Now connect the hand grip (1) of the vacuum hose to the vacuum tube (3). The desired length of the adjustable telescoping tube (3A) can be set by pressing the adjusting button (3B) in the direction indicated by the arrow and pulling the telescoping tube out or pushing it in [Fig. B1].
- Now select the combination brush (4) or the suitable accessory (25) for the surface to be cleaned and attach it to the vacuum tube (3).
ACCESSORIES
Combination brush for carpet / bare floor (4):
Set the combination brush to the floor type with the selector switch (5) [Fig. C1]:
- Selector switch (5) setting A (brush extended): for bare floors
- Selector switch (5) setting B (brush retracted): for rugs and carpet
Your appliance is equipped with the following accessories:
Crevice nozzle (25A): Cleaning of corners and crevices, e.g. for radiators, moulding, roller shutters, awnings;
Dust nozzle (25B): Cleaning of small objects, audio and video equipment, computers and furniture;
Cushion brush (25C): Cleaning of sofas, armchairs, upholstered chairs and curtains;
Parquet brush (25D): Special brush for cleaning of parquet floors.
NOTE:
- The accessories can be connected to the vacuum tube (3) or directly to the hand grip (1). When not using the crevice nozzle (25A), you can store it in the accessory compartment (20) [Fig. C2].
USE
Pull out the power cord (15) completely, but no farther than the red marking, and insert the plug into the power socket. The yellow cord marking is located before the end of the cord with the red marking.
Bear in mind that all new appliances smell slightly when used for the first few times. These smells are harmless and soon disappear. It is recommended to air the environment.
Press the ON/OFF switch (11) once to switch the appliance on or off.
With the electronic power regulation (12), you can individually adjust the suction power of the appliance [Fig. D1]. Select the following settings:
Minimum: For curtains, delicate and fine fabrics
Medium: For sofas, armchairs, upholstered chairs, rugs and carpet
Maximum: For smooth floors
The suction power can also be changed with the manual airflow regulator (2) on the hand grip (1) [Fig. D2].
Closed: Increases the suction power
Open: Reduces the suction power
Open this regulator to reduce the suction power if an object was sucked up and is blocking the opening.
After finishing your work, switch off the appliance by pressing the ON/OFF switch (11) and pull the power plug out of the socket.
Press the button for the automatic cord winding (13) to wind up the power cord. Hold the plug firmly during the automatic winding to prevent it from whipping around.
The vacuum hose (6) can be disconnected from the appliance for storage. To do this, press the button for the hose fastening (7) and pull the hose off.
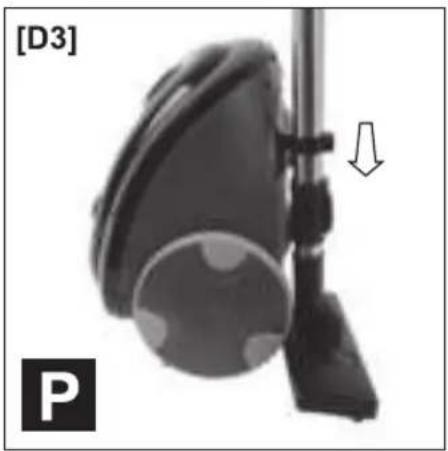
The vacuum tube (3) can be hung on the appliance for storage, the corresponding figure in the image section is marked with the parking symbol P [Fig. D3].
MAINTENANCE

IMPORTANT!
opening the appliance, switch it off and pull the power plug from the socket! Before using the appliance again, make certain that all parts cleaned with liquid are completely dry!
Cleaning the appliance:
Clean the appliance as needed with a damp cloth. Do not use solvents or other aggressive or sharp-edged cleaning aids. These could damage the surface.
Cleaning the combination brush (4):
With the motor switched on, run your hand over the brush to loosen clinging dust and lint. These are then directly vacuumed up.
Cleaning the dust collection system (24):
If the suction power of your vacuum cleaner declines or the level indicator (14) of the dust collection system indicates that it is necessary, the dust collected by the appliance must be removed.
NOTE:
- If the power of your vacuum does not improve after cleaning the dust collection system, this could result from the other filters in the appliance being very dirty. In this case, the filters must be replaced.
Do as shown in the figures marked with the symbol ().
Clean the dust collection system as described below and take note of the figures in the image section.
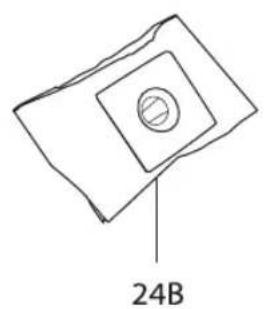
Replacing the paper dust bag (24B)
- Press the button (17) and open the appliance flap (16) [Fig. E1].
• Take the holder for the dust bag (24A) and the paper dust bag (24B) out of the appliance [Fig. E2]. - Pull the dust bag (24B) out of the holder (24A) and dispose of it as household waste [Fig. E3].
- Place a new paper dust bag (24B) with the cardboard card into the holder (24A) [Fig. E4].
- Then place the holder with the dust bag in the appliance compartment (23) [Fig. E5].
- Close the appliance flap (16) before using the appliance again.
NOTE:
• After every 5th dust bag change, the motor protection filter (22) must also be changed
Replacing the motor protection filter (22)
- Press the button (17) and open the appliance flap (16) [Fig. E1].
• Take the holder for the dust bag (24A) and the paper dust bag (24B) out of the appliance [Fig. E2]. - Pull the motor protection filter (22) out of the holder and replace it with a new filter insert [Fig. E6].
- Reassemble the appliance and close the appliance flap (16) before starting the appliance again.
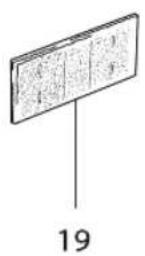
Replacing the exhaust air filter (19)
- Press on the catch of the exhaust air screen (18) and remove it [Fig. E7].
- Pull the holder (19A) with the exhaust air filter (19) out of the appliance [Fig. E8].
- Replace the exhaust air filter (19) with a new one and put the holder (19A) back in place.
- Put the exhaust air screen (18) back in place and allow the catch to snap into place.
GB
DISPOSAL

The product packaging consists of recyclable materials. Dispose of these in an environmentally appropriate manner.

In accordance with EU directive 2002/96/EC, the appliance must be disposed of properly at the end of its service life. This involves the recycling of valuable substances contained within the appliance and reduces the impact on the environment. For more information, contact your local disposal company or the store where you purchased the appliance.
SERVICE AND WARRANTY
For repairs or to purchase spare parts, contact an authorised IMETEC service centre.
The appliance is covered by a manufacturer's warranty. For details, see the attached warranty card.
Failure to observe the instructions contained in this manual, or failure to carry out care and maintenance of the product, will invalidate the manufacturer's warranty.

- MANUALE DI ISTRUZIONI PER L'USO DELL'ASPIRAPOLVERE
- IMPORTANT!
- Instructions and information for safe use
- TABLE OF CONTENTS
- SAFETY WARNINGS
- DESCRIPTION[OF]THE[APPLIANCE]AND[ACCESSORIES
- Explanation[of[Symbols[in[Figure[[A]:
- GB
- ASSEMBLY
- ACCESSORIES
- Combination brush for carpet / bare floor (4):
- Your appliance is equipped with the following accessories:
- NOTE:
- USE
- MAINTENANCE
- Cleaning the appliance:
- Cleaning the combination brush (4):
- Cleaning the dust collection system (24):
- Replacing the paper dust bag (24B)
- Replacing the motor protection filter (22)
- Replacing the exhaust air filter (19)
- DISPOSAL
- SERVICE AND WARRANTY
Brand : IMETEC
Model : ECO E5
Category : Vacuum Cleaner