
75-204 - Rangefinder NEO tools - Free user manual and instructions
Find the device manual for free 75-204 NEO tools in PDF.


| Product Type | Laser Rangefinder |
| Model | 75-204 |
| Brand | NEO Tools |
| Measuring Range | Max. 60 m |
| Measurement Accuracy | ±(2.0 mm + 5×10⁻⁵ × D) |
| Laser Class | Class 2 (EN 60825-1:2014) |
| Laser Wavelength | 635 nm |
| Max. Laser Power | < 1 mW |
| Power Supply | 2 × AA Ni-MH 1.2 V rechargeable |
| Charging | USB Type-C, 5V / 1A |
| Units of Measurement | m / in / ft |
| Memory Capacity | 30 measurements |
| Angle Measurement Range | X: ±90°, Y: ±90° |
| Reference Points | Front, center, rear |
| Laser Auto Shut-off | 30 seconds |
| Device Auto Shut-off | 180 seconds |
| IP Protection Rating | IP54 |
| Weight (without accessories) | 0.096 kg |
| Operating Temperature | 0°C to +40°C |
| Storage Temperature | -10°C to +60°C |
| Functions | Single, continuous, area, volume, Pythagorean, addition/subtraction, angle measurement, data recording |
| Included Accessories | Rangefinder, USB cable, 2× AA Ni-MH batteries |
| Maintenance | Clean with soft damp cloth; store in cool dry place |
Frequently Asked Questions - 75-204 NEO tools
User questions about 75-204 NEO tools
0 question about this device. Answer the ones you know or ask your own.
Ask a new question about this device
Download the instructions for your Rangefinder in PDF format for free! Find your manual 75-204 - NEO tools and take your electronic device back in hand. On this page are published all the documents necessary for the use of your device. 75-204 by NEO tools.
USER MANUAL 75-204 NEO tools

PL INSTRUKCJA ORYGINALNA (OBSŁUGI)......4
EN TRANSLATION (USER) MANUAL 8
Pomiar objętości

TRANSLATION (USER) MANUAL
Laser rangefinder
75-204 75-206
CAUTION: Before using the appliance, read these instructions carefully and keep them for future reference. Failure to observe the safety precautions in this manual may result in damage to the appliance and may cause personal injury.
WARNING: Do not look directly into the laser beam! The following safety rules must be observed:
- No modifications may be made to the unit.
- Use the laser device in accordance with the manufacturer's recommendations.
- Never intentionally point the laser beam towards people or animals.
- Do not point the laser beam towards the eyes of bystanders or animals. Laser radiation can damage the eye.
- Always ensure that the laser light is not directed at reflective surfaces. The reflective surface of the laser beam could then, reflect such a beam towards the operator, or towards third parties.
- Do not allow children to operate this appliance. Keep children away from the work area when setting up and using the appliance.
- Store unused equipment in a dry place out of the reach of children.
- Do not replace the laser unit with another type. All repairs should be carried out by the manufacturer's service department.
- The unit is equipped with a Class 2 laser in accordance with EN 60825-1:2014.
PURPOSE
The device is intended for private use only. It can be used to measure distances as well as area and volume.
In addition, the rangefinder has an indirect measuring function (according to Pythagoras' theorem) that allows height or distance to be calculated. Dynamic measuring allows continuous measurement. In addition, the device is equipped with an automatic spirit level, making it possible to read the angle of the device in real time. In addition, the device has a USB port to easily recharge the batteries of the device.
During operation, act strictly in accordance with the following instructions to ensure the best possible performance of the device. Any use other than that described below is not permitted and may lead to damage to the product.
EXPLANATION OF THE PICTOGRAMS USED
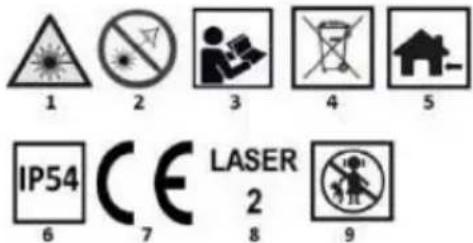
- Caution laser radiation!
-
Caution laser radiation - do not look into the beam
-
Read the Operating Instructions and observe the warnings and safety conditions contained therein.
- Selective collection
- For indoor use
- Degree of protection
- Certificate of conformity
- Laser class
- Keep out of reach of children
DESCRIPTION OF THE GRAPHIC PAGES
DISPLAY
- Battery charge status
- Angle
- Laser on
- Reference point
- Maximum
- Length, area, volume, Pythagorean measurement
- Auxiliary display
- Minimum
- Recording
- Sound
- Summary line
KEYBOARD
- Switch / measurement
- Addition/reference point
- Subtraction / change of measurement unit
- Length, area, volume, Pythagorean measurement, sound
- Switching off, delete
EQUIPMENT AND ACCESSORIES
- Distance meter
- USB cable
- 2 rechargeable AA type NI-MH batteries
SAFETY INSTRUCTIONS
CAUTION: Before using the appliance, read these instructions carefully and keep them for future reference. Failure to observe the safety precautions in this manual may result in damage to the appliance and may cause personal injury.
NOTE
Read all instructions supplied with the appliance. Do not remove any stickers from the device.
- Do not point the laser beam towards the eyes of bystanders or animals. Laser radiation can damage the eye.
- Do not point the laser beam towards other optical devices such as a telescope as this can cause serious damage to your eyesight.
- Do not make any modifications to the device. Modifying the device yourself may result in exposure to laser radiation.
- Exposure to a Class 2 laser beam is considered safe for up to 2 seconds. The eyelid reflex usually provides adequate protection.
- Always ensure that the laser light is not directed at reflective surfaces. The reflective surface of the laser beam could then, reflect such a beam towards the operator, or towards third parties.
- Do not allow children to operate this appliance. Keep children away from the work area when setting up and using the appliance
- In public areas, if possible shield the laser beam with barriers and partitions and mark the laser area with warning signs.
- The following stickers and markings are affixed to the product to indicate the laser class for the user's convenience and safety.
- Do not dispose of used batteries with household waste. Dispose of used batteries in designated areas.
- This product must not be disposed of with household waste. Dispose of the product in accordance with national regulations.
- The unit is equipped with a Class 2 laser in accordance with EN 60825-1:2014.
- When using alkaline batteries, DO NOT recharge them. Do not use alkaline batteries and rechargeable batteries in the device at the same time to avoid accidents. Any damage caused by charging alkaline batteries is not covered by the warranty. The manufacturer is not responsible for this.
- The device may become warm during charging, which is a normal symptom that does not affect the operation or life of the device. Disconnect the device from the charger and remove the batteries/batteries if the device is not in use. - If the unit cannot be switched on or the power icon is missing when the unit starts up, recharge the batteries or replace the batteries. A flashing power icon(1) will be displayed if the unit is operating without batteries (on the power supply).
- Use a DC5V power supply with 1A to charge the batteries. The charging port is a USB type C port. It is recommended to use a phone charger).
- During the charging process, the battery icon(1) is displayed alternately. When the charging process is complete the battery icon displayed will flash (1).
- Fully charge the rangefinder when not in use for long periods of time. Charge the device once every six months to avoid battery drain or permanent damage.
BATTERY REPLACEMENT
- To lock the battery cover, slide the top of the cover downwards. The cover should fit tightly to the unit, carefully tilt it away from the top side.
- Insert 2 new AA-size NI-MH batteries, taking care to ensure their correct polarity.
- Close the battery cover, then lock it by sliding the top of the cover upwards.

- The product should use NI-MH type batteries. Use the included USB cable for charging. The device can be charged with the help of a computer, but this will take more time.
SWITCHING THE DEVICE ON AND OFF
Switching on the rangefinder
Briefly press the button (12) to switch on the unit, the laser is ready for measurement. The screen is shown in figure A. The laser will automatically switch off if you do not perform any operation within 30 seconds.
Switching off the rangefinder
Press the button (16) and hold for ≥ 3 seconds to switch off the device. The laser will automatically switch off if you do not perform any operation within 180 seconds.
Changing the reference point
A long press on the button (13) changes the reference point. There are three reference points, the rear of the rangefinder (c), the centre (b) and the front (a). The default reference point of the device is the end.

Unit setting
Press and hold button (14) for minimum 2 sec. to enter the unit of measurement setting mode, which can reset the current unit of measurement. The default unit is 0.000m. There are 5 units to choose from (0.000m/0.000ft/0.000in/0 /0' 0").
Sound ON/OFF
Press the button (15) and hold for ≥ 3 seconds to switch the buzzer on/off. When the icon (10) appears on the screen and you hear the "beep", the buzzer is off; when the icon (10) disappears and you hear "beep", the buzzer is on.
1. Angle measurement
X/Y angle information is displayed at the top of the screen and the XY angle measurement range is -90.0° to +90.0°. Where the direction
X is front and back, and the Y direction is right and left.

Single distance measurement:
- Press button (12) to enter measurement mode and switch on the laser beam. Press button (12) again to take a single length measurement, then the measured result will be displayed in the summary line.
Continuous measurement:
- Press the key (12) for ≥3 seconds in single distance measurement mode and enter continuous measurement mode. The maximum and minimum distance is displayed in an additional area and the current result is displayed in the summary line.
- Briefly press button (12) to stop measurement and display data. Briefly press button (16) to exit continuous measurement mode.
Area measurement:
- Press the button (15) to enter the Surface Measurement, the icon (6) shows on the left side of the screen. One side of the rectangle flashes on the display, follow the instructions below for the surface measurement:
- Press the button (12) once to display the length of the
- Press the button (12) again to display the width The area is calculated and displayed in the summary line.
- Press the button (16) to clear the result and measure again if necessary.
- Press the button (16) until there is no
- no data on the additional display area.
- Press the button (16) again to exit the current mode and return to length measurement mode.
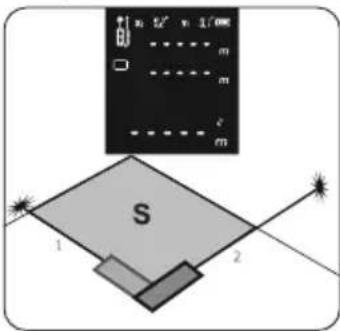
Volume measurement
- Press the button (15) twice to enter the volume measurement, the icon (6) is shown on the left side of the screen.
- One side of the icon on the display is flashing, follow the instructions below to measure the volume:
- Press the button (12) once to obtain the length of the
- Press the button (12) again to obtain the width of the
- Press the button (12) a third time to obtain the height of the
• The volume is calculated and displayed in the summary line. - Press button (16), to clear the result and measure again if necessary
- Press the button (16) until there is no data in the additional display area.
- Press button (16), again to exit the current mode and return to length measurement mode.

Indirect distance measurement / Pythagorean measurement
- There are four modes for measuring one-sided distance in a triangle using Pythagoras' theorem. This is convenient for making indirect measurements in a complex environment.
- Indirect measurement is used to measure distances that cannot be measured directly because obstacles would obstruct the laser beam or no other target surface is available as a reflection point. Correct results are only achieved if the right angles required for correct measurement are accurately observed/measured (Pythagoras' Theorem).
1 Attention: 1 Indirect
● measurement. Depending on the application, indirect measurement has larger measurement errors than are possible with direct measurement. To improve measurement accuracy, we recommend measuring with the help of a tripod.
(2) In Pythagorean measurement, the legs of the tripod must be shorter than the counter-rectangle, or an 'Err' message will be displayed on the screen. To guarantee accuracy, please make sure that all measurements start from the same point.
Pythagorean measurement (2 points)
- Press the button (15) three times until the Pythagorean Measurement
- (2-point) icon (6) appears on the left side of the screen. One side of the triangle on the display flashes, follow the instructions below to measure the result:
- Press the button (12) to obtain the distance of the first line, change to the last direction of the object from the fixed measuring point.
- Press the button (12) again to obtain the distance of the second line. The result is displayed on the summary line.

Indirect length measurement
- Press the button (15) four times until the intermediate length icon (6) shows on the left side of the screen, the angle X is displayed in real time at the top of the screen. One side of the rectangle flashes on the display, follow the instructions to obtain the measurement result:
- Press the button (12) to obtain the angle X and the distance of the counter-rectangle, the vertical and horizontal lines. The result will be displayed in the corresponding line.

Pythagorean measurement "1"
- Press the button (15) five times until the Pythagorean Measurement icon (6) shows on the left side of the screen. One side of the icon flashes on the display, follow the instructions below to obtain the measurement result:
- Press Button (12) to obtain the distance of the first line, change to the last object direction from the established measuring point.
- Press the button (12) again to obtain the distance of the last line. The result is displayed in the summary line.

Pythagorean measurement "2"
- Press button (15) six times until Pythagorean Measurement "2" is shown on the left side of the screen.
- Press the button (12) to obtain the length of the first line, change to the last line the direction of the object is fixed from the measuring point.
- Press the button (12) again to obtain the distance of the last line. The result is displayed in the summary line.

The device can be used to add and subtract measurements taken.
- Press buttons (13) (14) to select the function, pressing once will give you the measurement result.
- Briefly pressing button (13) ((14)), "+" ("-") will cause the screen with the addition or subtraction mode to appear. The screen will also show the previous set of measurements and the possible actions to select "+" ("-").
• The screen will display 0.000 if there is no set of measurements. - Area and volume can also be added up and subtracted. Take this area as an example:
Surface addition function:
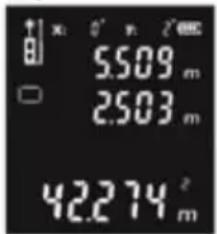
Step 1: Measure the first area as shown in PIC1.
Step 2: Then press the button (13) a "+" will appear in the lower left corner of the screen, measure the second area as shown on PIC2.
Step 3: Finally, press the button (12) to get a summary of the result of the summation of these two area data, which PIC3 shows.

PIC1

PIC2

PIC3
RECORDING FUNCTION
- Storage function: the storage function will be activated when the tool is running. The data of each measurement group will be automatically saved to the database and the maximum number of measurement groups is 30.
- Data groups will be sequenced from 1 to 30 until 30 groups are reached.
- When the database has fully stored 30 data groups and the 31st data group is measured, the data from the first group will be deleted automatically. The remaining data groups will be moved forward 1 place and the 31st data group will be stored in place 30. Replacing the battery will not result in data loss and the data will be stored as at the last shutdown.
- Opening the database: press the button (15) briefly until the icon (9) appears, the database will be accessible. The latest measured data will be displayed by default.
- Scrolling up and down the database: short press on the button (13) to scroll up the data; short press on the button (14) to scroll down the data.
- Deleting a group of measurements: briefly pressing the button (16) deletes the data. The last group of data will be deleted.
General information
The receiving lens and the laser beam outlet located on the left side of the device must not be covered during measurement. Do not move the device during measurement (except in continuous measurement mode). Therefore place the measuring instrument, if possible, on a stable, level and non-slippery surface.
Factors influencing the measuring range
The measuring range depends on the lighting conditions and the reflective properties of the target surface. To improve the visibility of the laser beam when working outdoors and when sunlight is intense, shade the target surface.
Factors influencing measurement accuracy
Due to physical effects, erroneous measurements cannot be ruled out when measuring on different surfaces such as:
• Transparent surfaces (e.g. glass, water),
• Reflective surfaces (e.g. polished metal, glass),
- Porous surfaces (e.g. insulation materials),- Structured surfaces (e.g. plaster, natural stone). In addition, erroneous measurements are also possible if the target surfaces are inclined.
Also, air layers of different temperatures or indirectly received reflections can affect the accuracy of the measurement taken.
Control of distance measurement accuracy
The accuracy of the measuring tool can be checked as follows:
- Choose a measurement distance that does not vary between approximately 3 and 10 m (9.8 to 32 ft) in length and whose dimension is known exactly (e.g. length of room, width of doorway).
- The measurement should be carried out under the most favourable conditions, i.e. the measuring section should be in a room with poor lighting and the target measurement area should be a smooth, well-reflecting surface (e.g. a wall painted white).
• Measure the distance 10 times in a row.
The deviation of individual measurements from the average value must not exceed ±2 mm ( ±0.12 in) of the entire measuring distance. The measurements should be recorded so that the accuracy can be compared in later measurements.
Working with a tripod
The use of a tripod is particularly necessary when measuring longer distances. The measuring device has a 1/4" thread for mounting on the tripod. Use the 1/4" fixing screw to mount and tighten the measuring device to the tripod.
Set the appropriate reference level for the tripod measurement by pressing the button (13).
ERROR CODES
| Code | Cause | Solution |
| Err10 | Battery level too low | Replace the batteries |
| Err15 | Outside the scope of | Take a measurement within the operating range of the device |
| Err16 | Received signal too weak, measurement time too long long | Use a reflector with higher reflectance |
| Err18 | Background brightness too high | Use a reflector with lower reflectivity |
| Err26 | Beyond the display | Measure the target within the device's operating range |
TECHNICAL DATA
| Laser rangefinder | ||
| Model | 75-204 | 75-206 |
| Laser working range | Max. 60 m | Max. 100 m |
| Type of power supply | 2x AA 1.2V | |
| Battery cell type | Ni-MH | |
| Max. laser power | <1mW | |
| Laser wavelength | 635 nm | |
| Units of measurement | m/in/ft | |
| Measurement accuracy | ±(2.0mm+5x10 xD)* / -5 ±(1/16inch+5x10 xD-5)* | |
| Memory for number of measurements | 30 measurements | |
| Laser auto shut-off time | 30 seconds | |
| Automatic rangefinder switch-off time | 180 seconds | |
| Reference measurement | Top/Stand/Rear | |
| Storage temperature | -10°C~+60°C(+14°F~+140°F) | |
| Operating temperature | 0°C~+40°C(+32°F~+104°F) | |
| Storage humidity range | 20%-80%RH | |
| Battery charging parameters | 5V-1A | |
| Angle measuring range | X±90°/Y±90° | |
| Laser class | II | |
| IP degree of protection | IP54 | |
| Weight (excluding accessories and batteries) | 0.096 kg | 0.096 kg |
| Year of production | 2023 | |
*Measurement accuracy: ± (2.0 mm + 5x10 x D), D is the measured 5 distance, for example if the measured distance is 10m (10000mm), the measurement accuracy is ±(2mm+5x10 x 10000 -5 mm) = ± 2.5 mm
Measuring range
The maximum range varies from model to model.
The actual range can be found on the packaging. And in the table above.
Measurement accuracy
When measured under favourable conditions, such as a smooth surface, suitable temperature and internal lighting, the device is able to operate within the indicated range.
When measuring under unfavourable conditions, such as strong light, uneven surfaces and inappropriate temperatures, the tolerance will be increased.
Tip: For low sunlight and poor object reflection, use a target disc or reflector.
MAINTENANCE OF THE APPLIANCE
- The device should not be stored in high temperatures and high humidity environments for long periods of time; if the rangefinder is not used frequently, remove the battery and place the device in its case and store in a cool, dry place.
- Please keep the surface of the appliance housing clean. Remove dirt and dust with a soft, damp and clean cloth. Do not use aggressive or strong substances to maintain the device. The laser output point and its lens can be maintained like other optical devices.
ENVIRONMENTAL PROTECTION

Electrically-powered products should not be disposed of with household waste, but should be taken to appropriate facilities for disposal. Contact your product dealer or local authority for information on disposal. Waste electrical and electronic equipment contains substances that are not environmentally friendly. Unrecycled equipment poses a potential risk to the environment and human health.
"Grupa Topex Spółka z ograniczoną odpowiedzialnością" Spółka komandytowa with its registered office in Warsaw, ul. Pograniczna 2/4 (hereinafter: "Grupa Topex") informs that all copyrights to the content of this manual (hereinafter: "Manual"), including, among others. Its text, photographs, diagrams, drawings, as well as its composition, belong exclusively to Grupa Topex and are subject to legal protection under the Act of 4 February 1994 on Copyright and Related Rights (ie Journal of Laws 2006 No. 90 Poz. 631, as amended). Copying, processing, publishing, modifying for commercial purposes the entire Manual and its individual elements, without the consent of Grupa Topex expressed in writing, is strictly prohibited and may result in civil and criminal liability.
EU Declaration of Conformity
Manufacturer: Grupa Topex Sp. z o.o. Sp.k., Pograniczna 2/4 02-285 Warszawa
Product: Laser rangefinder
Model: 75-204; 75-206
Trade name: NEO TOOLS
Serial number: 00001 ÷ 99999
This declaration of conformity is issued under the sole responsibility of the manufacturer.
The product described above complies with the following documents: Electromagnetic Compatibility Directive 2014/30/EU
RoHS Directive 2011/65/EU as amended by Directive 2015/863/EU And meets the requirements of the standards:
EN 55032:2015; EN 55035:2017
EN IEC 63000:2018
This declaration relates only to the machinery as placed on the market and does not include components
added by the end user or carried out by him/her subsequently.
Name and address of the EU resident person authorised to prepare the technical dossier:
Signed on behalf of:
Grupa Topex Sp. z o.o. Sp.k.
TOPEX GROUP Quality Officer
Warsaw, 2023-04-27
DE
PIC2
PIC3
AUFNAHMEFUNKTION
Измерение объема
Egység beállítása
Térfogatmérés
Setarea unității
Nastavení jednotky
Měření objemu
Pythagorova míra "1"
Pythagorova míra "2"
PIC2

PIC3
FUNKCE NAHRÁVÁNÍ
Misura del volume
Yksikön asetus

- POMIAR OBJĘTOŚCI
- TRANSLATION (USER) MANUAL
- WARNING: DO NOT LOOK DIRECTLY INTO THE LASER BEAM! THE FOLLOWING SAFETY RULES MUST BE OBSERVED
- PURPOSE
- EXPLANATION OF THE PICTOGRAMS USED
- DESCRIPTION OF THE GRAPHIC PAGES
- DISPLAY
- KEYBOARD
- EQUIPMENT AND ACCESSORIES
- SAFETY INSTRUCTIONS
- NOTE
- BATTERY REPLACEMENT
- SWITCHING THE DEVICE ON AND OFF
- SWITCHING ON THE RANGEFINDER
- SWITCHING OFF THE RANGEFINDER
- CHANGING THE REFERENCE POINT
- UNIT SETTING
- SOUND ON/OFF
- ANGLE MEASUREMENT
- SINGLE DISTANCE MEASUREMENT
- CONTINUOUS MEASUREMENT
- AREA MEASUREMENT
- VOLUME MEASUREMENT
- INDIRECT DISTANCE MEASUREMENT / PYTHAGOREAN MEASUREMENT
- PYTHAGOREAN MEASUREMENT (2 POINTS)
- INDIRECT LENGTH MEASUREMENT
- PYTHAGOREAN MEASUREMENT "1
- PYTHAGOREAN MEASUREMENT "2
- THE DEVICE CAN BE USED TO ADD AND SUBTRACT MEASUREMENTS TAKEN
- RECORDING FUNCTION
- GENERAL INFORMATION
- FACTORS INFLUENCING THE MEASURING RANGE
- FACTORS INFLUENCING MEASUREMENT ACCURACY
- CONTROL OF DISTANCE MEASUREMENT ACCURACY
- WORKING WITH A TRIPOD
- MEASURING RANGE
- MEASUREMENT ACCURACY
- MAINTENANCE OF THE APPLIANCE
- ENVIRONMENTAL PROTECTION
- EU DECLARATION OF CONFORMITY
- EN IEC 63000:2018
- AUFNAHMEFUNKTION
- ИЗМЕРЕНИЕ ОБЪЕМА
- EGYSÉG BEÁLLÍTÁSA
- TÉRFOGATMÉRÉS
- SETAREA UNITĂȚII
- NASTAVENÍ JEDNOTKY
- MĚŘENÍ OBJEMU
- PYTHAGOROVA MÍRA "1
- PYTHAGOROVA MÍRA "2
- FUNKCE NAHRÁVÁNÍ
- MISURA DEL VOLUME
- YKSIKÖN ASETUS
Brand : NEO tools
Model : 75-204
Category : Rangefinder