24350 - Uncategorized K&M - Free user manual and instructions
Find the device manual for free 24350 K&M in PDF.


| Product Type | Universal Wall Mount |
| Brand | K&M |
| Model | 24350 |
| Dimensions (W x D x H) | 69 x 69 x 211 mm |
| Weight | 0.435 kg |
| Load Capacity | 1.5 kg |
| Material | Steel, powder-coated; die cast joint; steel hardware |
| Color | Black |
| Mounting Thread | 3/8" or 5/8" (with adapter) |
| Rotation | 360° via universal joint |
| Inclination | Up to 90°, infinitely adjustable |
| Mounting Holes | 3 holes for surface attachment |
| Packaging Dimensions (W x D x H) | 75 x 75 x 229 mm |
| Cleaning | Use slightly damp cloth; avoid chlorinated or abrasive agents |
| Maintenance | Regularly check screw connections for tightness |
| Safety | Pinch hazard; secure mounting required; do not loosen clamping screw without holding equipment |
| Warranty | No warranty for improper use, modification, or natural wear |
| Intended Use | For equipment with 3/8" or 5/8" threading, up to 1.5 kg |
| Foreseeable Misuse | Loosening clamping screw without holding equipment |
| Repair | Only by qualified persons; spare parts available via manufacturer website |
Frequently Asked Questions - 24350 K&M
User questions about 24350 K&M
0 question about this device. Answer the ones you know or ask your own.
Ask a new question about this device
Download the instructions for your Uncategorized in PDF format for free! Find your manual 24350 - K&M and take your electronic device back in hand. On this page are published all the documents necessary for the use of your device. 24350 by K&M.
USER MANUAL 24350 K&M
natural_image
Mechanical assembly diagram showing a shaft, bearing housing, and gear mechanism with rotational arrows (no text or labels)The universal wall mount can accommodate various equipment with 3/8" or 5/8"-threading. Thanks to the universal joint, the mounted equipment can be rotated 360° and clamped into any position desired. The inclination can be set infinitely up to 90°. These adjustment options make it possible to realize specific mounting techniques or antenna positions. Can be attached to a wide range of different surfaces.
Foreseeable misapplication
Do not loosen the clamping screw without holding on to the mounted equipment.
General
▶ Care must be taken to ensure that the universal wall mount can be attached firmly to the surface where it is to be mounted.
The surface must be able to bear the weight involved and withstand the additional forces that will arise.
▶ Depending on the specifics of the surface, the correct means of attachment must be chosen.
▶ Pay attention to any pipes or electrical lines that may run through the area.
▶ Take care to follow the installation instructions for the means of attachment you use.
The equipment to be mounted must be equipped with 3/8" or 5/8"-threading. Take note of the instructions for use and/or assembly of the equipment being used. The maximum depth to which the equipment can be screwed in must be observed. Screwing the threading in too far can damage the equipment.
The installer must be physically fit, technically competent and familiar with the current local/state rules and regulations.
▶ Personal injury or property damage may occur if the mount falls down.
The adjustment option means there is a pinch hazard between the components.
▶ The user must be physically fit and technically competent.
The usage information is an integral part of the product and should be kept for its service life or passed on to any subsequent owner or user.
Warranty
No warranty is given for damage caused by:
▶ Non-observance of the usage information and the "General safety and assembly instructions".
▶ Improper use or use for other than the intended purpose.
▶ Improper installation or use by the buyer or third parties.
▶ Natural wear and tear.
▶ Careless handling.
▶ Improper modifications or repair work by the buyer and third parties.
▶ Impact on components of foreign origin.
▶ Use of non-original spare parts.
Modifications, additions and conversions that may impair safety are prohibited without the manufacturer's approval.

Technical data
| Material | Wall attachment plate, clamping bolt, universal joint:steel, powder-coated, blackThread adapter 3/8" - 5/8": steel, galvanizedJoint body: die cast, powder-coated, blackSet screw: steel, uncoatedClamping screw: steel, galvanized; plastic, black |
| Load capacity 1.5 kg | |
| Dimensions (W) 69 | x (D) 69 x (H) 211mm; Mounting thread 3/8" or 5/8" |
| Packaging (W) 75 | x (D) 75 x (H) 229 mm |
| Weight 0,435 kg |
Mounting
1.) Unpack and check product for damage and completeness.
!Pinch hazard: adjustable parts!
!The position of the universal wall mount creates a risk of falling parts!
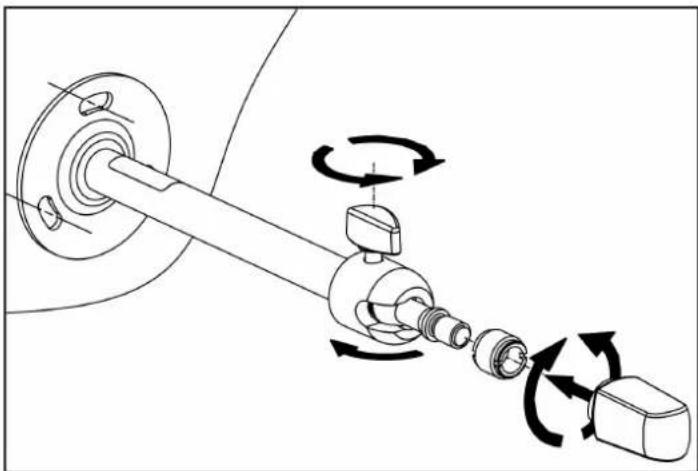
The universal wall mount is fully assembled. Installing the wall mount
natural_image
Mechanical assembly diagram showing a shaft, bearing housing, and rotating components with rotational arrows (no text or labels)All three holes in the wall mount must be used to attach it. A suitable means of attachment must be chosen according to the specifics of the surface.
Align the wall mount on the surface and mark the three attachment holes on it. Drill into the surface according to the chosen means of attachment and screw the wall mount securely onto it.
Screw the equipment onto the wall mount. Depending on the thread type of the equipment to be used, the factory-fitted thread adapter must be removed.
To set the direction or angle, hold the equipment screwed onto the mount firmly and loosen the clamping screw. Set the equipment to the desired position and re-tighten the clamping screw.
Maintenance, cleaning and repair
▶ Maintenance: Regularly check if the screw connections are tight.
▶ Cleaning: Use a slightly damp cloth to clean the universal wall mount. Do not use chlorinated or abrasive cleaning agents. These will cause damage to the surface and varnish.
▶ Repair: Immediately repair any damage that occurs and stop using the universal wall mount. Maintenance work may only be carried out if you have the necessary knowledge. If any parts are missing, contact the manufacturer at www.k-m.de. Here you can find a corresponding spare parts list by entering the article number on the type label. Use this page to reorder missing or damaged components.


Fault and troubleshooting
| Fault/cause Check/Remedy | |
| Mount wobbles on the surface to which it is attached | Check the screw connection between the surface and the mount and tighten if necessary. |
| Equipment slides at universal joint | Check the clamping at the joint and tighten if necessary. |
| Equipment can not be mounted on universal joint | Check connection thread.Without thread adapter, a 3/8" thread is available.With thread adapter a 5/8" thread is available. |
Storage, disposal
Store the tray in a dry place.
Recycle the components after they are disassembled:
▶ Scrape all components made of metal.
▶ Recycle or reuse all plastic, paper, and cardboard components.
▶ Sort all other components according to material composition and dispose of them according to local regulations.
Contact information

Brand : K&M
Model : 24350
Category : Uncategorized