
SSMW 750 E1 - Microwave SILVERCREST - Free user manual and instructions
Find the device manual for free SSMW 750 E1 SILVERCREST in PDF.


| Product Type | Microwave Oven |
| Brand | SilverCrest |
| Model | SSMW 750 E1 |
| Power Output | 750 W |
| Capacity | 20 L |
| Control Type | Digital with Touchpad |
| Display | LED |
| Power Levels | 6 Levels |
| Defrost Function | Yes, by weight or time |
| Timer | Up to 60 minutes |
| Turntable | Yes, 25.5 cm diameter |
| Interior Light | Yes |
| Child Lock | Yes |
| Door Interlock | Yes |
| Dimensions (W x D x H) | 45.5 x 35.5 x 26.5 cm |
| Weight | 10.5 kg |
| Power Supply | 230 V ~ 50 Hz, 1100 W (input) |
| Cavity Material | Enamel |
| Cleaning Instructions | Wipe with damp cloth, avoid abrasive cleaners |
| Spare Parts Availability | Contact SilverCrest service center |
Frequently Asked Questions - SSMW 750 E1 SILVERCREST
User questions about SSMW 750 E1 SILVERCREST
0 question about this device. Answer the ones you know or ask your own.
Ask a new question about this device
Download the instructions for your Microwave in PDF format for free! Find your manual SSMW 750 E1 - SILVERCREST and take your electronic device back in hand. On this page are published all the documents necessary for the use of your device. SSMW 750 E1 by SILVERCREST.
USER MANUAL SSMW 750 E1 SILVERCREST
natural_image
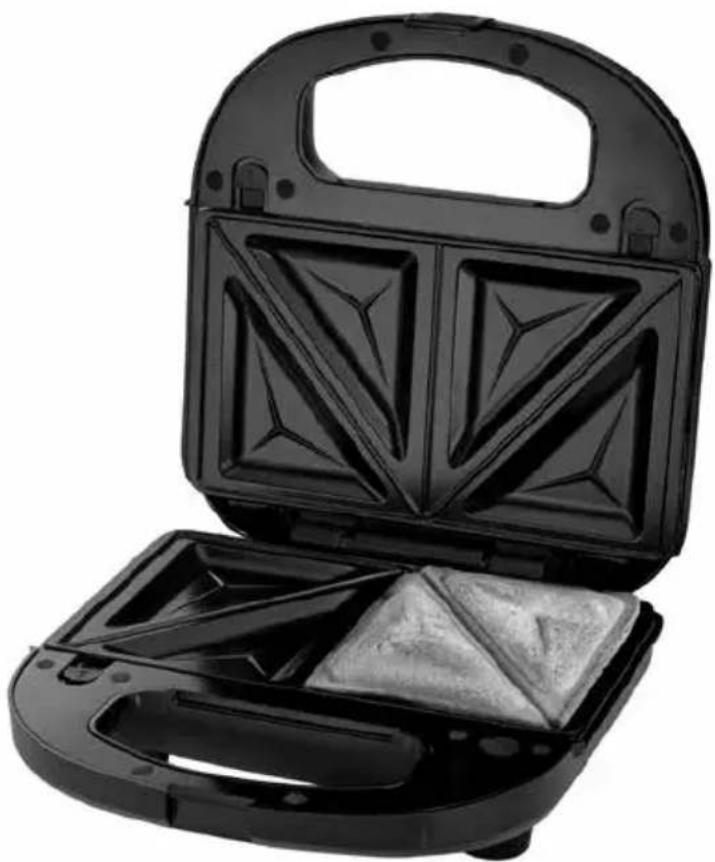
Black griddle oven with open lid and internal compartments (no text or symbols visible)SANDWICH TOASTER SSMW 750 E1
GB IE NI CY
SANDWICH TOASTER
Operating instructions
GR CY
TOΣTIEPA
Οδηγίες χρήσης
DE AT CH
SANDWICHMAKER
Bedienungsanleitung
IAN 459974_2401
GB IE NI CY
Before reading, unfold the page containing the illustrations and familiarise yourself with all functions of the device.
GR CY
GB/IE/NI/CY Operating instructions Page 1
Warnings and symbols used .... 2
Safety guidelines .... 3
Items supplied 5
Description of the appliance .... 5
Exchanging the removable plates .... 5
Placement of the removable plates 5
Extracting the removable plate 6
Commissioning 6
Operation 6
Toasting sandwiches 6
Baking waffles 7
Grilling 7
Cleaning 8
Storage 8
Troubleshooting 9
Technical data 9
Recipes....9
Dutch tomato toast 9
Italian toast 10
Hawaiian toast 10
Waffles 10
Apple waffles 10
Shrimp skewer 11
Disposal....11
Disposal of the appliance 11
Disposal of the packaging 11
Kompernass Handels GmbH warranty 12
Service 13
Importer 13
Introduction
Congratulations on the purchase of your new appliance!
You have selected a modern, high-quality product. These operating instructions are part of this product. They contain important information on safety, usage and disposal. Before using the product, familiarise yourself with all handling and safety guidelines. This appliance may only be used as described and for the purposes indicated. Please also pass these operating instructions on to any future owner(s).
Intended use
This appliance is intended exclusively for the toasting of filled sandwiches, baking waffles and the grilling of foodstuffs.
This appliance is intended solely for use in private households.
Not for commercial use!
Warnings and symbols used
The following warnings and symbols are used in these operating instructions, on the packaging and on the appliance (where applicable):
| DANGER! A warning with this symbol and the signal word "DANGER" indicates an imminently hazardous situation that will result in death or serious injury if not avoided. | |
| WARNING! A warning with this symbol and the signal word "WARNING" indicates a potentially hazardous situation that could result in death or serious injury if not avoided. |







CAUTION! A warning with this symbol and the signal word "CAUTION" indicates a potentially hazardous situation that could result in a minor or moderate injury if not avoided.
ATTENTION! A warning with this symbol and the signal word "ATTENTION" indicates a potential situation that could result in property damage if not avoided.
A note identifies additional information that facilitates the use of the appliance.
Caution! Hot surface!
All of the parts of this appliance that come into contact with food are food-safe.
Do not immerse in water!
AC current/voltage
Dishwasher-proof.
Safety guidelines
⚠ WARNING! RISK OF ELECTRIC SHOCK!
■ To avoid potential risks, if the appliance power cable is damaged, it must be replaced by the manufacturer, its customer service or by a qualified technician.
■ Use the appliance only in dry indoor areas, not outdoors.
■ NEVER immerse the appliance in water or other liquids! Otherwise there is a risk of an electric shock.
■ When cleaning, ensure that water cannot permeate into the appliance. NEVER clean the appliance under running water.
■ Ensure that the appliance can never come into contact with water. NEVER use the appliance adjacent to water or close to vessels containing liquids.
■ Ensure that the power cable never becomes wet or damp when the appliance is in use. Route the cable so that it cannot be trapped or damaged in any way.
■ After use, disconnect the power cable from the mains power socket to turn off the unit.
■ NEVER open the housing of the appliance.
⚠ WARNING! RISK OF INJURY!
■ This appliance may be used by children of the age of 8 years or more and by persons with reduced physical, sensory or mental capabilities or lack of experience and/or knowledge if they are being supervised or have been instructed with regard to the safe use of the appliance and have understood the potential risks.
■ Children must not use the appliance as a plaything.
■ Cleaning and user maintenance must not be performed by children unless they are older than 8 years of age and are supervised. Children younger than eight years of age must be kept away from the appliance and the power cable.
■ The appliance components can get hot during operation. Therefore, only touch the handles.
■ Let the appliance cool down completely before cleaning it, exchanging the removable plates or putting it into storage.
■ Use caution when removing the finished foods (sandwiches, waffles, etc.). The appliance, as well as the sandwiches, will be very hot.
■ Use the appliance only on a stable, non-slippery and level surface.
■ Do not use an external timer switch or a separate remote control system to operate the appliance.

CAUTION! Hot surface!
! ATTENTION - RISK OF FIRE!
This appliance may not be used in close vicinity to flammable material.
▶ Do not leave the appliance unattended at any time when it is in use.
▶ Operate the appliance only on heat resistant surface.
The appliance must always be supervised during use.
! ATTENTION - PROPERTY DAMAGE!
■ To avoid damaging the non-stick coating of the sandwich toaster, remove your cooked foods only with a plastic or wooden spatula or some other suitable, non-metallic implement.
■ Do not use abrasive cleansers or sharp objects for cleaning.
① Note:
■ No user action is required to switch the product between 50 and 60 Hz. The product adapts automatically to either 50 or 60 Hz.
Items supplied
The appliance is delivered with the following components as standard:
- Sandwich Toaster
- 2 Removable plates "Sandwich"
- 2 Removable plates "Waffles"
- 2 Removable plates "Grill"
- Operating instructions
1) Remove the appliance, the removable plates and the operating instructions from the carton.
2) Remove all packing material.
(i) Note:
▶ Check the contents to ensure everything is present and for visible damage.
▶ If the delivery is not complete or has been damaged due to defective packaging or transportation, contact the Service Hotline (see section Service).
Description of the appliance
Figure A:
① Cable retainer
② Green control lamp (temperature reached)
③ Lid catch
4 Catches
⑤ Heating coils
⑥ Holders (inside)
⑦ Small latches (outside)
8 Large latches (inside)
⑨ Removable plates „Sandwich“
⑩ Removable plates „Waffles“
⑪ Removable plates „Grill“
⑫ Red control lamp (operation)
Exchanging the removable plates
You can choose between 3 different removable plates:
- Removable plates "Sandwich" ⑨: for the preparation of filled sandwiches.
- Removable plates "Waffles" ⑩: for baking waffles.
- Removable plates "Grill" ⑪: for grilling meat, fish, etc.
⚠ WARNING! RISK OF ELECTRIC SHOCK
▶ Disconnect the plug from the mains power socket before exchanging the removable plates.
⚠ WARNING! RISK OF INJURY!
▶ Let the appliance cool down before exchanging the removable plates! Risk of Burns!
ATTENTION!
▶ Never use two different removable plates at the same time.
Placement of the removable plates
1) Open the sandwich maker by releasing the lid locking device ③ and lifting the lid.
2) First slide the large latches ⑧ of the selected removable plate into the holders ⑥ on the inside of the appliance.
3) Now press the removable plate downwards until the small latches ⑦ engage and the removable plate is firmly in place.
4) Repeat steps 2 and 3 to insert the second removable plate.
Extracting the removable plate
1) Open the sandwich maker by releasing the lid catch ③ and lifting the lid.
2) Slide the catches ④ in the direction of the arrow so that the removable plate can be released.
3) Remove the removable plate.
4) Repeat steps 2 and 3 to remove the second removable plate.
Commissioning
Carry out the following procedure with each of the 3 pairs of removable plates.
■ Smear the non-stick coating on the removable plates with oil suitable for cooking.
WARNING! RISK OF INJURY!
▶ Let the appliance cool down before exchanging the removable plates! Risk of Burns!
■ Install a pair of removable plates into the appliance.
■ Insert the plug into a mains power socket.
■ Close the appliance and lock it with the lid locking device ③. This must click audibly into the lower handle.
■ Let the appliance heat up for about 10 minutes.
(i) Note:
▶ With the first usage a slight smell can arise (minimal smoke development is also possible). This is normal and dissipates after a short time. Provide for sufficient ventilation. For example, open a window.
■ Disconnect the plug and allow the appliance to cool down.
■ Clean the removable plates and the appliance as described in the chapter Cleaning.
The appliance is now ready for use.
Operation
Toasting sandwiches
1) Select the removable plates "sandwich" ⑨ and install them.
① ATTENTION!
▶ Never use two different removable plates at the same time.
2) Close the lid and lock it with the lid locking device ③.
3) Insert the plug into a mains power socket. The red control lamp ⑫ lights up as long as the appliance is connected to the mains.
4) As soon as the appliance is heated up, the green control lamp "Ready" ② glows.
5) Open the lid and insert two prepared sandwiches on the lower removable plate.
6) Close the lid and lock it with the lid locking device ③. If the sandwich is still too thick, so that the lid locking device ③ cannot be closed, reduce the amount of filling.
(i) Note:
▶ While the sandwiches are toasting, the green control lamp ② switches off and on again. This indicates that the appliance is heating up or the temperature is being maintained.
! ATTENTION!
▶ To avoid damaging the non-stick coating of the Sandwich Maker, remove your cooked foods only with a plastic or wooden spatula or some other suitable, non-metallic implement.
7) The sandwiches are ready after about 5 - 6 minutes. This time information can, depending on the type of filling and personal tastes, vary. Open the lid and take the sandwiches out.
8) When you no longer wish to prepare any more sandwiches, disconnect the plug from the mains power socket.
Baking waffles
1) Select the removable plates "waffles" ⑩ and install them.
ATTENTION!
▶ Never use two different removable plates at the same time.
2) Close the lid and lock it with the lid locking device ③.
3) Insert the plug into a mains power socket. The red control lamp ⑫ lights up as long as the appliance is connected to the mains.
4) As soon as the appliance is heated up, the green control lamp "Ready" ② glows.
5) Open the lid and place about 2 - 3 large tablespoons of batter into each of the two waffle baking surfaces on the lower removable plate.
6) Now close the lid. Do not lock the lid!
i Note:
▶ While the waffles are baking, the green control lamp ② switches off and on again. This indicates that the appliance is heating up or the temperature is being maintained.
! ATTENTION!
▶ To avoid damaging the non-stick coating of the Sandwich Maker, remove your waffles only with a plastic or wooden spatula or some other suitable, non-metallic implement.
7) The waffles are ready after about 5 - 7 minutes. This time information can, depending on the type of batter used and personal tastes, vary. Open the lid and take the waffles out.
8) When you no longer wish to prepare any more waffles, disconnect the plug from the mains power socket.
Grilling
1) Select the removable plates "grill" ⑪ and install them.
! ATTENTION!
▶ Never use two different removable plates at the same time.
2) Close the lid and lock it with the lid locking device ③.
3) Insert the plug into a mains power socket. The red control lamp ⑫ lights up as long as the appliance is connected to the mains.
4) As soon as the appliance is heated up, the green control lamp "Ready" ② glows.
5) Open the lid and place the food to be grilled on the lower removable plate.
6) Now close the lid. Do not lock the lid!
7) From time to time check the degree of browning by lifting the lid.
i Note:
▶ While the food is being cooked, the green control lamp ② switches off and on again. This indicates that the appliance is heating up or the temperature is being maintained.
! ATTENTION!
▶ To avoid damaging the non-stick coating of the Sandwich Maker, remove your cooked foods only with a plastic or wooden spatula or some other suitable, non-metallic implement.
8) When the food is cooked through, take it from the removable plate.
9) When the appliance is no longer needed, remove the plug from the mains power socket.
Cleaning
WARNING! RISK OF ELECTRIC SHOCK
▶ Disconnect the plug from the mains power socket before cleaning the appliance.


NEVER submerse the appliance in water or other liquids! If you do, then you could receive a potentially fatal electric shock.
WARNING! RISK OF INJURY!
▶ Let the appliance cool down before cleaning it. Risk of Burns!
ATTENTION!
▶ Do not use aggressive or abrasive cleaning agents. These can damage the upper surfaces of the appliance.
(i) Note:
▶ Do not wait too long to start with the cleaning. Wait until the appliance has cooled down sufficiently that you can touch it without the risk of being burnt. Then the food particles can be removed more easily.
■ Clean the appliance housing only with a dry or lightly moistened cloth.
■ Detach the removable plates and clean them in warm water with a little detergent added.
(i) Note:

The removable plates may be cleaned in the dishwasher.
As the undersides of the removable
plates are not coated, they can easily stain after cleaning in the dishwasher. However, this does not affect the function. We therefore recommend cleaning the removable plates by hand.
If fats or food should be under the removable plates and in the space in which the heating coils ⑤ are located, proceed as follows:
–Dab the fats or other liquids with a piece of kitchen paper.
- Remove stuck-on burnt residues with a wooden spatula or small wooden skewers.
■ Dry all parts well before re-use.
Storage
■ Clean the appliance as described in the chapter "Cleaning".
■ Close the lid and lock it with the lid catch ③.
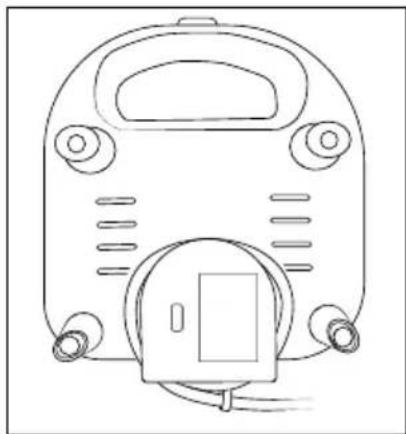
■ Wind the cable around the cable retainer ① on the underside of the appliance and fasten it with the cable clip.
natural_image
Line drawing of a vintage-style electronic device with front panel and side ports (no text or symbols)■ The appliance can also be stored upright if the mains cable is not wound up.
■ Store the sandwich toaster in a dry location.
Troubleshooting
| Malfunction Cause Solution | ||
| The appliance is not working. | The plug is not inserted into a mains power socket. | Connect the plug to the power supply. |
| The appliance is defective. | Contact the Customer Service department. | |
| The sandwiches/waffles/grilled food are too dark. | The sandwiches/waffles/grilled food were in the Sandwich Maker for too long. | Take the sandwiches/ waffles/ grilled food out a little earlier. |
Technical data
| Voltage 220 - 240 V ~, 50/60 Hz | |
| Power consumption 750 W |

This mark confirms that the product complies with the product safety requirements applicable in the UK.
Recipes
Dutch tomato toast
Ingredients:
◆ 4 slices of toasting bread
Water
♦ Spring onions
◆ 1 medium tomato
Herb butter
◆ 2 slices of cooked ham
Salt
♦ Freshly ground pepper
◆ 2 slices of young Gouda cheese
1) Wash the spring onions and let them drip dry. Halve the onions lengthwise and then cut them into large pieces. Bring the water with salt to the boil in a pot. Add the spring onions and blanch them for about 1 minute.
Then place the spring onions in a sieve, douse them with cold water and let them drip dry.
2) Wash the tomatoes and dab them dry. Halve them and remove the stalks. Cut the tomatoes into slices.
3) Spread the herb butter on the bread and place a folded slice of ham on the buttered bread. Chop the spring onions and spread them and the tomato pieces on the bread. Season with salt and pepper.
4) Lay the cheese slices on the slice of toast bread.
5) Spread a little herb butter on another slice of bread and use it to top your sandwich (buttered side downwards).
Italian toast
Ingredients:
◆ 4 slices of toasting bread
♦ 4 tbsp. tomato purée
◆ 2 tbsp mayonnaise
Salt
Herbs de Provence
♦ Freshly ground pepper
◆ 1 medium tomato
◆ 1 pack of Mozzarella cheese
♦ Freshly ground coloured pepper
1) Stir the tomato paste, mayonnaise, salt, herbs de Provence and pepper together. Spread the slices of toast bread with it.
2) Wash the tomatoes and dab them dry. Halve them and remove the stalks. Cut the tomatoes into slices.
3) Drain the Mozzarella cheese in a sieve and then cut it into slices. Cut these in half.
4) Now add the tomato and Mozzarella slices to the already spread bread.
5) Top your sandwich with the other piece of bread.
Hawaiian toast
Ingredients:
◆ 4 slices of toasting bread
◆ 2 slices of pineapple (tinned)
Butter
◆ 2 slices of cooked ham
◆ 2 cheese slices
1) Drain the pineapples in a sieve.
2) Now coat the toast slice with butter.
3) Garnish the toast bread with ham and pineapple.
4) Lay the cheese on the pineapple as the last ingredient.
5) Top your sandwich with a slice of bread.
Waffles
Ingredients
◆ 250 g Margarine or butter
◆ ca. 200 g Sugar
◆ 2 Packets of Vanilla sugar
◆ 5 Eggs
◆ 500 g Flour
◆ 2 teaspoons Baking powder
◆ 350 - 400 ml Milk
1) Stir the eggs until foamy.
2) Add the sugar and vanilla sugar, then stir everything together.
3) Then add the melted butter or margarine.
4) Blend in the baking powder.
5) Under constant stirring, gradually add the milk and flour alternately.
6) Combine everything at the highest speed with a hand blender until a smooth batter mixture is achieved.
Apple waffles
Ingredients
◆ 250 g Margarine or butter
◆ 75 g Sugar
◆ 4 Eggs
◆ 250 g flour
◆ 1 tsp of Baking powder
◆ 125 ml lukewarm Milk
◆ 300 g Apples (peeled, cut into cubes.)
◆ 50 g grated Almonds or Nuts
1) Stir the eggs until foamy.
2) Add the sugar and stir everything.
3) Then add the melted butter or margarine.
4) Blend in the baking powder.
5) Under constant stirring, gradually add the milk and flour alternately.
6) Finally, blend in the almonds/nuts and the apple cubes.
7) Combine everything at the highest speed with a hand blender until a smooth batter mixture is achieved.
Shrimp skewer
Ingredients
◆ 250 g medium size, peeled Shrimps
◆ 2 Garlic cloves (finely chopped)
◆ 5 tbsp. Olive oil
◆ 12 small Tomatoes (cherry tomatoes)
◆ 1 tbsp. chopped parsley
♦ Salt, pepper, paprika powder
1) Put the olive oil, garlic, a little paprika powder, salt, pepper and parsley in a bowl and mix everything.
2) Then add the shrimps and stir everything together, so that the shrimps are thoroughly moistened with the herb-spice mixture.
3) Let the shrimps marinade in the mixture for about 20 minutes.
4) Spike a tomato alternatively with a shrimp on a skewer.
5) Grill the skewers for about 5 minutes.
Disposal
Disposal of the appliance
The adjacent symbol of a crossed-out dustbin means that this appliance is subject to Directive 2012/19/EU. This directive states
that this appliance may not be disposed of in the normal household waste at the end of its useful life, but must be taken to specially set-up collection locations, recycling depots or disposal companies.
The disposal is free of charge for the user. Protect the environment and dispose of this appliance properly.
If your old appliance has stored any personal data, you are responsible for deleting it yourself before returning it.

Your local community or municipal authorities can provide information on how to dispose of the worn-out product.
Disposal of the packaging

The packaging materials have been selected for their environmental friendliness and ease of disposal and are therefore recyclable.
Dispose of packaging materials that are no longer needed in accordance with applicable local regulations.
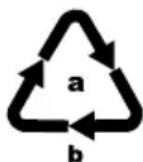
Dispose of the packaging in an environmentally friendly manner. Note the labelling on the packaging and separate the packaging material components for disposal, if
necessary. The packaging material is labelled with abbreviations (a) and numbers (b) with the following meanings: 1–7: plastics, 20–22: paper and cardboard, 80–98: composites.
Kompernass Handels GmbHwarranty
Dear Customer,
This appliance has a 3-year warranty valid from the date of purchase. If this product has any faults, you, the buyer, have certain statutory rights. Your statutory rights are not restricted in any way by the warranty described below.
Warranty conditions
The warranty period starts on the date of purchase. Please keep your receipt in a safe place. This will be required as proof of purchase.
If any material or manufacturing fault occurs within three years of the date of purchase of the product, we will either repair or replace the product for you or refund the purchase price (at our discretion). This warranty service requires that you present the defective appliance and the proof of purchase (receipt) within the three-year warranty period, along with a brief written description of the fault and of when it occurred.
If the defect is covered by the warranty, your product will either be repaired or replaced by us. The repair or replacement of a product does not signify the beginning of a new warranty period.
Warranty period and statutory claims for defects
The warranty period is not prolonged by repairs effected under the warranty. This also applies to replaced and repaired components. Any damage and defects present at the time of purchase must be reported immediately after unpacking. Repairs carried out after expiry of the warranty period shall be subject to a fee.
Scope of the warranty
This appliance has been manufactured in accordance with strict quality guidelines and inspected meticulously prior to delivery.
The warranty covers material faults or production faults. The warranty does not extend to product parts subject to normal wear and tear or to fragile parts which could be considered as consumable parts such as switches, batteries or parts made of glass.
The warranty does not apply if the product has been damaged, improperly used or improperly maintained. The directions in the operating instructions for the product regarding proper use of the product are to be strictly followed. Uses and actions that are discouraged in the operating instructions or which are warned against must be avoided.
This product is intended solely for private use and not for commercial purposes. The warranty shall be deemed void in cases of misuse or improper handling, use of force and modifications / repairs which have not been carried out by one of our authorised Service centres.
Warranty claim procedure
To ensure quick processing of your case, please observe the following instructions:
■ Please have the till receipt and the item number (IAN) 459974_2401 available as proof of purchase.
■ You will find the item number on the type plate on the product, an engraving on the product, on the front page of the operating instructions (below left) or on the sticker on the rear or bottom of the product.
If functional or other defects occur, please contact the service department listed either by telephone or by e-mail.
- You can return a defective product to us free of charge to the service address that will be provided to you. Ensure that you enclose the proof of purchase (till receipt) and information about what the defect is and when it occurred.

You can download these instructions along with many other manuals, product videos and installation software at www.lidl-service.com.
This QR code will take you directly to the Lidl service page (www.lidl-service.com) where you can open your operating instructions by entering the item number (IAN) 459974_2401.
Service
GB Service Great Britain
Tel.: 0800 404 7657
E-Mail: kompernass@lidl.co.uk
IE ServiceIreland
Tel.: 1800 101010
E-Mail: kompernass@lidl.ie
CY ServiceCyprus
Tel.: 8009 4241
E-Mail: kompernass@lidl.com.cy
IAN 459974_2401
Importer
Please note that the following address is not the service address. Please use the service address provided in the operating instructions.
For EU market

KOMPERNASS HANDELS GMBH
BURGSTRASSE 21
44867 BOCHUM
GERMANY
www.kompernass.com
For GB market
Lidl Great Britain Ltd
Lidl House 14 Kingston Road
Surbiton
KT5 9NU
Περιεχόμενα
Εισαγωγή....16
natural_image
Line drawing of a mechanical device with no visible text or symbolsKOMPERNASS HANDELS GMBH
BURGSTRASSE 21
44867 BOCHUM
ГЕРMANIA
www.kompernass.com
Lidl Great Britain Ltd
Lidl House 14 Kingston Road
Surbiton
KT5 9NU
Inhaltsverzeichnis
Einführung 30
natural_image
Line drawing of a vintage electronic device with front panel and control buttons (no text or symbols)KOMPERNASS HANDELS GMBH
BURGSTRASSE 21
44867 BOCHUM
DEUTSCHLAND
www.kompernass.com
Für den GB-Markt
Lidl Great Britain Ltd
Lidl House 14 Kingston Road
Surbiton
KT5 9NU
KOMPERNASS HANDELS GMBH
BURGSTRASSE 21
44867 BOCHUM
GERMANY
www.kompernass.com
- SANDWICH TOASTER SSMW 750 E1
- GB IE NI CY
- GR CY
- Introduction
- Intended use
- Warnings and symbols used
- Safety guidelines
- ⚠ WARNING! RISK OF ELECTRIC SHOCK!
- ⚠ WARNING! RISK OF INJURY!
- CAUTION! Hot surface!
- ! ATTENTION - RISK OF FIRE!
- ! ATTENTION - PROPERTY DAMAGE!
- ① Note:
- Items supplied
- Description of the appliance
- Figure A:
- Exchanging the removable plates
- Placement of the removable plates
- Extracting the removable plate
- Commissioning
- WARNING! RISK OF INJURY!
- Note:
- Operation
- Toasting sandwiches
- ① ATTENTION!
- ! ATTENTION!
- Baking waffles
- Grilling
- Cleaning
- WARNING! RISK OF ELECTRIC SHOCK
- ATTENTION!
- Storage
- Recipes
- Dutch tomato toast
- Ingredients:
- Italian toast
- Hawaiian toast
- Waffles
- Ingredients
- Apple waffles
- Shrimp skewer
- Disposal
- Disposal of the appliance
- The disposal is free of charge for the user. Protect the environment and dispose of this appliance properly.
- Disposal of the packaging
- Kompernass Handels GmbHwarranty
- Warranty conditions
- Warranty period and statutory claims for defects
- Scope of the warranty
- Warranty claim procedure
- Service
- Importer
- For EU market
- For GB market
- Περιεχόμενα
- Inhaltsverzeichnis
- Für den GB-Markt
Brand : SILVERCREST
Model : SSMW 750 E1
Category : Microwave