MR-854 - Meat Grinder Maestro - Free user manual and instructions
Find the device manual for free MR-854 Maestro in PDF.


| Product Type | Meat Grinder |
| Brand | Maestro |
| Model | MR-854 |
| Power Supply | 220-240V, 50Hz AC |
| Rated Power | 500W |
| Max Locked Power | 1500W |
| Protection Class | Class II |
| IP Rating | IPX0 |
| Overheat Protection | Thermostat auto shut-off |
| Cutting Plates | 3mm (fine), 5mm (medium), 8mm (coarse) |
| Functions | Mincing, Kebbe making, Sausage making |
| Material | Stainless steel and plastic |
| Cleaning | Motor unit: wipe with damp cloth; accessories: hand wash only, not dishwasher safe |
| Safety Features | Thermal cut-off, non-slip feet (assumed), safety switch (on/off) |
| Usage | Household use only |
| Max Continuous Operation | 5 minutes, then cool for 10 minutes |
| Assembly | No tools required |
| Accessories Included | Food pusher, hopper plate, cutting blade, 3 cutting plates, fixing ring, sausage horn, kebbe maker |
Frequently Asked Questions - MR-854 Maestro
User questions about MR-854 Maestro
0 question about this device. Answer the ones you know or ask your own.
Ask a new question about this device
Download the instructions for your Meat Grinder in PDF format for free! Find your manual MR-854 - Maestro and take your electronic device back in hand. On this page are published all the documents necessary for the use of your device. MR-854 by Maestro.
USER MANUAL MR-854 Maestro
Owners manual. Electric Meat Grinder
natural_image
Black Maestro® stainless steel kitchen tool with control knob (no visible text or symbols on body)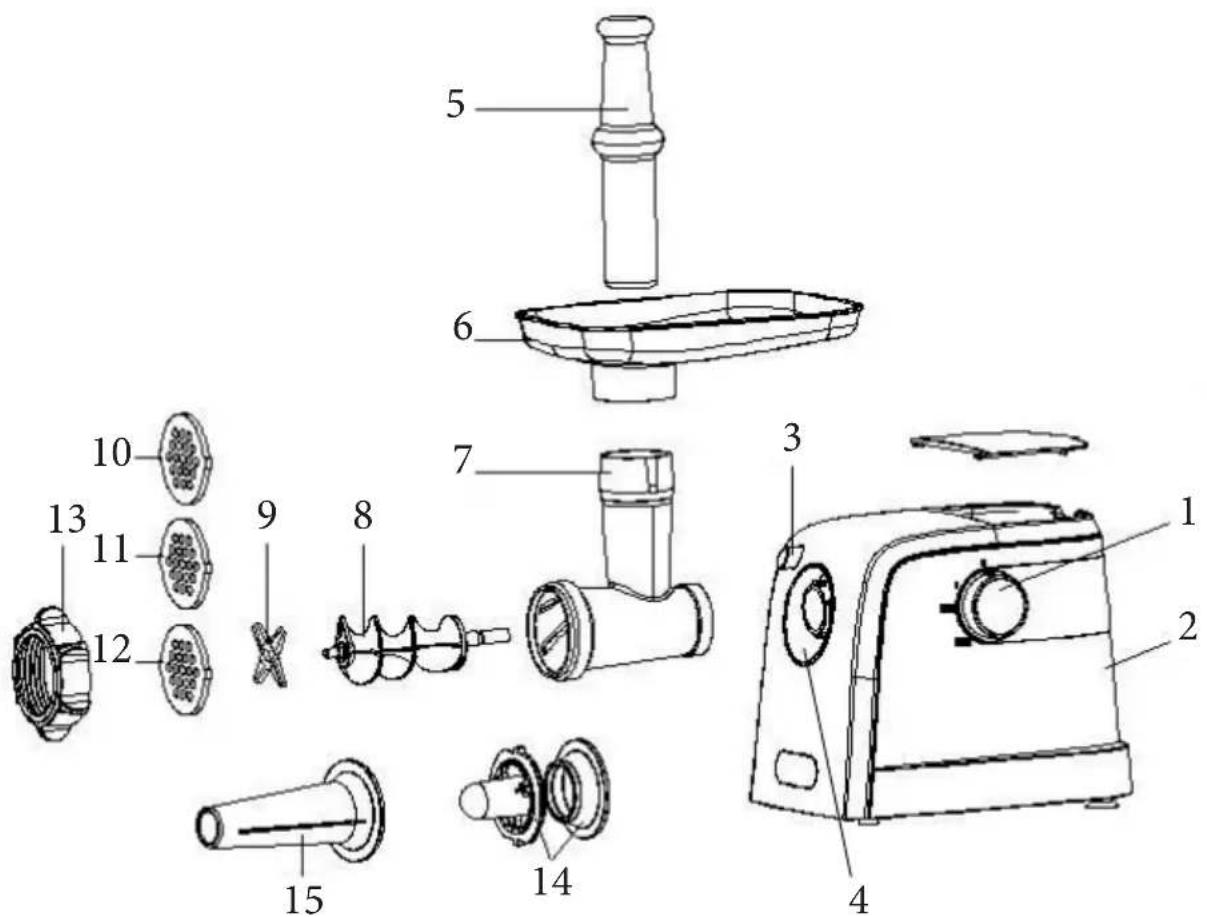
Pictures/ Paveikslai/ Rysunki/ Figuri/ Рисунки/ Малюнки
EN Description of the appliance....4
DE Gerät....12
PL Konstrukcja urządzenia....21
RO Structura produsului....30
RU Устройство прибора....38
UA Склад приладу....46
Dear customer, we thank you for purchase of goods!

Functionality, design and conformity to the quality standards guarantee to you reliability and convenience in use of this device.
Please read and comply with these original instructions prior to the initial operation of your appliance and store them for later use of subsequent owners.
The Meat Grinder is intended only for the preparation of beverages in living (home) conditions. Under condition of observance of user regulations and a special purpose designation, a parts of appliance do not contain unhealthy substances.
TECHNICAL SPECIFICATIONS
Model: MR-854
Electrical supply:
Alternating current- AC;
Rated voltage 220-240V;
Max locked power: 220-240 V, \~50 Hz, 1500W;
Rated power: 220-240 V, \~50 Hz, 500W;
Protective class II
Protection class IPX0
This appliance is equipped with a thermostat system. This system will automatically cut off the power supply to the appliance in case of overheating
Description of the appliance
Picture1| page 2
- ON/OFF switch
- Body
- Fasten button
- Tube inlet
- Food pusher
- Hopper plate
- Head Tube
- Snake
- Cutting blade
- Cutting plate (fine) 3 mm
- Cutting plate (medium) 5 mm
- Cutting plate 8 mm
- Fixing ring
- Sausage
- Kebbe
Safety instructions
When using your appliance, basic safety precautions should always be followed, including the following:
- DO NOT leave the appliance unnecessarily plugged in. Disconnect the plug from the mains when the appliance is not being used.
- Always turn off the switch (time controller) and take electrical connector out of socket before cleaning and storage.
- DO NOT use the power cord or the appliance in order to pull the plug out of the socket.
- Only plug the appliance into an outlet with an earthed (ground) contact.
- In the interest of safety, regular periodic close checks should be carried out on the supply cord to ensure no damage is evident.
Should there be any signs that the cord is damaged in the slightest degree, the entire appliance should be returned be authorized service engineer.
-If your device was brought from cold to warm room, do not switch it on within 2 hours to prevent damage due to condensation on internal parts - This appliance is not intended for use by persons (including children) with reduced physical, sensory or mental capabilities, or lack of experience and knowledge, unless they have been given supervision or instruction concerning use of the appliance by a person responsible for their safety.
- Do not operate the appliance if damaged, after an appliance malfunctions or it has been damaged in any manner, return to at authorized service engineer for repair.
- DO NOT let children or untrained persons use the appliance without supervision.
- Keep the power cord away from the hot and sharp surfaces. The power cord should not touch the top
part and the back wall of the oven during its operation.
- Do not let the cord hang over the edge of a table or counter or touch hot surfaces.
- Не бросайте прибор.
- DO NOT leave the appliance exposed to the weather (rain, sun, etc.).
Actions in extreme situations:
- If a device tumbled into water, immediately, unplug the device, not touching to the device or water.
- In case of appearance from appliance of smoke, sparkling, strong smell of a burn isolation, immediately stop use the device, unplug the device, appeal to the nearest service center.
ATTENTION!
- Never use your finger or an objection to push ingredients down the feed tube while the appliance is running. Only the pusher is to be used for this purpose.
- Do not touch moving parts during the operation
- Always disconnect appliance before cleaning, assembling,
disassembling, loading and unloading products. Perform assembly and disassembly only after full stop of moving
parts.
Do not use the appliance if the mains cord, the plug or other parts are damaged
In case of failure to observe the rules a danger of serious damages may arise!
Never use any accessories of parts from other manufacture. Your guarantee will become invalid if such accessories or parts have been used.
-THIS APPLIANCE IS FOR HOUSEHOLD USE ONLY. DO NOT USE THE APPLIANCE FOR ANYTHING OTHER THAN INTENDED USE.
Do not use it for commercial purpose.
Preparation for work
- Remove all wrap materials and stickers
- Make sure that all the parts of appliance don't have damages.
- Thoroughly clean the parts that will come into contact with food before you use the appliance for the first time.
We advise you to lubricate the cutter unit and the grinding discs with some vegetable oil.
- Switch the appliance off before detaching and install any accessory.
Wait until moving parts have stopped running before you remove the parts of the appliance.
ASSEMBLING
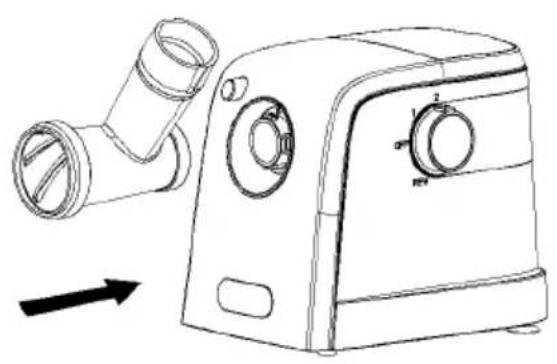
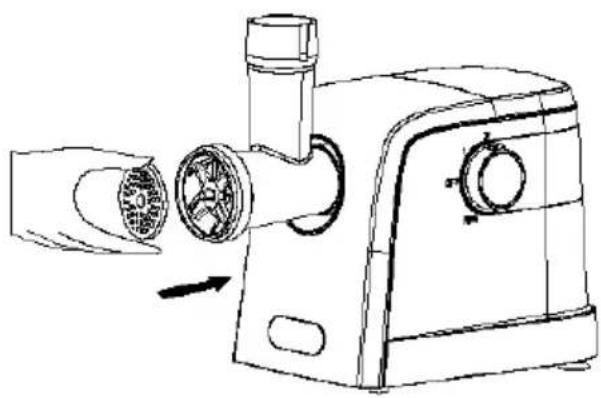
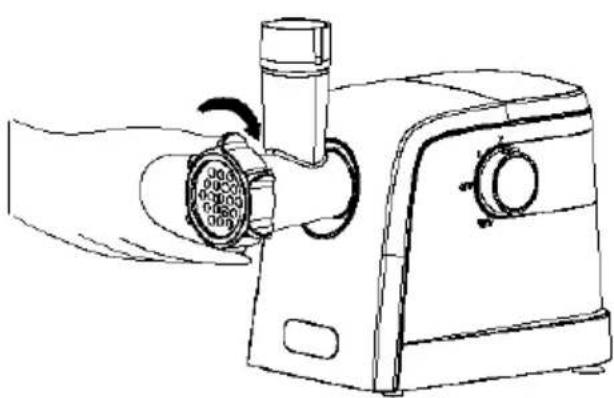
- Press the fasten button hold the head and insert it into the inlet (when inserting please pay attention the head must be slanted as per arrow indicated on the top, see fig.2.1, then move the head anticlockwise so that the head being fastened tightly (fig.2.2)
fig.2.1 fig.2.2
natural_image
Line drawing of a kitchen appliance with pipe fitting and control knobs (no text or symbols)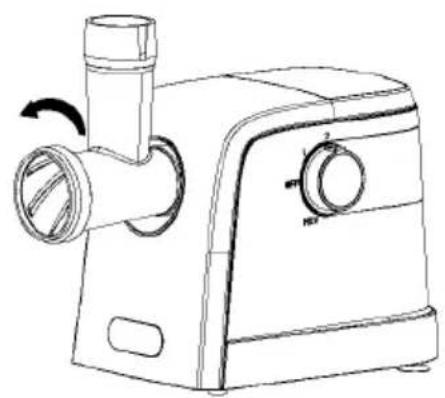
natural_image
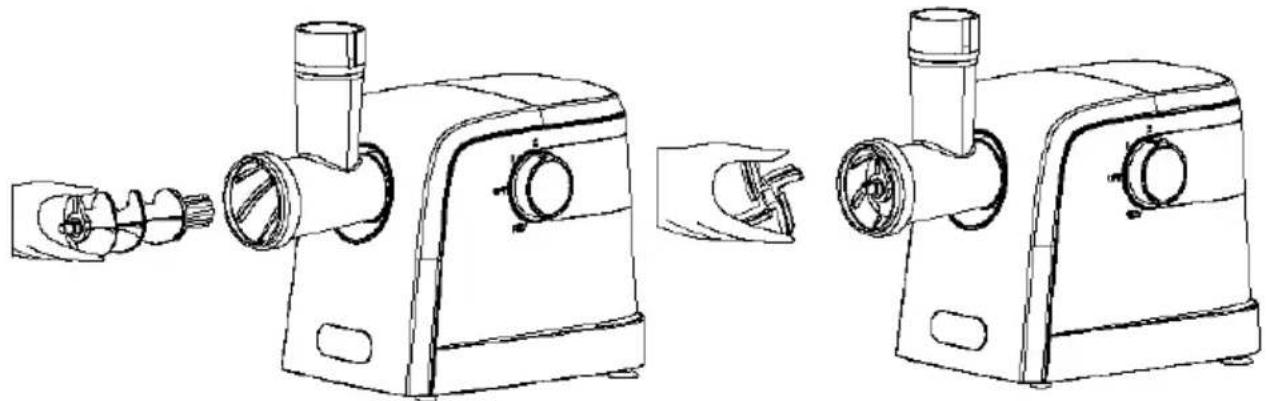
Line drawing of a kitchen electric oven with handle and control knob (no text or symbols)- Place the snake into the head, long end first, and turn to feed the screw slightly until it is set into the motor housing (fig. 2.3)
- Place the cutting blade onto the snake shaft with the blade facing the front as illustrated (fig.2.4). If it is not fitted properly, meat will not be grinded.
fig.2.3 fig.2.4
natural_image
Line drawing of a manual kitchen brush and a manual mixer device (no text or symbols)- Place the desired cutting plate next to the cutting blade, fitting protrusions in the slot (fig.2.5) - Support or press the center of the cutting plate with one finger then screw the fixing ring tight with another hand (fig.2.6). Do not over tighten.
fig.2.5 fig.2.6
EN
natural_image
Line drawing of a manual kitchen tool with a handle and fan (no text or symbols)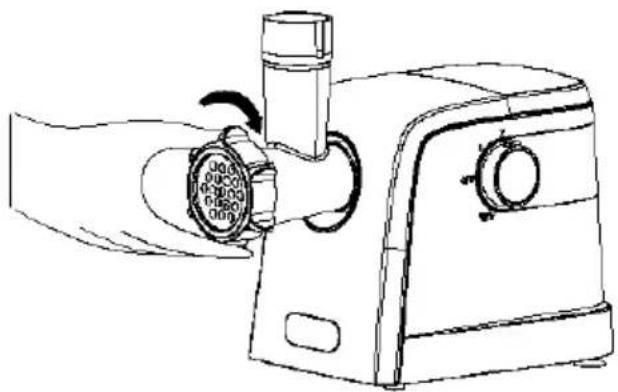
natural_image
Line drawing of a hand operating a sewing machine with a rotary knob (no text or symbols)- Place the hopper plate on the head and fix it into position.
- Locate the unit on a firm place.
- The air passage at the bottom and the side of the motor housing should be kept free and not blocked.
Mincers are fed with sinewless, boneless and fatless beef that has been cut into pieces approximately 20 mm x 20 mm x 60 mm. Pushers are pressed with a force of 5N against the meat. Do not use the appliance for more than 5 minutes consecutively. Leave the appliance to cool for 10 minutes before using again.
Mincer
- Insert the worm shaft into the cutter housing, the plastic end first.
- Place the cutter unit onto the worm shaft. (The cutting edges should be at the front)
Place the medium grinding disc or coarse grinding disc (depending on the consistency you prefer) onto the worm shaft. (Make sure the notch of the grinding disc fit onto the projections of the mincer head.)
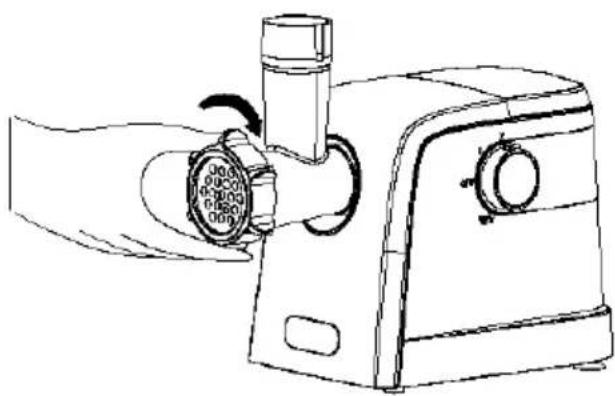
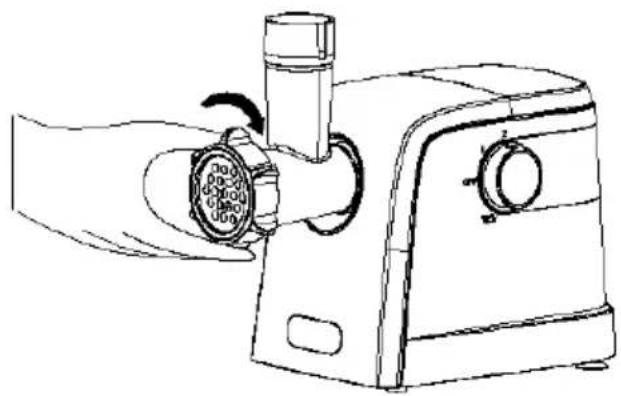
Turn the screw ring in the direction of the arrow on the cutter housing until it is properly fastened.
- Attach the cutter housing to the motor unit.
Cut the meat into 10cm-long, 2cm-thick strips. Remove bones, pieces of gristle and sinews as much as possible. (Never use frozen meat!)
Put the meat in the tray. Use the pusher to gently push the meat into the cutter hosing. (For steak tartare, mince the meat with the medium grinding disc twice.)
If the appliance is locked, please press Reversal button(REV). The meat locked in cutter housing is untrodden, so the appliance can renew its usual condition.
Meat left behind in the cutter housing may be removed from the inside of the appliance by passing a slice of bread through the cutter housing.
Making kebbe
Insert the worm shaft into the cutter housing, the plastic end first.
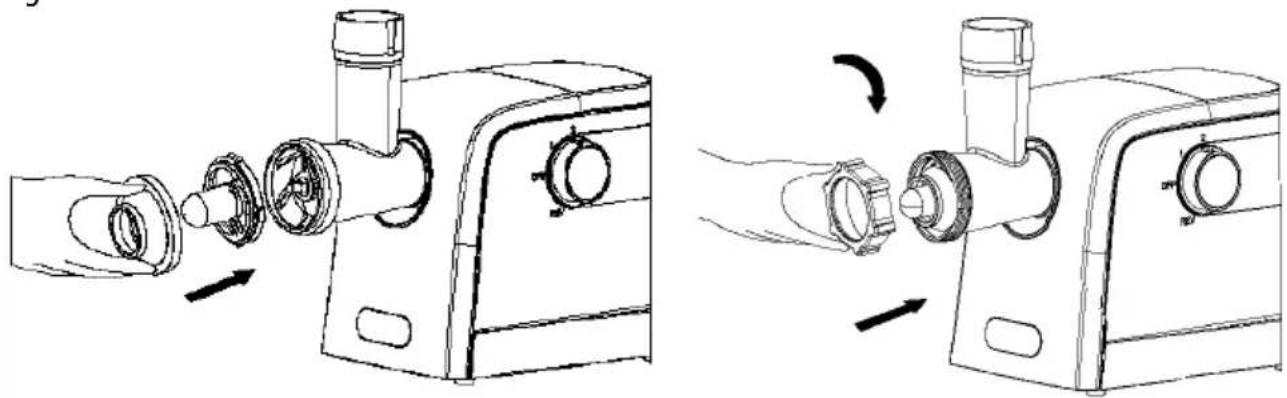
Place the cone in the cutter housing.
Place the former on the cutter housing and screw the ring on the cutter housing.
Place the tray on the upright part of the cutter housing.
Now the appliance is ready for making kebbe.
Feed the prepared kebbe mixture through the kebbe maker. Cut the continuous hollow cylinder into the desired lengths and user as required.
Kebbe is a traditional Middle Eastern dish made primarily of lamp and bulgur wheat which are minced together to form a paste the mixture is extruded through the kebbe maker and cut into short lengths .
The tubes can then be stuffed with a minced meat mixture, the ends pinched together and then deep fried.
fig.3
natural_image
Technical line drawing showing two stages of a mechanical device with internal components and directional arrows (no text or symbols)Making sausages
- Mince the meat Insert the worm shaft into the cutter housing , the plastic end first.
- Place the separator in the cutter housing.
- Place the sausage horn on the cutter housing and screw the ring on the cutter housing.
- (Make sure the notches of the separator fit onto the projections of the mincer head.)
- Attach the cutter housing to the motor unit.
- Place the tray on the upright part of the cutter housing.
- Now the appliance is ready for making sausages.
- Put the ingredients in the tray. Use the pusher to gently push the meat into the cutter housing.
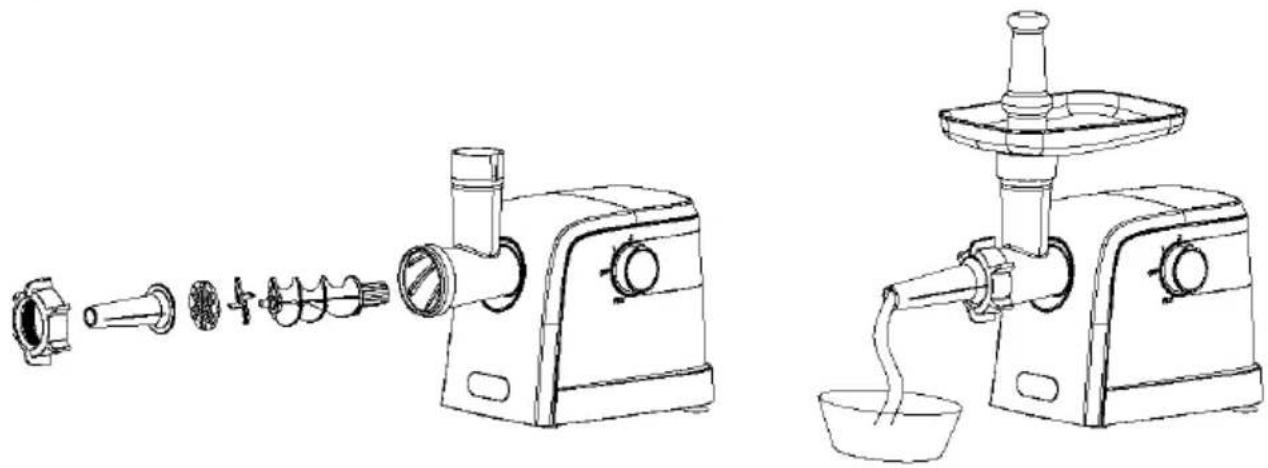
- Put the sausage skin in lukewarm water for 10 minutes. Then slide the wet skin onto the sausage horn. Push the (seasoned) minced meat into the cutter housing. If the skin gets stuck onto the sausage horn, wet it with some water. (fig.4)
fig.4
natural_image
Line drawings of two types of kitchen feeders, showing exploded and assembled views (no text or labels)CLEANING AND MAINTENANCE
ATTENTION!
- Before you clean the appliance, switch the appliance off and remove the plug from the socket
- Never immerse the motor unit in the water or any other liquid, nor rinse it under the tap. Use only a moist cloth to clean the motor unit.
- Never immerse the appliance or part of it in water.
- Do not use any strong or abrasive solvent, sponge or cream cleaner. Do not put in the dishwasher.
Press the release button and turn the whole cutter housing in the direction of the arrow. Remove the pusher and the tray.
Unscrew the screw ring and remove all parts of the cutter housing. Do not clean the parts in the dishwasher!
Wash all parts that have come into contact with meat in hot soapy water. Clean them immediately after use. Rinse them with clear hot water and dry them immediately.
We advise you to lubricate the cutter unit and the grinding discs with some vegetable oil.
Storage
- Switch off the appliance and let it completely cool before storage.
- Wipe and dry the appliance before storage.
- Store the appliance in a cool, dry and clean place beyond the access of children and people with limited physical and mental abilities

Environmental protection
The equipment is labeled in accordance with the European Directive 2012/19/EC «On the disposal of electrical and electronic waste» crossed-out garbage container sign This label indicates that this equipment must not be disposed of with other household waste at the end of its useful life. The user is obliged to hand it over to the collection point for electrical and electronic equipment waste. Electrical equipment waste is hazardous to the environment. Proper handling of used electrical and electronic equipment avoids harmful effects on human health and the environment resulting from the presence of hazardous components, as well as improper storage and recycling of such equipment. The manufacturer shall not be liable for any damage caused by the intended or improper use of the equipment. The manufacturer has the right to change product specifications at any time without prior notice for design, commercial, aesthetic or other reasons.

Funktionalität,
natural_image
Line drawing of a kitchen appliance with pipes and control knobs (no text or symbols)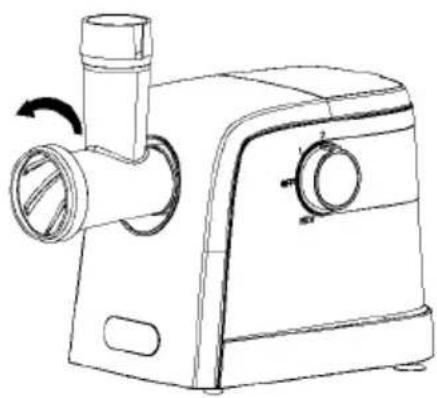
natural_image
Line drawing of a manual kitchen tool with handle and control knob (no text or symbols)natural_image
Line drawings of a manual kitchen brush and a hand holding a tool, showing mechanical components (no text or symbols)Abbildung 2.4
natural_image
Line drawing of a manual kitchen tool with a handle and fan blade (no text or symbols)Abbildung 2.6
natural_image
Line drawing of a hand operating a sewing machine with a rotary knob (no text or symbols)natural_image
Technical line drawing showing two stages of a mechanical device with internal components and directional arrows (no text or symbols)natural_image
Line drawings of two types of kitchen feeders, showing exploded and assembled views (no text or labels)natural_image
Line drawing of a manual kitchen brush and a hand holding a tool, showing mechanical components before and after assembly (no text or symbols)natural_image
Line drawing of a manual kitchen tool with a hand inserting into it (no text or symbols)Rys 2.6
natural_image
Line drawing of a hand operating a sewing machine with a rotary knob (no text or symbols)natural_image
Technical line drawing showing two stages of a mechanical device with internal components and directional arrows (no text or symbols)Gotowanie kiełbasy
natural_image
Line drawings of two types of kitchen feeders, one showing a single screw and the other a side view with a bowl of liquid (no text or labels)Current electric alternativ;
Frecventa nominala: 50 Hz;
natural_image
Line drawings of a manual kitchen brush and a hand tool (no text or symbols)natural_image
Line drawing of a manual kitchen tool with a handle and spout, showing mechanical components and an arrow indicating motion (no text or symbols)Figura 2.6
natural_image
Line drawing of a hand operating a kitchen tool with a circular component inserted (no text or symbols)natural_image
Technical line drawing showing two stages of a sewing machine tool, one with a valve mechanism and the other with a handle (no text or symbols)natural_image
Line drawings of two types of kitchen feeders, showing exploded and assembled views (no text or labels)natural_image
Line drawing of a manual kitchen appliance with pipe fitting and control knobs (no text or symbols)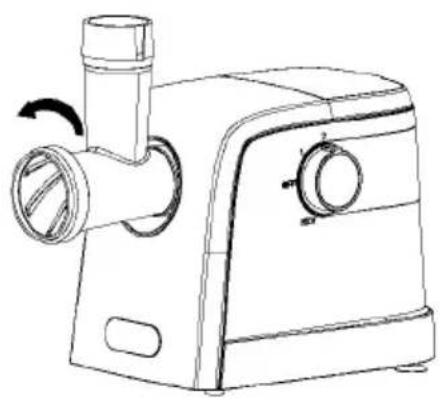
natural_image
Line drawing of a kitchen feeder with handle and control knob (no text or symbols)natural_image
Line drawing of a manual kitchen brush and a manual mixer device (no text or symbols)natural_image
Line drawing of a manual kitchen tool with a cylindrical component and fan blade (no text or symbols)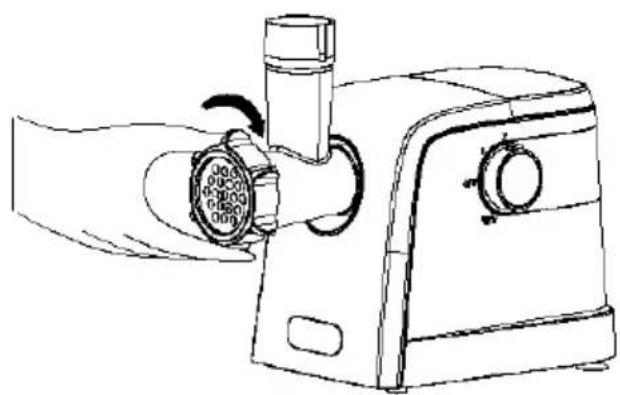
natural_image
Line drawing of a hand operating a kitchen tool with a circular dial (no text or symbols)natural_image
Technical line drawing showing two stages of a mechanical device with ports and components, no text or symbols present.natural_image
Line drawings of two types of kitchen feeders with different internal components and final parts (no text or labels)Чистка и уход
ВНИМАНИЕ!
natural_image
Line drawing of a manual kitchen appliance with pipes and control knobs (no text or symbols)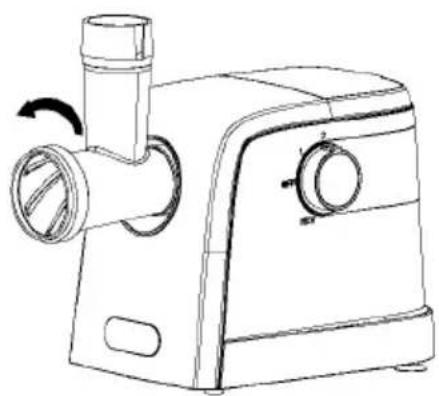
natural_image
Line drawing of a kitchen electric oven with handle and side panel (no text or symbols)natural_image
Line drawings of a manual kitchen brush and a manual mixer device (no text or symbols)natural_image
Line drawing of a manual kitchen tool with a handle and blade, showing internal components and motion direction (no text or symbols)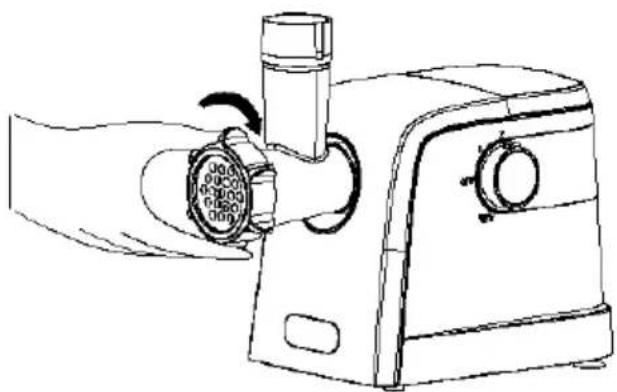
natural_image
Line drawing of a hand operating a kitchen tool with a circular dial (no text or symbols)natural_image
Technical line drawing showing two stages of a sewing machine tool, one being opened and then closed, the other assembled with a handle (no text or symbols present)Приготування ковбас
Certificated in Ukraine
Made in P.R.C. for Maestro
Apollo Corporation Limited ADD: Room 801-2, 8/F..
Easey Commercial Building, 253-261 Hennessy Road, Wanchai, Hong Kong,

- Dear customer, we thank you for purchase of goods!
- TECHNICAL SPECIFICATIONS
- Description of the appliance
- Safety instructions
- When using your appliance, basic safety precautions should always be followed, including the following:
- Actions in extreme situations:
- ATTENTION!
- In case of failure to observe the rules a danger of serious damages may arise!
- ASSEMBLING
- Mincer
- Making kebbe
- Making sausages
- CLEANING AND MAINTENANCE
- Storage
- Environmental protection
- Gotowanie kiełbasy
- Чистка и уход
- ВНИМАНИЕ!
- Приготування ковбас
Brand : Maestro
Model : MR-854
Category : Meat Grinder