
NorBreeze CUDO 520 SS - Range hood NODOR - Free user manual and instructions
Find the device manual for free NorBreeze CUDO 520 SS NODOR in PDF.


| Product type | Built-in range hood |
| Brand | Nodor |
| Model | NorBreeze CUDO 520 SS |
| Width | 520 mm |
| Cut-out dimensions | 265 x 506 mm (SL926_52) or 265 x 831 mm (SL926_85) |
| Number of motors | 1 |
| Airflow speeds | 4 speeds + intensive |
| Maximum airflow | 650 m³/h (internal motor), higher for external motor |
| Timer | 10-minute automatic timer |
| Lighting | Dimmable LED bar, color temperature adjustable (warm to cold) |
| Grease filter type | Metal mesh, removable and washable |
| Charcoal filter | Optional, not supplied |
| Filter saturation indicator | Yes (after 30 hours of use) |
| Operating modes | Exhaust (ducted) or recirculation (filtered) |
| Duct diameter | 150 mm |
| Maximum duct length | 5 m |
| Power supply | 220-240 V, 50 Hz |
| Electrical class | Class I (must be earthed) |
| Standby power consumption | < 0.5 W |
| Noise level | Approx. 50-65 dB (depending on speed) |
| Maintenance | Grease filter manual or dishwasher cleaning every 2 months; LED bar replacement by qualified person |
| Safety features | Automatic shut-off when overheating? Insulation class I |
| Compliance | EU65 and EU66 energy label directives, WEEE directive 2012/19/EC |
Frequently Asked Questions - NorBreeze CUDO 520 SS NODOR
User questions about NorBreeze CUDO 520 SS NODOR
0 question about this device. Answer the ones you know or ask your own.
Ask a new question about this device
Download the instructions for your Range hood in PDF format for free! Find your manual NorBreeze CUDO 520 SS - NODOR and take your electronic device back in hand. On this page are published all the documents necessary for the use of your device. NorBreeze CUDO 520 SS by NODOR.
USER MANUAL NorBreeze CUDO 520 SS NODOR


 18 18 |  19 19 |
 20 20 |  21 21 |
 22 22 |
CONTENTS

Warnings
Uses
Installation
Working
Maintenance
WARNINGS
The air outlet of the appliance must not be connected to a flue which is used for exhausting other fumes from appliances, such as a central heating, boilers etc..
For the external exhausting of the fumes, comply with the regulations in force.
The motor of the peripheral exhausting group is powered by the coo ker-hood placed in the kitchen.
Before connecting the coo- ker hood to the mains supply, make sure that the voltage in- dicated in the rating plate cor- responds to the mains voltage in the home.
Before carrying out any sort of maintenance or cleaning operation, make sure that the appliance is disconnected from the electrical mains.
An appropriate maintenance ensures a good working and a good per formance in the long run.
All models are built in class I, therefore they must be earthed.
- This appliance can be used by children aged from 8 years and above and persons with reduced physical, sensory or mental capabilities or lack of
experience and knowledge if they have been given supervision or instruction concerning use of the appliance in a safe way and under stand the hazards involved.
- Children shall not play with the appliance.
- Cleaning and user maintenance shall not be made by children without supervision.
- If the power cable is damaged, it must be replaced by a cable or a special assembly, available from the manufacturer or its service de partment technique.
- The room must have adequate ventilation when using the kitchen hood simultaneously with other appliances that use gas or other fuels (not yes applies to appliances that simply release the air back into the room);
- There is the possibility of fire if the cleaning operations are not carried out as indicated in the instructions;
- Do not prepare flambéed food under the kitchen hood.
ATTENTION: The accessible parts can burn if used in conjunction with the cooking appliances.
USES
The appliance is already arranged both for filtering and for suction performances.
* In its filtering version (Fig. 1), the air and fumes conveyed by the appliance are depured both by a grease filter and by an active coal filter, and put again into circulation through the hole made on the top of the cabinet.
The charcoal filter is not supplied with the appliance.
* In its sucking version (Fig. 2), fumes are directly conveyed outside, through an evacuation duct connected with the superior part of the wall or the ceiling. Both coal filter and air deflector are not necessary in this case.
INSTALLATION
Before installing the appliance, make sure that none of the parts is damaged in any way.
In case of damaged parts, contact your retailer and do not proceed with installation.
Read all of the following instructions with care before installing the appliance.
The LED bar of the range hood are supplied in the packaging, and you need to assemble them at the end of the installation.
Before installing the appliance, remove the metal grase filter and the oil collector.
Thes filter could be removed by pushing the handles towards the back side of the cooker hood and turning it downwards to unfasten it from its slot. (Pic. 3).
To remove the oil collector, loosem the two screws as indicated in Pic.4.
To install the appliance please respect the follow instructions.
The appliance must be install by competent authorities. In order to do not damage the electronic parts of the appliance please do not use added screws.
Essential precautions to respect before in stalling the appliance are the following:
- Prepare the power supply.
- Prepare a hole for the exhaust of the air both in the filtering and in the exhau sting version.
- Use an exhausting pipe whose maximum length does not exceed 5 meters.
- Do not use screws to fix the outlet pipe to the cooker hoods.
- Limit the no. of elbows in the piping, since each elbow reduces the aspiration efficiency of 1 linear meter. (Ex.: if you use no. 2 x90° elbows, the length of piping I must not exceed 3 meters)
- Avoid abrupt direction changes.
Use a 150 mm constat diameter pipe for the whole length.
- Use piping approved by standards in force.
To have made a cut-out on the bottom of the cabinet which is suitable to hold the applian ce in position (Pic. 5)
SL926_52 = 265x506 mm,
SL926_85 = 265X831 mm.
Right now, after drilling the kitchen cabinet please follow carefully the instructions above, calibrate the fixing spring depending on the depth of cabinet. (Pic. 6).
At this point, insert the range hood inside the kitchen cabinet until the fixed springs will be hooked into.
Fix the range hood to the cabinet, in the front and rear sides, using by the screws equipped.
To fix the hood on the rear side apply the screws on the holes of oil container as on pics indicated and fasten the screws. (Pic. 7 -8)
When the screws have been fastened, take the LED bar and connect the connector. Insert the LED bar on the appropriate hole until it will be hooked into (Pic. 9)
At this point take the oil container and hook it on the appropriate hole of the hood. Plea se be careful not to scratch and damage the product. (Pic. 10).
Fix the oil container fixing the pommels of range hood (Pic. 11)
At the end, place the grease filters that were removed before (Pic. 12)
Rear air outlet
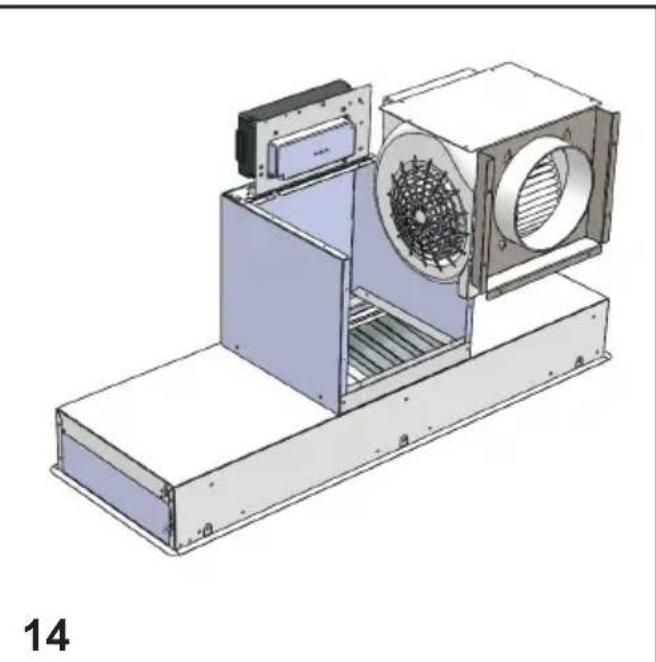
Models equipped with only one motor can be installed having the motor air out let oriented towards the appliance rear side.
If you choose this option, you will need to remove the motor support by removing the 18 screws (fig. 13), taking out and rotating the support, placing it in its housing, always keeping the air outlet oriented towards the appliance rear side. (fig. 14).
Secure it by using the screws previously removed.
Blocking of the stop valve
Warning! Before connecting the flexible exhausting pipe to the motor, make sure the stop valve, which is on the air outlet of the motor, can swing.
Exhausting version
Connect the flange to the exhausting hole with an appropriate pipe. Connect the appliance with the electrical mains through the supply cord.
Filtering version
Connect the flange with a pipe suitable to convey the air to the top of the cabinet. Connect the appliance with the electrical mains through the supply cord.
Chimney installation
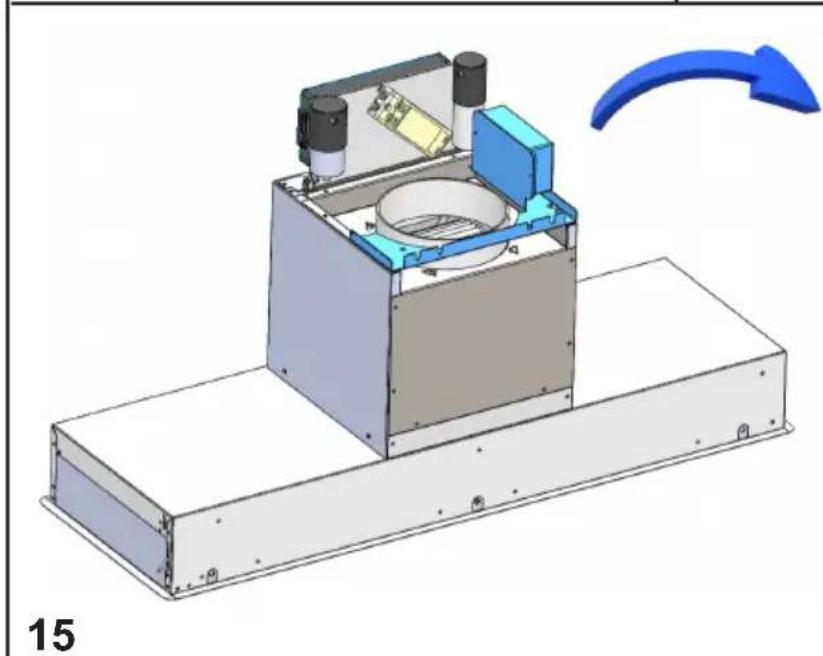
Separate the bracket from the hood (pic. 15), removing the 2 fixing screws as shown in pic.15A - B.
Lift the internal steel chimney up to the top of the wall unit (Pic. 16), draw with a pencil the rear end of the internal chimney on both sides (Pic. 17), lower the entire chimney and position the fixing bracket in corresponden ce with the marking made (Pic. 18), secure the bracket with screws (Pic. 19).
Lift the internal chimney up to cover the bra cket and secure it with screws positioned on both sides (Pic. 20).
WORKING
Mod. SL926 (fig. 21)
A: Light switch on/off
B: Motor switch on speed 1/off
C: Motor switch on speed 2
D: Motor switch on speed 3
E: Motor switch on speed 4
F: 10-minutes timer
Inside the product there is a switch to turn off the hood (fig. 22).
ATT: This switch does not disconnect the product from the mains.
DIMMABLE LIGHTS FUNCTION
This function provides for lights dim mability, ranging from 20% to 100%, by Continuously pressing the light key On the remote control.
Functions are the following:
- hood light off - shortly press the Key - light on at 100%.
- light on at 100% - shortly press the Key - light off.
- light on at 100% - continuously press The key - brightness reduction.
- releasing the key during reduction Or increase - light keeps the lumi nous intensity reached.
- light on - dimmed - continuously press The key - brightness is inverted if.
Compared to the previous function.
COLOUR TEMPERATURE SETTING
Make sure that the lights and the fan are off.
Holding down the TIMER key will turn on the light at the previously set colour temperature.
Press and hold the Light key to change the colour temperature.
As long as the key is kept pressed, the colour temperature is changed from warm to cold, just leave the Light key to select the desired colour.
Exit the colour temperature selection function by pressing the ON/OFF key.
TIMING
As a result of the new EU65 “Energy label” and EU66 “Ecodesign” regulations issued by the European Commission, which came into force as from January 1st, 2015, our products have been adapted to comply with these new requirements. All of the models complying with the energy label requirements, are equipped with new electronics including a timer device for suction speeds control, when the air capacity exceeds 650m3/h .
Internal motor models, with maximum air capacity higher than 650m3/h , are equipped with a timer device that automatically switches the suction speed from 4th to 3rd speed, after 5 minutes operation.
External motor models are equipped with remote motors that, as for internal motor versions, include a timer device that switches down the suction speed when it exceeds 650 m3/h . (See External Motors Instructions).
Remote motors, whose air capacity exceeds 650m3/h at both 4th and 3rd speed, will have the following by default timer control functions: The suction speed is automatically switched from 4th to 2nd speed, after 6 minutes operation.
If the appliance is working at 3rd speed, it is automatically switched to 2nd speed, after 7 minutes operation. Operation speeds can also be changed during operation.
The energy consumption of the appliance in stand – by mode is lower than 0.5W.
MAINTENANCE
* An accurate maintenance guarantees good functioning and long-lasting performance.
* Particular care is due to the grease filter panel. It can be removed by pushing its special handle toward the back-side of the cooker hood and turning the filter downwards so to unfasten it from its slot (Fig. 3).
To insert the filter just perform the opposite operation.
After 30 hours working (model), the push button control panel will signal the saturation of the grease filter by lighting all the buttons. Press the timer button to reset ⏻.
The grease filter needs cleaning by regular hand-washing or in dishwashers every two months at least or depending on its use.
* To clean the appliance itself tepid water and neutral detergent are recommended, while abrasive products should be avoided. For steel appliances specialized detergents are recommended (please follow the instructions indicated o the product itself to obtain the desired results).
LED BAR REPLACEMENT
To remove the led bar, it is recommended to remove the steel bar as shown in Fig. 9. To replace the led bar, it necessary to contact the sevice agent or a similarly qualified person in order to avoid a hazard.
The led bar must be the same as the damaged one.
* If the supply cord is damaged, it must be replaced by the manufacturer or its sevice agent or a similarly qualified person in order to avoid a hazard.

The symbol on the product or on its packaging indicates that this product may not be treated as household waste. Instead it shall be handed over to the applicable collection point for the recycling of electrical and electronic equipment. By ensuring this product is disposed of correctly, you will help prevent potential negative consequences for the environment and human health, which could otherwise be caused by inappropriate waste handling of this product. For more detailed information about recycling of this product, please contact your local city office, your household waste disposal service or the shop where you purchased the product. This appliance is marked according to the European directive 2012/19/EC on waste electrical and electronic equipment (WEEE).
CONTENIDO

Advertencias
Usos
Instalación
Funcionamiento
Mantenimiento
USOS
INSTALACIÓN


Brand : NODOR
Model : NorBreeze CUDO 520 SS
Category : Range hood