
Quantum QXB8A - Loudspeaker ESX - Free user manual and instructions
Find the device manual for free Quantum QXB8A ESX in PDF.


| Product Type | Active Subwoofer System |
| Model | ESX Quantum QXB8A |
| Speaker Size | 8" (20 cm) |
| Amplifier Class | Digital Class D |
| RMS Power Output | 1 x 400 W @ 14.4 V |
| Max Power Output | 1 x 800 W @ 14.4 V |
| Frequency Response (-3 dB) | 7 – 120 Hz |
| Signal-to-Noise Ratio | 102 dB |
| Total Harmonic Distortion (THD+N) | < 0.02% |
| Damping Factor | > 200 |
| Input Sensitivity (Low Level) | 5.5 – 0.2 V (RCA) |
| Input Sensitivity (High Level) | 15 – 0.5 V / 40 – 1.5 V (switchable) |
| Subsonic Filter | 5 – 35 Hz @ 12 dB/oct |
| Low Pass Filter | 40 – 120 Hz @ 12 dB/oct |
| Bass Boost | 0 – 6 dB @ 45 Hz |
| Phase Shift | 0° / 180° |
| Auto Turn-On | DC voltage rise / Signal detection |
| Start-Stop Capability | Yes |
| High Level Input with EPS Pro | Yes (adjustable load: 10 Ω, 150 Ω, 600 Ω) |
| Bass Level Remote Controller | Included |
| Fuse Rating | 2 x 25 A |
| Power Supply | 12 V DC (negative ground) |
| Dimensions (W x H x D) | 48 x 33 x 18 cm |
| Weight | Not specified |
| Protection Features | Overheat, short circuit, over/under voltage |
| Maintenance | Clean with dry cloth; keep away from moisture and dust |
| Safety Instructions | Disconnect battery before installation; use correct fuse rating; professional installation recommended |
| Replacement Parts | Fuses 2 x 25 A (ATO/ATC type); bass remote controller available as accessory |
| Repairability | Contact authorized dealer; do not open device |
Frequently Asked Questions - Quantum QXB8A ESX
User questions about Quantum QXB8A ESX
0 question about this device. Answer the ones you know or ask your own.
Ask a new question about this device
Download the instructions for your Loudspeaker in PDF format for free! Find your manual Quantum QXB8A - ESX and take your electronic device back in hand. On this page are published all the documents necessary for the use of your device. Quantum QXB8A by ESX.
USER MANUAL Quantum QXB8A ESX
natural_image
Abstract geometric logo design with stylized letter 'S' and diagonal lines (no text or symbols)QUANTUM
QXB6A
16,5 CM (6.5") ACTIVE SUBWOOFER SYSTEM
QXB8A
20 CM (8") ACTIVE SUBWOOFER SYSTEM
VERS.1.0
SICHERHEITSHINWEISE
natural_image
Symbol of cloud and raindrops crossed by a diagonal line (no text or numbers present)
natural_image
Simple black-and-white diagram of a sun with radiating lines and a central cross (no text or symbols)natural_image
Technical line drawing of a rectangular device with internal fan structure and mounting points (no text or symbols)THE PURCHASED DEVICE IS ONLY SUITABLE FOR AN OPERATION WITH A 12V ON-BOARD ELECTRICAL SYSTEM OF A VEHICLE. Otherwise fire hazard, risk of injury and electric shock consists.
PLEASE DO NOT MAKE ANY OPERATION OF THE SOUND SYSTEM, WHICH DISTRACT YOU FROM A SAFE DRIVING. Do not make any procedures, which demand a longer attention. Perform these operations not until you have stopped the vehicle on a safe place. Otherwise the risk of accident consists.
ADJUST THE SOUND VOLUME TO AN APPROPRIATE LEVEL, THAT YOU ARE STILL ABLE TO HEAR EXTERIOR NOISES WHILE DRIVING. High performance sound systems in vehicles may generate the acoustic pressure of a live concert. The permanent listening to extreme loud music may cause the loss of your hearing abilities. The hearing of extreme loud music while driving may derogate your cognition of warning signals in the traffic. In the interests of the common safeness, we suggest to drive with a lower sound volume. Otherwise the risk of accident consists.
REPLACE FUSES ONLY WITH FUSE WITH THE SAME RATING. Otherwise fire hazard and risk of electric shock consists.
DO NOT USE THE DEVICE ANY LONGER, IF A MALFUNCTION OCCURS, WHICH REMAINS NOT REMEDIED. Refer in this case to the chapter TROUBLE SHOOTING. Otherwise risk of injury and the damage of the device consists. Commit the device to an authorized retailer.
INTERCONNECTION AND INSTALLATION SHOULD BE ACCOMPLISHED BY SKILLED STAFF ONLY.
The interconnection and installation of this device demands technical aptitude and experience. For your own safeness, commit the interconnection and installation to your car audio retailer, where you have purchased the device.
DISCONNECT THE GROUND CONNECTION FROM THE VEHICLE'S BATTERY BEFORE INSTALLATION. Before you start with the installation of the sound system, disconnect by any means the ground supply wire from the battery, to avoid any risk of electric shock and short circuits.
CHOOSE AN APPROPRIATE LOCATION FOR THE INSTALLATION OF THE DEVICE. Look for an appropriate location for the device, which ensures a sufficient air circulation. The best places are spare wheel cavities, and open spaces in the trunk area. Less suitable are storage spaces behind the side coverings or under the car seats.
DO NOT INSTALL THE DEVICE AT LOCATIONS, WHERE IT WILL BE EXPOSED TO HIGH HUMIDITY AND DUST. Install the device at a location, where it will be protected from high humidity and dust. If humidity and dust attain inside the device, malfunctions may be caused.
MOUNT THE DEVICE AND OTHER COMPONENTS OF THE SOUND SYSTEM SUFFICIENTLY. Otherwise the device and components may get loose and act as dangerous objects, which could cause serious harm and damages in the passenger room.
ENSURE CORRECT CONNECTION OF ALL TERMINALS. Faulty connections may could cause fire hazard and lead to damages of the device.
SAFETY INSTRUCTIONS
MOUNT THE DEVICE AND OTHER COMPONENTS OF THE SOUND SYSTEM SUFFICIENTLY. Otherwise the device and components may get loose and act as dangerous objects, which could cause serious harm and damages in the passenger room.
ENSURE NOT TO DAMAGE COMPONENTS, WIRES AND CABLES OF THE VEHICLE WHEN YOU DRILL THE MOUNTING HOLES. If you drill the mounting holes for the installation into the vehicle's chassis, ensure by any means, not to damage, block or tangent the fuel pipe, the gas tank, other wires or electrical cables.
DO NOT INSTALL AUDIO CABLES AND POWER SUPPLY WIRES TOGETHER. Ensure while installation not to lead the audio cables between the head unit and the processor together with the power supply wires on the same side of the vehicle. The best is a areal separated installation in the left and right cable channel of the vehicle. Therewith a overlap of interferences on the audio signal will be avoided. This stands also for the equipped bass-remote wire, which should be installed not together with the power supply wires, but rather with the audio signal cables.
ENSURE THAT CABLES MAY NOT CAUGHT UP IN CLOSE-BY OBJECTS. Install all the wires and cables like described on the following pages, therewith these may not hinder the driver. Cables and wires which are installed close-by the steering wheel, gear lever or the brake pedal, may caught up and cause highly dangerous situations.
DO NOT SPLICE ELECTRICAL WIRES. The electrical wires should not be bared, to provide power supply to other devices. Otherwise the load capacity of the wire may get overloaded. Use therefor a appropriate distribution block. Otherwise fire hazard and risk of electric shock consists.
DO NOT USE BOLTS AND SCREW NUTS OF THE BRAKE SYSTEM AS GROUND POINT. Never use for the installation or the ground point bolts and screw-nuts of the brake system, steering system or other security-relevant components. Otherwise fire hazard consists or the driving safety will be derogated.
ENSURE NOT TO BEND OR SQUEEZE CABLES AND WIRES BY SHARP OBJECTS. Do not install cables and wires not close-by movable objects like the seat rail or may be bent or harmed by sharp and barbed edges. If you lead a wire or cable through the hole in a metal sheet, protect the insulation with a rubber grommet.
KEEP AWAY SMALL PARTS AND JACKS FROM CHILDREN. If objects like these will be swallowed, the risk of serious injuries consists. Consult promptly a medical doctor, if a child swallowed a small object.
TECHNICAL SPECIFICATIONS
| Model QXB6A QXB8A | ||
| Subwoofer 16,5 cm (6.5") 20 cm (8") | ||
| Circuit Digital Class D | ||
| Output Power @ 14,4 V RMS 1 x 250 W 1 x 400 W | ||
| Output Power @ 14,4 V MAX 1 x 500 W 1 x 800 W | ||
| Frequency Range -3dB 7 ~ 120 Hz | ||
| Damping Factor > 200 | ||
| Signal-to-Noise Ratio 102 dB | ||
| THD+N < 0,02 % | ||
| Input Sensitivity Low Levell: 5.5 ~ 0.2 V | High Level: 15 ~ 0.5 V / 40 ~ 1.5 V | |
| Filter Section | ||
| Subsonic Filter | 5 ~ 35 Hz @ 12 dB | |
| Low Pass Filter | 40 ~ 120 Hz @ 12 dB | |
| Bass Boost | 0 ~ 6 dB @ 45 Hz | |
| Phase Shift | 0° / 180° | |
| Start-stop capability Yes | ||
| High Level Inputs with EPS Pro | Input resistance 10 R / 150 R / 600 R | |
| Auto Turn-On | Voltage rise / Signal detection | |
| Bass Level Remote Controller | Ja | |
| Device fuses | 2 x 25 A | |
| Dimensions (W x H x D) | 42 x 34 x 16 cm | 48 x 33 x 18 cm |
All Specifications are subject to change


10 \~ 90% 5 \~ 50°C


natural_image
Symbol of cloud crossing with a crossed line and scattered dots (no text or numbers)
natural_image
Simple black-and-white diagram of a sun with radiating lines and a central cross (no text or symbols)INTENDED USE
- This product is only designed for the use in a vehicle with 12 volt on-board voltage with negative ground and functions as an amplifier for audio signals. In principle, this product should be used for installation in subwoofer enclosures.
- Please use the product only in its intended manner. Any other use may lead to damage to the product or in the vicinity of the product.
DISPOSAL
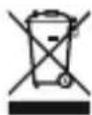
If you have to dispose of the device, please note that no electronic devices may be disposed of with household waste. Dispose of the device in a suitable recycling facility in accordance with local waste regulations. If necessary, consult your local authority or your dealer.
ASSEMBLING THE STANDS
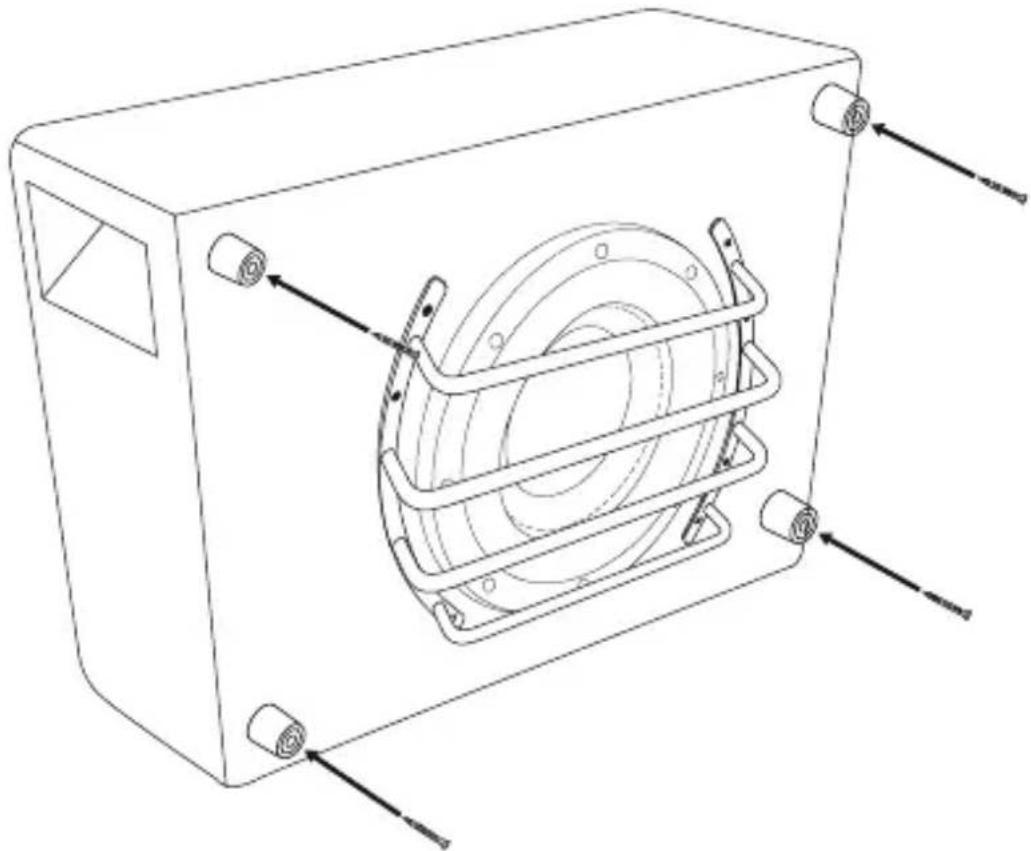
If you operate the subwoofer system in „Downfire“ mode, i.e. the baffle of the subwoofer points downwards, screw the four enclosed feet to the corners of the enclosure by using the also enclosed self-tapping screws.
natural_image
Technical line drawing of a rectangular device with internal fan structure and mounting points (no text or symbols)ELECTRICAL INTERCONNECTION
BEFORE CONNECTING
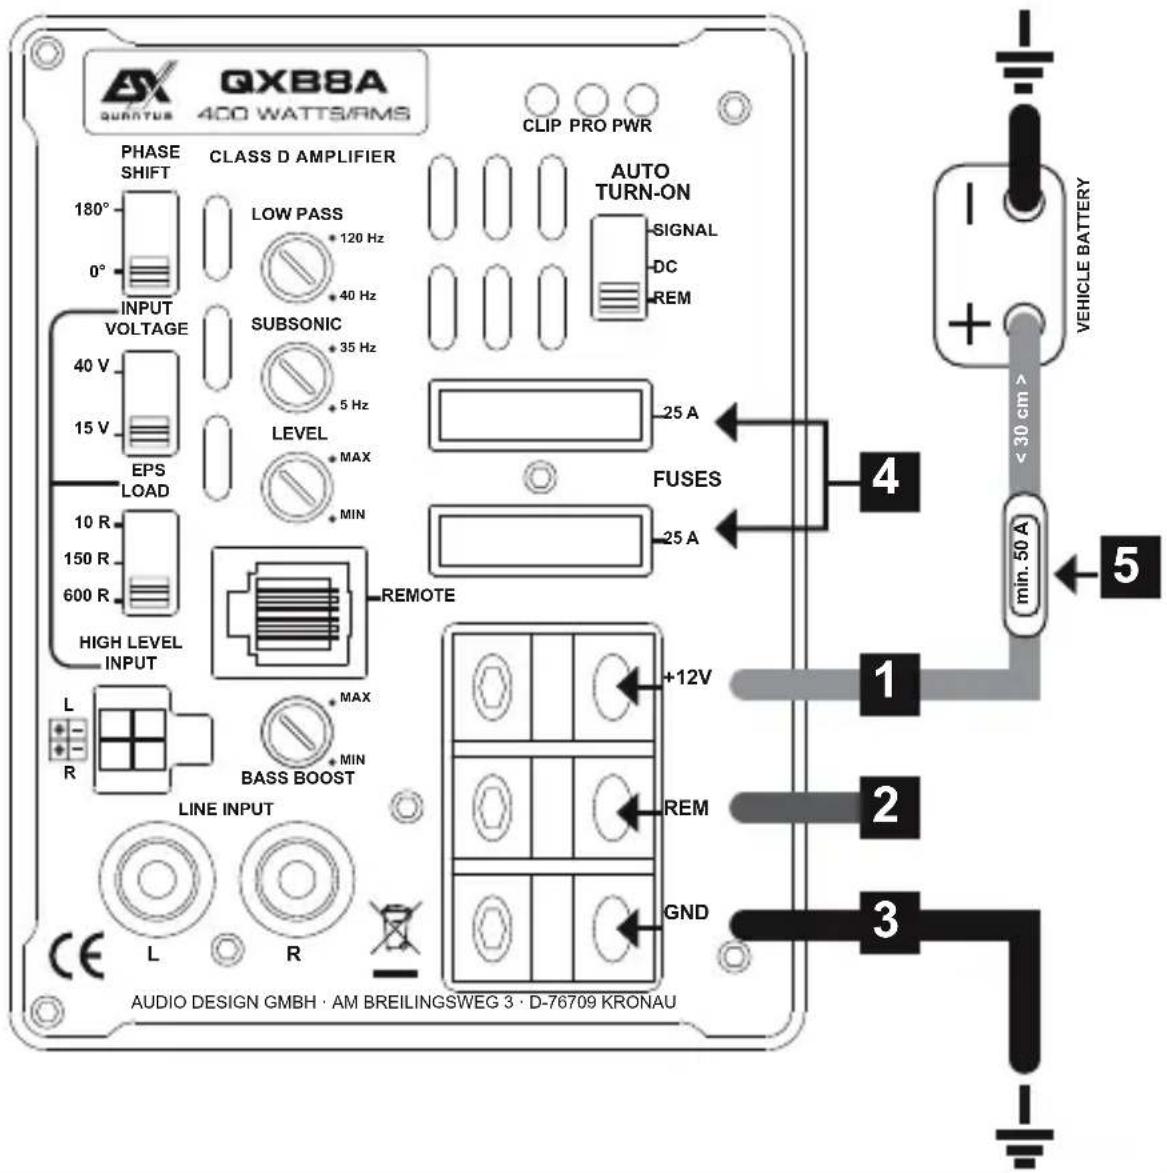
For the professional installation of a sound system, car audio retail stores offers appropriate wiring kits. Ensure a sufficient profile section (refer to the table on the next page) and a suitable fuse rating and the conductivity of the cables when you purchase your wiring kit. Clean and remove rust-streaked and oxidized areas on the contact points of the battery and the ground connection. Make sure that all screws are fixed tight after the installation, because loose connections cause malfunctions, insufficient power supply or interferences.

CAUTION
Before you start with the installation, disconnect necessarily the GROUND connection wire from the battery to avoid any risk of electric shocks and short circuits.
ELECTRICAL INTERCONNECTION
+12V
Connect the +12V terminal +12V with the +12V pole of the vehicle's battery. Use a suitable cable with a sufficient cross section (refer to section 5 on this page).
REM
Connect a turn-on signal or the turn-on remote signal of your head unit (REM) with the REM terminal of the amplifier module. Use therefor a suitable cable with a sufficient cross section (0,5 mm²). Hereby the amplifier module turns on or off with your head unit. If you use the AUTO TURN-ON function (refer to page 23, section 13), the REM terminal does not need to be connected.
GND
Connect the GND terminal with a suitable contact ground point on the vehicle's chassis. The ground wire must be as short as possible and must be connected to a blank metallic point at the vehicle's chassis. Ensure that this ground point has a stable and safe electric connection to the negative “-”pole of the battery. Check this ground wire from the battery to the ground point if possible and enforce it if required. Use a ground wire with a sufficient cross section (refer to the table and the recommendations on the next page) and the same size like the +12V power supply wire.
DEVICE FUSES
The amplifier module has two device fuses, each with 25 A.
ADDITIONAL CABLE FUSE (NOT INCLUDED)
Install an extra fuse (not included) for the +12V power cable near the battery to secure the power cable. The distance between the fuse and the battery should not exceed 30 cm. The fuse size must be adapted to the cable cross-section of the installed power cable (see table below).
IMPORTANT: The fuse on the battery does not protect the amplifier module, but the cable between the battery and the amplifier module against short circuits.
| Cable length in meters | ||||||||||
| 0 - 1,2 1,2 | -2,1 2,1 | -3,1 3,1 | -4,0 | 4,0 | -4,9 4,9 | -5,8 5,8 | -6,7 | 6,7 - 8,5 | ||
| Fuse value in Amperes | 35 - 50 6 | 10 10 | 16 16 | 20 20 20 | ||||||
| 50 - 65 10 | 10 16 | 20 20 | 20 20 35 | |||||||
| 65 - 85 16 | 16 20 | 20 35 | 35 35 50 | |||||||
| Minimum cable cross-section in mm^2 | ||||||||||
Recommended minimum cable cross-section to guarantee full amplifier module performance:
Up to a length of 3 m: 10 mm ^2
From a length of 3 m: 16 mm ^2

CAUTION
Replace defective fuses only with a new one of the same type and with the same fuse rating.
DESCRIPTION OF OPERATION
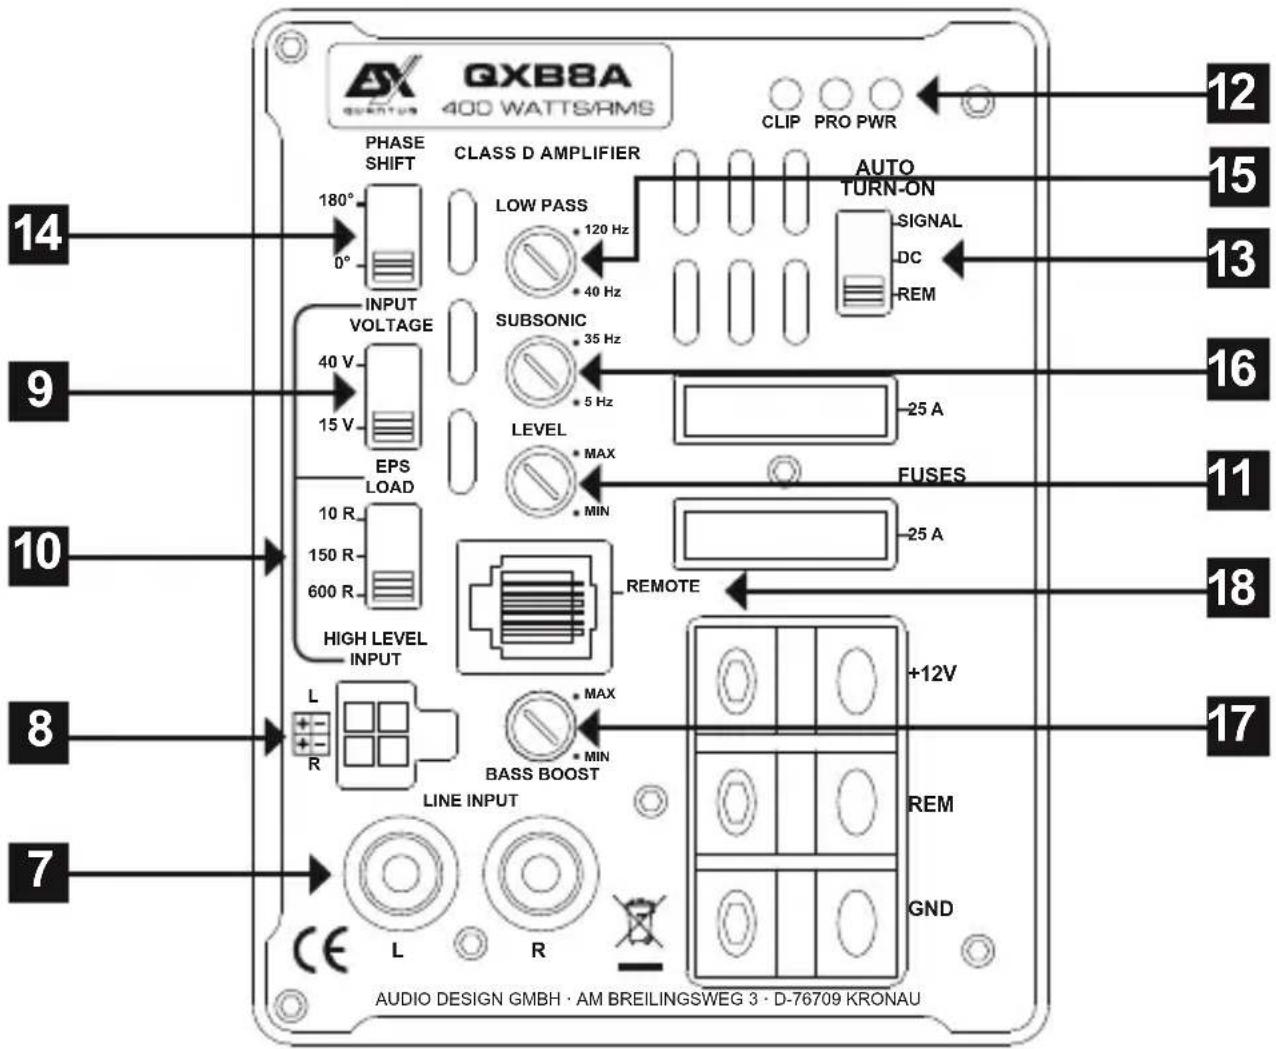
7 LINE INPUT (Low Level 5.5 \~ 0.2 V)
Connect the RCA inputs to the head unit/car stereo using a RCA audio cable. If available, use the subwoofer output of the head unit/car stereo for this.
HIGH LEVEL INPUT (High Level 40 \~ 1.5 V or 15 \~ 0.5 V)
If your head unit/car stereo does not have any RCA pre-amplifier module outputs, you can use the high level input as a signal input. To do this, connect the loudspeaker cable of the head unit/car stereo to the enclosed cable connector accordingly.
INPUT VOLTAGE
With this switch you can switch the input sensitivity of the high level input from 40 \~ 1.5 V to 15 \~ 0.5 V.

CAUTION
Never operate LINE INPUT and HIGH LEVEL INPUT at the same time.
DESCRIPTION OF OPERATION
10 The high level input is equipped with EPS PRO (Error Protection System) so that no functions are impaired or error messages are written to the vehicle memory when connected to OEM factory radios. The input resistance of the EPS PRO protection circuit can be set with the EPS LOAD switch. The following settings are possible:
10 R: Recommended for the outputs of a head unit/car stereo if a loudspeaker was previously operated with them.
150 R: Recommended for factory sound systems from f.e. VW / Audi / Skoda, with f.e. a built-in amplifier/booster.
600 R: Recommended for factory sound systems from f.e. BMW, with f.e. a built-in amplifier/booster or if the high level input is operated together with a loudspeaker.
11 LEVEL
This controller determines the input sensitivity of the amplifier module. Pay attention to the CLIP LED and turn back the LEVEL controller if it lights up yellow. You may have to adjust the INPUT VOLTAGE switch accordingly for the best result.
12 STATUS LEDs
The yellow CLIP LED lights up when the input signal is set too high. Please refer to the information under LEVEL [ 11 ]. If the blue PWR LED lights up, the amplifier module is ready for operation. If the red PRO LED lights up, there is a malfunction. Then follow the instructions in the section TROUBLE-SHOOTING on page 24.
13 AUTO TURN-ON
If your head unit/car stereo does not have a remote turn-on wire (see page 21, section 2), you can use the amplifier module's automatic turn-on and turn-off function. This function works only in combination with the HIGH LEVEL INPUT [8] and in two ways, which can be set with the AUTO TURN-ON switch:
DC: Preferred method.
SIGNAL: Should be only used if method DC is not working.
14 PHASE SHIFT This switch can be used to change the phase from 0^ to 180^ in order to adapt the subwoofer signal to the full-range loudspeakers.
15 LOW PASS This controller limits the frequency of the audio signal upwards. The crossover frequency is adjustable from 40 to 120Hz .
16 SUBSONIC
This controller limits the ultra low and not audible frequencies of the audio signal downwards to avoid mechanical and electrical overloading on the subwoofer. The crossover frequency is adjustable from 5 to 35 Hz and depends on the size of the subwoofer.
17 BASS BOOST This controller adjusts the bass boost from 0 dB to 6 dB at 45 Hz.
18 REMOTE
Connect here the cable of the included bass level remote controller. This can be used to adjust the bass level from the driver's seat, for example.
TROUBLE SHOOTING
ATTENTION: All instructions in this troubleshooting refer to the entire sound system and its individual components. The features of your device may not match the functions described in the notes. Then skip this point and move on to the next one.
| NO FUNCTION / THE POWER LED IS NOT ILLUMINATED |
| First check the fuse of the routed power cable on the vehicle battery |
| The fuse is defectiveReplace the defective fuse with an equivalent one, never with a higher value.The fuse fails again.In this case there appears to be a short circuit between the fuse and the amplifier module. To do this, check the + 12V power cable along its entire length from the battery to the amplifier module for damage and whether there is a short circuit to ground, e.g. a contact with the vehicle chassis or the body. If necessary, replace the defective power cable. |
| The fuse is apparently okayUse a standard 12 volt voltmeter to check the voltage between the + 12V connection and the ground connection on the amplifier module.There is no voltage.Use the voltmeter to check the fuse, which is located close to the vehicle battery, to see whether there is voltage between the output and ground.If there is no voltage there, either the fuse holder or the fuse is defective, although it appears to be okay. If necessary, replace the fuse holder or fuse.There is voltage.If you operate the amplifier module with a pre-amplifier module signal (RCA), you must have laid a remote turn-on wire from the head unit to the REM terminal of the amplifier module. The AUTO TURN-ON switch must be in the OFF position. However, you can test the AUTO TURN-ON switch to SIGNAL to see if the amplifier module then turns on. If so, there is a problem with the control line..A remote turn-on wire is connected to the REM terminal at the amplifier module.Use the voltmeter to check whether there is voltage between the REM terminal of the amplifier module and ground. The head unit must be switched on.There is no voltage.Check the remote turn-on wire from the amplifier module to the head unit for a short circuit or damage. If necessary, replace the control line..There is voltage.The amplifier module is probably malfunctioning or defective. Contact your retailer.If you operate the amplifier module with the loudspeaker signals (high level mode), the AUTO TURN-ON switch must be switched to DC.The AUTO TURN-ON switch is in the DC position, but the amplifier module remains off.Check the speaker cables from the head unit to the amplifier module for short circuits or damage. If necessary, replace the speaker cables or insulate the damaged area. |
TROUBLE SHOOTING
| THE POWER LED IS ON, BUT NO SOUND COMES FROM THE SPEAKERS |
| Check the following steps: |
| Low level mode: Are the RCA cables on the head unit and on the amplifier module correctly connected?The RCA cables are correctly connected.Then an RCA cables could be defective. Check the function of the RCA cables on another audio device. If necessary, replace the defective RCA cables. |
| High level mode: Are the loudspeaker cables on the head unit and the high level inputs of the amplifier module or on the high level cable plug correctly connected?The speaker cables are connected correctly.A speaker cable could be defective. If necessary, replace the speaker cable or insulate the damaged area. |
| Are the speaker cables correctly connected between the speakers or the subwoofer at the speaker outputs of the amplifier module?The speaker cables are connected correctly.A speaker cable could be defective. If necessary, replace the speaker cable or insulate the damaged area. |
| Is the high pass filter or subsonic filter set higher than the low pass filter on the amplifier module?Then slowly turn down the controller for the high pass filter or subsonic filter until the sound can be heard. |
| Is the input mode switch on the amplifier module set correctly?Check the setting and change the switch position if necessary. |
| Are the crossover switches on the amplifier module set correctly?Check the settings and change the respective switch position if necessary. |
| Are the speakers or the subwoofer working?Hold a standard 9 volt block battery to the terminals of each loudspeaker or the subwoofer.A faint cracking sound can be heard.The speaker or subwoofer is fine.There is nothing to be heard.The loudspeaker or subwoofer could be defective. If necessary, replace the defective speaker or subwoofer. |
| Are the settings on the head unit set correctly?Check the fader and balance settingsCheck whether the mute function is activatedCheck whether a high pass or low pass filter is activatedCheck whether playback has been pausedCheck the source settingsCheck whether any existing subwoofer output is activated |
TROUBLE SHOOTING
| DISTORTION OR HISSING NOISE CAN BE HEARD FROM THE SPEAKERS |
| Check the following steps: |
| Is a input level controller on the amplifier module set too high?Slowly turn the controller back until you hear a clean audio signal. |
| Is the Bass Boost controller on the amplifier module set too high?Slowly turn the controller back until you hear a clean audio signal. |
| Is the loudness function on the head unit set too high?Deactivate loudness or turn the loudness setting back until you can hear a clean audio signal. |
| Are the EQ and sound settings on the head unit set too high?Turn down the settings for Treble, Middle and Bass or deactivate the equalizer until you can hear a clean audio signal. |
| ENGINE SPEED DEPENDENT NOISE CAN BE HEARD FROM THE SPEAKERS |
| Check the following steps: |
| Have the RCA cables been laid separately from the power cable in the vehicle?If necessary, lay the cables again and make sure that the audio cables are laid separately from the power cable on the left and right in the vehicle. |
| Is the amplifier module's ground connection correctly connected?Make sure that the ground connection of the amplifier module is not connected directly to the negative pole of the vehicle battery. Select a suitable ground point on the vehicle body for connection. If necessary, use contact spray to improve the conductivity of the connections. |
| Is the conductivity of the ground cable from the vehicle battery to the body okay?Make sure that the ground connection of the vehicle battery has a stable and conductive connection to the body. If necessary, use contact spray to improve the conductivity of the connections. |
| AN ACTIVE OPERATED TWEETER IS DISTORTED OR CRACKED |
| CAUTION: Tweeters will be damaged if the frequencies are too low. Please note the manufacturer's information on which frequency setting is recommended. To be on the safe side, pause the playback of the head unit first. Check the following steps: |
| Is the crossover mode switch of the relevant channel pair on the amplifier module set correctly?Set the crossover mode switch to the high pass position (HP or HPF). |
| Is the high pass filter of the relevant channel pair set too low on the amplifier module?First turn the high pass controller fully clockwise. Now start playback on the head unit. Then turn the high pass controller slowly counter-clockwise until you can hear a clean sound from the tweeters and produce a balanced sound together with the woofers/mid-range speakers. Make sure that the woofers/mid-range speakers are set correctly with the respective high pass and low pass controllers. |
TROUBLE SHOOTING
| Amplifier moduleS ACTIVATES THE PROTECTIVE CIRCUIT / THE PROTECT LED ILLUMINATES |
| Check the following steps: |
| Short circuit on the speaker cablesFirst disconnect all speaker cables from the amplifier module. Use a multimeter to check the ohmic impedance of each loudspeaker by measuring between its plus and minus lines. With standard loudspeakers the value fluctuates between 3 and 5 ohms. The values for low-resistance subwoofers can be lower.The measurement shows a resistance value of less than 0.5 OhmsThen there is a short circuit. Remove the wiring of the affected loudspeaker at its connections. Now use the multimeter to check the ohmic impedance directly at the loudspeaker connections by measuring between the plus and minus connections.The measurement shows a resistance value of more than 0.5 OhmsThe speaker is fine, so the speaker wire appears to be defective and causing a short circuit. Replace the defective speaker cable.The measurement shows a resistance value of less than 0.5 OhmsThe speaker appears to be defective and is shorting out. Replace the defective speaker. |
| The load impedance of the loudspeakers or the subwoofer is too lowCompare the ohmic impedance of the connected loudspeaker or subwoofer with the technical specifications of the amplifier module. For example, if the amplifier module is only designed for 2 or 4 ohm operation, no loudspeaker with less than 2 ohms may be connected. |
| The cross-section of the power cables is too smallIf the cable cross-section is too small, this leads to an increased ohmic resistance and thus to a voltage drop (voltage loss). This indicates that the amplifier module consumes more power. The increased power consumption results in a significantly higher heat development and the amplifier module switches to thermal protection mode. Therefore, observe the recommended cable cross-sections in these instructions and, if necessary, lay power cables with a larger cable cross-section. |
| The amplifier module is overheated (refer also to page 17)The heat sink of each amplifier module requires sufficient air circulation to be able to dissipate the heat generated during operation. If necessary, change the installation position in favor of better cooling of the amplifier module or ensure better air circulation at the installation location.Turn off the sound system and wait about half an hour for the amplifier module to cool down again. With very hot outside temperatures and strong sunlight, enormous heat develops inside the vehicle. The amplifier module then activates its thermal protection circuit to prevent damage. After cooling down, the amplifier module works properly again. |
ATTENTION: All instructions in this troubleshooting refer to the entire sound system and its individual components. The features of your device may not match the functions described in the notes. Then skip this point and move on to the next one.

natural_image
Abstract geometric logo design with stylized letter 'S' and diagonal lines (no text or symbols)QUANTUM

Audio Design GmbH
Am Breilingsweg 3 · D-76709 Kronau/Germany
Tel. +49 7253 - 9465-0 · Fax +49 7253 - 946510
www.esxaudio.de • www.audiodesign.de
© Audio Design GmbH, All Rights Reserved
CE
- QUANTUM
- SICHERHEITSHINWEISE
- SAFETY INSTRUCTIONS
- TECHNICAL SPECIFICATIONS
- INTENDED USE
- DISPOSAL
- ASSEMBLING THE STANDS
- ELECTRICAL INTERCONNECTION
- BEFORE CONNECTING
- CAUTION
- +12V
- REM
- GND
- DEVICE FUSES
- ADDITIONAL CABLE FUSE (NOT INCLUDED)
- DESCRIPTION OF OPERATION
- LINE INPUT (Low Level 5.5 \~ 0.2 V)
- HIGH LEVEL INPUT (High Level 40 \~ 1.5 V or 15 \~ 0.5 V)
- INPUT VOLTAGE
- TROUBLE SHOOTING
Brand : ESX
Model : Quantum QXB8A
Category : Loudspeaker