
1992-2 - Measurement Hazet - Free user manual and instructions
Find the device manual for free 1992-2 Hazet in PDF.


| Product Type | Thermal Imaging Camera |
| Brand | Hazet |
| Model | 1992-2 |
| Temperature Measurement Range | -20 °C to 400 °C |
| Accuracy | ±2 °C or ±2% (ambient 15-35 °C, object >0 °C) |
| Detector Type | High-sensitivity IR detector with optical sensor |
| Display Modes | Thermal, Fusion, PiP (Picture-in-Picture), Optical |
| Color Palettes | BlackHot, WhiteHot, Ironbow, Rainbow, Rain, Fusion, RedHot |
| Image Resolution (Thermal) | 960 x 720 pixels |
| Image Resolution (Digital) | 1600 x 1200 pixels |
| Video Recording | Yes, with audio (via built-in microphone) |
| Internal Storage | 13.20 GB |
| Power Supply | Internal lithium battery 3.85 V / 2100 mAh; charger via Type-C (3.85 V DC, 570 mA) |
| Battery Charging Time | Approx. 2.5 hours (first charge recommended with device off) |
| Operating Temperature | -10 °C to 50 °C |
| Storage Temperature | -10 °C to 40 °C |
| Ingress Protection | IP54 (dust and splash water protected) |
| Pollution Degree | 2 |
| Dimensions (Approx.) | 200 x 100 x 80 mm (L x W x H) |
| Weight (Approx.) | 0.5 kg (with battery) |
| Standards Compliance | CE, RoHS, WEEE, Battery Directive |
| Intended Use | Building inspection, HVAC, electrical and mechanical maintenance |
| Included Accessories | 230 V power supply, Type-C cable, transport case, strap, operating instructions |
| Maintenance | Wipe with clean cloth and small amount of ethanol; store in dry, dust-free place |
| Safety Features | Automatic switch-off, temperature alarm (audible and visual), self-calibration |
| Spare Parts / Repairability | Macro lens available separately; repairs only by authorized service |
Frequently Asked Questions - 1992-2 Hazet
User questions about 1992-2 Hazet
0 question about this device. Answer the ones you know or ask your own.
Ask a new question about this device
Download the instructions for your Measurement in PDF format for free! Find your manual 1992-2 - Hazet and take your electronic device back in hand. On this page are published all the documents necessary for the use of your device. 1992-2 by Hazet.
USER MANUAL 1992-2 Hazet
Operating Instructions
Thermal camera
Instrukcja obsługi
Kamera termowizyjna
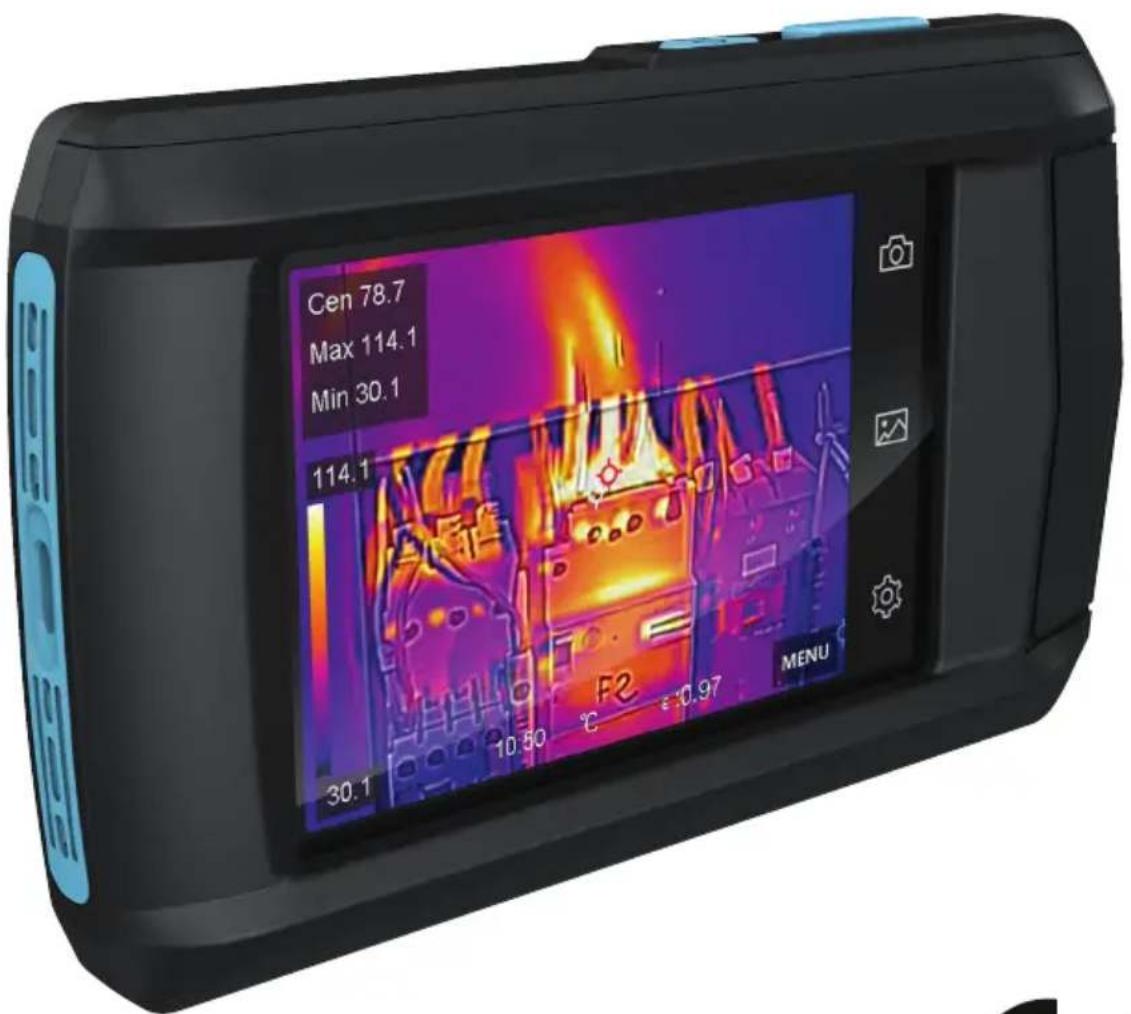
CE


21 - 39

41 - 59
Operating Instructions
Thermal Camera
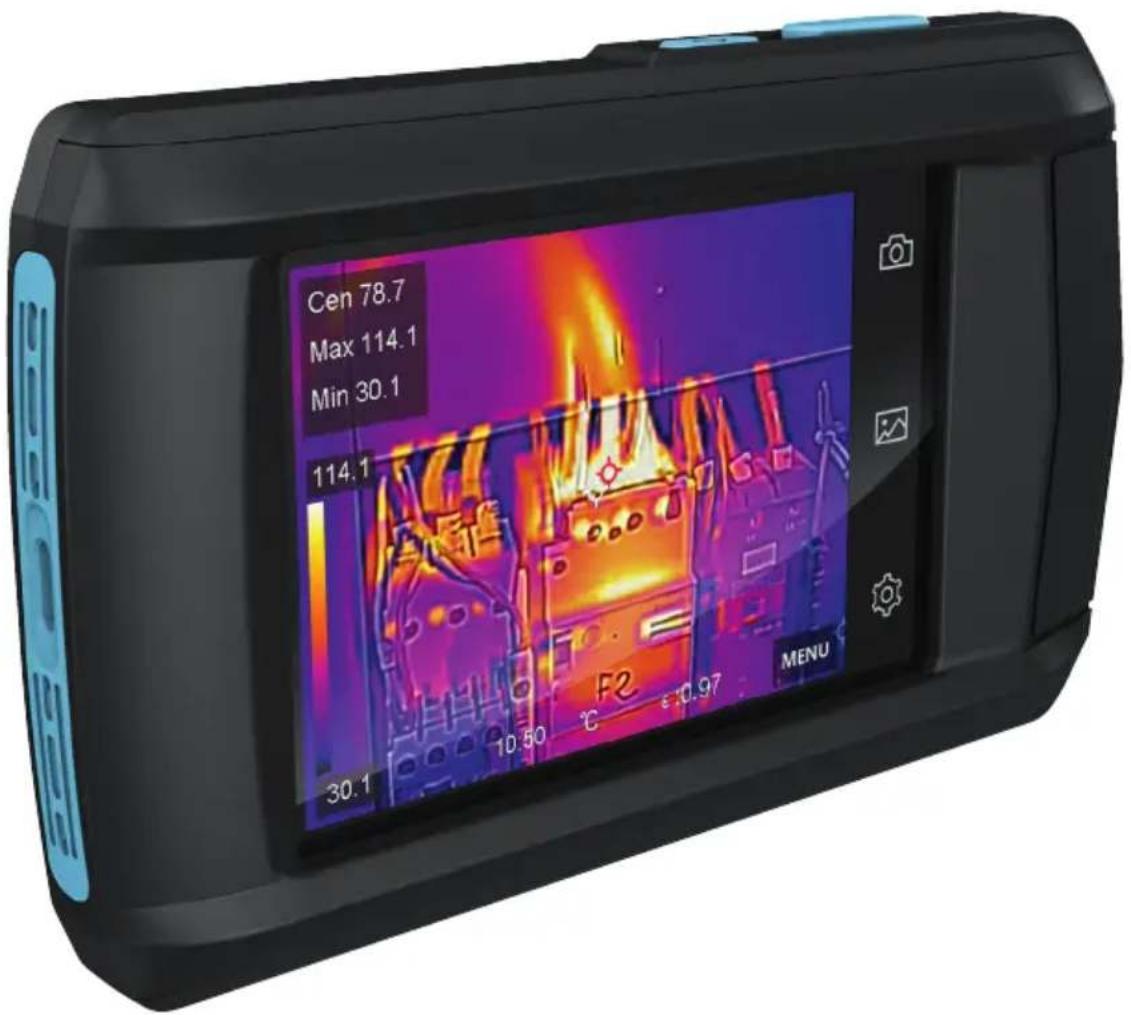
CE

en Table of contents
1. For your information 23 - 26
1.1 General information....23
1.2 Explanation of symbols....23
1.3 Legal information....24
1.4 Trademarks 24
1.5 Exclusion of liability....24
1.6 Regulatory information 24
1.7 Safety precaution 25
2. For your safety....27 - 28
2.1 Owner's liability 27
2.2 Intended use 27
2.3 Dangers that may arise from using the device 28
3. Design and Function 28 - 38
3.1 Main function....28
3.2 Included in delivery 29
3.2.1 Design 29
3.3 Charging the device 30
3.4 Switching on/off 30
3.4.1 Setting the duration for automatic switch-off 30
3.5 Operation....30
3.6 Display settings....31
3.6.1 Setting the screen brightness 31
3.7 Setting the display mode 31
3.7.1 Setting pallets 31
3.7.2 Setting the digital zoom 32
3.7.3 Displaying OSD information....32
3.8 Temperature measurement....32
3.8.1 Setting the thermography settings.... 32
3.8.2 Setting the device 33
3.8.3 Setting the level and span 33
3.8.4 Defining thermography rules....33
3.8.5 Setting the temperature alarm 33
3.9 Image and video....34
3.9.1 Capturing an image....34
3.9.2 Recording a video 34
3.9.3 Managing albums....35
3.9.4 Creating a new album 35
3.9.5 Renaming an album 35
3.9.6 Changing the default storage album.... 35
3.9.7 Deleting an album 35
3.9.8 Displaying recorded files....35
3.10 Managing files 36
3.10.1 Deleting a video file.... 36
3.10.2 Deleting multiple files....36
3.10.3 Moving a file....36
3.10.4 Moving multiple files 36
3.10.5 Adding a text note to a file.... 37
3.11 Exporting files....37
3.12 Setting the LED light 37
3.13 Setting Macro mode 37
4. Maintenance and care 38
4.1 Displaying device data....38
4.2 Setting the date and time 38
4.3 Updating the device....38
4.4 Restoring the device 38
4.5 Storage....38
4.6 Disposal....38
5 Reference for general material emissivity 39
Original language German
1.1 General information
- Please make sure that the user of this tool carefully reads these operating instructions and fully understands all the information provided before using the tool for the first time.
- These operating instructions contain important advice that is necessary for the safe and trouble-free operation of your HAZET tool.
- For intended use of the tool, it is essential that all safety and other information in these operating instructions is adhered to.
- For this reason, always keep these operating instructions together with your HAZET tool.
- This tool has been designed exclusively for specific applications. HAZET emphasises that any modification to the tool and/or use in a way that does not correspond to its intended application is strictly forbidden.
- HAZET will not be liable for any injuries to persons or damage to property originating from improper or inappropriate application, misuse of the tool or a disregard of the safety instructions.
- Furthermore, the general safety regulations and regulations for the prevention of accidents in the application range of this tool must be observed and respected.
1.2 Explanation of symbols
ATTENTION: Pay strict attention to these symbols!
READ THE OPERATING INSTRUCTIONS!

The owner of this tool is obliged to observe the operating instructions and instruct any users of this tool according to the operating instructions.
NOTE!

This symbol indicates advice that is helpful when using the tool.
WARNING!

This symbol indicates important descriptions, dangerous conditions, safety risks and safety advice.
CAUTION!

This symbol indicates advice which, if disregarded, results in damage, malfunction and/or functional failure of the tool.
QUALIFIED PERSONNEL!

The tool may be used by qualified personnel only. Handling by non-qualified people may lead to injuries to persons or damage to the tool or the workpiece.
1.3 Legal information
The operating manual contains instructions for using and managing the product. Pictures, diagrams, illustrations and all other information are for description and explanation purposes only. The information contained in the operating instructions is subject to change due to firmware updates or for other reasons. The latest version of these operating instructions can be found on the company's website. Please use these operating instructions with the guidance and assistance of professionals trained to support the product.
1.4 Trademarks
Trademarks and logos mentioned herein are the property of their respective owners.
1.5 Exclusion of liability
These operating instructions and the described product with its hardware and firmware are provided "as is" and with "all faults and errors" to the extent permitted by law. Our company makes no warranties, express or implied, including but not limited to merchantability, satisfactory quality or fitness for a particular purpose. Your use of the product is at your own risk. In no event will our company be liable to you for any special, incidental, direct or indirect damages, including but not limited to loss of business profits, business interruption, loss of data, system corruption, loss of documentation, whether in an action of contract, tort (including negligence), product liability or otherwise, in connection with the use of this product, even if our company has been advised of the possibility of such damages or losses.
You acknowledge that the nature of the Internet involves inherent security risks, and our Company shall not be liable for abnormal operation, loss of privacy or other damages resulting from cyber-attacks, hacker attacks, virus infections or other Internet security risks. However, if required, our company will provide technical support in a timely manner. You agree to use this product in accordance with all applicable laws and you are solely responsible for ensuring that your use does not violate any applicable laws. In particular, you are responsible for using this product in a manner that does not infringe the rights of third parties, including but not limited to rights of publicity, intellectual property rights or privacy and other personal rights. You must not use this product for prohibited end uses, including the development or manufacture of weapons of mass destruction, the development or manufacture of chemical or biological weapons, any activity involving a nuclear explosive device or unsafe nuclear fuel cycle, or in support of human rights abuses.
In the event of any conflict between these operating instructions and applicable law, the latter shall prevail.
1.6 Regulatory information
EU Declaration of Conformity
This product and – where applicable – the accessories supplied with it bear the "CE" mark and therefore comply with the applicable harmonised European standards listed in Directive 2014/30/EU (EMC), Directive 2014/35/EU (NSR) and Directive 2011/65/EU (RoHS).Directive 2012/19/EU (WEEE Directive): Products marked with this symbol must not be disposed of with household waste within the European Union. For correct recycling, return this product to your local dealer or dispose of it at one of the collection points. For further information, please visit: www.recyclethis.info
Directive 2006/66/EC and its amendment 2013/56/EU (Battery Directive): This product contains a battery which must not be disposed of with household waste within the European Union. See product documentation for specific instructions on batteries. The battery is marked with this symbol, which may also contain the letters Cd for cadmium, Pb for lead or Hg for mercury. For correct recycling, return the battery to your local dealer or dispose of it at one of the collection points. For further information, please visit: www.recyclethis.info
1.7 Safety precaution
These instructions are intended to ensure that you use the product correctly to avoid danger or damage to property.
Laws and regulations
- The product must be used in strict compliance with local electrical safety regulations.
Transportation
- When transporting the device, keep it in its original or comparable packaging.
- After unpacking, keep all packing material for future use. In the event of a fault, you must return the device to the plant in the original packaging. If transported without the original packaging, the device may be damaged and we accept no responsibility.
- Do not drop the product and avoid violent impacts. Keep the device away from magnetic interference.
Power supply
- The input voltage must correspond to a current source with limited power (3.85 V DC, 570 mA) according to the IEC 62368 standard. See technical data for detailed information.
- Make sure that the plug is properly inserted into the socket.
- DO NOT connect multiple devices to one power supply unit, otherwise overheating or fire may occur due to overloading.
- Use the power supply unit supplied by an approved manufacturer. For detailed information on battery/battery requirements, see the product specification.
Battery
- If the battery is used or replaced improperly, there is a possible risk of explosion. Always replace with the same or equivalent type. Dispose of used batteries according to the battery manufacturer's instructions.
- The integrated battery must not be disman-tled. If necessary, contact the manufacturer for repair.
- When storing the battery for a long time, make sure that it is fully charged every six months to ensure its lifespan. Otherwise, damage may occur.
- Only use a battery supplied by a qualified manufacturer. For detailed information on battery/battery requirements, see the product specification.
- Do not charge other types of batteries with the supplied charger. Make sure that there is no flammable material within 2 m of the charger during charging.
- DO NOT store the battery in the immediate vicinity of a heat or fire source. Do not expose to direct sunlight.
- DO NOT swallow the battery, there is a risk of chemical burns.
- DO NOT keep the battery within the reach of children.
- If the device is switched off and the RTC battery is full, the time settings are retained for 6 months.
- When using the device for the first time, charge it for more than 2.5 hours with the power off.
- The lithium battery has a voltage of 3.85 V and a capacity of 2100 mAh.
- It is certified according to UL2054.
Maintenance
- If the product does not work properly, contact your dealer or the nearest service centre. We accept no liability for problems caused by non-repair or maintenance work carried out by unauthorised third parties.
- Some device components (e.g. electrolytic capacitor) must be replaced regularly. The average service life varies, which is why regular testing is recommended. Contact your dealer for details.
- If necessary, wipe the device gently with a clean cloth and a small amount of ethanol.
- If the device is used in a manner not specified by the manufacturer, the protection provided by the device may be impaired.
- Please note that the current limit of the USB 3.0 PowerShare port may vary depending on the PC brand. This can cause compatibility problems. Therefore, use a normal USB 3.0 or USB 2.0 port if the PC does not recognise the USB device via the USB 3.0 PowerShare port.
- Your camera performs self-calibration at regular intervals to optimise image quality and measurement accuracy. During this process, the image will stop briefly and you will hear a "click sound" when a shutter moves in front of the detector. Self-calibration occurs more frequently during start-up or in very cold or hot environments. This is a normal process to get the best performance from your camera.
Application environment
- Make sure that the operating environment meets the requirements of the device. The operating temperature of the device is -10 °C to 50 °C and the operating humidity must not exceed 95 %.
- This device can only be used safely in regions below 2000 metres above sea level.
- Store the device in a cool and well-ventilated place.
- DO NOT expose the device to high electro-magnetic radiation or dusty environments.
- DO NOT point the lens at the sun or any other bright light source.
- When using a laser device, make sure that the lens of the device is not exposed to the laser beam. Otherwise it could burn out.
- DO NOT point the lens at the sun or any other bright light source.
- The device is suitable for indoor and outdoor use, but must not be used in humid environments.
• The protection class is IP 54.
• The degree of pollution is 2.
Emergency call
- If smoke, odours or noises develop in the device, switch it off immediately and unplug it from the mains; then contact the after-sales service.
- LEGAL NOTICE: Thermal Imaging Series products may be subject to export controls in various countries or regions, such as the United States, the European Union, the United Kingdom and/or other Wassenaar Arrangement member countries. Please consult your professional legal or compliance expert or the relevant authorities if you intend to transfer, export or re-export thermal imaging series products between different countries for information on any export authorisation that may be required.

2.1 Owner's liability
- This tool was developed and manufactured according to the technical norms and standards valid at the time and is considered to be operationally reliable. Nevertheless, the tool may present a danger when it is not used as intended or used in an inappropriate way by non-qualified personnel. Please make sure that any person using this tool or carrying out maintenance work carefully reads and fully understands these operating instructions before using the tool.
- Modifications of any kind or any additions or modifications to the unit are prohibited.
- All safety instructions, warning and operation notices on the tool must be kept legible at all times. All damaged labels or stickers must be replaced immediately.
- All specified installation values or setting ranges must be observed.
- Keep the operating instructions together with the tool at all times.
- The tool may only be used if it is in good working order.
- All safety equipment must always be within reach and should be checked regularly.

2.2 Intended use
Operational reliability is only guaranteed if the tool is used as intended in accordance with the information in the operating instructions. In addition to the occupational health and safety information in these operating instructions, the regulations for general safety, the prevention of accidents and for environmental protection valid for this tool's application range must be observed and respected.
Use and maintenance of the tool must always comply with relevant local and national regulations.
- The portable thermal imaging camera is a device for capturing optical and thermal images. It is suitable for temperature and distance measurement, video recording, photo recording and alarming. The integrated high-sensitivity IR detector and high-performance sensor detect temperature changes and measure the temperature in real time. The temperature measuring range is -20 °C to 400 °C with an accuracy of ±2 °C or ±2 % at an ambient temperature of 15 °C to 35 °C and an object temperature above 0 °C.
- The device is user-friendly and ergonomically designed. It is widely used for building inspection, HVAC, and electrical and mechanical maintenance.
- Any incorrect use of the HAZET tool or use that fails to comply with the safety instructions can result in serious injury or even death.
- Any deviation from the intended use and/or any misapplication of the tool is not allowed and will be considered as improper use.
- Any claims against the manufacturer and / or its authorised agents resulting from damage caused by improper use of the tool are excluded.
- Any personal injury or material losses caused by improper use of the tool are the sole responsibility of the operator.

2.3 Dangers that may arise from using the device
Before each use, check the HAZET tool for full functionality. Do not use the tool set if its functionality cannot be ensured or if damage is detected. If the tool is used when it is not in full working order, you risk severe injuries to persons and damage to property.
- Electrical energy may cause serious injuries to persons. The following fundamental safety instructions must be observed and adhered to in order to avoid electric shock, injuries or fire:
- The connecting cables and housing must not be damaged. Tools/chargers that have been dropped or damaged must be checked by qualified personnel before being used again.
- Never use tools with a defective on/off switch. Any tools that cannot be switched on or off with the On/Off switch are dangerous and must be repaired.
- The cables must not touch hot or sharp parts or become damaged in any other way. The cables must be laid in such a way that they do not present a tripping hazard.
- All service or repair work must be carried out by qualified personnel only. Only use original spare parts so as to guarantee its long-term operational safety.
- Safety devices and/or cover parts may not be removed.
-
Never operate the tool when a protective cover is missing or when not all of the safety devices are fitted and in perfect working order.
-
Only use the tool within the prescribed places, and governed under the current regulations relating to the working environment and to electrical systems.
- For safety reasons, any modification to the HAZET tool is strictly forbidden. Any modification of the tool will result in immediate exclusion from warranty and liability.
- Keep children away from HAZET tools. Unattended tools could be used by unauthorised persons and could cause injury to them or to other persons.
- Do not use the device in an explosive atmosphere. Electric tools can cause sparks or ignite combustible materials.
- Stop using any tool immediately if you feel unwell or jittery or if you start feeling pain.
• Make sure that the working area is clean, well ventilated and always well lit. - Never use the tool whilst under the influence of alcohol or drugs.
- Repairs must be performed by authorised personnel only.
- Solvents such as petrol, benzene, carbon tetrachloride, and alcohol can deform or crack the plastic parts. Do not come in contact with the above-mentioned solvents.
③ Design and function
3.1 Main function
Thermography
The device measures temperature in real time and displays it on the screen.
Fusion
The device can combine the thermal and optical views.
Pallet and alarm
The device supports multiple pallets. You can set the palette mode according to the alarm function.
3.2 Included in delivery
• 1xHAZET 1992-2 thermal camera
- 1xtie band
- 1x Transport case
• 1x230 V power supply unit
- 1x charging cable
• 1x operating instructions
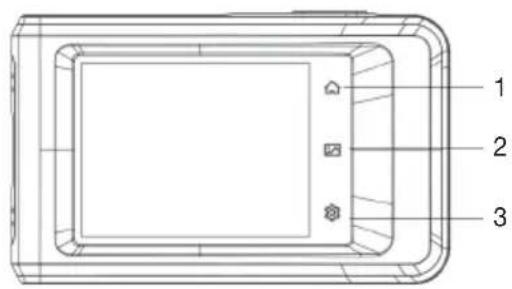
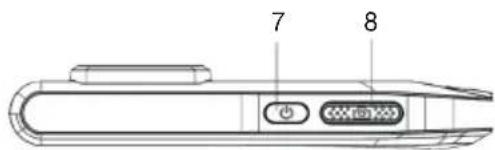
3.2.1 Design
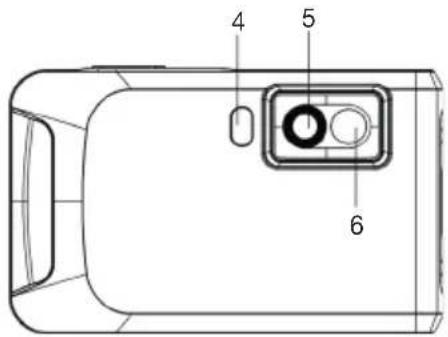
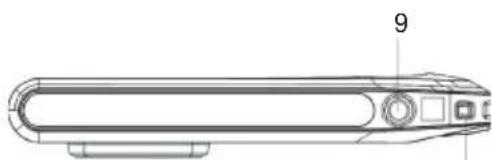
natural_image
Technical line drawing of a device with labeled parts (no text or symbols present)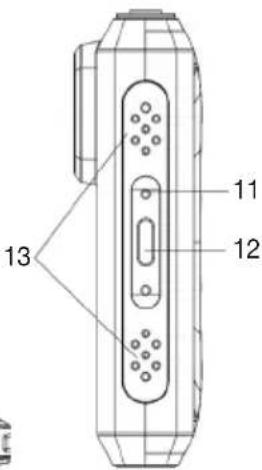
10
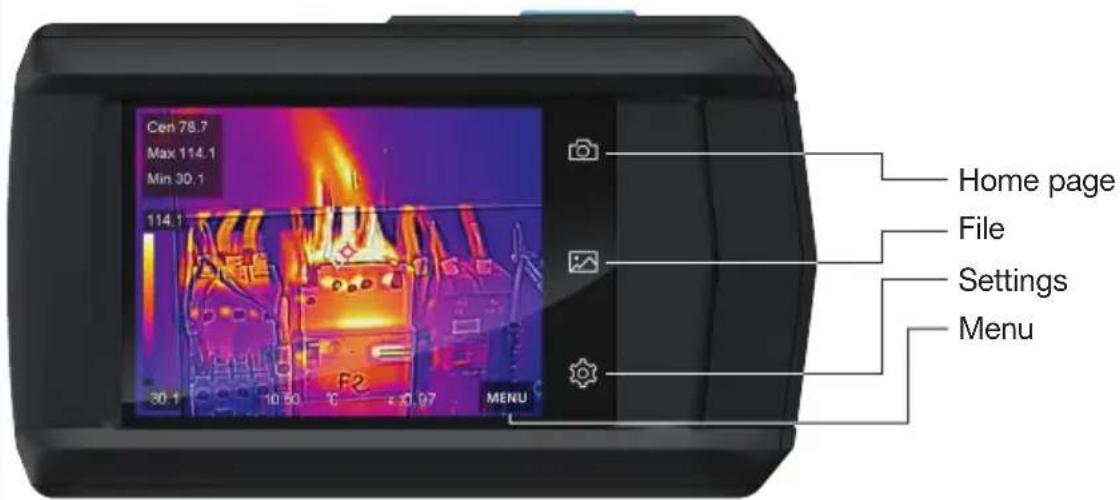
| No. | Description Function | |
| 1 | Home page Tap to return to the live view. | |
| 2 | File Tap to access albums. | |
| 3 | Settings Tap to access the settings. | |
| 4 | Torch light Illuminates objects and emits a flashing alarm. | |
| 5 | Thermal imaging lens Display thermal image. | |
| 6 | Optical lens Display optical image. | |
| 7 | On/Off Press and hold to switch the device on and off. | |
| 8 | Recording | Press in live view mode: Capture photos/stop recording.Press in menu mode: Return to the live view.Press and hold: Start recording |
| 9 | Attachment for a tripod Attachment for a tripod. | |
| 10 | Strap attachment point Attaches the strap. | |
| 11 | Status display | Indicates: the charging status of the device.Lights up red: normal charging processFlashes red: charging exceptionLights green: fully charged |
| 12 | Type-C interface Use the Type-C cable to charge the device or export files. | |
| 13 | Buzzer Sound an audible alarm. | |

Your camera performs self-calibration at regular intervals to optimise image quality and measurement accuracy. During this process, the picture stops briefly and you hear a "click sound". Self-calibration occurs more frequently during the start-up process or in very cold or hot environments. This is a normal process to get the best performance from your camera.
3.3 Charging the device
Before you start
Make sure the battery is inserted before charging.
Steps
- Lift the cover of the cable connection.
- Connect the cable and the mains adapter to charge the battery.
3.4 Switching on/off
Switching on
Press and hold for more than three seconds to switch on the device. You can observe the target when the surface of the device is stable.

After switching on, it may take at least 30 seconds until the device is ready for use.
Switching off
When the device is on, press and hold for about three seconds to switch off the device.
3.4.1 Setting the duration for automatic switch-off
Go to Local Settings -> Device Settings -> Auto Off to set the duration until the device automatically switches off as required.
3.5 Operation
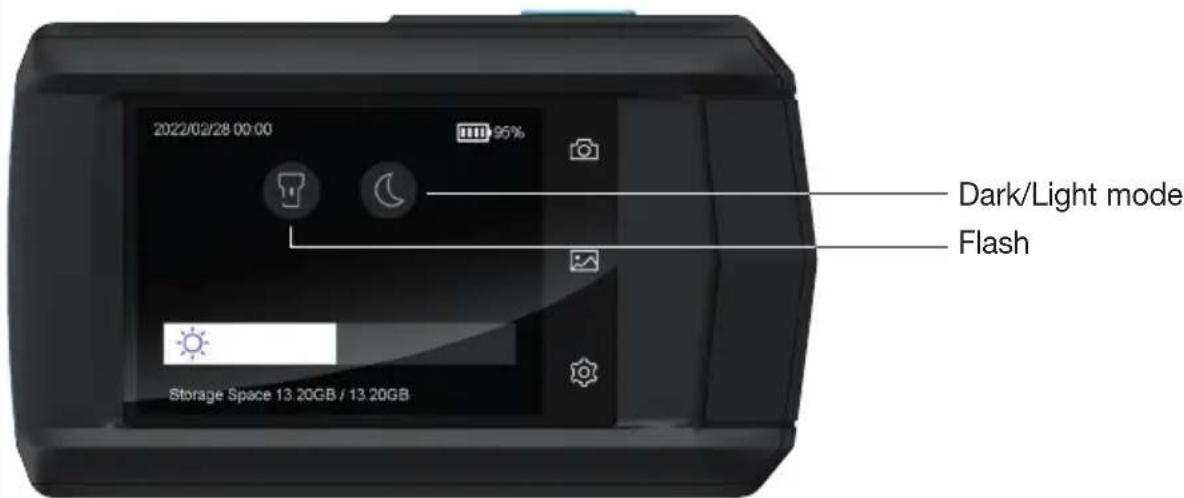
The device also supports touch screen control. Tap the screen to set parameters and configurations.
3.6 Display settings
3.6.1 Setting the screen brightness
You can drag the brightness setting in the drop-down menu.
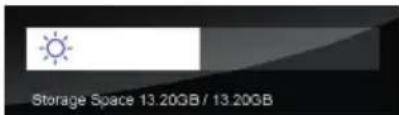
Figure 3-1 Setting the brightness via the down-wipe menu
3.7 Setting the display mode
Here you choose between thermal and optical display modes. You can choose between Thermal, Fusion, PIP and Optical.
Steps
- Tap Menu and select
- Tap the icons to select a display mode.

In Thermal mode, the device displays the thermal image view.

In Fusion mode, the device displays the combined view of the thermal and optical channels.
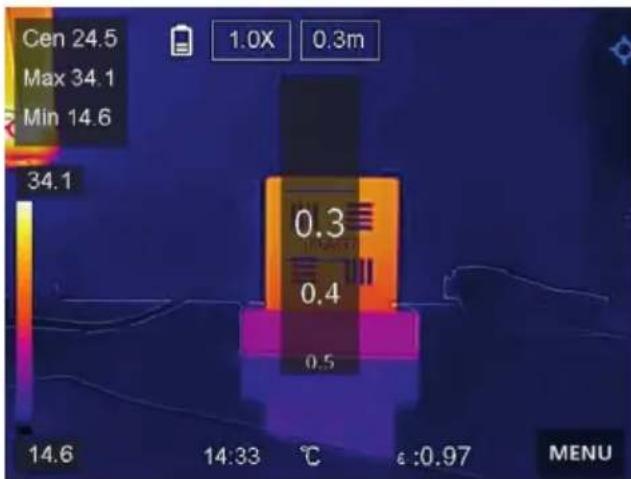

When selecting Fusion mode, you must select the parallax correction in the live view according to the distance to the target so that the thermal and optical images overlap better.

In PIP mode (picture in picture), the device displays the thermal view within the optical.

For PiP (picture in picture) you can set size, distance and digital zoom.

In optical mode, the device displays the optical view.
- PressBack to exit the function.
3.7.1 Setting pallets
You can select the desired colours with the palettes.
Steps
- In the Main menu, select

- Tap the icons to select a pallet type.
BlackHot
The hot area is coloured dark in the view.
WhiteHot
The hot area is coloured light in the view.
Ironbow
Hot areas are coloured yellow and cold areas are coloured purple.
Rainbow
The target shows several colours. It is suitable for scenes without significant temperature differences.
Rain
Hot areas in the image are coloured, the rest is blue.
Fusion
Hot areas are coloured yellow/white. Colder areas are coloured red/brown.
Red Hot
The hot area is coloured red in the view.
- PressBack to exit the settings menu.
3.7.2 Setting the digital zoom Steps
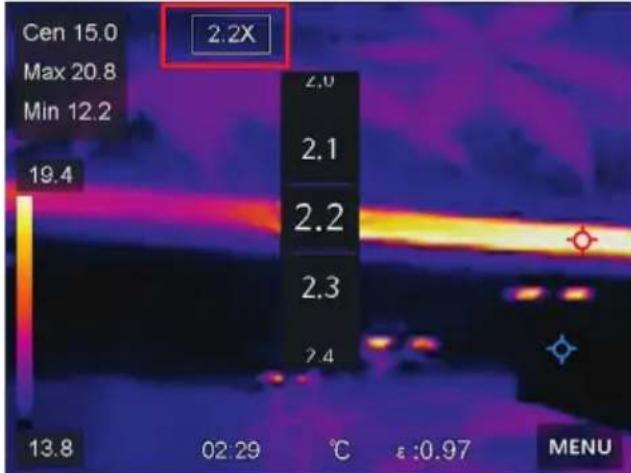
- Tap the Live View menu to access the digital zoom frame.
- Tap the digital zoom frame.
- Select the desired value for the digital zoom.
- Tap the screen to save and exit the function.
3.7.3 Displaying OSD information
Go to Local Settings -> Device Settings -> Display Settings to enable the display of information on the screen.
Time
Time and date of the device.
Settings
Thermography settings, such as target emissivity, temperature unit, etc.
3.8 Temperature measurement
The thermography function (temperature measurement) provides the real-time temperature of the scene and displays it on the left of the screen. The thermography function is switched on by default.
3.8.1 Setting the thermography settings
You have the option of adjusting the thermography settings to increase the accuracy of the temperature measurement.
Steps
- Go to Local Settings ->Thermography Settings.
- Set the Thermographic Range, Emissivity etc.
Thermographic range
Select the temperature measuring range. In Auto Switch mode, the device can detect the temperature and switch the thermography area automatically.
Emissivity
Refer to the Reference for general material emissivity to determine the emissivity of your target.
Reflection temperature
If there is an object other than the high temperature target in the scene and the emissivity of the target is low, set the reflection temperature as high temperature to correct the thermographic effect.
Distance
The distance between the target and the device. You can adjust the distance of the target or select as Near, Medium or Far.
Air humidity
The relative air humidity of the current environment is set here.
- Go back to the previous menu to save the settings.

Go to Local Settings -> Device Settings -> Device Initialisation -> Measurement Tool Initialisation to initialise the temperature measurement settings.
3.8.2 Setting the device
Go to Local Settings -> Device Settings -> Unit to set the units of measurement for temperature and distance.
3.8.3 Setting the level and span
You can adjust the temperature range with the Level and Span function. You can set a temperature range so that the palette only works for destinations within that temperature range. Level and span can be adjusted manually or automatically to achieve a good thermal effect for better temperature difference analysis.
Steps
- Tap Menu and select
- Select automatic setting or manual setting 👍️.
Automatic adjustment
Select 📁. The device automatically sets the temperature range setting.
Manual adjustment
There are two ways to set the temperature range manually:
- Set the temperature range using a selected range. Tap an area on the screen that interests you. A circle is then displayed around the area and the palette is adjusted to the temperature range of that area.
- Set the maximum and minimum temperature of the range.
- Tap to select the maximum temperature, the minimum temperature or both. You can also tap the maximum or minimum temperature at the ends of the palette bar to select them.
-
Tap the arrows on the right side of the screen to set the temperature value.
-
PressBack to exit the function.
3.8.4 Defining thermography rules
You can define thermography rules to measure the minimum, maximum and average temperature of the current scene.
Steps
- Tap Menu and select

- Tap to select the desired thermography
rule. Hot, Cold and Center can be selected.
3.TapBack to save and exit the function.

- The minimum, maximum and average temperatures are displayed at the top left of the screen.
- Tap the rule again to delete it.
3.8.5 Setting the temperature alarm
If the temperature of the target triggers the set alarm rule, the device will perform the configured actions, such as an audible warning and flashing alarm.
Steps
- Go to Local Settings ->Thermography Settings -> Alarm Settings -> Temperature Alarm.
- Activate the function and set the alarm and warning threshold.
Alarm threshold
When the audible warning is activated, the torch flashes when the light flash alarm has been activated. The range flashes red when the range rule has been configured.
Alarm threshold
- Go to Local Settings ->Thermography Settings -> Alarm Settings -> Alarm Linkage.
4.ActivateAudible Warning, Flashing Alarm or both.
Acoustic warning
The device will sound an audible alarm when the target temperature exceeds the alarm threshold.
Light flash alarm
The torch flashes when the target temperature exceeds the alarm threshold.
5.Tap < to save and exit the function.
3.9 Image and video

- The device does not support photo or video recording when the menu is displayed.
- The device does not support photo or video recording when connected to your PC.
- UnderLocal Settings -> Capture Settings -> File Name Header, you can set the file name header for photo or video capture to distinguish the files captured in a particular scene.
3.9.1 Capturing an image
Before you start
Activate the torch via the drop-down menu in a dark environment.
Steps
- Go to Local Settings ->Capture Settings.
- SelectPhoto Settings to set the shooting mode.
Single picture
Recording single images.
Continuous recording
Automated recording of several images (setting up to 9 images freely selectable).
Time-controlled recording
The device takes a picture after a set time interval. You can set the time interval as required.
- Optional: Set the optical resolution as required.
- To exit, press < .
- In live view, press the record button to take a photo.
- NoteExport Files to export photos.
3.9.2 Recording a video
Before you start
Activate the torch via the drop-down menu in a dark environment.
Steps
- In live view, press and hold the record button to start video recording. The user interface displays the recording symbol and a countdown.
- Finally, press the record button to stop recording. The recorded video is saved automatically.
- NoteExport Files to export photos.
3.9.3 Managing albums
The recorded picture/video files are saved in albums. You can create new folders, rename a folder, change the default folder, move files between folders and delete folders.
3.9.4 Creating a new album
Steps
- To access Albums, press
2.Tap + to add a new album. - A software keyboard is displayed that allows you to enter the name of the album by touching the screen.
- Confirm the entry with "return" on the keyboard.
- To exit, tap √

The newly created album becomes the default storage album and is displayed at the top of the list of albums.
3.9.5 Renaming an album
Steps
- To access Albums, press
- Select the album you wish to rename.
- Tap ·s·s and select Rename. A software keyboard is displayed.
- Tap ✗ to delete the old name and enter the new name for the album by touching the screen.
- To exit, tap √.
3.9.6 Changing the default storage album
Steps
- To access Albums, press
- Select the album you want to use as the default storage album.
- Tap ••• and select define As Default Storage Album.

The default storage album displayed at the top of the list of albums.
3.9.7 Deleting an album
Steps
- To access Albums, press
- Select the album you wish to delete.
- Tap ••• and select Delete. An input field is displayed on the user interface.
4.TapOK to delete the album.
3.9.8 Displaying recorded files
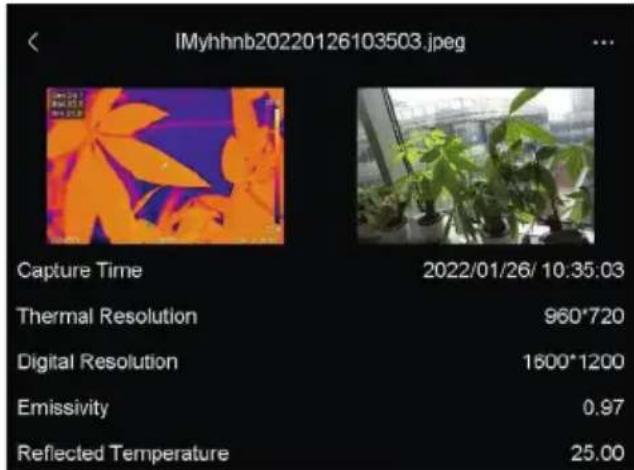
Steps
- To access Albums, press
- Tap to select the album where the files are stored.
- Tap to select the video or photo to be displayed.
- Display the selected file and the relevant information.
3.10 Managing files
You can move, delete and edit the recorded files. Voice memos and messages can be added to the files.
3.10.1 Deleting a video file
Steps
-
To access Albums, press
-
Tap to select the album where the file to be deleted is stored.
-
Tap in the album to select the file to be deleted.
-
Tap ••• and select Delete. An input field is displayed on the user interface.
5.TapOK to delete the file.
3.10.2 Deleting multiple files
Steps
-
To access Albums, press
-
Tap to select the album in which the files to be deleted are stored.
-
In the album, tap and then the files to be deleted.

You can tap to select all files and tap — to cancel the selection.
-
Tap . An input field is displayed on the user interface.
-
Tap OK to delete the files.

You can also delete a single file in this way.
3.10.3 Moving a file
Steps
-
To access Albums, press
-
Tap to select the album in which the file to be moved is stored.
-
Tap in the album to select the file to be moved.
4.Tap ••• and select Move. The list of albums is displayed.
- Tap to select the album you want to move to.
3.10.4 Moving multiple files
Steps
-
To access Albums, press
-
Tap to select the album where the files to be moved are stored.
-
Tap in the album to select the files to be moved.
You can tap to select all files and tap — to cancel the selection.
-
Tap. The list of albums is displayed.
-
Tap to select the album you want to move to.

You can also move a single file in this way.
3.10.5 Adding a text note to a file
Steps
- To access Albums, press
- Tap to select the album in which the file to be edited is stored.
- Tap in the album to select the file to be edited.
- Tap ••••, and select Text Note. A software keyboard is displayed.
- Enter the text note by touching the screen.
- To exit, tap √.
What follows next
You can open the edited photo to view the text note.
3.11 Exporting files
Connect the device to your PC using the cable supplied and export the videos and photos you have taken.
Steps
- Open the cover of the USB port.
- Connect the device to your PC with the cable and open the recognised drive.
- Select videos or photos and copy them to the PC to view them.
- Disconnect the device from your PC.

The driver is installed automatically the first time you connect.
3.12 Setting the LED light
Tap Torch light in the pop-up menu to activate the LED light.
3.13 Setting Macro mode
In Macro mode, you can focus on a very small object extremely close and the object will appear much larger in the view (and final image) compared to the standard lens.
Before you start
• Install the macro lens before using this function. For detailed information on operation, see the Quick Start Guide for the macro lens.
- The macro lens is not included in the scope of delivery. Please purchase it separately. Please purchase the model recommended by the manufacturer.
Steps
- In the Main menu, select
2.GotoLocal Settings -> Capture Settings -> Macro Mode.
3.Tap to activate the function.

• After activating Macro mode, only the emissivity can be changed. Settings such as distance, picture mode, parallax correction and measuring range cannot be changed.
• After deactivating this function, the settings are reset to the previously set values and the measuring range is set to automatic switching.
4.1 Displaying device data
Go to Local Settings -> Device Information to view the device information.
4.2 Setting the date and time
Go to Local Settings -> Device Information to view the device information.
Steps
- Go to Local Settings -> Device Settings -> Time and Date.
- Set the date and time.
- To save and quit, press< .

Under Local Settings -> Device Settings -> Display settings you can
activate or deactivate the display for time and date.
4.3 Updating the device
Steps
- Connect the device to your PC with the cable and open the recognised drive.
- Copy the update file to the root directory of the device.
- Disconnect the device from your PC.
- Restart the device and the update will take place automatically. The update process is displayed in the main menu.

After the update, the device restarts automatically. You can view the current version under Local Settings -> Device Settings -> Device Information.
4.4 Restoring the device
Go to Local Settings -> Device Settings -> Device Initialization to reset the device and restore the default settings.
4.5 Storage:

The tool must be stored under the following conditions:
- Keep the tool in a dry and dust-free place.
- Do not expose the device to liquids and/or aggressive substances
- Do not store the tool outdoors.
- Keep tool out of reach of children.
• Storage temperature: -10 up to +40 °C.
• Relative air humidity: max. 60 %.
4.6 Disposal:

- Electronic waste, electronic components, lubrication and other auxiliary materials must be treated as hazardous waste and may only be disposed of by authorised specialists!
- Reducing environmental pollution and preserving the environment are the main focus of our activities!
⑤ Reference for general material emissivity
| Material Emissivity | |
| Human skin 0.98 | |
| Circuit board 0.91 | |
| Concrete 0.95 | |
| Ceramic 0.92 | |
| Rubber 0.95 | |
| Colour 0.93 | |
| Wood 0.85 | |
| Resin 0.96 | |
| Brick 0.95 | |
| Sand 0.90 | |
| Soil 0.92 | |
| Fabric 0.98 | |
| Hardboard 0.90 | |
| White paper 0.90 | |
| Water 0.96 |
Notizen / Notes
HAZET-WERK
HÖCHSTE TECHNOLOGIE IN DER WERKZEUGFERTIGUNG SEIT 1868 HIGHEST TECHNOLOGY IN TOOL MANUFACTURE SINCE 1868

1992-2

natural_image
Black-and-white product photo showing various wrenches and a tool holder with no visible text or symbols.HAZET-WERK Hermann Zerver GmbH & Co. KG • 📄 Güldenwerther Bahnhofstrasse 25-29 42857 Remscheid • ✉ 10 04 61 • 42804 Remscheid • GERMANY • 📞 +49 (0) 21 91 / 7 92-0 FAX +49 (0) 21 91 / 7 92-375 (Deutschland) -400 (International) • www.hazet.de • e-mail info@hazet.de
- Operating Instructions
- Thermal Camera
- en Table of contents
- For your information 23 - 26
- For your safety....27 - 28
- Design and Function 28 - 38
- Maintenance and care 38
- Reference for general material emissivity 39
- General information
- Explanation of symbols
- READ THE OPERATING INSTRUCTIONS!
- NOTE!
- WARNING!
- CAUTION!
- QUALIFIED PERSONNEL!
- Legal information
- Trademarks
- Exclusion of liability
- Regulatory information
- EU Declaration of Conformity
- Safety precaution
- Laws and regulations
- Transportation
- Power supply
- Battery
- Maintenance
- Application environment
- Emergency call
- Owner's liability
- Intended use
- Dangers that may arise from using the device
- ③ Design and function
- Main function
- Thermography
- Fusion
- Pallet and alarm
- Included in delivery
- Charging the device
- Before you start
- Steps
- Switching on/off
- Switching on
- Switching off
- Setting the duration for automatic switch-off
- Operation
- Display settings
- Setting the screen brightness
- Setting the display mode
- Setting pallets
- BlackHot
- WhiteHot
- Ironbow
- Rainbow
- Rain
- Red Hot
- Setting the digital zoom Steps
- Displaying OSD information
- Time
- Settings
- Temperature measurement
- Setting the thermography settings
- Thermographic range
- Emissivity
- Reflection temperature
- Distance
- Air humidity
- Setting the device
- Setting the level and span
- Automatic adjustment
- Manual adjustment
- Defining thermography rules
- Setting the temperature alarm
- Alarm threshold
- Light flash alarm
- Image and video
- Capturing an image
- Single picture
- Continuous recording
- Time-controlled recording
- Recording a video
- Managing albums
- Creating a new album
- Renaming an album
- Changing the default storage album
- Deleting an album
- Displaying recorded files
- Managing files
- Deleting a video file
- Deleting multiple files
- Moving a file
- Moving multiple files
- Adding a text note to a file
- What follows next
- Exporting files
- Setting the LED light
- Setting Macro mode
- Displaying device data
- Setting the date and time
- Updating the device
- Restoring the device
- Storage:
- Disposal:
- Notizen / Notes
- HAZET-WERK
Brand : Hazet
Model : 1992-2
Category : Measurement