USER MANUAL LAGUNA CD36 BLAUPUNKT
Operating and installation instructions
① Button to switch the unit on/off and to mute the unit.
② Button to release the control panel.
③ CD Eject button ▲.
④ Volume control.
⑤ CD-Slot.
⑥ AUDIO button, to adjust the bass, treble, balance and fader settings and Sound Preset
⑦ Short press: MENU button, to open the basic settings menu. Long press: SCAN, to start scan function.
⑧ Arrow buttons
⑨ X-Bass button to adjust the X-Bass function.
⑩ Short press: ⏻ DIS button, to display the time.
Long press: to change the display priority.
⑪ Keys 1 - 6
⑫ Short press: BND button, to select the FM memory bank and the AM waveband, source selection to radio mode. Long press: TS, to start the Travelstore function.
⑬ SRC button, to select the CD, radio and CD changer or AUX sources.
Notes and accessories .... 5
Road safety 5
Installation 5
Accessories 5
International telephone information ..... 5
Detachable control panel 6
Theft protection 6
Detaching the control panel 6
Attaching the control panel 6
Switching on/off 7
Adjusting the volume 8
Setting the power-on volume 8
Instantaneous volume reduction (mute) .... 8
Mute while telephoning 8
Confirmation beep 9
Radio mode 9
Switching to radio mode 9
Setting the tuner 9
Selecting the frequency range/ memory . 10
Tuning into a station 10
Storing stations 10
Storing stations automatically
(Travelstore)....11
Listening to preset stations 11
Scanning receivable stations (SCAN) .... 11
Setting the display 11
CD mode 12
Switching to CD mode 12
Selecting tracks 12
Fast searching (audible) 12
Random play (MIX) 12
Scanning tracks (SCAN) 12
Repeating tracks (REPEAT) 13
Pausing playback (PAUSE) 13
Changing the display 13
Ejecting a CD 13
CD changer mode 14
Switching to CD changer mode 14
Selecting a CD 14
Selecting tracks 14
Fast searching (audible) 14
Changing the display 14
Repeating individual tracks or
whole CDs (REPEAT) 14
Random play (MIX) 14
Scanning all tracks on all CDs (SCAN) .. 15
Pausing playback (PAUSE) 15
CLOCK - Time 16
Briefly displaying the time 16
Setting the time....16
Selecting 12/24-hour clock mode ..... 16
Displaying the time continuously when the unit is off and the ignition is on 16
Briefly displaying the time when the unit is switched off .... 16
Tone and volume distribution settings.... 17
Adjusting the bass settings 17
Adjusting the treble settings 17
Setting the left/right volume distribution (balance) 17
Setting the front/back volume distribution (fader) 17
Equalizer and X-BASS 18
Setting the level display 19
External audio sources ...... 19
Specifications 20
Installation instructions.... 113
Notes and accessories
Thank you for deciding to purchase a Blaupunkt product. We hope you enjoy using this new piece of equipment.
Before using the device for the first time, please read these instructions carefully. The Blaupunkt editors are constantly working on making the operating instructions clearer and easier to understand. However, if you still have any questions on how to operate the unit please contact your dealer or the telephone hotline for your country. You will find the hotline telephone numbers printed at the back of this booklet.
Road safety
⚠️ Road safety has absolute priority. Only operate your car radio if the road and traffic conditions allow you to do so. Familiarise yourself with the unit before setting off on your journey.
You should always be able to hear police, fire and ambulance sirens in good time from inside your vehicle. For this reason, listen to your car sound system at a moderate volume level.
Installation
If you want to install your car radio yourself, please read the installation and connection instructions that follow these operating instructions.
Accessories
Only use accessories approved by Blau-punkt.
Remote control
RC-12H is included. You can conveniently access the most important functions of your car radio from the steering wheel via the optional RC08 or RC10.
You cannot switch the device on/off using the remote control.
Amplifier
All Blaupunkt and Velocity amplifiers can be used.
CD changer
You can connect the following Blaupunkt CD changers: CDC A 08, IDC A 09 and CDC A03.
If you have any questions regarding the operation of your car radio or if you require further information, please do not hesitate to call us!
The information hotline numbers are printed on the last page of these instructions.
Detachable control panel
Theft protection
As a way of protecting your equipment against theft, the unit is equipped with a detachable control panel (release panel). Without this control panel, the car radio is worthless to a thief.
Protect your equipment against theft by taking the control panel with you every time you leave your vehicle. Do not leave the control panel in your vehicle - not even in a hidden place.
The control panel has been designed to be easily use.
Note:
- Never drop the control panel.
- Never expose the control panel to direct sunlight or other heat sources.
- Avoid making direct skin contact with the control panel's contacts. If necessary, clean the contacts with a lint-free cloth and some alcohol.
Detaching the control panel
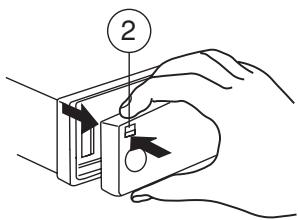
Press the [▼ button ②.
The control panel locking mechanism opens.
First, pull the control panel straight off the unit and then out towards the left.
- The unit switches off after the control panel is detached.
- All the current settings are saved.
- Any CD already inserted in the unit remains there.
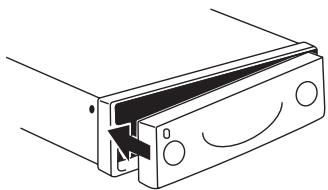
Attaching the control panel
Slide the control panel from left to right into the unit's guide.
Press the left-hand edge of the control panel into the unit until it clicks into place.
natural_image
Technical line drawing of a mechanical component with a curved arrow indicating direction (no text or symbols)
Note:
- When attaching the control panel, make sure you do not press the display.
If the device was still switched on when you detached the control panel, it will automatically switch on again with the last settings activated (i.e. radio, CD, CD changer or AUX) when the panel is replaced.
Switching on/off
There are various ways of switching the unit on/off:
Switching on/off using the vehicle ignition
If the unit is correctly connected to the vehicle's ignition and it was not switched off using ON/OFF button ①, it will switch on/off simultaneously with the ignition.
Switching on/off using the detachable control panel
Remove the control panel.
The unit switches off.
Attach the control panel again.
The unit switches on. The last settings (radio, CD, CD changer or AUX) will be reactivated.
To switch the unit on, press button ①.
To switch the unit off, press button ① for longer than two seconds.
The unit switches off.
Note:
- If you switch on the unit when the ignition is off, the unit will switch off automatically after one hour to prevent draining of the vehicle battery.
Switching on by inserting a CD
If the unit is switched off and there is no CD inserted in the drive,
◇ gently insert the CD with the printed side uppermost into the drive until you feel some resistance.
The CD will be drawn automatically into the drive.
You must not hinder or assist the drive as it draws in the CD.
The unit switches on. CD playback begins.
Note:
- The unit will remain off if the ignition is off. To turn it on, press button ① once.
Adjusting the volume
The volume can be adjusted in steps from 0 (mute) to 66 (maximum).
→ Increase the volume by pressing the ▲ button ④.
Decrease the volume by pressing the V button ④.
Setting the power-on volume
You can set the unit's default power-on volume.
Press the MENU button ⑦.
Press the V or A button ⑧ repeatedly until “ON VOLUME” appears in the display.
Set the power-on volume using the < and > buttons ⑧.
To help you adjusting the volume more easily, the audible volume level will increase or decrease accordingly as you make your changes.
If you select “LAST VOL”, the volume played before the unit was last switched off will be reactivated.
Note:
- To protect your hearing, the maximum switch-on volume under the "LAST VOL" setting is "38". If the volume was higher before the unit was switched off and "LAST VOL" has been selected, the volume will be set at "38" the next time the radio is switched on.
When you have finished making your changes,
→ press the MENU button ⑦ twice.
Instantaneous volume reduction (mute)
This feature allows you to instantaneously reduce (mute) the volume to a level preset by you.
Briefly press button ①.
"MUTE" appears in the display.
To restore the volume,
→ press button ① again.
Setting the mute level
You can set the unit's mute volume level.
Press the MENU button ⑦.
Press the V or A button ⑧ repeatedly until “MUTE LVL” appears in the display.
Set the mute level using the < and > buttons ⑧.
When you have finished making your changes,
→ press the MENU button ⑦ twice.
Mute while telephoning
If your unit is connected to a mobile telephone, the car radio's volume will be muted as soon as you "pick up" the telephone. "PHONE" shows in the display.
This requires the mobile telephone be connected to the car radio as described in the installation instructions.
Confirmation beep
For some functions you will hear a confirmation beep if you keep a button pressed for longer than two seconds. For instance, after storing a radio station to a station button you will hear a confirmation beep. The beep can be switched on/off.
Press the MENU button ⑦.
Press the V or A button ⑧ repeatedly until “BEEP” appears in the display.
Use the buttons ⑧ to switch between the options.
“OFF” means beep off, “ON” means the beep is switched on.
Press the MENU button ⑦.
Radio mode
Switching to radio mode
If you are listening to CD, CD changer or AUX mode,
→ press the BND•TS ⑫ button
or
press the SRC button ⑬ repeatedly until “FM” or “AM” (“MW”) appears in the display.
Setting the tuner
In order to guarantee the perfect functioning of the radio element, the unit must be set for the region in which you are located. You can choose between Europe (EUROPE), America (USA), Thailand (THAI) and South America (S-AMERICA). The tuner comes from the factory set for the region in which the unit was sold. Should you encounter problems with radio reception, please check this setting.
This set of instructions refers to the "USA" setting.
Switch off the device by pressing button ①.
Press and hold down the 1 and 5 buttons ⑪ at the same time and switch on the device again with button ①.
"TUNER" is displayed.
Press the AV buttons ⑧ within the next 8 seconds and select your tuner region.
To save the setting,
switch the device off and on again or wait approx. 8 seconds. The radio starts with the last setting activated (radio, CD, CD changer or AUX).
Selecting the frequency range/ memory
This unit can receive programmes broadcast over the FM and AM frequency ranges. There are three memory banks for the FM range and one for the AM range. Six stations can be stored in each memory bank.
Selecting the FM memory bank or the AM frequency range respectively
Press the BND•TS button ⑫ to switch between the FM memory banks (FM1, FM2 and FMT) and the AM frequency range respectively.
Tuning into a station
There are various ways of tuning into a station.
Automatic seek tuning
Press the V or ▲ button ⑧.
The unit tunes into the next receivable station.
Setting the sensitivity for station seek tuning
You can configure the radio to only tune into stations with a strong reception or to also tune into those with a weak reception.
Press the MENU button ⑦.
Press the V or ▲ button ⑧ repeatedly until “SENS HI” or “SENS LO” appears in the display.
“SENS HI” means that the tuner is highly sensitive. “SENS LO” means it is set to the lower sensitivity setting.
Set the required sensitivity using the buttons ⑧.
When you have finished making your changes,
→ press the MENU button ⑦.
Note:
- Different seek tuning sensitivities can be set separately for FM and AM respectively. To do so, activate the relevant waveband.
Tuning into stations manually
You can also tune into stations manually.
Press the button ⑧.
Storing stations
Storing stations manually
Select the required memory bank (FM1, FM2 or FMT) or the AM frequency range.
→ Tune into the station.
Press one of the station buttons 1 - 6 ^11 for longer than 2 seconds to store the station to that button.
Storing stations automatically (Travelstore)
You can automatically store six stations with the strongest reception in the region. The stations are stored in the FMT or AM memory depending on the selected frequency range.
Note:
- Stations that were previously stored in this memory are deleted in the process.
Press and hold the BND•TS button ⑫ until the seek tuning starts.
The station storing procedure begins. "FM TSTORE" or "AM TSTORE" appears in the display. After the process is completed, the station that is stored in location 1 of the respective memory bank will be played.
Listening to preset stations
Select the memory bank in which the station was stored.
Press the preset station button 1 - 6 ^11 of the station you want to listen to.
Scanning receivable stations (SCAN)
You can briefly play all the receivable stations by activating the scan function. You can set the scanning time to between 5 and 30 seconds in the menu.
Starting SCAN
Keep the MENU button ⑦ pressed until the scan process starts.
“SCAN” appears briefly in the display followed by the current frequency (which flashes).
Stopping SCAN and continuing listening to a station
Press the MENU button ⑦.
Scanning is stopped and the station that was tuned into last will remain active.
Setting the scantime
Press the MENU button ⑦.
Press the V or ▲ button ⑧ repeatedly until “SCAN TIME” appears in the display.
Set the required scantime using the buttons ⑧.
When you have finished making your changes,
→ press the MENU button ⑦ twice.
Note:
- The set scantime also applies to scanning in CD and CD changer mode.
Setting the display
You can choose to continuous display one of the followings:
- Band and Time
- Band and Frequency
Keep the ⏻ DIS button ⑩ pressed until the required display appears.
CD mode
You can use this unit to play standard CDs, CD-Rs and CD-RWs with a diameter of either 5 or 3 inches.
To ensure the system functions properly, only use CDs labelled with the compact disc logo. Problems might be experienced when trying to play copy-protected CDs. Blaupunkt cannot guarantee the proper functioning of copy-protected CDs!
Risk of damage to the CD drive! Contoured CDs (shape CDs) are not suitable for playback in this unit.
We accept no liability for any damage to the CD drive or CD that may occur as a result of the use of unsuitable CDs.
Switching to CD mode
If there is no CD inserted in the drive and the unit is playing Radio, CD Changer or AUX mode,
◇ gently insert CD with the printed side uppermost into the drive until you feel some resistance.
The CD is drawn into the drive automatically.
You must not hinder or assist the drive as it draws in the CD.
CD playback begins.
Note:
- The unit will remain off if the ignition is off. To turn it on and play the inserted CD, press button ① once.
If a CD is already inserted in the drive and the unit is playing Radio, CD Changer or AUX mode.
Press the SRC button ⑬ repeatedly until “CD” appears in the display.
Playback begins from the point at which it was last interrupted.
Selecting tracks
Press one of the arrow buttons ⑧ to select the next or previous track.
If you press the ∨ or <button ⑧ once, the current track will be played again from the beginning.
Fast searching (audible)
To fast search backwards or forwards,
keep one of the <> buttons ⑧ pressed until fast reversing / fast forwarding begins.
Random play (MIX)
Press button 5 MIX ⑪.
"MIX CD" appears briefly in the display and the MIX symbol lights up. The next randomly selected track will then be played.
Stopping MIX
→ Press button 5 MIX ⑪ again.
"MIX OFF" appears briefly in the display and the MIX symbol disappears.
Scanning tracks (SCAN)
You can briefly play all the tracks on a CD.
→ Press the MENU button ⑦ for longer than two seconds.
The next track will then be played for scantime as set in the “Setting the scantime”.
Note:
- You can set the scantime. For further details, please read the section entitled "Setting the scantime" in the "Radio mode" chapter.
Stopping SCAN and continuing playback
To stop scanning, press the MENU button ⑦.
The current track will then continue to be played.
Repeating tracks (REPEAT)
If you want to repeat a track, press button 4 RPT ⑪.
“RPT TRCK” appears briefly in the display and the RPT symbol lights up. The track is repeated until you deactivate RPT.
Cancelling repeat
If you want to stop the repeat function, press button 4 RPT ⑪ again.
“RPT OFF” appears briefly in the display and the RPT symbol disappears. Normal playback is then continued.
Pausing playback (PAUSE)
Press button 3 ▶ 11.
"PAUSE" appears in the display.
Cancelling pause
Press button 3 ▶⑪ while in pause mode.
Playback is continued.
Changing the display
Two options are available:
- Track number and clock.
- Track number and playing time.
Press the ⏻ DIS button ⑩ for longer than two seconds until the required display appears.
Ejecting a CD
Press the ▲ button ③.
Remove the CD
Notes:
- An ejected CD will be reloaded into the unit if not removed within 10 seconds to protect it from accidental damage.
- You may also eject a CD when the unit is off, or when CD is not playing.
CD changer mode
Note:
- Information on handling CDs, inserting CDs and operating the CD changer can be found in the operating instructions supplied with your CD changer.
Switching to CD changer mode
Press the SRC button ⑬ repeatedly until “CHANGER” appears in the display.
The CD Changer will resume playback from where it was last played previously.
Selecting a CD
To move up/ down from one CD to another, press the V or ▲ button ⑧ once or several times.
An empty CD magazine slot will be skipped in the CD selection process.
Selecting tracks
To move up/ down from one track to another on the current CD, press the button ⑧ once or several times.
Fast searching (audible)
To fast search backwards or forwards,
keep one of the buttons ⑧ pressed until fast reversing/fast forwarding begins.
Changing the display
5 options are available:
- Track number and play time
- Track number and clock
- CD number and track number
- CD number and clock
- CD number and play time
Press the ⏻ DIS button ⑩ once or several times for longer than two seconds until the required display appears.
Repeating individual tracks or whole CDs (REPEAT)
If you wish to repeat the current track, briefly press button 4 RPT ⑪.
“RPT TRCK” appears briefly and RPT lights up in the display.
If you wish to repeat the current CD, press button 4 RPT ⑪ longer than two seconds.
“RPT DISC” appears briefly and RPT lights up in the display.
Cancelling repeat
If you want to stop the repeat function for the current track or CD, press button 4 RPT ⑪ briefly and "RPT OFF" appears briefly in the display and RPT disappears.
Random play (MIX)
To play all the tracks on the current CD in random order, briefly press button 5 MIX ⑪.
"MIX CD" appears briefly and MIX lights up in the display.
To play the tracks on all the inserted CDs in random order, press button 5 MIX ⑪ longer than two seconds.
"MIX ALL" appears briefly and MIX lights up in the display.
Stopping MIX
Press button 5 MIX ⑪ briefly and "MIX OFF" appears briefly in the display and MIX disappears.
Scanning all tracks on all CDs (SCAN)
To briefly play all the tracks on all inserted CDs in ascending order, press the MENU button ⑦ for longer than two seconds.
"TRK SCAN" appears briefly follows by blinking the track number of the CD track being scanned.
Stopping SCAN
To stop scanning, briefly press the MENU button ⑦.
The current track will then continue to be played.
Note:
- You can set the scantime. For further details, please read the section entitled “Setting the scantime” in the “Radio mode” chapter.
Pausing playback (PAUSE)
Press button 3 ▶ 11.
"PAUSE" appears in the display.
Cancelling pause
Press button 3 ▶ 11 while in pause mode.
Playback is continued.
CLOCK - Time
Briefly displaying the time
To display the time, briefly press the ⏻ DIS button ⑩.
Setting the time
To set the time, press the MENU button ⑦.
Press the V or A button ⑧ repeatedly until “CLOCK SET” appears in the display.
Press the > button ⑧.
The time appears in the display. The minutes flash on and off and can be adjusted.
Adjust the minutes using the AV buttons ⑧.
Once you have set the minutes, press the <button ⑧. The hours start flashing.
Adjust the hours using the AV buttons ⑧.
When you have finished making your changes,
→ press the MENU button ⑦ twice.
Selecting 12/24-hour clock mode
Press the MENU button ⑦.
Press the V or ▲ button ⑧ repeatedly until “12H MODE” or “24H MODE” appears in the display.
Press the button ⑧ to switch between the modes.
When you have finished making your changes,
→ press the MENU button ⑦.
Displaying the time continuously when the unit is off and the ignition is on
"CLOCK ON" setting in the menu allows you to display the time when the unit is off and the vehicle ignition is on,
→ press the MENU button ⑦.
Press the V or A button ⑧ repeatedly until "CLOCK OFF" or "CLOCK ON" appears in the display.
Press the button ⑧ to switch between the ON/OFF settings.
When you have finished making your changes,
→ press the MENU button ⑦.
Briefly displaying the time when the unit is switched off
To briefly display the time when the unit is off,
→ press the ⏻ DIS button ⑩.
The time is displayed for eight seconds.
Tone and volume distribution settings
You can adjust the tone settings (bass and treble) separately for each source (radio, CD, CD changer and AUX).
The volume distribution (balance and fader) settings apply to all audio sources.
Adjusting the bass settings
Press the AUDIO button ⑥.
"BASS" appears in the display.
Press the V or ▲ button ⑧ to adjust the bass.
When you have finished making your changes,
→ press the AUDIO button ⑥.
Adjusting the treble settings
Press the AUDIO button ⑥.
"BASS" appears in the display.
Press the > button ⑧ repeatedly until “TREBLE” appears in the display.
Press the V or ▲ button ⑧ to adjust the treble.
When you have finished making your changes,
→ press the AUDIO button ⑥.
Setting the left/right volume distribution (balance)
To set the left/right volume distribution (balance), press the AUDIO button ⑥.
"BASS" appears in the display.
Press the > button ⑧ repeatedly until “BAL” appears in the display.
→ Press the √ or ▲ button ⑧ to adjust the balance (right/left).
When you have finished making your changes,
→ press the AUDIO button ⑥.
Setting the front/back volume distribution (fader)
To set the front/back volume distribution (fader), press the AUDIO button ⑥.
"BASS" appears in the display.
Press the > button ⑧ repeatedly until “FADER” appears in the display.
Press the V or A button ⑧ to adjust the fader (front/back).
When you have finished making your changes,
→ press the AUDIO button ⑥.
Equalizer and X-BASS
X-BASS
X-Bass means increased bass at low volumes.
You can set the X-Bass in steps ranging from OFF to three. Three means that the X-Bass boost is set to maximum and OFF means that X-Bass is switched off.
Note:
- X-BASS setting is shared by all audio source (radio, CD, CD-changer or AUX).
To set the X-BASS, press the X-BASS ⑨ button.
Press the V or ▲ button ⑧ to choose between the possible settings.
Press the X-BASS ⑨ button once you have completed the setting.
You can select a preset sound effect for the following styles of music:
The settings for these music styles have already been programmed.
To select one of the sound presets,
→ press the AUDIO ⑥ button.
"BASS" appears on the display.
Press the > button ⑧ repeatedly until one of the sound effect options appears on the display.
→ Press the V or ▲ button ⑧ to choose between the presets.
If you want to deactivate the sound pre-set,
choose "EQ OFF" from the available options.
→ Press the AUDIO ⑥ button once you have completed the setting.
Note:
- The selected preset sound effect is applied to all audio sources.
Setting the level display
The level display briefly provides a symbolic display of the volume and the audio control settings whilst you are adjusting them.
When settings are not being made, the level display indicates the music level of the car radio.
You can switch the music level display on/off in the menu.
Press the MENU button ⑦.
"MENU" appears on the display.
Press the V or A button ⑧ repeatedly until “PEAK LVL” appears on the display.
Press the button ⑧ to choose between "PEAK ON" and "PEAK OFF".
When you have finished making your changes,
→ press the MENU button ⑦ twice.
External audio sources
Instead of connecting a CD changer, you can connect another audio source equipped with a line output. The audio source, for example, can be a portable CD player, MiniDisc player or MP3 player.
The AUX input must be activated in the menu.
If you want to connect an external audio source, you will need an adapter cable. You can obtain this adapter cable (BP no.: 7 607 897 093) from your authorised Blaupunkt dealer.
Press the MENU button ⑦.
"MENU" appears in the display.
Press the V or A button ⑧ repeatedly until “AUX OFF” or “AUX ON” appears in the display.
→ Press the button ⑧ to switch AUX on/off.
When you have finished making your changes,
→ press the MENU button ⑦.
Note:
- If the AUX input is switched on it can be selected by pressing the SRC button ⑬ and it is shown as “AUX INPUT” on the display.
Specifications
Amplifier
Output power: 15W RMS x 4ch @ 14.4V @ 4ohm @ 1% THD
Tuner
Frequency ranges USA:
FM: 87.5 - 107.9 MHz (200 kHz step)
AM: 530 - 1710 kHz (10 kHz step)
Frequency ranges Europe:
FM: 87.5 - 108 MHz (100 kHz step auto/50 kHz manual)
AM: 531 - 1602 kHz (9 kHz step)
Frequency ranges Thailand:
FM: 87.5 - 108 MHz (50 kHz step auto/25 kHz step manual)
AM: 531 - 1602 kHz (9 kHz step)
Frequency ranges South America:
FM: 87.5 - 107.9 MHz (100 kHz step auto/50 kHz step manual)
AM: 530 - 1710 kHz (10 kHz step)
FM mono sensitivity:
17 dbf
FM frequency response:
35 - 16,000 Hz
CD
Frequency response:
20 - 20,000 Hz
Pre-amp out
4 channels: 2 V
AUX input: 2 V / 6 kΩ
natural_image
Technical line drawing of a mechanical component with a curved arrow indicating direction (no text or symbols)
Note :
Survoler les stations captables (SCAN)
natural_image
Technical line drawing of a mechanical component with a curved arrow indicating direction (no text or symbols)
Nota:
Percorrer as faixas (SCAN) 68
Regular os graves 73
Regular os agudos 73
natural_image
Technical line drawing of a mechanical component with a curved handle and mounting holes (no text or symbols)
Observação:
Percorrer as faixas (SCAN)
natural_image
Technical line drawing of a mechanical component with a curved handle and mounting holes (no text or symbols)
注意:
natural_image
Technical line drawing of a mechanical component with a curved arrow indicating direction (no text or symbols)
주의:
FM: 87.5-107.9 MHz (200 kHz 단위)
AM: 530-1710 kHz (10 kHz 단위)
유럽지역 주파수 범위:
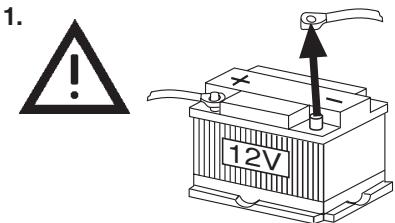
When carrying out installation work and making connections please observe the following safety instructions:
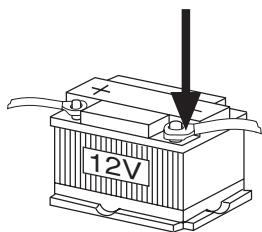
- Disconnect the negative terminal of the battery! When doing so, please observe the vehicle manufacturer's safety instructions.
- Make sure you do not damage vehicle components when drilling any holes.
- The cross sections of the positive and negative cables must not be less than 1.5 mm^2 .
- Do not connect the vehicle's plug connectors to the radio!
- You can obtain the adapter cable required for your vehicle type from any BLAUPUNKT dealer.
- Depending on the model, your vehicle may differ from the description provided here. We accept no responsibility for any damages due to incorrect installation or connection or for any consequential damages.
If the information provided here is not suitable for your specific installation requirements, please contact your Blaupunkt dealer, your vehicle manufacturer or our telephone hotline.
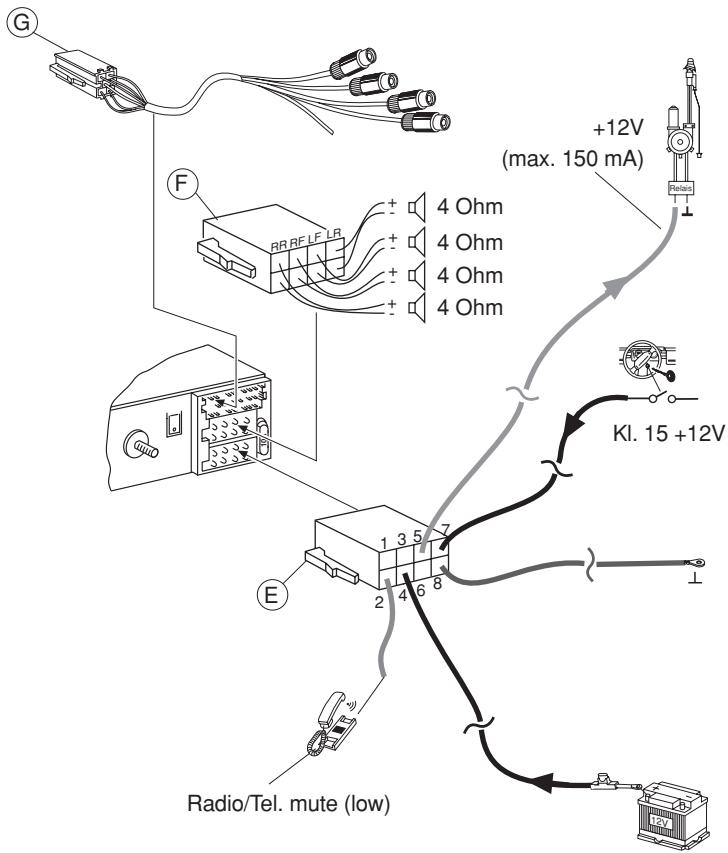
When installing an amplifier or changer, you must first connect the device earth connections before connecting the plugs for the line-in or line-out jacks.
Earth connection of external devices may not be connected to earth of car sound system (housing).


RC-12H
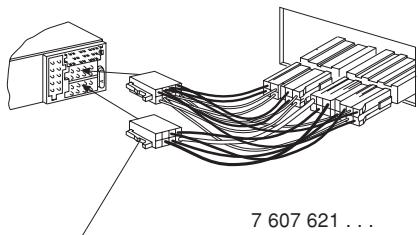
Car-specific adapter cable which is available at your dealer.
natural_image
Diagram of a mechanical component with arrows indicating motion or force direction (no text or symbols)
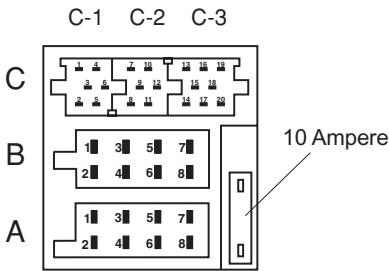
| A | B |
| 1 | nc | 1 | Speaker out RR+ |
| 2 | Tel.-Mute | 2 | Speaker out RR- |
| 3 | nc | 3 | Speaker out RF+ |
| 4 | Permanent +12V | 4 | Speaker out RF- |
| 5 | Aut. antenna | 5 | Speaker out LF+ |
| 6 | Illumination | 6 | Speaker out LF- |
| 7 | KI.15/Ignition | 7 | Speaker out LR+ |
| 8 | Masse/GND | 8 | Speaker out LR- |
| C |
| C1 | C2 | C3 |
| 1 | Line Out LR | 7 | nc | 13 | CDC-Data - In |
| 2 | Line Out RR | 8 | nc | 14 | CDC-Data - Out |
| 3 | Line Out / Ground | 9 | nc | 15 | Permanent +12V |
| 4 | Line Out LF | 10 | RC +12V | 16 | +12V |
| 5 | Line Out RF | 11 | Remote Control | 17 | Bus / GND |
| 6 | +12V Amplifier | 12 | RC - GND | 18 | AF / GND |
| | | | 19 | Line In - L |
| | | | 20 | Line In - R |
| | | | | |
| | | | | |
| | | | | |
| | | | | |
| | | | | |
| | | | | |
| | | | | |
| | | | | |
| | | | | |
| | | | | |
| | | | | |
| | | | | |
| | | | | |
| | | | | |
This information is subject to change without notice!
Please keep the filled-in radio pass in a safe place!

