
IAN 300304 - Uncategorized Livarno Lux - Free user manual and instructions
Find the device manual for free IAN 300304 Livarno Lux in PDF.


| Product Type | LED Solar Spotlight with Motion Detector |
| Model | IAN 300304 |
| Brand | Livarno Lux |
| Operating Voltage | 7.4 V DC |
| Battery | Lithium-ion 7.4 V, 1800 mAh (non-replaceable) |
| Lamp | 9 x max. 1 W LED |
| Protection Class | III |
| Solar Cell | Polycrystalline, 3.5 W, approx. 21 x 16 x 1.6 cm |
| Twilight Switch Range | Adjustable approx. 5 lx to 20,000 lx |
| Lighting Duration | Adjustable 5 s (±2 s) to 5 min (±1 min) |
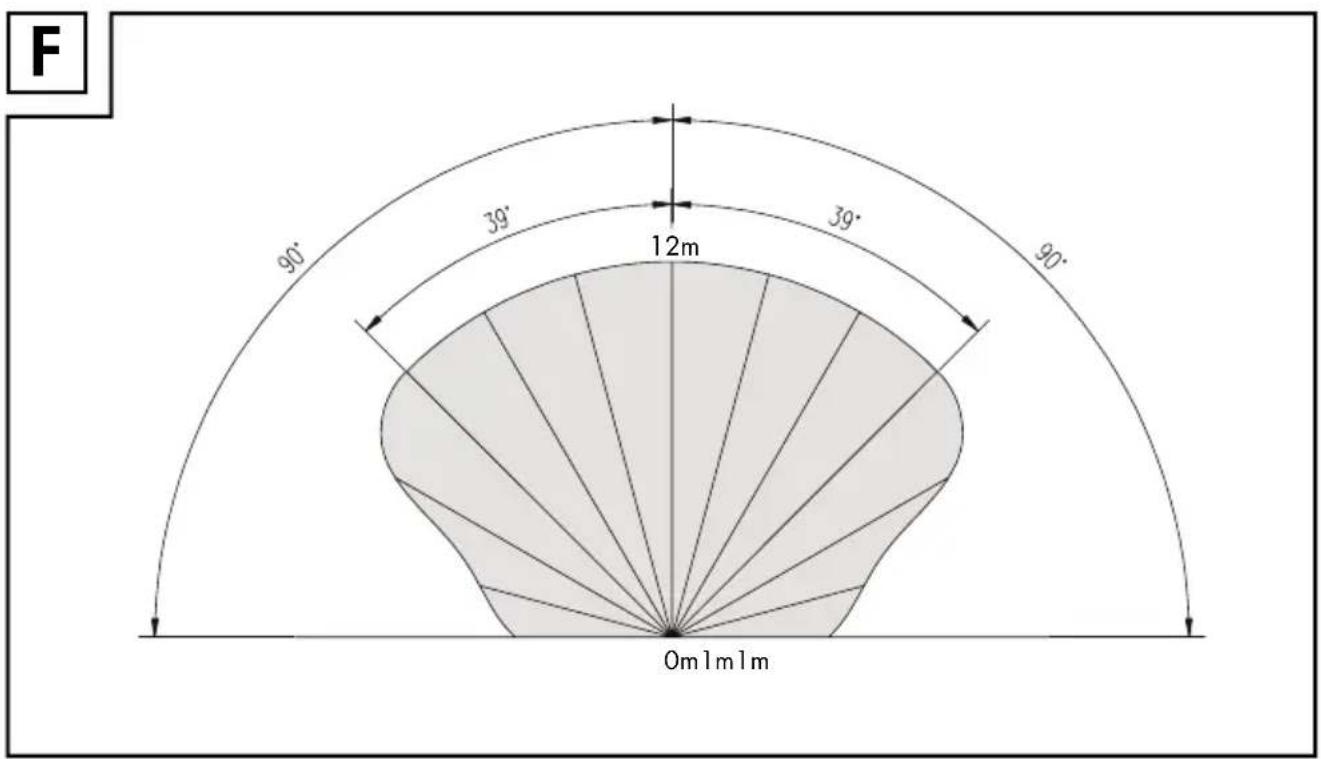
| Motion Detector Range | Max. 12 m (weather dependent) |
| Detection Angle | Approx. 180° |
| Degree of Protection | IP44 (splashproof) |
| Weight | Approx. 635 g |
| Dimensions (Spotlight) | Approx. 11.4 x 14 x 15.6 cm |
| Mounting Height | 1.8–2.5 m |
| Included Items | 1 spotlight, 1 solar cell, screws, dowels, operating instructions |
| Charging Time (Full Sun) | 4–6 days for full charge |
| Cleaning Instructions | Clean with lint-free damp cloth and mild detergent; keep free from snow and ice |
| Safety Notes | Keep packaging away from children; not for commercial use; illuminants not replaceable; maintain 0.5 m distance from illuminated materials |
| Spare Parts Availability | Battery non-replaceable; no spare parts specified |
| Warranty | 3 years from date of purchase |
Frequently Asked Questions - IAN 300304 Livarno Lux
User questions about IAN 300304 Livarno Lux
0 question about this device. Answer the ones you know or ask your own.
Ask a new question about this device
Download the instructions for your Uncategorized in PDF format for free! Find your manual IAN 300304 - Livarno Lux and take your electronic device back in hand. On this page are published all the documents necessary for the use of your device. IAN 300304 by Livarno Lux.
USER MANUAL IAN 300304 Livarno Lux
Assembly, operating and safety instructions
BG
GB / CY Assembly, operating and safety instructions Page 5
HR Upute za montažu, uporabu i sigurnost Stranica 12
List of pictograms used....Page 6
Introduction......Page 6
Intended use....Page 6
Description of Parts Page 6
Included items Page 6
Technical data......Page 6
Safety notes....Page 7
Safety instructions for batteries/rechargeable batteries Page 7
Functioning......Page 8
Charging the rechargeable battery....Page 8
Assembly Page 8
Mounting the spotlight....Page 8
Mounting the solar cell....Page 9
Preparing the product for use....Page 9
Switching the motion detector on and off Page 9
Setting the lighting duration....Page 9
Adjusting the sensitivity of the sensor....Page 9
Setting the daylight level Page 10
Orientating the motion detector....Page 10
Cleaning and storage Page 10
Troubleshooting Page 10
Disposal Page 11
Warranty Page 11
| List of pictograms used | |||
 | Direct current |  | Protection class III |
 | Motion detector detection range approx. 12 m (weather dependant) |  | Splashproof (IP44) |
LED Solar Spotlight
- Introduction
We congratulate you on the purchase of your new product. You have chosen a high quality product. The instructions for use are part of the product. They contain important information concerning safety, use and disposal. Before using the product, please familiarise yourself with all of the safety information and instructions for use. Only use the product as described and for the specified applications. If you pass the product on to anyone else, please ensure that you also pass on all the documentation with it.
Intendeduse
This product is suitable for outdoor use. This product is only intended for private use and is not suitable for commercial use or for use in other applications.
• Description of parts
1 Dowels (mounting material for spotlight, ∅ 9mm)
2 Screws (mounting material for spotlight, ∅ 6 x 40mm)
3 Mountingbracket
4 Hingejoint
5 Springwasher
6 Flatwasher
7 Fastenscrews
8 Solar electricity socket
9 Motiondetector
10Spotlight
11 ON/OFF switch
12Solarcell
13 Screws (mounting material for solar cell, ∅ 4 x 34mm)
14 Solar cable plug
15 Dowels (mounting material for solar cell, ∅ 6mm)
16 Rotary control LUX
17 Rotary control SENS
18 Rotary control TIME
Includeditems
Immediately after unpacking, check that all the items and accessories are present and that the product is in perfect condition.
1 spotlight
1 solar cell
2 screws (mounting material for spotlight ∅ 6 x 40 mm)
4 screws (mounting material for solar cell ∅ 4 x 34 mm)
2 dowel (mounting material for spotlight ∅ 9 mm)
4 dowel (mounting material for solar cell, ∅ 6 mm)
1 operating instructions
●Technicaldata
Operating voltage: 7,4V (direct+current)
Lithium-ionbattery:7,4V === (direct current), 1800 mAh (not replaceable)
Lamp: 9 x max. 1 W
Protection class: III /

Solar cell: polycrystalline, 3.5 W/
$$ 1 4. 5 \mathrm{V}, 2 1 \times 1 6 \times 1. 6 \mathrm{cm} $$
$$ (\text { without mounting plate }) $$
Twilight switch: adjustable from approx.
$$ 5 \mathrm{lx} - 2 0, 0 0 0 \mathrm{lx} $$
Lighting duration: adjustable from 5 s +/-2 s
$$ \text { to } 5 \min + / - 1 \min $$
Spotlight:
Motion detector: range: max. 12 m,
$$ \text { detection angle: approx. } $$
$$ 1 8 0 \text { degree } $$
Degree of protection: IP44 (splash proof)
Weight: approx. 635 g
Dimensions: approx. 11.4 x 14 x
$$ 1 5. 6 \mathrm{cm} $$
Max projected area: max. 11.4 x 15.6 cm
Mounting height: max. 1.8–2.5 m

Safety notes

WARNING! DANGER TO LIFE AND ACCIDENT HAZARD FOR TODDLERS AND SMALL
CHILDREN! Never leave children unsupervised with the packaging materials. The packaging material presents a danger of suffocation. Children often underestimate dangers. Always keep children away from the product.
DANGER TO LIFE! During installation keep children away from the area in which you are working. A large number of screws and other small parts are included with delivery. These may prove life-threatening if swallowed or inhaled.
This product can be used by children aged from 8 years and above and persons with reduced physical, sensory or mental capabilities or lack of experience and knowledge if they have been given supervision or instruction concerning use of the product in a safe way and understand the hazards involved. Children shall not play with the product. Cleaning and user maintenance shall not be made by children without supervision.
Do not use the product if you detect any kind of damage.
■ The illuminants are not replaceable.
If the illuminants fail at the end of their lifes, the entire light must be replaced.
FIRE HAZARD! Fit the product so that it is at least 0.5 m away from the material to be illuminated. Exces-
sive heat can result in a fire.
CAUTION! RISK OF INJURY!
Broken lamp glass must be replaced before any further use is made of
the lamp.

Safety instructions for batteries/rechargeable batteries
■ DANGER TO LIFE! Keep batteries/rechargeable batteries out of reach of children. If accidentally swallowed seek immediate medical attention.
DANGER OF EXPLOSION!
Never recharge non-rechargeable batteries. Do not short-circuit batter-
ies/rechargeable batteries and/or open them. Overheating, fire or bursting can be the result.
■ Never throw batteries/rechargeable batteries into fire or water.
Do not exert mechanical loads to batteries/rechargeable batteries.
Risk of batteries/rechargeable batteries leakage
- Avoid extreme environmental conditions and temperatures, which could affect batteries/rechargeable batteries, e.g. radiators/direct sunlight.
- Avoid contact with the skin, eyes and mucous membranes. In the event of contact with battery acid, thoroughly flush the affected area with plenty of clean water and seek immediate medical attention.
WEAR PROTECTIVE GLOVES!

Leaked or damaged batteries/rechargeable batteries can cause
burns on contact with the skin. Wear suitable protective gloves at all times if such an event occurs.
This product has a built-in rechargeable battery
which cannot be replaced by the user. The removal or replacement of the rechargeable battery may only be carried out by the manufacturer or his customer service or by a similarly qualified person in order to avoid hazards.
When disposing of the product, it should be noted that this product contains a rechargeable battery.
Functioning
When exposed to sunlight, the solar cell 12 converts the light into electrical energy and via the connected solar electricity socket 8, stores the electricity in the built-in rechargeable battery. With a fully charged rechargeable battery, the lighting duration is about 1.3 hours. Before being used for the first time, the rechargeable battery must be fully loaded (see section "Charging the rechargeable battery").
●Chargingthe rechargeable battery
Upon delivery, the rechargeable battery is fully charged. Due to storage times, the rechargeable battery may be partially discharged when first used. Therefore, charge the rechargeable battery completely before first use.
Charging the rechargeable batteries with a solar cell
☐ Toggle the ON / OFF switch 11 into the OFF position, so the charging process is not influenced by the light being switched on.
☐ Insert the solar cable plug 14 into the solar electricity socket 8 of the spotlight 10. Position the solar cell 12 as described in section "Mounting the solar cell 12".
Note: With steady exposure to sunlight, the rechargeable battery is fully charged after 4 to 6 days. The duration of the charging process
depends on the charge state of the rechargeable battery as well as the quality of the exposure to sunlight.
●Assembly
Note: Remove all packaging materials from the product.
Before mounting, decide where you want to Mount the solar cell 12 and the spotlight 10. The solar cell 12 and the spotlight 10 can be mounted independently of each other, but after being mounted must be connected with the approx. 3 m long power cable of the solar cell 12. After the mounting, lay the cable so it is not subject to any mechanical stresses. Use typical installation material such as cable clamps or conduit to fasten the cable, to prevent damage to the insulation.
Note: The included mounting material is suitable for ordinary solid concrete or masonry construction. Other wall substrates may require other fastening materials. Seek specialist advice if necessary.
- Mounting the spotlight
Make sure you will not be drilling into electrical, gas or water lines inside the wall. Use a power drill to drill the holes into the brick wall. Always observe all safety instructions for the power drill in the manual for the power drill. Death or injury due to electric shock may otherwise result.
When selecting the mounting location for the spotlight 10, pay attention to the following:
Make sure the spotlight illuminates the desired area. You can move the spotlight 10.
Make sure the motion detector covers the desired area. The motion detector 9 has a maximum coverage range of 12 m, with a coverage angle of about 180° (depending on the mounting height - a height of 1.8–2.5 m is ideal).
Make sure the motion detector is not illuminated at night by street lighting. This can influence its functioning.
☐ Unscrew hinge joint 4 to detach the mounting bracket 3 from the spotlight 10.
☐ Utilize the mounting bracket 3 as a template for making the position of the two outer drill holes.
☐ Then drill these holes and attach the mounting bracket 3 using the supplied dowels 1 and screws 2.
Now attach the spotlight 10 to the mounting bracket 3 using the previously removed hinge joint 4, spring washer 5 and flat washer 6. Please make sure that the spring washer 5 and flat washer 6 are located as fig A.
- Mounting the solar cell
Make sure you will not be drilling into electrical, gas or water lines inside the wall. Use a power drill to drill the holes into the brick wall. Always observe all safety instructions for the power drill in the manual for the power drill. Death or injury due to electric shock may otherwise result.
When selecting the mounting location for the solar cell 12, pay attention to the following:
☐ The solar cell 12 needs to be as directly exposed to sunlight as possible. Even partial shading of the solar cell 12 during the day can have a significant influence on charging.
Cardinal direction:
Orientation towards the south is optimum. Orientations with slight deviations towards the west are preferable to those with slight deviations towards the east.
Horizontal orientation:
The horizontal orientation of the solar cell depends on the geographic latitude of the mounting location. In central Europe, and angle of 30^-40^ is ideal.
A mounting plate with 6 drill holes for screws is located at the back of solar cell 12.
☐ Mount the solar cell 12 at the designated location using the 4 small screws 13 and dowels 15. Depending on the topography of the
mounting location, you can freely choose 4 of the drill holes in the mounting plate; however, you should ideally select 2 drill holes on the right and left each (see fig. B).
☐ Then lay the solar cable plug 14 and connect the plug to the solar electricity socket 8 of the spotlight 10.
☐ The solar cell 12 is connected to the mounting plate via a swivel joint. Orient the solar cell 12 in a manner that ensures maximum exposure to sunlight.
● Preparing the product for use
- Switching the motion detector on and off
☐ Press the ON / OFF switch 11 into the ON position to switch on the motion detector 9.
☐ Press the ON / OFF switch 11 into the OFF position to switch off the motion detector 9.
- Setting the lighting duration
☐ Turn the rotary control TIME 18 on the bottom of the motion detector 9 clockwise to increase the duration of the illumination. The lighting duration can be adjusted within a time window of approx. 5s +/-2s to 5 min +/-1min.
- Adjusting the sensitivity of the sensor
☐ Turn the rotary control SENS 17 on the bottom of the motion detector 9 clockwise to increase the sensitivity of the sensor.
Note: The motion detector responds to heat radiation. When outdoor temperatures are low, it is more sensitive to body heat than when outdoor temperatures are warm. Be sure to regulate the sensitivity of the sensor over the course of the year.
- Setting the daylight level
Turn the rotary control LUX 16 on the bottom of the motion detector 9 clockwise to increase the daylight level. In position, the motion detector only responds at pitch-black night (approx. 5 lx). In position, the motion detector also responds at daylight levels, as long as about 20,000 lx are not exceeded.
- Orientating the motion detector
☐ Loosen the fastening screws 7 of the motion detector 9.
Turn the rotary control LUX 16 to position
Orient the motion detector into the central region of the desired coverage area.
☐ Move about through the coverage area until you are satisfied with the response characteristics of the motion detector. To find the proper orientation, change the position of the rotary control SENS 17 or the orientation of the motion detector.
☐ Re-tighten the fastening screws 7 to fix the adjustment.
☐ Turn the rotary control LUX 16 to the desired position. These can be determined during the dawn or twilight hours during which the spotlight 10 should respond. Slowly turn the rotary control LUX 16 clockwise until it reacts to movement within the coverage area.
- Cleaning and storage
☐ Press the ON / OFF switch 11 into the OFF position if you will not be using the product and want to store it.
☐ Check the motion detector 9 and the solar cell 12 for dirt regularly. If dirt or is present, remove it to guarantee flawless function of the product.
□ Especially during the winter, keep the product free from snow and ice.
□ Clean the product with a lint-free, slightly moist cloth and mild cleaning agent.
●Troubleshooting
● = Fault
C=Cause
O=Solution
● = The product does not switch on.
● = The ON/OFF switch 11 is in the OFF position.
O = Press the ON/OFF switch[11] into the ON position.
= The rotary rotary control LUX16 is adjusted too dark.
O = Adjust the rotary control LUX16 so it is brighter.
● = The motion detector9 is dirty or is incorrectly oriented.
O = Clean the motion detector9 or reorient it.
● = The sensitivity of the motion detector9 is too low.
O = Readjust the sensitivity of the motion detector 9 (see section "Adjusting the sensitivity of the sensor").
- = The rechargeable battery is discharged.
O = Charge the rechargeable battery (see section "Charging the rechargeable battery").
● = The product also switches on when it is light out.
● = The rotary control LUX16 is adjusted too bright.
O = Adjust the rotary control LUX16 so it is darker.
● = The light flickers.
● = The rechargeable battery is almost discharged.
O = Charge the rechargeable battery (see section "Charging the rechargeable battery").
● = The rechargeable battery loses its charge after a short time.
= The plug connection of the solar cell 12 and spot light 10 has come loose.
O = Refasten the plug connection at the product.
© = The solar cell is dirty.
O = Clean the solar cell.
= The solar cell is unfavourably oriented.
O = Re-align the solar cell (see section "Mounting the solar cell").
●Disposal
The packaging is made entirely of recyclable materials, which you may dispose of at local recycling facilities.
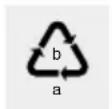
Observe the marking of the packaging materials for waste separation, which are marked with abbreviations (a) and numbers (b) with following meaning: 1–7: plastics / 20–22: paper and fibre-board / 80–98: composite materials.

The product and packaging materials are recyclable, dispose of it separately for better waste treatment. The Triman logo is valid in France only.

Contact your local refuse disposal authority for more details of how to dispose of your worn-out product.
To help protect the environment, please dispose of the product properly when it has reached the end of its useful life and not in the household waste. Information on collection points and their opening hours can be obtained from your local authority.
Faulty or used batteries / rechargeable batteries must be recycled in accordance with Directive 2006/66/EC and its amendments. Please return the batteries/rechargeable batteries and/or the product to the available collection points.
Environmental damage through incorrect disposal of the batteries / rechargeable batteries!
Batteries / rechargeable batteries may not be disposed of with the usual domestic waste. They may
contain toxic heavy metals and are subject to hazardous waste treatment rules and regulations. The chemical symbols for heavy metals are as follows: Cd = cadmium, Hg = mercury, Pb = lead. That is why you should dispose of used batteries / rechargeable batteries at a local collection point.
- Warranty
The product has been manufactured to strict quality guidelines and meticulously examined before delivery. In the event of product defects you have legal rights against the retailer of this product. Your legal rights are not limited in any way by our warranty detailed below.
The warranty for this product is 3 years from the date of purchase. Should this product show any fault in materials or manufacture within 3 years from the date of purchase, we will repair or replace it – at our choice – free of charge to you.
The warranty period begins on the date of purchase. Please keep the original sales receipt in a safe location. This document is required as your proof of purchase. This warranty becomes void if the product has been damaged, or used or maintained improperly.
The warranty applies to defects in material or manufacture. This warranty does not cover product parts subject to normal wear, thus possibly considered consumables (e.g. batteries) or for damage to fragile parts, e.g. switches, rechargeable batteries or glass parts.
CE IP44
- List of pictograms used....Page 6
- Introduction......Page 6
- Safety notes....Page 7
- Functioning......Page 8
- Charging the rechargeable battery....Page 8
- Assembly Page 8
- Preparing the product for use....Page 9
- Cleaning and storage Page 10
- Troubleshooting Page 10
- Disposal Page 11
- Warranty Page 11
- LED Solar Spotlight
- - Introduction
- Intendeduse
- • Description of parts
- Includeditems
- ●Technicaldata
- Spotlight:
- Safety notes
- WARNING! DANGER TO LIFE AND ACCIDENT HAZARD FOR TODDLERS AND SMALL
- CAUTION! RISK OF INJURY!
- Safety instructions for batteries/rechargeable batteries
- DANGER OF EXPLOSION!
- Risk of batteries/rechargeable batteries leakage
- WEAR PROTECTIVE GLOVES!
- Functioning
- ●Chargingthe rechargeable battery
- Charging the rechargeable batteries with a solar cell
- ●Assembly
- - Mounting the spotlight
- - Mounting the solar cell
- Cardinal direction:
- Horizontal orientation:
- ● Preparing the product for use
- - Switching the motion detector on and off
- - Setting the lighting duration
- - Adjusting the sensitivity of the sensor
- - Setting the daylight level
- - Orientating the motion detector
- - Cleaning and storage
- ●Troubleshooting
- ●Disposal
- Environmental damage through incorrect disposal of the batteries / rechargeable batteries!
- - Warranty
- CE IP44
Brand : Livarno Lux
Model : IAN 300304
Category : Uncategorized