
MuseBox - Audio Equipment PEAVEY - Free user manual and instructions
Find the device manual for free MuseBox PEAVEY in PDF.


| Product Type | Digital Mixer / Effects Processor |
| Brand | Peavey |
| Model | MuseBox |
| Dimensions (W x D x H) | 19" x 8" x 1.75" (Rackmount, 1U) |
| Weight | 5.5 kg (12.1 lbs) |
| Power Supply | 100-240V AC, 50/60 Hz |
| Power Consumption | 30W max |
| Audio Inputs | 4 x XLR/TRS combo jacks, 2 x RCA stereo |
| Audio Outputs | 2 x XLR main out, 2 x TRS monitor out, 1 x headphone |
| Digital Connectivity | USB 2.0 Type B for audio streaming |
| Effects | 24-bit DSP with reverb, delay, chorus, flanger, and more |
| Channels | 4 mono input channels with 3-band EQ |
| Sampling Rate | 48 kHz / 24-bit |
| Frequency Response | 20 Hz - 20 kHz ±1 dB |
| Signal-to-Noise Ratio | >90 dB |
| Phantom Power | +48V selectable per channel |
| Maintenance and Cleaning | Use a soft, dry cloth; avoid liquids and solvents |
| Safety | Keep away from moisture; use grounded outlets; do not open device |
| Spare Parts and Repairability | Contact authorized Peavey service centers; user-replaceable fuse |
| General Information | Designed for live sound reinforcement and studio recording; includes USB audio interface |
Frequently Asked Questions - MuseBox PEAVEY
User questions about MuseBox PEAVEY
0 question about this device. Answer the ones you know or ask your own.
Ask a new question about this device
Download the instructions for your Audio Equipment in PDF format for free! Find your manual MuseBox - PEAVEY and take your electronic device back in hand. On this page are published all the documents necessary for the use of your device. MuseBox by PEAVEY.
USER MANUAL MuseBox PEAVEY
Intended to alert the user to the presence of uninsulated "dangerous voltage" within the product's enclosure that may be of sufficient magnitude to constitute a risk of electric shock to persons.
Intended to alert the user of the presence of important operating and maintenance (servicing) instructions in the literature accompanying the product.

CAUTION: Risk of electrical shock — DO NOT OPEN!
CAUTION: To reduce the risk of electric shock, do not remove cover. No user serviceable parts inside. Refer servicing to qualified service personnel.
WARNING: To prevent electrical shock or fire hazard, this apparatus should not be exposed to rain or moisture, and objects filled with liquids, such as vases, should not be placed on this apparatus. Before using this apparatus, read the operating guide for further warnings.

IMPORTANT SAFETY INSTRUCTIONS
WARNING: When using electrical products, basic cautions should always be followed, including the following:
-
Read these instructions.
-
Keep these instructions.
-
Heed all warnings.
-
Follow all instructions.
-
Do not use this apparatus near water.
-
Clean only with a dry cloth.
-
Do not block any of the ventilation openings. Install in accordance with manufacturer's instructions.
-
Do not install near any heat sources such as radiators, heat registers, stoves or other apparatus (including amplifiers) that produce heat.
-
Do not defeat the safety purpose of the polarized or grounding-type plug. A polarized plug has two blades with one wider than the other. A grounding type plug has two blades and a third grounding plug. The wide blade or third prong is provided for your safety. If the provided plug does not fit into your outlet, consult an electrician for replacement of the obsolete outlet.
-
Protect the power cord from being walked on or pinched, particularly at plugs, convenience receptacles, and the point they exit from the apparatus.
-
Only use attachments/accessories provided by the manufacturer.
-
Use only with a cart, stand, tripod, bracket, or table specified by the manufacturer, or sold with the apparatus. When a cart is used, use caution when moving the cart/apparatus combination to avoid injury from tip-over.
-
Unplug this apparatus during lightning storms or when unused for long periods of time.
-
Refer all servicing to qualified service personnel. Servicing is required when the apparatus has been damaged in any way, such as power-supply cord or plug is damaged, liquid has been spilled or objects have fallen into the apparatus, the apparatus has been exposed to rain or moisture, does not operate normally, or has been dropped.
-
Never break off the ground pin. Write for our free booklet "Shock Hazard and Grounding." Connect only to a power supply of the type marked on the unit adjacent to the power supply cord.
-
If this product is to be mounted in an equipment rack, rear support should be provided.
-
Note for UK only: If the colors of the wires in the mains lead of this unit do not correspond with the terminals in your plug, proceed as follows: a) The wire that is colored green and yellow must be connected to the terminal that is marked by the letter E, the earth symbol, colored green or colored green and yellow. b) The wire that is colored blue must be connected to the terminal that is marked with the letter N or the color black. c) The wire that is colored brown must be connected to the terminal that is marked with the letter L or the color red.
-
This electrical apparatus should not be exposed to dripping or splashing and care should be taken not to place objects containing liquids, such as vases, upon the apparatus.
-
The on/off switch in this unit does not break both sides of the primary mains. Hazardous energy can be present inside the chassis when the on/off switch is in the off position. The mains plug or appliance coupler is used as the disconnect device, the disconnect device shall remain readily operable.
-
Exposure to extremely high noise levels may cause a permanent hearing loss. Individuals vary considerably in susceptibility to noise-induced hearing loss, but nearly everyone will lose some hearing if exposed to sufficiently intense noise for a sufficient time. The U.S. Government's Occupational Safety and Health Administration (OSHA) has specified the following permissible noise level exposures:
Duration Per Day In Hours Sound Level dBA, Slow Response
| 8 90 | |
| 6 92 | |
| 4 95 | |
| 3 97 | |
| 2 100 | |
| 1 1/2 102 | |
| 1 105 | |
| 1/2 | 110 |
| 1/4 or less | |
According to OSHA, any exposure in excess of the above permissible limits could result in some hearing loss. Earplugs or protectors to the ear canals or over the ears must be worn when operating this amplification system in order to prevent a permanent hearing loss, if exposure is in excess of the limits as set forth above. To ensure against potentially dangerous exposure to high sound pressure levels, it is recommended that all persons exposed to equipment capable of producing high sound pressure levels such as this amplification system be protected by hearing protectors while this unit is in operation.
SAVE THESE INSTRUCTIONS!
a) The wire that is colored green and yellow must be connected to the terminal that is marked by the letter E, the earth symbol, colored green or colored green and yellow.
b) The wire that is colored blue must be connected to the terminal that is marked with the letter N or the color black.
c) The wire that is colored brown must be connected to the terminal that is marked with the letter L or the color red.
a) The wire that is colored green and yellow must be connected to the terminal that is marked by the letter E, the earth symbol, colored green or colored green and yellow.
b) The wire that is colored blue must be connected to the terminal that is marked with the letter N or the color black.
c) The wire that is colored brown must be connected to the terminal that is marked with the letter L or the color red.
a) The wire that is colored green and yellow must be connected to the terminal that is marked by the letter E, the earth symbol, colored green or colored green and yellow.
b) The wire that is colored blue must be connected to the terminal that is marked with the letter N or the color black.
c) The wire that is colored brown must be connected to the terminal that is marked with the letter L or the color red.
a) The wire that is colored green and yellow must be connected to the terminal that is marked by the letter E, the earth symbol, colored green or colored green and yellow.
b) The wire that is colored blue must be connected to the terminal that is marked with the letter N or the color black.
c) The wire that is colored brown must be connected to the terminal that is marked with the letter L or the color red.
FCC Compliancy Statement
This device complies with Part 15 of the FCC rules. Operation is subject to the following two conditions: (1) this device may not cause harmful interference, and (2) this device must accept any interference received, that may cause undesired operation.
Warning: Changes or modifications to the equipment not approved by Peavey Electronics Corp. can void the user's authority to use the equipment.
Note - This equipment has been tested and found to comply with the limits for a Class B digital device, pursuant to Part 15 of the FCC Rules. These limits are designed to provide reasonable protection against harmful interference in a residential installation. This equipment generates, uses and can radiate radio frequency energy and, if not installed and used in accordance with the instructions, may cause harmful interference to radio communications. However, there is no guarantee that interference will not occur in a particular installation. If this equipment does cause harmful interference to radio or television reception, which can be determined by turning the equipment off and on, the user is encouraged to try and correct the interference by one or more of the following measures.
- Reorient or relocate the receiving antenna.
- Increase the separation between the equipment and receiver.
- Connect the equipment into an outlet on a circuit different from that to which the receiver is connected.
- Consult the dealer or an experienced radio/TV technician for help
- Shielded cables must be used with this unit to ensure compliance with the Class B FCC limits.

Peavey Electronics Corporation • 5022 Hartley Peavey Drive • Meridian, MS • 39305 (601) 483-5365 • FAX (601) 486-1278 • www.peavey.com • 80305780 • ©2011
ENGLISH
MuseBox™ Operating Manual
Introduction
First off, thank you for purchasing a MuseBox. We sincerely hope that it will be a great music-making tool for you, and that it will provide you with many years of satisfaction.
MuseBox is a joint development between Peavey® Electronics and Muse Research, Inc. It is based on the technology developed for the Muse Research RECEPTOR hardware plug-in player. RECEPTOR is the standard of the industry for running virtual instruments and effects live, and is used on major concert tours, in professional music theater productions, on TV, and by composers of film and game soundtracks. With MuseBox, Peavey and Muse Research have taken the breakthrough technology of Receptor and made it easier to use, more compact, and more affordable.
MuseBox was designed to be an easy-to-use, comprehensive and versatile instrument and effects processor that works in a wide variety of musical situations. MuseBox includes a large number of sounds and effects built-in and ready to go, featuring software such as Universons MusePlayer, Peavey ReValver HP, Wave Arts MasterVerb 4 and TrackPlug 4, ForeFront TruePianos Amber Lite, Camel Audio Camel Phatt and Camel Space, MuVoice from MuTech, and much more.
All this software is pre-configured so that making music with it could not be easier: simply plug it in, turn it on, and play. However, that's just where the fun begins. You can easily create your own custom sounds and effects with the powerful graphical user interface that you can access by simply plugging in a mouse, monitor, and keyboard. And MuseBox is expandable using the CF card reader slot, letting you run entirely new virtual instrument and effects, making it arguably the most versatile music instrument or effects processor you've ever owned.
MuseBox has something for every musician. Here are some of the many ways you can use yours: As the ultimate sound module for use with any MIDI keyboard or controller.
- As a mind-blowing piano module for enhancing your digital piano's sound.
- As an amazing guitar effects processor for electric or acoustic guitars.
- As a vocal processor to give your voice fullness and clarity.
- As an astounding electric bass processor-like a DI box with processing!
- As an electronic drum module for providing punchy drum sounds live or in the studio.
- As a versatile effects processor for your recording studio or P.A. system.
- As an "all-in-one" device for processing both your voice and guitar at the same time.
- As a software-expandable device that will grow with you and your music.
This manual will help you get your MuseBox set up and working. We highly recommend that you register your MuseBox as soon as possible by visiting www.plugorama.com and taking advantage of the online tutorial videos and wealth of information available there.
So... let's jump in and start making music!
Getting Familiar: Unpacking and Setup
First, you are going to want to unpack your MuseBox and remove all the packing material. In your MuseBox package, you'll find the following:
- Your MuseBox (of course).
- The power supply and power cable.
- A CD containing this manual and some other useful utility software.
- The printed quick-start guide.
MuseBox is really easy to set up and get working:
- Remove all the packing material from your MuseBox, and place it on a stable indoor surface with adequate ventilation where it won't get wet.
- Plug the power supply connector into the back of the unit where it says "Power Supply."
- Plug the power cord into an AC power wall socket and the other end into the power supply.
Note: MuseBox's power supply is auto-ranging and can be used anywhere in the world. All you need is the correct AC cable to connect to the power supply to your wall outlet.
- Plug your MIDI keyboard into the back, or your microphone into the bottom front panel input, or your guitar into the top front panel input.
- Power it up by pressing the power button on the top right hand corner of the front panel.
- Get ready to make some music!

Getting Familiar with MuseBox: Overview
To start, here are some general concepts about MuseBox.
MuseBox is a four channel device. It has two Synth channels that produce sampled or synthesized sounds in response to MIDI messages from your MIDI keyboard, and two Audio Input channels that process the audio from stereo or mono analog input signals. Each Synth channel can have a different virtual instrument program running to produce two entirely unique sounds at once, and each Audio input channel can have a different virtual effect program running to independently process the two incoming audio signal chains. MuseBox also has a mixer section that allows for two additional effect programs to process any or all of the four input channels.
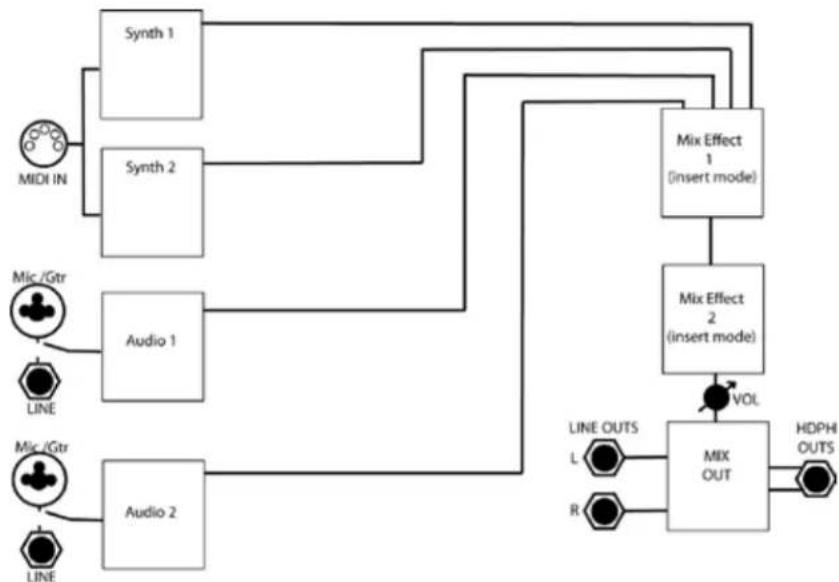
flowchart
graph TD
    A["MIDI IN"] --> B["Synth 1"]
    A --> C["Synth 2"]
    D["Mic/Gtr"] --> E["Audio 1"]
    F["LINE"] --> E
    G["Mic/Gtr"] --> H["Audio 2"]
    I["LINE"] --> H
    B --> J["Mix Effect 1 (insert mode)"]
    C --> J
    E --> K["Mix Effect 2 (insert mode)"]
    H --> K
    J --> L["MIX OUT"]
    K --> L
    L --> M["HDPH OUTS"]
    style A fill:#f9f,stroke:#333
    style D fill:#f9f,stroke:#333
    style F fill:#f9f,stroke:#333
    style G fill:#f9f,stroke:#333
    style I fill:#f9f,stroke:#333
    style J fill:#ccf,stroke:#333
    style K fill:#ccf,stroke:#333
    style L fill:#cfc,stroke:#333
    style M fill:#cfc,stroke:#333
MuseBox is capable of doing more than one thing at a time, which makes it truly unique! For example, you can play an acoustic piano sound using your MIDI keyboard, and simultaneously "mix in" and process the sounds of your keyboard's internal sounds through the inputs on the back of the unit, supplementing the sounds of your keyboard with the sounds of MuseBox!
Or, if you are a singer, you can plug your microphone in to your MuseBox and take advantage of the vocal processing capabilities it offers. It also lets you play one of the MuseBox synth sounds using your MIDI keyboard while processing your vocals simultaneously.
If you are a guitarist, you can process your guitar using the supplied amp-modeling and effects processor software. And since there is a second input channel available for guitar, you can have a friend play their guitar at the same time, or you want to sing and play guitar, you can simply plug in a microphone and process your vocals along with your guitar!
MuseBox is an incredibly versatile device. With a little exploration on your part, your MuseBox will become an indispensable musical tool, whether you're jamming at a friend's house, recording your first CD, or playing at the local pub!
So let's dive right in and explore the knobs, buttons, and jacks on your MuseBox!
The Front Panel
The MuseBox can be controlled using the buttons, control knobs, and 2-line LCD located on the front panel. MuseBox might have a couple of concepts that are new to you, so be sure to read this section in its entirety so you can get the most out of your MuseBox.

Front panel Controls and Functions
- Power Button: Press once to turn on; press twice to shut it down completely. Since it can take a minute or so for the MuseBox to power up and initialize all your presets, instead of powering it up and shutting it down each time you use it you have the option of "putting it to sleep" when it is powered on by simply pressing the power button ONCE while the unit is powered up. This "suspends" the current state of your MuseBox, keeping your settings as they were but saving power until you're ready to continue from where you left off. To "wake up" the MuseBox, simply press the power button again and in a few moments you'll be ready to continue on. Should you ever want to reboot the unit, simply press the power button three times. Pressing and holding the power button will force an instant power down, but you should not do this unless the unit is completely unresponsive.
Note: Be sure to press the power button TWICE and wait until the unit turns off completely before removing power from the MuseBox. This ensures normal start up next time you apply power.
- Master Volume Control: This control affects the output volume of the MuseBox in addition to controlling the volume heard in the headphones. When using it with an external P.A. or powered speakers, we recommend that you set this control to its maximum, and then adjust the gain on the amp or speakers to a comfortable listening or performance level. When using headphones, use this control to ensure that you are listening at a comfortable and safe listening volume. Note that this is the actual hardware output level of the unit and does not affect the metering either on the front panel or on the graphical user interface.
Note: Listening to music at high volumes for extended periods of time can cause temporary or permanent hearing loss. Always use common sense and take adequate precautions when listening to loud sounds or instruments so as to protect your hearing!
-
Headphone Output: The 1/4" front panel headphone jack lets you listen to your MuseBox in private. You can also use it as an additional set of analog audio outputs by connecting an appropriate stereo TRS jack to dual mono cable. The headphone outputs and main outputs have identical audio signals and audio quality.
-
Control Encoders: These controls let you change the menu items that are on the LCD. The top knob controls the menu items on the top line of the display, and the bottom knob controls the menu items on the lower line of the display. Pushing on either of these knobs "selects" displayed items in the LCD when a choice is presented on the LCD.
-
LCD: This blue LED backlit display shows the names of presets and TAGS, as well as listing parameters as well as MIDI activity (indicated by a note) and audio output levels (L / R meters) are displayed on the LCD.
-
Main Function Buttons: These eight buttons provide control the main functions of MuseBox and let you control and program the sounds or effects in the MuseBox. The buttons are described in detail in the next section.
-
Front Panel Input Gain Controls: This control sets the input gain of the front panel microphone/instrument input, with the top one controlling input "A," and the bottom one controlling input "B." These gain controls do not affect the line level inputs on the back; they only control the front panel input gain settings.
Note: Before connecting either an instrument or microphone to the front panel inputs, turn the GAIN control all the way counter-clockwise to its minimum setting to prevent overload or feedback audio signals that could damage speakers.
-
Front Panel Input Led Level Indicators: These three LEDs show you the level of the inputs (both front and rear). The green LED indicates signal presence (-40dB and above); the amber LED shows levels above -7dB; and the red LED indicates the onset of clipping (-1dB). For best fidelity, your input should trigger the green and yellow LEDs regularly and very rarely, if ever, trigger the red LED. If the red LED stays lit on a regular basis, your input level is too high and you should turn the gain control counter-clockwise until the red light is no longer lit.
-
Phantom Power Switch and Indicator LED: When this switch is depressed, the 48VDC Phantom Power is applied to the Microphone jack to power condenser-type microphones. When the Phantom Power is active, the red LED above the switch will illuminate.
NOTE: You should reduce the output level of MuseBox or reduce the input gain of any amplifiers attached to the MuseBox outputs when turning on and off the phantom power, as it can cause a slight audio pop or thump to occur in the audio outputs.
- Front Panel Microphone/Guitar/Bass Inputs (A and B): These two high-grade combination microphone/instrument input jacks feature a high impedance guitar preamp on the 1/4" jack section in the middle of the jack, and a balanced, low-impedance input (with optional phantom power ... see #9) for dynamic or condenser microphones. The top input is Input A; the bottom is input B. When selecting PLAY presets, the default input for your guitar is Input A on top, and the default input for your microphone is B on bottom.
Getting Familiar: The Rear Panel
Connecting your MuseBox to your mixer, your amplifier, your computer, or to other music gear is simple to do with the connections on the back. The rear panel also features a CF card expansion slot to add new virtual instruments and effects by simply popping in a CF card (available separately from Muse Research).
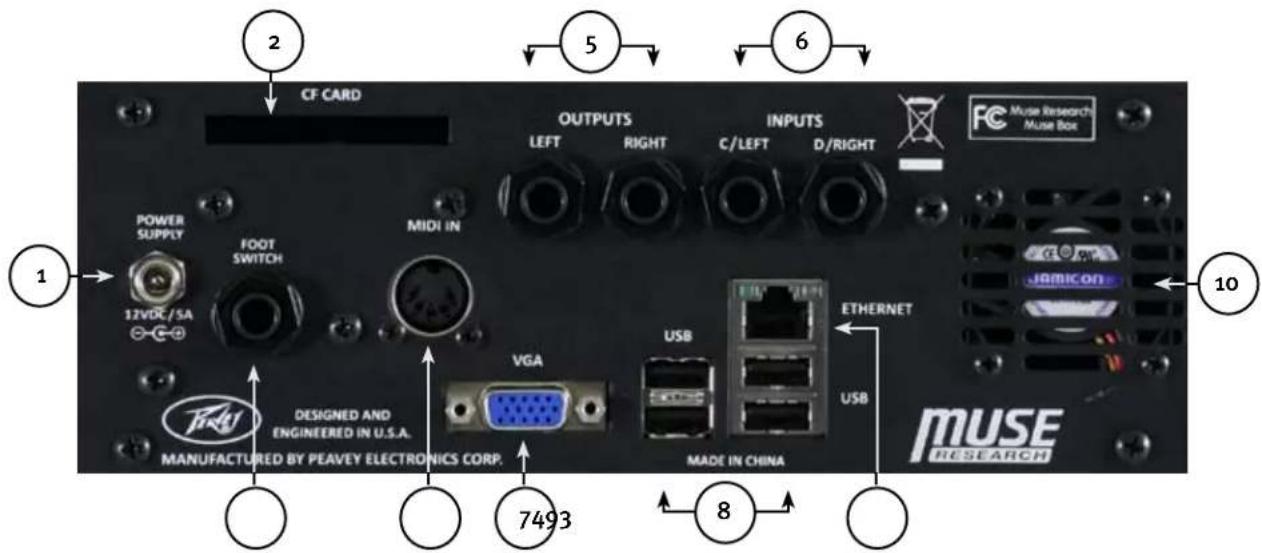
-
DC Power Input: This is where you connect MuseBox's 12-volt external DC power supply. For your safety, and to preserve the warranty on your product, use only the power supply adapter and cables provided with your MuseBox.
-
CF Card Slot: The CF card slot is used to run new virtual instruments and effects. Insert the card with the label side up and use care when inserting it to ensure proper alignment. Use only CF cards provided by Muse Research or certified for use with MuseBox, as only those cards will provide you with the appropriate level of performance.
-
Footswitch Input: The footswitch input accepts either a single 1/4" tip-sleeve jack footswitch (single action) or a double footswitch with a 1/4" tip/ring/sleeve connection. The footswitch input can be used for incrementing (or decrementing using a second footswitch) through patches in the unit, making it easy to change sounds or effects while performing. This is particularly valuable to guitarists who might not have any MIDI devices attached to their MuseBox, or keyboardists who do not have their hands free to select program changes from their keyboard while performing.
-
MIDI Input: This full-size 5-pin DIN connector is where you plug in your standard MIDI keyboard for controlling the virtual instruments in your MuseBox. If you want to connect more than one keyboard to this input, you can first connect to a MIDI merge box, and then connect to this input.
-
Audio Outputs: This is the Left (L) and Right (R) channel output of MuseBox for connection to your mixer, amplifier, or powered speakers. The outputs accept 1/4" unbalanced cables and should be connected to a high impedance input. You can adjust the output volume using the front panel volume control. The audio outputs will not drive speakers directly, you must connect your MuseBox to a mixer, or to a keyboard amplifier, or to an amplified speaker to hear sufficient output volume.
-
Audio Line Inputs (C and D): This input accepts a balanced, 1/4" tip/ring/sleeve (TRS) line-level device, such as the output of your keyboard or another sound module, a drum machine, an MP3 player, or the effects sends of your mixer. The rear input on the left is Input C; the rear input on the right is Input D; and if you want to use a stereo input, you would connect the left output of your device to Input C and the right output of your device to input D. Once connected, your line-level inputs can be processed using the audio effects slots or passively combined with the sounds being generated by virtual instruments running in MuseBox.
Warning: Do not connect the output of amplifiers or other "speaker level signals" to the MuseBox line inputs or damage to your MuseBox will result.
-
VGA Video Monitor Output: This is where you connect a VGA computer monitor to view the software graphical user interface of MuseBox, as well as to see the graphical user interface of the virtual instruments and effects that are running inside MuseBox. You do not need to connect it to a computer to see the software running inside MuseBox.
-
USB 2.0 Ports: Each port will accept a standard computer mouse, computer "ASCII" keyboards for controlling the graphical user interface of MuseBox, as well as device-compliant USB MIDI keyboard inputs or software license dongles such as the Pace iLok. You can attach up to 4 devices at once to these ports. The USB ports do not support external USB drives, hubs, or network adapters at this time.
Note: "Device Compliant USB MIDI devices" are required for use with MuseBox. All compliant USB MIDI devices are "plug and play" devices that do not require additional drivers or software to work. If the device requires special software to be installed, the USB MIDI hardware may still work, but it is not guaranteed to work with MuseBox since those types of devices are not "device compliant."
-
Gigabit Ethernet Port: This port is used to perform software updates or to connect to a laptop or desktop computer with an Ethernet cable. By connecting to your computer, you can view the graphical user interface ("GUI") of your MuseBox without having to attach a computer monitor to #7 above. However, you must first install the MuseBox Tools software onto your computer (see the supplied CD-ROM). The Ethernet port and the MuseBox Tools software is compatible with Macs or PCs and can be used with a WiFi network. See the website for more information about networking to your MuseBox.
-
Cooling Fan Exhaust Port: This keeps MuseBox running cool at all times. Please ensure unrestricted airflow around this exhaust port to ensure that your MuseBox performs reliably for many years to come.
Getting Started: Typical Connections
Below are typical connections that you might want to use with your MuseBox:
MuseBox as a sound module:

flowchart
graph TD
    A["MIDI OUT to MIDI IN"] --> B["MuesBox"]
    B --> C["LINE OUT to LINE IN"]
MuseBox as a Guitar Processor:
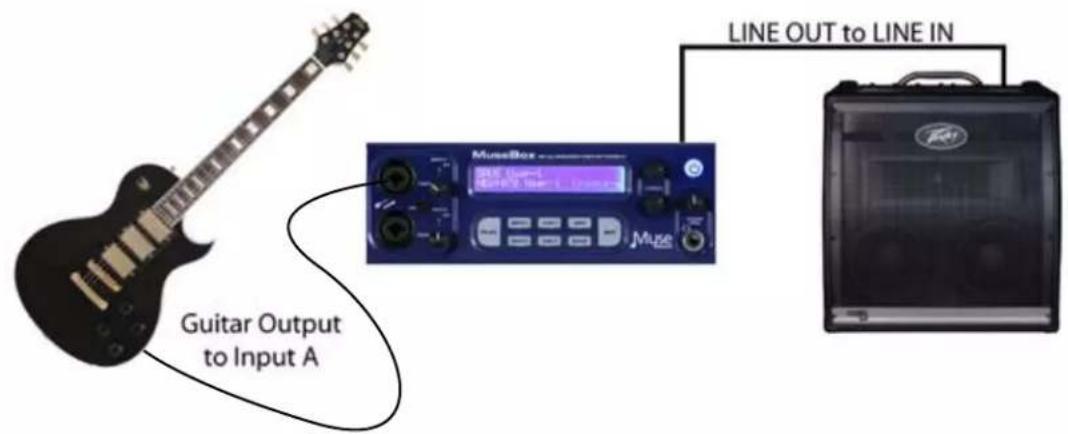
MuseBox as a Vocal Processor:

Making Music: The PLAY mode
MuseBox features SoundFinder, an easy and simple way to find the right preset for the instrument you have connected and the style of music you are making. SoundFinder works whenever you are selecting presets either on a global (PLAY mode) basis, or when you are selecting a sound or effect preset in a particular channel or "slot" (SNTH 1, SNTH 2, AUD 1, AUD 2, MIX 1, or MIX 2).

PLAY mode is the default mode when you power up your MuseBox. Simply press the PLAY button on the left side of the button field (if its not already lit) and turn the BOTTOM knob to select what category (TAG) you want to choose from, and then turn the TOP knob to select the sound or effect (preset) in that category that you want to hear. These "PLAY" presets affect the entire MuseBox setup – the two SYN channels, the 2 AUD channels, and the 2 MIX effect slots.
TAGS are the "categories" in SoundFinder that allow you to organize your sounds and effects. For example, you might have an "Acoustic Pianos" TAG, that contains all of your various acoustic pianos for playing with your MIDI keyboard. You might have an "Guitar Clean" Tag, which contains your various clean sound amp models and effect presets when you plug your electric guitar into the front panel input. And you might have a "Vocal FX" Tag that contains the appropriate vocal effects when you plug your microphone into the front panel microphone input.
Note: TAGS are organized into two primary main groups: sounds for playing with a MIDI keyboard, and effects for processing the incoming audio from one of the inputs. Sounds are simply listed with the description of the TAG, and effects are preceded by the letters FX. Within the FX group you have different sub-categories depending on what you are processing, like electric guitar, acoustic guitar, vocals, etc.
TAGS are also user-definable, meaning you can create your own categories in which to organize the sounds to your liking, or even use a Tag to define a set list, where each preset in that particular Tag has all the sounds you are using for a particular gig, or a certain set list for a gig. More on that later.
So you might have a "Wedding Set 1" Tag, or a "School Play Act 1" Tag, or a "Jam Night" Tag, each loaded with the sounds or effects that pertain to that particular event. Remember, Tags at the PLAY level save the entire MuseBox setup, whereas Tags in the individual channels save single instrument or effect channel presets for the SYN1, SYN2, AUD1, and AUD2 channel "slots".
Note: To create a unique Tag, or to RENAME a Tag, you need to have access to the MuseBox GUI using an LCD monitor, mouse, and keyboard, or use the supplied MuseBox remote software and connect the MuseBox to your computer using an Ethernet cable.
MuseBox as an Drum Module processor:

MuseBox as an Effects processor:

PRESETS are the unique sounds or effects that are in a particular Tag. In your Acoustic Pianos Tag, you might have presets like Concert Grand Piano, Studio Grand, Rock Piano, Jazz Piano, etc. These different pianos can be selected by turning the top knob, and pressing the knob to load.
Note: The same preset may be associated with several different Tags. For example, the "Rock Piano" preset might reside in the "Acoustic Pianos" Tag, as well as the "Jam Night" Tag you created.
PLAY mode makes it super simple to use all the functionality of your MuseBox quickly and easily. Even someone completely unfamiliar with music technology can use it! However, it is valuable to know how the different sounds and effects are organized so you can quickly find the preset you are looking for.
You already know MuseBox does two basic things: it generates sounds using a MIDI keyboard or controller, or it processes sounds coming from an audio input of some sort. Because of this, there are two main categories of TAGs: SOUNDS and EFFECTS.
The Tags for SOUNDS simply state the type of sounds to expect in that particular Tag. For example, the "Acoustic Pianos" Tag has all the various acoustic piano sounds, the "Strings" Tag has all sampled string instruments inside it.
The Tags for EFFECTS all have the letters FX before the effect category. Therefore, to hear a preset with FX in its Tag, you have to have an audio input. In the realm of effects presets, there are presets that are designed specifically for use with different pre-assigned inputs, as well as "generic" effect categories for specific types of effects.
Here are some example Tags for the synth and sampled sounds:
TAG Name TAG contains: Expected Input:
TAG: Acoustic Guitars Synth / Sampled Sounds MIDI keyboard, controller or interface
TAG: Acoustic Pianos Synth / Sampled Sounds MIDI keyboard, controller or interface
TAG: Brass Synth / Sampled Sounds MIDI keyboard, controller or interface
TAG: Electric Basses Synth / Sampled Sounds MIDI keyboard, controller or interface
TAG: Electric Guitars Synth / Sampled Sounds MIDI keyboard, controller or interface
TAG: Electric Pianos Synth / Sampled Sounds MIDI keyboard, controller or interface
- etcetera -
Here are some example Tags for effects. Note they indicate what they are intended to process:
TAG Name TAG contains: Expected Input:
TAG: FX Acous Guitar Effects for Acous Gtrs Input A on front panel
TAG: FX Elec Guitar Effects for Acous Gtrs Input A on front panel
TAG: FX Vocals Effects for Vocalists Input B on front panel
TAG: FX PA Effects Effects for use with Mixers Inputs C and D on rear panel
TAG: FX Kbd + Gtr Synths + effects at once MIDI and Input A
Specific Effects Types have presets that indicate what input the effect expects to see:
TAG Name TAG contains: Expected Input:
TAG: FX Reverb Reverb effects only Any Audio Input (varies by preset)
TAG: FX Spectral Chorus, flanger, etc. effects Any Audio Input (varies by preset)
TAG: FX Dynamics Compression, limiter, gates Any Audio Input (varies by preset)
Inside the effects-specific Tags you'll find presets organized by input type, i.e. inside the TAG: FX Reverb, you might have GTR Large Hall, VOC Large Hall, and AUX Large Hall, where the GTR preset processes a guitar on Input A, the VOC preset processes a microphone on Input B, and an AUX preset processes line level inputs from an external device (keyboard, mixer, etc.) on inputs C & D.
Using PRESETs in the PLAY mode
Now that you have an overview of the different SoundFinder TAGs and what they provide, let's move ahead and select a couple of presets.
MuseBox as a Synthesizer/Sound Module
-
Connect your keyboard to the MIDI input as described in the "Getting Started: Typical Connections" section under "MuseBox as a Sound Module".
-
Power up MuseBox (if it is not already on). If not already lit, press the PLAY button.
-
Turn the BOTTOM knob until the "TAG:Electric Pianos" is displayed. Press the BOTTOM knob to select the preset called "Electric Piano".

-
Play your controller keyboard. Feel free to browse the other Electric Piano presets and enjoy the high-quality sampled sounds. Simply turn the top knob and press the bottom knob to load another preset.
-
Now lets change to a different Tag and browse another category. Turn the bottom knob until it says "TAG: Acoustic Pianos". Turn the top knob to select the piano "Concert Grand Lite." Press the encoder to load the sound. Enjoy the richness and detail of a sampled piano that is typically four times the size of most pianos found in keyboard workstations! For the ultimate piano, try "Concert Grand Big" Its massive, so it takes a few moments to load, but its worth the wait!
MuseBox as an Electric Guitar Effects Processor/Amp Modeller
-
Power up MuseBox if it's not already on.
-
Plug the 1/4" guitar cable from your guitar into Input A of MuseBox as shown in the "Getting Started: Typical Connections" section describing "MuseBox as a Guitar Processor."
-
Turn the BOTTOM knob and select the Tag labeled "FX: Elec Gtr":

-
Select the "GTR Clean 6505+" preset and press the encoder to load the preset.
-
Play your guitar and adjust the GAIN control for Channel A so that the green and yellow LEDs light on a regular basis, but the Red LED does not light even when playing hard.
Feel free to browse the other Guitar Effect presets; especially in some of the other TAGs since there are many different sounds available to you. Enjoy the 32-bit floating point processing and 24-bit audio output that makes your guitar sound amazing!
MuseBox as a Vocal Processor/Effects box
-
Start by plugging the XLR-type microphone cable from your microphone into Input B of MuseBox as shown in the "Getting Started: Typical Connections" section describing "MuseBox as a Vocal Processor." If your microphone requires +48V Phantom power, press the button labeled "48V" next to the Input B label.
-
Power up MuseBox if its not already on. If it isn't already lit, press the PLAY button.
-
Turn the BOTTOM knob and select "TAG: FX: Vocal". Select the preset "VOC Pop Vocal" using the top knob and push the knob to load. Sing in to your microphone and enjoy the high quality processing of your vocals. Feel free to browse the other Vocal processing presets and enjoy how MuseBox enhances the sound of your own voice.

Effects that are typically only found in high-end professional recording studios are now yours to use any time you like!
Selecting Individual Synth Presets
PLAY mode lets you instantly select factory presets using SoundFinder, making MuseBox incredibly simple to use. But what if you want to layer two sounds together, or make your own custom preset consisting of different effects on different inputs? Well you can make your own preset easily based on the presets that are in MuseBox. You can either start by modifying an existing PLAY preset, or start from scratch and build your own.
To modify an existing PLAY preset, simply press the SNTH 1, SNTH2, AUD1 or AUD2 buttons to select the channel you want to modify, then change the Preset for that particular channel. This type of modification is particularly useful when you have a PLAY preset that has both a keyboard sound and a vocal effect working simultaneously, and you want to change one sound or effect without changing the other.
We can also create a new preset, starting from scratch:
- First, we want to clear out the system of any presets that are already loaded. To do this, turn the bottom knob counter-clockwise until you see Tag: (none) and (New Empty Preset) as the preset name. Press the encoder button to load this empty preset. The display will show this:

- Now let's select a Synth preset into one of the two Synth channels. With the PLAY mode lit, we press the SNTH 1 button. You'll notice it too says (Empty) and Tag: (none).

Turn the bottom knob to find the sound you want. For example, let's choose "Electric Piano 1" from the "TAG: Electric Pianos." Press the knob to load it.
- Now we'll layer that with another sound—say a pad synthesizer. To do this, we press the SNTH 2 button and load a different sound. Select "Analog Pad 2" from the "TAG:Synth Pads" category. Press the knob to load this preset. Now press the "PLAY" button to hear both sounds combined together.
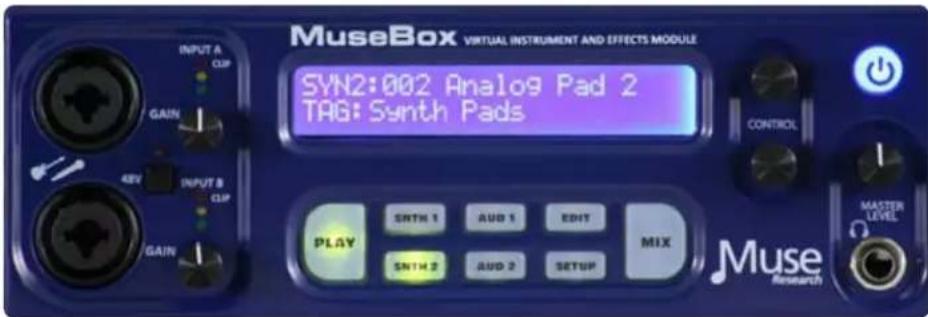
-
What we've done is layered the Electric Piano 1 and the Analog Pad 2 sounds together, which creates an entirely new sound. You can adjust the volume of either sound by pressing MIX and either SNTH 1 or SNTH 2 to adjust the Electric Piano 1 or Analog Pad 2 volume level respectively.
-
Pressing either SNTH 1 or SNTH 2 solos just that one sound. If you want to SAVE this combination of sounds, simply press and hold the EDIT button, and you can save this preset to the USER TAG.
Splitting Two Sounds Across a Keyboard
Once you have both a SYN1 and SYN2 sound selected, it is easy to turn those two sounds into a "SPLIT" where one sound plays in one-half the keyboard, and the other sound plays in the other half.
- While in PLAY mode, press the SYN1 button, and while holding that button, press the SYN2 button. You'll see the LCD display change to the following:
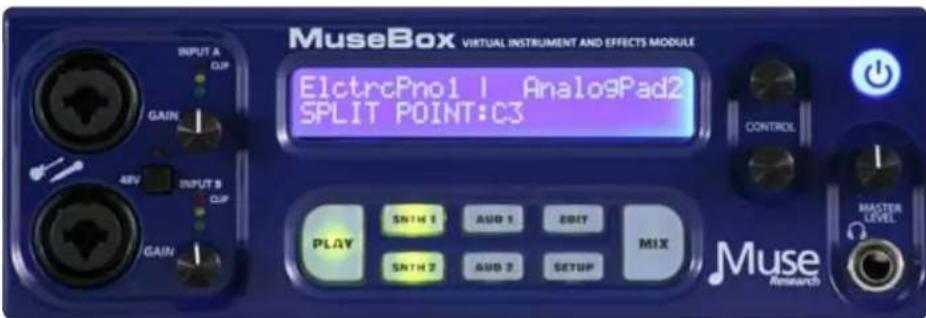
Voila! Now we have Electric Piano 1 preset (SYN1) playing on the left-hand side of the keyboard, and Analog Pad 2 (SYN2) playing on the right side of the keyboard, and the transition point between the two sounds is the default C3.
NOTE: In Split mode, SNTH 1 is always on the left side of the keyboard and SNTH 2 is always on the right side of the keyboard.
-
To move the Split Point, simply rotate the bottom encoder until it displays the note name of where you want the split to be. C3 is middle C, C2 an octave below that, and C4 is an octave above.
-
If you want to SAVE this combination of sounds, simply press and hold the EDIT button to save this preset to the USER TAG. Turn either encoder to select a preset location to write over, or save to a new preset location using the default name provided by MuseBox.
Selecting Individual Effect Presets
Now let's make your own custom preset consisting of different effects on different audio inputs. Say, for example we wanted to play acoustic guitar and have some chorus on the guitar sound, and sing with a little a bit of compression on our vocal.
- First, press the "PLAY" button. Now, since we want to start from scratch, first turn the bottom knob counter-clockwise until you see "Tag: (none)" and "(None)" as the preset name and then press the bottom encoder button to clear out all the previous settings.

- Next, we press the PLAY button and then select AUD1 channel. The default input assignment is Input A, so this is where we will plug in our guitar and assign the chorus effect. When we clear out the system by loading an empty preset, the AUD1 channel is set to off, so it appears like this:

NOTE: The MuseBox defaults are for AUD1 to be assigned to INPUT A, and AUD2 to be assigned to INPUT B. These assignments can be changed by pressing either the AUD 1 or AUD 2 button, and then pressing the SETUP button, which allows you to change the assignments to any of the available inputs.
NOTE: Please be aware that because MuseBox is only a two-channel device, so you can only use the front inputs or the rear inputs at the same time. You cannot simultaneously process both the front panel and the rear panel inputs. However, you can bring in a signal on the rear panel inputs and have them mixed passively with the front panel inputs, which is great if you have an MP3 player or drum machine that you want to mix in with what you are processing with the front panel inputs
- Turn the gain control to minimum on Input A and plug in your guitar. Turn the bottom encoder to select "TAG FX Spectral" and then turn the top knob to select the preset "Ac. GtrPhase1" Press the encoder button to load the patch. Of course if there is a different chorus you'd like to use on the guitar, feel free to select it now.

-
Bring up the gain on Input A, and verify that the green and yellow level indicators light on a regular basis, but the Red indicator never illuminates.
-
Now it's time to plug in the Microphone into Input B, and select an appropriate compression effect on that input. Turn the gain control to minimum, plug in the microphone, and if it is a condenser microphone that requires 48V phantom power, press the switch to apply phantom power.
-
Now we want to select an appropriate preset for use with the microphone signal. Press the AUD2 button, and you will see that the input is turned off:
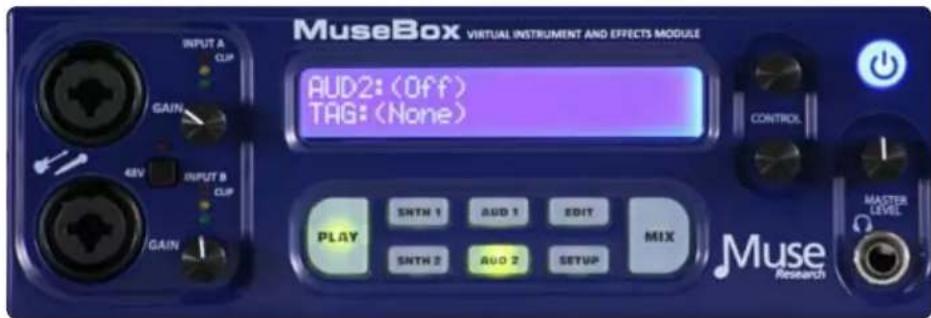
- Now turn the bottom knob to select the "TAG: FX Vocal", and select the preset "Smooth Lead Vox."

-
Now press the PLAY button to hear both effects simultaneously. Pretty cool, yes?
-
Now bring up the gain on Input B, and adjust the input levels so that the green and yellow indicators are lit on a regular basis, but not the red one.
-
Press the PLAY button and you will now hear BOTH the guitar and the vocal at the same time. If you want to SAVE this combination of effects and input assignments, simply press and hold the EDIT button, and you can save this preset to the USER bank by simply pressing the encoder button:

The MIX Button and Adding MIX Effects
Its easy to adjust the levels of the individual synth or audio input channels you are processing, or add some overall effects to your sounds. This is done by pressing the MIX button on the front panel.

The MIX section allows you to adjust the volume and panning of the main outputs, or adjust the channel volume on any of the SNTH or AUD slots, as well as configuring insert or send effects using their factory presets.
When you are in PLAY mode, pressing the MIX button lets you adjust or see the following:
Master Volume: Adjust the main output mixer volume.
Master Pan: Adjust the left or right panning of the main output.
Main Output Meters: View the output levels on separate L and R meters.
With the MIX button pressed, you can also load two separate effects into the mixer channel, allowing you to perform additional processing on any source, whether it is a synth or an audio input.
Here are the parameters for the effects you can control in the MIX section:
Effects 1 Tag: Select the effects preset category of Effect 1.
Effects 1 Preset: Select the Preset within the current Tag for Effect 1.
Effects 1 DRY/WET amount: Adjust overall Effect 1 amount.
Effects 1 Mode (either INSERT, or SEND): Change signal path of Effect 1.
Effects 2 Tag: Select the effects preset category of Effect 2.
Effects 2 Preset: Select the Preset within the current Tag for Effect 2.
Effects 2 DRY/WET amount: Adjust over all Effect 2 amount.
Effects 2 Mode (either INSERT, or SEND): Change signal path of Effect 2.
Passive Mix C+D: Mixes inputs C and D (unprocessed) with the main outputs.
MIX also allows you to adjust the levels and panning of any of the individual channels inside MuseBox. For example, to adjust the volume of the SYNTH 1 channel, simply press MIX and then SNTH 1:

When you select SNTH 1, SNTH 2, AUD 1 or AUD 2, the MIX menu allows you to do the following:
Adjust Volume for Synth 1 / Synth2 / Audio 1 / Audio 2
Adjust Panning for Synth 1 / Synth2 / Audio 1 / Audio 2
View the Output Meters for Synth 1 / Synth2 / Audio 1 / Audio 2 channels
You can configure the mixer effects as "INSERTS" (all signals go through the effects) or "SENDS" where the amount of the effect is variable by channel. If you have configured a mixer effect as a "SEND" effect, then you can adjust the amount of that effect by pressing the MIX button and the channel you are interested in. Just after you see the output meters, you will see the following parameters become available:
FX1 Send amount for the selected channel (ONLY IF Send FX 1 is enabled).
FX2 Send amount for the selected channel (ONLY IF Send FX 2 is enabled).
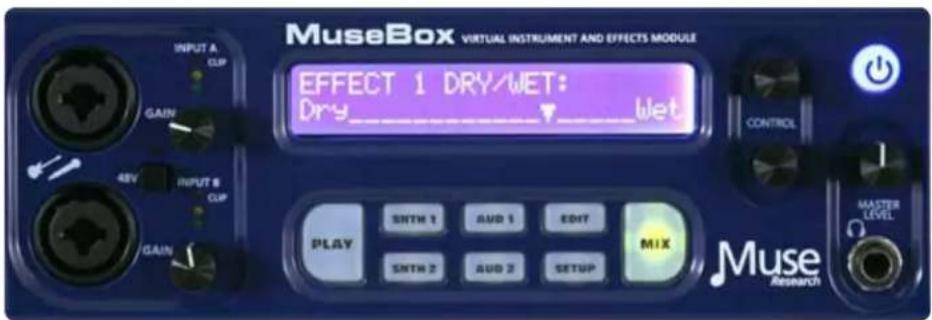
If there are no MIX effects configured as "SEND" effects, then the SEND menu for that effect will say: (Not Available).
Saving the Presets You've Created
Any new preset you create, as well as any modifications to the factory presets can quickly be saved from the front panel. Always be sure to save any changes you make as they are NOT retained when you turn off the power!
To save a preset, simply PRESS and HOLD the EDIT button. You have the option to "save over" an existing preset, or create a NEW one (labeled as USER-X, where X is the last saved user preset number plus one)

Simply use the bottom knob to select the location you want to save, and then press the bottom encoder to either create (if "new") or save (if writing over) the preset. Writing a preset takes a moment, after which time it will say "Created" on the display. All naming is automatic, but if you want to give them specific names you can do so using the Graphical User Interface.
If you change your mind and decide not to save the preset, simply hit the PLAY button to exit the SAVE screen. Remember, presets can be renamed using the Graphical User Interface.
Verifying Your MIDI Connection:
What do you do if you have your keyboard connected and you think you should be hearing sound, but you don't? Just follow these simple steps:
- Verify your MIDI keyboard OUTPUT jack is connected to MuseBox INPUT jack.
- Make sure there is a synth PRESET selected in PLAY mode on MuseBox.
- Verify the master volume on the front of the unit is turned up.
- Press the SETUP button to turn on the MIDI monitor. Play a note, and if it doesn't display on the system, then your keyboard is not transmitting MIDI or it is improperly connected.
- If MIDI data is displayed, make sure the MIX levels have not been turned down.
Selecting Presets at a Gig
When performing with MuseBox, you'll most likely want to quickly move from preset to preset on stage without having to touch the MuseBox itself. This is easily accomplished either by sending MIDI Program Change messages to MuseBox from your MIDI keyboard, or by connecting a standard momentary footswitch to the rear panel footswitch jack.

If you have a MIDI keyboard attached, you can send a MIDI program change message and MuseBox will load the corresponding presets in that particular TAG. If you change to a different TAG, then your program changes will select presets within that new TAG.
You can easily create a custom named TAG before your gig using the Graphical User Interface and then TAG the presets of interest to reside in that TAG. If you don't have the GUI handy, you can simply save the presets into the USER TAG and select them there.
If you want to move back and forth through the preset list, you can connect a 1/4" stereo to dual-mono breakout cable to the footswitch jack and connect TWO footswitches to the rear panel. One switch will allow you to increment through the list (increasing the preset number with each push of the switch) and the other switch will allow you to decrement through the list (decreasing the preset number with each push of the switch).

natural_image
Close-up of two audio jack cables with black and red components (no text or symbols visible)In either case, each time you press the footswitch, the next (or previous) preset will load immediately. This function is ideal for guitarists who might want to move through different guitar effects during a set without having to take their hands off their guitar to change patches.
Editing Virtual Instruments or Effects
The virtual instruments and effects in MuseBox are intended to be edited from their Graphical User Interfaces which you can see when you connect an LCD monitor to your MuseBox, or when you use the MuseBox Remote software with your Mac or PC through a network.
However, you can edit some of the key parameters on a plugin from the front panel by pressing the EDIT button. The EDIT mode lets you adjust up to eight pre-defined editable parameters per virtual instrument or effect.
To edit a virtual instrument or effect, first you need to select the channel you want to edit. You do this by simply pressing the SNTH1, SNTH2, AUD1, or AUD2 channel from the front panel.
In the case of MusePlayer, the default sound generating plugin in MuseBox, the parameters you can adjust are:
- Amplitude Envelope Attack 5. Master Filter Cutoff Frequency
- Amplitude Envelope Decay 6. Master Filter Resonance
- Amplitude Envelope Sustain 7. Filter Cutoff
- Amplitude Envelope Release 8. Filter Q
For ReValver TM HP TM , the default amp modeling plugin in MuseBox, the parameters you can adjust are:
- PreAmp 1 Gain 5. Reverb Mix
- Bass EQ 6. Presence
- Mid EQ 7. Master Output
- Treble EQ 8. PreAmp 2 Gain
MIDI Learn and Editable Paramaters
MuseBox supports "MIDI Learn" which allows you to assign various MIDI-controllable parameters to various MIDI continuous controllers. This feature requires you to use the Graphical User Interface, and as such it is not covered in this quickstart guide, so please consult the website for more information. However, it is important to realize the first eight parameters that are assigned using the MIDI Learn function show up as the first eight parameters in when the EDIT button is lit.
Getting Started: Using the MuseBox Graphical User Interface
The MuseBox Graphical User Interface (GUI), lets you see what is happening inside your MuseBox, as well as letting you use a keyboard and mouse to make edit the factory presets or make new ones. To view the MuseBox GUI, simply connect a standard computer VGA monitor to the VGA output on the rear of the unit, and a USB mouse and USB QWERTY keyboard to the USB Port. You can also see this interface by networking to your Mac or PC. For more information on how this is done, please visit the website. The Graphical User Interface will appear on your screen like this:

Exploring the GUI: The PRESET Menu Tab
In the top left-hand corner, you'll see the PRESET Tab. Here you can create a new empty preset, or save an existing preset that you've edited, or use SAVE AS to save your changes as a new preset. You can also rename, or delete an existing preset using the menu items in this tab.
Exploring the GUI: The TAG Tab
Next to the Preset Tab menu is the TAG Tab, which lets you Add a new TAG, Remove an existing Tag, or Rename a Tag as something different Note that to Add a new Tag to your preset, simply select an existing Tag from the drop down menu, or type the name of a new Tag and click OK.
Exploring the GUI: Tags/Presets
On the left hand side of the screen you'll see a column with the heading Tags/Presets. These are just like the Tags and Presets you see when you have the PLAY button pressed on the front panel of your MuseBox, except here you can see ALL the Tags and Presets at once!
Each TAG has a small Arrow that you can click to reveal all the Presets associated with that particular Tag. To load a preset in a Tag, simply click on the preset and the preset will load.
Tip: When the contents of a Tag are displayed, you can select presets in that Tag by using the UP/DOWN arrows on your QWERTY keyboard. This is a great way to quickly audition sounds.
Once you select a Preset, you will see the name of the preset and tag appear at the top of the center section of the screen. This lets you know that the preset is loaded as well as what virtual instruments or effects are associated with that preset.
Exploring the GUI: Synth / Effects Selection Area
Just to the right of the Tags/Presets menu you'll see two zones labeled "Synth Plugins" and "Effects Plugins." This is where you can chose which synth or effect to load. Each synth or effect has a small picture and the name of the synth or effect. There are two scroll bars to the right so you can scroll through the available synths and effects.
Main Rack Channels or "Slots"
In the center of the GUI is a large area that constitutes a virtual "rack" for running your virtual instruments and effects. There are two "synth" channels or "slots," and two "effect" slots.
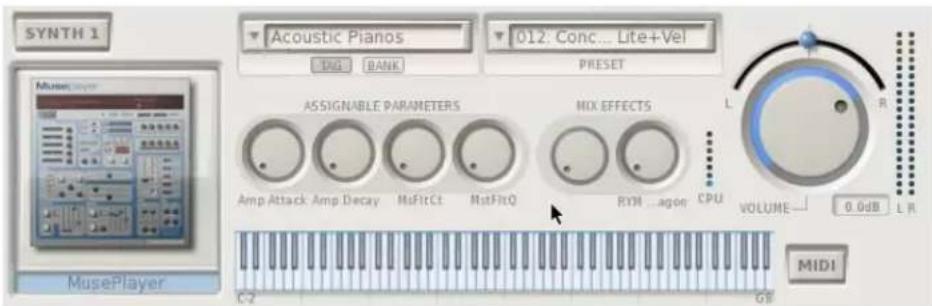
To activate a synth virtual instrument, simply click on the instrument, then drag and drop it into one of the channels in the main rack. The synth will load and is ready to respond to MIDI.
Once a virtual instrument is loaded, you can select the patches that are in the instrument using the drop down menus located in the center of the channel. Note that there are two buttons below the left-most menu area, one labeled TAG and one labeled BANK. This allows you to select either presets that have been organized with TAGS in the synth itself, or by using the more conventional factory BANK organization found in all synths and effects.
Synth Slot Controls

Descriptions of all the Synth Slot controls are as follows:
-
TAG or BANK selector: Drop-down menu that lets you browse and select any of the TAGs or internal factory BANKs associated with this particular synth. Selecting the top-most NONE item will remove the synth from the rack and empty the channel.
-
TAG/BANK Buttons: Let you select either TAG mode (where the presets are organized by TAGs) or BANK mode (where the factory default banks are shown).
Tip: You can browse banks and tags without having to open the drop-down menu by simply resting the mouse indicator on the field, and then using your scroll wheel on your mouse to move through the items in the list.
-
Preset selector: Drop-down menu that lets you browse and select any of the presets in the currently selected TAG or BANK.
-
Synth Graphical Editor: Click on the icon of the synth you have loaded and the interface of that synth will appear. You can then manipulate all of the controls of the synth using your mouse.
-
Assignable Parameters: These four knobs are "assignable parameters" which are the first four parameters that you assign using the MIDI Learn function.
Tip: You can move all the knobs in the MuseBox GUI by clicking and dragging the knob in a circular fashion, or by simply resting the mouse indicator on the knob and using your mouse scroll wheel to rotate the knob.
-
MIX Effects: These knobs adjust the amount of signal from this channel to be sent to the SEND EFFECT in the mixer section. Note that there must be an effect loaded in the MIX section and configured as a "SEND" effect for these knobs to become functional.
-
CPU indicator: This meter shows the relative load on the CPU in real time from this particular plugin. Playing more notes at one time will increase the CPU load.
-
Keyboard Range: Shows the current playable range of this particular synth. Allows you to see splits or assigned ranges easily. Click on the left hand side of the keyboard to change the lower range, and click on the right hand side of the keyboard to change the top range.
-
MIDI Button: Lets you open up the MIDI FILTER page. The MIDI Filter page lets you re-assign MIDI channels, adjust the transposition of the channel, change the note range and velocity range of the plugin, and activates the MIDI monitor that displays all the incoming MIDI information.
-
Channel Output Pan Control: Adjusts the output between the left and right channels.
-
Channel Output Volume Control: Adjusts the relative level of this channel's output. The output level from nominal is indicated numerically in decibels in the small display to the right of the volume control to allow precise volume settings (you can use your mouse scroll wheel for this).
-
Channel Level Meters: These peak-reading meters show you the instantaneous volume level coming from the output of the channel. Reduce the output volume control if the red segments at the top of the meter illuminate. Clipping conditions will cause the top-most segment to glow red and remain red until you click on the segments to reset the meter.
Audio Input Slot Controls

Descriptions of all the Audio Slot controls are as follows:
- TAG or BANK selector: Drop down menu that lets you browse and select any of the TAGs or BANKs associated with this particular effect. Selecting the top-most NONE item will remove the plug-in and empty out the channel.
- TAG / BANK Buttons: Lets you select either TAG mode (where the presets are organized by TAGs) or BANK mode (where the factory default banks are shown).
- Preset Selector: Drop down menu that lets you browse and select any of the presets in the currently selected TAG or BANK.
- Effect Graphical Editor: Click on the icon of the effect and the interface of the effect itself will appear. You can then manipulate all of the controls of the effect using your mouse.
- Assignable Parameters: These four knobs are "assignable parameters" which are the first four parameters that you assign using the MIDI Learn function.
Tip: You can move any of the knobs in the MuseBox GUI by clicking and dragging the knob in a circular fashion, or positioning the mouse tip on the knob and moving your mouse scroll wheel.
6. MIX Effects: These knobs adjust the amount of signal from this channel to be sent to the SEND EFFECT in the mixer section. Note that there must be an effect plugin active in the MIX section to hear an effect, and that mix effect must be in SEND mode for this effects send knob to work.
7. CPU Indicator: This meter shows the relative load on the CPU in real time from this particular effect. Some effects require more processing as the volume gets louder, most don't.
8. Input Selection Indicator: Shows the current input selected and detected by the MuseBox. From left to right the icons are: Mic, Instrument, and Line input.
9. Input Selector: Lets you select one of the physical inputs on MuseBox. You can select an individual channel, like Input B Mic/Inst, or a pair of channels, like Line Inputs C+D.
Note: inputs between the front and rear of the units are mutually exclusive: if you use the front panel inputs for anything, then the rear panel inputs are not available for processing and vice versa. However, you can use the front panel inputs and also bring two line level inputs into the MuseBox on the rear inputs and mix them passively with the Passive mix function described later.
- Input Level indicator: Indicates the input level received by the unit. Note that it is possible to clip the inputs of the unit even when the output is low, resulting in distorted sound. So it is imperative to ensure that your input levels do not cause the red segments of this meter (or the red LED on the front panel) to light continuously or your sound will be distorted.
- Channel Output Pan Control: Adjusts the output between the left and right channels.
- Channel Output Volume Control: Adjusts the relative level of this channel's output. The output level from nominal is indicated numerically in decibels in the small display to the right of the volume control to allow precise volume settings (you can use your mouse scroll wheel for this).
- Channel Level Meters: These peak reading meters show you the instantaneous volume level coming from the output of the channel. Reduce the output volume control if the red segments at the top of the meter illuminate. Clipping conditions will cause the top-most segment to glow red and remain red until you click on the segments to reset the meter.
Note: If you make any changes to a synth, effect or PLAY level preset, be sure to SAVE your work before loading a new presets, or your changes will be lost!
Exploring the GUI: The Mixer Section
Now that you know how to select different synths, effects and their presets, it is time to craft the overall sound using the MIX section.
The MIX section consists of two slots for additional effects, as well as the master volume and pan controls. These slots operate just like the audio input slots; simply drag the effect of interest into the slot to activate it.
The effects slots are configurable either as an INSERT effect, or as a SEND effect. There is a drop-down menu next to each effect slot that allows you to select the mode you want.
INSERT EFFECT MODE: In INSERT mode, all of the audio coming from the synths and audio inputs are routed THROUGH the effect you are running in the MIX section. This means that all the signals are effected at the same time, which is really useful if you want to add some reverb to your overall sound, or if you want to insert a limiter to prevent the signal level from overloading the inputs of your amp or PA system.
NOTE: In INSERT mode, 100% of the synths and audio input signals are going through the effect you have inserted. As a result, there is a WET/DRY control enabled in INSERT mode that lets you adjust the overall amount of the effect. To hear more of the effect, move the control towards the WET side.
SEND EFFECT MODE: In SEND mode, the audio is sent to the effect much like the Auxiliary send on an audio mixer. You can adjust the effect amount by changing the "send" level each channel (or slot). This way, you can adjust the amount of effect, if any, on a per channel basis.
Both the Effect 1 and Effect 2 slots have TAG and BANK buttons to select presets, just like on the synths and audio effects. You can browse the presets by selecting either TAGs or Banks and clicking on the drop down menu.
Main Mix Controls: At the bottom of the MIX section you'll find the MIX controls, which consist of the main audio output volume and pan controls, the main output meters, the CPU meter, the RAM meter, and the passive mix control.
The main audio output volume and pan control work just like they do on the channel slots. Click on the knob or pan button and move your mouse to change the volume or left/right pan settings, respectively.
NOTE: The software volume controls are completely independent of the front panel hardware volume control. For example, if the software volume controls are at maximum, but the hardware volume control is all the way down, you will not hear anything from the MuseBox outputs!

Passive Mix Mode: When you are using the front panel inputs on MuseBox, the rear panel inputs are not available for processing. However, if you have an external audio device, such as an MP3 Player, a keyboard with its own sounds, a drum machine, or some other audio device, it is possible mix together the rear panel input signals with the sounds being processed or generated inside the MuseBox by selecting the PASSIVE MIX function.
When PASSIVE MIX is selected, the audio connected to inputs C and D will be mixed with the signals being processed from the front panel inputs or with the sounds being generated with the synthesizers and sent through main outputs. Note that since these are "passive" inputs, there is no processing or level control provided when in this mode.
To adjust the relative mix between the MuseBox output and your passively mixed inputs, either 1) change the output level of your external device, or 2) adjust the output volume of the MuseBox to set the relative level between the two. Remember: when passive mix is engaged, you have no control over the levels of the C & D inputs!
NOTE: Please use caution when connecting an external device to the MuseBox when it is in Passive Mode. The only control you will have over the level coming out of the MuseBox is by changing the output level of the device you have attached.
WARNING: The Passive Mix function is ONLY for line level input devices. NEVER connect an amplifier output to ANY of the MuseBox inputs or permanent damage can result. Such damage is NOT covered under warranty.
Exploring the GUI: The Setup Menu Tab
Your MuseBox has several system level settings. These are all found in the SETUP tab on the Graphical User Interface.
Setup: Network Settings
There are two network settings in MuseBox: Automatic or Crossover.
The Network Settings window allows you to determine what mode the networking will be configured. In Automatic mode, it is assumed that your MuseBox is connected to a computer
network that has a device like a cable or DSL modem on it for connection to the internet. This mode would allow you to use the Muse Tools software to view the GUI, or update the software on your MuseBox.
In Crossover mode, the assumption is that the MuseBox will be connected directly to another computer using a single "crossover" cable, and NOT connected to a network device like a router or switch. In this mode, the assumption is that you will be using the computer primarily to view the GUI using the MuseBox Tools program.
Also handy is the Network Status screent that tells you whether your network is properly configured.

MuseBox uses standard network cables, available at your local computer store.
Setup: Software Updates
MuseBox is powered by software, and as such, one of the most powerful aspects of it is the fact that you are able to receive software updates to improve the functionality of your MuseBox.
To update the software, you must first have a "live" Internet connection available, and you must also connect a mouse, monitor and keyboard to your MuseBox. Once these connections have been made, simply select Software Update from the SETUP menu, and the MuseBox will automatically check for, download and install any relevant software updates for the system.
IMPORTANT NOTE: We highly recommend that you check for software updates immediately after purchase of your MuseBox, and then once every 3 to 6 months to keep your MuseBox up to date!
Setup: Audio "Latency" Settings
MuseBox makes use of computer software, and has a very high-performance audio sub-system that converts the digital information in the software into audio you can hear, all in realtime. In order to handle the calculations necessary to turn digital "bits" into music, the computer inside your MuseBox needs a very small amount of time, or a "buffer" to do its work. This setting is called your latency setting, and it will affect how many plugins you can run at once as well as how "fast" or "tight" your MuseBox feels.
With MuseBox, certain virtual instruments and effects can make it so that MuseBox is not able to finish all the calculations you are asking it to do, then an audible "click" might be heard on the outputs since the system didn't have enough time to finish its work before it had to submit them to the outputs. It can cause the audio to click or pop, and is generally unpleasant. The key is to find the right "buffer size" or "system latency" for your system to allow everything to work smoothly and efficiently.
MuseBox gives you the choice of several different "System Latency" settings.
Lowest: This is the fastest setting in the MuseBox, and is best for drums or when you are singing. This is also the most demanding setting in terms of the processor load, so some presets may not be able to run well at this setting. If you hear clicking or popping in the audio output while playing at this setting, try selecting the next higher setting.
Normal: This is the standard setting in the MuseBox. Fast, but not so fast that you are likely to overload on a regular basis. If you hear clicking or popping in the audio output while playing at this setting, try selecting the next higher setting.
Medium: Slower than normal, this setting is typical of most computer systems. Sounds that have fast attacks may feel a bit a little slow in their response at this setting but should be fine for sounds that are more legato, like strings and pad synths. If you hear clicking or popping in the audio output while playing at this setting, try selecting the next higher setting.
Highest: If Medium does not give your MuseBox enough time to get its work done, then try the highest setting. This setting gives the processor the most amount of time to do its job, and should be sufficient for every sound found in MuseBox.
The best way to set the latency is to use the NORMAL setting in normal playing, and if you hear any clicks in the audio (not related to the volume level) then change to the next higher latency setting.
System Specifications
Dimensions: 8.375" wide (1/2 rack space), 3.0" high (not including feet), 10.5" deep, not including knobs. MuseBox is designed for table-top and rackmount use.
Weight: MuseBox weighs 5 lbs., 12 oz. (2.55 kg) The power supply and cable are 1 lb., 2 oz. (0.51 kg). Together they weigh 6 lbs. 12 oz. (3.06kg).
Power Requirements: 12VDC input, 5A Max, center pin positive, using approved AC to DC converter. The AC to DC converter accepts inputs from 100 to 240VAC, 50/60Hz 1.5A Max The power adapter supplied with the unit is both auto-ranging and auto-power factor correcting for use anywhere in the world.
Inputs and outputs:
Front panel:
Two combination XLR/ 1/4" inputs with high-Z instrument input on 1/4" inputs, and low-Z Microphone input on XLR-type jacks, Pin 2 positive, with 48V phantom power selectable via push-button switch.
One 1/4" TRS (Tip / Ring / Sleeve) headphone jack.
Rear Panel:
Two 1/4" line level outputs, low impedance.
Two 1/4" line level balanced inputs, high impedance.
One full-size 5-pin DIN MIDI INPUT jack.
One 1/4" TRS Footswitch Input jack. Grounding the Tip or Sleeve will invoke assigned function. Default function assignment is Tip=Patch Increment, Ring=Patch Decrement)
Four USB 2.0 Jacks for convection to a mouse, keyboard, or device-compliant MIDI USB devices.
One Gigabit Ethernet Jack for connection to a Computer or network (networking cables not supplied).
One 15-pin VGA monitor connector for connecting a computer monitor.
One Coaxial bi-pin 12VDC power input jack. (Center pin positive).
One CF Card slot for connecting Compact Flash memory cards to add additional virtual instruments or effects.
Special Front Panel Key Combinations & Shortcuts
Pressing the power button once will cause the unit to go in to "standby" mode, keeping all sounds and effects loaded, but unit not drawing as much power. The power button will "wink" when it is in standby mode. Press power button once to restore normal operation.
Pressing the power button twice will cause the unit to shut down completely. IMPORTANT: ALWAYS SHUT THE MUSEBOX DOWN BY PRESSING THE POWER BUTTON TWICE TO ENSURE NORMAL OPERATION.
Pressing the power button three times will reset the unit and reload the current sounds or effects.
Holding down 'PLAY' at startup will rescan Banks and Patches, rebuild the plugin list, and start the mixer in a default setting with no sounds or effects loaded.
Holding down PLAY + MIX will generate MIDI panic in the event that your keyboard or MIDI device did not send a Note Off message.
Holding both the SNTH1 and SNTH 2 buttons will create a split between SNTH 1 and SNTH2 at middle C.
END-USER SOFTWARE LICENSE AGREEMENT
By opening the seal of this product and operating it, you are agreeing to the following end-user licensing agreements for the software that runs on MuseBox. If you do not agree to the terms set forth herewith, return the unit to your retailer in the same condition as it was purchased for a full refund.
DEFINITIONS: This license is between you, the end-user ("you"), Muse R&D ("Muse") and the third party software developers ("Developers") whose software is included for use with this product. This license agreement covers all software used in and with the MuseBox product, made available for download, or provided on physical data storage media for use with the MuseBox product. The term "software" in this agreement includes all source code, application software, drivers, virtual instruments or effects, content, presets, and tools used or associated with the MuseBox product.
OWNERSHIP: The software and any authorized copies of the software used in MuseBox, in any form, is intellectual property of Muse or the Developer who created the software. You acknowledge that the software in MuseBox is licensed (not sold) to you on a non-exclusive basis for use with the MuseBox hardware. You may use and benefit from the functionality and intellectual property expressed in the software, but you are not allowed to unbundle, resell or distribute the software for any purpose whatsoever. The copyrights, trademarks, and intellectual property of all software contained or associated with the Musebox remains the property of Muse or its suppliers at all times, including when or if MuseBox is sold or transferred to another user.
THIS SOFTWARE IS PROTECTED BY LAW, INCLUDING BUT NOT LIMITED TO INTERNATIONAL COPYRIGHT AND INTELLECTUAL PROPERTY TREATIES. YOU ARE SPECIFICALLY FORBIDDEN FROM UNBUNDLING, REVERSE ENGINEERING, MODIFYING, HACKING, DE-COMPILING, RE-PURPOSING OR RE-DISTRIBUTING THE SOFTWARE INCLUDED IN MUSEBOX FOR ANY REASON. FURTHERMORE, THE RESAMPLING OF THE CONTENT OF ANY OF THE SOUNDS OR PRESETS IN MUSEBOX TO CREATE COMMERCIAL SOUND LIBRARIES FOR SALE IS STRICTLY FORBIDDEN AND VIOLATES THE COPYRIGHTS OF THE SOFTWARE AND SOUND DEVELOPERS.
ACCEPTABLE USE: The software in this product, including but not limited to the host software, software tools, the virtual instruments and effects as well as the sampled sound content and presets used in MuseBox are licensed to you for music composition, recording, and/or performance, including using the sounds created by or processed with the software on recordings, live performance or in broadcast without restriction. Some software that can be installed on MuseBox may have different restrictions on use and those specific terms of use are not superseded by the terms of this agreement.
WARRANTY: Muse and/or the Developers of the licensed software included with MuseBox warrant the product will perform substantially in accordance with the accompanying MuseBox documentation for the first 90 days after purchase. Beyond the operation of the software as documented, you agree that Peavey, Muse and the Developers have made no express warranties to you regarding the software provided herein, and acknowledge that the software is provided "AS-IS" without warranty. Furthermore, you agree that no claims of the fitness of this software for any particular purpose, merchantability, satisfactory quality, or non-infringement of third party rights have been made by Peavey, Muse, or the Developers. Some States do not allow the exclusion of implied warranties, so this exclusion or limitation may not apply to you.
DISCLAIMER OF LIABILITY: In no event will Peavey, Muse or the Developers be liable to you for any loss of use, interruption of business, or any direct, indirect, special, incidental or consequential damages of any kind (including loss of data, income, or profits) associated with the use of this product, regardless of the form of action including contract, tort (including negligence), strict product liability, or otherwise, even in the event that Peavey, Muse, and/or the Developers have been advised of the possibility of such damages. Some States do not allow exclusions or limitations of liability rights, so the above limitation or exclusion may not apply to you.
INTERNET CONNECTIVITY: The software in this product may connect to the Internet for the purposes of software registration, updates, or enhancement. Whenever the product connects to the Internet, the IP address associated with your MuseBox will be made available to Muse and/or its suppliers. All information obtained in this manner is treated confidential, and all customer information associated with the registration, updating, or use of MuseBox or the online serlyvices associated with the device are managed in accordance with the company's privacy policies which can be found on the website www.museresearch.com.
COPYRIGHT / TRADEMARK NOTICE: The software contained in and associated with MuseBox is Copyright 2001-2011, All Rights Reserved, by Muse Research and Development Inc., Peavey Electronics, Inc., Ultimate Sound Bank, Inc., WaveArts, Inc., MuVoice, Inc., Camel Audio, Inc., ForeFront, Inc., and any or all other third party developers whose software is included with this device. The Muse logo, MuseBox, and MusePlayer are trademarks of Muse Research and Development, Inc. Peavey, the Peavey Logo, and ReValver, are trademark of Peavey Electronics, Inc. All other Copyrights and Trademarks are property of their respective owners.
Acknowledgements
MuseBox was created by a dedicated group of individuals at both Muse Research and Peavey Electronics. Special thanks go to the following individuals for turning this concept into a reality:
Executive Producers: Hartley Peavey, Matt Christiano, Chris Halaby, Courtland Gray.
Hardware & Firmware Engineering: Dan Freeman, Chuck Geber, John Fera, Mihai Ionescu, Bryan Lanser, David McRell. Special thanks to Chuck and Dan for all their help on weekends!
Software Engineering and System Design: Michael Ost and Louis Gorenfeld.
Product Concept and GUI Design: Michael Ost, Bryan Lanser, Axel Hartmann (DesignBox).
Industrial Design / Mechanical Engineering / Manufacturing Engineering: Paul Kitterman, Jimmy Horton, Tim Tardo, Jay Shangraw.
Software Testing: Kevin Bryson, Gary Grove, Rick Escobar, Kevin Looney, Conrad Sasinski.
Sound Design and Preset Creation: Kevin Bryson, Chris Martirano, Tom Allen, Louis Gorenfeld. Special thanks to Mario DeCuittius at Alternate Mode for the great pitched percussion samples.
Project Wranglers: Bryan Lanser and Fred Poole.
Product Marketing: Scott Mire, Andy Rust, and Laura Whitmore.
Manual: Bryan Lanser, Scott Mire, Bill Harper, Matt Christiano.
Virtual Instrument and Effects partners: Alain Etchart and Emanuel Usai (Universons) Ben Gillette (Camel Audio), Bill Gardner (WaveArts), Wim D'Haes (Mu Tech), Marc-Pierre Verge (Applied Acoustics Systems), Michael Lundgren (Peavey), Urs Heckmen (U-He), George Yohng (ForeFront) Peter Linsener (LinPlug).
Good Advice Along The Way: Scott Garcia, Korel Tunador, Marshall Otwell, Peter Muller, and Egor Simpson.
Demo Video Special Guest Stars: Timothy Drury, Tom Allen, Tom Savell.
Magical Sample Editing Tools provided by Jeremy Todd of Izotope, Inc.
Features and specifications subject to change without notice.

Peavey Electronics Corporation • 5022 Hartley Peavey Drive • Meridian • MS • 39305
(601) 483-5365 • FAX (601) 486-1278 • www.peavey.com • ©2011 • EX000129
Muse Research
970 O'Brien Drive, Menlo Park, CA 94025
(650) 326-5400
www.museresearch.com
e: info@museresearch.com
PEAVEY ELECTRONICS CORPORATION LIMITED WARRANTY
Effective Date: 09/15/2010
What This Warranty Covers
Your Peavey Warranty covers defects in material and workmanship in Peavey products purchased and serviced in the U.S.A. and Canada.
What This Warranty Does Not Cover
The Warranty does not cover: (1) damage caused by accident, misuse, abuse, improper installation or operation, rental, product modification or neglect; (2) damage occurring during shipment; (3) damage caused by repair or service performed by persons not authorized by Peavey; (4) products on which the serial number has been altered, defaced or removed; (5) products not purchased from an Authorized Peavey Dealer.
Who This Warranty Protects
This Warranty protects only the original purchaser of the product.
How Long This Warranty Lasts
The Warranty begins on the date of purchase by the original retail purchaser. The duration of the Warranty is as follows:
| Product Category Duration | |
| Guitars/Basses, Amplifiers, Preamplifiers, Mixers, Electronic Crossovers and Equalizers 2 years *(+ 3 years) | |
| Drums 2 years *(+ 1 year) | |
| Enclosures 3 years *(+ 2 years) | |
| Digital Effect Devices and Keyboards and MIDI Controllers 1 years *(+ 1 year) | |
| Microphones 2 years | |
| Speaker Components 1 year(incl. Speakers, Baskets, Drivers, Diaphragm Replacement Kits and Passive Crossovers) | |
| Tubes and Meters | 90 Days |
| Cables Limited Lifetime | |
| AmpKit Link, Xport, Rockmaster Series, Strum'n Fun, RetroFire, GT & BT Series Amps | 1 year |
[* Denotes additional Warranty period applicable if optional Warranty Registration Card is completed and returned to Peavey by original retail purchaser within 90 days of purchase.]
What Peavey Will Do
We will repair or replace (at Peavey's discretion) products covered by Warranty at no charge for labor or materials. If the product or component must be shipped to Peavey for Warranty service, the consumer must pay initial shipping charges. If the repairs are covered by Warranty, Peavey will pay the return shipping charges.
How To Get Warranty Service
(1) Take the defective item and your sales receipt or other proof of date of purchase to your Authorized Peavey Dealer or Authorized Peavey Service Center.
OR
(2) Ship the defective item, prepaid, to Peavey Electronics Corporation, International Service Center, 412 Highway 11 & 80 East, Meridian, MS 39301. Include a detailed description of the problem, together with a copy of your sales receipt or other proof of date of purchase as evidence of Warranty coverage. Also provide a complete return address.
Limitation of Implied Warranties
ANY IMPLIED WARRANTIES, INCLUDING WARRANTIES OF MERCHANTABILITY AND FITNESS FOR A PARTICULAR PURPOSE, ARE LIMITED IN DURATION TO THE LENGTH OF THIS WARRANTY.
Some states do not allow limitations on how long an implied Warranty lasts, so the above limitation may not apply to you.
Exclusions of Damages
PEAVEY'S LIABILITY FOR ANY DEFECTIVE PRODUCT IS LIMITED TO THE REPAIR OR REPLACEMENT OF THE PRODUCT, AT PEAVEY'S OPTION. IF WE ELECT TO REPLACE THE PRODUCT, THE REPLACEMENT MAY BE A RECONDITIONED UNIT. PEAVEY SHALL NOT BE LIABLE FOR DAMAGES BASED ON INCONVENIENCE, LOSS OF USE, LOST PROFITS, LOST SAVINGS, DAMAGE TO ANY OTHER EQUIPMENT OR OTHER ITEMS AT THE SITE OF USE, OR ANY OTHER DAMAGES WHETHER INCIDENTAL, CONSEQUENTIAL OR OTHERWISE, EVEN IF PEAVEY HAS BEEN ADVISED OF THE POSSIBILITY OF SUCH DAMAGES.
Some states do not allow the exclusion or limitation of incidental or consequential damages, so the above limitation may not apply to you.
This Warranty gives you specific legal rights, and you may also have other rights which vary from state to state.
If you have any questions about this Warranty or services received or if you need assistance in locating an Authorized Service Center, please contact the Peavey International Service Center at (601) 483-5365.
Features and specifications are subject to change without notice.
| . |
Optional Product Extended Warranty Registration
Give us some information and put your extended warranty into effect!
Please take a few minutes to fill out this information/survey sheet to help us get to know and serve you better.
To save time, submit your warranty registration online at www.peavey.com/support/warrantyregistration
| First Name | Initial | Last Name |
| Street Address |
| City | State/Province | Postal Code |
( )
| Telephone Number( ) | E-mail Address- - | ||
| Fax Number | Date of Birth | ||
| Gender ☐ M ☐ F | |||
2.

| Model | 8-Digit Serial Number |
| Date of Purchase | Price Paid |
3.
Name of store where purchased
| City | State |
- Top two (2) reasons why you purchased from this store/dealer:
| Availability of productFriend/Relative's recommendationStore credit cardKnowledgeable staffAvailability of lessonsTechnical instruction | Past favorable experienceBest priceAdvertised specialConvenient locationReceived as a giftOther____ |
- Where do you most often shop for music and sound products?
| □ Independent retailer | □ Newspaper ads |
| □ Mass market retailer | □ Internet/Web sites |
| □ Mail order magazines | □ Other ____ |
- What two (2) factors most influenced your purchase of this product?
| □ Peavey brand name | □ Product appearance |
| □ Craftsmanship | □ Durability |
| □ Features for price | □ Prior experience with Peavey |
| □ Bundled accessories | □ Packaging |
| □ Sound quality | □ Other ____ |
- How did you learn about this Peavey product? (select best answer)
| □ Magazine review | □ Teacher's recommendation |
| □ Newspaper review | □ Catalog or flyer |
| □ Radio advertisement | □ Saw in store |
| □ Advertised special | □ Use by professional |
| □ Friend/Relative's recommendation | □ Other ____ |
| □ Salesperson's recommendation |
- Which other brands/models did you consider?
| 9. How would you describe your level of musicianship/technical expertise? |
| ☐ Beginner - Never played or taken less than one (1) year of lessons |
| ☐ Intermediate - One (1) to five (5) years of lessons or playing |
| ☐ Advanced - More than five (5) years of lessons or playing; play professionally |
- Education: (select best answer)
| □ High school |
| □ Some college |
| □ Completed college |
| □ Graduate school |
- Which best describe your family income? (select best answer)
| □ Under 15,000 | □75,000 - 99,999 |
| □15,000 - 24,999 | □100,000 - 149,999 |
| □25,000 - 34,999 | □ Over -150,000 |
| □ 35,000 -49,999 | |
| □ 50,000 -74,999 |
- Which of the following is your primary source of information on musical products: (select best answer)
| □ Television | □ Mail order catalogs |
| □ Radio | □ Direct mail |
| □ Internet | □ Literature from manufacturer |
| □ Newspaper | □ Other ____ |
| □ Magazines |
- What is your main motivation for buying new equipment?
| ☐ Replacing old product☐ Want new and leading edge equipment☐ Fullfill a specific need☐ Supplement existing products☐ Value | ☐ Impulse☐ Need for improved performance☐ New technology☐ Availability of product☐ Other ____ |
- Please list your three most frequently visited Web sites.
| 1. http:// |
| 2. http:// |
| 3. http:// |
- In your opinion, what could Peavey do to improve its products and/or service? Please use the space below to tell us your answer.
Median, Ms 39302-5108
P.O. Box 5108
Attn: Warranty Department
Pearvey Electronics Corporation

Place Postage Here


- IMPORTANT SAFETY INSTRUCTIONS
- SAVE THESE INSTRUCTIONS!
- FCC Compliancy Statement
- ENGLISH
- MuseBox™ Operating Manual
- Introduction
- Getting Familiar: Unpacking and Setup
- Getting Familiar with MuseBox: Overview
- The Front Panel
- Front panel Controls and Functions
- Getting Familiar: The Rear Panel
- Getting Started: Typical Connections
- Making Music: The PLAY mode
- TAG Name TAG contains: Expected Input:
- Using PRESETs in the PLAY mode
- MuseBox as a Synthesizer/Sound Module
- MuseBox as an Electric Guitar Effects Processor/Amp Modeller
- MuseBox as a Vocal Processor/Effects box
- Selecting Individual Synth Presets
- Splitting Two Sounds Across a Keyboard
- Selecting Individual Effect Presets
- The MIX Button and Adding MIX Effects
- Saving the Presets You've Created
- Verifying Your MIDI Connection:
- Selecting Presets at a Gig
- Editing Virtual Instruments or Effects
- MIDI Learn and Editable Paramaters
- Getting Started: Using the MuseBox Graphical User Interface
- Exploring the GUI: The PRESET Menu Tab
- Exploring the GUI: The TAG Tab
- Exploring the GUI: Tags/Presets
- Exploring the GUI: Synth / Effects Selection Area
- Main Rack Channels or "Slots"
- Synth Slot Controls
- Audio Input Slot Controls
- Descriptions of all the Audio Slot controls are as follows:
- Exploring the GUI: The Mixer Section
- Exploring the GUI: The Setup Menu Tab
- Setup: Network Settings
- Setup: Software Updates
- Setup: Audio "Latency" Settings
- System Specifications
- Inputs and outputs:
- Front panel:
- Rear Panel:
- Special Front Panel Key Combinations & Shortcuts
- END-USER SOFTWARE LICENSE AGREEMENT
- Acknowledgements
- PEAVEY ELECTRONICS CORPORATION LIMITED WARRANTY
- What This Warranty Covers
- What This Warranty Does Not Cover
- Who This Warranty Protects
- How Long This Warranty Lasts
- What Peavey Will Do
- How To Get Warranty Service
- Limitation of Implied Warranties
- Exclusions of Damages
- Optional Product Extended Warranty Registration
Brand : PEAVEY
Model : MuseBox
Category : Audio Equipment