Artisan 1024 - Microscope Discovery - Free user manual and instructions
Find the device manual for free Artisan 1024 Discovery in PDF.


| Product Type | Digital Microscope |
| Brand | Discovery |
| Model | Artisan 1024 |
| Magnification | 10x - 300x (optical zoom) |
| Image Resolution | 12M, 10M, 8M, 5M, 3M (JPEG) |
| Video Resolution | 1080p, 720p (AVI) |
| Frame Rate | 30 fps |
| Display | 4-inch color LCD |
| Illumination | 8-LED system with brightness adjustment |
| Focus | Manual, 0 - 100 mm |
| Optics Material | Optical glass |
| Polarizing Filter | Rotatable wheel to reduce reflections |
| Storage | microSD card slot (up to 32 GB, not included) |
| Connectivity | USB 2.0 (to PC), AV out (to TV), HDMI out |
| Power Source | 5V DC via USB cable or rechargeable Li-ion battery (3.7V, 1050 mAh) |
| Battery Life | Approximately 2.5 hours |
| Charging Time | Approximately 4 hours |
| Body Material | Plastic |
| Software | PortableCapture (Windows/Mac) with measurement tools |
| Included Accessories | Tripod, rechargeable battery, USB cable, AV cable, power adapter, software CD, pouch, user manual |
| Operating Temperature | -10°C to +65°C (14°F to 149°F) |
| System Requirements | Windows 7/8/10, Mac OS 10.14+, USB 2.0, CD drive |
| Safety Warning | Never look directly at the Sun through the microscope; use with caution around children |
Frequently Asked Questions - Artisan 1024 Discovery
User questions about Artisan 1024 Discovery
0 question about this device. Answer the ones you know or ask your own.
Ask a new question about this device
Download the instructions for your Microscope in PDF format for free! Find your manual Artisan 1024 - Discovery and take your electronic device back in hand. On this page are published all the documents necessary for the use of your device. Artisan 1024 by Discovery.
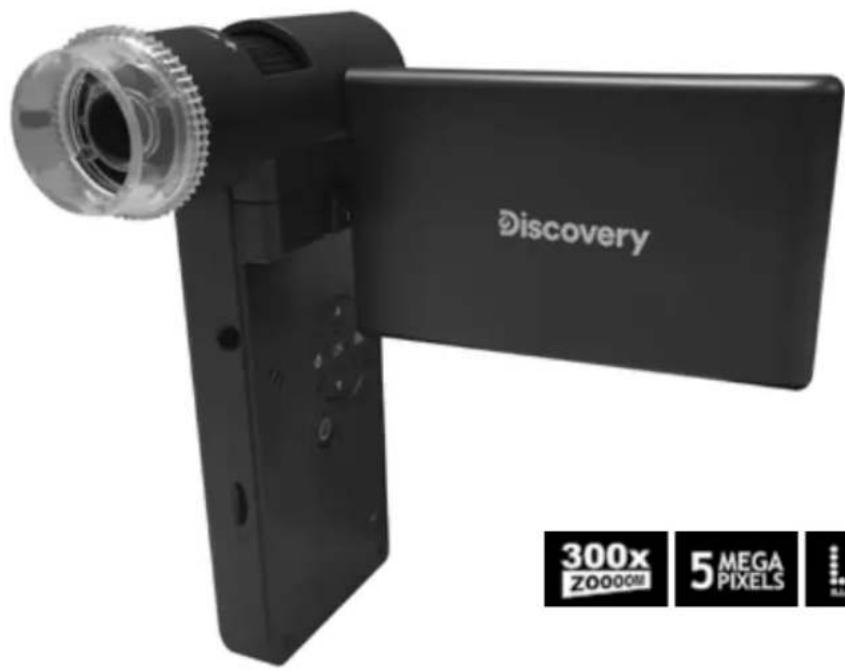
USER MANUAL Artisan 1024 Discovery
Discovery Artisan 1024
Digital Microscope
EN User Manual
BG Ръководство за потребителя
CZ Návod k použití
DE Bedienungsanleitung
ES Guía del usuario
HU Használati útmutató
IT Guida all'utilizzo
PL Instrukcja obstugi
PT Manual do usuário
RU Инструкция по эксплуатации
TR Kullanım kılavuzu

Discovery
levenhuk
Zoom&Joy
Discovery
Artisan 1024
Digital Microscope
EN
Microscope parts
① Capture
2 Zoom adjustment wheel
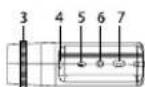
3 Polarizing wheel
Battery status indicator
⑤ HDMI out
6 AV out
7 DC: charge battery
USB: output to PC
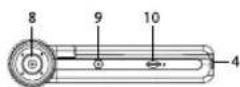
8 Objective lens
9 1/4" screw
10 MicroSD slot
⑪ Focus wheel
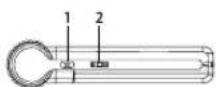
12 Brightness adjustment wheel
13 Battery compartment
14 4" color LCD display
15 Speaker
16 Setup
17 Power on/off
18 Up
19 Photo/Video/Playback
20 OK (Confirm)
21 Down
22 Microphone
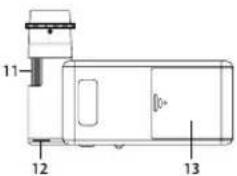
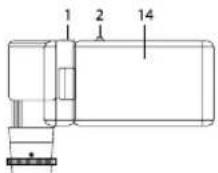
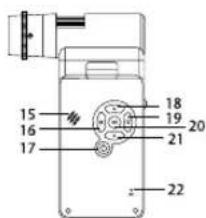
The kit includes: microscope, tripod, rechargeable battery, USB cable, AV cable, power adapter, software CD, pouch, user manual and lifetime warranty.
Never, under any circumstances, look directly at the Sun, another bright source of light or at a laser through this device, as this may cause PERMANENT RETINAL DAMAGE and may lead to BLINDNESS.
Microscope assembly
Open the battery compartment and insert the battery into the battery compartment matching the indicated polarity. The battery has to be fully charged before turning the microscope on for the first time. Plug the power cable into the power cable socket on the microscope body (7) and connect it to a power source. The battery status indicator (4) will turn red. Once the battery is fully charged, the indicator will go out. You can now disconnect the microscope from the power source and turn it on. The fully-charged battery allows you to use the microscope for 2.5 hours. The illumination will grow dim and the image quality will decrease to inform you that the battery is low. Charge the battery, as described above.
A microSD card (purchased separately) is required to save captured images and recorded videos. Turn the microscope off and insert the microSD card into the corresponding slot on the microscope body until it locks in place with a click. Do not apply excessive force when inserting the microSD card. Try rotating the card, if it does not lock in place with ease. Format the card before using it. To turn the microscope on, open the LCD display or press the power button (17). To turn the microscope off, fold the LCD display or press the power button (17) again (refer to Power saving section for more information).
Display icons

Capture an image

Playback mode
12M
Current image resolution

Battery status indicator

Start and stop video recording
001618
Total number of images that may be captured (based on the current resolution)

MicroSD status icon
Note: Interface icons will be hidden if no key has been pressed and held for 10 seconds.
Capturing an image
Turn the microscope on and point it at an object. Make sure the LCD display is fully unfolded. Adjust the illumination brightness, so that the specimen is evenly lit. Change magnification, then focus your view and press the capture button (1) to capture an image.
Recording a video
Press the Photo/Video/Playback button (19) to switch to video mode. The icon in the upper left corner of the screen will change in confirmation. Press the capture button (1) to start recording and press it again to stop.
Playback
Press the Photo/Video/Playback button (19) to switch to playback mode. The icon in the upper left corner of the screen will change in confirmation. Select the desired photo or video clip with UP (18) and DOWN (21) buttons and press OK (20) to play it.
Deleting files
When browsing saved files, press the Setup button (16), select Delete... and press OK (20) to confirm selection (you can choose to delete everything or just the selected file from the displayed menu).
Protecting files
When browsing saved files, press the Setup button (16), select Protect and press OK (20) to confirm selection (you can choose to protect everything or just the selected file from the displayed menu).
Zoom
Scroll the zoom adjustment wheel (2) to zoom your view in or out.
Polarizing filter
You can use a polarizing filter to reduce light reflection while observing objects with a shiny surface like metal, crystals, etc. Rotate the polarizing wheel (3) by 90 degrees to activate or deactivate the polarizing effect.
Mass storage on PC
Insert a microSD card in the slot. Connect the microscope to your PC with the USB cable to download images from the card to your computer.
Preview on PC
Only works with the software installed. Remove the microSD card from the slot. Connect the microscope to your PC with the USB cable.
Connecting the microscope to a TV-set
Plug the AV cable into the microscope and connect it to your TV-set (refer to the User Guide of your TV-set for additional information). Turn on the TV and select the correct channel from the corresponding menu of the TV-set (refer to the User Guide of your TV-set for additional information).
Attaching the tripod
Place the tripod on a stable surface. Connect the tripod to the threaded hole (9) on the microscope and rotate the microscope until it locks in place. Do not apply excessive pressure during rotation, as this may damage both the microscope and the tripod. Tripod height may be adjusted, if necessary.
Display menu
Press Setup button (16) to open the main display menu. From this menu you can set image and video resolution, the interface language, date and time, turn on the power saving mode, set up the TV connection, format the SD card, reset settings and check the hardware version. Also, this menu provides access to the Loop recording mode and Date Stamp option.
Resolution
Select the image or video resolution from the main menu and choose the required resolution by pressing the Down button (21), then confirm by pressing the OK button (20).
Note: This model supports the following image resolutions: 12M, 10M, 8M, 5M, 3M; video resolutions: 1080P, 720P.
Capture mode
In photo mode, press the Setup button (16) and choose the Capture mode to setup the sequence capture. For example, you can set up the microscope to take a photo every 5 seconds.
Loop recording
In video mode, press the Setup button (16) and choose the Loop recording mode. You can select the duration of the video clip or turn the Loop recording mode off. While the Loop recording mode is on, each video clip of selected duration will be recorded over the previous one.
Date Stamp
Select Date Stamp from the main menu and then select a target option.
Date and time
Select Date/Time from the main menu by the Down button (21) and set the current date and time.
TV connection
Select TV Mode from the main menu and then select, between NTSC and PAL, the correct mode compatible with your TV. Press the OK button (20) to confirm selection.
Power saving
Select Auto Power Off from the main menu and set the idle time before the microscope automatically shuts down. Press the OK button (20) to confirm selection.
Settings reset
Select Default Setting from the main menu to revert back to factory settings.
Language
Select Language from the main menu and choose one of the existing settings. Press the OK button (20) to confirm selection.
MicroSD card formatting
Select Format SD from the main menu to format the installed memory card. All the files on the card will be deleted after card formatting. Normally card formatting is not necessary, unless your card is not able to store the captured image.
PortableCapture software
Insert the installation CD into your CD drive. Choose the folder according to the operating system of your device. Double click the installation file to install the application and follow the instructions on screen. The installation CD contains a copy of the user manual, which you can find in the User Manual folder. Connect the microscope to your PC with a USB cable and run the PortableCapture application. A pop-up message will warn you if the microscope is not connected to the PC.

Capture an image

Start and stop video recording

Sequence capture (you can set the time to begin capturing images or videos, interval between them, video duration and the number of images or videos to be captured)

Full screen mode. To exit full screen mode, press Escape on your keyboard or double-click anywhere on the screen
Application menu
File
Photos Folder: set a directory for captured images.
Videos Folder: set a directory for recorded videos.
Options
Resolution: set image resolution.
Date/Time: hide or display date and time of capture during preview.
Language: change the language of the user interface.
XY Guide: hide or display a grid on images.
Full screen mode: go full screen.
Capture
Photo: capture an image.
Video: record a video.
Capturing an image
Click the corresponding icon on the toolbar or select Photo from the Capture menu.
Recording a video
Click the corresponding icon on the toolbar or select Video from the Capture menu.
Sequence capture
Click the corresponding icon on the toolbar. A dialog window will appear where you can set a number of parameters for sequence capture. Click the Photo radio button to set the time to begin capturing images, interval between them and the total number of images. Click the Video radio button to set the time to begin recording videos, their duration, interval between them and the total number of clips.
Calibration
Before calibrating the microscope, turn the grid display on. To do so, select On from Options > XY Guide. By default, the grid is visible. Place the calibration scale on the stage and focus your view. Make sure that the vertical axis of the grid is parallel to scale divisions and capture an image. Double-click the image thumbnail to open it in a separate window.
Click the corresponding icon on the toolbar to begin calibration. Using your mouse, choose two points on the image (you have to know the actual distance between these two points). Once you choose the second point, a dialog window will open, where you have to enter the known distance in the Actual dimension field. The application will

Save as

Copy to clipboard

Copy file

Previous image

Next image

Undo the last action

Repeat the last action

Draw

Text

Measurement

Calibration
automatically calculate the magnification of the image. Click OK to close the dialog window. The calculated magnification will be displayed in the Magnification field.
Note: Chosen points should form a horizontal line.
You can check calibration results by measuring the same distance with the Straight line tool. Click the measurements icon, choose the Straight line tool and draw a similar line on the image. If the measured distance is equal to the actual distance, calibration has been successful.
Recalibration
The calibration process has to be repeated if the magnification or focus has been changed during observations.
Click the corresponding icon on the toolbar again and select Reset picture magnification from Reset magnification. Repeat the calibration process, as described above. Change the magnification and capture a few images. Double-click one of the thumbnails to open the resulting image in a preview window. Click the calibration icon on the toolbar and select Set picture magnification from Set magnification. Enter the current magnification in the dialog window that appears and click OK.
If you want to use the same magnification when capturing images in the future, click the calibration icon on the toolbar and select Set capture magnification from Set magnification.
Measurements
It is recommended to calibrate the system before proceeding with measurements. Straight line. Press and hold the left mouse button to start drawing a line. Release the left mouse button to complete the line.
Continuous Line. Press and hold the left mouse button and draw a line. Release the left mouse button to complete the segment. You can continue adding more segments to the free-form line.
Radius Circle. Draw a straight line on the image. The application will automatically calculate the radius, as well as circumference and area of the corresponding circle. Diameter Circle. Draw a straight line on the image. The application will automatically calculate the diameter, as well as circumference and area of the corresponding circle. Three Points Angle. Press and hold the left mouse button to draw a line on the image.
Release the left mouse button and draw another line. The application will automatically calculate value of the resulting angle.
Draw and text
PortableCapture allows you to add drawings and textboxes to your images. Open an image in a preview window and click the Pencil icon on the toolbar. Select one of the tools from the drop-down menu and draw something on the image. By clicking the TT icon on the toolbar, you can edit font type and color to be used in textboxes.
Specifications
LCD display 4"
Optics material optical glass
Megapixels 5
Magnification 10—300x
Photo *.jpg
Video *.avi
Focusing manual, 0—100mm
Speed 30fps
Illumination 8-LED system with brightness adjustment
Body material plastic
Power source 5V DC-in via USB cable or Li-ion battery: 3.7V, 1050mAh work time: 2.5 hours; charging time: 4 hours
Software image and video processing software with measurement function
Software language English, German, French, Spanish, Russian, Japanese, Chinese, etc.
Ability to connect additional equipment
support of microSD cards with capacity up to 32GB (not included in the kit)
connect to PC via USB cable (included) connect to TV via AV cable (included)
Operating temperature range
-10...+65°C/14...149°F
The manufacturer reserves the right to make changes to the product range and specifications without prior notice.
System requirements
Operating system: Windows 7/8/10, Mac 10.14 and above CPU: at least P2 1GHz or above, RAM: 512MB, Video card: 512MB Interface: USB 2.0, CD drive, any monitor with AV input
Care and maintenance
Never, under any circumstances, look directly at the Sun, another bright source of light or at a laser through this device, as this may cause PERMANENT RETINAL DAMAGE and may lead to BLINDNESS. Take necessary precautions when using the device with children or others who have not read or who do not fully understand these instructions. After unpacking your microscope and before using it for the first time check for integrity and durability of every component and connection. Do not try to disassemble the device on your own for any reason. For repairs and cleaning of any kind, please contact your local specialized service
center. Protect the device from sudden impact and excessive mechanical force. Do not apply excessive pressure when adjusting focus. Do not overtighten the locking screws. Do not touch the optical surfaces with your fingers. To clean the device exterior, use only special cleaning wipes and special optics cleaning tools from Levenhuk. Do not use any corrosive or acetone-based fluids to clean the optics. Abrasive particles, such as sand, should not be wiped off lenses, but instead blown off or brushed away with a soft brush. Do not use the device for lengthy periods of time, or leave it unattended in direct sunlight. Keep the device away from water and high humidity. Be careful during your observations, always replace the dust cover after you are finished with observations to protect the device from dust and stains. If you are not using your microscope for extended periods of time, store the objective lenses and eyepieces separately from the microscope. Store the device in a dry, cool place away from hazardous acids and other chemicals, away from heaters, open fire and other sources of high temperatures. When using the microscope, try not to use it near flammable materials or substances (benzene, paper, cardboard, plastic, etc.), as the base may heat up during use, and might become a fire hazard. Always unplug the microscope from a power source before opening the base or changing the illumination lamp. Regardless of the lamp type (halogen or incandescent), give it some time to cool down before trying to change it, and always change it to a lamp of the same type. Always use the power supply with the proper voltage, i.e. indicated in the specifications of your new microscope. Plugging the instrument into a different power outlet may damage the electric circuitry of the microscope, burn out the lamp, or even cause a short circuit. Children should use the device under adult supervision only. Seek medical advice immediately if a small part or a battery is swallowed.
Battery safety instructions
Always purchase the correct size and grade of battery most suitable for the intended use. Always replace the whole set of batteries at one time; taking care not to mix old and new ones, or batteries of different types. Clean the battery contacts and also those of the device prior to battery installation. Make sure the batteries are installed correctly with regard to polarity (+ and -). Remove batteries from equipment that is not to be used for an extended period of time. Remove used batteries promptly. Never short-circuit batteries as this may lead to high temperatures, leakage, or explosion. Never heat batteries in order to revive them. Do not disassemble batteries. Remember to switch off devices after use. Keep batteries out of the reach of children, to avoid risk of ingestion, suffocation, or poisoning. Utilize used batteries as prescribed by your country's laws.
Levenhuk Warranty
Levenhuk products, except for their accessories, carry a 10-year warranty against defects in materials and workmanship. All Levenhuk accessories are warranted to be free of defects in materials and workmanship for six months from the purchase date. The warranty entitles you to the free repair or replacement of the Levenhuk product in any country where a Levenhuk office is located if all the warranty conditions are met.
For further details, please visit: www.levenhuk.com/warranty
If warranty problems arise or if you need assistance in using your product, please contact the local Levenhuk branch.
Discovery
Artisan 1024
Цифров микроскоп
BG
Части на микроскопа
Recalibration (Ricalibrazione)
Measurements (Misure)
The original Levenhuk cleaning accessories

Levenhuk Cleaning Pen LP10

natural_image
Black levenhuk handheld hairdryer tool with trigger handle and plastic clip (no visible text or symbols)Removes dust with a brush The soft tip is treated with a special cleaning fluid that removes greasy stains Does not damage optical coatings of the lenses Leaves no smudges or stains
© 2022 Discovery or its subsidiaries and affiliates. Discovery and related logos are trademarks of Discovery or its subsidiaries and affiliates, used under license. All rights reserved. Discovery.com
levenhuk.com
Levenhuk Inc. (USA): 928 E 124th Ave. Ste D, Tampa, FL 33612, USA, +1 813 468-3001, contact_us@levenhuk.com Levenhuk Optics s.r.o. (Europe): V Chotejně 700/7, 102 00 Prague 102, Czech Republic, +420 737-004-919, sales-info@levenhuk.cz Levenhuk® is a registered trademark of Levenhuk, Inc. © 2006–2022 Levenhuk, Inc. All rights reserved. 20220322

discovery+
- Discovery Artisan 1024
- Digital Microscope
- Discovery
- Artisan 1024
- EN
- Microscope parts
- Never, under any circumstances, look directly at the Sun, another bright source of light or at a laser through this device, as this may cause PERMANENT RETINAL DAMAGE and may lead to BLINDNESS.
- Microscope assembly
- Display icons
- Capturing an image
- Recording a video
- Playback
- Deleting files
- Protecting files
- Zoom
- Polarizing filter
- Mass storage on PC
- Preview on PC
- Connecting the microscope to a TV-set
- Attaching the tripod
- Display menu
- Resolution
- Capture mode
- Loop recording
- Date Stamp
- Date and time
- TV connection
- Power saving
- Settings reset
- Language
- MicroSD card formatting
- PortableCapture software
- Application menu
- File
- Options
- Capture
- Sequence capture
- Calibration
- Recalibration
- Measurements
- Draw and text
- Specifications
- System requirements
- Care and maintenance
- Battery safety instructions
- Levenhuk Warranty
- BG
- Части на микроскопа
- Recalibration (Ricalibrazione)
- Measurements (Misure)
- Levenhuk Cleaning Pen LP10
- levenhuk.com
Brand : Discovery
Model : Artisan 1024
Category : Microscope