
MC-SB53K - Vacuum Cleaner PANASONIC - Free user manual and instructions
Find the device manual for free MC-SB53K PANASONIC in PDF.


| Product Type | Canister Vacuum Cleaner |
| Brand | Panasonic |
| Model | MC-SB53K |
| Power Consumption | 1000 W |
| Dust Capacity | 1.0 L |
| Filtration System | Washable HEPA filter |
| Suction Control | Variable (manual or electronic) |
| Cord Length | 5.0 m |
| Weight | 4.5 kg |
| Dimensions (W x D x H) | 300 x 250 x 400 mm |
| Noise Level | 72 dB |
| Bagless Operation | Yes (cyclonic technology) |
| Automatic Cord Rewind | Yes |
| Attachments Included | Crevice tool, dusting brush, upholstery tool |
| Floor Modes | Carpet and hard floor |
| Safety Features | Overheat protection |
| Maintenance | Regularly empty dust cup and wash filter |
| Spare Parts Availability | Filter and brush roll available |
| Energy Class | A |
Frequently Asked Questions - MC-SB53K PANASONIC
User questions about MC-SB53K PANASONIC
0 question about this device. Answer the ones you know or ask your own.
Ask a new question about this device
Download the instructions for your Vacuum Cleaner in PDF format for free! Find your manual MC-SB53K - PANASONIC and take your electronic device back in hand. On this page are published all the documents necessary for the use of your device. MC-SB53K by PANASONIC.
USER MANUAL MC-SB53K PANASONIC
natural_image
3D rendering of a vacuum cleaner with motion lines, no text or symbols visibleOperating Instructions Rechargeable Vacuum Cleaner
(Domestic use)
使用說明書
充電式吸塵機
(家用型)
Operating Instructions
Rechargeable Vacuum Cleaner (Domestic use)
Model No. MC-SB53K
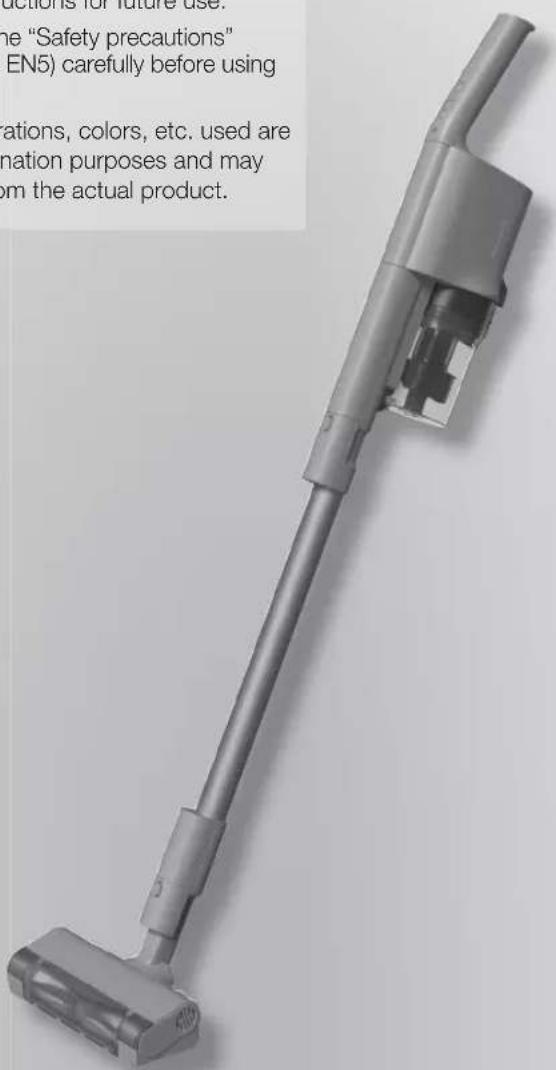
Thank you for purchasing this Panasonic product.
Please read these instructions carefully before using this product, and save this operating instructions for future use.
Please read the "Safety precautions" (Pages EN4 to EN5) carefully before using the product.
■ Photos, illustrations, colors, etc. used are used for explanation purposes and may slightly vary from the actual product.

: This symbol means indoor use only.
This appliance contains battery that is only replaceable by skilled persons.
Table of Contents
EN4 | Safety Precautions
EN6 Notes on Use
EN6 | Part Names
EN8 | Charging
EN10 | Vacuuming
EN14 Empty the dust box
EN14 | Maintenance
EN18 Troubleshooting
EN21 Product Disposal
EN22 | Specifications
Safety Precautions
Please observe all instructions
This section describes the safety precautions that must be observed in order to prevent personal injury and/or property damage.
The levels of danger and damage that may result when the device is used incorrectly are classified and indicated as shown below.
■ The following symbols indicate what you must observe.

DANGER
Indicates high risk of serious injury or death.

Indicates actions which are prohibited.

WARNING
Indicates risk of serious injury or death.

Indicates actions which must be enforced.

CAUTION
Indicates risk of injury or property damage.

DANGER
Battery (Rechargeable lithium ion battery)

Do not mishandle
● Do not use for other than MC-SB53K
- Do not use batteries or adapters other than genuine rechargeable lithium-ion batteries and charging adapters
(Overcurrent may cause fluid leakage, overheating or explosion)
- Do not dispose of the battery in a fire or expose it to heat
- Do not charge, use or place in places with high temperatures, including near fire or in hot weather (Danger of fluid leakage, overheating, ignition or explosion)
- Do not pierce with nails or subject to shock. Do not disassemble or alter
- Do not expose to water or other liquids (Danger of fluid leakage, overheating, ignition or electric shock)
- Do not short-circuit by allowing metals or other materials to come into contact with the terminals
- Do not transport or store with metal objects such as necklaces or hairpins (Short-circuit may cause fluid leakage, overheating or ignition)
■ Main unit and accessories

Do not disassemble, repair or modify
(Danger of electric shock or fire)

Do not touch the floor nozzle's agitator
Agitator (brush)
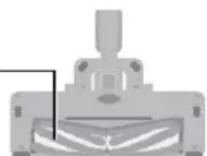
(There is a risk of getting your fingers caught and injured)
▶ In particular, pay attention to children.

WARNING

Do not suck up flammables or burning objects
(Danger of explosion or fire)
Cigarettes, copier toner, kerosene, thinner, etc.
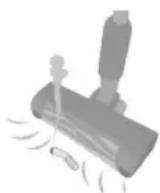

Do not mishandle
- Do not plug or unplug the charging adapter with wet hands (Danger of electric shock)
- Do not damage the charging adapter (Do not let it get tangled up in the floor nozzle's agitator, damage it, modify it, get it near heating appliances, bend it, twist it, nor forcibly pull on it, also do not put heavy objects on it, nor use it with it bundled up, etc.) (Failure to do so may lead to electric shock or ignition due to short-circuit) → For repairs, consult your retailer.
- Do not overload the outlet or wiring device (Exceeding the rated value owing to too many connected plugs and the like may lead to fire due to heat generation)
- Do not use the charging adapter to charge rechargeable batteries of other than this product or non-rechargeable batteries (Doing so may lead to battery leakage, heat generation or explosion due to excess current)
- Do not use a damaged charging adapter (Doing so may lead to fire due to heat generation or ignition)
- Do not short-circuit the main unit connector or charging adapter plug with a metallic object. (Short-circuit may cause fluid leakage, overheating or ignition)

Use the charging adapter correctly
- Insert fully into the socket
(Failure to do so may lead to electric shock or fire due to heat generation)
● The plug must be removed from the socket outlet before cleaning or maintaining the appliance (Danger of electric shock)
● Regularly wipe off dust with a dry cloth (Dust gathered can lead to poor insulation due to moisture, which can lead to fire)
! WARNING
Battery (Rechargeable lithium ion battery)

Do not touch the battery with wet hands (Danger of overheating, ignition or electric shock)

If battery liquid gets into your eyes, immediately wash with clean water (Do not rub your eyes)
(Danger of blindness)
→ Seek medical attention immediately.

If the battery pack is leaking, place the battery in a sealed plastic bag and recycle of safely according to regulations of your residential area
(Liquid may contact resulting in skin irritation or injuries)

For the purposes of recharging the battery, only use the detachable supply unit provided with this appliance
Charging adapter Model No. → See P.EN22
CAUTION
Battery (Rechargeable lithium ion battery)

Do not place items on its top, or place it where you can drop it easily
(Danger of overheating, ignition, electric shock or injuries)

If the battery leaks and the fluid gets onto your skin or clothes, wash carefully with clean water
(Danger of skin irritation or injuries)

Store the main unit and the batteries in a clean, dry place
(Danger of overheating, ignition or electric shock)

The battery must be removed from the appliance before it is scrapped (P. EN21)
(Danger of ignition, electric shock or accidents)

Avoid dropping, impacting or wetting
(Danger of overheating, ignition or electric shock)

If the cord is damaged, you need to replace the charging adapter to avoid danger
(It may cause an electric shock or fire caused by short circuit)

This appliance is not intended for use by persons (including children) with reduced physical, sensory or mental capabilities, or lack of experience and knowledge, unless they have been given supervision or instruction concerning use of the appliance by a person responsible for their safety. Children should be supervised to ensure that they do not play with the appliance
(It may cause a burn, injury or electric shock)

In the event of an anomaly or failure, stop using immediately and unplug the charging adapter
(Failure to do so may lead to smoke generation, ignition or electric shock)
Examples of anomalies and failures
- Pressing the operation switch does not start the stick cleaner
- Moving the charging adapter turns on and off the battery status indicator lamp
- The stick cleaner makes an abnormal noise when used
- The main unit deforms and/or becomes abnormally hot
• A burning "smell" comes out of the main unit
→ Immediately request your retailer for inspection or repairs.
■ Main unit and accessories
Do not mishandle
- Do not overthrow the main unit
● Do not drag, roll or drop the main unit
- If the floor nozzle's raised fabric, roller, etc. are worn, or foreign matter such as sand or pebbles is adhering on them, do not use them like that
→ Check the unit before use, and if there is wearing, consult the place of purchase.
(This can cause scratching to the floor surface)
- Do not put metals on the contacts of the main unit, extension wand, etc.
Contacts
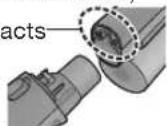
- Do not pull the cord when unplugging the charging adapter (Failure to do so may lead to electric shock or ignition due to short-circuit)
Do not allow near fire
(The exhaust may make the flame bigger increasing the risk of fire)
Do not wash it with water (excludes the accessories and parts that can be washed with water), nor use it in bathrooms
(Danger of electric shock or fire)
Do not operate with the nozzle cover removed
(There is a risk of getting your fingers caught and injured)
Be sure to turn off the operation switch when leaning the stick cleaner against walls, etc.
(There is a risk of injury, or the floor getting damaged due to the main unit falling over)
For long-term use
Do not use for business or other purpose than vacuuming.
■ Do not use to suck up the following or similar things
(This can cause malfunctions and odors)
• Chemical dehumidifiers
• Large amounts of a powder (such as the powder inside a fire extinguisher)
• Water and other liquids
• Things with pet excrement and the like
• Glass, pins, needles, toothpicks
- Long strings
- Damp materials
• Carpet fringes (tassels)
- Things that easily block the suction port (such as stockings)
■Do not vacuum a place with large amounts of sand, sand for pets or pebbles and the like
(This can cause malfunctions)
■ Do not vacuum with the tips of the main unit or extension wand
(This can cause poor contact and damage due to the wearing of the tips, etc.)
→Use the telescopic 2-way nozzle, etc. (P. EN13)
■Do not use for long periods of time with the suction port blocked
(This can cause deformation due to overheating)
■Do not block the exhaust vent
(This can cause deformation due to overheating)
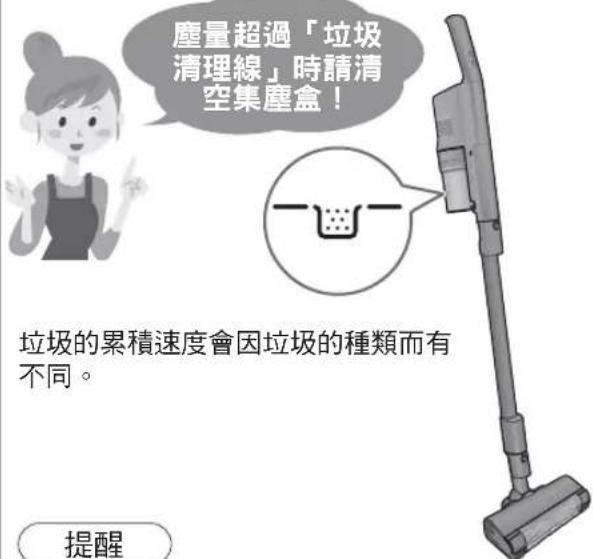
Do not vacuum up large debris, nor vacuum when the dust level MAX line is exceeded
(This can cause clogging in the intake passage, extension wand, and floor nozzles, etc.)
→ Remove large debris such as candy wrappers and tissue papers, etc. then vacuum. Dispose of the debris, before the dust level MAX line is exceeded.
When removing the clogged up debris, refer to "Troubleshooting" (P. EN18).

After vacuuming, check the floor nozzle's underside!
If any debris is entangled, or stuffed in, clear it out. (P. EN16)
To avoid overheating the motor and/or battery (protection device)
Continuing operation under the following conditions triggers the protection device which will stop and disable the stick cleaner. (P. EN18, EN19)
• Use with operation lamps (brue and red) flashing at the same time (P. EN14)
- Blocked suction port
- Blocked extension wand and/or nozzle
• Leaving the agitator (brush) in the same place while it is rotating
• Letting the agitator (brush) chew up foreign objects
- Operating it on HIGH in places where there are high temperatures
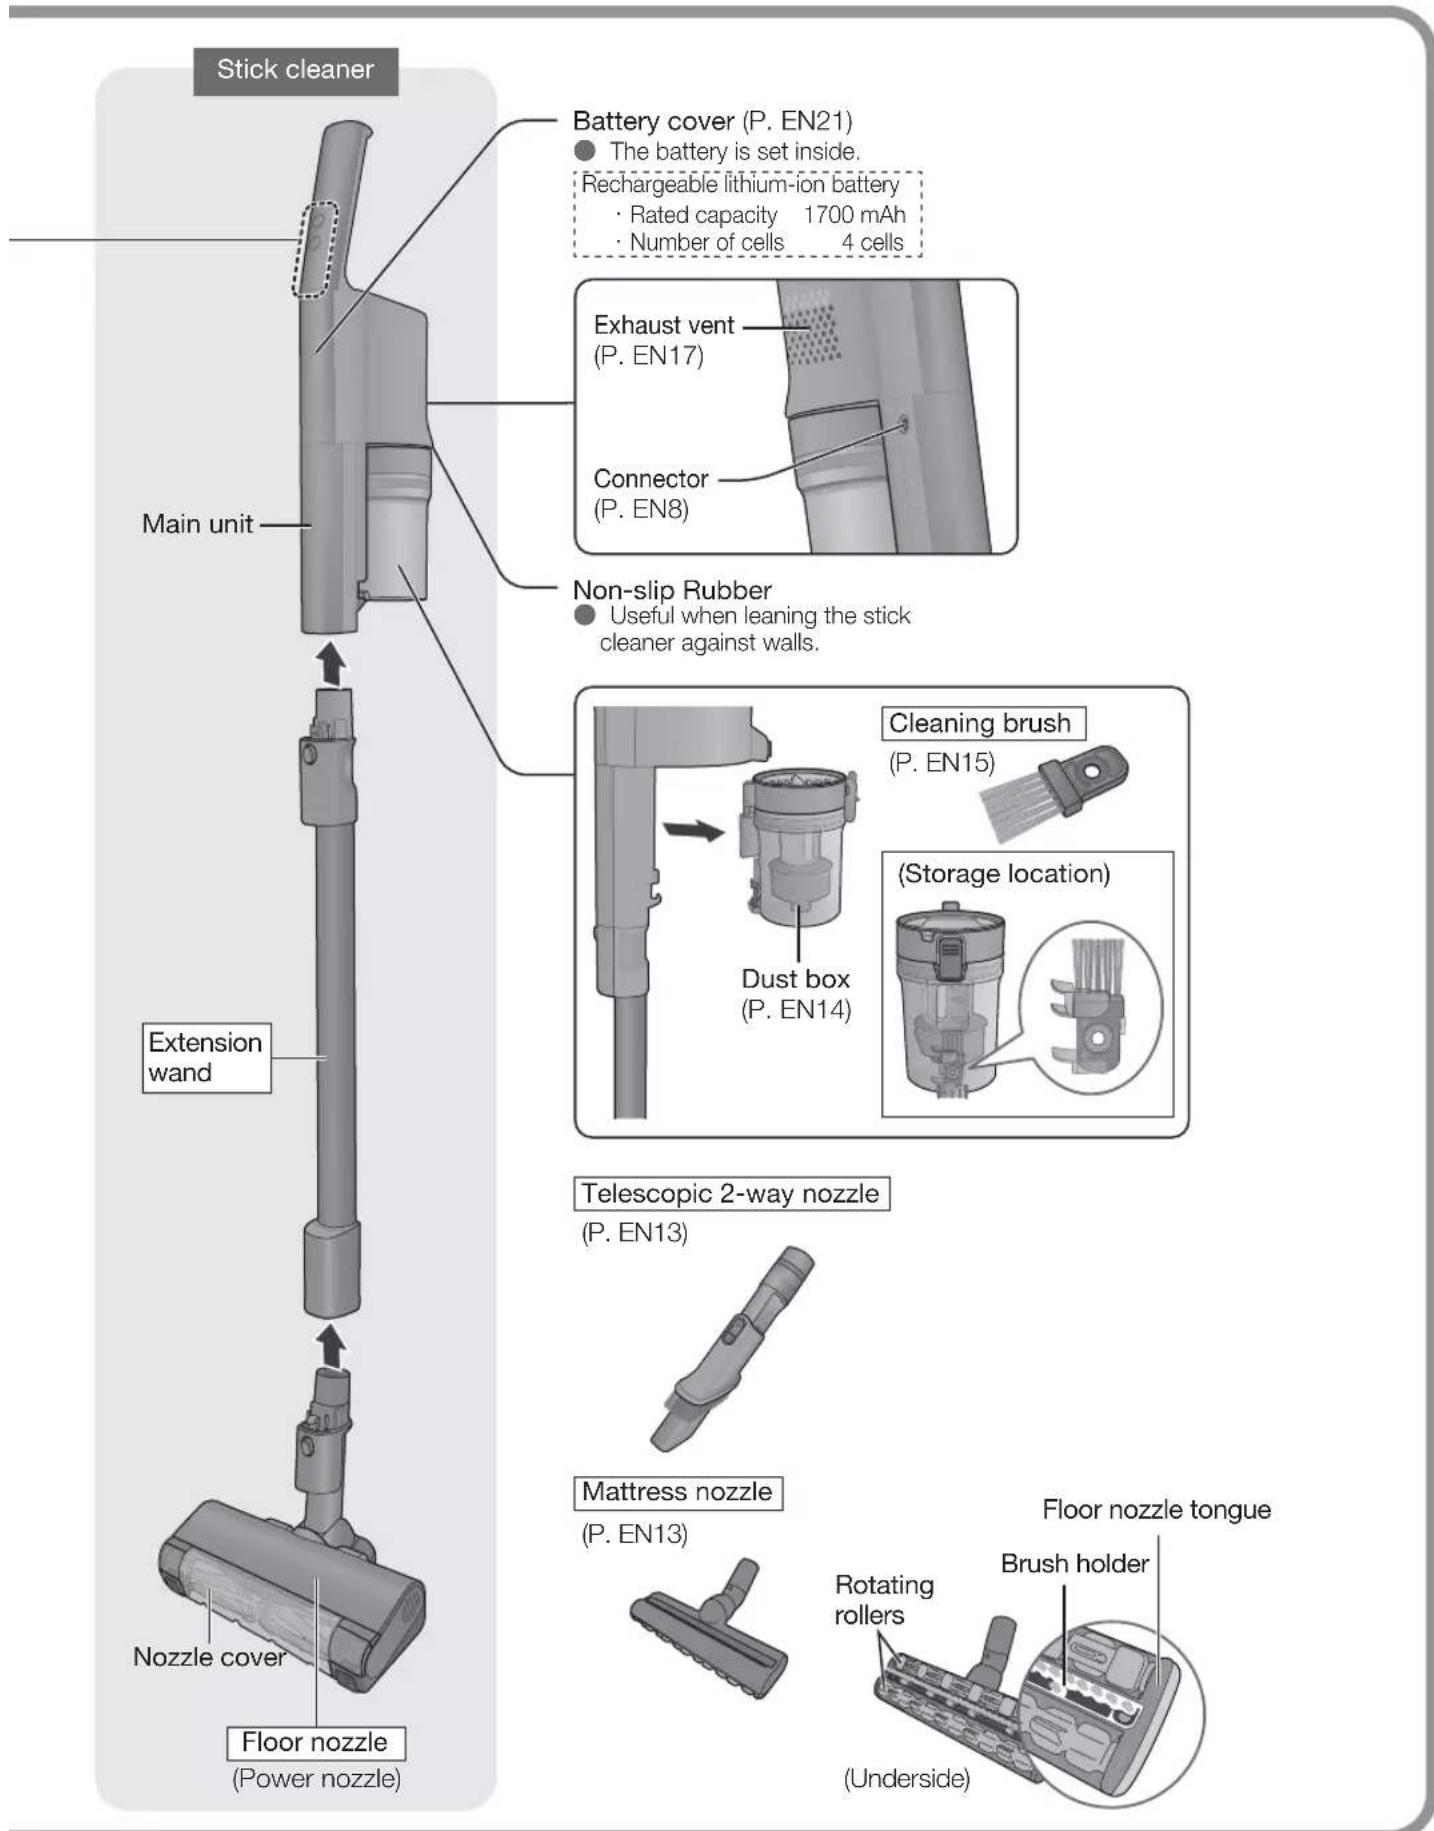
Check the included accessories.
Parts enclosed in are included accessories.
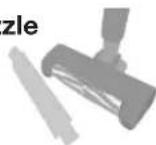
(P. EN8)
Charging adapter
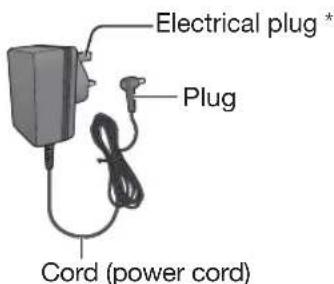
* Electrical plug might be different from illustration.
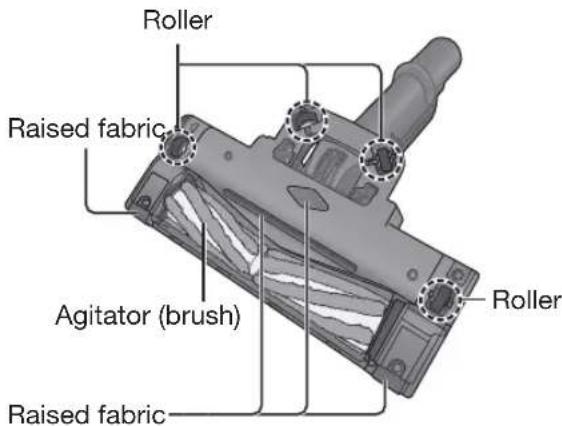
(Underside of the floor nozzle)
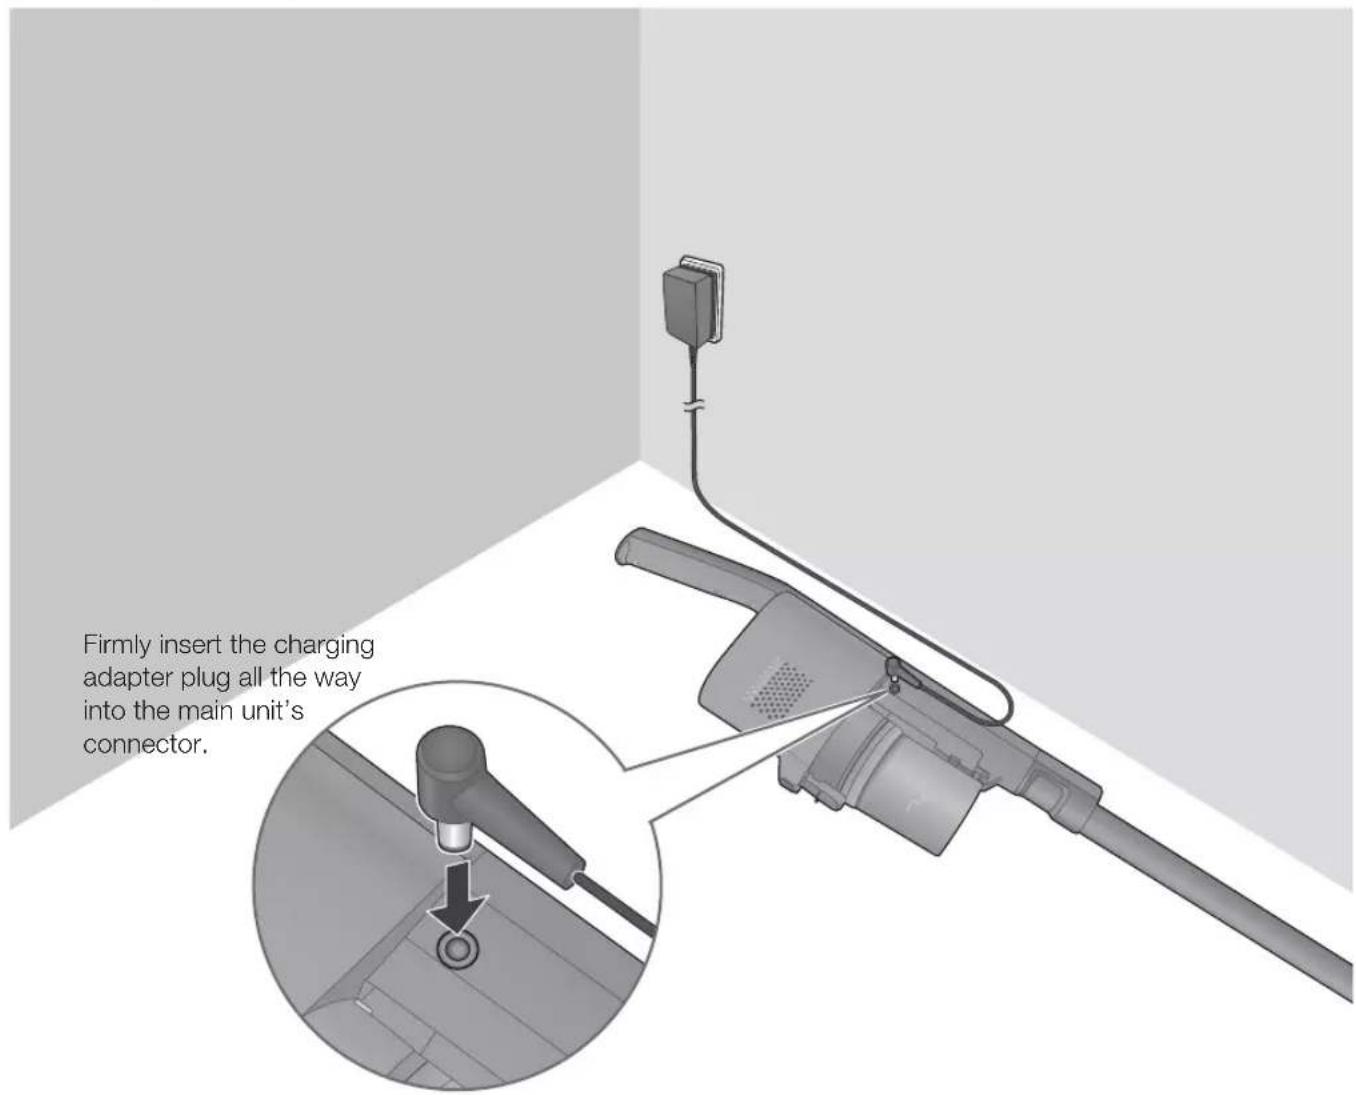
Charging
Charging
The battery is not fully charged at the time of purchase, so please be sure to charge it before use.
(Charging time: Approx. 3.5 hours)
Request
- When unplugging the plug, do not hold onto the cord, instead hold onto the end of the plug.
(This can cause malfunctioning due to the wire getting broken)
How to read the battery status indicator lamp (blue)
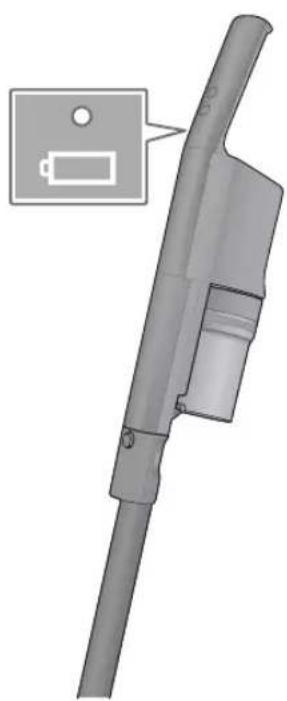
natural_image
3D rendering of a mechanical component with a battery icon and an inset showing a battery symbol (no text or labels present)
Pulsating (blue) It is charging
The battery temperature changes depending on the usage conditions such as the ambient temperatures and usage times, etc. If the battery temperature is high, then it might take longer to charge it because it automatically waits until it reaches a temperature suitable for charging. (The maximum is about 5 hours)

Goes out Charging is completed
It goes out when charging is completed.
There is an abnormality when it quickly flashes (about 0.3 seconds intervals). Refer to "Troubleshooting" (P. EN20).
To help make the battery last longer
- When not using for one month or more, store it fully charged and be sure to charge once a year at the least. (If the battery is stored without any residual power, it might no longer be able to be charged, or the battery's performance or lifespan might be reduced)
- When the stick cleaner stops operating during vacuuming due to a depleted battery, operation may be resumed for a short time by pressing the operation switch again. However, do not operate in this way repeatedly. Doing so shortens the battery service life.
- Be sure to charge the battery in a place with room temperature between 5 °C and 35 °C. The battery cannot be charged correctly in a place with low room temperature, or high temperature such as under direct sunlight. The operating time may become shorter, or the charging time may become longer.
Request
- When the battery status indicator lamp (blue) does not light up, or when it immediately goes out, unplug the charging adapter plug from the main unit, and then plug it in again.
When using it for the first time, if it has not been used for 6 months or longer, since the battery might be over-discharged, its usage time may be short, so be sure to charge it before using it.
If radio and TV are disturbed by electrical interference, then move them away from the charging adapter by 1 m or more.
Note
The main unit and charging adapter become warm during charging, but this is normal.
The operating time varies depending on the battery temperature and service conditions.
The charging adapter consumes about 0.3 W of power even when it is not connected to the main unit.
The charging adapter may make some noise, but this is normal.
The stick cleaner cannot be used during charging. To use, unplug the charging adapter from the main unit.
Vacuuming
1 To start it up
Press

(Operation starts in AUTO mode)
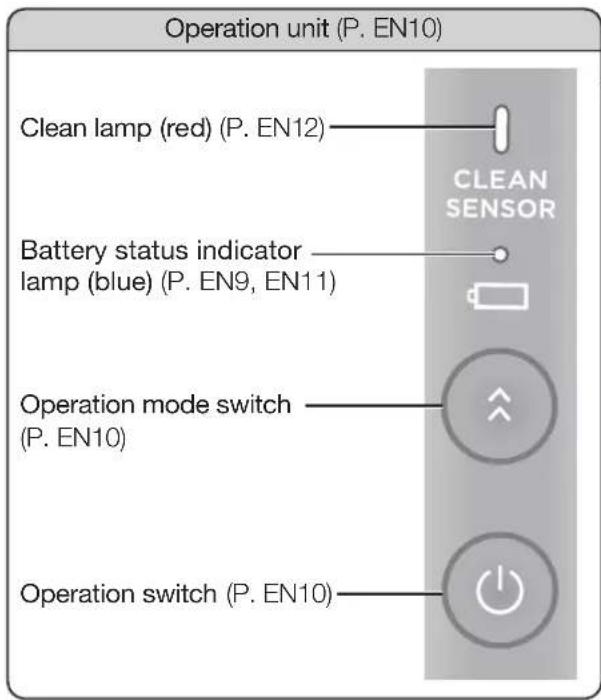
The suction power is automatically adjusted in accordance with the amount of debris on the cleaning surface.
The floor nozzle brushes are rotating (The rotating cannot be stopped)
■To change the strength

The operating mode changes each time the button is pressed.
HIGH AUTO
AUTO : Normal vacuuming
HIGH : To vacuum with high suction power
2 To shut it off
Press

3 Charge the battery after use. (P. EN8)
Request
Do not use force on the nozzle, and move it lightly and slowly along tatami mats and wood flooring.
Move it back and forth on carpets. Debris can easily be taken up by pulling the nozzle towards yourself.
(When vacuuming soft and easy to scratch floors such as cedar, cypress and vinyl floors, etc. and when floor waxes and polishing floor detergents are being used on them, the floors might get scratched up.)
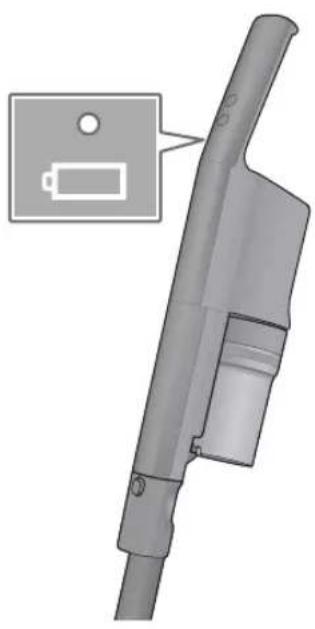
The battery status indicator lamp lights up to let you know!
It indicates the remaining battery level while you are vacuuming.
natural_image
3D model of a handheld electronic device with a battery icon and a close-up inset showing the battery symbol (no text or labels present)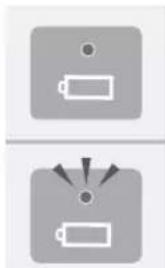
natural_image
Two gray square icons with battery symbols and lightning bolts, no text or labels present.Lights up (blue) There is enough battery power. You can vacuum.
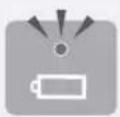
Flashing (blue) The battery power is low. Charge it. (P. EN8)
Note
- If the battery runs out during operation, the over-discharge prevention device will automatically stop the battery.
The clean lamp notifies you by lighting up!
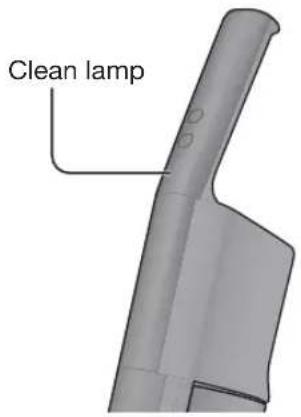
Clean sensor
The clean lamp (red) flashes to let you know it has found dirt you can't see. (It detects very fine house dust, even pollen)
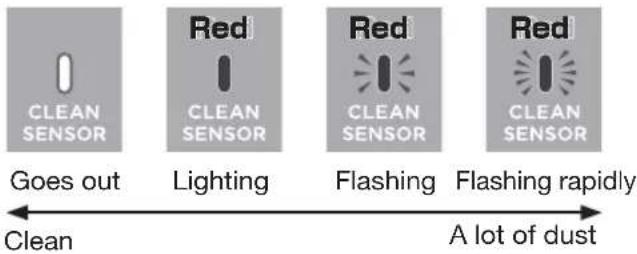
flowchart
graph LR
    A["Clean Sensor"] --> B["Does out"]
    C["Lighting"] --> D["Green Light"]
    E["Flashing"] --> F["Red Flashing"]
    G["Flashing rapidly"] --> H["Red Flashing"]
    style A fill:#f9f,stroke:#333
    style C fill:#f9f,stroke:#333
    style E fill:#f9f,stroke:#333
    style G fill:#f9f,stroke:#333
You are concerned that the clean lamp (red) does not light up / does not go out / lights up too much
● Wipe away any debris or dust that is on the sensor
with a soft cloth, etc. (P. EN17)
- When you are concerned that the lamp lights up too much, set the clean sensor's sensitivity to "Convenient" then use it.
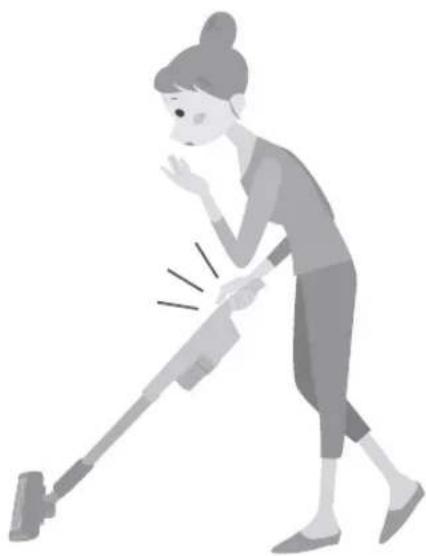
There are infants around, and it is hay fever season... I want to be more careful about vacuuming
- Set the clean sensor's sensitivity to "Careful" then use it.
natural_image
Illustration of a woman using a vacuum cleaner, no text or symbols presentTo change the clean sensor's sensitivity settings
1
While pressing
press

(pressed down)
release, the

for 5 seconds or longer
(you are notified of the current settings)
| Lamp status Sensor sensitivity | ||
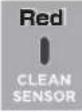 | Lit | NormalFor regular vacuuming(Setting when purchased) |
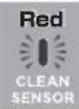 | Rapidly flashes(2 to 3 times per second) | CarefulFor careful vacuumingIncrease the sensitivity, and the lamp (red) sensitively lights up to even a small amount of dust. |
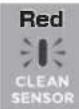 | Slowly flashes(Once per every 2 seconds) | ConvenientThe lamp (red) lights up when something is hard to vacuum upLower the sensitivity, and suppress the lamp lighting up |

2
Press , and select your desired sensitivity
(it switches each time it is pressed)
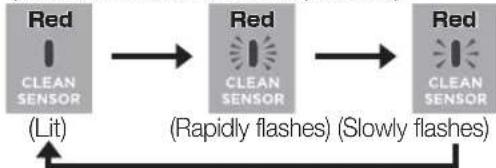
flowchart
graph LR
    A["Red\nCLEAN SENSOR\n(Lit)"] --> B["Red\nCLEAN SENSOR\n(Rapidly flashes)"]
    B --> C["Red\nCLEAN SENSOR\n(Slowly flashes)"]
3
Press (settings completed)
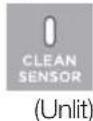
- The settings are stored until they are next changed.
Cleaning Techniques...
Use different nozzles to match the places to be vacuumed.
Request
Do not use on shiny surfaces such as a piano. (Doing so may scratch the surface)
As a handy cleaner
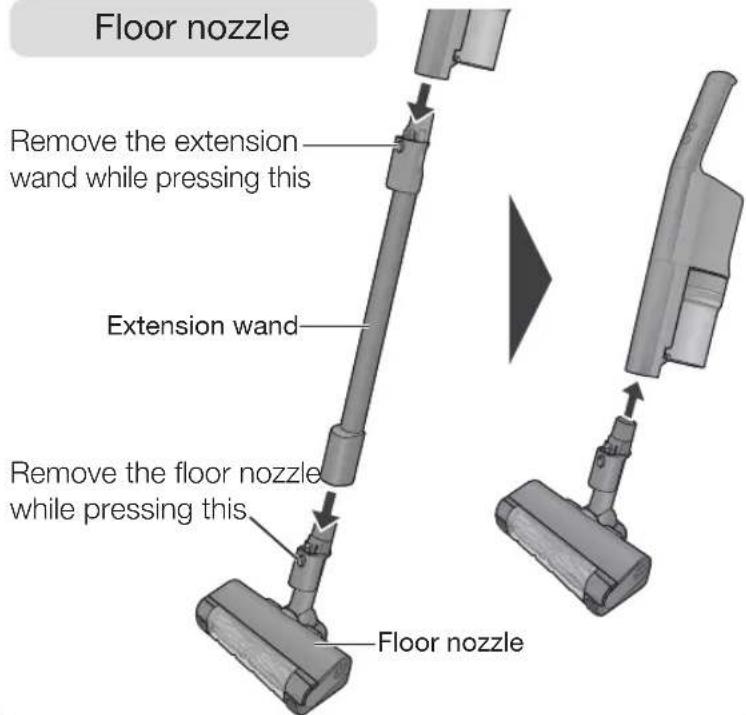
Beat out ticks
Mattress nozzle
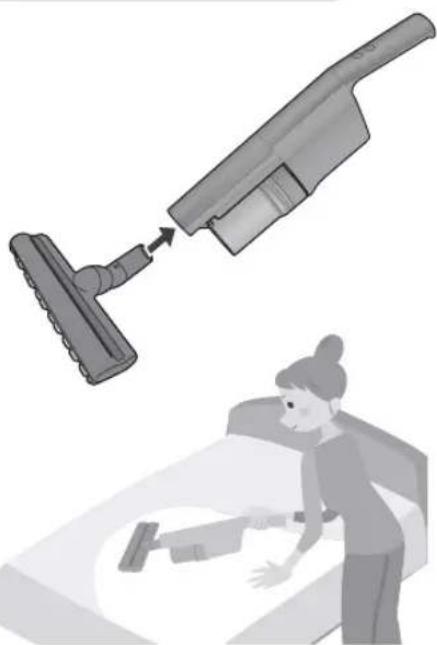
natural_image
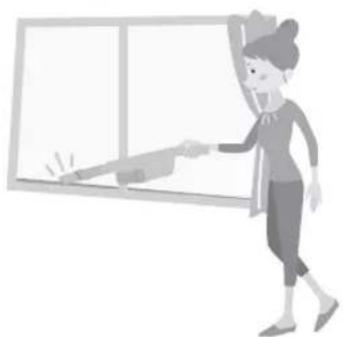
Illustration of a person using a vacuum cleaner to clean a bed (no text or symbols present)For window sashes...
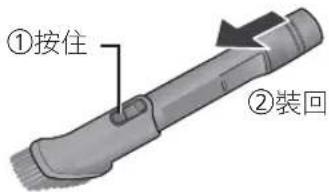
Telescopic 2-way nozzle
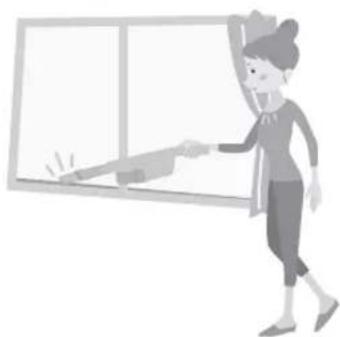
natural_image
Illustration of a person standing next to a blank whiteboard with a hand near the top (no text or symbols)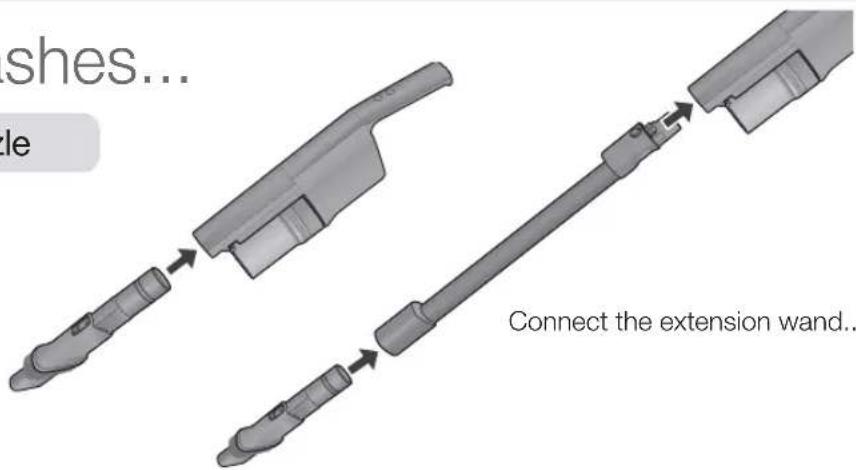
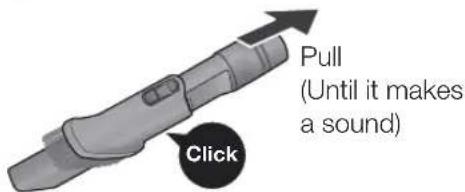
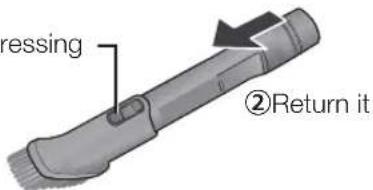
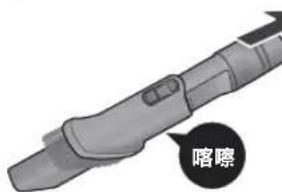
①While pressing this
Empty the dust box
Maintenance
Empty the dust box
Check the Dust Level (─┐)
As a guide, once a week
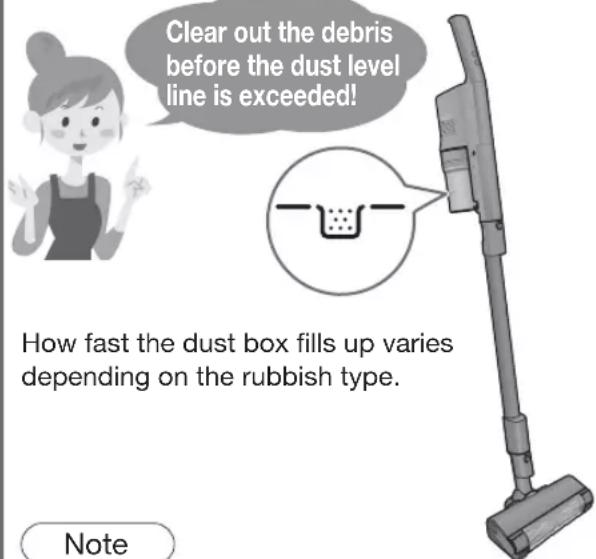
With a new carpet, the dust box is quickly filled up with loose tufts. (Loose tufts will decrease with the number of vacuuming times)
1 Remove the dust box
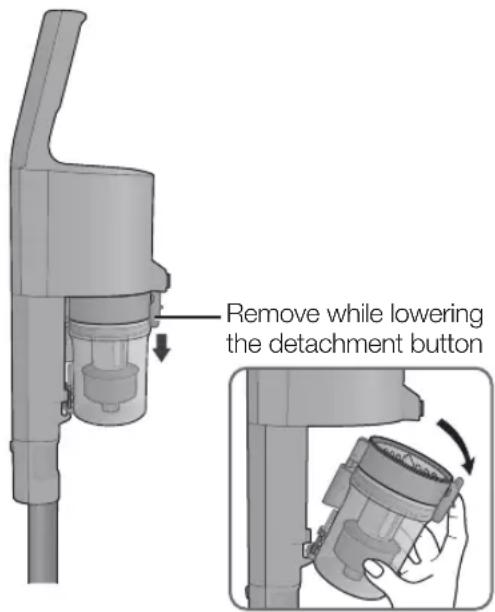
Maintenance (Dust box)
At these times, clean it out (on the right).
■ Even though the debris is thrown away, the suction power does not recover...
When the lamps (blue and red) on the operation unit flash at the same time and the suction stops...

The lamp informs you about the care times (approximate)!
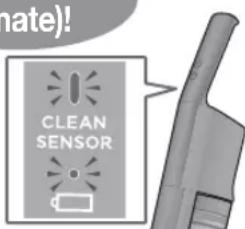
Note
When the situations are as per the following, the lamp might not flashing even if it is filled with debris.
- When there is a lot of pet hair and cotton debris (Directly check how much debris is accumulated)
- At the following times, the lamp might flashing even if there is a little debris.
- When there is a lot of sand and dirt (discard the debris)
- When the extension wand/nozzle is clogged with debris (remove the debris)
- When using the telescopic 2-way nozzle (directly check how much debris is accumulated)
Disassembly
1 Throw away the debris (see above)
2 Lift up the pleat filter to remove it
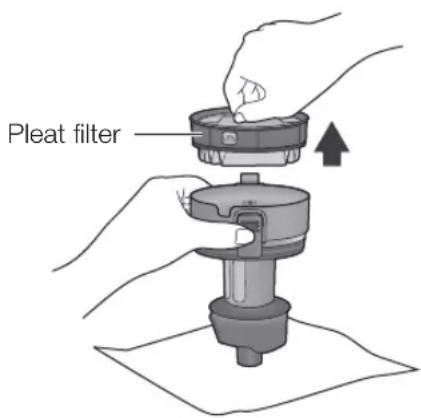
2 Throw away the trash and dust to clean out
1 Remove while pressing the net filter's tabs
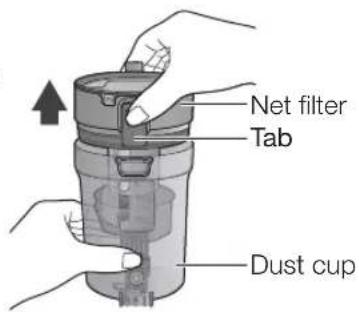
2 Clear out the debris
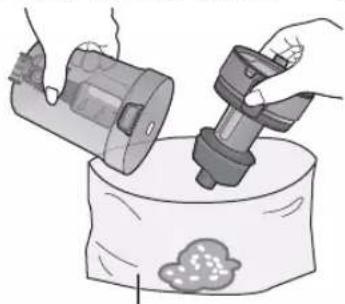
natural_image
Illustration of hands using a tool to press or spread material over a container (no text or symbols visible)Request
If it is hard to get the debris to come out, vibrate the dust cup by lightly tapping on it, etc.
Large garbage bag etc.
If hair, etc. is entangled around it and the debris cannot be removed, then clean it out (dust box).
3 Set the dust box
Firmly press until you hear a "click"
1
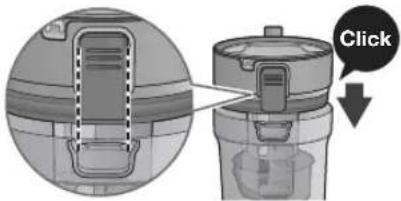
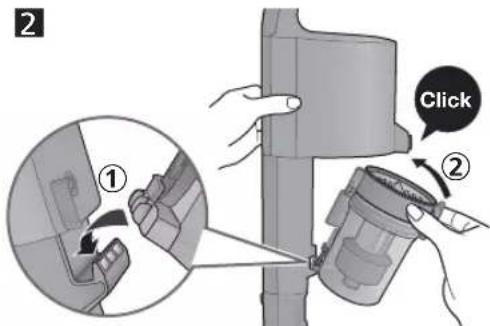
- If the dust box is not securely set in, it will not suck in the debris.
Cleaning
Net filter
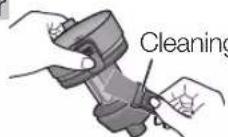
Pleat filter
Cleaning brush
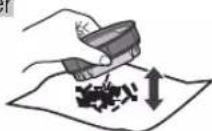
It can also be washed with water when you are concerned about grime
(Dry it sufficiently then put it back in)
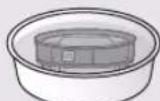
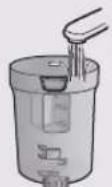
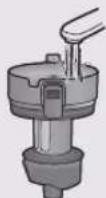
Immerse it in water (about 30 minutes)
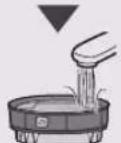
Wash it with running water (Do not rub with a brush, etc.)
Request
Do not use detergent, benzine, thinner, alcohol, etc. (May lead to cracks and discoloration)
Leave it in a well-ventilated place for about 24 hours, and let it thoroughly dry.
(Not doing so can cause it to smell and get clogged up)
Do not expose to hot airflow from a hairdryer and the like. (May lead to deformation and failure)
Assembly
● Install in the reverse sequence of disassembly
1 Set the pleat filter inside as per the illustration
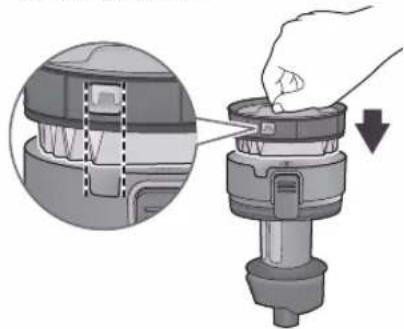
natural_image
Diagram of a mechanical device with a hand inserting a component into a housing, showing internal structure and a downward arrow (no text or symbols present)2 Set the net filter in the dust cup and attach the dust box to the main unit
Maintenance (Continued)
When suction power weakens / When maintenance is required
Be sure to turn off the operation switch and unplug the charging adapter before performing maintenance.
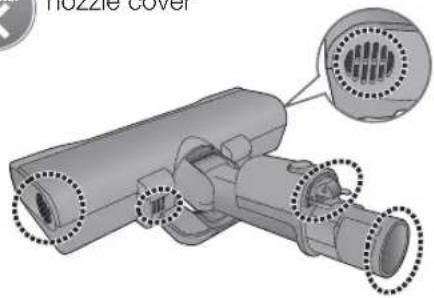
Floor nozzle
Remove rubbish from the area.

Except for the nozzle cover
natural_image
3D mechanical component diagram with no visible text or symbols, showing internal parts and dotted circular annotations (no readable text or symbols)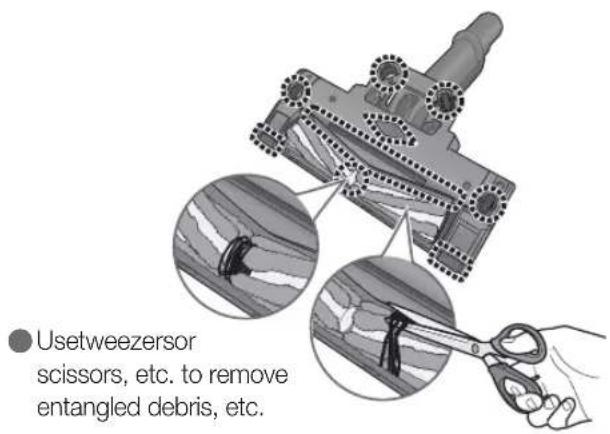
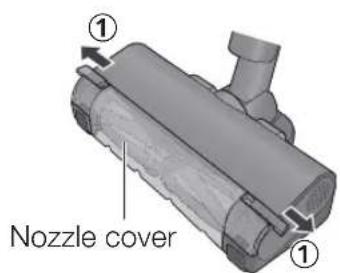
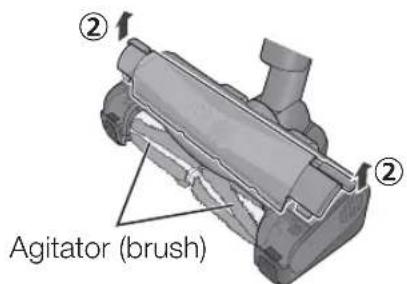
■ When you are concerned about the dirt on the rotating parts (brushes) and nozzle cover
1 Remove the nozzle cover

2 Wipe with a cloth.
● Wring dry
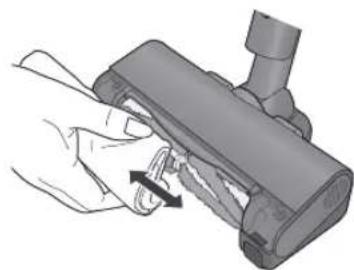
natural_image
Illustration of a hand holding a mechanical component with a tool, no visible text or symbols● Wash the nozzle cover with water
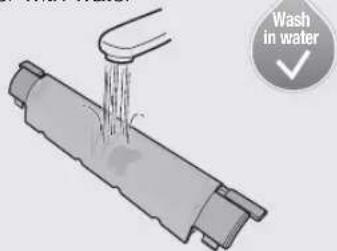
3 Set the nozzle cover in
Fit the nozzle cover's tabs into the recesses (2 places)
Tab Recess
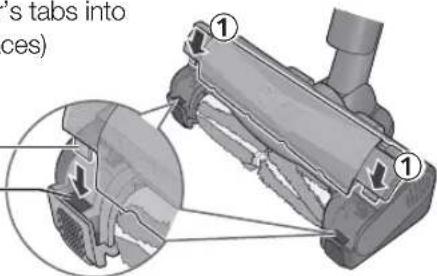

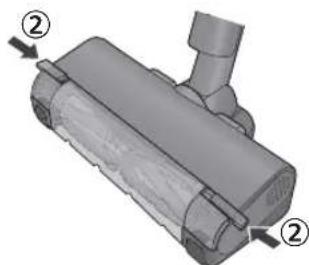
natural_image
3D mechanical component diagram showing a cylindrical housing with two labeled parts (②), no text or symbols present.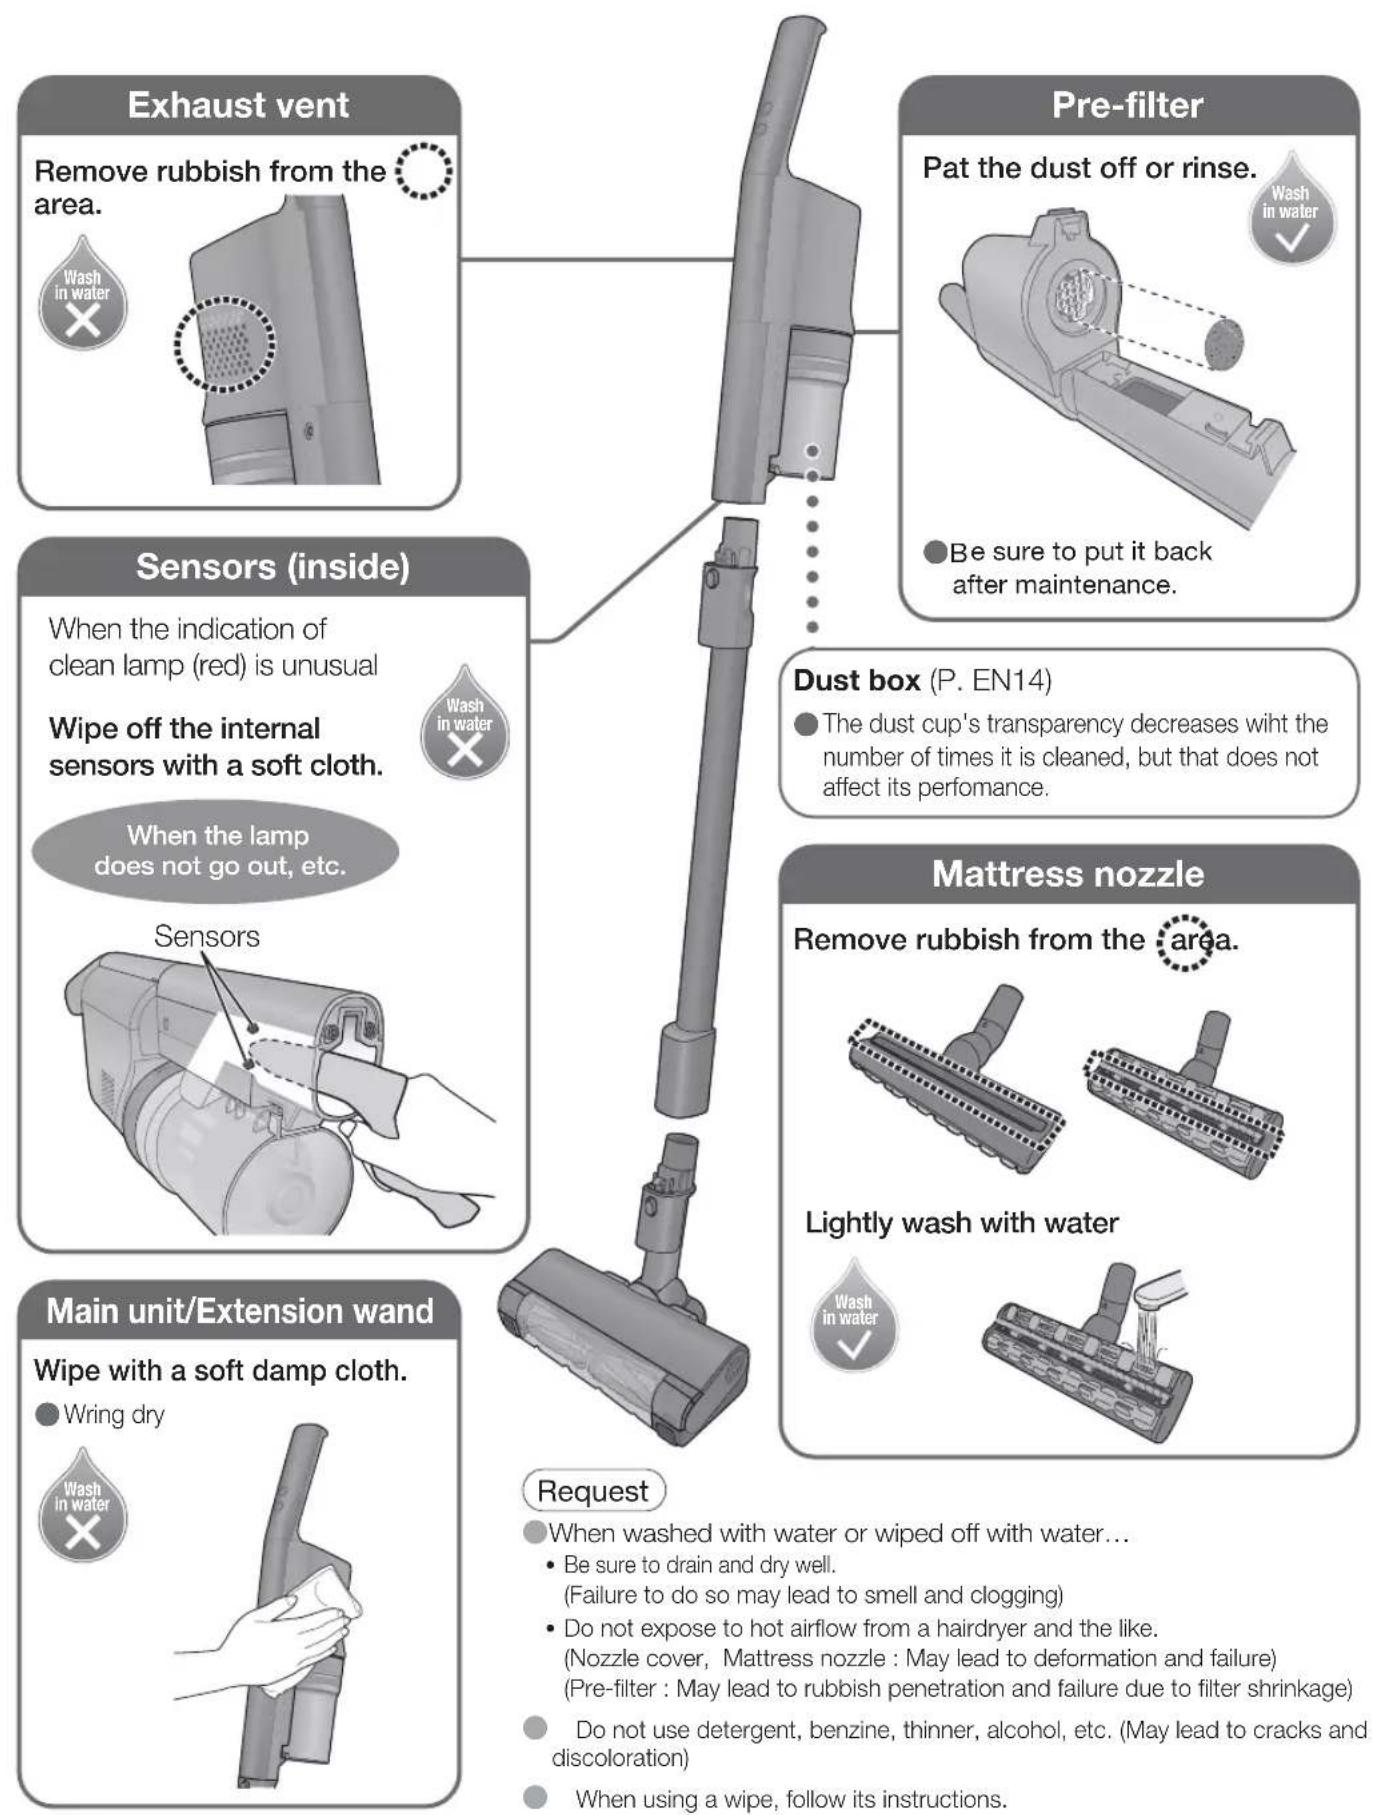
Dust box (P. EN14)
The dust cup's transparency decreases with the number of times it is cleaned, but that does not affect its performance.
Request
When washed with water or wiped off with water...
- Be sure to drain and dry well.
(Failure to do so may lead to smell and clogging) - Do not expose to hot airflow from a hairdryer and the like.
(Nozzle cover, Mattress nozzle: May lead to deformation and failure)
(Pre-filter : May lead to rubbish penetration and failure due to filter shrinkage)
Do not use detergent, benzine, thinner, alcohol, etc. (May lead to cracks and discoloration)
When using a wipe, follow its instructions.
Troubleshooting
Please check the following items before contacting the retailer for repairs.
| Problem Check here | ||
| Operation and suction power | It cannot be operated | ● Is the battery depleted? (P. EN8) |
| ● In order to prevent the motor from overheating, is the safeguard device working?(The lamps (brue and red) on the operation unit lights up at the same time)→ 1Turn off the operation switch2 Wait 5 to 30 minutes (the motor cools down, and the safeguard device is released)3Investigate what caused (P. EN6) the safeguard device to workContinuously operated with a lot of dust accumulated in the dust box→ Throw away the debris in the dust box, and clean it (P. EN14)The extension wand and nozzle are clogged up with debris→ Remove the debrisUsed with foreign matter entwined in the agitator (brush)→ Remove the foreign matter | ||
| The suction power weakens, or it stops operating even though nothing is being done | ||
| The floor nozzle's agitator (brush) stops moving | ● In order to prevent the battery from overheating, is the safeguard device working?(The lamps (brue and red) on the operation unit lights up at the same time)→ 1Turn off the operation switch2 Wait 5 to 30 minutes (the battery cools down, and the safeguard device is released)3Investigate what caused (P. EN6) the safeguard device to workContinuously operated with a lot of dust accumulated in the dust box→ Throw away the debris in the dust box, and clean it (P. EN14)The extension wand and nozzle are clogged up with debris→ Remove the debrisIf it is continually operated in HIGH operation in places where there are high temperatures, the protective device might work, and it might stop operating. | |
| ● Have you been using it so that the floor nozzle fell off?→ Lift the floor nozzle up once, and slowly lower it.Are debris or strings wrapped around, or jamming up the agitator (brush)? (P. EN16)Depending on the floor surface types, such as long-pile carpets, the agitator (brush) might not rotate, or it might slow down. | ||
| The suction power from the floor nozzle is weak | ● Is it full of debris?● Is the dust box clogged up?→ Clean it (P. EN14) | |
| The suction power is weak even in the “HIGH” operating mode | ● Turn off the operation switch, and retry operating it.Is each filter clogged up?→ Clean them (P. EN14, EN17)● Is the dust box securely set in?● Is the protective device working? (P. EN18, EN19)Are the air intake passage, extension wand, and floor nozzle clogged up with debris?→ Remove the clogged up debris with a thin stick, etc. | |
| The suction power weakens while it is being operated | ||
| Clean Lamp (red) | The lamp flashes and lights up even though no debris has been sucked up (not turn off) | ►● Is there any debris or dust on the sensor?→ Maintenance (P. EN17) |
| The lamp does not flash nor light up even though debris was sucked up | ||
| The lamp does not go out easily | ►When the situations are as per the following, the lamp's lighting up frequency will increase.New carpets, long-haired carpets, etc. (detects fluff)Bedding such as futons and blankets, etc. (detects accumulated keratin, dandruff, dead mites, or droppings, etc.)Blankets, etc. (detects fluff)→ While vacuuming, reduce the debris and fluff, and the lighting up frequency will decrease.When it is troublesome, set the sensor's sensitivity to “Convenient” (P. EN12) | |
| Operation lamps (blue and red) at same time | The lamp flashes even though there is very little debris | ● When the situations are as per the following, the lamp flashing, but there are no aberrations.When sand and dirt, etc. are concentratedly sucked in.→ Clean the dust box (P. EN14)When the extension wand and nozzle are clogged with debris→ Remove the debrisWhen using the telescopic 2-way nozzle (P. EN13) |
| The lamp does not flash even though there is a lot of debris | ● When there is a lot of pet hair, and cotton debris, it might not flash, but this is not an aberration.→ Discard the debris in the dust box (P. EN14)● The lamp may not flash correctly during AUTO operation→ Check that it is in HIGH operation | |
| The lamps light up | ● In order to prevent the motor and battery from overheating, is the safeguard device working?→ 1Turn off the operation switch2Wait 5 to 30 minutes (the motor and battery cools down, and the safeguard device is released)3Investigate what caused (P. EN6) the safeguard device to workContinuously operated with a lot of dust accumulated in the dust box→ Throw away the debris in the dust box, and clean it (P. EN14)The extension wand and nozzle are clogged up with debris→ Remove the debris | |
| Noise | The operating sound makes high and loud (“Conk, conk” etc.) noises. | ● Is the net filter and pleat filter clogged up?→ Clean them (P. EN14)● Are the extension wand and nozzle clogged up with debris?● Is the nozzle tip blocked? |
| While it is being used, the operating sounds fluctuate | ● In AUTO operation, the suction force is interlocked with the clean sensor so it is automatically adjusted. This is not an aberration. | |
| Smell | The smell of the debris is coming from the exhaust | ● Are you leaving the vacuum filled with strongly smelling sucked up debris in it?→ If you are concerned about this with repeated operating, dispose of the debris (P. EN14)→ Clean out each filter (P. EN14, EN17) |
Troubleshooting (Continued)
Please check the following items before contacting the retailer for repairs.
| Problem Check here | ||
| Charging | The battery status indicator lamp (blue) does not come on | ● Is the charging adapter firmly plugged into the outlet?● I s the charging adapter plug securely inserted into the main unit's connector? |
| The battery status indicator lamp (blue) does not go out (The charging times are long) | ● The charging times might take up to 5 hours at the most depending on the usage conditions such as the ambient temperatures and usage times.● If the battery status indicator lamp does not go out even though the battery is charged for 5 hours or more, then since the device can be considered to be defective, consult the retailer where it was purchased. | |
| The battery status indicator lamp quickly flashes (about 0.3 second intervals) | ● Is the charging adapter plug securely inserted into the main unit's connector?→ Unplug the plug from the main unit, and reinsert it● Is there any foreign matter on the main unit's connector, or the charging adapter plug?→ Remove the foreign matter● Was the battery charged in places where the ambient temperatures are high or low?→ Charge it in places where the room temperatures are 5 °C to 35 °C (P. EN9)● Is the dedicated charging adapter being used?● Is the battery set in? (P. EN21) | |
| The operating times are short even when it is charged up | ● Even if the battery level indicator lamp (blue) is pulsating, it might not be charged. (It is inoperable)If the battery temperature is high, such as immediately after it has been operated, it will not be charged even if the battery level indicator lamp (blue) is pulsating since it automatically goes into standby for charging until a temperature suitable for charging is reached.→ Charge it until the battery status indicator lamp (blue) goes out● Was the battery charged in places where the ambient temperatures are high or low?→ Charge it in places where the room temperatures are 5 °C to 35 °C (P. EN9)● When the usage times are significantly shortened even though it is being correctly charged, the battery's lifespan is over.(The battery's lifespan varies depending on the usage conditions such as ambient temperatures and usage times)→ Replace the battery (P. EN21) | |
| If anomaly persists even after checking | ● Bring the product (main unit, extension wand, floor nozzle, battery and charging adapter) along with the warranty to your retailer. | |
Product Disposal
The rechargeable lithium-ion battery in this product is a consumable item.
When the usage times are still obviously getting shorter right away, even after it has been correctly charged, then the battery has probably reached the end of its life span.
If the battery needs to be replaced, please contact your dealer or a Panasonic affiliated service center.
In order to avoid improper installation which will cause product malfunctions or generate hazards, please do not replace the battery by yourself.
About the rechargeable lithium-ion battery
The usable time reduces as you continue to repeatedly use the unit. The life of the battery depends on factors such as the ambient temperature, and amount of time it is used, and the length of charge/discharge cycles will become shorter depending on usage conditions.
The used battery should not be disassembled and disposed it together with normal household waste. Please take it to appropriate collection points in accordance with your municipal rules. For more information, contact with the retailer or your local authorities in charge of waste management.
Handling of used batteries
●Insulate the terminals with cellophane tape or vinyl tape, etc.
●Do not disassemble the battery.
Request
Before removing the battery, operate the main unit repeatedly until the battery is discharged completely.
The appliance must be disconnected from the supply mains when removing the battery.
● The battery is to be disposed of safely.
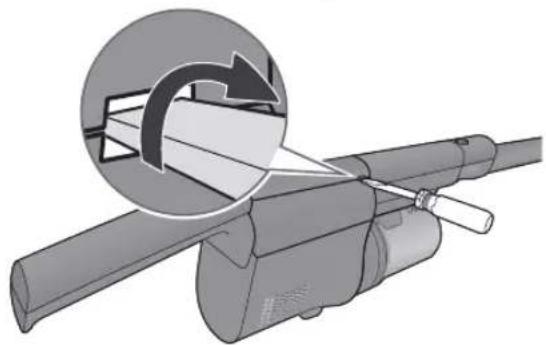
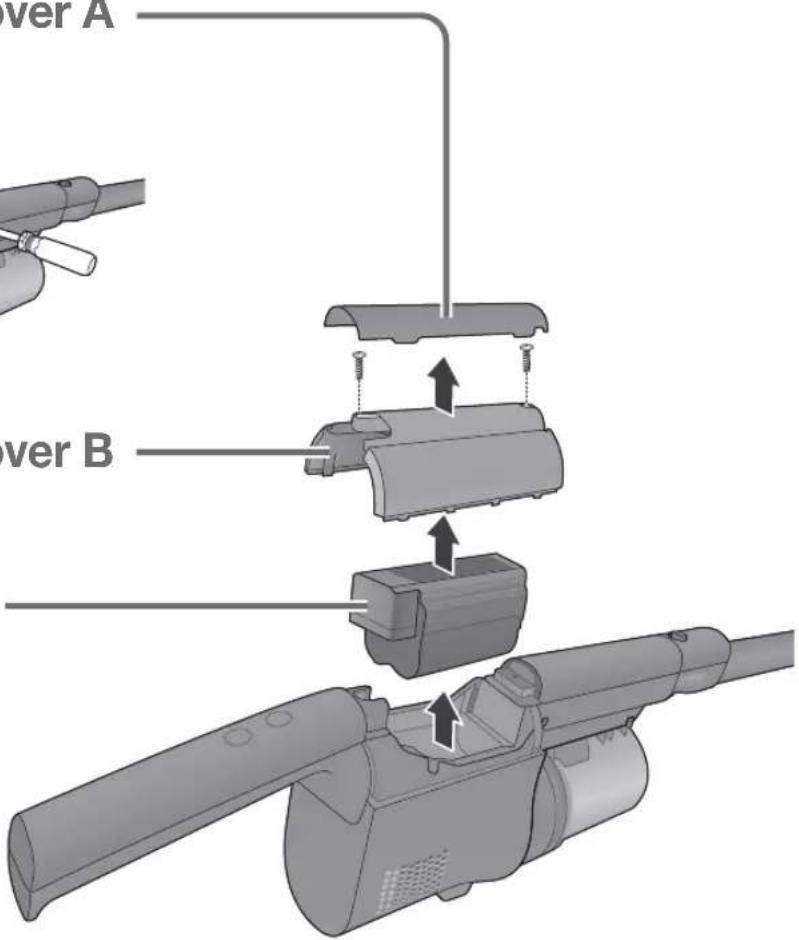
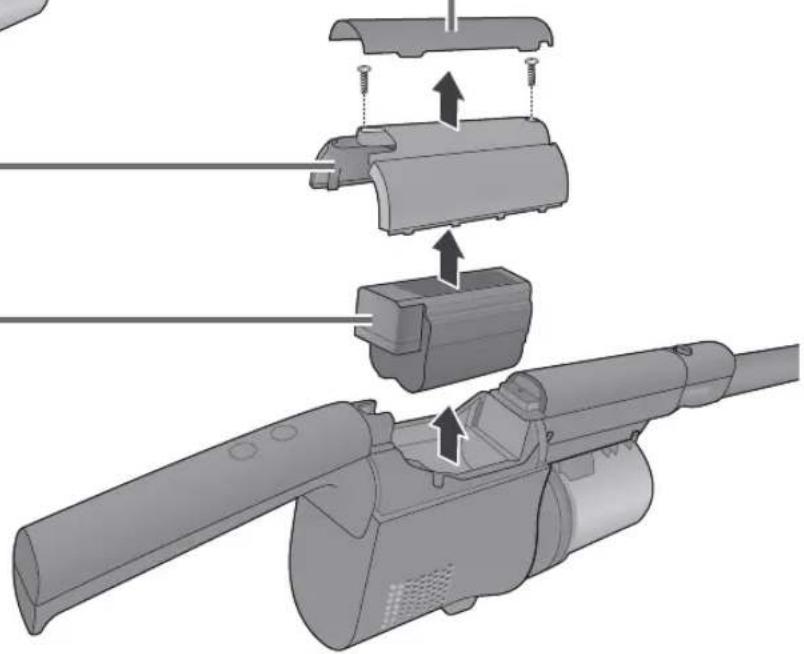
1 Remove the battery cover A
natural_image
Diagram of a mechanical device with a circular inset showing internal components (no text or symbols)2 Remove the battery cover B
3 Take the battery out
Specifications
| Dimensions | (Stick cleaner) W 213 mm × D 178 mm × H 1102 mm | ||||
| (Main unit) W 88 mm × D 162 mm × H 431 mm | |||||
| Weight | 1.5 kg (Stick cleaner) | ||||
| 0.9 kg (Main unit,) | |||||
| Dust capacity | 0.15 L (Up to the dust level line) | ||||
| 0.3 L (Maximum) | |||||
| Battery used | Rechargeable lithium-ion batteryModel No. AVA97V-1AH | Nominal voltage | 14.4 V = | ||
| Rated capacity | 1700 mAh | ||||
| Number of cells 4 cells | |||||
| Continuous operating time* | AUTO | Approximately 10 minutes - Approximately 15 minutes (When using the floor nozzle) | |||
| Approximately 15 minutes - Approximately 30 minutes(When using the telescopic 2-way nozzle or the mattress nozzle) | |||||
| HIGH | Approximately 6 minutes (When using the floor nozzle) | ||||
| Charging adapter | Model No. | AVA61V-1AH (For Hong Kong, Malaysia)AVA61V-1AF (For Philippines)AVA61V-1A1 (For Vietnam) | |||
| Input | 100-240 V ~ 50-60 Hz 0.35-0.2 A(Power consumption : Charging - Approx. 11 W, Removed from main unit - Approx. 0.3 W) | ||||
| Output 16.5 V | 0.7 A= | ||||
| Charging time | Approx. 3.5 hours. (When charged from empty at ambient temperature of 20 °C) | ||||
| Cord length 1.5 m | |||||
| Accessories | Extension wand (1)Floor nozzle (1)Charging adapter (1)Telescopic 2-way nozzle (1)Mattress nozzle (1)Cleaning brush (1) | ||||
* Fully charged, initial capacity of battery/at ambient temperature of 20 °C
Charging Information for battery pack
| Nominal Specifications | ||
| Item Specifications Remark | ||
| Charging Current 0.7 A – | ||
| Charging Voltage 16.54 V | – | |
| Charging cut current | 100 mA | – |
| Ambient (Charge) | 0 – 45 °C | – |
| Charge Limits | ||
| Battery Pack Model | Maximum Charge Currents, A | Maximum Charge Voltage, V |
| AVA97V-1AH | 1.1 A | 16.7 V |
使用說明書
充電式吸塵機(家用型)
型號
MC-SB53K
natural_image
3D rendering of a mechanical component with a close-up inset showing a battery symbol (no text or labels)
閃爍(藍色)
充電中
natural_image
3D model of a mechanical component with a highlighted battery symbol (no text or labels)
點亮(藍色)
電力足夠。可以清掃。
閃爍(藍色)
電量低,請充電。(P.HK8)
提醒
natural_image
Illustration of a woman using a vacuum cleaner, no text or symbols present如要變更微塵感應器的敏感度設定
1
按住

時按下

(在按下的狀態下)
放開

,持續按下

5秒以上
(顯示目前的設定)
natural_image
Illustration of a person using a vacuum cleaner to clean a bed (no text or symbols present)打掃窗框…
伸縮兩用吸嘴
natural_image
Illustration of a person standing next to a blank whiteboard with a hand pointing at it (no text or symbols visible)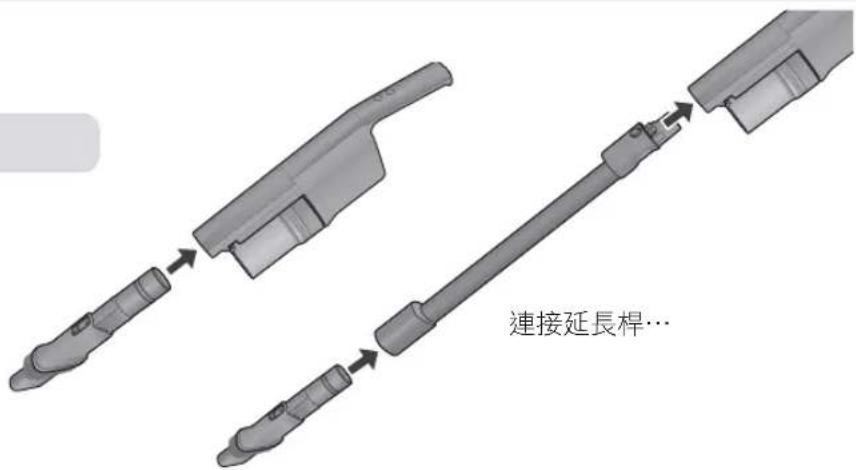
<延長毛刷> <縮短毛刷>
往外拉
(直到發出聲響)
清空集塵盒 保養維護
清空集塵盒
檢查垃圾清理線(厂囲一
建議一週一次
提醒
natural_image
Illustration of a hand pouring liquid into a container with a cloth (no text or symbols)要求
natural_image
Two mechanical components with handles and internal structures, no visible text or symbols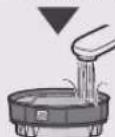
natural_image
Diagram of a mechanical component being inserted into a housing, showing internal structure and a downward arrow (no text or symbols)natural_image
Illustration of a hand holding a mechanical component with a tool, no text or symbols present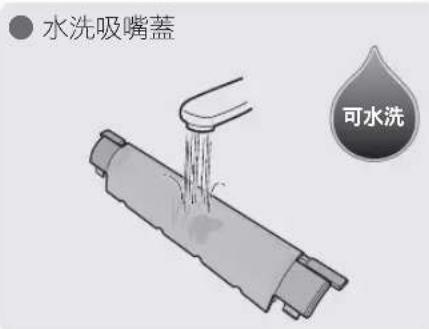
natural_image
3D mechanical component diagram showing a cylindrical housing with two labeled parts (②), no text or symbols present.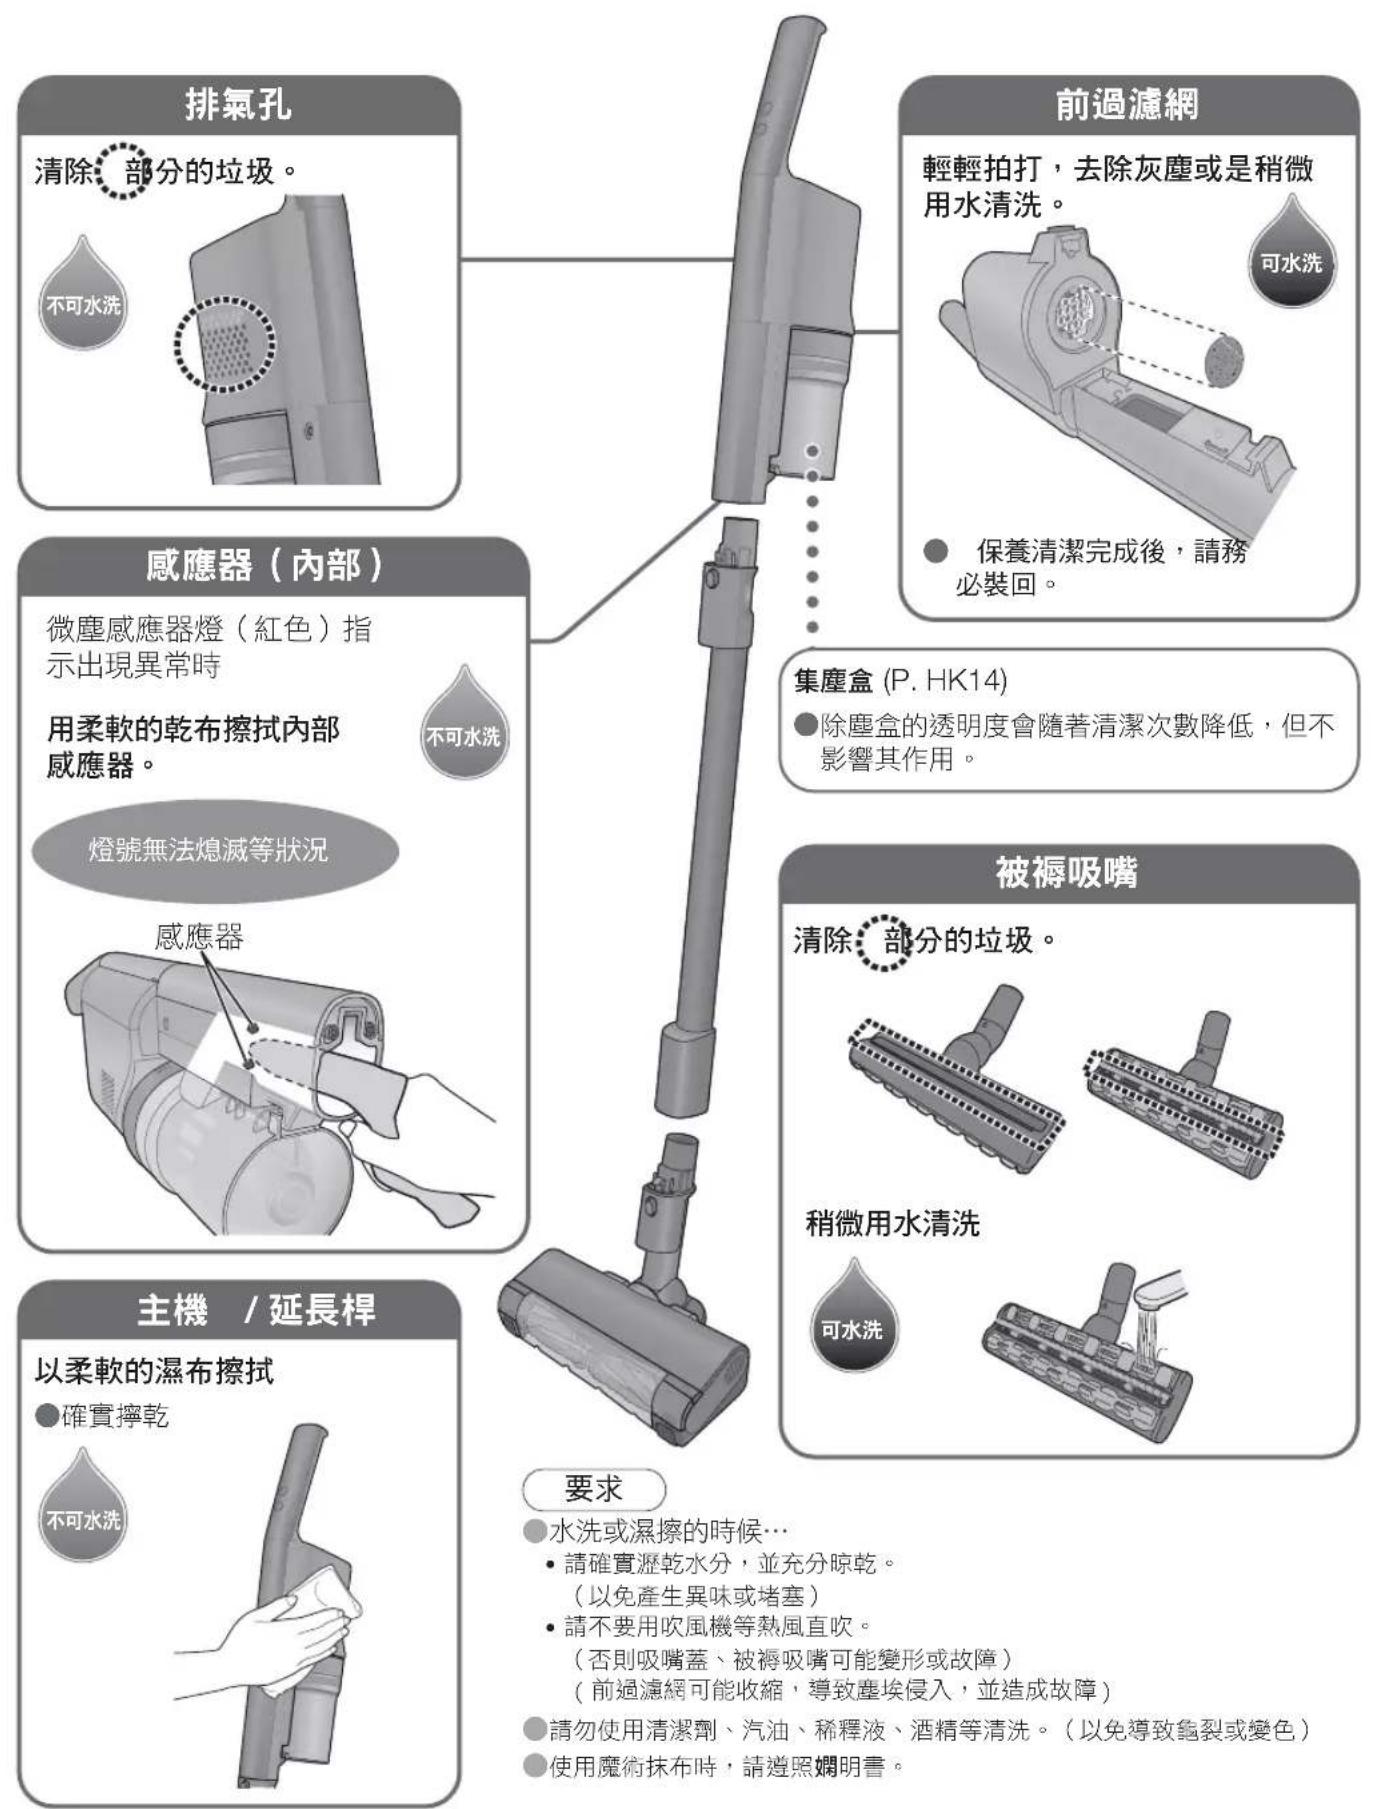
natural_image
Diagram of a mechanical device with a circular inset showing internal components (no text or symbols)2 取下電池蓋 B
3 取出電池
natural_image
Mechanical assembly diagram showing a device with internal components and directional arrows indicating movement (no text or symbols present)規格
natural_image
3D mechanical component with a highlighted battery symbol and an inset showing the battery (no text or labels present)
Berkelip (biru)
Sedang dicas
natural_image
3D model of a handheld electric plug with a battery icon and a close-up inset showing the battery symbol (no text or labels present)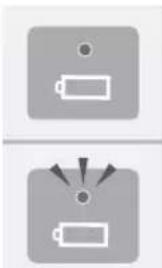
natural_image
Two gray square icons with battery symbols and radiating lines, no text or labels present.natural_image
Illustration of a person using a vacuum cleaner, no text or symbols presentnatural_image
Illustration of a hand pouring liquid into a container with a cloth (no text or symbols)natural_image
Diagram of a mechanical component being inserted into a housing, showing internal structure and a downward arrow (no text or symbols)natural_image
Technical illustration of a mechanical component with highlighted parts and dotted outlines (no text or symbols)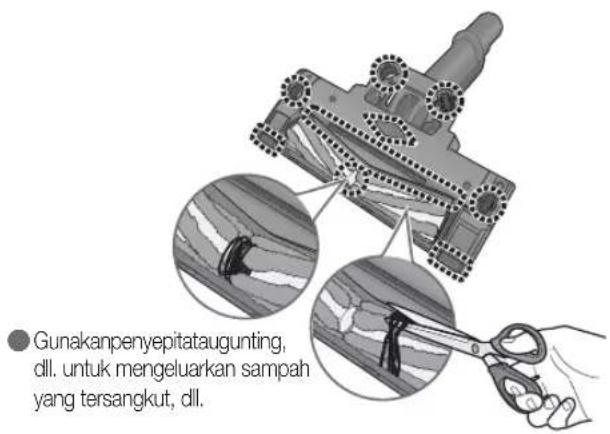
natural_image
Illustration of a hand holding a mechanical component with a tool, no visible text or symbols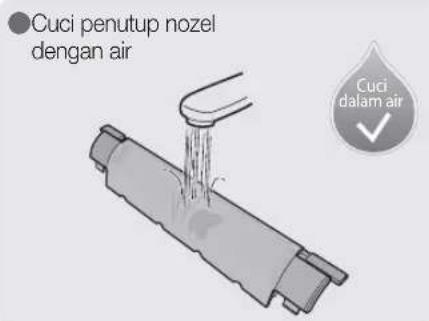
natural_image
3D mechanical component diagram showing a cylindrical housing with a pipe fitting and two numbered arrows indicating parts of the base (no text or symbols present)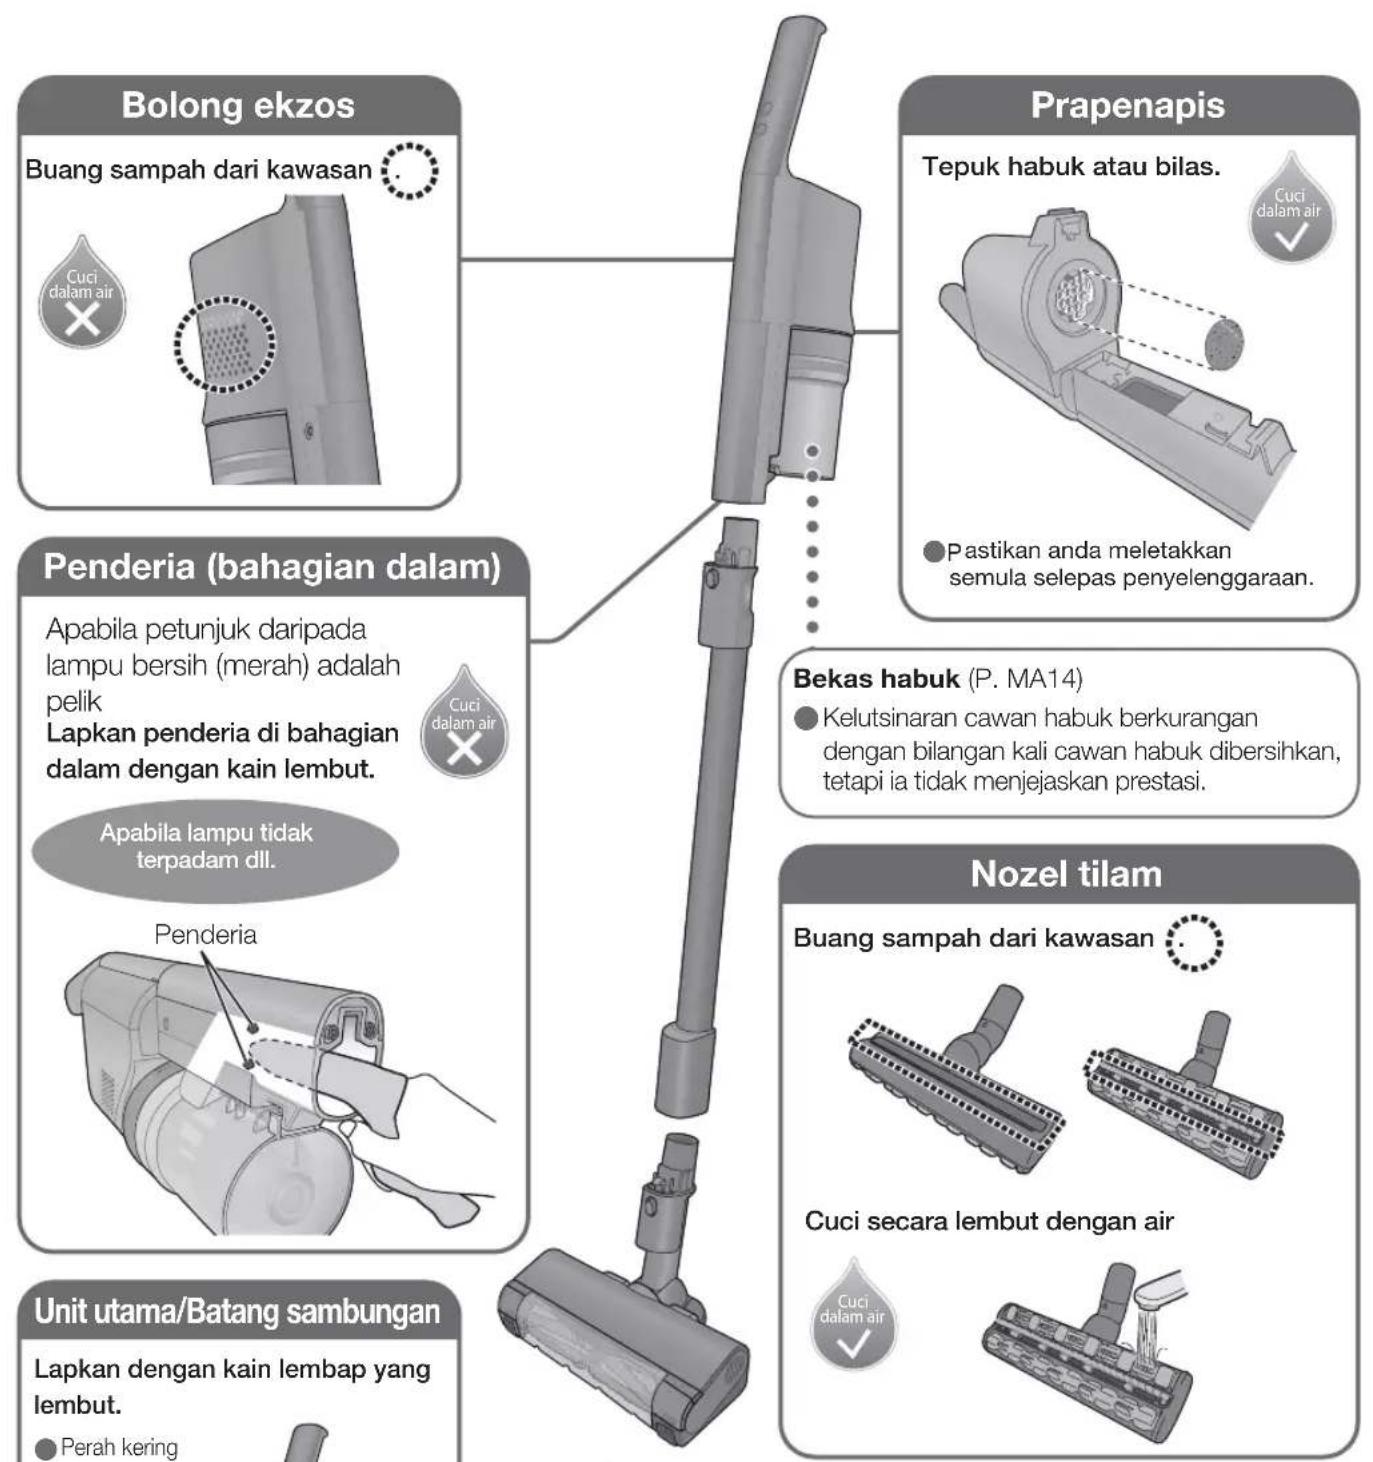
natural_image
Diagram of a mechanical device with a circular inset showing internal components (no text or symbols)natural_image
Mechanical assembly diagram showing a lever and cylindrical component with an arrow indicating motion (no text or symbols present)Spesifikasi
| Dimensi | (Pembersih berdiri) L 213 mm × D 178 mm × T 1102 mm | ||||
| (Unit utama) L 88 mm × D 162 mm × T 431 mm | |||||
| Berat | 1.5 kg (Pembersih berdiri) | ||||
| 0.9 kg (Unit utama<Termasuk bateri>) | |||||
| Kapasiti habuk | 0.15 L (Sehingga garis tahap habuk) | ||||
| 0.3 L (Maksimum) | |||||
| Bateri digunakan | Bateri litium ion boleh dicas semulaNo. Model AVA97V-1AH | Voltan nominal | 14.4 V = | ||
| Kapasiti terkadar | 1700 mAh | ||||
| Bilangan sel 4 sel | |||||
| Masa operasi berterusan* | AUTO | Lebih kurang 10 minit – Lebih kurang 15 minit (Semasa menggunakan nozel lantai) | |||
| Lebih kurang 15 minit – Lebih kurang 30 minit(Apabila menggunakan muncung 2 hala teleskopik atau muncung tilam) | |||||
| HIGH Lebih kurang 6 minit (Semasa menggunakan nozel lantai) | |||||
| Penyesuai pengecasan | No. Model | AVA61V-1AH (Untuk Hong Kong, Malaysia)AVA61V-1AF (Untuk Filipina)AVA61V-1A1 (Untuk Vietnam) | |||
| Input | 100-240 V ~ 50-60 Hz 0.35-0.2 A(Penggunaan kuasa: Pengecasan - Lebih kurang 11 W, Ditanggalkan daripada unit utama - Lebih kurang 0.3 W) | ||||
| Output 16.5 V | 0.7 A = | ||||
| Masa pengecasan | Lebih kurang 3.5 jam. (Apabila dicas daripada kosong pada suhu persekitaran 20°C) | ||||
| Panjang kord | 1.5 m | ||||
| Aksesori | • Batang sambungan (1)• Nozel lantai (1)• Penyesuai pengecasan (1)• Nozel teleskop 2 hala (1)• Nozel tilam (1)• Berus pembersih (1) | ||||
* Dicas sepenuhnya, kapasiti permulaan bateri/pada suhu persekitaran 20°C
natural_image
3D rendering of a mechanical component with a close-up inset showing a battery symbol (no text or labels)
natural_image
3D model of a mechanical component with a highlighted battery symbol (no text or labels)natural_image
Illustration of a person using a vacuum cleaner to clean or walk (no text or symbols)Luu y
natural_image
Diagram of a mechanical device with a hand inserting a component into a housing, showing internal structure and a downward arrow (no text or symbols present)natural_image
3D mechanical component diagram with highlighted parts and a magnified inset showing internal structure (no text or symbols)natural_image
Illustration of a hand holding a mechanical component with a tool, showing a curved arrow indicating motion (no text or symbols present)natural_image
3D mechanical component diagram showing a cylindrical housing with two labeled parts (②), no text or symbols present.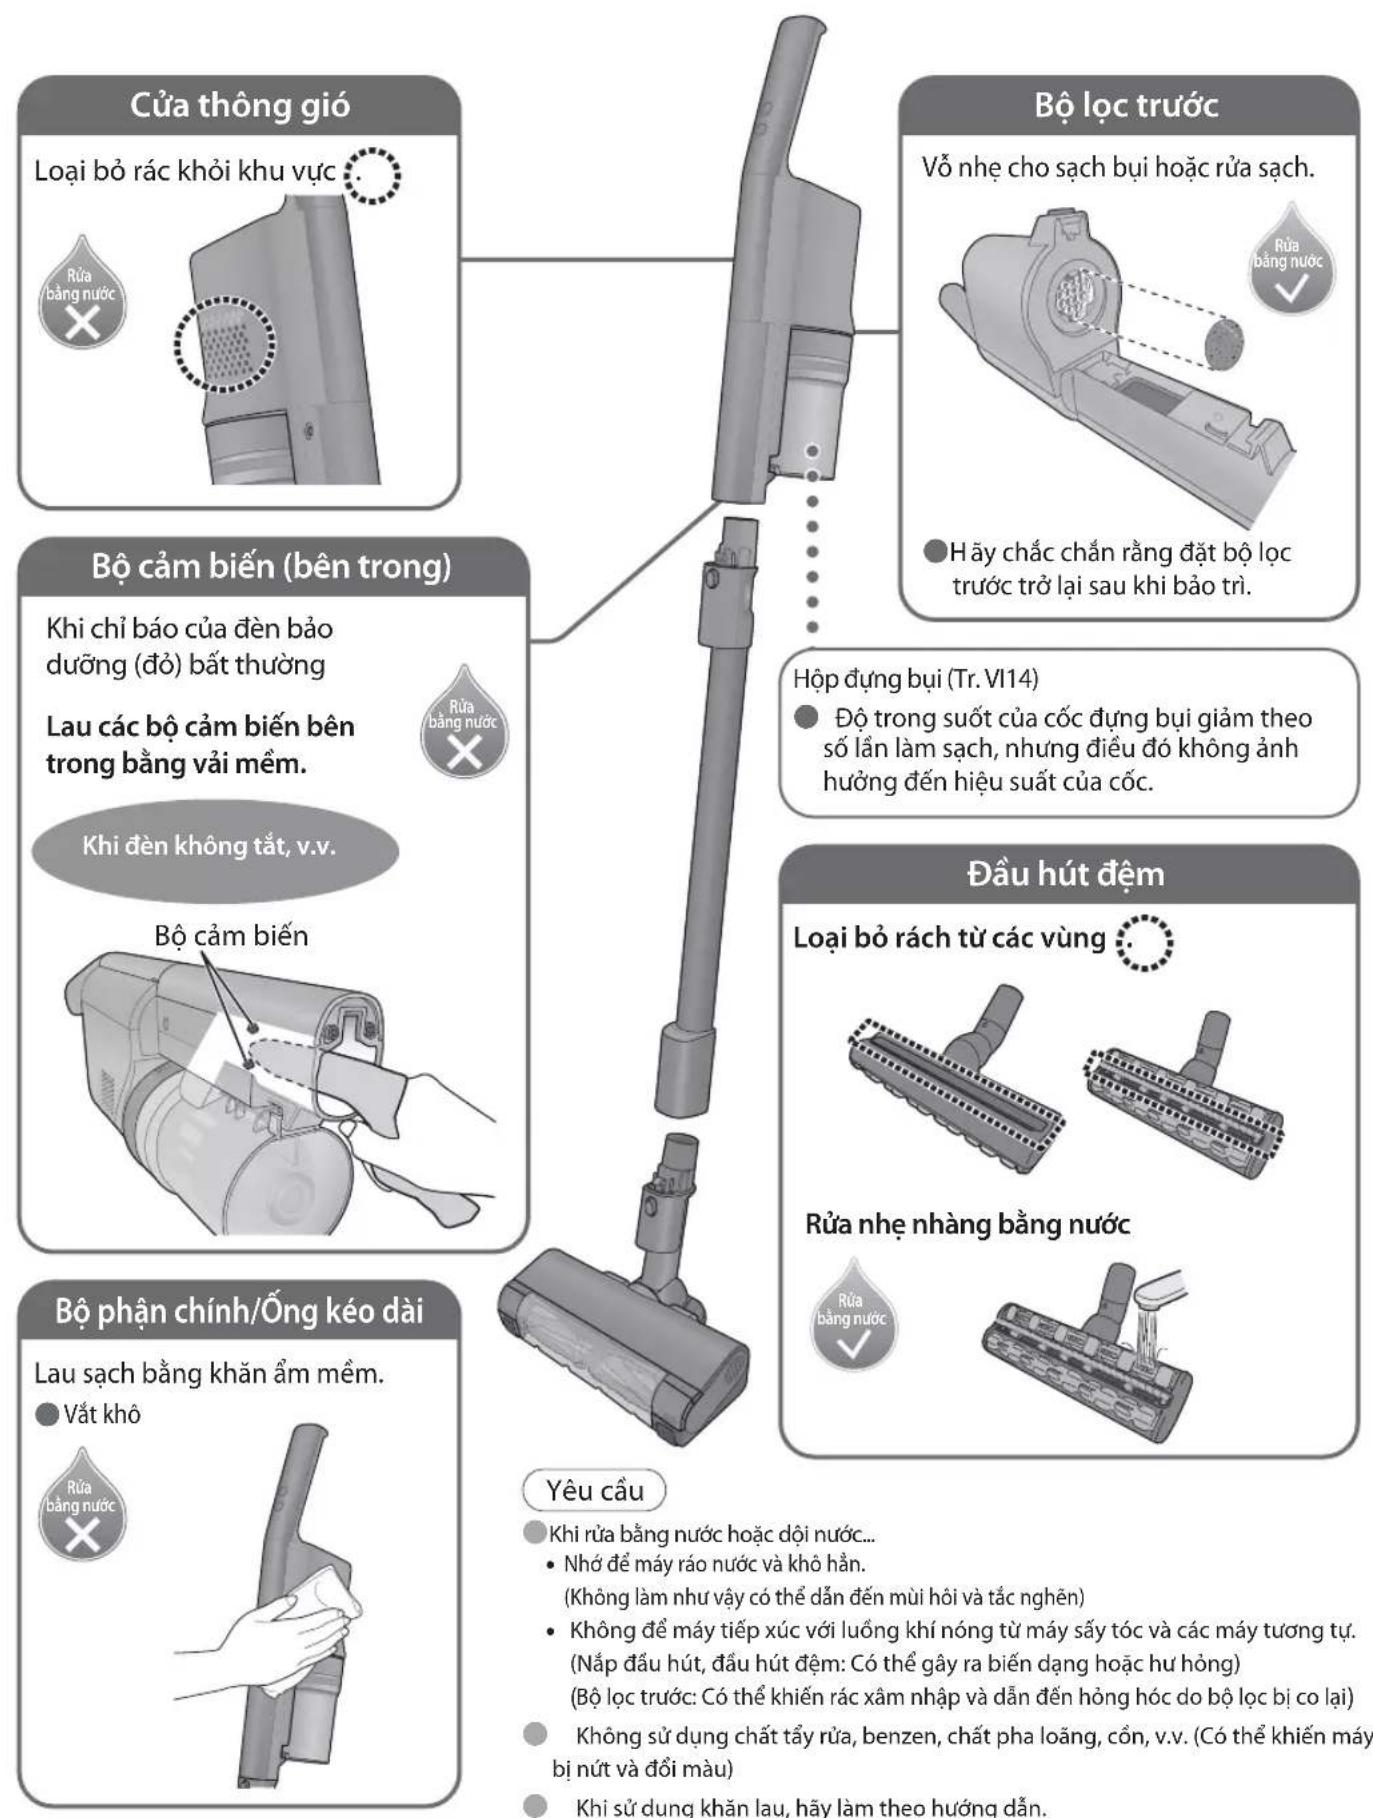
Yêu câu
natural_image
Diagram of a mechanical device with a magnified inset showing internal components (no text or symbols)natural_image
Mechanical assembly diagram showing a cylindrical component with a handle and a bracket, no visible text or symbolsThông số kỹ thuật
© Panasonic Corporation 2022
AVAWWZ01AH00
W1222-0
Issued in 12 2022
- Operating Instructions Rechargeable Vacuum Cleaner
- Operating Instructions
- Model No. MC-SB53K
- Table of Contents
- Safety Precautions
- DANGER
- WARNING
- CAUTION
- Do not mishandle
- Do not disassemble, repair or modify
- Do not touch the floor nozzle's agitator
- Do not suck up flammables or burning objects
- Use the charging adapter correctly
- ! WARNING
- For long-term use
- After vacuuming, check the floor nozzle's underside!
- To avoid overheating the motor and/or battery (protection device)
- Check the included accessories.
- Charging
- Request
- How to read the battery status indicator lamp (blue)
- Pulsating (blue) It is charging
- Goes out Charging is completed
- To help make the battery last longer
- Note
- Vacuuming
- To start it up
- Press
- ■To change the strength
- To shut it off
- Charge the battery after use. (P. EN8)
- The battery status indicator lamp lights up to let you know!
- The clean lamp notifies you by lighting up!
- Clean sensor
- You are concerned that the clean lamp (red) does not light up / does not go out / lights up too much
- To change the clean sensor's sensitivity settings
- Cleaning Techniques...
- Empty the dust box
- Maintenance
- Check the Dust Level (─┐)
- Remove the dust box
- Maintenance (Dust box)
- Disassembly
- Throw away the trash and dust to clean out
- Set the dust box
- Cleaning
- It can also be washed with water when you are concerned about grime
- Assembly
- Maintenance (Continued)
- Floor nozzle
- Dust box (P. EN14)
- Troubleshooting
- Troubleshooting (Continued)
- Product Disposal
- The rechargeable lithium-ion battery in this product is a consumable item.
- About the rechargeable lithium-ion battery
- Handling of used batteries
- Remove the battery cover A
- Remove the battery cover B
- Take the battery out
- Specifications
- 使用說明書
- 提醒
- 如要變更微塵感應器的敏感度設定
- 清空集塵盒 保養維護
- 清空集塵盒
- 檢查垃圾清理線(厂囲一
- 建議一週一次
- 要求
- Spesifikasi
- Luu y
- Yêu câu
- Thông số kỹ thuật
Brand : PANASONIC
Model : MC-SB53K
Category : Vacuum Cleaner