
MC-E3002 - Vacuum Cleaner PANASONIC - Free user manual and instructions
Find the device manual for free MC-E3002 PANASONIC in PDF.


| Product Type | Canister Vacuum Cleaner |
| Brand | Panasonic |
| Model | MC-E3002 |
| Power Consumption | 1200 W |
| Suction Power | 350 Air Watts |
| Bag Type | Paper dust bag (type C-13) |
| Bag Capacity | 3.0 L |
| Filtration System | HEPA H13 filter |
| Cord Length | 5.0 m |
| Operating Radius | 8.0 m |
| Noise Level | 78 dB(A) |
| Weight (Body Only) | 4.5 kg |
| Dimensions (Body) | 250 x 300 x 400 mm |
| Floor Nozzle Type | Multi-surface with brush on/off |
| Additional Tools | Crevice tool, upholstery brush, dusting brush |
| Handle Type | Ergonomic grip with controls |
| Tube Material | Stainless steel telescopic tube |
| Parking Position | Vertical park on back of canister |
| Automatic Cord Rewind | Yes, foot pedal |
| Filter Cleaning Indicator | LED indicator for bag full/filter clogged |
| Energy Efficiency Class | A |
| Repairability Index | 8.5 / 10 (France standard) |
| Warranty | 2 years |
Frequently Asked Questions - MC-E3002 PANASONIC
User questions about MC-E3002 PANASONIC
0 question about this device. Answer the ones you know or ask your own.
Ask a new question about this device
Download the instructions for your Vacuum Cleaner in PDF format for free! Find your manual MC-E3002 - PANASONIC and take your electronic device back in hand. On this page are published all the documents necessary for the use of your device. MC-E3002 by PANASONIC.
USER MANUAL MC-E3002 PANASONIC
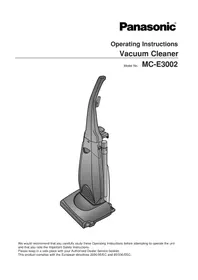
Operating Instructions Vacuum Cleaner
Model No. MC-E3002

We recommend that you carefully study these Operating Instructions before attempting to operate the unit and that you note the Important Safety Instructions.
Please keep in a safe place with your Authorised Dealer Service booklet.
This product complies with the European directives 2006/95/EC and 89/336/EEC.
TABLE OF CONTENTS
Page
Page
- Caution for AC Mains Lead (UK and Republic of Ireland only) 2
- Important Safety Instructions for the user ....3 • Cautions ....3
- Identification of main parts ....4
HOW TO ASSEMBLE YOUR CLEANER
A) Handle assembly / Hose assembly / Mains lead storage....4
B) Mains lead release ....5 C) ON/OFF Switch....5 D) Handle lock / release by foot pedal ....5
E) Automatic height adjustment ....5 F) How to use the accessories....6 G) Dust bag check indicator....6
MAINTENANCE AND SERVICING
H) How to change the dust bag ....7
I) Filters care ....7 J) Blockages 8 K) Maintenance for the beater bar 8 L) Servicing and repairs 9 M) Trouble shooting guide ....10
- Specifications ....10
• Vacuum Cleaner Consumables / Accessories .....11

CAUTION FOR AC MAINS LEAD ( UK and Republic of Ireland only )
FOR YOUR SAFETY PLEASE READ THE FOLLOWING TEXT CAREFULLY
This appliance is supplied with a moulded three pin mains plug for your safety and convenience.
A 13 amp fuse is fitted in this plug.
Should the fuse need to be replaced please ensure that the replacement fuse has a rating of 13 amps and that it is approved by ASTA or BSI to BS1362.
Check for the ASTA mark of the BSI mark on the body of the fuse.
If the plug contains a removable fuse cover you must ensure that it is refitted when the fuse is replaced.
If you lose the fuse cover the plug must not be used until a replacement cover is obtained.
A replacement fuse cover can be purchased from your local Panasonic Dealer.
IF THE FITTED MOULDED PLUG IS UNSUITABLE FOR THE SOCKET OUTLET IN YOUR HOME THEN THE FUSE SHOULD BE REMOVED AND THE PLUG CUT OFF AND DISPOSED OF SAFELY.
THERE IS A DANGER OF SEVERE ELECTRICAL SHOCK IF THE CUT OFF PLUG IS INSERTED INTO ANY 13 AMP SOCKET.
If a new plug is to be fitted please observe the wiring code as shown below.
If in any doubt please consult a qualified electrician.
IMPORTANT: The wires in this mains lead are coloured in accordance with the following code:
Blue : Neutral
Brown : Live
As the colours of the wire in the mains lead of this appliance may not correspond with the coloured markings identifying the terminals in your plug, proceed as follows:
The wire which is coloured BLUE must be connected to the terminal in the plug which is marked with the letter N or coloured BLACK.
The wire which is coloured BROWN must be connected to the terminal in the plug which is marked with the letter L or coloured RED.
Under no circumstances should either of these wires be connected to the earth terminal of the three pin plug, marked with the letter E or the Earth Symbol.
How to replace the Fuse:
- There are two types of the supplied AC Mains Lead: A and B as shown below.
1 Open the fuse compartment with a screwdriver. 2 Replace the fuse and fuse cover if detachable.


TYPE A


TYPE B
IMPORTANT SAFETY INSTRUCTIONS FOR THE USER

Before using the vacuum cleaner, please observe these basic precautions. WARNING: To reduce the risk of fire, electric shock, or injury:
■ Do not leave the vacuum cleaner plugged into mains socket. Unplug from the socket when not in use and before cleaning the appliance or undertaken maintenance operations. ■ This appliance is not intended for use by young children or infirm persons without supervision; young children should be supervised to ensure that they do not play with the appliance. ■ Do not use if the mains lead or mains plug is damaged. If the vacuum cleaner is not working as it should be, or has been dropped, damaged, left outdoors, or come into contact with water, consult an authorised Panasonic Service Centre. ■ Do not pull or carry by the mains lead, use mains lead as a handle, close a door on the mains lead, pull mains lead around sharp edges or corners. Do not run vacuum cleaner over the mains lead. Keep the mains lead away from heated surfaces. ■ Do not handle plug or vacuum cleaner with wet hands. ■ Do not put any object into openings. Do not use with any opening blocked; keep free of dust, lint, hair and anything that may block or reduce air flow. - Keep hair, loose clothing, fingers, and all parts of body away from openings and moving parts. ■ Do not use the vacuum cleaner without filters and / or dust bag in place. Never try to patch a broken dust bag. ■ Do not use wet filters after wash, see I) Filters Care. ■ Turn off all controls before unplugging. ■ Do not use to pick up flammable or combustible materials, or other that may become so or use in areas where they may be present. ■ This appliance should be serviced by an authorised Panasonic Service Centre, and only genuine Panasonic spare parts should be used. ■ Use extra care when cleaning on stairs. Keep hold the handle to prevent the cleaner from falling. ■ To prevent damaging carpeted floors, tiled floors, Linoleum, etc. Do not leave the beater bar rotating in the same place for too long. - Keep bare feet and hands away from the beater bar. (It may cause injury.)
NOTE: This vacuum cleaner is designed for general household use only and is not suitable for use in a garage, garden or to suck up liquids.

CAUTIONS

- To avoid any possible damage to the mains lead, never run over the mains lead or allow it to become caught in the beater bar when using the vacuum cleaner.

- Do not run the vacuum cleaner over tassels or fringes of rugs or mats as they could get caught up in the beater bar and may cause damage to the brush and belt.
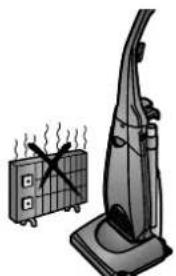
- Keep the vacuum cleaner away from heat sources such as radiators, fires, direct sunlight, etc.

- To avoid damaging the machine or the dust bag, never let the vacuum cleaner pick up wet matter, mud, burning ashes or large and sharp objects.
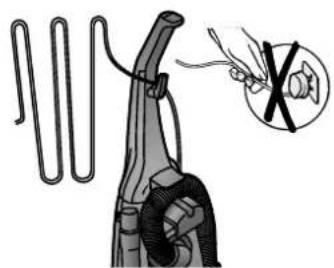
- Do not pull on the mains lead when disconnecting the appliance from the mains, always pull on the plug body itself.
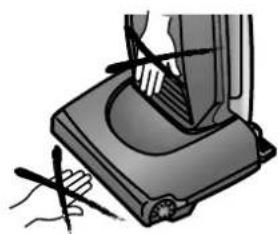
- To avoid injury, keep your fingers and hands away from the beater bar, and never put them between the body parts.
IDENTIFICATION OF MAIN PARTS
HOW TO ASSEMBLE YOUR CLEANER
A) HANDLE ASSEMBLY / HOSE ASSEMBLY / MAINS LEAD STORAGE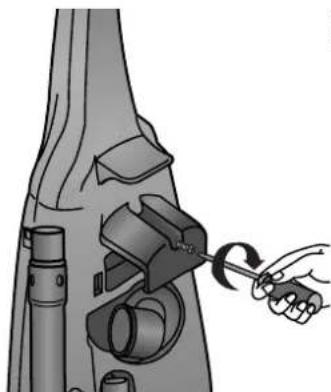
1) Insert the base of the handle into the top of the body of the machine as shown. Push in the handle and tighten the screw.
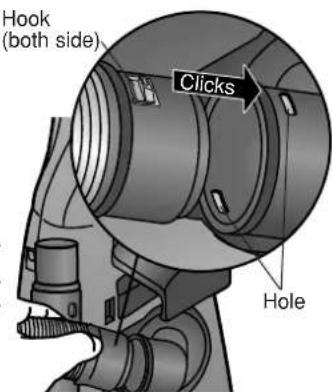
2) Insert the hose into the suction inlet. Ensure that the 2 hooks of the hose are completely fitted into the 2 holes of the suction inlet.

3) Set the hose around the hose clip. NOTE: Always place the hose in the clockwise direction.
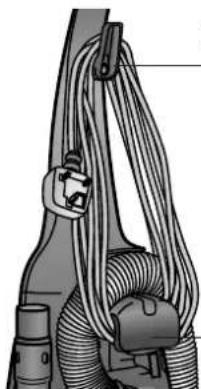
4) Turn the upper cord hook to the upright position and wind the mains lead around the upper and lower cord hooks.
IMPORTANT:
Do not overtighten the screw.
1) Turn the upper cord hook to release the mains lead.

2) Fix the mains lead into the cord clip to help secure it during use. IMPORTANT: To avoid any possible damage to the mains lead, never run over the cord or allow it to become caught in the beater bar.
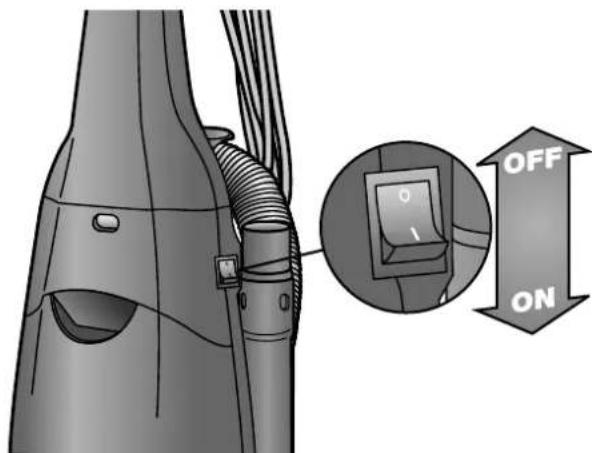
To start or stop the vacuum cleaner, push the switch button to "I" to turn ON and to "O" to turn OFF.
D) HANDLE LOCK / RELEASE BY FOOT PEDAL
To unlock the handle of the cleaner, step on the foot pedal. To return to the upright position, simply put the handle back.
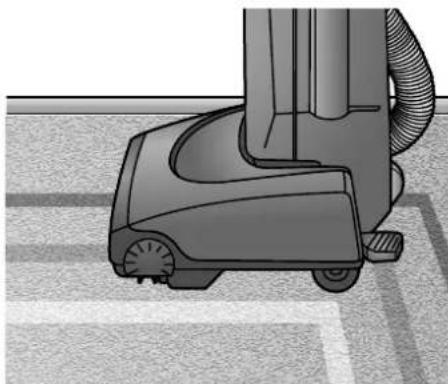
1) Upright position The handle should be in an upright position when cleaning tools are used.
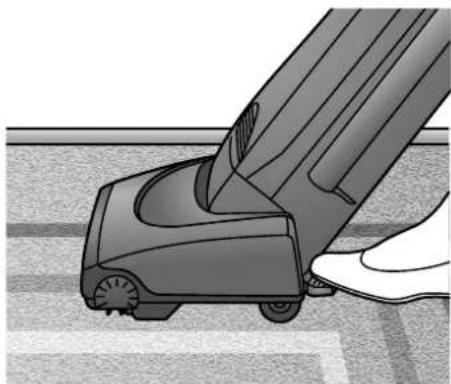
2) Middle position For normal cleaning, step the foot pedal and pull back the handle to a comfortable angle and release the pedal to lower the cleaning head.

3) Low position For cleaning under furniture, step the pedal twice slowly. The handle may now be lowered almost to the floor as shown.
CAUTION: To prevent damaging carpeted floors, tiled floors, Linoleum, etc., do not leave the beater bar rotating in the same place for too long.
E) AUTOMATIC HEIGHT ADJUSTMENT
Your Panasonic vacuum cleaner is designed with an Automatic Height Adjustment, which adjusts the cleaning head to the proper height of any carpet pile. This system allows you to move from one carpeted area to another, without having to make time consuming manual adjustments.


F) HOW TO USE THE ACCESSORIES
1) To use the accessories keep the vacuum cleaner in upright position. 2) Pull out the hose from the rear side of the vacuum cleaner and remove the hose from the hose clip and support. Then connect any accessory as illustrated.
NOTE: When finish using the accessories, re-insert the hose to the suction inlet and re-install the hose into the hose clip and support. And re-install the extension wand with the crevice nozzle setting on the projection.


CAUTION:
While using the accessories, hold the handle with one hand to avoid pulling the cleaner over.
To prevent damage to carpeted floors, Linoleum, etc., tilt the cleaner back so that the cleaning head is raised off the floor.
To avoid accidental injury, keep children away from the beater bar while in operation.
G) DUST BAG CHECK INDICATOR
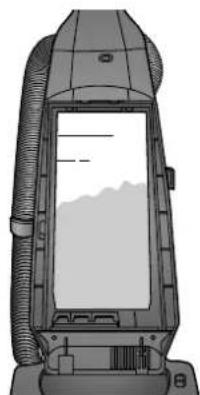
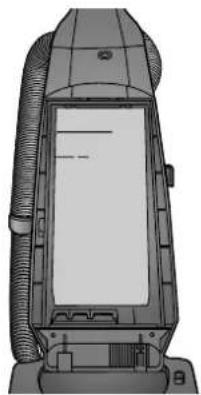
The dust bag check indicator (orange mark) will appear in the window, when airflow through the dust bag is insufficient.
When this happens, check the dust bag, it may be full or blocked with fine dust and needs to be replaced.
NOTE: If after replacing the dust bag, the yellow mark continues appearing in the window, check to see if the hose or suction inlet is clogged. (see BLOCKAGES).
Also the yellow mark can appear when using the crevice nozzle.



IMPORTANT NOTE: Before servicing any part, always DISCONNECT THE CLEANER FROM THE MAINS SUPPLY
H) HOW TO CHANGE THE DUST BAG

1) Remove dust cover simply pulling it forwards.

2) Grip the cardboard of the dust bag and pull out.

3) Install the dust bag by pressing the cardboard as shown.
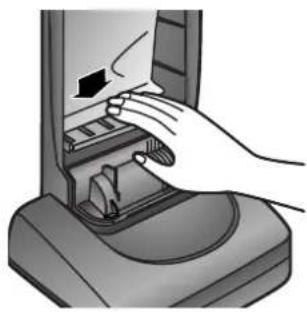
4) Press bottom of the dust bag and set it completely inside the dust bag compartment. Make sure all edges of the dust bag are completely inside the bag compartment.
IMPORTANT: Dust bag should be changed regularly for the maximum efficiency of the filters and prolonged motor efficiency. Never use the cleaner without the dust bag.
We recommend the use of genuine Panasonic bags Type U-20E only.
I) FILTERS CARE

Central filter

The central filter (foam filter) is installed in the dust bag compartment to protect the motor from dirt.
When it becomes dirty, simply rinse it out in warm water and dry it thoroughly before replacing.
To remove the central filter, hold the filter at the top (as illustrated) and pull it out.
IMPORTANT: Ensure that the filter is completely dry before re-installing it into the cleaner.

Exhaust filter (Clean air filter)
NOTE: Under normal use, it is advisable to change the Clean air filter once or twice a year.
To change the filter, first remove the dust cover and then slide out the filter support. Replace the filter and re-install.
IMPORTANT: Never use the cleaner without the filters properly installed. Failure to do so may result in motor damage.
J) BLOCKAGES
If your cleaner stops picking up dust, or the dust bag check indicator shows "Full" while the dust bag is still empty, a blockage may have occurred.
Remove the hose from the suction inlet, turn the hose right and pull it upwards (Fig. 1). Clear any obstruction from the hose and/or suction inlet using a blunt implement, taking care not to damage the hose. If the obstruction occurs in the suction pipe inlet, it can be removed with care as shown in Fig. 2.

Fig. 1

Fig. 2
When it is necessary to remove threads, strings, hairs, etc., which have wound around the beater bar, cut across them with a pair of scissors making sure not to cut the brush.
CAUTION: Ensure the cleaner is DISCONNECTED from the mains supply before any beater bar maintenance.


NOTE: Take care not to cut the brush.
L) SERVICING AND REPAIRS

CAUTION:
Before replacing any part, DISCONNECT THE CLEANER FROM THE MAINS SUPPLY.
Keep screws away from children after removing this cover.
We recommend the use of genuine Panasonic replacement parts.
To replace any of the following parts, place the vacuum cleaner in the horizontal position by using the foot pedal and turn it over exposing the underside.
Beater bar assembly / Motor shaft belt / Beater bar belt
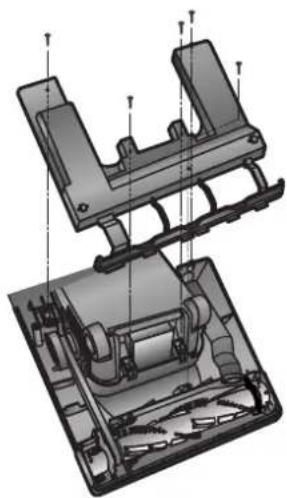
1) Remove the 5 screws from the base plate and lift it off.

2) To replace the beater bar assembly, lift it up and release the beater bar belt from the beater bar pulley. Replace the beater bar assembly with a new one fitting the each bending part of the both parts and reassemble in the reverse order.

3) To replace the motor shaft belt, remove it from the outer pulley and motor shaft. Replace the motor shaft belt with a new one and reassemble in the reverse order.

4) To replace the beater bar belt, release the motor shaft belt and lift the beater bar assembly to remove the beater bar belt.
Replace the beater bar belt with a new one and reassemble in the reverse order.
Turn the beater bar assembly by hand to ensure the belts have been seated correctly.

5) The tabs on the base plate should be placed into the slots on the cleaning head. Then re-fasten the screws securely.
Before contacting your Panasonic service centre, check the following points:
NOTE: Failure to correctly maintain your product, for example regular cleaning and unblocking, may result in a charge if referred to a service agent for attention.
| TROUBLE | CHECK POINT | CAUSE / REMEDY |
| Motor fails to rotate (no noise is heard at all). | Mains plug connection.Mains plug fuse. (UK, IRL only)Thermal cut-out device may have operated. | Check that the mains plug is connected firmly and mains outlet is ON.Check fuse and replace if blown.(See Thermal cut-out protection features below described). |
| Motor runs but no suction. | Hose or each inlet clogged.Check dust indicator.Paper bag broken.Central filter. | If there is a blockage, remove it.If shows full, replace the paper bag.If paper bag is broken replace it.If the central filter is full of dust, clean or replace it. |
| Beater bar does not rotate. | Beater bar housing is clogged.Belt broken / loose. | If there is any obstruction, remove it.If the belt is broken or loose, replace it. |
Thermal Cut-out
This vacuum cleaner is fitted with a thermal cut-out device which automatically turns off the cleaner to prevent overheating of the motor. When this happens, disconnect the cleaner from the mains socket and check the dust bag as it may be full or clogged with fine dust. Check for any other obstructions.
After replacing the dust bag or removing the obstruction, leave the vacuum cleaner to cool down until the thermal cut-out resets after approximately 40 minutes.
Important: The thermal cut-out will not reset if the unit is not disconnected from the mains socket.
Mains lead
IMPORTANT: If the mains lead becomes damaged, it must be repaired by Panasonic, authorised Service Centre or a qualified person in order to avoid any hazard.
| SPECIFICATIONS | MC-E3002 |
| Power source | 230-240 V ~ 50 Hz |
| Max. Input | 1900 W |
| Nominal input | 1600-1700 W |
| Dimensions (L x W x H) | 320 mm x 323 mm x 1045 mm |
| Net weight | 6.3 kg |
| Dusting brush | √ |
| Extension wand | √ |
| Crevice nozzle | √ |
- Design and specifications may be changed without notice. • Weight and dimensions shown are approximate.
Vacuum Cleaner Consumables / Accessories (For UK and Republic of Ireland customers only)
| DESCRIPTION MC-E3002 | ||
| Handle |  | AMC95B-XB0AE (BLUE)AMC95B-XB0AE (RED) |
| Handle screw |  | AMC73B-XD00E |
| Exhaust filter(Clean air filter (electrostatic)) |  | AMC38K-XA00E |
| Central filter |  | AMC64H-XB00E |
| Extension wand |  | AMC40P-XB04E |
| Crevice nozzle |  | AMC61R-XB04E |
| Dusting brush |  | AMC88R-XD04E |
| Dust bag (pack of 5 bags) Type U-20E |  | AMC-B1EP |
| Kit of 2 belts |  | AMC95S-XD00E |
| Beater bar assy |  | AMC92S-XD00E |
NOTE: Specifications are subject to change without notice.
Sales and Support Information
Customer Care Centre
■ For customers within the UK: 0844-844-3868 ■ For customers within the Republic of Ireland: 01 289 8333 ■ Visit our website for product information ■ E-mail: customer.care@panasonic.co.uk
Direct sales at Panasonic UK
■ Order accessory and consumable items for your product with ease and confidence by telephoning our Customer Care Centre Mon – Thu 9:00am – 5:30pm, Fri 9:30am – 5:30pm. (Except public holidays). ■ Or go on line through our Internet Accessory ordering application at www.panasonic.co.uk. ■ Most major credit and debit cards accepted. ■ All enquiries transactions and distribution facilities are provided directly by Panasonic UK Ltd. ■ It couldn't be simpler! ■ Also available through our internet is direct shopping for a wide range of finished products, take a browse on our website for further details.
REMINDER FOR CUSTOMER
The model and serial number of this product may be found on the nameplate located at the back of your cleaner. You should note the model and serial number in the spaces provided and retain this book for future reference.
Model Number: ....
Serial Number: ....
Date Purchased: ....
Where Purchased: ....
Information on Disposal for Users of Waste Electrical & Electronic Equipment (private households)

This symbol on the products and/or accompanying documents means that used electrical and electronic products should not be mixed with general household waste.
For proper treatment, recovery and recycling, please take these products to designated collection points, where they will be accepted on a free of charge basis. Alternatively, in some countries you may be able to return your products to your local retailer upon the purchase of an equivalent new product.
Disposing of this product correctly will help to save valuable resources and prevent any potential negative effects on human health and the environment which could otherwise arise from inappropriate waste handling. Please contact your local authority for further details of your nearest designated collection point.
Penalties may be applicable for incorrect disposal of this waste, in accordance with national legislation.
Information on Disposal in other Countries outside the European Union
This symbol is only valid in the European Union.
If you wish to discard this product, please contact your local authorities or dealer and ask for the correct method of disposal.
- OPERATING INSTRUCTIONS VACUUM CLEANER
- TABLE OF CONTENTS
- PAGE
- HOW TO ASSEMBLE YOUR CLEANER
- MAINTENANCE AND SERVICING
- CAUTION FOR AC MAINS LEAD ( UK AND REPUBLIC OF IRELAND ONLY )
- FOR YOUR SAFETY PLEASE READ THE FOLLOWING TEXT CAREFULLY
- HOW TO REPLACE THE FUSE
- IMPORTANT SAFETY INSTRUCTIONS FOR THE USER
- BEFORE USING THE VACUUM CLEANER, PLEASE OBSERVE THESE BASIC PRECAUTIONS. WARNING: TO REDUCE THE RISK OF FIRE, ELECTRIC SHOCK, OR INJURY
- CAUTIONS
- IMPORTANT
- HANDLE LOCK / RELEASE BY FOOT PEDAL
- AUTOMATIC HEIGHT ADJUSTMENT
- HOW TO USE THE ACCESSORIES
- CAUTION
- DUST BAG CHECK INDICATOR
- IMPORTANT NOTE: BEFORE SERVICING ANY PART, ALWAYS DISCONNECT THE CLEANER FROM THE MAINS SUPPLY
- HOW TO CHANGE THE DUST BAG
- FILTERS CARE
- BLOCKAGES
- SERVICING AND REPAIRS
- BEATER BAR ASSEMBLY / MOTOR SHAFT BELT / BEATER BAR BELT
- THERMAL CUT-OUT
- MAINS LEAD
- SALES AND SUPPORT INFORMATION
- DIRECT SALES AT PANASONIC UK
- REMINDER FOR CUSTOMER
- INFORMATION ON DISPOSAL FOR USERS OF WASTE ELECTRICAL & ELECTRONIC EQUIPMENT (PRIVATE HOUSEHOLDS)
- INFORMATION ON DISPOSAL IN OTHER COUNTRIES OUTSIDE THE EUROPEAN UNION
Brand : PANASONIC
Model : MC-E3002
Category : Vacuum Cleaner