
IAN 369598 - Uncategorized CRIVIT - Free user manual and instructions
Find the device manual for free IAN 369598 CRIVIT in PDF.

| Product Type | Golf Laser Rangefinder |
| Brand | Crivit |
| Model | IAN 369598 |
| Dimensions (mm) | 104 x 44 x 77.4 |
| Weight (g) | 181 |
| Battery | 1x CR2 (3V) |
| Laser Class | Class 1 (IEC 60825-1) |
| Laser Wavelength (nm) | 905 |
| Max Output Power (W) | Up to 25 |
| Range (m) | 5 – 1100 |
| Resolution (m) | +/- 1 |
| Magnification | 6x |
| Lens Diameter (mm) | 19.7 |
| Eye Relief (mm) | 14.5 |
| Field of View (°) | 7.2 |
| Waterproof Rating | IPX4 (splash proof) |
| Modes | Standard Ranging, Flag Lock, Golf Slope Compensation, Horizontal Distance, Vertical Height, Speed |
| Diopter Adjustment | Yes, via eyepiece cover (focus wheel) |
| Auto Shut-off (s) | 30 |
| Scope of Delivery | Rangefinder, Hand strap, Case, Cleaning cloth, Instruction manual, 1x CR2 battery |
| Cleaning & Maintenance | Clean lenses with soft lint-free cloth; use spectacle cleaning fluid for heavy dirt. Remove battery for long storage. Protect from dust and moisture. |
| Safety | Class 1 laser product; do not look at sun; do not open housing; no user-serviceable parts. Keep away from children. Avoid temperatures above 60°C. |
| Repairability | No user-serviceable parts; servicing by qualified personnel only. |
| Warranty | 3 years from purchase date. Details at www.bresser.de/warranty_terms |
Frequently Asked Questions - IAN 369598 CRIVIT
User questions about IAN 369598 CRIVIT
0 question about this device. Answer the ones you know or ask your own.
Ask a new question about this device
Download the instructions for your Uncategorized in PDF format for free! Find your manual IAN 369598 - CRIVIT and take your electronic device back in hand. On this page are published all the documents necessary for the use of your device. IAN 369598 by CRIVIT.
USER MANUAL IAN 369598 CRIVIT
natural_image
Black CRIVIT surveying device with dual lenses and lens (no visible text or symbols)DE BEDIENUNGSANLEITUNG .... 4
EN INSTRUCTION MANUAL....13
ES MANUAL DE INSTRUCCIONES.....24
FI KÄYTTÖOPAS 35
SE BRUKSANVISNING......46
DK BRUGERVEJLEDNING 57


natural_image
Simple grayscale color gradient bar with a central crosshair symbol (no text or labels)INHALTSVERZEICHNIS
SEITE
KLASSE 1 LASER PRODUKT

natural_image
Simple grayscale color gradient bar with a central crosshair symbol (no text or labels)natural_image
Line drawing of a mechanical device with no visible text or symbolsnatural_image
Color gradient bar with a central crosshair symbol (no text or labels)DE


9

natural_image
Simple grayscale color gradient bar with a central crosshair symbol (no text or labels)13. MODUS 2:
FLAGGENMODUS


10


14. MODUS 3: GOLF-ENTFERNUNGSKORREKTUR
natural_image
Simple grayscale color gradient bar with a central crosshair symbol (no text or labels)15. MODUS 4: HORIZONTALE ENTFERNUNGSMESSUNG
natural_image
Simple grayscale color gradient bar with a central crosshair symbol (no text or labels)20. ENTSORGUNG

natural_image
Simple grayscale color gradient bar with a central crosshair symbol (no text or labels)SAFETY INSTRUCTIONS
CLASS 1 LASER PRODUCT
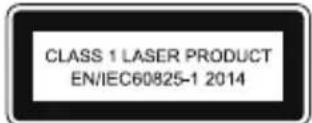
This device has been classified as a CLASS 1 LASER product according to EN/IEC 60825-1-2014.
The accessible laser radiation is safe under reasonably foreseeable conditions, and under normal conditions of use. Do not open the housing. The device does not contain any parts that can be serviced by the end consumer. Servicing of this unit must be left up to qualified service personnel.
Intended use
The device is designed for measuring distances.
! RISK of physical injury!
Never look through this device directly at or near the sun. There is a risk of BLINDING YOURSELF!
This device contains electronic components that are powered by either a mains connection or batteries. Never leave a child unsupervised with this device. The device should only be used as per these instructions otherwise there is a serious RISK of ELECTRICAL SHOCK.
Batteries should be kept out of children's reach. When inserting batteries please ensure the polarity is correct. Leaking or damaged batteries can cause injury if they come into contact with the skin. If you need


to handle such batteries please wear suitable safety gloves.
Children should only use this device under supervision. Keep packaging materials (plastic bags, rubber bands, etc.) away from children. There is a risk of SUFFOCATION.

DANGER of fire and explosion!
Never short circuit the device or batteries or throw into a fire. Exposure to high temperatures or misuse of the device can lead to short circuits, fire or even explosion!
Never subject the device - especially the lenses - to direct sunlight. Light ray concentration can cause fires and/or burns.

RISK of material damage!
Never take the device apart. Please consult your dealer if there are any defects. The dealer will contact our service centre and send the device in for repair if needed. Only use the batteries that have been recommended. Always replace low or used batteries.
Remove the battery from the device for long periods of disuse.
Do not subject the device to temperatures exceeding 60 C.
RESPECT privacy!
This device is meant for private use. Respect others privacy – do not use the device to look into other peoples homes, for example.
17

natural_image
Simple horizontal bar with grayscale color swatches and a central crosshair symbol (no text or labels)EC DECLARATION OF CONFORMITY
CE Bresser GmbH has issued a "Declaration of Conformity" in accordance with applicable
guidelines and corresponding standards. The full text of the EU declaration of conformity is available at the following internet address:
www.bresser.de/download/9625821/CE/9625821_CE.pdf
SCOPE OF DELIVERY
• Golf Laser Rangefinder
- Hand strap
- Case
- Cleaning cloth
- Instruction manual
- 1x CR2 battery (3V) ---
TECHNICAL DATA
| Lens diameter 19.7 mm | |
| Field of view 7.2° | |
| Laser safety class Laser Class 1 | |
| Laser max. output power | up to 25 watts |
| Laser pulses | suitable for short laser pulses from 1 to 200 ns |
| Laser wavelength 905 | nm |
| Resolution +/- 1m | |
| Range 5 - 1100 m | |
| Magnification 6X | |
| Eye relief 14.5 mm | |
| Battery 1x CR2 (3V) | |
| Splash WaterproofIPX4 | IPX4 (Protection against splashing water) |
| Dimensions 104x44x77,4 mm | |
| Weight 181 g | |
PARTS OVERVIEW

A. Power button ⏻
B: Eyepiece cover (focus wheel)
C. Battery compartment cover
D. Strap holder
E. Objective lens
F. Laser reception objective
G. Mode button (MODE)
START THE DEVICE
Hold the power button ⏻ for about 1 second. On first startup the display will enter the default standard ranging mode.
The next time you start the device you will always start with the last mode used.
The device switches off automatically after 30 seconds of inactivity.
DIOPTER ADJUSTMENT
If the display is out of focus, the focus can be adjusted by turning the eyepiece cover (focus wheel) to the left or right.
LOW POWER WARNING
When the battery power is too low, the low battery icon 📄 is displayed to remind you to change the battery.
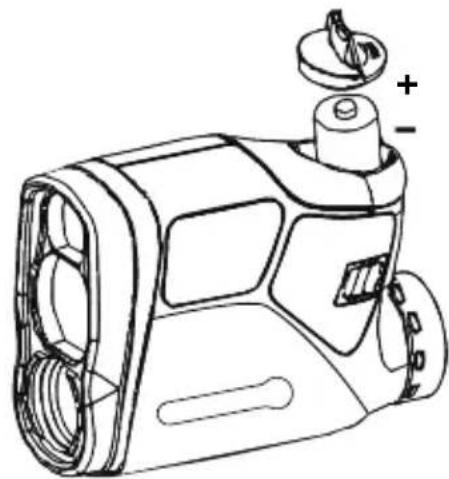
BATTERY REPLACEMENT
natural_image
Line drawing of a mechanical device with no visible text or symbolsOpen the battery compartment by turning the battery cover. Insert a new CR2 battery. Ensure that the battery polarity (+/-) is correct. Close battery cover.
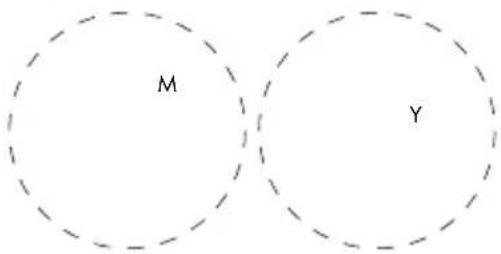
RANGING UNIT METER (M) / YARD (Y) SELECTION, FOG MODE ON/OFF & GOLF SLOPE COMPENSTATION ON/OFF SETTING
Press the power button 🔊. The default mode is "Standard ranging" for first time to start.
Hold the (MODE) button for approx. 3 seconds, M (metre) or Y (yard) flashes. Press the power button ⏻ to select the unit.

Then press the (MODE) button. "Fog" is now flashing. Press the power button ⏻ to choose fog on or off. Flashing = on, static = off. The fog mode is used in foggy/rainy conditions to provide an accurate range in atmospheric interference.
Press the (MODE) button again. "bc" (ballistics calculation) is now flashing. Press the power button 🔒 to choose golf slope compensation on or off. Flashing = on, static = off.
MODE SELECTION
Press the (MODE) button to cycle between:
MODE 1: Standard ranging
MODE 2: Flag lock [▶]
MODE 3: Golf slope compensation [Δ]
MODE 4: Horizontal distance [HD]
MODE 5: Vertical height [VH]
MODE 6: Speed
Note: When the fog setting is on, "Fog" is displayed on the screen and all modes will use the fog setting.

After selection, hold the (MODE) button to exit.
21

natural_image
Simple grayscale color gradient bar with a central crosshair symbol (no text or labels)MODE 1: STANDARD RANGING
Aim the center target area at an object, press the power button ⏻ to obtain the distance.
SCAN MODE
In standard range mode, hold the power button ⏻ to activate scan mode and pan the rangefinder over the targets to get continuous readings.
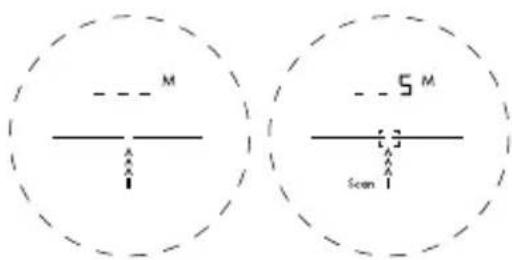
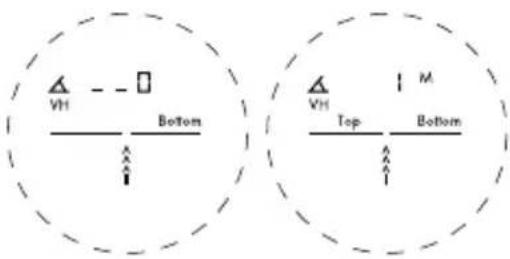
MODE 2: FLAG LOCK
This advanced mode allows you to easily lock on to the flag without accidentally measuring background targets (e.g. trees).
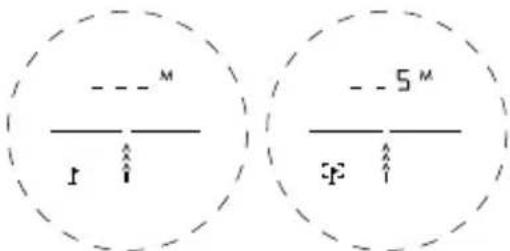
Hold down the power button and slowly move the target area over the fl ag or the desired object until a circle surrounds the fl ag symbol f]. Now only the distance of the fl ag is displayed without interfering background objects like trees affecting the measurement.
22

MODE 3: GOLF SLOPE COMPENSATION
The Golf slope compensation mode adjusts for differences in elevation and is suitable to use for uphill and downhill situations. The [] icon indicates that the unit adjusts the distance based on the slope angle.

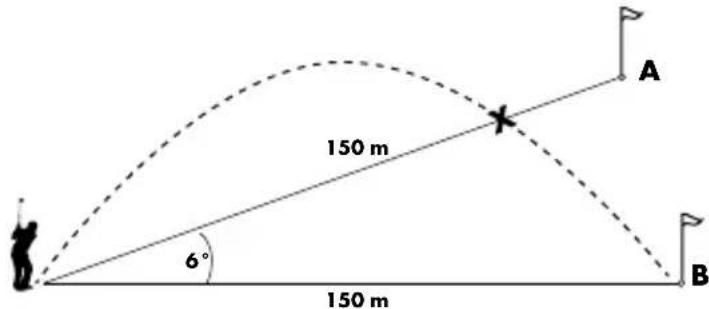
Aim the center target area at an object, and press the power button 🔊. Distance and slope angle readings alternate in the viewfinder.
The distance to both fl ags is 150 metres. However, fl ag A is on a hill. If you were to play this hole at 150 metres, the ball (X) would land in front of the fl ag because you have not taken the slope into account.

natural_image
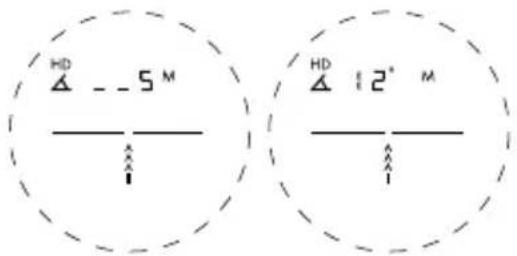
Simple grayscale color gradient bar with a central crosshair symbol (no text or labels)MODE 4: HORIZONTAL DISTANCE MEASUREMENT
Aim the center target area at an object and press the power button ⏻. The horizontal distance and the angle to the target are displayed alternately.
MODE 5: VERTICAL HEIGHT MEASUREMENT
Aim the bottom of the object and press the power button ⏻ to scan the bottom of the object. Next move to the top of the object and press the power button again to scan the top of the object. The distance from the bottom to the top is measured and the height is displayed.
24

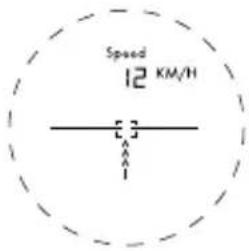
MODE 6: SPEED MODE
Aim at the moving object and press and hold the power button ⏻ until the speed is displayed.
IF NO DISPLAY APPEARS ON THE INTERNAL LCD SCREEN
- Make sure the battery is inserted correctly and hold the power button ⏻ for about 1 second.
- Make sure that no object is blocking the view of the objective lens, such as transparent window glass or hand, etc.
- When measuring, please hold the device steady and aim properly at the target, then press the power button.
CLEANING AND MAINTENANCE
Remove the device from it's energy source before cleaning (remove battery). Lenses (eyepieces and/or object lenses) should be cleaned with a soft, lint-free cloth (e.g. microfi bre) only. Do not use excessive pressure - this may scratch the lens. Dampen the cleaning cloth with a spectacle clean-
25

natural_image
Simple grayscale color gradient bar with a central crosshair symbol (no text or labels)ing fluid and use it on very dirty lenses. Protect the device from dust and moisture. Store the device in the bag supplied or in its original packaging. Batteries should be removed from the device if it is not going to be used for a long period of time.
DISPOSAL

Dispose of the packaging materials properly, according to their type, such as paper or cardboard. Contact your local waste-disposal service or environmental authority for information on the proper disposal.

Do not dispose of electronic devices in the household garbage! As per Directive 2002/96/EC of the European Parliament on waste electrical and electronic equipment and its ad-
aptation into German law, used electronic devices must be collected separately and recycled in an environmentally friendly manner.
WARRANTY & SERVICE
The regular guarantee period is 3 years and begins on the day of purchase. You can consult the full guarantee terms and details of our services at www.bresser.de/warranty_terms.


natural_image
Simple grayscale color gradient bar with a central crosshair symbol (no text or labels)natural_image
Line drawing of a mechanical device with no visible text or symbolsnatural_image
Simple grayscale color gradient bar with a central crosshair symbol (no text or labels)MODO 6: Velocidad (speed)
MODO 2: FIJAR OBJETIVO
natural_image
Color gradient bar with a central target symbol (no text or labels)natural_image
Simple grayscale color gradient bar with a central crosshair symbol (no text or labels)MODO 6: MODO VELOCIDAD
natural_image
Simple grayscale color gradient bar with a central crosshair symbol (no text or labels)TURVALLISUUSOHJEET
LUOKAN 1 LASERLAITE
natural_image
Simple horizontal bar with grayscale color swatches and a central crosshair symbol (no text or labels)EU-VAATIMUSTENMUKAISUU- SILMOITUS
natural_image
Line drawing of a mechanical device with no visible text or symbolsnatural_image
Simple grayscale color gradient bar with a central crosshair symbol (no text or labels)TILA 1: TAVALLINEN ALUEEN MÄÄRITYS
TILA 2: LIPPULUKITUS
natural_image
Simple grayscale color gradient bar with a central crosshair symbol (no text or labels)TILA 4: VAAKAETÄISYYDEN MITTAAMINEN
JOS SISÄISEEN LCD-NÄYTTÖÖN EI TULE NÄKYVIIN MITÄÄN
natural_image
Simple grayscale color gradient bar with a central crosshair symbol (no text or labels)LASERPRODUKT KLASS 1
natural_image
Simple grayscale color gradient bar with a central crosshair symbol (no text or labels)
FARA FÖR BRAND/ EXPLOSION!
A. Strömknapp 🔒
B: Skydd för oklular (fokushjul)
C. Batterifackets lock
D. Remhållare
E. Objektivlins
F. Lasermottagningsobjektiv
G. Mode-knapp (MODE) 52
STARTA ENHETEN
natural_image
Line drawing of a mechanical device with no visible text or symbolsnatural_image
Simple grayscale color gradient bar with a central crosshair symbol (no text or labels)
natural_image
Simple horizontal bar with grayscale color swatches and a central target symbol (no text or labels)natural_image
Simple horizontal bar with grayscale color swatches and a central crosshair symbol (no text or labels)LÄGE 6: HASTIGHETSLÄGE
OM INGEN DISPLAY VISAS PÅ DEN INTERNA LCD-SKÄRMEN
natural_image
Simple grayscale color gradient bar with a central crosshair symbol (no text or labels)SIKKERHEDSANVISNINGER
KLASSE 1-LASERPRODUKT
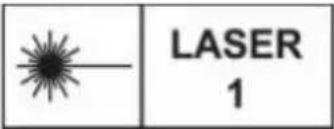
LASER 1
natural_image
Simple grayscale color gradient bar with a central crosshair symbol (no text or labels)EG-KONFORMITETSERKLÆ- RING
natural_image
Line drawing of a mechanical device with no visible text or symbolsnatural_image
Simple grayscale color gradient bar with a central crosshair symbol (no text or labels)TILSTAND 1: STANDARDAFSTANDSMÅLING
natural_image
Simple grayscale color gradient bar with a central crosshair symbol (no text or labels)TILSTAND 4: VANDRET AFSTANDSMÅLING
HVIS DER IKKE VISES NOGEN SKÆRM PÅ DEN INTERNE LCD- DISPLAY
natural_image
Simple grayscale color gradient bar with a central crosshair symbol (no text or labels)natural_image
Color gradient bar with a central crosshair symbol (no text or labels)
Manual_9625821_Golf-Laser-Rangefinder_de-en-es-fi-se-dk_CRIVIT_v032021a
Bresser GmbH
Gutenbergstraße 2
46414 Rhode · Germany
www.bresser.de


@BresserEurope
- INHALTSVERZEICHNIS
- SEITE
- KLASSE 1 LASER PRODUKT
- MODUS 2:
- FLAGGENMODUS
- MODUS 3: GOLF-ENTFERNUNGSKORREKTUR
- MODUS 4: HORIZONTALE ENTFERNUNGSMESSUNG
- ENTSORGUNG
- SAFETY INSTRUCTIONS
- CLASS 1 LASER PRODUCT
- Intended use
- ! RISK of physical injury!
- DANGER of fire and explosion!
- RISK of material damage!
- RESPECT privacy!
- EC DECLARATION OF CONFORMITY
- SCOPE OF DELIVERY
- START THE DEVICE
- DIOPTER ADJUSTMENT
- LOW POWER WARNING
- RANGING UNIT METER (M) / YARD (Y) SELECTION, FOG MODE ON/OFF & GOLF SLOPE COMPENSTATION ON/OFF SETTING
- MODE SELECTION
- MODE 1: STANDARD RANGING
- SCAN MODE
- MODE 2: FLAG LOCK
- MODE 3: GOLF SLOPE COMPENSATION
- MODE 4: HORIZONTAL DISTANCE MEASUREMENT
- MODE 5: VERTICAL HEIGHT MEASUREMENT
- MODE 6: SPEED MODE
- IF NO DISPLAY APPEARS ON THE INTERNAL LCD SCREEN
- CLEANING AND MAINTENANCE
- DISPOSAL
- WARRANTY & SERVICE
- MODO 2: FIJAR OBJETIVO
- MODO 6: MODO VELOCIDAD
- TURVALLISUUSOHJEET
- LUOKAN 1 LASERLAITE
- EU-VAATIMUSTENMUKAISUU- SILMOITUS
- TILA 1: TAVALLINEN ALUEEN MÄÄRITYS
- TILA 2: LIPPULUKITUS
- TILA 4: VAAKAETÄISYYDEN MITTAAMINEN
- JOS SISÄISEEN LCD-NÄYTTÖÖN EI TULE NÄKYVIIN MITÄÄN
- LASERPRODUKT KLASS 1
- FARA FÖR BRAND/ EXPLOSION!
- STARTA ENHETEN
- LÄGE 6: HASTIGHETSLÄGE
- OM INGEN DISPLAY VISAS PÅ DEN INTERNA LCD-SKÄRMEN
- SIKKERHEDSANVISNINGER
- KLASSE 1-LASERPRODUKT
- EG-KONFORMITETSERKLÆ- RING
- TILSTAND 1: STANDARDAFSTANDSMÅLING
- TILSTAND 4: VANDRET AFSTANDSMÅLING
- HVIS DER IKKE VISES NOGEN SKÆRM PÅ DEN INTERNE LCD- DISPLAY
- Bresser GmbH
Brand : CRIVIT
Model : IAN 369598
Category : Uncategorized