
VS 54586-90 B/1 - Wine cellar GRAM - Free user manual and instructions
Find the device manual for free VS 54586-90 B/1 GRAM in PDF.

| Product Type | Built-in wine cellar |
| Model | VS 54586-90 B/1 |
| Brand | Gram |
| Bottle Capacity | Approximately 150-200 bottles (based on standard 0.75L) |
| Temperature Range | 5°C to 20°C (adjustable) |
| Cooling System | Compressor with thermostat control |
| Climate Zone | Single zone (one temperature setting for whole interior) |
| Door Type | Reversible door hinge (left/right opening) |
| Lighting | Interior LED light |
| Shelves | Wooden / metal shelves, slide-out or fixed |
| Dimensions (H x W x D) | Approx. 87 x 60 x 58 cm (may vary) |
| Weight | Approx. 50 kg (empty) |
| Power Supply | 220-240 V ~ 50 Hz |
| Energy Consumption | Low energy, class A or higher (exact on rating label) |
| Installation Type | Built-in or freestanding (clearance required for ventilation) |
| Alarm | Visual/audible alarm for temperature deviations or open door |
| Lock | Door lock with key (optional or standard) |
| Maintenance | Clean with damp cloth, avoid abrasive cleaners; defrost manually when needed |
| Spare Parts Availability | Available through Gram service centers and authorized dealers |
| Safety Features | Thermal overload protection, child lock (if applicable), stable shelves |
Frequently Asked Questions - VS 54586-90 B/1 GRAM
User questions about VS 54586-90 B/1 GRAM
0 question about this device. Answer the ones you know or ask your own.
Ask a new question about this device
Download the instructions for your Wine cellar in PDF format for free! Find your manual VS 54586-90 B/1 - GRAM and take your electronic device back in hand. On this page are published all the documents necessary for the use of your device. VS 54586-90 B/1 by GRAM.
USER MANUAL VS 54586-90 B/1 GRAM
EN- Table of contents
GUIDELINES CONCERNING THE SAFETY OF USE 9
INSTALLATION AND OPERATING CONDITIONS OF THE APPLIANCE 11
CLIMATE RANGE 12
PRACTICAL EVERYDAY TIPS 13
UNPACKING 14
DISPOSAL OF OLD APPLIANCE 15
CONTROLS 16
APPLIANCE CONTROLS- SINGLE AND DUAL ZONE 16
TO SWITCH THE POWER ON/OFF 16
TO CHANGE THE TEMPERATURE 16
OPTIMAL TEMPERATURE SELECTION 17
INDOOR LIGHTING 17
SETTINGS MODE 17
SET THE TEMPERATURE UNIT °F OR °C. 17
SET THE DISPLAY BACKLIGHT INTENSITY 17
SET THE APPLIANCE INTERIOR LIGHTING INTENSITY. 17
SET SOUNDS. 17
INTERNAL HUMIDITY 17
TEMPERATURE DISPLAY 18
SILENT MODE 18
DYNAMIC COOLING MODE 18
WEEKEND MODE 18
TEMPERATURE ALARM 18
CARE AND CLEANING 19
REMOVING THE SHELVES 19
CLEANING 19
TROUBLESHOOTING 19
IF THE APPLIANCE IS NOT WORKING, CHECK 19
THE APPLIANCE IS WORKING, BUT NOT VERY WELL, CHECK 20
THE APPLIANCE IS NOISY, CHECK 20
THE LIGHT DOES NOT WORK, CHECK 20
THE DOOR WILL NOT CLOSE PROPERLY, CHECK 20
THE DISPLAY SHOWS "E1" OR "E2" 20
EPREL 20
WARRANTY AND AFTER SALES SERVICE 21
WARRANTY 21
DA- INDHOLDSFORTEGNELSE
VEJLEDNING I SIKKER BRUG 23
INSTALLATION OG BETJENINGSFORHOLD FOR APPARATET 25
KLIMAINTERVAL 26
PRAKTISKE HVERDAGSTIPS 27
UDPAKNING 28
BORTSKAFFELSE AF DET GAMLE PRODUKT 28
BETJENING 29
APPARATETS BETJENINGSKNAPPER - ENKELT- OG DOBBELTZONE 29
TÆND/SLUK FOR STR∅MMEN. 29
ÆNDRING AF TEMPERATUREN 29
VALGFRIT TEMPERATURVALG 30
LYS I SKABET 30
INDSTILLINGSTILSTAND 30
INDSTIL TEMPERATURENHE DEN TIL °F ELLER °C. 30
INDSTIL INTENSITETEN AF DISPLAYETS BAGBELYSNING 30
INDSTIL INTENSITETEN AF APPARATETS INDRE LYS. 30
INDSTIL LYDE. 30
FUGTIGHED I SKABET 30
TEMPERATURDISPLAY 31
LYDL∅S TILSTAND 31
DYNAMISK K∅LETILSTAND 31
WEEKEND-TILSTAND 31
TEMPERATURALARM 31
PLEJE OG RENG∅RING
FJERNELSE AF HYLDERNE 32
RENG∅RING 32
FEJLFINDING 32
HVIS APPARATET IKKE VIRKER 32
HVIS APPARATET FUNGERER, MEN IKKE SÆRLIG GODT 33
HVIS APPARATET LARMER 33
HVIS LYSET IKKE VIRKER 33
HVIS DØREN IKKE LUKKER RIGTIGT 33
DISPLAYET VISER "E1" ELLER "E2" 33
EPREL 33
GARANTI OG SERVICE 34
GARANTI 34
SV- INNEHÅLLSFÖRTECKNING
SÄKERHETSANVISNINGAR 36
INSTALLATION OCH FÖRUTSÄTTNINGAR FÖR ANVÄNDNING 38
TILLÅTET TEMPERATUROMRÅDE 39
PRAKTISKA TIPS I VARDAGEN 39
UPPACKNING 41
SKROTA PRODUKTEN 41
REGLAGE 42
DISPLAYEN VISAR "E1" ELLER "E2" 46
EPREL 46
GARANTI OCH SERVICE 47
GARANTI 47
NO- INNHOLDSFORTEGNELSE
RETNINGSLINJER FOR TRYGG BRUK 49
INSTALLERING OG BRUK AV APPARATET 51
KLIMAOMRÅDE 52
PRAKTISKE HVERDAGSTIPS 52
UTPAKKING 54
AVHENDING AV GAMMELT APPARAT 54
KONTROLLER 55
APPARATKONTROLLER - ENKEL- OG DOBBELTSONE 55
FOR Å SLÅ STR∅MMEN PÅ/AV 55
FOR Å ENDRE TEMPERATUREN 55
VELG OPTIMAL TEMPERATUR 56
INNVENDIG LYS 56
INNSTILLINGSMODUS 56
VELG TEMPERTURVISNING I °F ELLER °C. 56
STILL INN BAKGRUNNSLYSETS INTENSITET 56
STILL INN BELYSNINGSINTENSITETEN FOR ENHETEN. 56
STILL INN LYDENE. 56
INNVENDIG LUFTFUKTIGHET 56
TEMPERATURDISPLAY 56
STILLEMODUS 57
DYNAMISK KJ∅LEMODUS 57
HELGEMODUS 57
TEMPERATURALARM 57
VEDLIKEHOLD OG RENGJ∅RING
TA UT HYLLENE 58
RENGJ∅RING 58
FEILS∅KING 58
HVIS APPARATET IKKE VIRKER, KONTROLLER F∅LGENDE 58
APPARATET VIRKER, MEN IKKE HELT SOM DET SKAL, KONTROLLER F∅LGENDE 59
APPARATET BRÅKER, SJEKK F∅LGENDE 59
LYSET VIRKER IKKE, SJEKK F∅LGENDE 59
DØRA LUKKER SEG IKKE ORDENTLIG, SJEKK F∅LGENDE 59
DISPLAYET VISER "E1" ELLER "E2" 59
EPREL 59
GARANTI OG ETTERSALGSSERVICE 60
GARANTI 60
FI- SISÄLLYSLUETTELO
TURVALLISTA KÄYTTÖÄ KOSKEVIA OHJEITA 62
LAITTEEN ASENNUS- JA KÄYTTÖEHDOT 64
ILMASTOALUE 65
KÄYTÄNNÖN VINKKEJÄ 65
PAKKAUKSEN PURKAMINEN 67
VANHAN LAITTEEN HÄVITYS 67
SÄÄTIMET 68
LAITTEEN SÄÄTIMET - YKSITTÄISALUE JA KAKSOISALUE 68
VIRRAN KYTKEMINEN PÄÄLLE JA POIS PÄÄLTÄ 68
LÄMPÖTILAN MUUTTAMINEN 68
IHANTEELLISEN LÄMPÖTILAN VALINTA 69
SISÄVALAISTUS 69
ASETUKSET-TILA 69
ASETA LÄMPÖTILAN YKSIKÖKSI °F TAI °C. 69
VALITSE NÄYTÖN TAUSTAN KIRKKAUS. 69
MÄÄRITÄ LAITTEEN SISÄVALAISTUKSEN KIRKKAUS. 69
MÄÄRITÄ ÄÄNET. 69
SISÄINEN KOSTEUS 69
LÄMPÖTILANÄYTTÖ 70
HILJAINEN TILA 70
DYNAAMINEN JÄÄHDYTYSTILA 70
VIIKONLOPPUTILA 70
LÄMPÖTILAHÄLYTYS 70
HOITO JA PUHDISTUS 71
HYLLYJEN POISTO 71
PUHDISTUS 71
VIANMÄÄRITYS 71
JOS LAITE EI TOIMI - TARKISTA SEURAAVAT: 71
LAITE TOIMII, MUTTA EI KOVIN HYVIN - TARKISTA SEURAAVAT: 72
LAITE PITÄÄ MELUA - TARKISTA SEURAAVAT: 72
VALO EI TOIMI - TARKISTA SEURAAVAT: 72
OVI EI SULKEUDU OIKEIN - TARKISTA SEURAAVAT: 72
NÄYTÖSSÄ NÄKYY "E1" TAI "E2" 72
EPREL 72
TAKUU JA MYYNNIN JÄLKEINEN HUOLTO 73
TAKUU 73
Dear Customer!
Your appliance is exceptionally easy to use and extremely efficient. Before being packaged and leaving the manufacturer, the appliance was thoroughly checked with regard to safety and functionality.
Before using the appliance, please carefully read these Operating Instructions
Sincerely,

GUIDELINES CONCERNING THE SAFETY OF USE
- The appliance is intended for household use only.
- The manufacturer reserves the right to introduce changes which do not affect the operation of the appliance.
- The Manufacturer shall not be held liable for damage arising from the failure to observe the instructions contained in this manual.
- Keep this manual for future reference, or to pass it over to the next user.
- This appliance is not intended for use by persons (including children) with limited physical or mental capabilities and persons who lack experience or familiarity with the appliance.
- Do not allow children to use the appliance. Do not allow them to play with the appliance. They must not climb inside the drawers and swing on the doors.
- The appliance operates properly at the ambient temperature (see product fiche). Do not use it in the cellar, unheated summer cottage during autumn and winter.
- When placing, moving, lifting the appliance, do not hold the door handles, do not pull the condenser at the rear part of the refrigerator and do not touch the compressor unit.
- Pull the plug out from the mains socket before each maintenance activity. Do not pull on the cord, but hold the body of the plug instead.
- The “cracking” sound, which the appliance may emit is caused by the expansion and contraction of parts as a result of temperature variations.
-
For safety reasons do not repair the appliance yourself. Repairs carried out by persons who do not have the required qualifications may result in serious danger for the user of the appliance.
-
Make sure you do not damage the cooling system, by puncturing the refrigerant pipes in the evaporator or breaking the pipes. The refrigerant is flammable. If the refrigerant makes contact with the eyes, rinse them with clean water and call for medical assistance immediately.
- Important! If the power cord is damaged, it should be replaced by the manufacturer or specialist repair centre or a qualified person in order to avoid danger.
- When performing activities, such as cleaning, maintenance or moving, the appliance must be completely disconnected from power supply (by pulling the plug out from the socket)
- This appliance can be used by children aged 8 years and older or by persons with physical, mental or sensory handicaps, or by those who are inexperienced or unfamiliar with the appliance, provided they are supervised or have been instructed how to safely use the appliance and are familiar with risks associated with the use of the appliance. Ensure that children do not play with the appliance. Cleaning and maintenance of the appliance should not be performed by children unless they are 8 years or older and are supervised by a competent person.
- Do not clean the appliance with steam
- Keep the appliance and its power cord away from children under 8 years old.
- Do not immerse the power cord or plug in water.
- Keep cord away from heated surfaces.
- Do not allow the connection cord hanging over the edge of a table or counter.
- Do not use any electrical appliances inside the chamber
- Do not use any tools to speed up the defrosting process
-
Regularly clean the ventilation openings (in case of built-in appliances or those installed under the worktop)
-
This appliance is not designed to be controlled by electronic timers or other devices that cut off power directly or remotely.
- In case of accidental spillage of liquids on electrical components, immediately unplug your appliance from the power supply.
- Make sure that the power cord is not crushed or damaged during installation.
- Disable the appliance before disposing of it. Unplug the appliance from the power supply and cut off the power cord. To prevent children or animals from being trapped in the appliance, remove the doors, hinges and locks.
- Note: If the appliance does not have a freezer compartment ( ^ ^** ), it is not suitable for freezing foodstuffs.
- Pursuant to Commission Regulation (EU) 2019/2019, the minimum availability period for spare parts necessary to repair the appliance is 7 or 10 years depending on the type and purpose of the spare part.
- The list of spare parts and the ordering procedure are available on the websites of the manufacturer, importer or an authorized representative.
INSTALLATION AND OPER- ATING CONDITIONS OF THE APPLIANCE
- Connect the appliance to the power supply 24 hours after unpacking and setting in the final location.
• Take the product out of the package, remove the scotch tape protecting the door and the equipment. Any remaining adhesive stains may be removed with a mild washing agent. - Clean the interior surface of the cooler and the elements of the equipment with a washing agent dissolved in lukewarm water, then wipe it dry.
- Place the cooler on an even, flat and stable surface, in dry, aired and shaded room, far from the heat sources such as: oven, hob, central heating radiators, central heating pipes, hot water installation, etc.
- On the exterior surface of the product may be a protective foil, this foils should be removed.
- Make sure the appliance is placed in a horizontal position by screwing
in the 2 adjustable front legs (fig. 1)
- Keep free space on the sides and rear of the appliance (see installation drawing)
- When you install your wine cooler inside a furniture cabinet, make sure that the ventilation grille located in the bottom of the appliance is not blocked.
- Odours may be released when you first start your appliance. It will dissipate when the interior of the appliance cools down
- When you first start your wine cooler, the compressor will run continuously until the desired temperature is reached inside the chamber
- When you unplug your appliance from the power supply, it is recommended to wait 5 minutes before you plug it back in. This will reduce the risk of damage to the compressor.
- On selected models, the correct temperature will be shown on the display only a few hours after the wine cooler has been put into operation
- This appliance should be connected to AC 220-240V 50Hz supply socket. The socket must be fitted properly, and must be supplied with an earthing conduit and a 10A fuse.
- It is a legal requirement that the appliance is properly earthed. The manufacturer will not be held liable for any damage or injury which may result from the failure to fulfil this requirement.
- Do not use adapters, multiple sockets and two-wire extension leads. If it is necessary to use the extension lead, it must be equipped with a protection ring and a single socket and must have a VDE/GS safety certificate.
- If an extension lead is used (with a protection ring and safety certificate), its socket must be located at a safe distance, away from the sinks, and must not be in a place where it could be flooded by water or waste water.
- Make sure the appliance can be easily disconnected from the mains, either by pulling the plug out of the mains socket, or by switching the two-pole switch off.
Climate range
The information about the climate range of the appliance is provided on the rated plate. It indicates at which ambient temperature (that is, room temperature, in which the appliance is working) the operation of the appliance is optimal (proper).
Climate class Allowable ambient temperature
| SN | Extended Temperate | This refrigeration appliance is intended for use at an ambient temperature ranging between 10°C and 32°C |
| N Temperate | This refrigeration appliance is intended for use at an ambient temperature ranging between 16 °C and 32°C | |
| ST Subtropical | This refrigeration appliance is intended for use at an ambient temperature ranging between 16 °C and 38 °C | |
| T Tropical | This refrigeration appliance is intended for use at an ambient temperature ranging between 16 °C and 43 °C | |
PRACTICAL EVERYDAY TIPS
- If the light inside the appliance remains turned on, keep in mind that the temperature inside the appliance will be higher
- Temperature inside the appliance depends on the amount and type of stored wine bottles
- To ensure user safety and high quality of stored wine, do not install the appliance in damp rooms
- Store wine bottles in designated spaces
- Your wine cooler has a limited capacity. Do not place more bottles in your wine cooler than recommended in specification
- Do not open the wine cooler door if it is not necessary
- Do not cover the shelves with aluminium foil or other material. This blocks the air circulation inside the appliance
- To avoid damage to the door seal, make sure that the door is completely open before pulling out the shelf. The shelves should be inserted as far as possible, otherwise the shelf may deform and damage the door seal.
- Do not extend the loaded shelves beyond the extension limit (about 1/3 of the shelf length)
- This appliance is designed for storing bottles of wine. Do not use it for any other purpose.
• Temperature stability is very important when storing wine.
- Exposing your wine cooler to sunlight, significant temperature fluctuations, high humidity and vibrations may cause the wine to go bad.
- In periods of high humidity, condensed water vapour may appear on the outer surfaces of the glass door. To prevent this, install the appliance in a dry, adequately ventilated room.
- Selected models have an external handle. You need to install it on your own. Do not use electric tools for this purpose (fig. 3*). To do this, pull the door seal slightly to the side and place the screws on the inside of the door. Align the handle with the holes on the outside of the door and tighten the screws with a screwdriver. Reinstall the door seal.
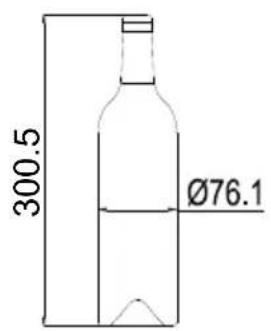
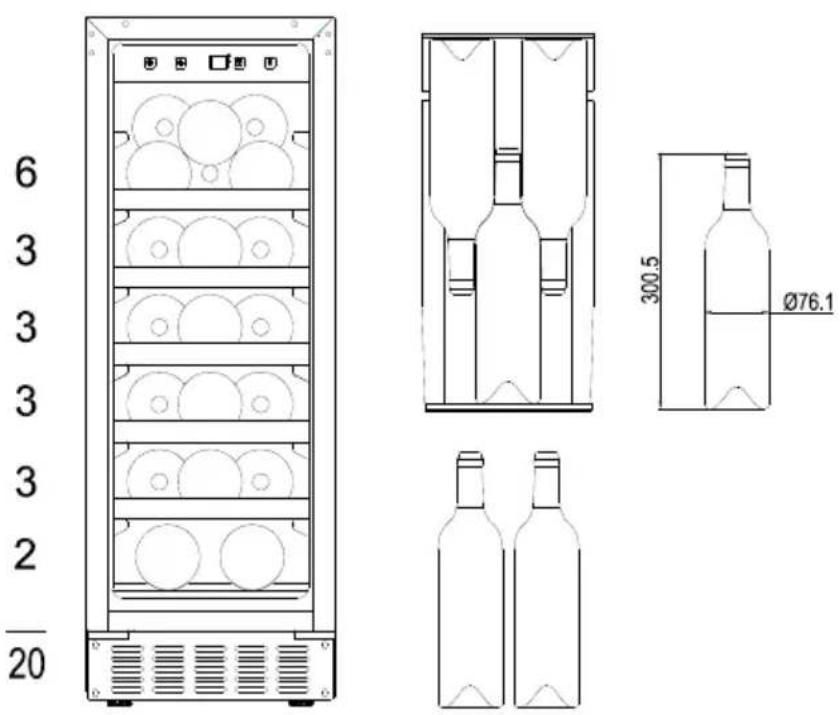
- The maximum capacity of the appliance is given in the product sheet enclosed with the wine cooler. This capacity applies to standard 0.75 litre bottles of Bordeaux.
- Selected models have an Anti-tip kit. Install it according to the enclosed diagram (fig. 6*).
- This refrigeration appliance is intended for use as a built-in appliance.
- To achieve the most effective food preservation for the longest possible time and to avoid wasting any food, position the products as shown in Figure 12. In addition, this figure illustrates the layout of drawers, baskets and shelves, which allows the most efficient use of energy.
- Optimal temperature and storage conditions will extend product shelf life and optimize electricity consumption. Optimal storage temperature range should be stated on the food product packaging.
UNPACKING

natural_image
Simple line drawing of a three chasing recycling symbol (no text or labels)During transportation, protective packaging was used to protect the appliance against any damage. After unpacking, please dispose of all elements of packaging in a way that will not cause damage to the environment.
All materials used for packaging the appliance are environmentally friendly; they are 100% recyclable and are marked with the appropriate symbol.
Important! Packaging materials (bags, polyethylene, polystyrene, etc.) should be kept away from children during unpacking.
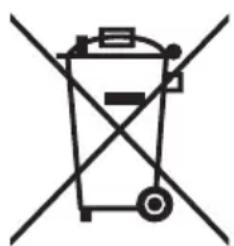
DISPOSAL OF OLD APPLIANCE
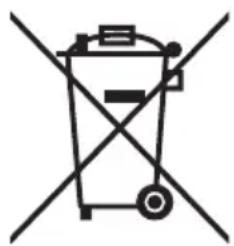
natural_image
Symbol of a trash bin crossed out by two diagonal lines (no text or labels)
In accordance with European Directive 2012/19/EU and local legislation regarding used electrical and electronic goods, this appliance is marked with the symbol of the crossed-out waste container. This marking indicates that the appliance must not be disposed of together with other household waste after it has been used.
The user is obliged to hand it over to waste collection centre collecting used electrical and electronic goods. The collectors, including local collection points, shops and local authority departments provide recycling schemes.
Proper handling of used electrical and electronic goods helps avoid environmental and health hazards resulting from the presence of dangerous components and the inappropriate storage and processing of such goods.
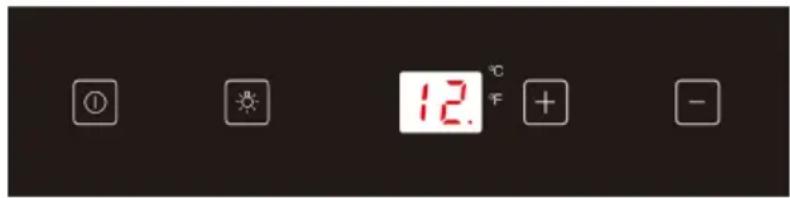
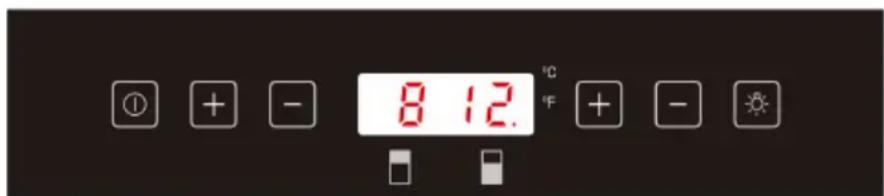
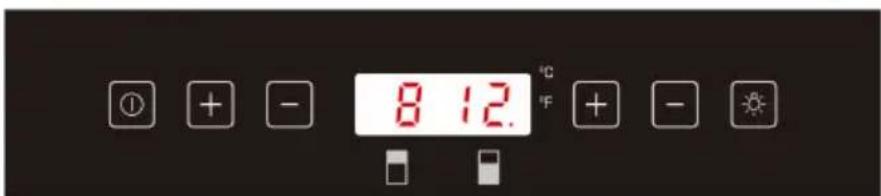
CONTROLS
Appliance controls- single and dual zone
The control panel is shown in figure 4. For reference it is also shown below:
Single zone
Dual zone
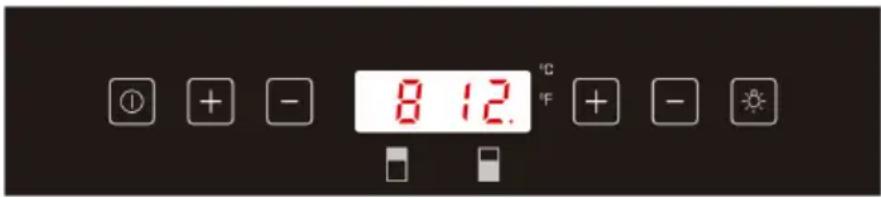
① - Power button
- Light button
+ - "+" button
- “-” button
To switch the power on/off
Press and hold the power button for one second to switch the wine cooler on.
Press and hold the power button for five seconds to switch the wine cooler off.
To change the temperature
- Press the "+" or "-" buttons until the required temperature is shown on the display.
- The Preset temperature is 12^ / 54^ . (for single zone models)
- For dual zone models: For the upper/left zone, the default temperature setting is 8°C/46°F, and for the lower/right zone, the default temperature setting is 12°C/54°F.
- To view the set temperature, touch the "+" or "-" button at any time and the set temperature will flash in the LED display for five seconds.
- The display shows the current internal temperature when the wine cooler is on.
Note: The temperature in the lower zone must be set either the same as or higher than the temperature in the upper zone.
Optimal temperature selection
Whilst wine is best stored at temperatures between 13 and 15°C, your wine can also be stored at drinking temperature. For red wine this is between 15 and 17°C, and for white wine between 12 and 13°C.
Indoor lighting
Press and hold the light button for 5 seconds to turn the light on or off. Activation is indicated a dot on the display.
Settings mode
Some settings are available depending on the mode.
Set the temperature unit °F or °C.
Touch and hold +for 5 seconds, then use and to set the unit. Touch Ⓞ to confirm. Touch +for 5 seconds to exit.
Set the display backlight intensity
Touch and hold +for 5 seconds, then touch once. Now use and to set the display backlight intensity. The default setting is d2. Touch to confirm. Touch +for 5 seconds to exit.
Set the appliance interior lighting intensity.
Touch and hold +for 5 seconds, then touch twice. Now use and to set the interior lighting intensity. The default setting is L1 Touch to confirm. Touch +for 5 seconds to exit.
Set sounds.
Touch and hold + for 5 seconds, then touch four times. Now use + and - to set the sounds. The default setting is S1. The possible settings are as follows:
S0: Touch sensor sound ON / Audio alarm OFF
S1: Touch sensor sound ON / Audio alarm ON
S2: Touch sensor sound OFF / Audio alarm OFF
S3: Touch sensor sound OFF / Audio alarm ON
Touch ☉ to confirm. Touch ☐ for 5 seconds to exit.
Internal Humidity
According to the model wine coolers are equipped with a humidity system to maintain optimal humidity within the wine cooler. Fill the humidity reservoir approximately 3/4 full with water. Place the reservoir on the runners on the top shelf as shown in fig. 2. Ensure it is located correctly to prevent water spillage. Check the water level regularly and refill if required.
Temperature display
The temperature display will show the current internal temperature. The display flashes:
- When a different temperature is being set
- If the internal temperature is +/- 5^ away from the set temperature. This serves as a warning to prevent damage to the contents of the appliance should the temperature be too high.
Silent Mode
Touch and hold + for 5 seconds, then touch five times. Now use an - to set the silent mode (F0). When the required temperature is reached, the appliance operates without the fan. This is the default mode of the wine cooler.
Dynamic cooling mode
Touch and hold + for 5 seconds, then touch five times. Now use + and - to set the dynamic mode (F1- half time, F2- full time). The fan alternately turns on and off to maintain air circulation even when the required temperature is reached. This ensures uniform and stable humidity and temperature in the wine cooler for ideal long-term wine storage conditions.
Weekend mode
This will switch off the displays, interior light and audible alarms. The cooling process will continue.
To switch the Weekend mode on, touch and hold the power and light keys simultaneously for five seconds. The indicator light will flash four times and confirm the mode is on. Mode will switch off automatically after 48 hours, but to switch the mode off at any time, touch and hold the power and light keys simultaneously for five seconds.
Temperature alarm
If the temperature rises or falls outside the set temperature range, an alarm will sound and the display will flash. This may be because:
- The wine cooler has not yet reached the set temperature (when first switched on).
• There has been a power failure.
• The wine cooler has been overloaded. - The door is not closed properly.
CARE AND CLEANING
Always disconnect the appliance from the mains electrical supply before any cleaning or maintenance.
Removing the shelves
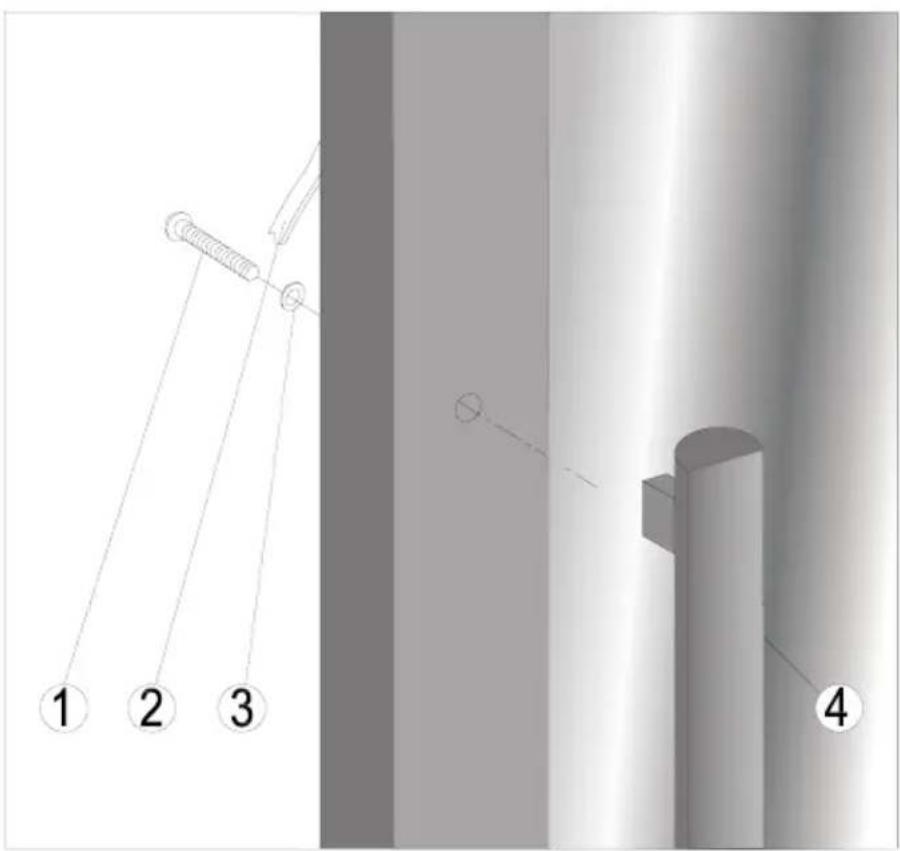
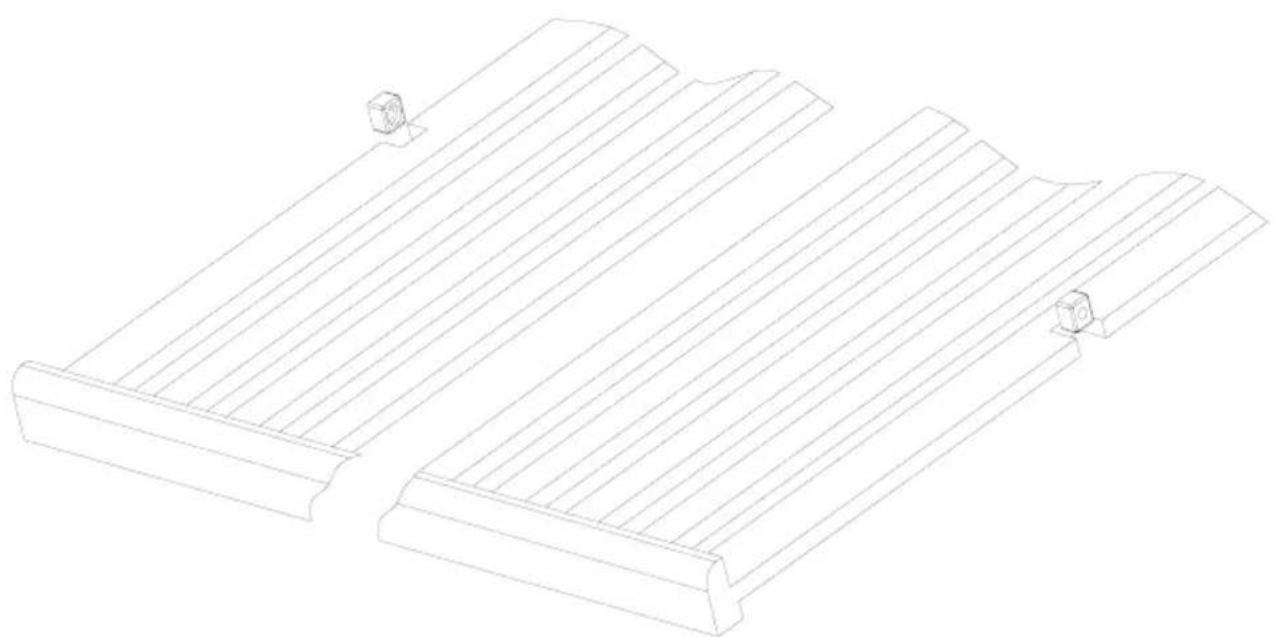
- To remove a shelf from the wine cooler, first remove all bottles from the shelf, then pull the shelf forwards until the groove on either side of the shelf is level with the plastic peg on either side of the cabinet (as shown in fig 5). Then lift the shelf up and pull forwards.
- To replace the shelves, follow the steps above in reverse order.
Cleaning
- Do not use abrasive products or detergents. After washing, rinse and dry thoroughly.
- The exterior of the appliance and the door seal should be cleaned using mild soapy water and dried thoroughly.
- The interior cabinet should be cleaned using a solution of bicarbonate of soda and lukewarm water.
- Clean the shelves separately by hand using soap and water. Do not put them in the dishwasher.
- Ensure that the cloth is only moist when cleaning the control panel and electrical parts, and that all water is thoroughly dried off before reconnecting the power.
- Once cleaning is complete, reconnect the mains electrical supply.
- If the appliance is not to be used for prolonged periods of time, unplug and clean the appliance thoroughly. The door should be left slightly ajar to prevent the formation of odours or condensation
TROUBLESHOOTING
If you have any problems with your appliance, you should check the troubleshooting guide prior to calling Call Center to prevent unnecessary service calls and potential cost.
If the appliance is not working, check
• There is power to the appliance
- The house fuses or circuit breakers are intact and the fuse in the plug has not blown.
- The plug socket is functioning correctly. To check this, plug another electrical appliance in to see if the socket is working.
- The ambient temperature is between 16^ to 32^ .
The appliance is working, but not very well, check
- The appliance is not overloaded.
- The thermostat is set to an appropriate temperature.
- The door is closing properly.
• The door gasket is sealing properly - There is enough ventilation at the side and rear walls.
- The ambient temperature is between 16^ to 32^ .
The appliance is noisy, check
- The appliance is level and stable.
- The cooling gas will make some noise, even when the compressor is not running.
- During operation, it is normal for the fan to run, even when the compressor is not running.
The light does not work, check
- There is power to the appliance.
- The house fuses or circuit breakers are intact and the fuse in the plug has not blown.
- The light button is not set to off.
Please note:
The LED lighting cannot be replaced without a service call
The door will not close properly, check
- The appliance is level and stable.
- If the door has been removed, it may not have been correctly refitted.
• The door seal is dirty. - The shelves are not positioned correctly.
The display shows "E1" or "E2"
- The temperature sensor has failed. Please contact Call Center
EPREL
For more information about the product, please refer to the EU EPREL Product Database at https://eprel.ec.europa.eu. For more information, please use your mobile device to scan the QR code on the energy label or enter the product model listed on the energy label in the EPREL search engine https://eprel.ec.europa.eu/
WARRANTY AND AFTER SALES SERVICE
Warranty
Warranty service as stated on the warranty card. The manufacturer shall not be held liable for any damage caused by improper use of the product.
Service
- The manufacturer recommends that all repairs and adjustments be carried out by the Factory Service Technician or the Manufacturer's Authorized Service Point. For safety reasons, repairs should be referred to professionals.
- Repairs carried out by unqualified persons may seriously endanger the appliance user.
- The minimum warranty period for the appliance offered by the manufacturer, importer or authorized representative is given in the warranty card.
- The warranty shall be void if you make any independent adaptations or alterations, tamper with seals or other appliance safety devices or its parts or interfere with the appliance contrary to operating instructions.
In the event of appliance malfunction, request assistance or repair.
If your appliance needs repair, please contact the service centre. Please see warranty card for address and contact details of our service centre. Before contacting us, please have ready the appliance serial number, which can be found on the identification sticker: For your convenience, please write it down below:
Manufacturer's Declaration
The manufacturer hereby declares that this product meets the requirements of the following European directives:
• Low Voltage Directive 2014/35/EC
• Electromagnetic Compatibility (EMC) Directive 2014/30/EC
• ErP Directive 2009/125/EC
• Directive RoHS 2011/65/EC
and has thus been marked with the symbol and been issued with a declaration of compliance made available to market regulators.
Kære kunde!
INSTALLATION OG BETJE-NINGSFORHOLD FOR APPA-RATET
natural_image
Recycling symbol composed of three chasing arrows forming a triangle (no text or labels)BORTSKAFFELSE AF DET GAMLE PRODUKT
natural_image
Symbol of a trash bin crossed out by two diagonal lines (no text or labels)natural_image
Recycling symbol composed of three chasing arrows forming a triangle (no text or labels)natural_image
Symbol of a trash bin crossed out by two diagonal lines (no text or numbers present)Två zoner
① - Strömknapp
- Belysningsknapp
+ - "+"-knapp
- -"-"-knapp
natural_image
Recycling symbol composed of three chasing arrows forming a triangle (no text or labels)Under transport er produktet emballert mot eventuelle skader. Etter utpakkingen må du ayhende alle emballasjeelementer på en måte som ikke skader miljøet.
Alle apparatets emballasjematerialer er miljøvennlige, 100 % resirkulerbare og merket med relevant symbol.
natural_image
Symbol of a trash bin crossed with a diagonal line, no text or labels presentnatural_image
Recycling symbol composed of three chasing arrows forming a triangle (no text or labels)natural_image
Symbol of a trash bin crossed out by two diagonal lines (no text or numbers present)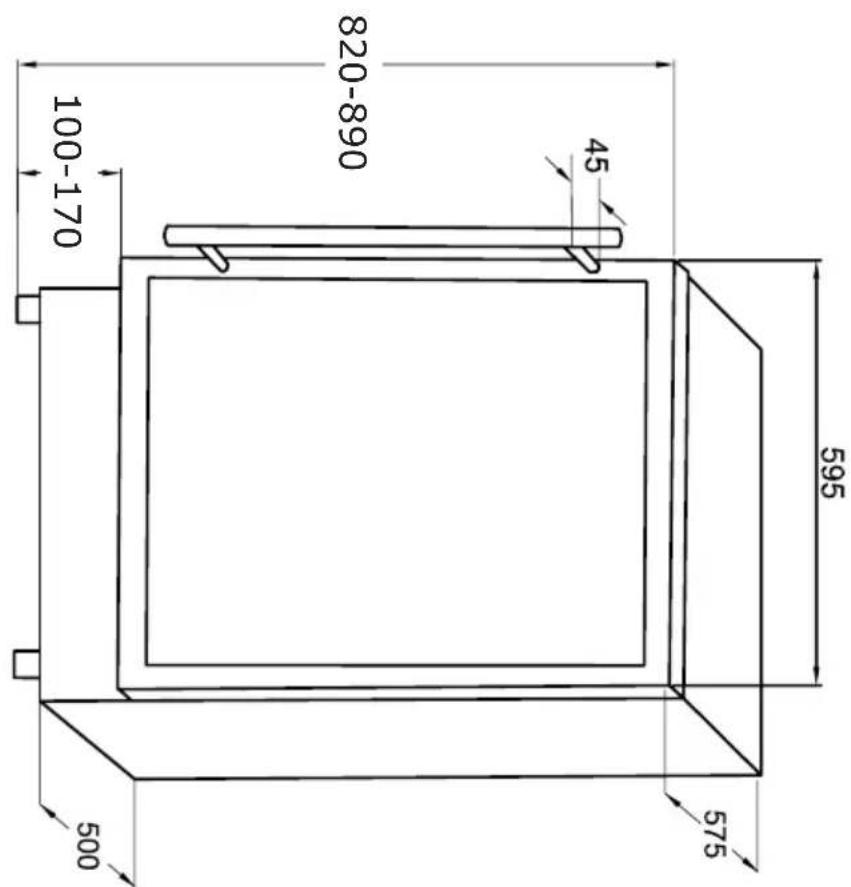
VS 54586-90 B*
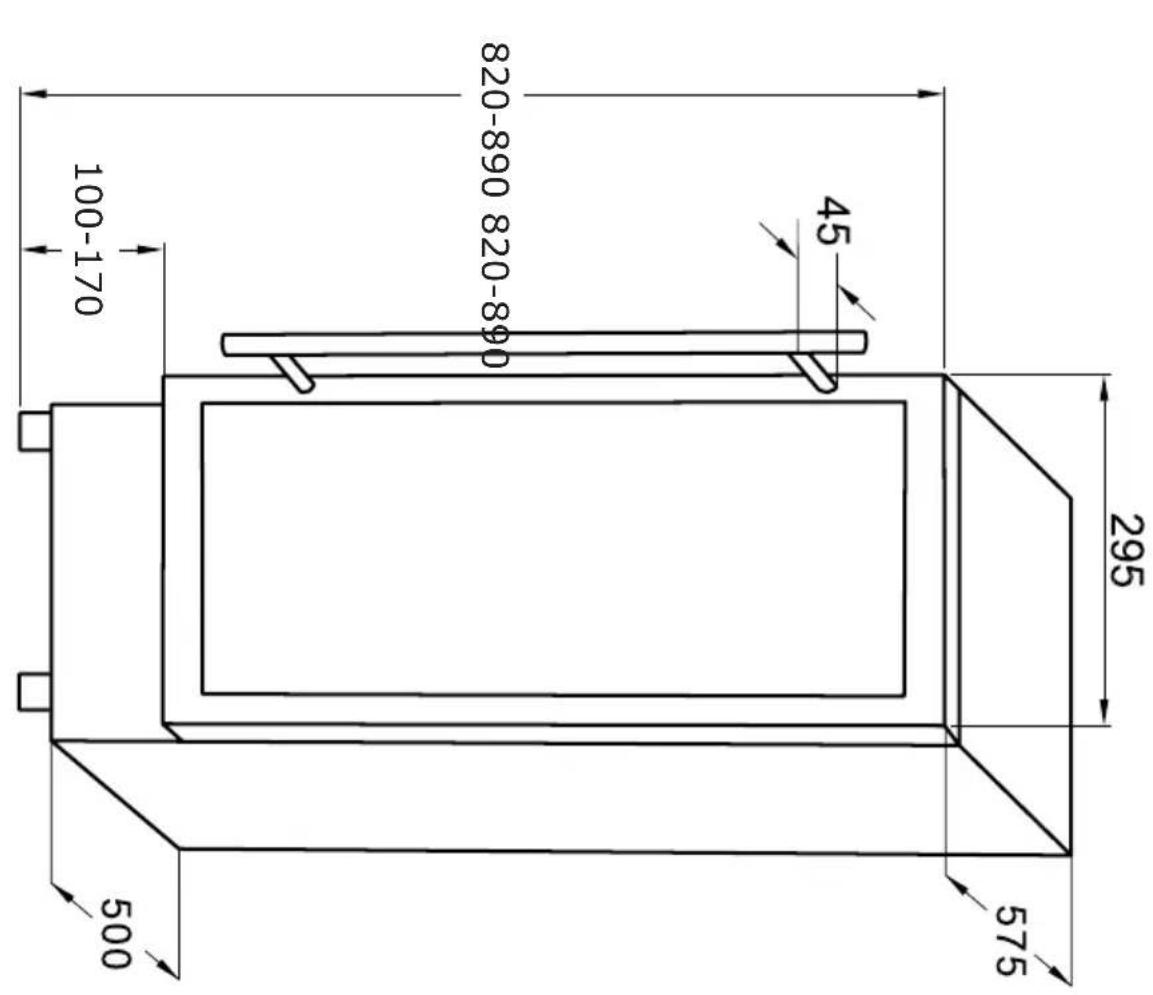
VS 52083-90 B* VS 50781-90 B*
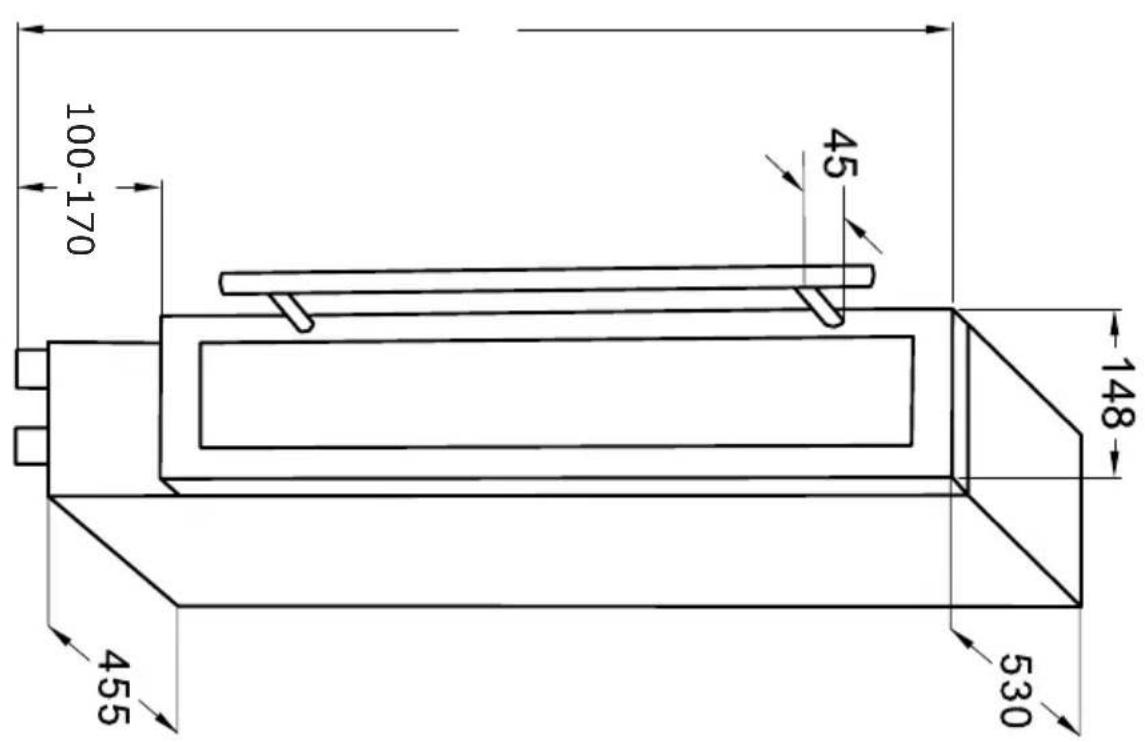

| A [mm] B | [mm] C | [ mm] D | [mm] | |
| VS 50781-90 B* | 148 150 | 455 75 | ||
| VS 52083-90 B* | 295 300 | 460 115 | ||
| VS 54586-90 B* | 595 600 | 460 115 |
- Since the appliance will be built into a furniture unit, before installing the appliance, prepare a ventilation duct behind the appliance running from the floor to the top of the furniture unit. Ensure there is free space between the back of the appliance and the wall, which is not blocked by furniture. The area of ventilation grille should be at least 300 cm ^2
- To ensure correct appliance operation never cover any ventilation openings. Regularly clean the ventilation grille.
DA:
natural_image
Technical line drawing of a mechanical component with slots and a bracket (no text or symbols)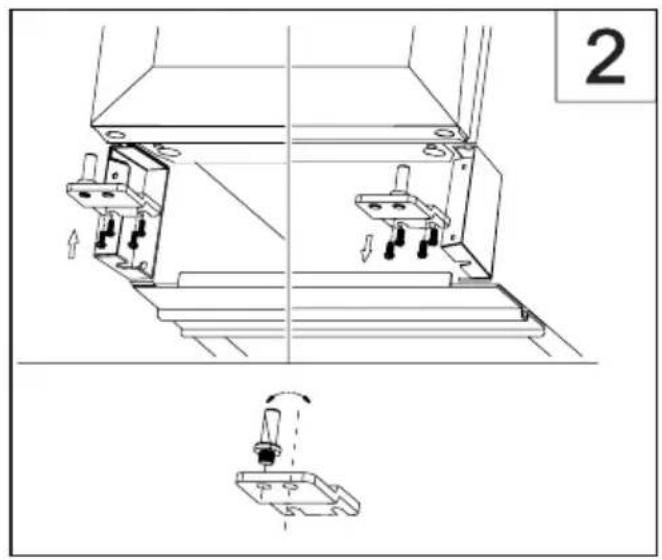
natural_image
Technical line drawing of a mechanical assembly with two components and a close-up view of a component (no text or symbols)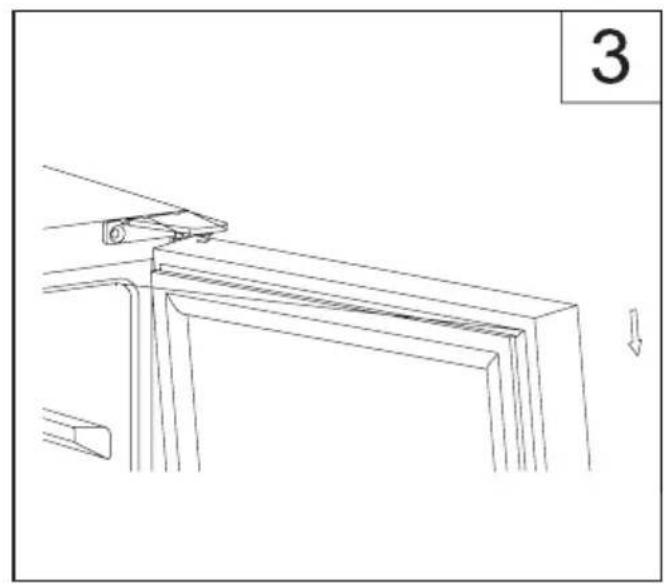
natural_image
Technical line drawing of a mechanical component with a downward arrow indicating motion (no text or symbols)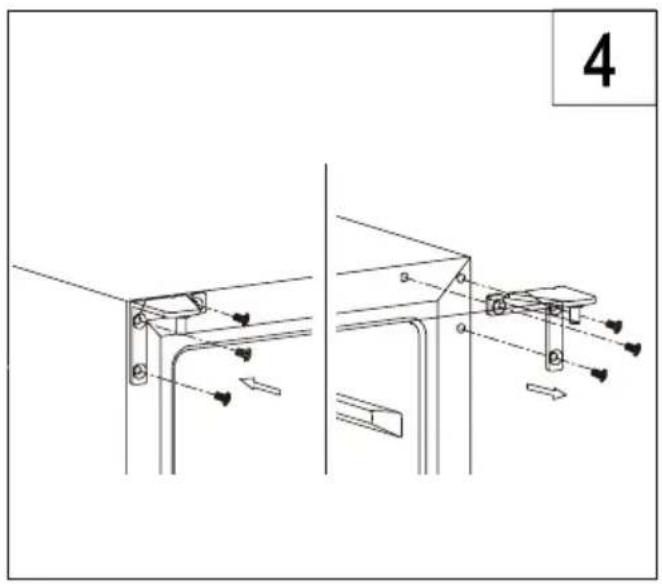
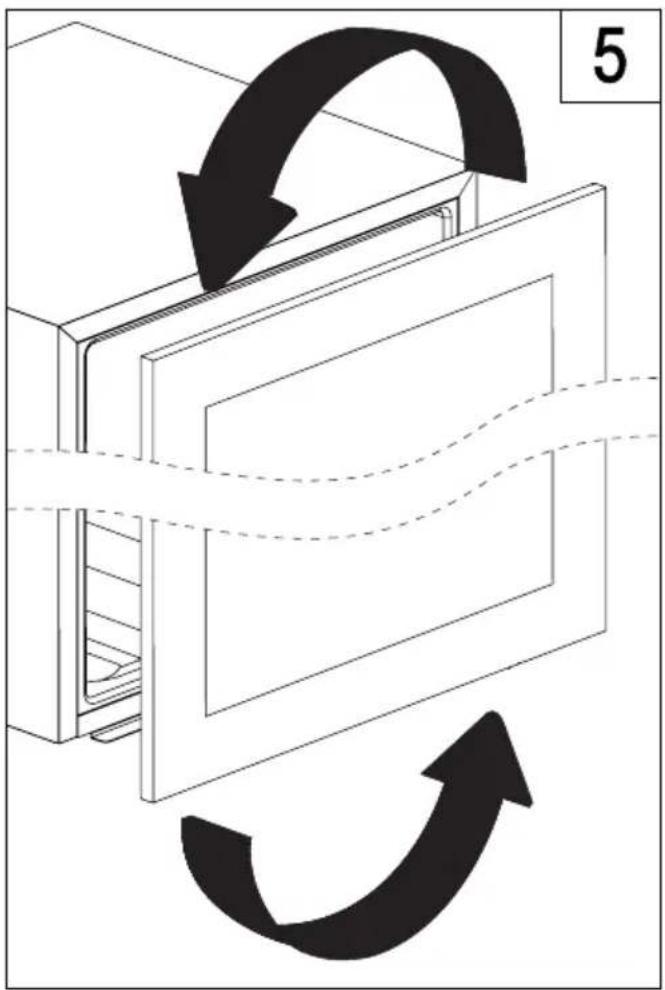
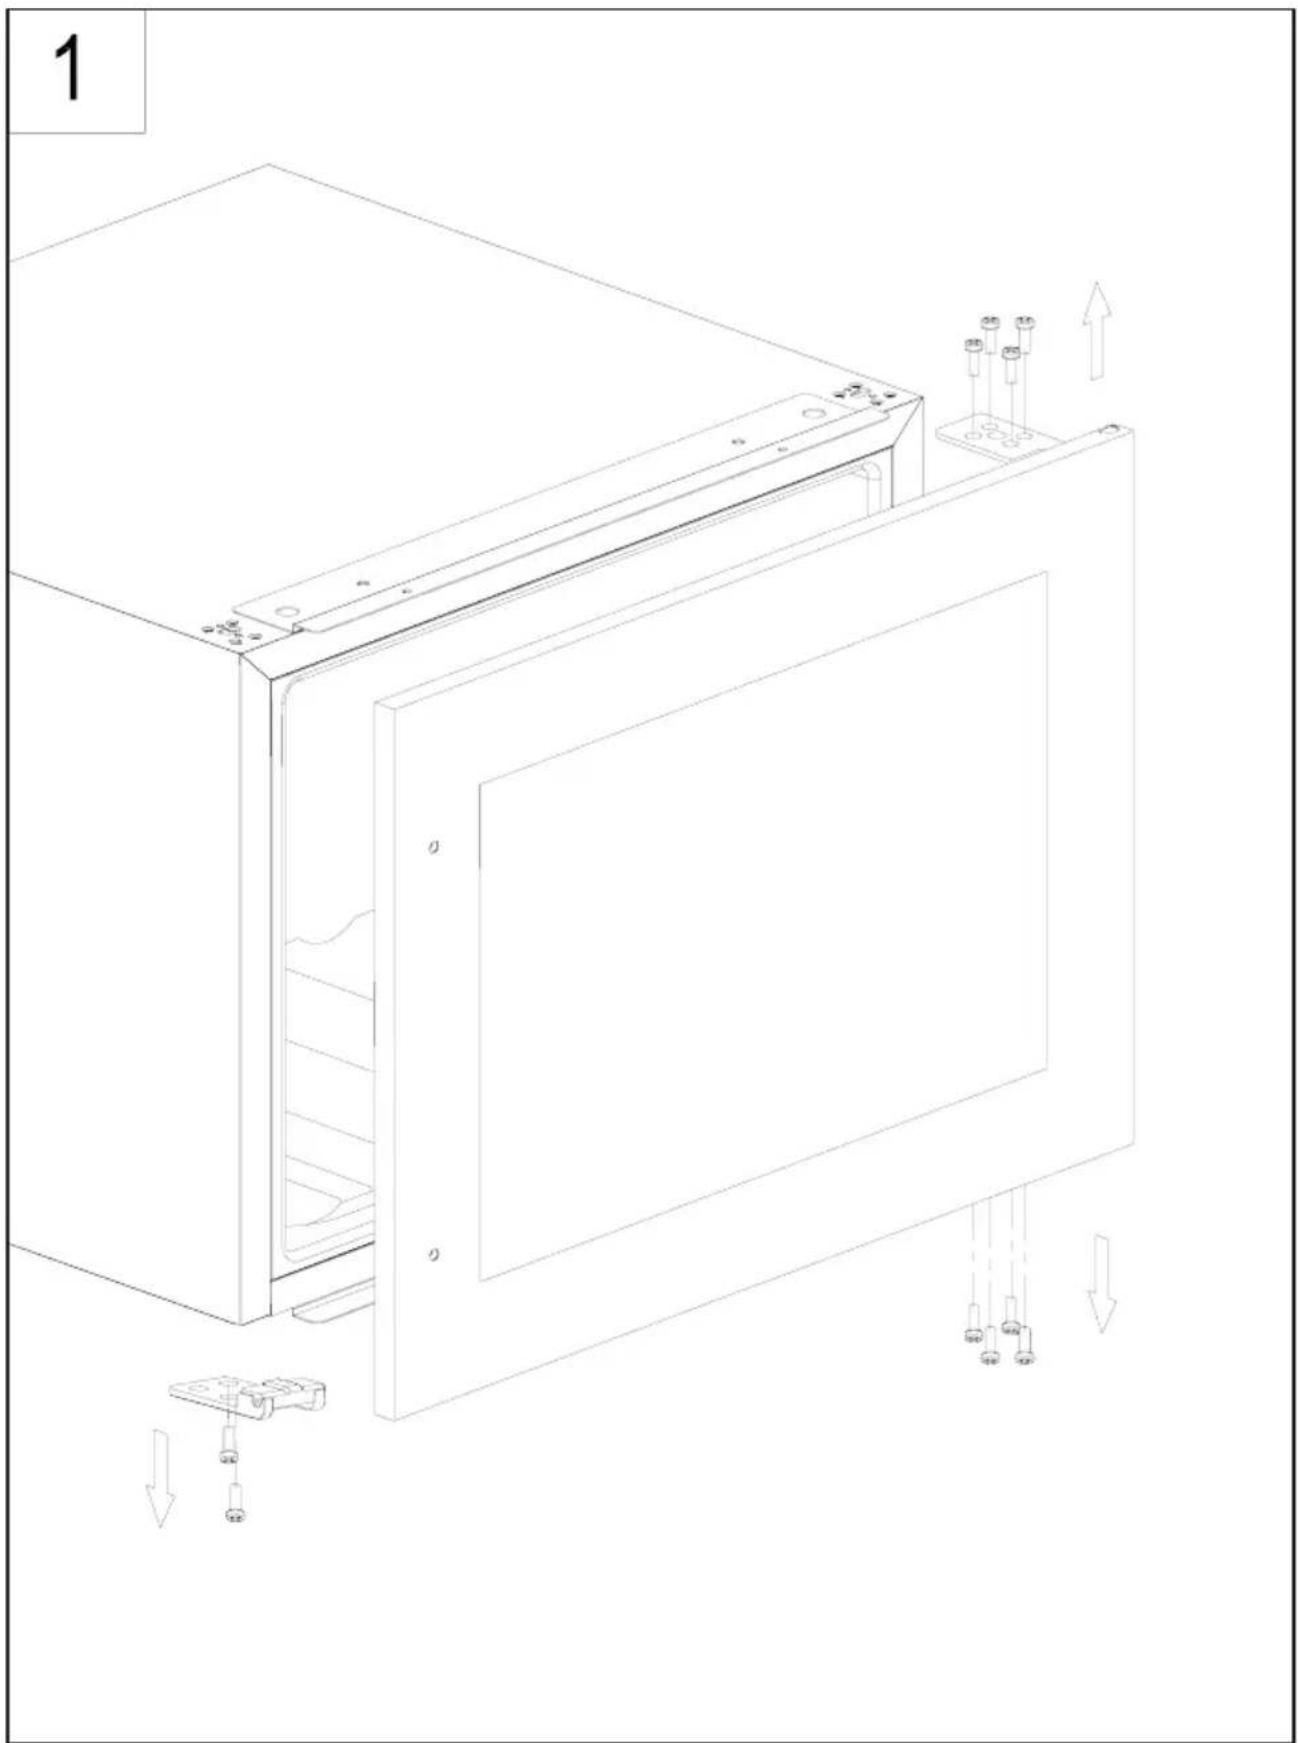
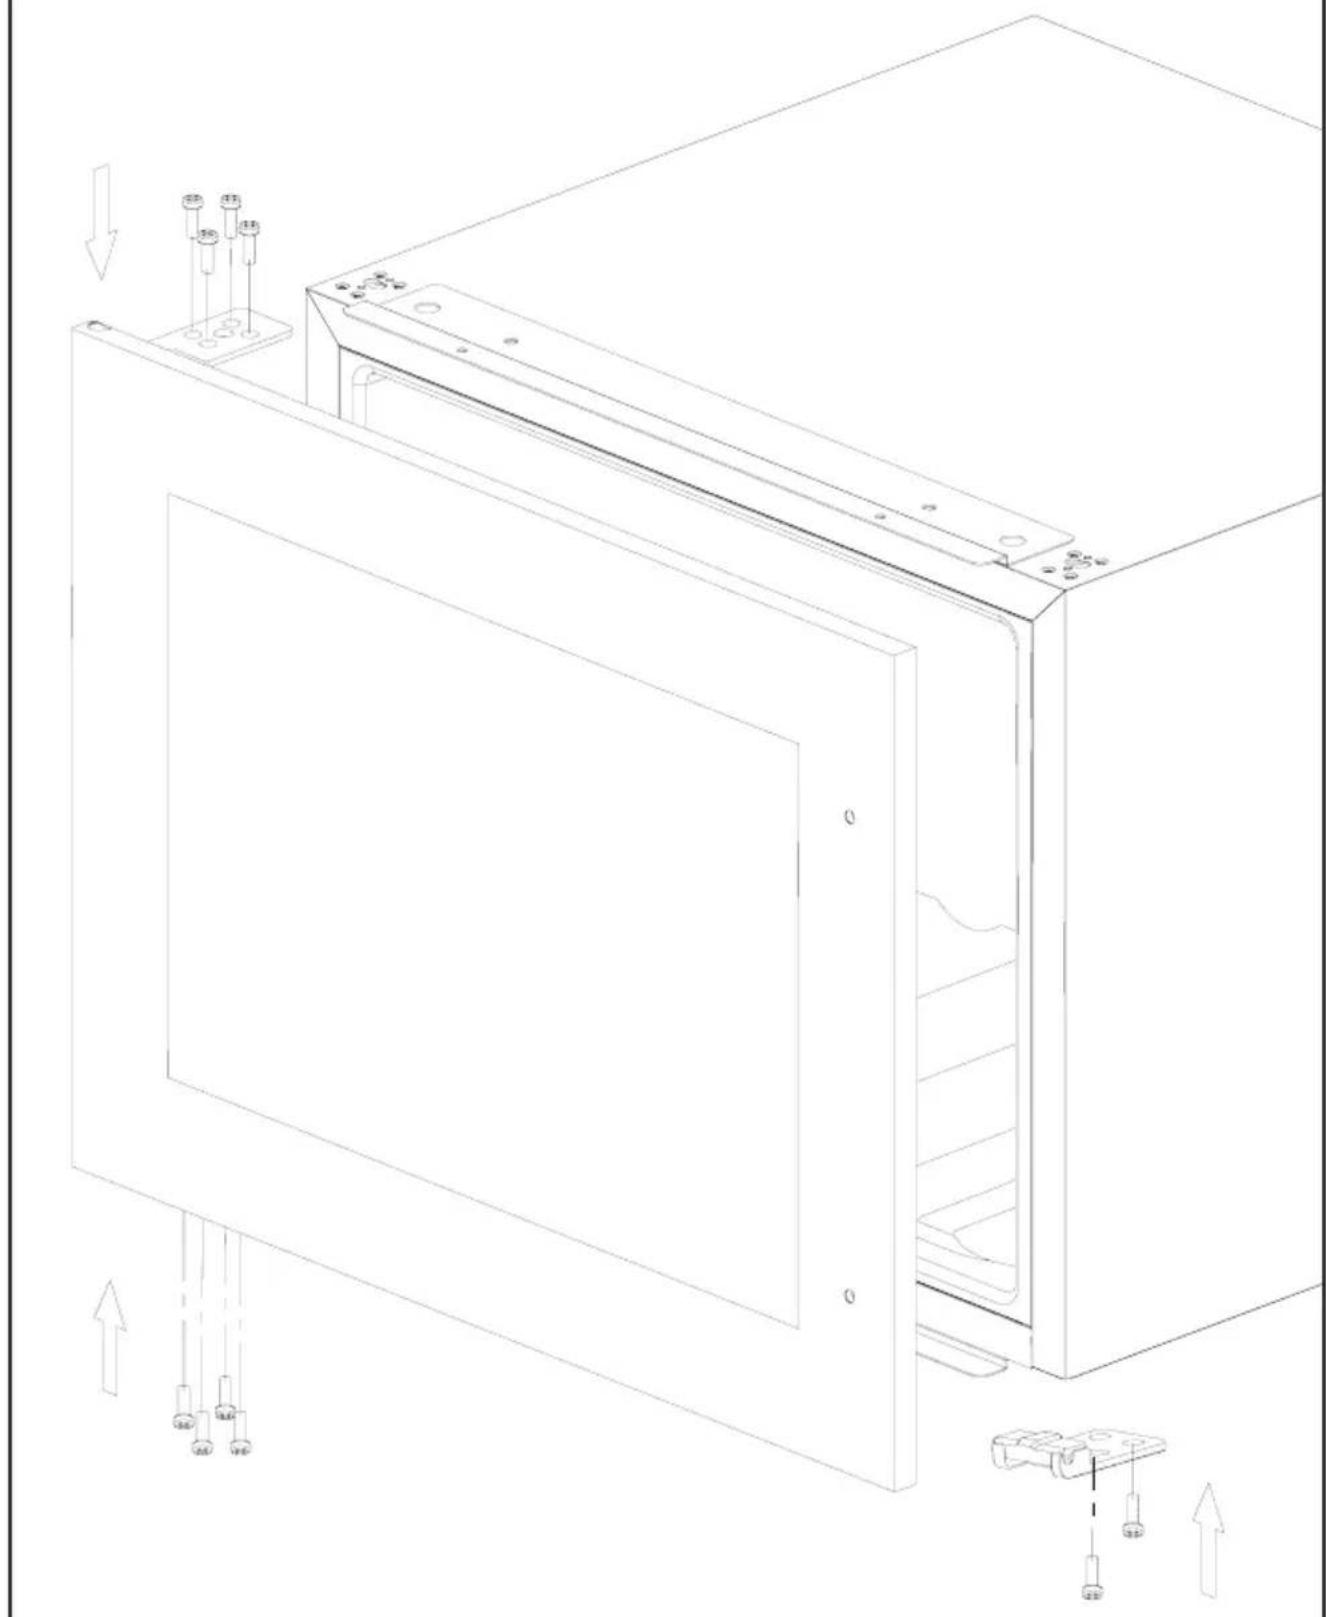
EN- CHANGING THE DIRECTION OF THE DOOR OPENING / DA- AENDRING AF D∅RENS ÅBNINGSRETNING / SV- ÄNDRA VILKEN SIDA DÖRREN ÖPPNAS ÅT / NO- OMHENGSLE D∅RA / FI- OVEN AVAUTUMISSUUNNAN VAIHTO
natural_image
Technical line drawing of a door assembly with mounting holes and internal components (no text or symbols)2
natural_image
Technical line drawing of a cabinet or enclosure with mounting hardware and internal components (no text or symbols)
natural_image
Diagram showing a mechanical assembly with stacked blocks and an upward arrow, enclosed in a circle (no text or symbols)1
natural_image
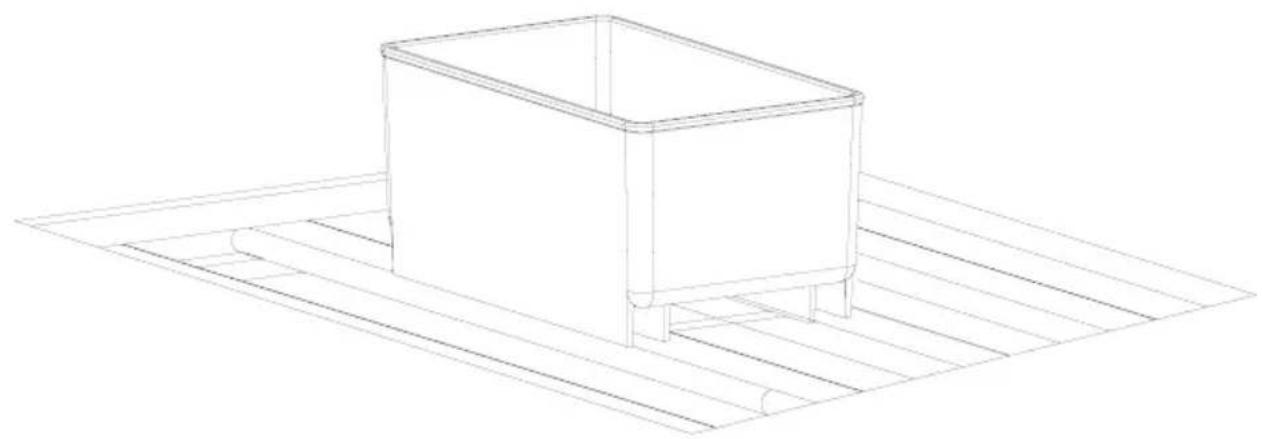
Line drawing of a rectangular container placed on a flat surface with supports (no text or symbols)2
3

4
natural_image
Technical line drawing of a mechanical component with two parallel grooves and a small protrusion (no text or symbols)5
VS 50781-90 B*
VS 52083-90 B*
12
VS 54586-90 B*
natural_image
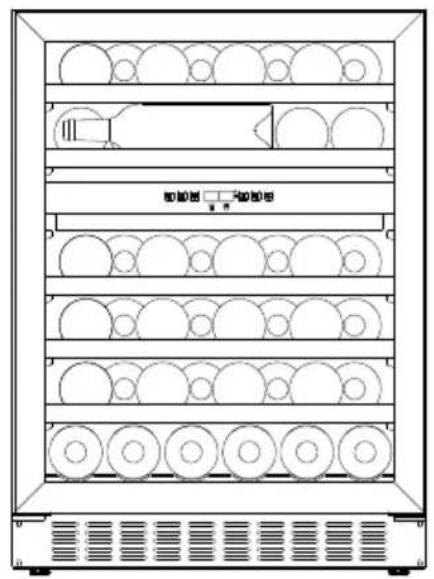
Line drawing of a multi-level refrigerator with circular compartments and ventilation grilles (no text or symbols)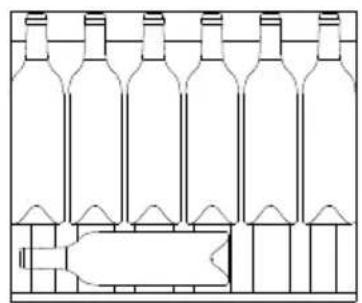
natural_image
Line drawing of a multi-volume wine bottle arrangement (no text or labels)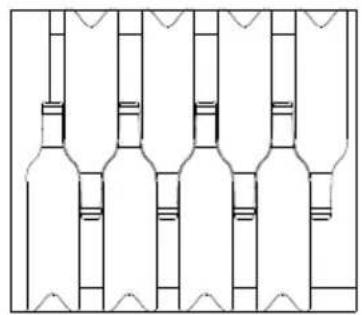
natural_image
Pure architectural line drawing of a wine bottle layout without any text, labels, or symbols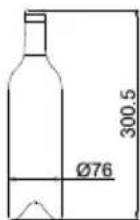
12
NO:
Gram A/S
Tel.: 22 07 26 30
www.gram.no
SE:
Gram A/S
Tel.: 040 38 08 40
www.gram.se
FI
Gram A/S
Tel.: 020 7756 350
www.gram.fi
GRAM
Gram A/S
Gejlhavegård 2B
DK-6000 Kolding
+45 73 20 10 00
www.gram.dk