
Puremex 5 - Air purifier Thermex - Free user manual and instructions
Find the device manual for free Puremex 5 Thermex in PDF.


| Product Type | Air Purifier (Recirculating Cooker Hood) |
| Brand | Thermex |
| Model | Puremex 5 |
| Installation Type | Ceiling mounted with 4 fixing wires |
| Power Supply | 230/380 V ±10% ~ 50 Hz |
| Max Load | 10 kW (<25 A per phase) |
| Remote Control Range | Up to 400 m (line of sight) |
| Fan Speeds | Low, Medium, High |
| Light Control | 2-step brightness (100%, 50%) |
| UV Lamp | Yes, can be turned on/off via remote |
| Grease Filter | Monthly cleaning required |
| Carbon Filter | Replace at least once a year (for recirculation mode) |
| Plasma Filter | Self-cleaning, no replacement needed (lifetime) |
| Operation Mode | Recirculation only (must use carbon or plasma filter) |
| Touch Control | Yes, on the unit |
| Remote Control | Included, with battery film removed before use |
| Safety Features | Grounding required; must be installed by skilled electrician |
| Maintenance | Wipe with damp cloth; never use abrasive materials |
| Warranty | Repealed if used outside private household |
Frequently Asked Questions - Puremex 5 Thermex
User questions about Puremex 5 Thermex
0 question about this device. Answer the ones you know or ask your own.
Ask a new question about this device
Download the instructions for your Air purifier in PDF format for free! Find your manual Puremex 5 - Thermex and take your electronic device back in hand. On this page are published all the documents necessary for the use of your device. Puremex 5 by Thermex.
USER MANUAL Puremex 5 Thermex
natural_image
Three black-and-white icons: a person reading, a book with gears and a tablet, and a rectangular block with dimension arrows (no text or symbols)THERMEX SCANDINAVIA A/S
www.thermex.dk

THERMEX SCANDINAVIA AS
www.thermex.no
THERMEX SCANDINAVIA AB
www.thermex.se

THERMEX SCANDINAVIA S.L.U.
www.thermex.es
THERMEX SCANDINAVIA A/S
www.thermex.fi


INDHOLD
| Dansk | 4 |
| Norsk | 12 |
| Svensk | 20 |
| Suomi | 28 |
| Espanöl | 36 |
| English | 44 |
M 7402110302 17022021 THERMEX PUREMEX 5 4
INDHOLD
Generel adversel 5
Installation
6
Touch control med fjernbetjening 8
Vedligeholdelse
10
Fejlfinding
11
GENEREL ADVARSEL
natural_image
Simple line drawing of a smartphone with a stylized face, power button, and battery symbol (no text or labels)"VENTILATIONSHASTIGHED" knap:
natural_image
Technical line drawing of a ceiling structure with mounting holes and support beams (no text or symbols)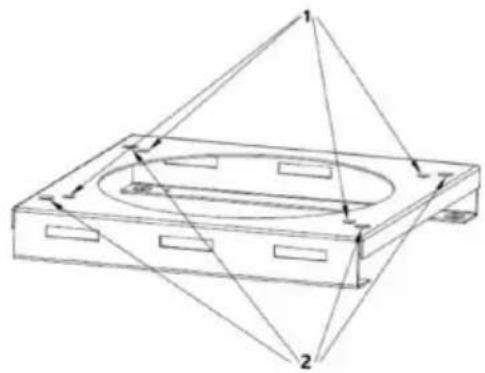
natural_image
Technical line drawing of a mechanical component with internal cavity and mounting holes (no text or symbols)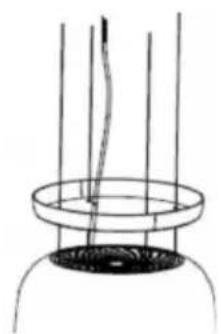
natural_image
Simple line drawing of a cylindrical container with vertical rods and a central ring (no text or symbols)© - 4 x ST6 (40 mm)skruer fortretak
Cd -- 4 x M6 (60 mm)ekspansjonsbolter for sementtak
natural_image
Line drawing of a cylindrical object with a flanged top and base, resembling a mechanical or architectural component (no text or symbols)4) Skyv hengeplaten dekselet opptil hengeplaten som installerte The magnet kan fikse dekselet.
Viktig:
Den elektriske tilkoblingen må tilsvare det elektriske kravet som er angitt på typeskiltet som er plassert inne i kjøkken hetten. Apparatet må ikke kobles til strømforsyningen mens du installerer
1 Knapp med lav hastighet
natural_image
Simple line drawing of a remote control panel with icons for fan, power button, and refresh symbol (no text or labels)Før du bruker fjernkontrollen, må du ta ut batterifilmen!

"PÅ/AV"-knapp:
natural_image
Simple line drawing of a cylindrical object with a hexagonal top and two vertical tubes (no text or symbols)natural_image
Simple line drawing of a smartphone with icons for battery, power switch, and star (no text or symbols)natural_image
Technical line drawing of a structural frame with two views (top and side), no text or symbols present.natural_image
Simple line drawing of a cylindrical container with three vertical rods inserted into the top (no text or symbols)natural_image
Simple line drawing of a cylindrical object with a hexagonal top and textured base (no text or symbols)natural_image
Simple line drawing of a remote control panel with icons for refresh, power, and alarm (no text or symbols)natural_image
Technical line drawing of a structural support frame with suspended components and triangular loadings (no text or symbols)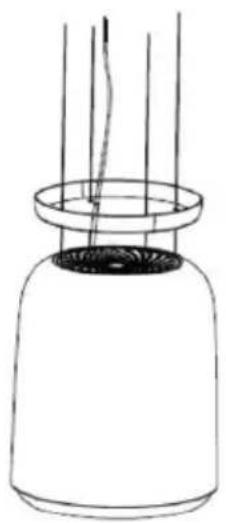
natural_image
Simple line drawing of a bottle with a lid and three vertical lines above it (no text or symbols)natural_image
Simple line drawing of a laboratory apparatus with a central column and a base (no text or symbols)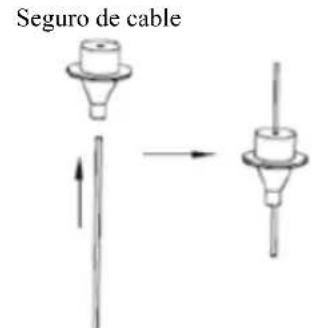
Cable de acero transparente
natural_image
Line drawing of a cylindrical object with a lid and base, resembling a kitchen or appliance (no text or symbols)natural_image
Simple line drawing of a remote control panel with buttons and power symbols (no text or labels)Touch control with remote control 48
Maintenance 50
Troubleshooting 51
WARNINGS
- The product is designed and manufactured according to DS/EN 60335-1.
- This product is only for use in private householdings, if used for other purposes the warranty will be repealed.
- Installation must be performed by a skilled electrician in accordance with the specifications given by Thermex Scandinavia A/S (Thermex) and legislation in force.
- Thermex disclaims all responsibility with regards to damages caused by wrong installation, mounting or use.
BEFORE MOUNTING/COMMISSIONING
- Inspect the product for transport damages, flaws and defects immediately after the receipt.
- Transport damages must be filed to the haulage contractor and Thermex immediately after the receipt.
- Flaws and defects must be filed to Thermex within 8 days after the receipt, and not later than mounting/commissioning.
INSTALLATION
- The device is designed to operate at 230/380 Volts ±10%\~50 Hz.
- The device must always be grounded.
• Maximum range between receiver and transmitter is 400 m (line of sight). - Maximum load on the connected device is 10 kW (<25 A per phase).
INSTALLATION
MODEL INSTALLATION
natural_image
Technical line drawing of a structural support frame with vertical supports and a central circular component (no text or symbols)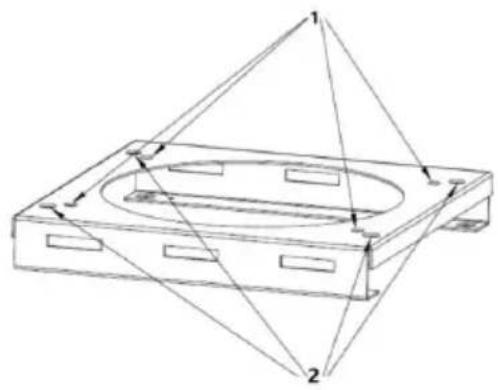
natural_image
Technical line drawing of a mechanical component with two numbered reference points (1 and 2), no text or symbols present.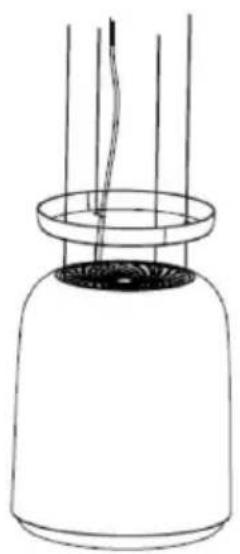
natural_image
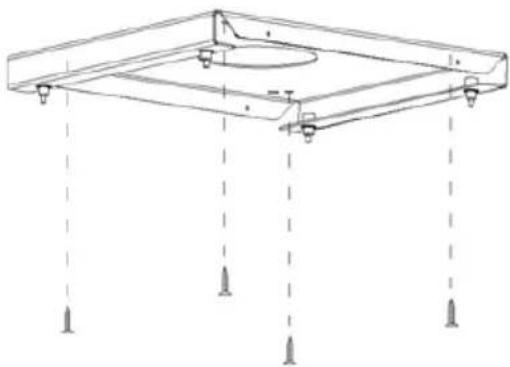
Simple line drawing of a cylindrical container with three vertical rods extending upward (no text or symbols)1) Position the hanging plate on the ceiling and then mark the position of the screw holes. The hanging plate should be securely fixed to the ceiling,
① ---- 4 x ST6 (40 mm)screws for wooden ceiling
②----4 x M6 (60 mm)expansion bolts for cement ceiling
2) Make the fixing wire & Power cable pass through to the hole of hanging plate cover.
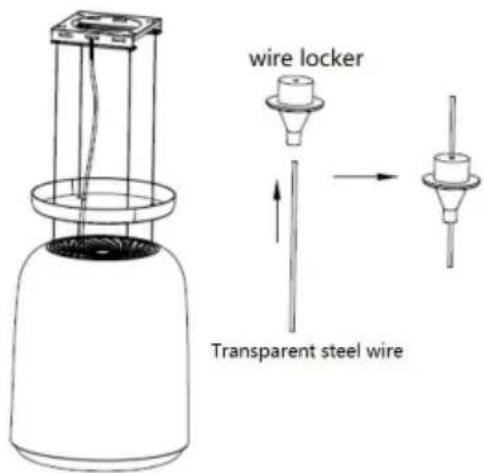
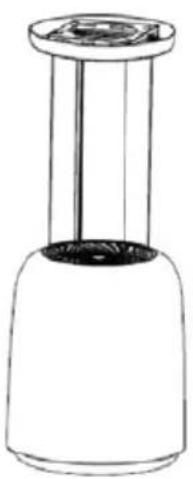
3) Fix the transparent steel wire with the special screw (wire locker) onto the hanging plate & connect Power cable in the right way. PIs adjust the steel wires with suitable length to insure the main body of the cooker hood in a right position for use.
- IMPORTANT: This stage of the installation process MUST be completed by two people.
- IMPORTANT: make the same length of the 4 fixing wires to let the hood in balance level
natural_image
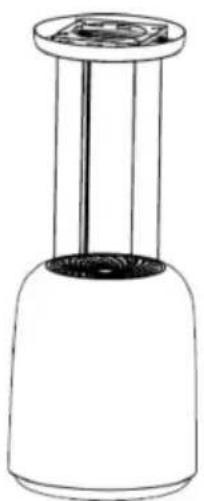
Simple line drawing of a cylindrical object with a square top and a base, resembling a lamp or stand (no text or symbols)4) Push the hanging plate cover up to the hanging board which installed the magnet can fix the cover.
IMPORTANT:
The electrical connection must correspond to the electrical requirement noted on the rating plate, which is placed inside the cooker hood. The appliance should not be connected to the electrical supply while install
After fixed, check that the appliance is operating correctly by selecting each speed and switching the light bulbs on and off.
This hood is only use in recirculation style which must be with carbon or plasma filter.
TOUCH CONTROL WITH REMOTE CONTROL
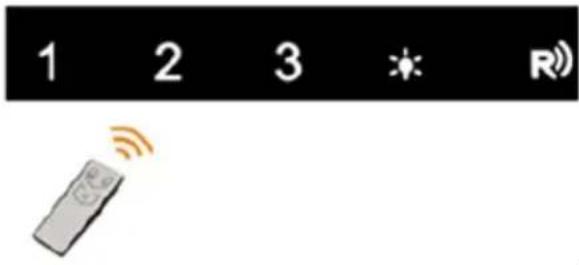
1 Low Speed button
It's used for Ventilation on the kitchen. It is suitable for simmering and cooking which do not make much steam.
2 Medium Speed button
Airflow speed is ideally for ventilation in standard cooking operation.
3 High Speed button
When high density of smoke or steam produced, press high-speed button for highest effective ventilation.
For 1/2/3 speed button:
a. In STANDBY MODE, long press "1/2/3"any button to turn on the hood
b. Speed button "1/2/3" interlock during operation, short press any button to turn off the hood.
Light button
a. In STANDBY MODE, long press to turn on the lamp In WORKING MODE, short press to turn off the lamp
b.Light button have 2 speed
Short press in first time to control lamp brightness 100%, Short press in second time to control lamp brightness 50%
c.UV lamp control
In WORKING MODE, long press "3" and "light" button to turn on the UV lamp, "light" button flash 1 second,
Long press "3" and "light" button again to turn off the UV lamp, "light" button do not flash.
Remote control
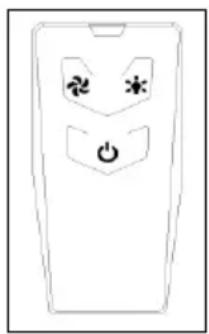
natural_image
Line drawing of a remote control panel with icons for refresh, power, and alarm (no text or symbols)Before use the remote control, please Remove the battery film!

"ON/OFF" button:
It's used for turning on/off the fan.

"FAN SPEED" button:
In WORKING MODE, Button for changing the speed of motor following cycle "Low-Middle-High-Low". (This key could not stop motor working.)

"Light" Kbutton
a. In STANDBY MODE, short press for lamp power control.
b. In WORKING MODE, short press in first time to control lamp brightness 100%, short press in second time to control lamp brightness 50%, short press in third time to turn off the lamp
MAINTENANCE
Before cleaning switch the unit off and pull out the plug.
I. Regular Cleaning
Use a soft cloth moistened with hand-warm mildly soapy water or household cleaning detergent. Never use metal pads, chemical, abrasive material or stiff brush to clean the unit.
II. Monthly Cleaning for Grease Filter
ESSENTIAL: Clean the filter every month can prevent any risk of fire.
The filter collects grease, smoke and dust.....so the filter is directly affecting the efficiency of the cooker hood. If not cleaned, the grease residue (potential flammable) will saturate on the filter. Clean it with household cleaning detergent.
III. Carbon filter
Apply SOLELY to unit that installed as a recirculation unit (not vented to the outside). This filter traps odours and must be replaced at least once a year depending on how frequent the cooker hood used.
IV. Plasma filter
If install with plasma filter, No maintenance requirement .Self-cleaning system of the filter and no filter changes required .You can keep the whole life time together with the installed cooker hood.
TROUBLESHOOTING
| Fault | Cause | Solution |
| Light on, but fan does not work | The fan blade is jammed. | Switch of the unit and repair by qualified service personnel only. |
| The motor is damaged. | ||
| Both light and fan do not work | light bulb burn. | Replace the bulb with correct rating. |
| Power cord looses. | Plug in to the power supply again. | |
| Serious Vibration of the unit | The fan blade is damaged. | Switch of the unit and repair by qualified service personnel only. |
| The fan motor is not fixed tightly. | Switch of the unit and repair by qualified service personnel only. | |
| The unit is not hung properly on the bracket. | Take down the unit and check whether the bracket is in proper location. | |
| Suction performance not good | Too long distance between the unit and the cooking plane | Readjust the distance to 65-75cm |
MILJ∅HENSYN
EMBALLAGE
SKROTNING AF PRODUKTET

The packaging must be disposed of in accordance with local regulations on waste management.
SCRAPPING OF THE PRODUCT

The symbol _1 on the product or accompanying documentation indicates that this product may not be disposed of as household waste but must be delivered to the nearest collection center for the recycling of electrical and electronic equipment.
THERMEX SCANDINAVIA A/S
- INDHOLD
- M 7402110302 17022021 THERMEX PUREMEX 5 4
- GENEREL ADVARSEL
- "VENTILATIONSHASTIGHED" knap:
- Viktig:
- Knapp med lav hastighet
- WARNINGS
- BEFORE MOUNTING/COMMISSIONING
- INSTALLATION
- MODEL INSTALLATION
- IMPORTANT:
- TOUCH CONTROL WITH REMOTE CONTROL
- Low Speed button
- Medium Speed button
- High Speed button
- For 1/2/3 speed button:
- Light button
- b.Light button have 2 speed
- c.UV lamp control
- Remote control
- MAINTENANCE
- Regular Cleaning
- Monthly Cleaning for Grease Filter
- Carbon filter
- Plasma filter
- MILJ∅HENSYN
- THERMEX SCANDINAVIA A/S
Brand : Thermex
Model : Puremex 5
Category : Air purifier