
Puremex 2 - Air purifier Thermex - Free user manual and instructions
Find the device manual for free Puremex 2 Thermex in PDF.


| Product Type | Air Purifier |
| Brand | Thermex |
| Model | Puremex 2 (740.21.1000.2) |
| Dimensions | Φ292 × 663 mm |
| Rated Voltage | 220–240 V~, 50/60 Hz |
| Rated Power Input | 25 W |
| Clean Air Delivery Rate (CADR) – Particles | 350 m³/h |
| Clean Air Delivery Rate (CADR) – Formaldehyde | 200 m³/h |
| Noise Level | 58 dB(A) |
| Filtration System | HPAC integrated composite filter (primary filter, modified activated carbon, composite HEPA, spray coating) |
| Air Intake / Outlet | Side intake, top discharge |
| Fan Speeds | 5 speeds (1–5) |
| Operating Modes | Auto, Sleep, High, Manual |
| Air Quality Indicator | PM2.5 digital display and color-coded LED (excellent, decent, poor) |
| Filter Replacement Reminder | Yes (indicator flashes when filter life is over) |
| Power-Off Memory | Yes (remembers mode and fan speed after shutdown) |
| Filter Maintenance | Clean composite filter with brush or vacuum every 2 months; replace when reminder flashes |
| Dust Sensor Cleaning | Clean sensor lens with cotton swab every 2 months |
| Decorative Board | Washable with water; let dry before reinstalling |
| Front Panel Cleaning | Do not wash with water; use dust collector or soft brush |
| Power Cord | Detachable; if damaged, replace by manufacturer or qualified person |
| Safety Features | Automatic shut-off when decorative board is removed? (not specified, but safety instructions forbid operation without proper installation) |
| Packing List | Air purifier (1 set), operation instruction (1 copy) |
Frequently Asked Questions - Puremex 2 Thermex
User questions about Puremex 2 Thermex
0 question about this device. Answer the ones you know or ask your own.
Ask a new question about this device
Download the instructions for your Air purifier in PDF format for free! Find your manual Puremex 2 - Thermex and take your electronic device back in hand. On this page are published all the documents necessary for the use of your device. Puremex 2 by Thermex.
USER MANUAL Puremex 2 Thermex
natural_image
White industrial fan or vent with radial blades, no visible text or symbols on the device itself.Puremex II
DANSK •NORSK • SVENSKA •SUOMI •ESPAÑOL •ENGLISH
YDERLIGERE INFORMATION
Mer informasjon ■ Mer information ■ Lisätietoja
natural_image
Three symbolic icons: a person reading, a book with gears and a box, and a rectangular block with double-headed arrows indicating measurement or dimension (no text or symbols present)THERMEX SCANDINAVIA A/S

www.thermex.dk

THERMEX SCANDINAVIA AS

www.thermex.no

THERMEX SCANDINAVIA AB

www.thermex.se

THERMEX SCANDINAVIA S.L.U.

www.thermex.es

THERMEX SCANDINAVIA A/S

www.thermex.fi


Indhold
| Dansk | 5 |
| Norsk | 22 |
| Svenska | 39 |
| Suomi | 56 |
| Espanöl | 73 |
| English | 90 |
INDHOLD
Sikkerhedsregler 6
natural_image
Line drawing of a cylindrical air conditioner unit with hands adjusting its lid (no text or symbols)3. Monter den dekorative plade
natural_image
Line drawing of a cylindrical container with hands holding a lid and a paper clip, showing internal structure (no text or symbols)2. Monter det sammensatte filter
natural_image
Diagram of a cylindrical device with internal components and a hand adjusting its top section (no text or symbols visible)natural_image
Diagram of a device with a container and two rectangular compartments, no text or symbols present④ Luk sensorens dæksel.
natural_image
Diagram of a hand cleaning a circular object with a textured interior (no text or symbols)Vedligehold
Fejlfinding
natural_image
Line drawing of a hand inserting a filter into a fan device (no text or symbols)3. Installer det dekorative
brettet Sett klemmene nederst på dekorplaten inn i sporet, trykk på den øvre enden av dekorplaten og installer deretter dekorplaten godt.
natural_image
Line drawing of a hand inserting a component into a filter device (no text or symbols)2. Installer komposittfilteret Ta
natural_image
Diagram of a vacuum cleaner with a hand inserting a component into the air gap (no text or symbols visible)1 Visning av modusstatus
6 Indikator for luftkvalitet
2 Påminnelse om erstatning av filter
7 Visningsdel
3 Statusskjerm for viftehastighet
8 Modus-knapp
4 Viftehastighetsknapp
9 Betjeningsdel
5 PÅ/Av-knapp
natural_image
Diagram of a device with a sensor and two rectangular components, no text or symbols present④ Lukk dekselet på sensoren.
natural_image
Diagram of a hand using a tool to press or watch a circular object, no text or symbols presentVedlikehold
Feilsøking
natural_image
Diagram of a hand placing a component into a fan-like device (no text or symbols visible)natural_image
Line drawing of a hand inserting a filter into a cylindrical device (no text or symbols)natural_image
Diagram of a cylindrical device with a hand inserting a component into it, showing internal structure and airflow direction (no text or symbols)natural_image
Diagram showing a device with a sensor connected to a rectangular panel containing two dot-patterned cells (no text or symbols present)natural_image
Line drawing of a cylindrical device with a hand pointing to a textured interior (no text or symbols)Underhåll
Felsökning
natural_image
Line drawing of a cylindrical air purifier with hands installing or adjusting the cover (no text or symbols)3. Asenna koristelevy
natural_image
Line drawing of a cylindrical air purifier with hands installing or adjusting material inside (no text or symbols)natural_image
Diagram of a vacuum cleaner with a hand inserting a component into the air gap (no text or symbols visible)1 Tilanäyttö
natural_image
Diagram of a device with a sensor and two rectangular components, no text or symbols presentnatural_image
Line drawing of a cylindrical device with a hand interacting with the interior panel (no text or symbols)Huolto
Vianmääritys
natural_image
Line drawing of a cylindrical air purifier with hands installing or adjusting the interior panel (no text or symbols)3. Instale la tapa decorativa.
natural_image
Line drawing of a hand inserting a filter into a cylindrical device (no text or symbols)natural_image
Diagram of a vacuum cleaner with a hand inserting a component into the air gap (no text or symbols visible)1 Estado
natural_image
Diagram of a device with a sensor and two rectangular components, no text or symbols presentnatural_image
Line drawing of a cylindrical device with a hand pointing to a textured interior (no text or symbols)Mantenimiento
Safety regulation 91
Product instruction 95
Product operation 98
Maintenance
Exception clauses 106
102
Safety Regulation
Please follow this instruction manual strictly for correct operation.
In order to prevent personal injury and property loss, please follow those safety regulations as below.
If you don't follow these safety regulations, wrong operation may cause accident.
Prohibition
-
This appliance can be used by children aged from 8 years and above and persons with reduced physical, sensory or mental capabilities or lack of experience and knowledge if they have been given supervision or instruction concerning use of the appliance in a safe way and understand the hazards involved. Children shall not play with the appliance. Cleaning and user maintenance shall not be made by children without supervision.
-
Do not use corrosive detergent to clean the unit. The residual detergent in the air purifier will emit toxic gas, which is harmful to health. The residual chlorine or the detergent itself will corrode the unit, which will affect the service life of the unit.
-
Do not turn on the unit when operating an aerosol bomb. After using the aerosol bomb, keep the room ventilated completely and then operate the unit. Otherwise, the residual chemical substance will be accumulated in the unit and then released from the air outlet, which will be harmful to health.
-
Prohibit burning the filter.
Safety Regulation
- Do not insert or pull the power plug with wet hand. Otherwise, it may cause electric shock.
- Do not pull or drag the power cord. Otherwise, the power cord may be damaged, which may result in bad contact or short circuit and may even cause fire hazard.
- Do not pull out the power plug during operation. Otherwise, it may cause fire hazard or electric shock.
- Never insert fingers or other objects into the air inlet, air outlet or other seams. Otherwise, it may cause electric shock, injury, fire hazard or damage the unit.
- Never disassemble, refit or repair the unit by yourself. Otherwise, it may cause electric shock, injury or fire hazard.
Follow
-
They shall state that prior to cleaning or other maintenance, the appliance must be disconnected from the supply mains.
-
If the supply cord is damaged, it must be replaced by the manufacturer, its service agent or similarly qualified persons in order to avoid a hazard.
-
This unit is only for residential or similar use. Such as :
※shop, office;
※family inn.
- Please use the equipped filter provided by the manufacturer. Otherwise, it may affect the performance or cause damage to the unit.
Safety Regulation
5.Do not operate or store this product at the following places:
※The place with fumes discharge.
※The place with volatile oil products or inflammable gas, or the place where there may be leakage of similar substances.
※The place with corrosive gas or metal powder. Otherwise, the purification performance will be affected.
※The place that is hot and humid, such as bathroom. Otherwise, the product's performance will be affected and electric shock or fire hazard may even occur.
※The place that is not flat. Otherwise, the unit may turn over or even cause electric shock, fire hazard or get damaged.
※The place with direct sunlight. Otherwise it may cause discolor of the unit.
※The place where it may be affected by outdoor air, such as at the window, or the place where there is direct air flow from an air conditioner. Otherwise, it will affect the normal operation of sensors.
※Near burning appliances or heating appliances where there is warm air flow. Otherwise, it will affect the normal operation of sensors.
※Hospital, factory, laboratory, photo room or somewhere that deals with chemical treatment. Otherwise, the volatile chemicals or solvent will affect the product performance.
- Before energization, please make sure whether the filter is installed correctly.
Safety Regulation
- This unit can purify the air, but it can't provide fresh air. Users are suggested to open the window for ventilation during operation periodically (for example, every day). When it is used together with burning appliances, please make sure the room is well ventilated; otherwise, it may cause carbon monoxide poisoning or other gas poisoning.
- Do not put other object on the unit or let object close to the unit. (If the object drops or turns over, it may cause damage to the unit)
- When placing this unit, make sure it is at least 30cm away from wall, furniture, curtain or other objects. Keep the air inlet and air outlet away from obstacles(such as wall, flowerpot, hanging clothes, cloth or curtain).
- Before maintaining, checking or moving the unit, please turn off the unit and pull out the power plug. Otherwise, it may cause electric shock or damage the product.

Correct Disposal of This Product: This marking indicates that this product should not be disposed with other household wastes throughout the EU. To prevent possible harm to the environment or human health from uncontrolled waste disposal, recycle it responsibly to promote the sustainable reuse of material resources. To return your used device, please use the return and collection systems or contact the retailer where the product was purchased. They can take this product for environmental safe recycling.
Product Instruction
Product Introduction
Features of product
This product adopts the side air intake and top air discharge method. It intakes indoor air and the air passes through the composite filter for fast indoor air circulation for purification, which can effectively remove the particles matters, formaldehyde and allergen.
Working principle
This product is the filter-type air purifier, which adopts HPAC integrated composite filter. It can effectively remove particles matters and formaldehyde.
①The primary filter: filtrate hair, dust and other big particle matters;
②Modified activated carbon: formaldehyde CADR is up to 200m^3/h ; CCM is F4 class;
③Composite HEPA filter paper: increase electrostatic fibre and particle matters CCM is up to P4 class;
④Spray coating: increase the strength of filter structure and prolong the service life.
Product Instruction
Parts' Name
Front Side Rear Side
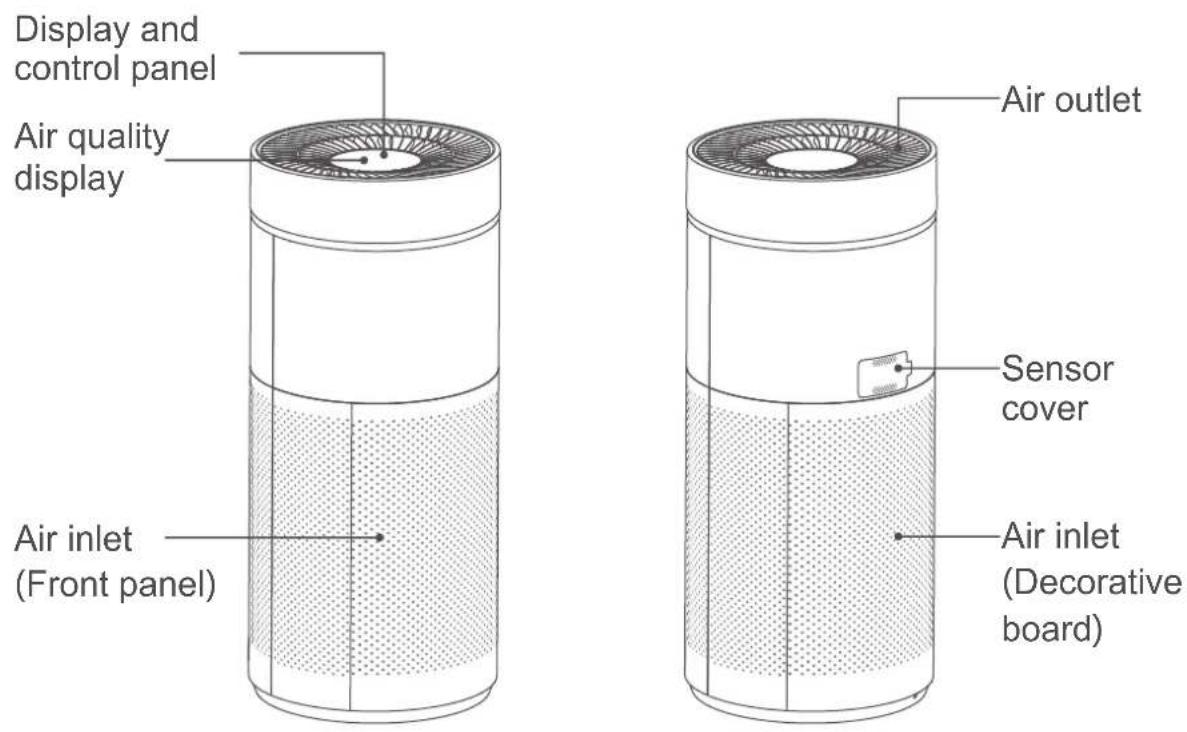
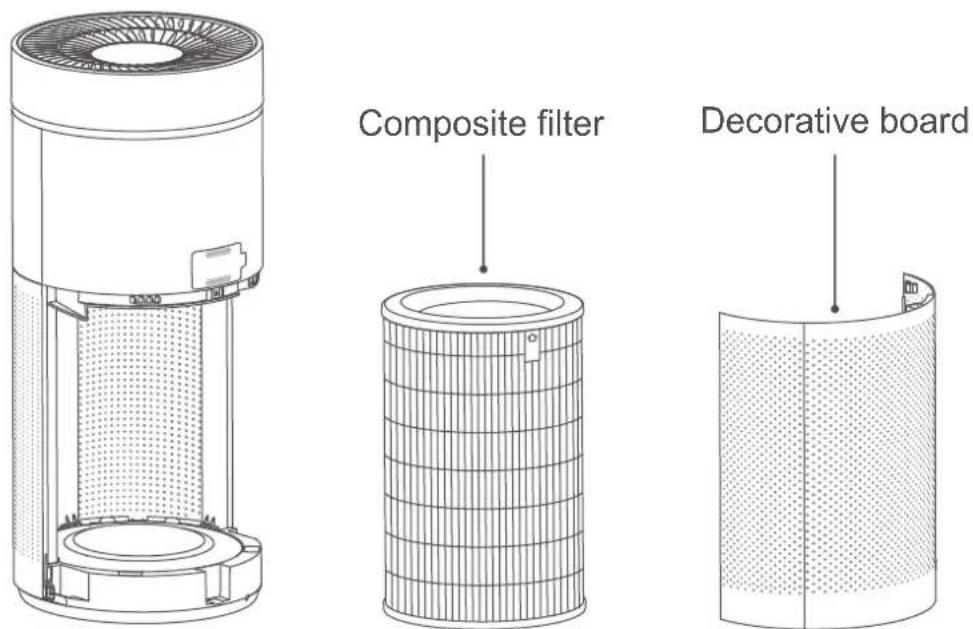
Note: The quantity of attached accessories and the structure diagram is subject to change without notice. Please refer to the current product.
Product Instruction
Main Technical Parameters
| Model | 740.21.1000.2 |
| Rated voltage | 220-240V~ |
| Rated frequency | 50/60Hz |
| Rated power input | 25W |
| Clean air delivery rate of particles(CADR particles) | 350m3/h |
| Clean air delivery rate of formaldehyde(CADR formaldehyde) | 200m3/h |
| Noise | 58dB(A) |
| Product dimension | Φ292×663(mm) |
Note: If above parameters are changed, please refer to the product.
Packing List
| Name | Quantity |
| Air purifier | 1 set |
| Operation instruction | 1 copy |
Product Operation
Notices before Operation
When operate the unit for the first time, tear off the sealing plastic bag of composite filter and then install the composite filter according to the following procedures before putting through the power.
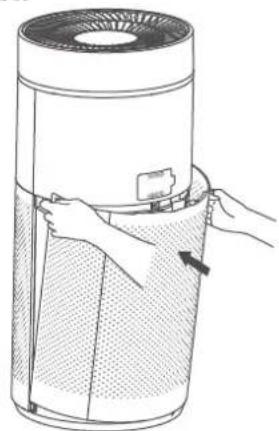
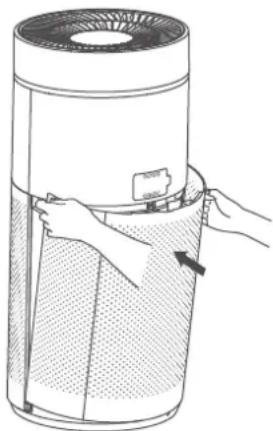
1. Remove the decorative board
Hold both sides of the top panel with both sides and then remove the decorative board.
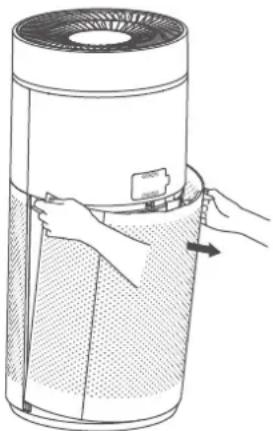
natural_image
Line drawing of a hand inserting a component into a fan-shaped device (no text or symbols)3. Install the decorative board
Put the clasps at the bottom of the decorative board into the groove, press the upper end of decorative board and then install the decorative board well.
natural_image
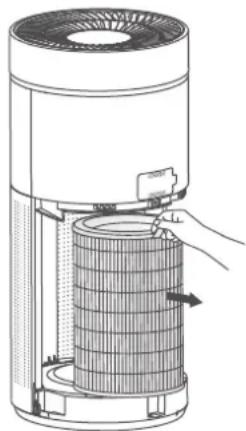
Diagram of a cylindrical device with hands holding a lid and a mesh chamber, showing internal components (no text or symbols)2. Install the composite filter
Take out the composite filter and then tear off the sealing plastic bag of filter.
natural_image
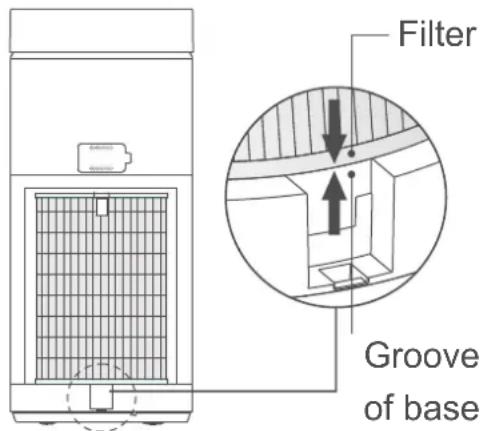
Diagram of a cylindrical device with internal components and a hand adjusting its top panel (no text or symbols visible)When installing the filter, the label with the characters of "FRONT" faces outwards. Align the filter at the groove at the middle of the base to make sure the filter is installed well.
Product Operation
Operation Instruction

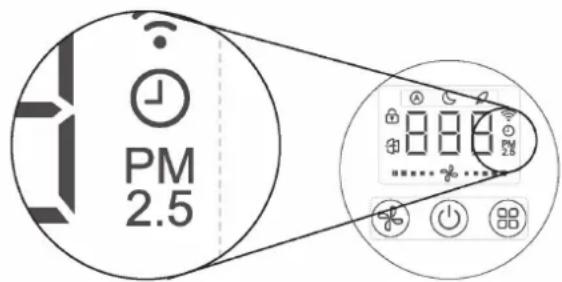
Display and control panel
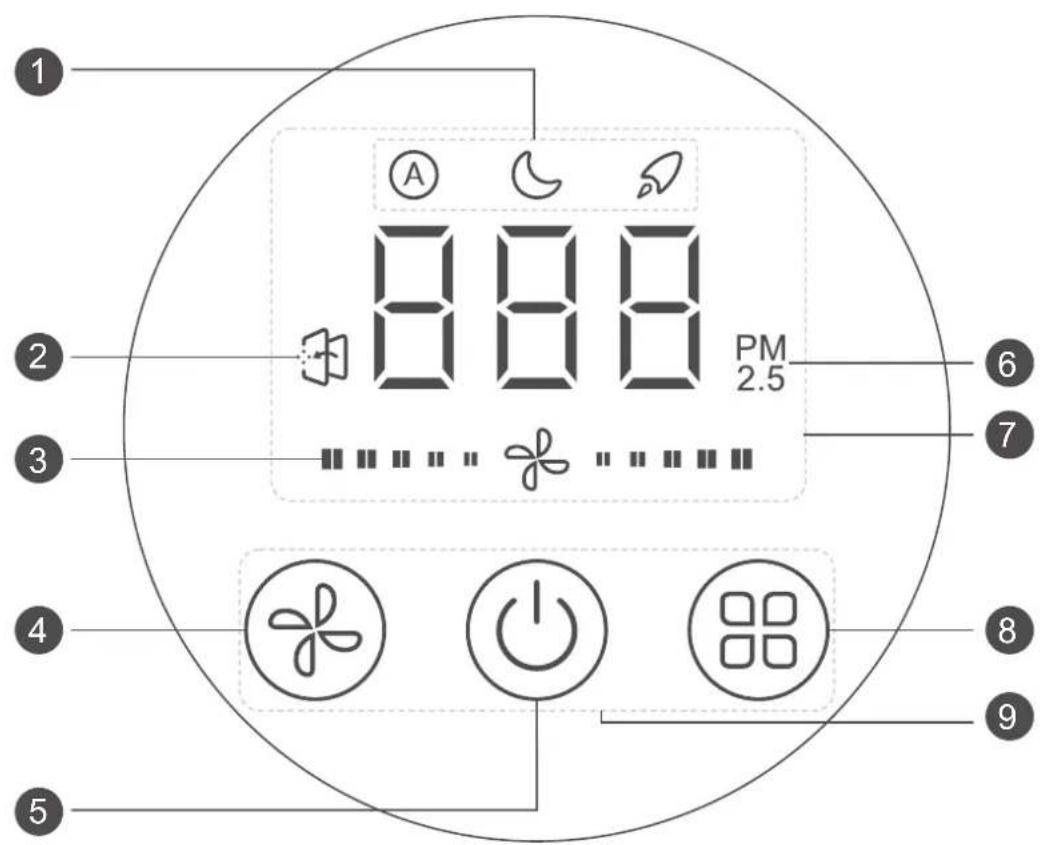
1 Mode status display
② Filter replacement reminder
③ Fan speed status display
4 Fan speed button
5 ON/OFF button
6 Air quality indicator
⑦ Display part
8 Mode button
⑨ Operation part
Note: PM2.5 value may be different when it detected by different measuring method and measuring instrument. The data is only for reference.
Product Operation
Air quality indicator (PM2.5)
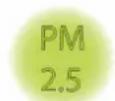
PM2.5 ≤ 35
Air quality is excellent
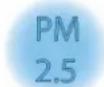
35 < PM2.5 ≤ 115
Air quality is decent
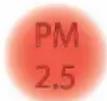
115 < PM2.5
Air quality is poor
Operation Instruction
Put through the power
- Once the complete unit is put through the power, the display panel will be on for 2s and give out sound. The "button is in red."
Note: The energization status as above indicates the standby status.
Turn on the unit
- This product is with power-off memory function. The mode and the speed all can memory the previous status before the unit is turned off. If turn on the unit for the first time, the defaulted status is auto mode and notch 2 fan speed.
- Under standby status, press" ⏻ "button to turn on the unit. All buttons are in white and corresponding mode icon will be on. The current PM2.5 will be displayed on the display panel.
- When there's no operation for 40s during the operation, the display panel and all buttons will enter into half-light status, Under half-light status, press other buttons except "button and then screen will resume to the highlighted status.
Note: When the unit has been turned on just now, PM2.5 value is not stable. The screen displays "--". The display will be normal when the value is stable.
- Under sleep mode, the air quality indicator is off. PM2.5 digital display and fan speed status display will be off. When there's no operation for 40s, all other display will be off except " ” icon and button indicator are in half-light status.
Product Operation
Mode selection
- When the air purifier is operating, press "☐" button to select the modes ("A" - "☐" - "☐").
● Under "A" mode, "A" icon is on. The air purifier automatically switches the fan speed according to current air quality.
● Under "☐" mode, "☐" icon will be on. The air purifier operates at the low fan speed.
● Under " Mode, " icon will be on. The air purifier operates at the high fan speed.
Fan speed selection
● This product has 5 fan speeds.
- Under on status, the fan speed will change once after each pressing of "☐" button and the fan speed will change in the sequence of "1→2→3→4→5" circularly.
● Under any working modes, press "💡" button to switch to manual mode and then adjust the fan speed directly.
Turn off the unit
● Under on status, press " OK" button to enter into the standby status.
Replace filter
- When the service life of composite filter is over, the icon of " " flashes to remind the user to replace the composite filter.
- Please purchase the composite filter at the designated service provider or customer service center and replace it by referring to the "Notices before Operation".
- Once the composite filter is replaced, put through the power again.
- Hold "💡" button for 2s to reset it and the complete unit enters into the standby status. Press "💡" button to turn on the unit again.
Maintenance
Clean and Maintenance

Warm remind
※ The power supply for the air purifier must be cut off before cleaning or maintaining it.
※ Do not wash the complete unit with water. Otherwise, it may cause electric shock. Only use soft and dry cloth to wipe the unit.
※ Do not use corrosive or volatile and flammable chemicals to clean the product; otherwise, it will damage the appearance.

Clean and maintenance for filter and dust sensor
For the best performance, please clean the composite filter and dust sensor once every 2 months. If the environmental condition is bad, please clean it frequently.
1. Clean and replace the filter
Clean: Take out the composite filter and then use brush or dust collector to clean its surface. After that, reinstall the filter at the unit.
Replacement: Please refer to "Notices before Operation" for replacement.
Note:
- Do not use water or other abluent to clean the composite filter.
- The composite filter belongs to consumable items, which is not covered by the warranty.
2. Clean the dust sensor
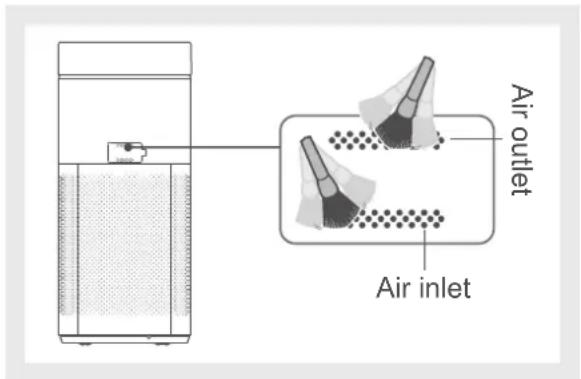
①Clean the air inlet and air outlet of dust sensor.
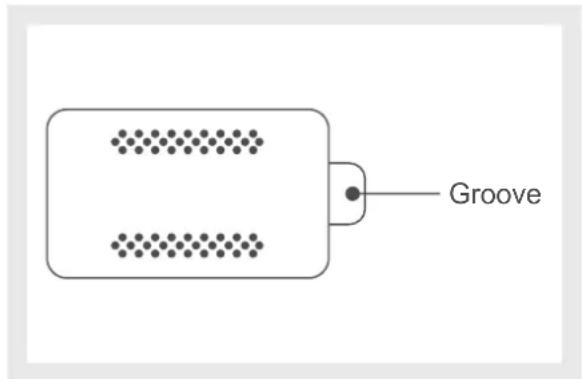
②Put the finger at the groove, and then open the cover of sensor outwards.
Maintenance
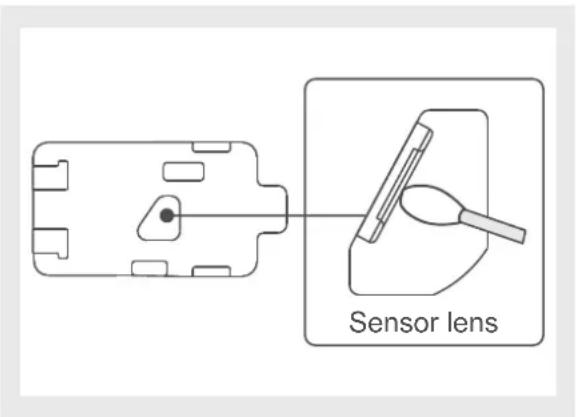
③Use moist cotton swab to wipe the sensor lens slightly and then use dry cotton swab to wipe it to make sure no water left on the sensor.
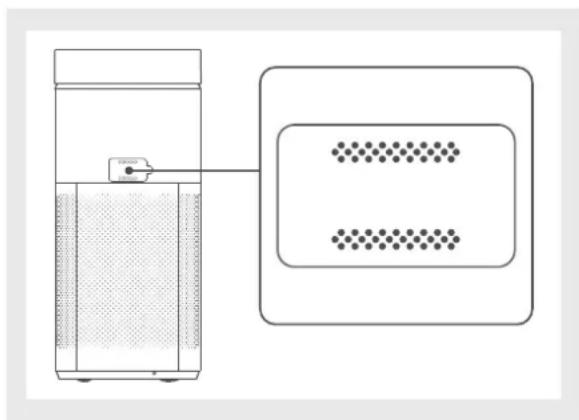
natural_image
Diagram of a device with a sensor and two rectangular components, no text or symbols present④Close the cover of sensor.
3. Clean decorative board and front panel
When the unit has operate for a long time, there will be much dust inside the unit. Please clean the decorative board and the panel according to the operation instruction as below.
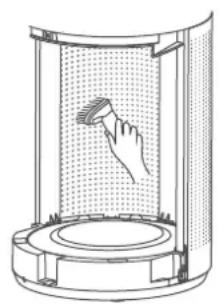
①The decorative board can be washed by water. Please do not damage the decorative board when washing it. Once the decorative board is washed, hang it up to dry it or wipe it and then reinstall it into the unit. Otherwise, the unit may be damaged.
②Front panel can't be washed by water. Before cleaning, remove the decorative board and the composite filter, and then use dust collector or soft brush or rag to clean the dust attached on the front air inlet of panel. After that, install the composite filter well and then install the decorative board.
natural_image
Diagram of a hand using a tool to press or watch a circular object, no text or symbols presentMaintenance
Troubleshooting
Please check below items before asking for maintenance service. If the problems still exist, please contact the designated service provider or customer service center.
Unit can't operate
Unit can't operate
- Please confirm whether the power is connected.
- Please confirm whether it connected 220-240V\~50/60Hz power.
- Please confirm whether the decorative board is installed well.
- Please confirm the remind time for " " is overdue.
There is peculiar odor in the out airflow
There will be a smell of new materials during the initial operation.
- The smell is normal and will disappear after working for a period of time.
Please check whether the unit works at specific places (such as smoking area, BBQ restaurant or newly decorated room).
- The indoor polluted gas molecule may be attached on the filter which is more likely to be saturated in above conditions. The filter should be replaced timely and reset it.
Check whether there are too much dusts or contaminant accumulation on the surface of filter.
- The filter can be reused after it being cleaned and air-dried. If the odor still exists, it is recommended to replace the filter and reset it.
There is peculiar odor in the out airflow
If the unit operates in high humidity environment(such as in rainy season or there is also humidifier in working).
- You are suggested to sun-dry or air-dry the filter for a while, then you can reuse it.
indicator flashes
- It indicates it needs to replace the composite filter. Please replace the filter at the designated service provider or customer service center and replace the filler by referring to the" ".Notices before Operation
Others
When the operation environment is good, the air quality indicator color is always in red
- The dust sensor becomes dirty. Please clean the dust sensor by referring to the "Clean and Maintenance".
PM2.5 value displays "L3/H8/H3/---"(3min above)
- Please contact the designated service provider or customer service center.
Exception Clauses
Exception Clauses
Manufacturer will bear no responsibilities when personal injury or property loss is caused by the following reasons:
- Damage the product due to improper use or misuse of the product;
- Alter, change, maintain or use the product with other equipment without abiding by the instruction manual of manufacturer;
- After verification, the defect of product is directly caused by corrosive gas;
- After verification, defects are due to improper operation during transportation of product;
- Operate, repair, maintain the unit without abiding by instruction manual or related regulations;
- After verification, the problem or dispute is caused by the quality specification or performance of parts and components that produced by other manufacturers;
- The damage is caused by natural calamities, bad using environment or force majeure.
THERMEX SCANDINAVIA A/S
- Puremex II
- YDERLIGERE INFORMATION
- INDHOLD
- Monter den dekorative plade
- Monter det sammensatte filter
- Vedligehold
- Fejlfinding
- Installer det dekorative
- Installer komposittfilteret Ta
- Vedlikehold
- Feilsøking
- Underhåll
- Felsökning
- Asenna koristelevy
- Huolto
- Vianmääritys
- Instale la tapa decorativa.
- Mantenimiento
- Safety Regulation
- Prohibition
- Follow
- Product Instruction
- Product Introduction
- Features of product
- Working principle
- Parts' Name
- Product Operation
- Notices before Operation
- Remove the decorative board
- Install the decorative board
- Install the composite filter
- Operation Instruction
- Air quality indicator (PM2.5)
- Put through the power
- Turn on the unit
- Mode selection
- Fan speed selection
- Turn off the unit
- Replace filter
- Maintenance
- Clean and Maintenance
- Warm remind
- Clean and maintenance for filter and dust sensor
- Clean and replace the filter
- Clean the dust sensor
- Clean decorative board and front panel
- Troubleshooting
- Unit can't operate
- There is peculiar odor in the out airflow
- Others
- Exception Clauses
- Manufacturer will bear no responsibilities when personal injury or property loss is caused by the following reasons:
- THERMEX SCANDINAVIA A/S
Brand : Thermex
Model : Puremex 2
Category : Air purifier