
DN-300R MKII - Media player DENON - Free user manual and instructions
Find the device manual for free DN-300R MKII DENON in PDF.


| Product Type | Professional Media Player |
| Brand | Denon |
| Model | DN-300R MKII |
| Supported Audio Formats | WAV, MP3, FLAC, AAC, Ogg Vorbis |
| Storage Media | USB, SD/SDHC, external hard drive (FAT32) |
| Audio Outputs | Balanced XLR, Unbalanced RCA, headphone (6.35mm jack) |
| Audio Input | RCA line input (auxiliary) |
| Network Connectivity | 100Base-T Ethernet, Wi-Fi (optional via USB adapter) |
| Display | Backlit LCD screen (2 lines) |
| Dimensions (W x H x D) | 482 x 44 x 200 mm (1U rack mount) |
| Weight | 3.0 kg |
| Power Supply | 100-240 V AC, 50/60 Hz, power consumption 15 W |
| Main Functions | Play, pause, search, repeat, program, shuffle, CUE markers, crossfade |
| Remote Control | Infrared (remote control included) |
| Maintenance and Cleaning | Dust the device with a soft, dry cloth. Do not use abrasive products or solvents. |
| Safety | Do not expose to moisture, shocks, or extreme temperatures. Unplug before cleaning. |
| Spare Parts and Repairability | Availability of spare parts (power supply, motherboard) from authorized dealers. Repair possible by qualified technician. |
| General Information | Device designed for use in studio, radio, events. 2-year warranty. |
| Included Accessories | Power cord, remote control, RCA audio cable, rack mounting brackets, user manual |
Frequently Asked Questions - DN-300R MKII DENON
User questions about DN-300R MKII DENON
0 question about this device. Answer the ones you know or ask your own.
Ask a new question about this device
Download the instructions for your Media player in PDF format for free! Find your manual DN-300R MKII - DENON and take your electronic device back in hand. On this page are published all the documents necessary for the use of your device. DN-300R MKII by DENON.
USER MANUAL DN-300R MKII DENON
User Guide (English)
Introduction
Please see this guide's Setup chapter to learn how to integrate DN-300R MKII with your audio system, and then refer to the Operation chapter to start using DN-300R MKII.
Box Contents
DN-300R MKII
Power Cable
(4) Rubber Feet
Rack Ears (attached)
User Guide
Safety & Warranty Manual
Support
For the latest information about this product (documentation, technical specifications, system requirements, compatibility information, etc.) and product registration, visit denonpro.com.
For additional product support, visit denonpro.com/support.
Safety Instructions
| Before turning the power on: | Make sure all connections are secure and correct and that there are no problems with the connection cables.Power is supplied to some of the circuitry even when the unit is powered off. When the unit will not be used for long periods of time, disconnect the power cable from the power outlet. |
| About condensation: | If there is a major difference in temperature between the inside of the unit and the surroundings, condensation may form inside the unit, causing the unit not to operate properly. If this happens, let the unit sit for an hour or two while powered off, and wait until there is little difference in temperature before using the unit. |
| Cautions on using mobile phones: | Using a mobile phone near this unit may cause noise. If this occurs, move the mobile phone away from this unit when it is in use. |
| Moving the unit: | Before moving the unit, turn off its power and disconnect the power cable from the power outlet. Next, disconnect its connection cables from other devices before moving it. |
| About care: | Wipe the cabinet and control panel clean with a soft cloth.Follow the instructions when using a chemical cleaner.Do not use benzene, paint thinner, insecticide, or other organic solvents to clean the unit. These materials can cause material changes and discoloration. |
| Rackmount warnings:(required rack specifications for mounting the unit in a rack) | EIA standard 19-inch (48.3cm) rack1U-size installation compatible rackRack that has a guide rail or shelf board that can support this device. |
Features
Front Panel

- Power: Press this switch to turn DN-300R MKII on or off. Make sure the power input is properly connected to a power outlet. Do not turn the unit off during media recording or playback—doing so could damage your media.
- SD Card Slot: Insert an SDHC or SDXC card to this slot.
- USB Port: Connect a mass-storage-class USB device to this port.
- Folder: Press this button to view this list of folders on the active device (SD or USB).
- Menu: Press this button to access the Menu.
- Back: Press this button to move back a level in the Menu.
- SD/USB: Press this button to toggle between SD, USB, and SD+USB recording modes.
- Repeat: Press this button to cycle through the Repeat playback modes. See Operation >Playback > Playback Modes for more information.
- Random: Press this button to turn Random playback mode on or off. See Operation >Playback > Playback Modes for more information.
- Jog Dial: Turn this dial to select tracks or to edit options shown in the Display. Press this dial to confirm a selection.
- Display: This screen indicates the unit's current operation.
- SD/USB Indicators: These LEDs will be lit red to indicate an SD Card and/or USB Device is connected and selected for recording. If another device is connected but not selected for recording, the respective LED will turn blue when playback or recording is stopped.
- Input Level Indicators: Indicates the input signal level from the Audio Inputs. If the red LED consistently lights, it is recommended to lower the input level.
- Track/Search Buttons: Press one of these buttons to move to the previous or next track. Press and hold one of these buttons to rewind/fast-forward.
- Stop: Press this button to stop recording or playback.
- Play/Pause: Press this button to start, resume, or pause playback.
- Record: Press this button to start recording. While recording, the button will be solidly lit; when Auto Track is turned On, the button will blink.
- Headphone Level: Adjusts the volume of the headphones.
- Headphones Jack: Connect headphones to this 1/4" (6.35 mm) TRS jack.
- Input Level: Adjusts the volume of the Audio Inputs.
Rear Panel

- Audio Inputs (balanced XLR): Use XLR cables to connect an external audio source to these inputs.
- Audio Inputs (unbalanced RCA): Use RCA cables to connect an external audio source to these inputs.
- Audio Outputs (balanced XLR): Use XLR cables to connect these outputs to external speakers, sound system, etc.
- Audio Outputs (unbalanced RCA): Use RCA cables to connect these outputs to external speakers, sound system, etc.
- Power Input: Use the included power cable to connect this input to a power outlet.
- Fuse: If the fuse blows, replace it with a fuse of the same type. Using a fuse with an incorrect rating can damage the unit and/or fuse.
Setup
Important: Connect all cables securely and properly (with stereo cables: left with left, right with right), and do not bundle them with the power cable.
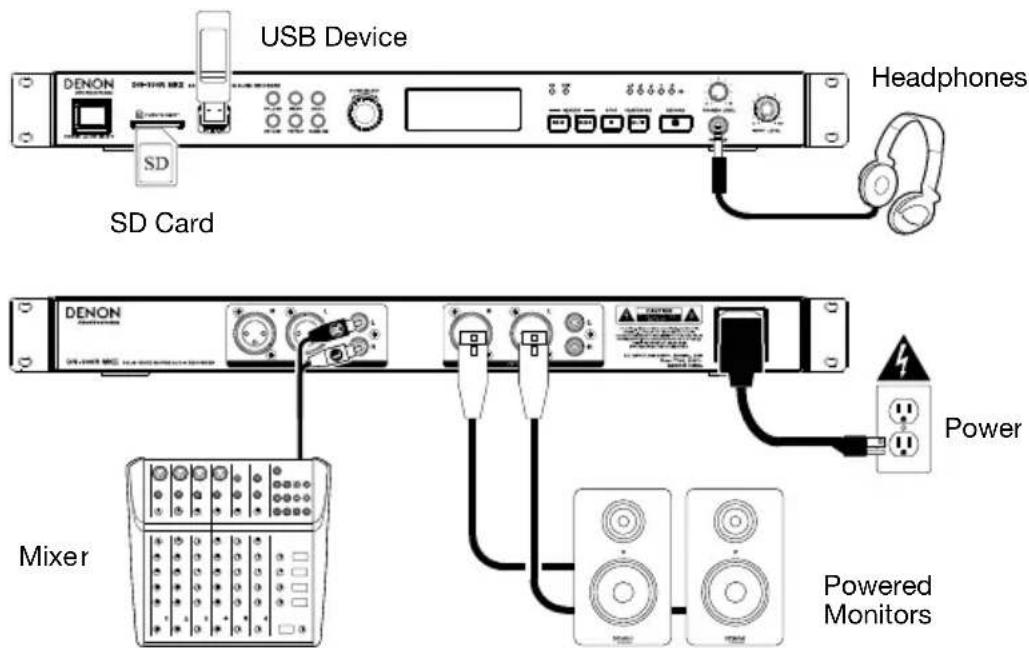
- Use XLR or stereo RCA cables to connect the outputs of your audio sources to the Inputs (balanced or unbalanced) of DN-300R MKII.
- Use XLR or stereo RCA cables to connect the Outputs (balanced or unbalanced) to the inputs of your external receiver, amp, powered monitors, etc.
- After completing all the connections, use the included power cable to connect the Power In to a power outlet.
- Power on all of your input sources.
- Power on DN-300R MKII.
Connection Diagram
Items not listed under Introduction > Box Contents are sold separately.
Operation
Recording
To record files onto a USB device or SD Card:
-
Do one or both of the following:
-
Insert your USB device (mass storage class) into the USB Port.
-
Insert your SDHC/SDXC card into the SD Card Slot until you hear it "click."
-
Connect your external audio source to the Audio Inputs using XLR or RCA cables.
-
If the unit is off, press the Power button to power it on.
-
Select your desired media type by pressing the SD/USB button.
-
Press the Record button to begin recording.
-
When you are finished recording, press the Stop button.
Important: Please see Menu Operation to learn more about the different settings for Recording.
Playback
To play audio files on a USB device or SD card:
-
Do one of the following:
-
Connect your USB device (mass storage class) to the USB Port.
-
Insert your SDHC/SDXC card into the SD Card Slot until you hear it "click."
-
If the unit is off, press the Power button to power it on.
- Select your desired media type by pressing the SD/USB button.
- Select an audio file by turning the Jog Dial or by pressing the Track/Search buttons. If your media contains folders, use the Folder button to display the list of folders.
- To start playback, press the Play/Pause button on the unit.
When playing audio files, you can perform any of the following operations:
- To start, resume, or pause playback, press the Play/Pause button.
- To stop playback, press the Stop button.
- To rewind or fast-forward through the track, press and hold one of the Track/Search buttons. To resume playback, release the button.
- To select another folder or audio file, follow the steps described in Step 4 above.
- To remove a USB device, gently remove it from the USB Port when it is not playing or recording. (Removing a USB device while it is playing or recording can damage it.)
- To remove an SD card, gently press it into the SD Card Slot when it is not playing or recording. The SD card will spring out, after which you can remove it. (Removing an SD card while it is playing or recording can damage it.)
Important: Please see Other Information to learn more about the types of USB devices and SD cards the DN-300R MKII supports.
Playback Modes
Press the Repeat button to cycle through the following options:
- Play All: Plays back all files on the device and then stops. This is the default playback mode.
- Play Folder: Plays all files in the currently selected folder, but not any sub-folders, and then stops. The Play Folder Icon (F) appears in the display.
- Play One: Plays a single track and then stops. The Play One Icon (1▶) appears in the display.
- Repeat All: Repeats all files on the device. The Repeat Icon (💡) appears in the display.
- Repeat Folder: Repeats all files in the currently selected folder, but not any sub-folders. The Repeat Folder Icon (F) appears in the display.
- Repeat One: Repeats a single file. The Repeat One Icon (1) appears in the display.
Press the Random button to cycle through the following options:
- On: Shuffles all files on the device or in the selected folder, but not any sub-folders, for random playback. The Random Icon (R) appears in the display.
- Off: Files are played consecutively in the order of their track number. This is the default playback mode.
Note: You can combine Random playback and Play All, Play Folder, Repeat All, or Repeat Folder modes.
Menu Operation
1. Record
- Auto Lvl: Turns Auto Level On or Off. When Auto Level is On, the recording level for the Inputs is automatically kept around -3 dB (±3 dB).
- Rec Mode: Sets how and what kind of files are recorded from the following options:
- Mono: Records a single mono file to your selected device(s).
- Stereo (default): Records a single stereo file to your selected device(s).
- Dual Mono: When recording to SD or USB, records two mono audio files to the device at the same time. The second file will record at -10 dB to help protect your recording against accidental peaks in the audio source. When recording to both SD and USB, records two mono audio files to each device (creating a total of four files between both devices). The second file on each device will record at -10 dB.
- Dual Stereo: When recording to SD or USB, records two stereo files to the device at the same time. The second file will record at -10 dB. When recording to both SD and USB, records two stereo files to each device (creating a total of four files between both devices). The second file on each device will record at -10 dB.
Note: Dual Mono and Dual Stereo are only available with 44.1K/16bit WAV recording.
If you select one of the Dual recording options, DN-300R MKII will prompt you to test the SD card and/or USB drive to ensure it is compatible with Dual recording functions. Turn the Jog Dial to select Yes, and press it to confirm. DN-300R MKII will test the SD card and/or USB drive and display whether the test has passed or failed. Class 10 or greater SDHC/SDXC cards are required when using Dual recording.
- Pre Rec: Turns Pre-Record On or Off. When Pre-Record is On, a 2 second buffer of audio is kept in memory. When the record button is pressed, this buffer is used at the beginning of the recording.
Note: Pre-Record cannot be used with 48K/24bit WAV recording.
-
Auto Track: Turns Auto Track On or Off. When Auto Track is Off, new tracks must be created manually (by starting and stopping recording). When Auto Track is On, the Record button will flash, and recording will start and stop based on the options below. Press the Jog Dial to choose the options below, then select its value.
-
Level: Starts and stops recording when the input level passes a certain threshold. Set to -24, -30, -36, or -42 dB.
- Time: Stops recording after a period of time has elapsed. Set to 1 min, 5 min (default), 10 min, 15 min, 30 min, 1 hr, 2 hr, 8 hr, 12 hr, or 24 hr. You can also press Stop to end the recording at any time.
Note: If using the 8 hr, 12 hr, or 24 hr options, make sure to set the Format to MP3. WAV files will be too large and stop recording before the set time.
2. Browse
- SD: Select this option to view the contents of an SD card.
- USB: Select this option to view the contents of a USB drive.
3. System
- Format: Select this option to set the recording format. Choose WAV (44.1K/16bit or 48K/24bit) or MP3 (192Kbps or 256Kbps).
- Info: Select this option to view the following information:
- Format: Displays the current recording format.
- Rec Mode: Displays the current recording mode.
• Media Size: Displays the total size of the connected device.
- Free Size: Displays the remaining free space on the connected device.
- Time Left: Displays the remaining recording time on the connected device.
- Tracks: Displays the number of tracks on the connected device.
- Folders: Displays the number of folders on the connected device.
4. Utility
- Time/Date: Displays the current date and time. Turn the Jog Dial to switch between the date and time, and press it to edit the current setting. Use the Back button to return to the main menu when you have finished editing.
- FW Version: Shows the current firmware version.
- Format: Select this option to format your connected SD or USB device. Doing so will erase the contents of the device, and cannot be undone.
- Default: Select this option to revert DN-300R MKII to its factory default settings. This cannot be undone.
Other Information
USB Devices / SD Cards
When playing audio files on a USB device or SD card, note the following:
- DN-300R MKII does not charge any connected USB device and does not support USB hubs, USB extension cables, or SD card readers.
- DN-300R MKII supports USB devices that are mass storage class or compatible with MTP.
- DN-300R MKII supports USB devices and SDHC/SDXC cards with a capacity of:
o USB: 256 MB - 2 TB
o SDHC card: 4 GB - 32 GB
o SDXC card: 64 GB - 128 GB
Note: Class 4 or greater SDHC/SDXC cards are recommended, and Class 10 or greater is required for Dual recording.
- DN-300R MKII supports FAT16 or FAT32 file systems only.
- You can have up to 99 folders, and up to 2 folder levels, including the root directory.
- You can have up to 999 audio files. If the USB device or SD card contains more than 1000 files, some audio files may not play or appear correctly.
- File names, folder names, and text characters can use up to 255 characters. Only uppercase letters, lowercase letters, numbers, and symbols can be displayed. Japanese file names will not be shown.
• Copyright-protected files might not play properly and/or may appear as Unknown File.
• DN-300R MKII supports the following tag data:
| MP3 | WAV |
| o ID3 tags: Version 1.x – 2.4 | o ID3 tags: Version 1.x – 2.4 |
| o Sample rate: 44.1 kHz | o Sample rate: 44.1, 48 kHz |
| o Bit rate: 64–320 kbps | o Bit depth: 16 bit/24 bit |
| o Format: MPEG1 Audio Layer 3 | o Format: Waveform Audio File Format |
| o File extension: .mp3 | o File extension: .wav |
Audio File Playback Order
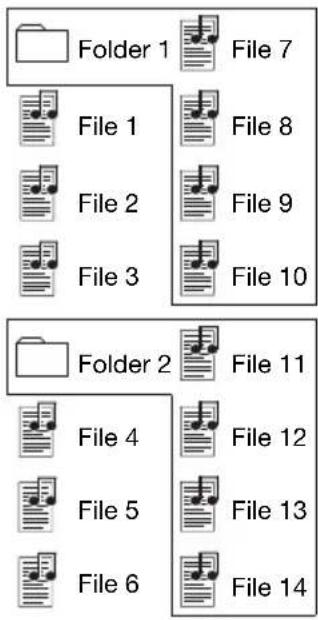
When playing audio files stored within multiple folders, the playback order of each folder is automatically set when the unit reads the media. The files in each folder will play in the same order in which they were added to the media. (This order may appear differently on your computer and/or in your software than it does on the unit.)
The image here illustrates how folders are structured into levels on your media.
The folder structure also determines the playback order: For audio files on a USB device or SD card, files in the root level will play, then files in the first folder of the first level, then files in the second folder of the second level, and so on.
Level 1 (root) Level 2
Troubleshooting
If you encounter a problem, try doing these things first:
- Make sure all cables and other connected devices are properly and securely connected.
- Make sure you are using DN-300R MKII as described in this user guide.
- Make sure your other devices or media are working properly.
- If you believe DN-300R MKII is not working properly, check the following table for your problem and solution.
| Problem: | Solution: | Please | see: |
| Power does not turn on. | Make sure DN-300R MKII’s power input is properly connected to a power outlet using the included power cable. | Setup | |
| DN-300R MKII does not produce any sound, or the sound is distorted. | Make sure all cable and device connections are secure and correct.Make sure none of the cables are damaged.Make sure the settings on your device, loudspeaker, mixer, etc. are correct. | Setup | |
| Problem: | Solution: Please see: | |
| No Device appears even when a USB device or SD card is inserted. | Disconnect and reconnect the USB device or SD card to make sure it is securely inserted.Make sure the USB device is of a mass storage class or compatible with MTP.Make sure the USB device or SD card is formatted using a FAT16 or FAT32 file system.Do not use a USB hub, USB extension cable, or SD card reader.The unit does not supply power to USB devices. If your USB device requires a power source, connect it to one.Not all USB devices or SD cards are guaranteed to work; some may not be recognized. | Other Information >USB Devices / SD Cards |
| Files on a USB device or SD card do not appear. | Make sure the files are of a supported file format. Files that are not supported by this unit will not appear.Make sure the USB device or SD card uses a folder structure that the unit supports: up to 99 folders (up to 2 folder levels, including the root) and up to 999 files.If your USB device or SD card is partitioned, make sure the files are in the first partition. The unit will not show other partitions. | Other Information >USB Devices / SD Cards |
| Files on a USB device or SD card cannot play. | Make sure the files are of a supported file format. Files that are not supported by this unit will not appear.Make sure the files are not copyright-protected. The unit cannot play copyright-protected files. | Other Information >USB Devices / SD Cards |
| Files on an SD card are not recorded properly (noise, clicks, or incorrect speed). | Make sure the card is Class 4 or greater, or Class 10 or greater if you are using Dual recording. | Other Information >USB Devices / SD Cards |
| File names do not appear properly. | Make sure the files are using only supported characters. Characters that are not supported will be replaced with a “.” | Other Information >USB Devices / SD Cards |
Technical Specifications
| Digital Audio System | |
| System | Media recorder and player |
| Compatible Media | USB device (mass storage class), SDHC/SDXC Card (Class 4 or greater recommended, Class 10 or greater required for Dual Recording) |
| Supported File Systems | FAT16, FAT32 |
| Supported File Formats MP3: Sampling frequency: 44.1 kHzBit rate: 192, 256 kbps (recording); 64–320 kbps and VBR ( playback)Format: MPEG1 Audio Layer 3File extension: .mp3 | |
| Number of Channels | 2 channels stereo |
| Audio Frequency Range | 10 Hz – 20 kHz (±1.0 dB, recording; ±0.8 dB playback) |
| Signal-to-Noise Ratio Recording | >90 dB (WAV); >80 dB (MP3)Playback: >90 dB(1 kHz, 0 dB, A-weighted) |
| Channel Separation | Recording: >85 dB (WAV); >60 dB (MP3)(1 kHz, 0 dB, A-weighted) |
| Wow and Flutter | < 0.001% |
| Distortion | Recording: < 0.01% (WAV); < 0.03% (MP3)Playback: < 0.02% (WAV); < 0.05% (MP3) |
| Total Harmonic Distortion | < 0.01% (1 kHz, 0 dB, A-weighted) |
| Inputs | |
| Balanced XLR Nominal Level: | +4 dBu ±1 dBuMinimum Level: -40 dBuMaximum Level: 20 dBu ±1 dBuInput Impedance: 18 kΩ |
| Unbalanced RCA Nominal Level: | -10 dBV (at full scale: -16 dB)Minimum Input Level: -19 dBV or higherInput Impedance: 22 kΩ ±10% |
| Outputs | |
| Balanced XLR Nominal Level: | +4 dBu ±1 dBuMaximum Output Level: +20 dBu ±1 dBuOutput Impedance: 600 Ω ±10% |
| Unbalanced RCA Nominal Level: | -10 dBV ±2 dBVMaximum Output Level: +6 dBV ±2 dBVOutput Impedance: 600 Ω ±10% |
| General | |
| Connectors | (2) XLR outputs(1) 1/4” (6.35 mm) headphone output(1) RCA stereo output pair(2) XLR inputs(1) RCA stereo input pair(1) USB port(1) SD card slot(1) IEC power input |
| Power | Connection: IECInput Voltage: 100–240 V~, 50/60 Hz |
| Operating Conditions | Operating Temperature: 41 – 113 °F (5 – 45 °C)Operating Humidity: 25 – 85%, no condensation |
| Dimensions(width x depth x height) | 19.0” x 10.0” x 1.7”483 x 254 x 44 mm |
| Weight | 6.6 lbs.3.0 kg |
Specifications are subject to change without notice.
Trademarks & Licenses
Denon is a trademark of D&M Holdings Inc., registered in the U.S. and other countries. Denon Professional products are produced by inMusic Brands, Inc., Cumberland, RI 02864, USA.
All other product names, company names, trademarks, or trade names are those of their respective owners.
denonpro.com
- User Guide (English)
- Introduction
- Box Contents
- Support
- Features
- Front Panel
- Rear Panel
- Setup
- Connection Diagram
- Operation
- Recording
- To record files onto a USB device or SD Card:
- Playback
- To play audio files on a USB device or SD card:
- Playback Modes
- Menu Operation
- Record
- Browse
- System
- Utility
- Other Information
- USB Devices / SD Cards
- Audio File Playback Order
- Troubleshooting
- Trademarks & Licenses
- denonpro.com
Brand : DENON
Model : DN-300R MKII
Category : Media player