
IAN 282261 - Electric grater Ernesto - Free user manual and instructions
Find the device manual for free IAN 282261 Ernesto in PDF.


| Product type | Electric grater |
| Model | IAN 282261 |
| Brand | Ernesto |
| Dimensions (L x W x H) | Approx. 20 x 10 x 15 cm |
| Weight | 1.2 kg |
| Supply voltage | 220-240 V ~ 50/60 Hz |
| Power | 150 W |
| Main functions | Grate, slice, julienne |
| Drums included | Coarse grating drum, fine grating drum, julienne drum |
| Housing material | ABS plastic |
| Blade material | Stainless steel |
| Fill bowl capacity | 750 ml |
| Safety | Safety on/off button, anti-slip feet |
| Care and cleaning | Drums washable in soapy water, motor unit wiped with a damp cloth |
| Spare parts and repairability | Replacement parts available through Ernesto customer service |
| Warranty | 2 years |
| Package contents | Motor unit, 3 drums, fill bowl, pusher, instruction manual |
| Color | White and gray |
Frequently Asked Questions - IAN 282261 Ernesto
User questions about IAN 282261 Ernesto
0 question about this device. Answer the ones you know or ask your own.
Ask a new question about this device
Download the instructions for your Electric grater in PDF format for free! Find your manual IAN 282261 - Ernesto and take your electronic device back in hand. On this page are published all the documents necessary for the use of your device. IAN 282261 by Ernesto.
USER MANUAL IAN 282261 Ernesto
natural_image
Black-and-white photo of a cylindrical container with dried herbs or tea leaves being poured from it (no text or symbols visible)MULTIREIBE / MULTI-PURPOSE GRATER / MOULIN À RÂPER
DE AT CH
MULTIREIBE
MULTI-PURPOSE GRATER
Operation and safety notes
FR BE
MOULIN À RÂPER
![A Garlic [1] Outside 12 14 Herb [1] 7](/content/2026/05/881296/images/4077a9d1a83b1d4f58a7bb35121f3efcc6d8c8820ddfbaebef18d75f6ba2561b.jpg)

flowchart
graph TD
    A["Carved Ring"] --> B["Cut to Container"]
    B --> C["Garlic [1"] or_Herb["1"]]
    C --> D["7 Box"]
    style A fill:#f9f,stroke:#333
    style B fill:#ccf,stroke:#333
    style C fill:#cfc,stroke:#333
    style D fill:#fcc,stroke:#333
flowchart
graph TD
    A["Garlic [1"]] --> B["Outside"]
    C["Herb [1"]] --> D["Outside"]

flowchart
graph TD
    A["D"] --> B["Process Step"]
    B --> C["Output"]

natural_image
Technical diagram of a circular fan or impeller with blades and central hub, no text or symbols present

natural_image
Exploded view diagram of a mechanical assembly showing internal components (no text or labels)
natural_image
Technical line drawing of a mechanical device with a cylindrical component and a base, showing internal components and assembly (no text or symbols)
flowchart
graph TD
    A[" fan rotation"] --> B[" grid pattern "]
    B --> C[" fan blade rotation "]
    style A fill:#f9f,stroke:#333
    style B fill:#ccf,stroke:#333
    style C fill:#cfc,stroke:#333

MULTIREIBE
Einleitung
MULTI-PURPOSE GRATER
Introduction
We congratulate you on the purchase of your new product. You have chosen a high quality product. Familiarise yourself with the product before using it for the first time. In addition, please carefully refer to the operating instructions and the safety advice below. Only use the product as instructed and only for the indicated field of application. Keep these instructions in a safe place. If you pass the product on to anyone else, please ensure that you also pass on all the documentation with it.
● Description of parts
1 Top lid
2 Blade storage container
3 Top locking ring
4 Spring loaded pusher
5 Transparent cup
6 Maximum fill line
7 Blade base
8 White base lock
9 Collecting base
10 Lid of collecting base
11 Cheese blade
12 Garlic [1] blade
13 Garlic [2] blade
14 Herb [1] blade
15 Herb [2] blade

WARNING!
Keep well away from small children.
Blades can cause serious injury!
● Assembly and use instructions (for garlic, herbs)
Note: For grating garlic, chocolate and nuts, use garlic [1] blade 12 and garlic [2] blade 13 in combination.
For grating herbs, use herb [1] blade 14 and herb [2] blade 15 in combination.
NOTE: The product is already pre-assembled. If you want to switch any of the blades, refer to figures H, G, D, C, A and reverse the order of steps.
- Place the blade base 7 upside down.
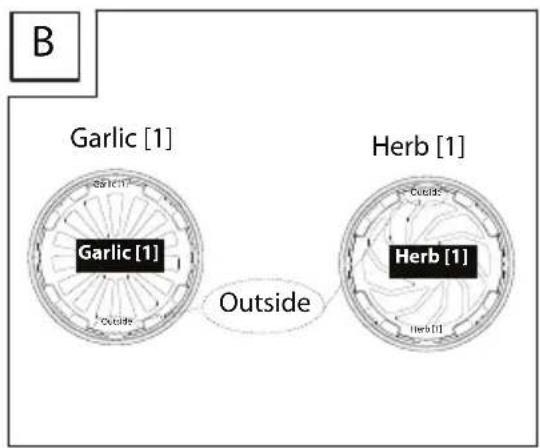
- Insert the garlic blade [1] 12 or herb [1] blade 14 into the blade base 7 with the wording "Outside" facing upward (figures A, B).
Note: Cheese blade 11 is already pre-assembled. Removed the blade first before you insert other blades.
- Align the grooves in the white base lock 8 with the notches in the blade base 7. Turn the white base lock 8 in clockwise direction to lock in place (figure C).
-
Align the collecting base 9 and the blade base 7. Turn the collecting base 9 to lock in place (figure D).
-
Turn the blade base 7 to the upright position, you can now see the wording "Inside" is facing upward (figure E).
-
Insert the spring loaded pusher 4 into the transparent cup 5. Push the top locking ring 3 down and turn the transparent cup 5 to lock in place (figure F).
-
Turn the upper body upside down, then you can see the star bearing is facing upward to you. Insert the second blade (garlic [2] blade 13 or herb [2] blade 15) into the star bearing. After that, you will see the wording "Outside" on the blade is facing to you (figure G).
-
Align the grooves in the blade base 7 with the transparent cup 5. Turn the transparent cup 5 to lock in place (figure H).
-
Fill the transparent cup 5 with garlic or herbs (figure I).
Note: DO NOT allow the content to exceed the maximum fill line 6.
Hint: For grating herbs, remove the herbs' stems from herbs before filling into the transparent cup 5.
- Turn the base storage container 2 in clockwise and anti-clockwise direction to grate the foods (figure J).
Hint: The garlic blades can also be used for chocolate and nuts.
● Assembly and use instructions (for cheese)
Note: Only cheese blade 11 is needed.
Note: Cheese blade 11 is already pre-assembled. If you like to grate cheese in first time use, you could jump to step 6 and start to use.
-
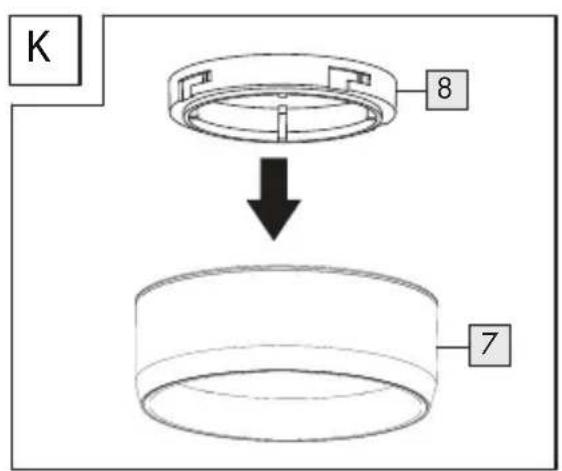
Align the grooves in the white base lock 8 with the notches in the blade base 7. Turn the white base lock 8 in clockwise direction to lock in place (figure K).
-
Align the collecting base 9 and the blade base 7. Turn the collecting base 9 to lock in place (figure D).
-
Insert the spring loaded pusher 4 into the transparent cup 5. Push the top locking ring 5 down and turn the transparent cup 5 to lock in place (figure F).
-
Turn the transparent cup 5 then you can see the star bearing is facing upward to you. Insert the cheese blade 11 into the star bearing. After that, you will see the wording "Outside" on the blade is facing to you (figure G).
-
Align the grooves in the blade base 7 with the transparent cup 5. Turn the transparent cup 5 to lock in place (figure H).
-
Fill the transparent cup 5 with cheese (figure I).
Note: DO NOT allow the content to exceed the maximum fill line 6.
- To shred cheese, turn the base storage container 2 in clockwise direction.
- To slice cheese, turn the base storage container 2 in anti-clockwise direction.
Hint: The cheese blade 11 can also be used for chocolate and nuts.
● Cleaning and storage
■ Disassemble the product and separate all components.
■ Clean all components by using a commercially available cleaning agent and warm water.
■ Blades can be cleaned in a dishwasher.
- Avoid using aggressive and abrasive cleaning agents.
Dry all components thoroughly and assemble the product.
- Stack the unused blades inside the blade storage container 2 and close by its top lid 1.
- Disposal
The packaging is made entirely of recyclable materials, which you may dispose of at local recycling facilities.
Contact your local refuse disposal authority for more details of how to dispose of your worn-out product.
MOULIN À RÂPER
Introduction

Brand : Ernesto
Model : IAN 282261
Category : Electric grater