
ST1500E-F - Lawn mower EGO - Free user manual and instructions
Find the device manual for free ST1500E-F EGO in PDF.


| Brand | EGO |
| Model | ST1500E-F |
| Product type | Cordless lawn mower |
| Power | 56 V lithium-ion battery |
| Battery capacity | 5.0 Ah (recommended) |
| Cutting width | 51 cm |
| Cutting height | 25 to 75 mm |
| Number of cutting heights | 7 positions |
| Grass bag capacity | 55 L |
| Motor | Brushless motor |
| Mulching function | Yes (with mulching plug included) |
| Rotation speed | 2900 rpm |
| Sound level | 92 dB(A) |
| Dimensions (L x W x H) | 143 x 52 x 108 cm |
| Weight (without battery) | 22 kg |
| Battery type | EGO 56 V ARC Lithium |
| Recommended charger | EGO CH5500 or CH2800 |
| Charging time (5.0 Ah) | Approximately 60 min |
| Runtime (5.0 Ah) | Approximately 45 min |
| Warranty | 5 years (parts and labor) |
| Maintenance | Regular cleaning of the deck and blade sharpening |
| Cleaning | Use a gentle water spray, avoid high-pressure cleaners |
| Safety | Safety key start and dead man's switch |
| Spare parts | Blades, batteries, chargers, mulching plug available |
| Repairability | Repairability score 8.2/10 |
Frequently Asked Questions - ST1500E-F EGO
User questions about ST1500E-F EGO
0 question about this device. Answer the ones you know or ask your own.
Ask a new question about this device
Download the instructions for your Lawn mower in PDF format for free! Find your manual ST1500E-F - EGO and take your electronic device back in hand. On this page are published all the documents necessary for the use of your device. ST1500E-F by EGO.
USER MANUAL ST1500E-F EGO
OPERATOR'S MANUAL
56 VOLT LITHIUM-ION








EN
READ ALL INSTRUCTIONS!

READ OPERATOR'S MANUAL
⚠️ Residual risk! People with electronic devices, such as pacemakers, should consult their physician(s) before using this product. Operation of electrical equipment in close proximity to a heart pacemaker could cause interference or failure of the pacemaker.
WARNING: To ensure safety and reliability, all repairs and replacements should be performed by a qualified service technician.
SAFETY SYMBOLS
The purpose of safety symbols is to attract your attention to possible dangers. The safety symbols and the explanations with them deserve your careful attention and understanding. The symbol warnings do not, by themselves, eliminate any danger. The instructions and warnings they give are no substitutes for proper accident prevention measures.
WARNING: Be sure to read and understand all safety instructions in this Operator's Manual, including all safety alert symbols such as "DANGER," "WARNING," and "CAUTION" before using this tool. Failure to following all instructions listed below may result in electric shock, fire, and/or serious personal injury.
SYMBOL MEANING
SAFETY ALERT SYMBOL: Indicates DANGER, WARNING, or CAUTION. May be used in conjunction with other symbols or pictographs.

WARNING: The operation of any power tools can result in foreign objects being thrown into your eyes, which can result in severe eye damage. Before beginning power tool operation, always wear safety goggles or safety glasses with side shields and a full face shield when needed. We recommend a Wide Vision Safety Mask for use over eyeglasses or standard safety glasses with side shields.
SAFETY INSTRUCTIONS
This page depicts and describes safety symbols that may appear on this product. Read, understand, and follow all instructions on the machine before attempting to assemble and operate.
 | Safety Alert | Precautions that involve your safety. |
 | Read Operator's Manual | To reduce the risk of injury, user must read and understand operator's manual before using this product. |
 | Wear Eye Protection | Always wear safety goggles or safety glasses with side shields and a full face shield when operating this product. |
 | Wear Ear Protection | Always wear ear protection when operating this product. |
 | Line Diameter | The Diameter of the nylon cutting line |
 | Cutting Width | The Max. cutting width of line trimmer |
 | No Cutting Blade | Do not install metal or plastic cutting blades |
 | Do Not Expose To Rain | Do not use in the rain or leave outdoors while it is raining. |
 | Keep Bystanders Away | Ensure that other people and pets remain at least 15m away from the line trimmer when it is in use. |
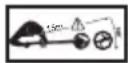 | Keep Bystanders Away | Ensure that other people and pets remain at least 15m away from the line trimmer when it is in use. |
| V Volt Voltage | ||
| A Amperes Current | ||
| Hz Hertz | Frequency (cycles per second) | |
| W Watt Power | ||
| min Minutes Time | ||
| [KGWA] | Alternating Current | Type of current |
 | Direct Current | Type or a characteristic of current |
| n0 | No Load Speed | Rotational speed, at no load |
| ... /min Per Minute Revolutions per minute | ||
IMPORTANT SAFETY INSTRUCTIONS
WARNING: When using line trimmers, basic safety precautions should always be followed to reduce the risk of fire, electric shock, and personal injury, including the following:
READ CAREFULLY BEFORE USE KEEP FOR FUTURE REFERENCE
DANGER: Do not rely on the tool's insulation against electric shock. To reduce the risk of electrocution, never operate the machine in the vicinity of any wires or cables (power, etc.) which may carry electric current.
CAUTION: Wear appropriate personal hearing protection during use. Under some conditions and durations of use, noise from this product may contribute to hearing loss.
TRAINING
- Read the instructions carefully. Be familiar with the controls and the proper use of the machine.
■ Never allow people unfamiliar with these instructions or children to use the machine. Local regulations can restrict the age of the operator. - Keep in mind that the operator or user is responsible for accidents or hazards occurring to other people or their property.
PREPARATION
■ Never operate the machine while people, especially children, or pets are nearby.
■ Wear eye protection and stout shoes at all times while operating the machine.
■ The distance between the machine and bystanders shall be at least 15m.
■ Do not use metal blades
OPERATION
■ Use the machine only in daylight or good artificial light.
■ Never operate the machine with damaged guards or shields or without guards or shields in place.
■ Switch on the motor only when the hands and feet are away from the cutting means.
■ Always disconnect the machine from the power supply (i.e. remove the plug from the mains or remove the disabling device).
■ whenever leaving the machine unattended;
■ before clearing a blockage;
■ before checking, cleaning or working on the machine;
■ after striking a foreign object;
■ whenever the machine starts vibrating abnormally
EN
■ Take care against injury to feet and hands from the cutting means.
■ Always ensure that the ventilation openings are kept clear of debris.
MAINTENANCE AND STORAGE
■ Disconnect the machine from the power supply (i.e. remove the plug from the mains or remove the disabling device) before carrying out maintenance or cleaning work.
- Use only the manufacturer's recommended replacement parts and accessories.
- Inspect and maintain the machine regularly. Have the machine repaired only by an authorized repairer.
■ When not in use, store the machine out of the reach of children.
OTHER SAFETY WARNINGS
- Avoid Dangerous Environments – Don't use trimmers in damp or wet locations.
■ Always turn the line trimmer off or remove the battery pack whenever leaving the trimmer unattended. - Don’t Use In Rain.
- Keep Children Away – All visitors should be kept at a distance from work area.
- Dress Properly – Do not wear loose clothing or jewelry. They can be caught in moving parts. Use of rubber gloves and substantial footwear is recommended when working outdoors. Wear protective hair covering to contain long hair.
- Use Safety Glasses – Always use a face or dust mask if operation is dusty.
- Use the Right Tool – Do not use the tool for any job except that for which it is intended.
- Don't Force the Trimmer – It will do the job better and with less likelihood of a risk of injury at the rate for which it was designed.
- Don't Overreach – Keep proper footing and balance at all times.
■ Stay Alert – Watch what you are doing. Use common sense. Do not operate the trimmer when you are tired.
■ Do not operate the trimmer while under the influence of alcohol or drugs. - Keep guards in place and in working order.
- Store Trimmer Indoors – When not in use the trimmer should be stored indoors in a dry and high or locked-up place with the battery pack removed – out of reach of children.
EN
- Maintain Trimmer With Care – Keep the cutting attachment clean for best performance and to reduce the risk of injury. Follow instructions for changing accessories. Keep handles dry, clean, and free from oil and grease.
- Check Damaged Parts – Before further use of the trimmer, a guard or other part that is damaged should be carefully checked to determine that it will operate properly and perform its intended function. Check for alignment of moving parts, binding of moving parts, breakage of parts, mounting, and any other condition that may affect its operation. A guard or other part that is damaged should be properly repaired or replaced by an authorized service center unless indicated elsewhere in this manual.
- Clear the area to be cut before each use. Remove all objects such as rocks, broken glass, nails, wire, or line that can be thrown or become entangled in the cutting attachment. Make sure that other persons and pets are at least 15m away.
■ Before using the machine and after any impact, check for signs of wear or damage and repair as necessary.
■ Always hold the trimmer firmly, with both hands on the handles while operating. Wrap your fingers and thumbs around the handles.
- Avoid Accidentally Starting—Don’t carry the trimmer with your finger on the trigger.
■ Do not operate the trimmer in petrolic or explosive atmospheres. Motors in these appliances normally spark, and the sparks might ignite fumes.
- Damage to Trimmer – If you strike a foreign object with the trimmer or it becomes entangled, stop the tool immediately, remove the battery pack from the line trimmer, check for damage and have any damage repaired before further operation is attempted. Do not operate with a broken guard or spool.
If the equipment should start to vibrate abnormally, stop the motor, remove the battery pack from the line trimmer. and check immediately for the cause. Vibration is generally a warning of trouble. A loose head may vibrate, crack, break or come off the trimmer, which may result in serious or fatal injury. Make sure that the cutting attachment is properly fixed in position. If the head loosens after fixing it in position, replace it immediately. Never use a trimmer with a loose cutting attachment.
■ Replace a cracked, damaged or worn-out cutting head immediately, even if damage is limited to superficial cracks. Such attachments may shatter at high speed and cause serious or fatal injury.
- Check the cutting attachment at regular short intervals during operation, or immediately if there is a noticeable change in cutting behavior.
■ Only use ™ EGO authorized polymer trimmer line accessories and trimmer line that are designed for use with this machine. Although certain unauthorized attachments might be fitted to the EGO ™ line trimmer, their use may be extremely dangerous, and/or damaging to the tools.
■ To reduce the risk of serious injury, never use wire or metal-reinforced line or other material in place of the nylon cutting lines. Pieces of wire could break off and be thrown at high speed toward the operator or bystanders.
■ To reduce the risk of injury from loss of control, never work on a ladder or on any other insecure support. Never hold the cutting attachment above waist height.
■ If situations occur that are not covered in this manual, use care and good judgment. Contact the EGO Service Center for assistance.
■ Do not charge the battery pack in rain, or in wet locations.
- Use only with EGO’s battery packs and chargers.
| BATTERY | CHARGER |
| BA1120E, BA2240E, BA2800, BA3360, BA4200 | CH5500E, CH2100E |
■ The battery pack must be removed from the appliance before it is scrapped.
■ The battery shall be disposed of safely.
■ Do not dispose of the battery in a fire. The cells may explode. Check with local authorities for possible special disposal instructions.
■ Do not open or mutilate the battery. Released electrolyte is corrosive and may cause damage to the eyes or skin. It may be toxic if swallowed.
■ Exercise care in handling batteries in order not to short the battery with conducting materials such as rings, bracelets, and keys. The battery or conductor may overheat and cause burns.
- When servicing, use only identical EGEplacement parts. Use of any other accessory or attachment may increase the risk of injury.
■ Battery tools do not have to be plugged into an electrical outlet; therefore, they are always in operating condition. Be aware of possible hazards even when the tool is not operating. Take care when performing maintenance or service.
■ Do not wash with a hose; avoid getting water in motor and electrical connections.
■ Save these instructions. Refer to them frequently and use them to instruct others who may use this tool. If you loan this tool to someone else, also loan these instructions to them to prevent misuse of the product and possible injury.
■ Always wear substantial footwear and long trousers while operating the machine.
■ Always be sure of the footing on slopes and to walk, never run.
SAVE THESE INSTRUCTIONS!
SPECIFICATIONS
| Voltage | 56 V--- | |
| No-load Speed 4000-5800 /min | ||
| Cutting Mechanism Bump Head | ||
| Cutting Line Type | 2,4mm nylon twist line | |
| Cutting Width 38 cm | ||
| Weight (without battery pack) | 3.22 kg | |
| Measured sound power level LWA | 91.55 dB(A)K=2.57 dB(A) | |
| Sound pressure level at operator's ear LPA | 78.9 dB(A) | |
| Guaranteed sound power level LWA (according to 2000/14/EC) | 96 dB(A) | |
| Vibration ah | Front-assist Handle | 2.175 m/s 2 K=1.5 m/s 2 |
| Rear Handle | 1.729 m/s 2 K=1.5 m/s 2 | |
■ The declared vibration total value has been measured in accordance with a standard test method and may be used for comparing one tool with another;
■ The declared vibration total value may also be used in a preliminary assessment of exposure.
NOTICE: The vibration emission during actual use of the power tool can differ from the declared value in which the tool is used; In order to protect the operator, user should wear gloves and ear protectors in the actual conditions of use.
PACKING LIST
| PART NAME QUANTITY | |
| Line Trimmer 1 | |
| Guard 1 | |
| Front-assist Handle Assembly 1 | |
| Shoulder Strap 1 | |
| Hex Wrench 1 | |
| Operator's Manual 1 |
DESCRIPTION
KNOW YOUR LINE TRIMMER (Fig. A)
- Trigger
- Rear Handle
- Lock-off Lever
- Soft Sleeve
- Adjustable Front-Assist Handle
- Shoulder Strap
- Cutting Line
- Guard
- Line-Cutting Blade
- Release Tab
- Trimmer Head (Bump Head)
- Ejection Mechanism
- Electric Contacts
- Latch
- Battery-Release Button
ASSEMBLY
WARNING: If any parts are damaged or missing, do not operate this product until the parts are replaced. Use of this product with damaged or missing parts could result in serious personal injury.
WARNING: Do not attempt to modify this product or create accessories not recommended for use with this Line trimmer. Any such alteration or modification is misuse and could result in a hazardous condition leading to possible serious personal injury.
WARNING: To prevent accidental starting that could cause serious personal injury, always remove the battery pack from the tool when assembling parts.
EN
MOUNTING THE GUARD
WARNING: Always wear gloves when mounting or replacing the guard. Take care of the blade on the guard and protect your hand from cutting.
WARNING: Never operate the tool without the guard firmly in place. The guard must always be on the tool to protect the user! When the guard is fixed, never attempt to remove or adjust the guard, if a replacement is needed, it should be performed by a qualified service technician!
- Lift the trimmer head and face it downward; align the two mounting holes in the guard with the two bolts that are preassembled on the base of the shaft (Fig. B).
- Use the supplied hex wrench to lock the guard in place with the two bolts (Fig. C).
Make sure the guard is fixed according to Fig. B & C, any reverse fixing will cause great danger!
MOUNTING AND ADJUSTING THE FRONT-ASSIST HANDLE
Push the front-assist handle onto the shaft (Fig. E), then insert the clamping block into the handle slot (Fig. F), mount the lock pole, and lock them with the wing nut (Fig. G). The sequence is as Fig. D shown. Lastly, adjust the front-assist handle between the soft sleeve and the label to make sure your front arm is straight when using the trimmer (Fig. H) and then lock the lever of the lock pole (Fig. I).
Fig. D & H parts description see below:
| D-1 | Front-assist Handle D-4 | Wing Nut |
| D-2 | Lock Pole H-1 Soft Sleeve | |
| D-3 | Clamping Block H-2 Warning Label | |
NOTICE: The front-assist handle should be turned upwards to point toward the top of the rear handle.
WARNING: Only fix the front-assist handle between the soft sleeve and the label on the shaft.
WARNING: The tool can not be used without the front-assist handle securely fixed.
MOUNTING THE SHOULDER STRAP
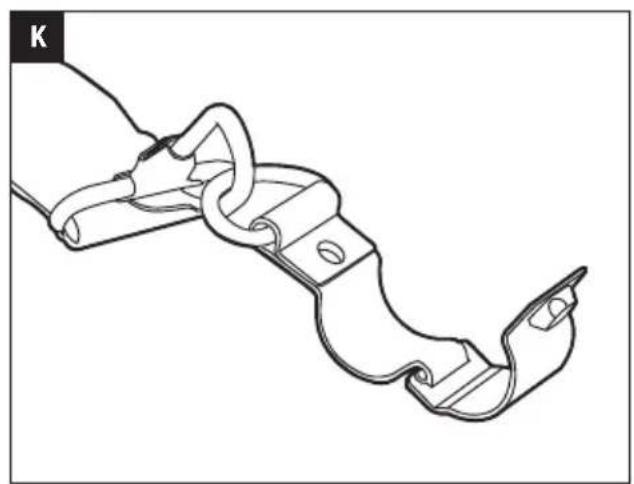
- Loosen and remove the bolt in the hook of the strap (Fig. J & K).
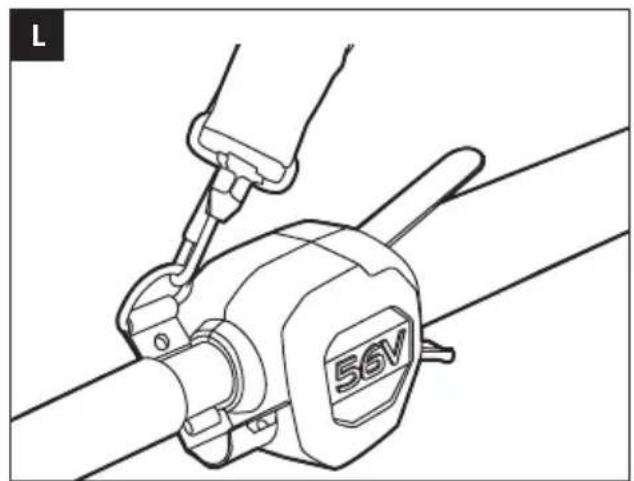
2 Attach the hook onto the shaft as Fig. L shown and lock it with the bolt (Fig. M).
WARNING: Only fix the hook of the strap between the housing and the soft sleeve on the shaft.
OPERATION
WARNING: Do not allow familiarity with this product to make you careless. Remember that a careless fraction of a second is sufficient to inflict serious injury.
WARNING: Always wear safety goggles or safety glasses with side shield, along with hearing protection. Failure to do so could result in objects being thrown into your eyes and other possible serious injuries.
WARNING: Do not use any attachments or accessories not recommended by the manufacturer of this product. The use of attachments or accessories not recommended can result in serious personal injury.
⚠ WARNING: To prevent serious personal injury, remove the battery pack from the tool before servicing, cleaning, changing attachments or removing material from the unit.
You may use this product for the purposes listed below:
Trimming: used for removing grass and weeds up against walls, fences, trees and borders.
Cutting: used for cutting the grass that is difficult to reach using a normal mower.
NOTICE: The tool is to be used only for its prescribed purpose. Any other use, for example edge trimming, is deemed to be a case of misuse.
ATTACHING/DETACHING THE BATTERY PACK
Fully charge before first use.
To Attach
Align the battery ribs with the mounting slots and press the battery pack down until you hear a "click" (Fig. N).
To Detach
Depress the battery-release button and pull the battery pack out as Fig. 0 shown.
HOLDING THE LINE TRIMMER
WARNING: Dress properly to reduce the risk of injury when operating this tool. Do not wear loose clothing or jewelry. Wear eye and ear/hearing protection. Wear heavy duty, long trousers, boots and gloves. Do not wear short trousers, sandals or go barefoot.
Before operating, stand in the operating position and check for eye protection, proper clothing, balanced footing, straight arm, which holds the front-assist handle.
NOTICE: The trimmer head is parallel to the ground at a proper cutting distance without the operator bending over (Fig. P).
For safe and better operation, put on the shoulder strap across the shoulder as Fig. P. Adjust the shoulder strap in a comfortable operating position. Hold the line trimmer with both hands: One hand on the rear handle and the other hand on the front-assist handle.
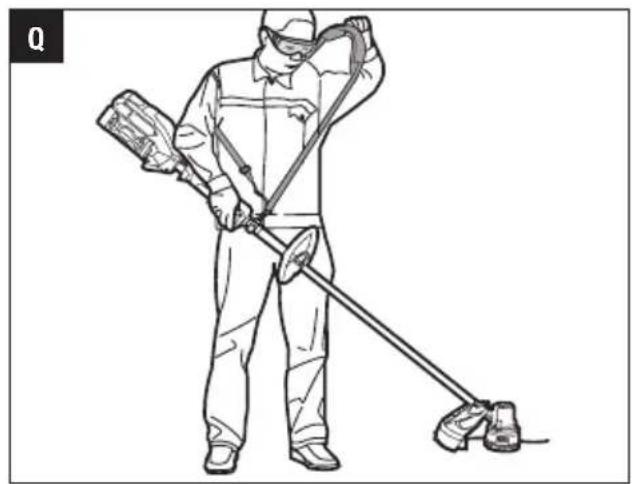
There are two ways to release the strap. Take it away from your shoulder directly (Fig. Q) or press the hook of the strap and take it apart from the tubing clip fixed on the shaft (Fig. R).
WARNING: The shoulder strap is also a quick release mechanism in hazardous situation. When an emergency occurs, take it off from your shoulder immediately, no matter what way the strap is in.
STARTING/STOPPING THE LINE TRIMMER (Fig. S) To Start
Press down the lock-off lever then depress the trigger. Different pressure on the trigger results in variable rotating speed of the cutting line. More pressure, higher speed.
To Stop
Release the lock-off lever and the trigger.
NOTICE: The motor runs only when the lock-off lever and trigger are both pressed.
WARNING: Always remove the battery pack from the line trimmer during work breaks and after finishing work.
USING THE LINE TRIMMER
WARNING: To avoid serious personal injury, wear goggles or safety glasses at all times when operating this unit. Wear a face mask or dust mask in dusty locations.
Clear the area to be cut before each use. Remove all objects, such as rocks, broken glass, nails, wire, or line, that can be thrown or become entangled in the cutting attachment. Clear the area of children, bystanders, and pets. At a minimum, keep all children, bystanders and pets at least 15m away; there still may be risk to bystanders from thrown objects. Bystanders should be encouraged to wear eye protection. If you are approached, stop the motor and cutting attachment immediately.
Before each use, check for damage/worn parts
Check the bump head, guard and front-assist handle and replace the parts that are cracked, warped, bent, or damaged in any away.
The line-cutting blade on the edge of the guard can dull over time. It is recommended that you periodically sharpen it with a file or replace it with a new blade.
WARNING: Always wear gloves when mounting the guard or servicing the blade. Take care of the blade on the guard and protect your hand from cutting.
After each use, clean the trimmer.
CAUTION: Obstructions in the vents will prevent the air from flowing into the motor housing and result in overheating or damaged of the motor.
■ Use only mild soap and a damp cloth to clean the tool. Never let any liquid get inside the tool; never immerse any part of the tool into a liquid.
- Keep air vents in the motor housing from debris at all times.
WARNING: Never use water for cleaning your trimmer. Avoid using solvents when cleaning plastic parts. Most plastics are susceptible to damage from various types of commercial solvents. Use clean cloths to remove dirt, dust, oil, grease, etc.
ADJUSTING CUTTING LINE LENGTH
The trimmer head allows the operator to release more cutting line without stopping the motor. As line becomes frayed or worn, additional line can be released by lightly tapping the spool retainer on the ground while operating the trimmer (Fig. T).
NOTICE: Line release will become more difficult as the cutting line becomes shorter.
WARNING: Do not remove or alter the line cutting blade assembly. Excessive line length will cause the motor to overheat and may result in serious personal injury.
LINE REPLACEMENT
NOTICE: Always use the recommended nylon cutting line with a diameter that does not exceed 2.4 mm. Using line other than that specified may cause the line trimmer to overheat or become damaged.
WARNING: Never use metal-reinforced line, wire, or rope, etc. These can break off and become dangerous projectiles.
- Remove the battery pack.
- Remove the remaining cutting line, if necessary. Simply pull it out by hand.
- Rotate the spool retainer in the arrow direction, as necessary, to align the LOAD line on the spool retainer with the eyelets in the spool base (Fig. U).
EN
Fig. U parts description see below:
| U-1 Eyelet |
| U-2 LOAD Line |
| U-3 Arrow Direction |
- Cut 5m long cutting line, about 5 times the length of the trimmer aluminium shaft. Insert the line into the mounting hole inside the eyelet (Fig. V). Push and pull the line from the other side until equal amounts of line appear on both sides of the spool.
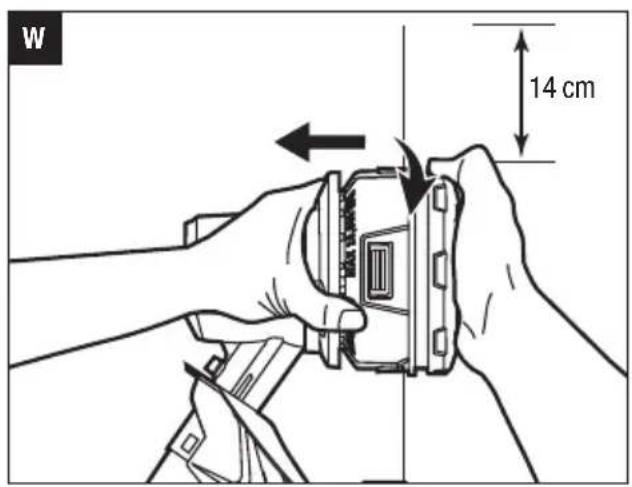
- Press, while rotating the spool retainer in the arrow direction, to wind the line onto the spool until approximately 14cm of line is showing on each side (Fig. W).
- Push the spool retainer down while pulling on the lines to manually advance the line and to check for proper assembly of the trimmer head.
When the cutting line breaks from the line outlet or the cutting line is not released when the trimmer head is tapped, follow the steps below:
- Press the two release tabs on the spool retainer and remove the spool retainer by pulling it straight out (Fig. X).
Fig. X parts description see below:
| X-1 Release Tab |
| X-2 Spool Retainer |
| X-3 Spool Base |
- Remove the cutting line from the spool retainer.
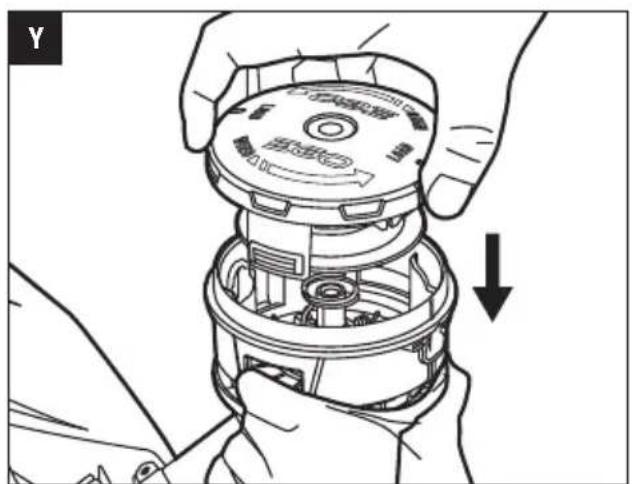
- With one hand holding the spool base, use the other hand to grasp the spool retainer and align the tabs on the spool retainer with the holes in the spool base (Fig. Y); Use your palm to press and rotate the spool retainer left and right until the tabs lock with the spool base (Fig. Z).
- Following the instructions in "LINE REPLACEMENT" to reload the cutting line.
MAINTENANCE
WARNING: When servicing, use only identical replacement parts. Inspect and maintain the machine regularly. To ensure safety and reliability, all repairs should be performed by a qualified service technician.
WARNING: Battery tools do not have to be plugged into an electrical outlet; therefore, they are always in operating condition. To prevent serious personal injury, take extra precautions and care when performing maintenance, service or for changing the cutting attachment or other attachments.
⚠ WARNING: To prevent serious personal injury, remove the battery pack from the tool before servicing, cleaning, changing add-on attachments or removing material from the unit.
CLEANING THE UNIT
■ Clean the unit using a damp cloth with a mild detergent.
■ Do not use any strong detergents on the plastic housing or the handle. They can be damaged by certain aromatic oils, such as pine and lemon, and by solvents such as kerosene. Moisture can also cause a shock hazard. Wipe off any moisture with a soft dry cloth.
■ Use a small brush or the air discharge of a small vacuum cleaner brush to clean the air vents on the rear housing.
STORING THE UNIT
■ Remove the battery pack from the line trimmer when it is not in use.
■ Clean the tool thoroughly before storing it.
■ Store the unit in a dry, well-ventilated area, locked-up or up high, out of the reach of children. Do not store the unit on or adjacent to fertilizers, petrol, or other chemicals.
Protecting the environment

Do not dispose of electrical equipment, battery charger and batteries/rechargeable batteries into household waste!
According to the European law 2012/19/EU, electrical and electronic equipment that is no longer usable, and according to the European law 2006/66/EC, defective or used battery packs/batteries, must be collected separately.
If electrical appliances are disposed of in landfills or dumps, hazardous substances can leak into the groundwater and get into the food chain, damaging your health and well-being.
EC DECLARATION OF CONFORMITY
EN
We, EGO EUROPE GMBH
Declare that the product 56V lithium-ion cordless line trimmer ST1500E-F complies with the essential health and safety requirements of the following Directives:
2006/42/EC, 2014/30/EU, 2011/65/EU, 2000/14/EC
Standards and technical specifications referred to:
EN 60335-1, EN 50636-2-91, EN ISO 11806-1,
EN ISO 12100, EN ISO 60745-1, EN 55014-1, EN 55014-2
Measured Sound Power Level: 91.55 dB(A).
Guaranteed Sound Power Level: 96 dB(A).
Conformity assessment procedure of Annex VI is followed according 2000/14/EC.
Managing Director of EGO
Europe GmbH
Quality Manager of Chervon
* (Authorized representative for CHERVON and responsible for technical documentation)
01/12/2016
EN
TROUBLESHOOTING
| PROBLEM CAUSE SOLUTION | ||
| Line trimmer fails to start | ■ The battery pack is not attached to the line trimmer.■ No electrical contact between the trimmer and battery.■ The battery pack is depleted.■ The lock-off lever and trigger are not depressed simultaneously. | ■ Attach the battery pack to the line trimmer.■ Remove battery, check contacts and reinstall the battery pack.■ Charge the battery pack.■ Press down the lock-off lever and hold it, then depress the trigger to turn on the line trimmer. |
| Line trimmer stops while cutting | ■ The guard is not mounted on trimmer, resulting in an overly long cutting line and motor overload.■ Heavy cutting line is used.■ The motor shaft or trimmer head is bound with grass.■ The motor is overloaded.■ The battery pack or line trimmer is too hot.■ The battery pack is disconnected from the tool.■ The battery pack is depleted. | the ■ Remove the battery pack and mount the guard on the trimmer.■ Use recommended nylon cutting line with diameter no greater than 2.4mm.■ Stop the trimmer, remove the battery, and remove the grass from the motor shaft and trimmer head.■ Remove the trimmer head from the grass. The motor will recover to work as soon as the load is removed. When cutting, move the trimmer head in and out of the grass to be cut and remove no more than 20cm of length in a single cut.■ Allow the battery pack or trimmer to cool until the temperature drops below 67°C.■ Re-install the battery pack.■ Charge the battery pack. |
| Trimmer head will not advance line | ■ The motor shaft or trimmer head is bound with grass.■ There is not enough line in the spool retainer.■ The trimmer head is dirty.■ Line is tangled in the spool retainer.■ The line is too short. | ■ Stop the trimmer, remove the battery, and remove the grass from the motor shaft and trimmer head.■ Remove the battery and replace the cutting line; follow the section “LINE REPLACEMENT” in this manual.■ Remove the battery and clean the spool retainer and spool base.■ Remove the battery, remove the line from the spool retainer and rewind; follow the section “LINE REPLACEMENT” in this manual.■ Remove the battery and pull the lines while alternately pressing down on and releasing the trimmer head. |
| Grass wraps around trimmer head and motor housing | ■ Cutting tall grass at ground level. | ■ Cut tall grass from the top down, removing no more than 20cm in each pass to prevent wrapping. |
| The blade is not cutting the line. | ■ The line-cutting blade on the edge of the guard has become dull. | ■ Sharpen the line-cutting blade with a file or replace it with a new blade. |
| Cracks on the trimmer head or the spool retainer comes loose with spool base. | ■ The trimmer head is worn out. | ■ Replace the trimmer head Immediately performed by a qualified service technician. |
| During line replacement, the line can’t be loaded into the trimmer head properly. | ■ Spool retainer’s LOAD lines do not align with the eyelets in the spool base.■ The string line is not correctly inserted into the mounting hole in the eyelet. | ■ Rotate the spool retainer in the arrow direction to align the LOAD lines on the spool retainer with the eyelets in the spool base.■ Align the LOAD lines with the eyelets first, the insert the line into the mounting hole inside the eyelet. |
WARRANTY
EGO WARRANTY POLICY
Please visit the website egopowerplus.com for full terms and conditions of the EGO Warranty policy.
DÉCLARATION DE CONFORMITÉ CE
CE
Nous, EGO EUROPE GMBH
2006/42/CE, 2014/30/UE, 2011/65/UE, 2000/14/CE
ANDERE VEILIGHEIDSWAARSCHUWINGEN
| BATTERIJ | LADER |
| BA1120E, BA2240E, BA2800, BA3360, BA4200 | CH5500E, CH2100E |
DE BESCHERMING MONTEREN
HET APPARAAT SCHOONMAKEN
HET APPARAAT OPBERGEN
| BATTERI | OPLADER |
| BA1120E, BA2240E, BA2800, BA3360, BA4200 | CH5500E, CH2100E |
RENG∅RING AF APPARATET
OPBEVARING AF APPARATET
BEHOLD FOR SENERE BRUK
VEDLIKEHOLD OG LAGRING
| BATTERI | LADER |
| BA1120E, BA2240E, BA2800, BA3360, BA4200 | CH5500E, CH2100E |
DEKLARACJA ZGODNOŚCI WE
CE
Producent, EGO EUROPE GMBH
POLITYKA GWARANCYJNA EGO
DÔLEŽITÉ BEZPEČNOSTNÉ POKYNY
CITIȚI MANUALUL DE INSTRUCTIUNI
| SET DE ACUMULATORI | ÎNCĂRCĂTOR |
| BA1120E, BA2240E, BA2800, BA3360, BA4200 | CH5500E, CH2100E |
KITI SAUGOS ISPĖJIMAI
LUGEGE KASUTUSJUHENDIT
OLULISED OHUTUSJUHISED
| AKU | LAADIJA |
| BA1120E, BA2240E, BA2800, BA3360, BA4200 | CH5500E, CH2100E |




- 56 VOLT LITHIUM-ION
- EN
- READ ALL INSTRUCTIONS
- READ OPERATOR'S MANUAL
- SAFETY SYMBOLS
- SYMBOL MEANING
- SAFETY INSTRUCTIONS
- IMPORTANT SAFETY INSTRUCTIONS
- READ CAREFULLY BEFORE USE KEEP FOR FUTURE REFERENCE
- TRAINING
- PREPARATION
- OPERATION
- MAINTENANCE AND STORAGE
- OTHER SAFETY WARNINGS
- SAVE THESE INSTRUCTIONS
- SPECIFICATIONS
- DESCRIPTION
- KNOW YOUR LINE TRIMMER (FIG. A)
- ASSEMBLY
- MOUNTING THE GUARD
- MOUNTING AND ADJUSTING THE FRONT-ASSIST HANDLE
- MOUNTING THE SHOULDER STRAP
- ATTACHING/DETACHING THE BATTERY PACK
- FULLY CHARGE BEFORE FIRST USE
- TO ATTACH
- TO DETACH
- HOLDING THE LINE TRIMMER
- STARTING/STOPPING THE LINE TRIMMER (FIG. S) TO START
- TO STOP
- USING THE LINE TRIMMER
- BEFORE EACH USE, CHECK FOR DAMAGE/WORN PARTS
- AFTER EACH USE, CLEAN THE TRIMMER
- ADJUSTING CUTTING LINE LENGTH
- LINE REPLACEMENT
- MAINTENANCE
- CLEANING THE UNIT
- STORING THE UNIT
- PROTECTING THE ENVIRONMENT
- EC DECLARATION OF CONFORMITY
- TROUBLESHOOTING
- WARRANTY
- EGO WARRANTY POLICY
- DÉCLARATION DE CONFORMITÉ CE
- ANDERE VEILIGHEIDSWAARSCHUWINGEN
- DE BESCHERMING MONTEREN
- HET APPARAAT SCHOONMAKEN
- HET APPARAAT OPBERGEN
- RENG∅RING AF APPARATET
- OPBEVARING AF APPARATET
- BEHOLD FOR SENERE BRUK
- VEDLIKEHOLD OG LAGRING
- DEKLARACJA ZGODNOŚCI WE
- POLITYKA GWARANCYJNA EGO
- DÔLEŽITÉ BEZPEČNOSTNÉ POKYNY
- CITIȚI MANUALUL DE INSTRUCTIUNI
- KITI SAUGOS ISPĖJIMAI
- LUGEGE KASUTUSJUHENDIT
- OLULISED OHUTUSJUHISED
Brand : EGO
Model : ST1500E-F
Category : Lawn mower