
STV 45 C2 - Fan SILVERCREST - Free user manual and instructions
Find the device manual for free STV 45 C2 SILVERCREST in PDF.

| Product type | Tower fan |
| Brand | SilverCrest |
| Model | STV 45 C2 |
| Power supply | 220-240 V ~ 50/60 Hz |
| Power consumption | 45 W |
| Protection class | II |
| Number of speeds | 3 (low, medium, high) |
| Timer | 0 to 120 minutes |
| Oscillation function | Yes |
| Maximum air flow | 16.98 m³/min |
| Sound power level | 55 dB(A) |
| Maximum air speed | 2.17 m/s |
| Service value (SV) | 0.44 (m³/min)/W |
| Standby consumption | 0 W |
| Use | Dry indoor, household use |
| Assembly | Screw-on base with threaded ring |
| Cleaning | Damp cloth, do not immerse |
| Warranty | 3 years (HOYER Handel GmbH) |
| Article number (IAN) | 273374 |
Frequently Asked Questions - STV 45 C2 SILVERCREST
User questions about STV 45 C2 SILVERCREST
0 question about this device. Answer the ones you know or ask your own.
Ask a new question about this device
Download the instructions for your Fan in PDF format for free! Find your manual STV 45 C2 - SILVERCREST and take your electronic device back in hand. On this page are published all the documents necessary for the use of your device. STV 45 C2 by SILVERCREST.
USER MANUAL STV 45 C2 SILVERCREST
natural_image
Black SilverCAST industrial fan tower with visible grille and control panel (no text or symbols on body)
TOWER FAN STV 45 C2
GB IE CY
TOWER FAN
Operating instructions
FR BE
ID: STV 45 C2_16_V1.3


Overview / Oversigt / Aperçu de l'appareil / Overzicht / Επισκόπηση / Übersicht


Contents
- Overview 2
- Intended purpose 3
- Safety information .... 3
- Items supplied 5
- Assemble appliance .... 5
- Operation 5
6.1 Start and switch off the appliance 5
6.2 Set blower setting 6
6.3 Set running time.... 6
6.4 Oscillation function 6
- Cleaning 6
- Disposal 6
- Technical specifications .... 7
- Warranty of the HOYER Handel GmbH 7
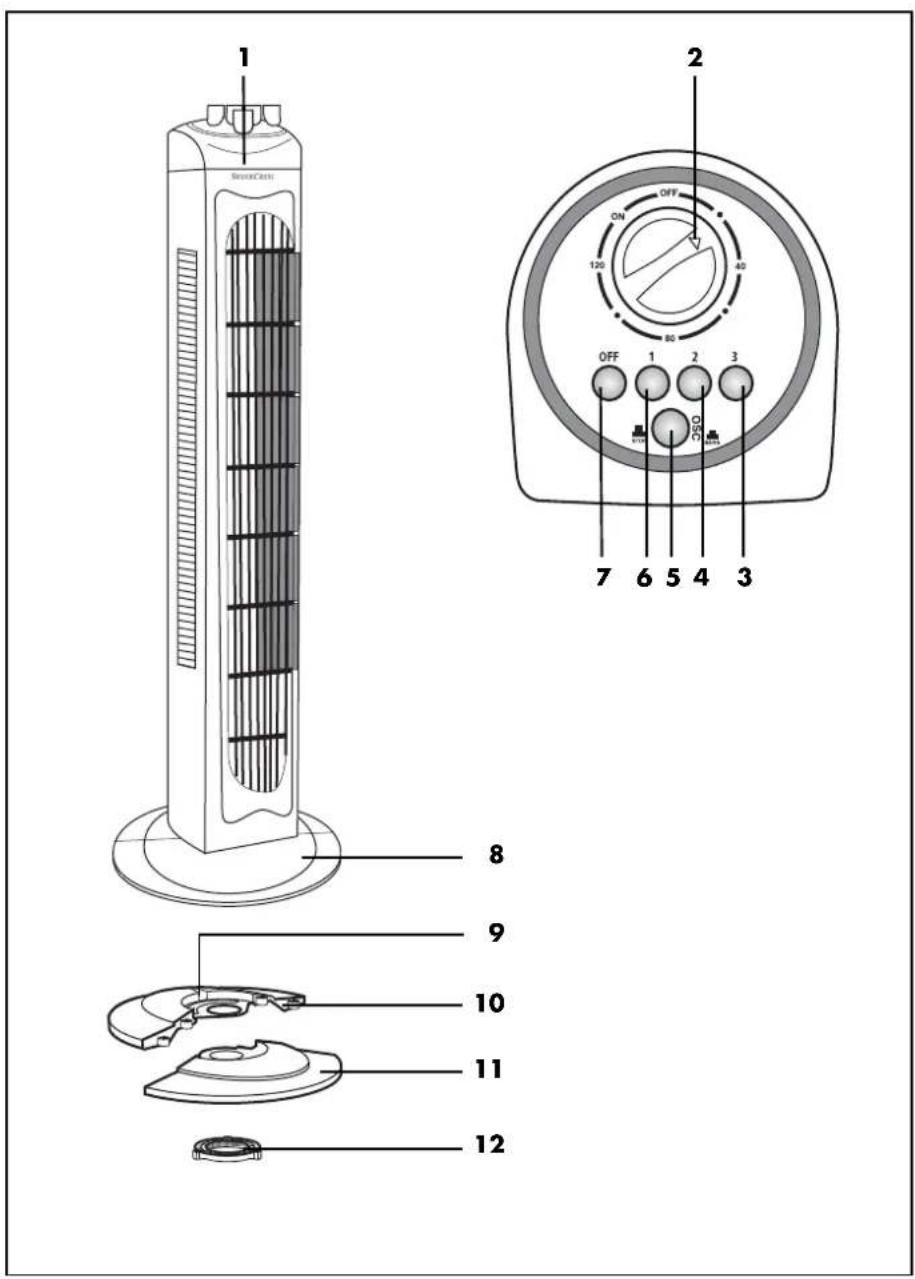
1. Overview
1 Tower fan
2 Rotary switch and timer
3 Button 3: high blower setting
4 Button 2: moderate blower setting
5 Button for oscillation function
6 Button 1: low blower setting
7 Off button (OFF)
8 Stand
9 Depression for power supply cable
10 Rear half of stand
11 Front half of stand
12 Screw ring
2
GB


Thank you for your trust!
Congratulations on your new Tower fan.
For a safe handling of the device and in order to get to know the entire scope of features:
• Thoroughly read these operating instructions prior to first use.
- Above all, observe the safety instructions!
- The device should only be used as described in these operating instructions.
- Keep these operating instructions for reference.
- If you pass the device on to someone else, please include these operating instructions.
We hope you enjoy your new Tower fan!
2. Intended purpose
Use this Tower fan to circulate air in dry indoor areas.
The device is designed for private, domestic use. The device must only be used indoors. This device must not be used for commercial purposes.
3. Safety information
Warnings
If necessary, the following warnings will be used in these operating instructions:

DANGER! High risk: failure to observe this warning may result in injury to life and limb.
WARNING! Moderate risk: failure to observe this warning may result in injury or serious material damage.
CAUTION: low risk: failure to observe this warning may result in minor injury or material damage.
NOTE: circumstances and specifics that must be observed when handling the device.
Instructions for safe operation
- This device can be used by children from the age of 8 and people with restricted physical, sensory or intellectual abilities or people without adequate experience and/or understanding, if they are supervised or instructed on how to use this device safely and if they are aware of the resulting danger. Children must not play with the device. Cleaning and user maintenance must not be performed by unsupervised children unless they are older than 8 years and supervised.
Children under the age of 8 must be kept away from the device and the power cable.
GB
3


- If the mains power cable of this device should become damaged, it must be replaced by the manufacturer, the manufacturer's customer service department or a similarly qualified specialist, in order to avoid any hazards.
- This device is not intended to be operated using an external timer clock or a separate remote control system.

DANGER for children
- Packing materials are not children's toys. Children should not be allowed to play with the plastic bags: there is a risk of suffocation!
- Keep the device out of the reach of children.

DANGER to and from pets and livestock
Electrical devices can represent a hazard to pets and livestock. In addition, animals can also cause damage to the device. For this reason you should keep animals away from electrical devices at all times.

DANGER! Risk of electric shock due to moisture
The device, the cable and the mains plug must not be immersed in water or any other liquids.
- Protect the device from moisture, water drops and water spray. Failure to observe this instruction may result in an electrical shock hazard.
- If liquid gets into the device, remove the mains plug immediately. Have the device checked before reusing.
- Never touch the device with wet hands.
If the device has fallen into water, pull out the mains plug immediately, and only then remove the device from the water. Do not use the device again, and have it checked by a specialist.

DANGER! Risk of electric shock
- Never put the device into operation if there are visible damages to the device or the power cable or if the device has been dropped before.
- Only connect the mains plug to a properly installed and easily accessible wall socket whose voltage corresponds to the specifications on the rating plate. The wall socket must continue to be easily accessible after the device is plugged in.
- Ensure that the power cable cannot be damaged by sharp edges or hot surfaces.
- When using the device, ensure that the power cable cannot be trapped or crushed.
The device is not fully disconnected from the power supply, even after it is switched off. In order to fully disconnect it, pull out the mains plug. - When removing the mains plug from the wall socket, always pull the plug and never the cable.
- Disconnect the mains plug from the wall socket...
... if there is a fault,
... when you are not using the device,
... before you clean the device and
... during thunderstorms.
- To avoid any risk, do not make modifications to the product.
- Fully unwind the mains cable during use to avoid overheating and scorching.
- When using an extension cable, this must correspond to the applicable safety regulations.
WARNING! Risk of material damage
- Never place the device on hot surfaces (e.g. hob plates) or near heat sources or open fire.
-Only use the original accessories.
Do not use any astringent or abrasive cleaning agents.
4. Items supplied
1 tower fan 1
1 stand (consisting of 2 parts) 8
1 screw ring (screwed to the underside of the fan) 12
1 set of operating instructions
Unpacking
- Remove all parts from the packaging.
- Check that all parts are present and intact.
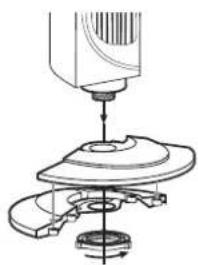
5. Assemble appliance
Before the appliance can be started up, stand 8 needs to be screwed on.
1. Put rear half of the stand 10 and front half of the stand 11 together.
NOTE: You can recognize rear half of the stand 10 by the depression for power supply cable 9.
- Use screw ring 12 supplied to screw stand 8 to the underside of the tower fan.
NOTES:
- O n d e l i v e r y , s c r e w r i n g onto the bottom of the tower fan.
- Ensure that power supply cable 9 is located in the depression provided for it.
- Tightens screw ring not use a tool.
12 hand-tig
natural_image
Mechanical assembly diagram showing a turning tool interacting with a base plate (no text or symbols visible)- Select a location in line with the safety instructions (see "Safety information" on page 3).
- Plug the power plug into a power supply socket which meets the technical data requirements.
6. Operation
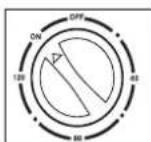
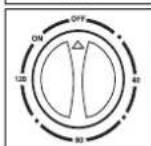
6.1 Start and switch off the appliance
- Plug the power plug into a power supply socket which meets the technical data requirements.
- Switch on the power supply by turning rotary switch 2 to "ON". The appliance is now operational.
- Switch off the power supply by turning rotary switch 2 to "OFF".
12 is screwed
GB
5
6.2 Set blower setting
The blower settings are used to select how fast the appliance circulates air in the room. The appliance has three blower settings:
- 1, low: press button 6;
- 2, moderate: press button 4;
- 3, high: press button 3.
Press the 7 "OFF" button to stop the appliance working.
6.3 Set running time
The appliance has a timer which you can use to set the desired running time to between 0 and 120 minutes.
- Switch on the timer by turning rotary switch 2 to any time between 0 and 120 minutes. The power supply is switched on at the same time.
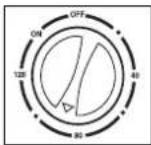
- To switch off the timer, set rotary switch 2 to "OFF".
NOTE: If you want the appliance to operate continuously, set rotary switch 2 to "ON".
6.4 Oscillation function
The appliance has an oscillation function. This causes the appliance to move to and fro, distributing the air produced evenly throughout the room.
- Switch on the oscillation function by pressing button for oscillation function 5.
- Switch off the oscillation function by pressing button for oscillation function 5 again.
7. Cleaning
To ensure your appliance gives you lasting service, you should clean it regularly.

DANGER! Risk of electric shock!
- Remove the mains plug before each clean.
- Never immerse the appliance in water. - Never allow water or cleaning agent to run into the appliance.
WARNING! Risk of material damage!
- Do not use any astringent or abrasive cleaning agents.
- Carefully remove major dust deposits with a vacuum cleaner.
- Clean the outside of the appliance with a damp cloth. You could also use a little washing-up liquid.
- Wipe the appliance with a cloth moistened with clear water.
- Do not use the appliance again until it has dried completely.
8. Disposal
The symbol showing a wheelie bin crossed through indicates that the product requires separate refuse collection in the European Union. This applies to the product and all accessories
marked with this symbol. Products identified with this symbol may not be discarded with normal household waste, but must be taken to a collection point for recycling electric and electronic appliances. Recycling helps to reduce the consumption of raw materials and protect the environment.
Packaging
When disposing of the packaging, make sure you comply with the environmental regulations applicable in your country.
9. Technical specifications
| Model: STV 45 C2 |
| Mains voltage: 220 - 240 V ~ 50/60 Hz |
| Protection class: II ☐ |
| Power rating: 45 W |
| Description | Symbol | Value | Unit |
| Maximum fan flow rate | F 16,9 | 98 | m^3/min |
| Fan power input | P 38,9 | W | |
| Service value SV | 0,44 | (m^3/min)/W | |
| Standby power consumption | Psb 0 | W | |
| Fan sound power level | Lwa | 55 | dB(A) |
| Maximum air velocity | c | 2,17 | m/s |
| Measurement standard for service value | IEC 60879:1986+(corr.1992) | ||

Subject to technical modification.
10. Warranty of the HOYER Handel GmbH
Dear Customer, your device is provided with a 3 year warranty starting with the purchase date. In the event of product defects, you are entitled to statutory rights against the vendor. These statutory rights are not restricted by our warranty presented in the following.
Warranty conditions
The warranty period starts with the purchase date. Please keep the original purchase receipt in a safe place. This document is required to verify the purchase.
If within three years from the purchase date of this product a material or factory defect occurs, the product will be repaired or replaced by us – at our discretion – free of charge to you. This warranty implies that within the period of three years the defective device and the purchase receipt are presented, including a brief written description of the defect and the time it occurred.
If the defect is covered by our warranty, the repaired or a new product will be returned to you. No new warranty period starts with a repair or replacement of the product.
Warranty period and statutory claims for defects
The warranty period is not extended when the warranty has been claimed. This also applies to replaced and repaired parts. Any damages and defects already existing at the time of purchase must be reported immediately upon unpacking. Repairs arising after the expiration of the warranty period are subject to a charge.
Warranty coverage
The device was produced carefully according to strict quality guidelines and tested diligently prior to delivery.
GB
7


The warranty applies to material or factory defects. This warranty does not include product parts that are subject to standard wear and therefore can be considered wear parts; the same applies to damages at fragile parts, e.g. switches, rechargeable batteries or parts made of glass.
This warranty expires if the product is damaged, not used as intended or not serviced. For the proper operation of the product, all instructions listed in the operating instructions must be observed carefully. Any form of use and handling that is advised against in the operating instructions or warned against must always be avoided.
The product is only intended for private and not for commercial use. In the case of incorrect and improper treatment, use of force and interventions not performed by our authorised Service Centre, the warranty shall cease.
Handling in case of a warranty claim
In order to ensure prompt processing of your matter, please observe the following notes:
- Please keep the article number IAN: 273374 and the purchase receipt as a purchase verification for all inquiries.
- If faulty operation or other defects occur, first contact the Service Centre listed in the following by telephone or email.
- Then, you are able to send a product reported as defective free of charge to the service address specified to you, including the purchase receipt and the information on the defect and when it occurred.

Please visit www.lidl-service.com to download this and many other manuals, product videos and software.

Service Centre
GB Service Great Britain Tel.: 0871 5000 720 (£ 0.10/Min.) E-Mail: hoyer@lidl.co.uk
IE Service Ireland Tel.: 1890 930 034 (0,08 EUR/Min., (peak)) (0,06 EUR/Min., (off peak)) E-Mail: hoyer@lidl.ie
CY Service Cyprus Tel.: 8009 4409 E-Mail: hoyer@lidl.com.cy
IAN: 273374

Supplier
Please note that the following address is no service address. First contact the aforementioned Service Centre.
natural_image
Mechanical assembly diagram showing a tool pressing into a circular component (no text or symbols visible)natural_image
Mechanical assembly diagram showing a rotating component with a base and shaft (no text or symbols)natural_image
Mechanical assembly diagram showing a turning tool interacting with a base plate (no text or symbols visible)natural_image
Mechanical assembly diagram showing a turning tool interacting with a rotating component (no text or symbols visible)natural_image
Mechanical assembly diagram showing a turning tool interacting with a mechanical component (no text or symbols visible)natural_image
Pure geometric diagram with crosshair and circular pattern (no text or symbols)
