
RCS1050MPB - Microwaves AMANA - Free user manual and instructions
Find the device manual for free RCS1050MPB AMANA in PDF.


| Product type | Countertop microwave |
| Brand | Amana |
| Model | RCS1050MPB |
| Dimensions (W x D x H) | 52 x 40 x 30 cm |
| Weight | 12 kg |
| Capacity | 42 L (1.5 cu ft) |
| Microwave power | 1000 W |
| Power consumption | 1500 W |
| Power supply voltage | 230 V / 50 Hz |
| Installation type | Free-standing on worktop |
| Main functions | Defrost, quick cooking, multi-stage cooking, timer |
| Care and cleaning | Clean with a damp cloth and mild soap |
| Safety | Integrated child lock |
| Spare parts and repairability | Parts available from after-sales service |
| General information | User manual included, 240 pages |
Frequently Asked Questions - RCS1050MPB AMANA
User questions about RCS1050MPB AMANA
0 question about this device. Answer the ones you know or ask your own.
Ask a new question about this device
Download the instructions for your Microwaves in PDF format for free! Find your manual RCS1050MPB - AMANA and take your electronic device back in hand. On this page are published all the documents necessary for the use of your device. RCS1050MPB by AMANA.
USER MANUAL RCS1050MPB AMANA
* Additional alphanumeric characters representing other models in the series may follow each model number.
Keep these instructions for future reference. If the oven changes ownership, be sure this manual accompanies oven.
Contents Model Identification
Model Identification
Microwave Power....2
Important Safety Instructions ....3
Precautions to Avoid Possible Exposure
to Excessive Microwave Energy ....4
Earthing Instructions....5
Installation
External Equipotential Earthing Terminal....5
Unpacking Equipment 5
Equipment Placement....5
Radio Interference 5
Control Pads....6
Displays....7
Operation
Power-up Display 8
Interrupting Operation 8
Canceling Mistakes 8
Preprogrammed Times and Cook Level 8
Operating Preprogrammed Pads 8
Reviewing Preprogrammed Pads ......9
Manual Time Entry....9
Programming
Preprogrammed Number Pads 10
Multiple Heating Stages 10
Deactivating Preprogrammed Pad....11
Reactivating Preprogrammed Pad....11
User Options 12
Microwave Utensils
Changing Oven Light Bulb 13
Cleaning Interior, Exterior, and Door....14
Cleaning Splatter Shield 14
Cleaning Air Intake Filter 15
Cleaning Discharge Air Vents 15
Before Calling for Service 15
Quick Reference Instructions ....16
Warranty.... 17
When contacting equipment supplier, provide product information. Product information is located on equipment serial plate. Record the following information:
Model Number: ____
Manufacturing Number: ____
Serial or S/N Number: ____
Date of purchase: ____
Dealer's name and address:
Keep a copy of sales receipt for future reference or in case warranty service is required.
Any questions or to locate an authorized servicer, call equipment supplier. Warranty service must be performed by an authorized servicer. Amana also recommends contacting an authorized servicer if service is required after warranty expires.
Microwave Power
Model RFS511MP* delivers 1100 watts I.E.C. 705 of microwave power to oven cavity.
Model RFS59MP* delivers 900 watts I.E.C. 705 of microwave power to oven cavity.
Model RFS58MP* delivers 800 watts I.E.C. 705 of microwave power to oven cavity.
Model RCS1050MP* delivers 1000 watts I.E.C. 705 of microwave power to oven cavity.
This product conforms to the EU Low Voltage Directive 73/23/EEC and EMC Directive 89/336/EEC as indicated by the CE mark.
IMPORTANT SAFETY INSTRUCTIONS

Recognize this symbol as a SAFETY message

Warning
When using electrical equipment, basic safety precautions should be followed to reduce the risk of burns, electrical shock, fire, or injury to persons.
-
READ all instructions before using equipment.
-
READ AND FOLLOW the specific "PRECAUTIONS TO AVOID POSSIBLE EXPOSURE TO EXCESSIVE MICROWAVE ENERGY" on page 4.
-
This equipment MUST BE EARTHED. Connect only to properly EARTHED outlet. See "EARTHING INSTRUCTIONS" on page 5.
-
Install or locate this equipment ONLY in accordance with the installation instructions in this manual.
-
Some products such as whole eggs and sealed containers, for example, closed glass jars may explode and SHOULD NOT be HEATED in this oven.
-
Use this equipment ONLY for its intended use as described in this manual. Do not use corrosive chemicals or vapors in this equipment. This type of oven is specifically designed to heat or cook. It is not designed for industrial or laboratory use.
-
As with any equipment, CLOSE SUPERVISION is necessary when used by CHILDREN.
-
DO NOT operate this equipment if it has a damaged cord or plug, if it is not working properly, or if it has been damaged or dropped.
-
This equipment, including power cord, must be serviced ONLY by qualified service personnel. Special tools are required to service equipment. Contact nearest authorized service facility for examination, repair, or adjustment.
-
DO NOT cover or block filter or other openings on equipment.
-
DO NOT store this equipment outdoors. DO NOT use this product near water, for example, near a kitchen sink, in a wet basement, or near a swimming pool, and the like.
-
DO NOT immerse cord or plug in water.
-
Keep cord AWAY from HEATED surfaces.
-
DO NOT let cord hang over edge of table or counter.
-
See door cleaning instructions in "Care and Cleaning" section of manual on page 13.
-
For commercial use only.

Caution
To reduce the risk of fire in the oven cavity:
a. DO NOT overcook food. Carefully attend equipment if paper, plastic, or other combustible materials are placed inside the oven to facilitate cooking.
b. Remove wire twist-ties from paper or plastic bags before placing bag in oven.
c. KEEP oven DOOR CLOSED, turn oven off, and disconnect the power cord, or shut off power at the fuse or circuit breaker panel, if materials inside the oven should ignite. Fire may spread if door is opened.
d. DO NOT use the cavity for storage. DO NOT leave paper products, cooking utensils, or food in
SAVE THESE INSTRUCTIONS
IMPORTANT SAFETY INSTRUCTIONS

Caution
To avoid personal injury or property damage, observe the following:
- Briskly stir or pour liquids before heating with microwave energy to prevent spontaneous boiling or eruption. Do not overheat. If air is not mixed into a liquid, liquid can erupt in oven or after removal from oven.
- Do not deep fat fry in oven. Fat could overheat and be hazardous to handle.
- Do not cook or reheat eggs in shell or with an unbroken yolk using microwave energy. Pressure may build up and erupt. Pierce yolk with fork or knife before cooking.
- Pierce skin of potatoes, tomatoes, and similar foods before cooking with microwave energy. When skin is pierced, steam escapes evenly.
- Do not operate equipment without load or food in oven cavity.
-
Use only popcorn in packages designed and labeled for microwave use. Popping time varies depending on oven wattage. Do not continue to heat after popping has stopped. Popcorn will scorch or burn. Do not leave oven unattended.
-
Do not use regular cooking thermometers in oven. Most cooking thermometers contain mercury and may cause an electrical arc, malfunction, or damage to oven.
- Do not heat baby bottles in oven.
- Do not use metal utensils in oven.
- Never use paper, plastic, or other combustible materials that are not intended for cooking.
- When cooking with paper, plastic, or other combustible materials, follow manufacturer's recommendations on product use.
- Do not use paper towels which contain nylonor other synthetic fibers. Heated synthetics could melt and cause paper to ignite.
- Do not heat sealed containers or plastic bags in oven. Food or liquid could expand quickly and cause container or bag to break. Pierce or open container or bag before heating.
- To avoid pacemaker malfunction, consult physician or pacemaker manufacturer about effects of microwave energy on pacemaker.
PRECAUTIONS TO AVOID POSSIBLE EXPOSURE TO EXCESSIVE MICROWAVE ENERGY
a. DO NOT attempt to operate this oven with the door open since open-door operation can result in harmful exposure to microwave energy. It is important not to defeat or tamper with the safety interlocks.
b. DO NOT place any object between the oven front face and the door or allow soil or cleaner residue to accumulate on sealing surfaces.
c. DO NOT operate the oven if it is damaged. It is particularly important that the oven door close properly and that there is no damage to the: (1) door (bent), (2) hinges and latches (broken or loosened), (3) door seals and sealing surfaces.
d. The oven should NOT be adjusted or repaired by anyone except properly qualified service personnel.
SAVE THESE INSTRUCTIONS

Warning
To avoid the risk of electrical shock or death, this equipment must be earthed.

Warning
To avoid the risk of electrical shock or death, do not alter the plug.
This equipment MUST be earthed. In the event of an electrical short circuit, earthing reduces the risk of electric shock by providing an escape wire for the electric current. This oven is equipped with a cord having a earthing wire with a earthing plug. The plug must be plugged into an outlet that is properly installed and earthed.
Consult a qualified electrician or servicer if earthing instructions are not completely understood, or if doubt exists as to whether the equipment is properly earthed.
Do not use an extension cord. If the product power cord is too short, have a qualified electrician install a three-slot receptacle. This oven should be plugged into a separate 50 hertz circuit with the electrical rating as shown in the appropriate drawing. Model requires a 230 supply voltage. When a microwave oven is on a circuit with other equipment, an increase in cooking times may be required and fuses can be blown.
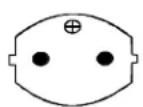
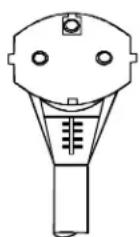

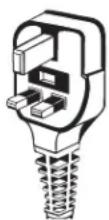
230V-16AMP 230V-13AMP
External Equipotential Earthing Terminal
Some models have secondary earthing terminal.
Terminal provides external earthing connection used in addition to earthing prong on plug. Located on outside of oven back, terminal is marked with symbol shown below.

Unpacking Equipment
- Inspect equipment for damage such as dents in door or dents inside oven cavity.
- Report any dents or breakage to source of purchase immediately. Do not attempt to use oven if damaged.
- Remove all materials from oven interior.
- If oven has been stored in extremely cold area, wait a few hours before connecting power.
Equipment Placement
- Allow at least 1 12 inches/3.81 centimeters of clearance around top and sides of equipment. Proper air flow around equipment cools electrical components. With restricted air flow, oven may not operate properly and life of electrical parts is reduced.
- Do not install equipment next to or above source of heat, such as pizza oven or deep fat fryer. This could cause microwave oven to operate improperly and could shorten life of electrical parts.
- Do not block or obstruct oven filter.
- Allow access for cleaning.
Radio Interference
Microwave operation may cause interference to radio, television, or similar equipment. Reduce or eliminate interference by doing the following:
- Clean door and sealing surfaces of oven according to instructions in “Care and Cleaning” section.
- Place radio, television, etc. as far as possible from oven.
- Use a properly installed antenna on radio, television, etc. to obtain stronger signal reception.
Power Level Pads
Use to select power level. Oven can heat at full, reduced, or no power. If oven power level is set to 0% oven does not heat for programmed time. If no power level is selected, oven operates at 100% power.
| Pad | Power level | |
| 0% | ||
| 20% | ||
| 50% | ||
| 70% |

TIME ENTRY
Use to enter heating time without changing preprogrammed number pads.
Pads 1-0
Use to begin heating with preprogrammed times and power levels or to enter times for “Manual Time Entry” cooking.

RESET
Use to exit programming mode and stop cooking during cooking cycle.

START
Use to start “Manual Time Entry” program or restart interrupted cooking cycle. Use to advance to next user option. Use to save times and power levels when programming pads.
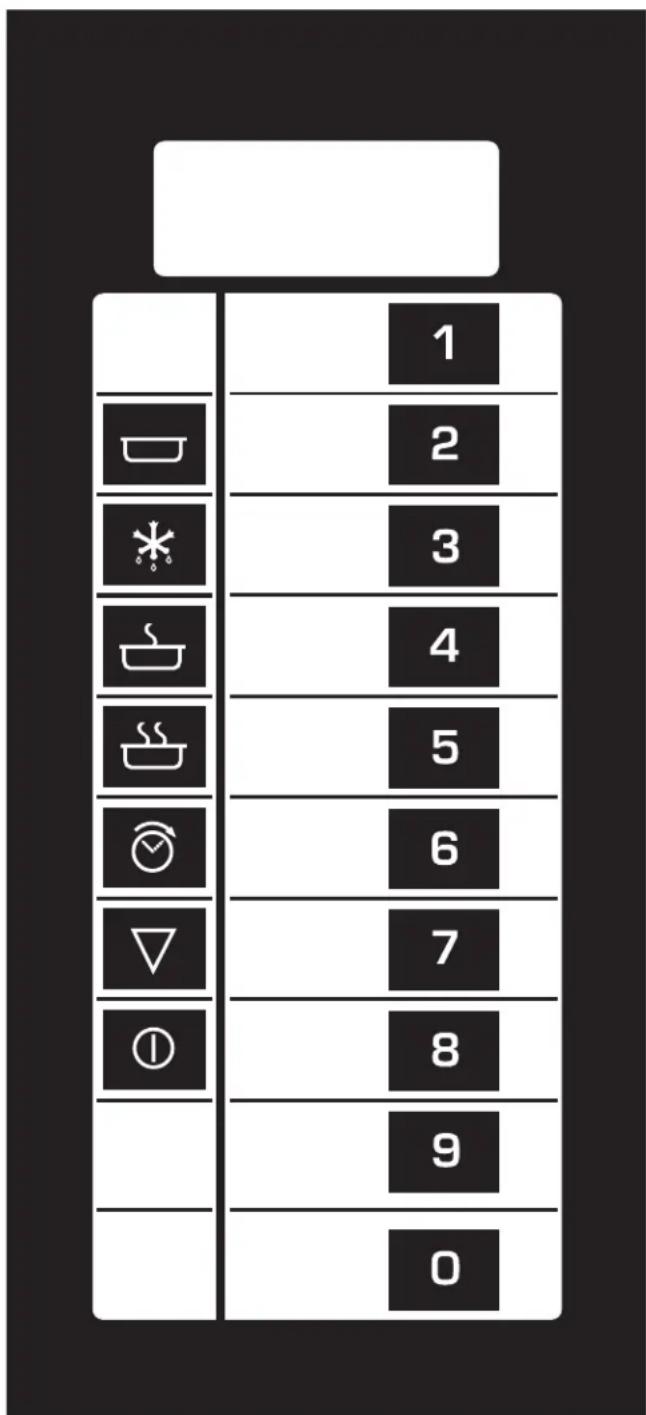
natural_image
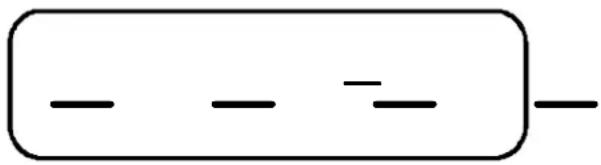
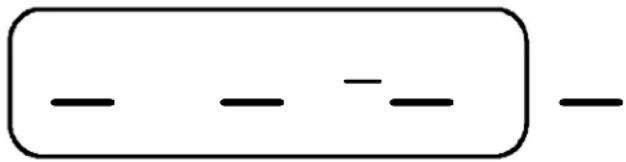
Simple diagram with three horizontal lines inside a rectangle (no text or symbols)- Shows after oven is plugged in. Open oven door to clear.
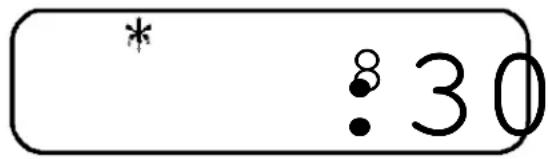
- Indicates defrost, 30 seconds heating time, and pad 8.
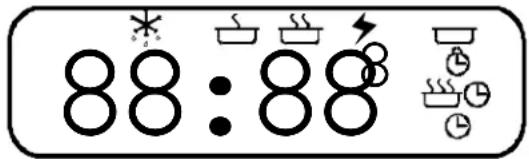
• 🐎 indicates pads will accept entry. Shows when oven is paused or ready for next entry.
- "88:88" — Shows heating time.
- Shows when oven generates microwave energy.
• * Shows when viewing stage with reduced power or hold.
- Small "8" indicates pad being programmed in programming mode.
- Some indicators in display can be seen but will not light.
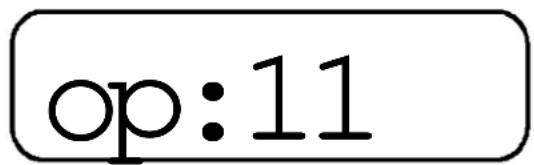
- "OP:11" — Indicates programming user options mode. See "User Options" section of manual for programming procedure.
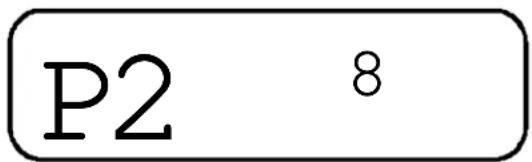
- Indicates programming mode and cooking stage. See “Programming” section of manual for programming procedure.
Power-up Display
After equipment is plugged in, display shows 4 large dashes and 1 small dash. Open and close oven door to clear display and activate pads.
Interrupting Operation
- Open oven door to interrupt operation. Oven fan continues to operate. Close door and press
① (START) pad to resume oven operation.
- Press (RESET) pad to interrupt operation. Display continues to show countdown time. Press
① (START) pad to resume oven operation and countdown timing.
Canceling Mistakes
- If oven is not operating, press (RESET) pad to clear display.
- If oven is operating, press (RESET) pad once to stop oven, then again to clear display.
- If oven door is open and time shows in display, close oven door and press (RESET) pad to clear display.
Preprogrammed Times and Cook Level
All preprogrammed pads arrive set at full power.
| Pad Heatin | g Time |
| 1 10 seconds | |
| 2 20 seconds | |
| 3 30 seconds | |
| 4 45 seconds | |
| 5 1 minute | |
| 6 1 minute 30 seconds | |
| 7 2 minutes | |
| 8 3 minutes | |
| 9 4 minutes | |
| 0 5 minutes |
Operating Preprogrammed Pads
Equipment has 10 preprogrammed number pads. Instructions are written for factory programmed ovens. Ovens that are reprogrammed can respond differently than described below.
-
Open oven door, place food in oven, and close oven door.
-
Display shows
- Fan and light operate.
-
If pad is not pressed in 30 seconds, open and close oven door again.
-
Press desired number pad.
-
Oven operates and time counts down.
- Display shows only when microwave energy is present.
- Display counts down cooking time.
-
If additional heating time is required, press preprogrammed pads before or after heating cycle ends.
-
Oven stops heating and oven signal sounds when heating timing elapses.
Reviewing Preprogrammed Pads
-
Open oven door.
-
Display shows
- Fan and light operate.
-
If door is closed or (RESET) pad is pressed before finishing programming sequence, oven exits programming mode.
-
Press and hold ⬇(TIME ENTRY) pad for approximately 15 seconds.
- After 15 seconds, signal sounds. Display shows "P".
- Press desired number pad.
- Display shows heating time.
- Press ⚙(TIME ENTRY) pad to review heating stages for pad.
- “P” and stage show briefly, then heating time.
- Press ⓄSTART) pad after reviewing preprogrammed pad.
- Repeat steps 3-6 to review another preprogrammed pad.
- Press (RESET) pad or close oven door to exit programming mode.
Manual Time Entry
-
Open oven door, place food in oven, and close oven door.
-
Display shows
- Fan and light operate.
-
If pad is not pressed in 30 seconds, open and close oven door again.
-
Press ⬇(TIME ENTRY) pad.
• Display shows "0000" and 📊
- Press number pads to enter desired cooking time.
- For example, to heat for 2 minutes 30 seconds, press 2, 3, and 0 pads.
- Press a power level pad (if power level other than 100 percent is required).
- Display shows current power level indicator (if other than 100 percent power).
-
Press Ⓐ(START) pad.
-
Oven operates and time counts down.
- Display shows only when microwave energy is present.
-
If power level other than 100 percent power was programmed, display shows power level indicator.
-
Oven stops heating and oven signal sounds when heating timing elapses.
Preprogrammed Number Pads
-
Open oven door.
-
Display shows
- Fan and light operate.
-
If door is closed or (RESET) pad is pressed before finishing programming sequence, oven exits programming mode.
-
Press and hold pad 1 for approximately 15 seconds.
- After 15 seconds, signal sounds. Display shows "P".
- Press desired number pad.
- Display shows heating time and power level indicator (if other than 100 percent power), and pad number.
- Press number pads to enter desired cooking time.
- For example, to heat for 2 minutes 30 seconds, press 2, 3, and 0 pads.
- Press a power level pad (if power level other than 100 percent is required).
- Display shows current power level indicator (if other than 100 percent power).
-
Press Ⓐ(START)pad to save new heating time and power level in oven memory.
-
Display shows "P".
-
Repeat step 3-8 to program additional pads.
-
Press (RESET) pad or close oven door to exit programming mode.
Multiple Heating Stages
Oven can be programmed to perform 4 independent heating cycles without interruption.
-
Open oven door.
-
Display shows
- Fan and light operate.
-
If door is closed or (RESET) pad is pressed before finishing programming sequence, oven exits programming mode.
-
Press pad 1 for approximately 15 seconds.
- After 15 seconds, signal sounds. Display shows "P".
- Press desired number pad.
- Display shows heating time and power level indicator (if other than 100 percent power), and pad number.
- Press number pads to enter desired cooking time.
- For example, to heat for 2 minutes 30 seconds, press 2, 3, and 0 pads.
- Press a power level pad (if power level other than 100 percent is required).
- Display shows current power level indicator (if other than 100 percent power).
-
Press ⬇ (TIME ENTRY) pad.
-
Display briefly shows "P2" indicating menu, programming stage. Then cook time and power level for stage show in display.
-
Repeat steps 5-8 to create up to 4 additional stages.
-
Press Ⓐ(START)pad to save new heating time and power level in oven memory.
-
Press (RESET) pad or close oven door to exit programming mode.
Deactivating Preprogrammed Pad
-
Open oven door.
-
Display shows 📊
• Fan and light operate. -
If door is closed or (RESET) pad is pressed before finishing programming sequence, oven exits programming mode.
-
Press and hold pad 1 for approximately 15 seconds.
• After 15 seconds, signal sounds. Display shows "P".
- Press desired number pad.
- Display shows heating time and power level indicator (if other than 100 percent power).
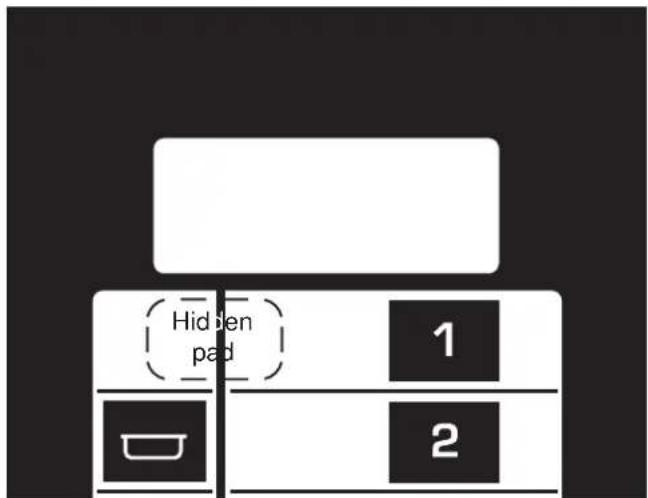
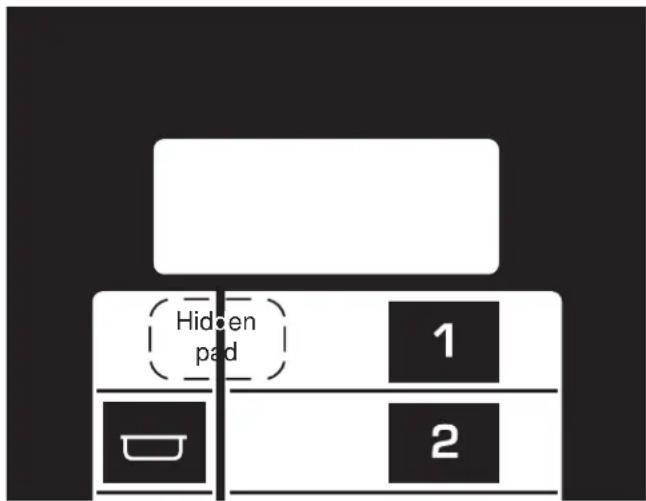
- Press hidden pad.
- "dddd" and pad number show in display.
- Press Ⓐ(START) pad to save in oven memory.
- To reactivate pad, repeat steps.
- Press (RESET) pad or close oven door to exit programming mode.
Reactivating Preprogrammed Pad
-
Open oven door.
-
Display shows
• Fan and light operate. -
If door is closed or (RESET) pad is pressed before finishing programming sequence, oven exits programming mode.
-
Press and hold pad 1 for approximately 15 seconds.
- After 15 seconds, signal sounds. Display shows "P".
- Press desired number pad.
- Display shows heating time, "COOK LEVEL" and power level indicator (if other than 100 percent power).
- Press hidden pad.
• Display shows "0000" and 📋
-
Program pad according to "Preprogrammed Number Pads" section step 5-7.
-
Press Ⓐ(START) pad to save in oven memory. • To reactivate pad, repeat steps.
-
Press (RESET) pad or close oven door to exit programming mode.
User Options
- Open oven door.
- If door is closed or (RESET) pad is pressed before finishing programming sequence, oven exits programming mode.
- Press and hold pad 1 for approximately 15 seconds.
- After 15 seconds, signal sounds. Display shows "P".
- Press hidden pad.
- Displays shows "OP:1(0,1-3)".
- “OP” represents optional program mode, first number represents option number and second number represents functions currently selected for option.
-
Press Ⓐ(START) pad to advance to next option. See table for options.
-
Press number pad (0,1-3) to change option.
-
Press Ⓐ(START)pad to save changes.
- Repeat steps 4-6 to change additional options.
- Press (RESET)pad or close oven door to exit programming mode.
Numbered Display Options
Pads () = Factory Settings
| 1 OP:10 Prevents adding heating time while oven is heating. | |
| OP:11 (Allows adding heating time while oven is heating.) | |
| 2 OP:20 Sounds 3 second signal at end of heating cycle. | |
| OP:21 (Sounds 4 short signals at end of heating cycle.) | |
| 3 O P (Allows 99 minutes 99 seconds of heating time.) | |
| OP:31 Allows 10 minutes of heating time. | |
| 4 OP:40 Prevents signal when pad is pressed. | |
| OP:41 (Allows signal when pad is pressed. | |
| 5 O P (Allows oven to resume heating time countdown after door is opened during cycle.) | |
| OP:51 Cancels heating time count down after door is opened during cycle. | |
| 6 O P (Allows use of power levels.) | |
| OP:61 Prevents use of power levels. | |
| 7 OP:70 Eliminates end of heating cycle signal. | |
| OP:71 Sets end of heating cycle signal volume to low. | |
| OP:72 Sets end of heating cycle signal volume to medium. | |
| OP:73 (Sets end of heating cycle signal volume to high.) | |
| 8 OP:80 Sets oven to standard operation. Blower starts when oven operates. | |
| OP:81 (Sets oven to instant on operation. Blower starts when oven door is opened.) | |
| 9 O P (Allows use of variable time entry and preprogrammed pads.) | |
| OP:91 Allows use of preprogrammed pads only. | |
| 0 O P (Allows lockout to be programmed.) | |
| OP:01 Prevents lockout from being programmed. |
Recommended Not Recommended
| Glass/ceramic Aluminum foil | |
| Natural fiber cloth Grocery bags | |
| Non-recycled paper Recycled paper | |
| Plastic Lead crystal | |
| Wood Newspapers | |
| Metal | |
| Metallic trimmed china | |
Utensil Check Test
Use the following test to check utensils for microwave safeness.
- Place glass measuring cup of water next to empty dish to be tested in microwave oven.
- Heat on full power for one minute.
-
Check temperature of dish and water.
-
If dish remains cool and water is hot, dish is microwave safe.
- If dish is slightly warm, use for short term cooking only.
- If dish is hot and water is cool, do not use. Dish remains cool if not absorbing microwaves and microwaves are being absorbed by water. Dish becomes hot if absorbing microwaves.
An authorized servicer must inspect equipment annually. Record all inspections and repairs for future reference.
Changing Oven Light Bulb

Caution
To avoid electrical shock hazard unplug power cord or open circuit breaker to microwave oven before replacing light bulb. After replacing light bulb, reconnect power.

Caution
To avoid burns and cuts, wear gloves to protect hands should bulb break. If hot, allow bulb to cool.
Tools and Bulb
- Protective gloves
-
Standard screwdriver or 14 -inch socket
• Light bulb rated 230 volt, 25 watt -
Unplug oven.
- Remove screw from back of oven and remove access cover.
- See figure below.
- Remove bulb by turning counterclockwise, being careful not to burn fingers or break bulb.
- Replace with bulb rated 230 volt, 25 watt.
- Plug in oven.
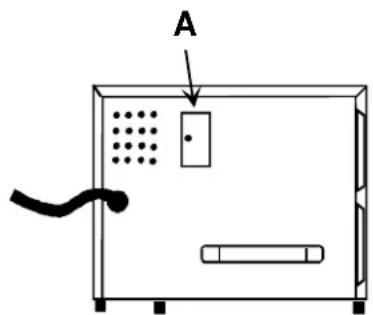
A—Light bulb access cover
Cleaning Interior, Exterior, and Door

Warning
To avoid electrical shock which can cause severe personal injury or death, unplug power cord or open circuit breaker to oven before cleaning.
Clean microwave oven with mild detergent in warm water using soft sponge or cloth. Wring sponge or cloth to remove excess water before wiping equipment. If desired, boil a cup of water in microwave oven to loosen soil before cleaning.
- Do not use abrasive cleansers or cleaners containing ammonia. These could damage finish.
- Never pour water into microwave oven bottom.
- Do not use water pressure type cleaning systems.
Cleaning Splatter Shield

Caution
To avoid oven cavity damage, do not operate oven without splatter shied in place. Arcing will damage oven cavity, support bar, and stirrer blade when operated without shield in place.
Splatter shield keeps top of microwave oven cavity and antenna from becoming soiled. Clean soil from shield with damp cloth or clean with mild detergent and water. Remove splatter shield for easy cleaning.
- Unplug oven before removing splatter shield to stop antenna from rotating.
- Place fingers on front of shield, push forward, and down.
- When removing and replacing splatter shield, be careful not to bend antenna.
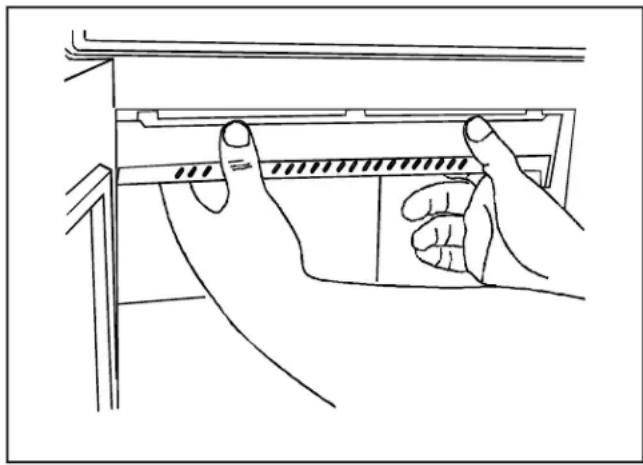
natural_image
Line drawing of hands holding a tool inside a device (no text or symbols)-
Wash shield in hot, soapy water. Rinse and dry thoroughly.
-
Do not wash splatter shield in dishwasher.
-
Do not use abrasive cleaners.
-
Reinstall splatter shield by fitting tabs into slots at top of oven cavity back. Lift and press front of shield until shield snaps into place.
Cleaning Air Intake Filter

Caution
To avoid overheating and oven damage, clean air filter regularly.

Caution
To avoid oven door damage, do not lift oven by oven door.
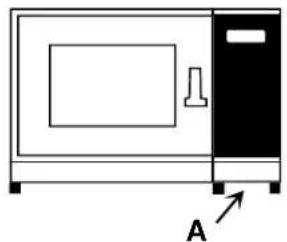
Filter is located below oven control panel. Clean air intake filter weekly for proper air flow. Wash filter in hot water and mild detergent. Do not use oven without filter in place. Remove filter to clean. To remove filter, grasp filter tab and slide out.
natural_image
Simple line drawing of a microwave oven with a door and side panel, labeled A (no text or symbols on the device itself)A—Filter tab
Cleaning Discharge Air Vents
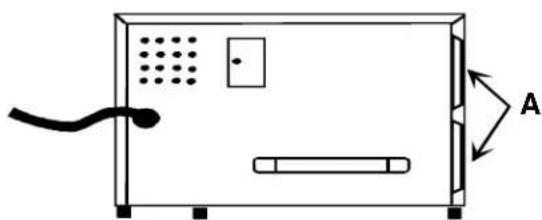
Check for a buildup of cooking vapors along discharge louvers in back of oven. Clean air vent with damp cloth to ensure proper airflow. Dry thoroughly.
natural_image
Simple line drawing of a device with labeled component A, no text or symbols presentA. Discharge Air Vent
If oven does not operate:
- Confirm oven is plugged into dedicated circuit.
- Confirm oven is on earthed and polarized circuit. (Contact electrician to confirm.)
- Check fuse or circuit breaker.
If oven light does not work:
- Confirm light bulb is screwed in tightly.
- Confirm light bulb has not failed.
If oven operates intermittently:
- Check filter inlet and discharge areas for obstructions.
If oven does not accept entries when pad is pressed:
- Open and close oven door. Press pad again.
If oven malfunctions:
- Unplug oven, wait for 1 minute, and plug in oven.
If oven operates, but will not heat food:
- Place one cup cool water in oven. Heat for one minute. If water temperature does not rise, oven is operating incorrectly.

Warning
To avoid electrical shock which can cause severe personal injury or death, do not remove outer case at any time. Only authorized servicer should remove outer case.
Any questions or to locate an authorized servicer, call equipment supplier. Warranty service must be performed by an authorized servicer. Amana also recommends contacting an authorized servicer if service is required after warranty expires.
Read "Important Safety Information" before using "Quick Reference Instructions". If there are unanswered questions, see detailed sections of this manual.
Operating Preprogrammed Pads
- Open oven door, place food in oven, and close oven door.
- Press desired number pad.
- Oven stops heating and oven signal sounds when heating timing elapses.
Reviewing Preprogrammed Pads
- Open oven door.
- Press and hold ⬇(TIME ENTRY) pad for approximately 15 seconds.
- Press desired number pad.
- Press ⬇(TIME ENTRY) pad to review heating stages for pad.
- Press (START) pad after reviewing preprogrammed pad.
- Press (RESET) pad or close oven door to exit programming mode.
Manual Time Entry
- Open oven door, place food in oven, and close oven door.
- Press ⬇(TIME ENTRY) pad.
- Press number pads to enter desired cooking time.
- Press a power level pad if power level other than 100 percent is required.
- Press Ⓐ(START) pad.
- Oven stops heating and oven signal sounds when heating timing elapses.
Preprogrammed Number Pads
- Open oven door.
- Press and hold pad 1 for approximately 15 seconds.
- Press desired number pad.
- Press number pads to enter desired cooking time.
- Press a power level pad if power level other than 100 percent is required.
- Press Ⓐ(START) pad to save new heating time and power level in oven memory.
- Press (RESET) pad or close oven door to exit programming mode.
Multiple Heating Stages
- Open oven door.
- Press pad 1 for approximately 15 seconds.
- Press desired number pad.
- Press number pads to enter desired cooking time.
- Press a power level pad if power level other than 100 percent is required.
- Press ⬇(TIME ENTRY) pad.
- Press Ⓐ(START)pad to save new heating time and power level in oven memory.
- Press (RESET) pad or close oven door to exit programming mode.
Deactivating Preprogrammed Pad
- Open oven door.
- Press and hold pad 1 for approximately 15 seconds.
- Press desired number pad.
- Press hidden pad.
- Press Ⓐ(START) pad to save in oven memory.
- Press (RESET) pad or close oven door to exit programming mode.
Reactivating Preprogrammed Pad
- Open oven door.
- Press and hold pad 1 for approximately 15 seconds.
- Press desired number pad.
- Press hidden pad.
- Program pad according to "Preprogrammed Number Pads" section step 5-7.
- Press Ⓐ(START) pad to save in oven memory.
- Press (RESET) pad or close oven door to exit programming mode.
User Options
- Open oven door.
- Press and hold pad 1 for approximately 15 seconds.
- Press hidden pad.
- Press Ⓐ(START) pad to advance to next option. See table for options.
- Press number pad (0,1-3) to change option.
- Press Ⓐ(START) pad to save changes.
- Press (RESET) pad or close oven door to exit programming mode.

INTERNATIONAL COMMERCIAL MICROWAVE OVEN
LIMITED ONE YEAR WARRANTY
LIMITED THREE YEAR WARRANTY
Amana Appliances warrants this product when the original purchaser uses the oven
for commercial food service preparation.
FIRST YEAR
Amana Appliances will replace any part, f.o.b. Amana, Iowa, U.S.A., which proves to be defective
due to workmanship or materials.
SECOND THROUGH THIRD YEAR
Amana Appliances will replace any electrical part, f.o.b. Amana, Iowa, U.S.A., which proves to be defective
due to workmanship or materials.
OWNER'S RESPONSIBILITIES:
- Provide proof of purchase.
- Provide normal care and maintenance, including cleaning as instructed in owner's manual.
- Replace owner replaceable items where directions appear in the owner's manual.
- Make product accessible for service.
- Pay for premium service costs for service outside servicer's normal business hours.
- Pay for service calls related to product installation and customer education.
ITEMS NOT COVERED:
• Normal product maintenance and cleaning.
- Lost or broken air filters.
• Light bulbs.
- Lost or broken grease shields.
• Damages which occur in shipment.
• Broken ceramic shelves.
- General rebuilding or refurbishing.
- Failures caused by:
- Unauthorized service.
- Grease or other material buildup due to improper cleaning or maintenance.
- Accidental or intentional damage.
- Connection to an improper power supply.
- Acts of God.
- Operating an empty oven.
- Use of improper pans, containers, or accessories that cause damage to the product.
WARRANTY LIMITATIONS:
• Begins at date of original purchase.
- Applies to product used for NORMAL commercial food preparation.
• Service must be performed by an authorized Amana servicer.
WARRANTY IS VOID IF:
- Serial plate is defaced.
• Product is altered by user. - Product is not installed or used according to manufacturer's instructions.
IN NO EVENT SHALL AMANA APPLIANCES BE LIABLE FOR INCIDENTAL OR CONSEQUENTIAL DAMAGES\*
For answers to questions regarding the above, contact equipment supplier or:
International Division
Amana Appliances
2800 220th Trail
PO Box 8901
Amana, Iowa 52204-0001
USA
1-800-843-0304 inside U.S.A.
1-319-622-5511 outside U.S.A.
Indhold
Modelidentifikation
Modelidentifikation
Mikrobølgestrøm 18
Brugerindstillinger
1. Åbn ovndøren.
natural_image
Line drawing of hands installing or adjusting a component inside a device (no text or symbols)natural_image
Simple line drawing of a microwave oven with a door and label A (no text or symbols on the device itself)A—Filterflig
natural_image
Simple line drawing of a device with labeled component A, no text or symbols presentInternational Division
Amana Appliances
2800 220th Trail
PO Box 8901
Amana, Iowa 52204-0001
USA
1-800-843-0304 i USA
natural_image
Simple diagram with three horizontal lines inside a rectangle (no text or symbols)natural_image
Simple diagram with three horizontal lines inside a rectangle (no text or symbols)natural_image
Line drawing of hands installing or adjusting a component inside a device (no text or symbols)natural_image
Simple line drawing of a microwave oven with a door and label A (no text or symbols on the device itself)A—Filterlasche
natural_image
Simple line drawing of a device with labeled component A, no text or symbols presentA. Entlüftungshaube
International Division
Amana Appliances
2800 220th Trail
PO Box 8901
Amana, IA 52204-0001
USA
Telefon: 1-800-843-0304 (in den USA)
natural_image
Simple diagram with a rectangle containing three horizontal lines and one vertical line, no text or symbols present.natural_image
Simple diagram with a rectangle containing four horizontal lines and one dashed line, no text or symbols present.| ÁnéèiçíYía | ÅðéëiãYó | ||
| DéPêôñá | I èuíc | ( ) = Nãoínbåø | Änăióôáófið |
| 1 | OOP:11 | P | Áðiðnýðaéócí ðñúóeáóc ÷nülið éýñláiócò aíp i öiýníið eäñiáñáðáé(Àðeñýðaéócí ðñúóeáóc ÷nülið éýñláiócò aíp i öiýníið eäñiáñáðáé) |
| 2 | OOP:21 | P: | Ç÷30YÍá óPiá 3 ääðčanïeýðouí óói óýěið óið éýéëið éýñláiócò.(Ç÷iýí 4 óyíóilá óPiáóá óói óýěið óið éýéëið éýñláiócò.) |
| 3 | OOP:31 | P: | (Àðeñýðaé99 éáðÜ éaé99 ääðčanúeáðóá ÷nülið éýñláiócò.)Aðeñýðaé10 éáðÜ ÷nülið éýñláiócò. |
| 4 | OOP:41 | P: | Áðiðnýðaéói óPiá aíp ói õèpēôní áñáéðáóiYíí.(Àðeñýðaéói óPiá aíp ói õèpēôní áñáéðáóiYíí.) |
| 5 | OOP:51 | P: | (Àðeñýðaéócií öiýníí íá óóíá+naéocí áíðbóniöç iýðnçóç óçòèýniáíóçò áí áíífáec ðůnóá éáðÜ óçi éäðiðnáñ.)Áéónp íaéocí áíðbóniöç iýðnçóç óçò èýñláiócò áí áíífáec ðůnóáéáðÜ óçi éäðiðnáñá. |
| 6 | OOP:61 | P: | (Àðeñýðaéóc ÷nPóç áðYáùí é÷ýið.)Áðiðnýðaéóc ÷nPóç áðYáùí é÷ýið. |
| 7 | OOP:71 | P: | Dáyáðeói ç÷çòéü óPiá óið óýěiðó óið éýéëið.Nõeífaéói ç÷çòéü óPiá óið óýěiðó óið éýéëið óá ÷aìçëp ÿíóáóç.Nõeífaéói ç÷çòéü óPiá óið óýěiðó óið éýéëið óá īáóáñá ÿíóáóç.(Nõeífaéói ç÷çòéü óPiá óið óýěiðó óið éýéëið óá õøçëp ÿíóáóç.) |
| 8 | OOP:81 | P: | Nõeš0aéói öiýníí óá éaíííép éäðiðnáñá.Í áíaliéóPnáo éäðiðnáàsūdái íaééü i öiýníið.Nõeífaéói öiýníí óá Úiáóç éäðiðnáñá.Í áíaliéóPnáo éäðiðnáàsūdái áíífáec ðůnóá.) |
| 9 | OOP:91 | P: | (Àðeñýðaéóc ÷nPóç íaóáæçòiý ÷nülið æóáaňuãPò éaéðniānálláóéóiYíáðèPêôñá.)Aðeñýðaéóc ÷nPóç iúíí õniānálláóéóiYíúí õèpēônúí. |
| 0 | OOP:01 | P: | (Àðeñýðaéóií õniānálláóéóiú óçò áóöÜééóçò.)AðiÓnýðaéóií õniānálláóéóiú óçò áóöÜééóçò. |
ìáāaénéêÜ óeâyç ăéá Õiýníiõò ìteâñiêõiüûùí
natural_image
Line drawing of hands installing or adjusting a component inside a device (no text or symbols)-
Εδέγιάδα ὅςί αόδβää ia æåóöü íåñü êéé óáðiýíé. Îåðëyíáδα êéé óðäāípóðα ὅςί ὅñióåêôêêÜ.
-
Íçí õëYÍåðå ôçí áóðßää óå õëõíôPñéi õéÜûúí.
-
Íçí ÷ñçóéliðiéåßðå óöéëäùôêêÜ áðïñnõðáíôêêÜ.
-
Άδαίαόιδιεάρόσα ὁςί αόδβαά αλείιδαὸ δα δοαήγαέα ὁσεὸ αλεῖοΥὸ διὸ δύιὺ ελε ὁβοὺ ιγῆιὸ ὁçò εἰεέμοςοὰ διὸ ὁγῆίιὸ. ὁçèpóδα ἀεαöñéÜ ελε ὁεΥόσα δι ὁπίοδÜ άπιὸ ὁçò αόδβαὰ άःñé íá αόαπιύσαέ ὁσçí èYóç ὁçò.
Éaèañéóiüò Ößëöniõ ÅéoáãuãPò ÁYnáEaèañéóiüö Ößëöniõ ÅéoáãuãPò ÁYná

Dñiói÷P Dñiói÷P
Ãéá íá áðiöåð÷èaß ç õðåñèÝniáíóç êáe æçiéÜ öiö öiýnííõ, êáeáñbæååð ői ößëöni öiö áýná óá éáíííéêÜ ÷ñííéêÜ äéáóôPíáóá.

Dñiói÷P Dñiói÷P
Ãéa íá áðiöyãåðå æçíéÜ ôçò ðüñôáo, ¡cí áíáóçêpíåðå ôíí öiýñíí áðü ôcí ðüñôá.
natural_image
Simple line drawing of a microwave oven with a door and base, labeled A (no text or symbols on the device itself)natural_image
Simple line drawing of a device with labeled component A, no text or symbols presentA-Áåñáäüäüò ÁiáäùäPò
International Division
Amana Appliances
2800 220th Trail
P.O. Box 8901
Amana, Iowa 52204-0001
USA
Aíóuò oùí C.D.A. 1-800-843-0304
Aêôùò ôuí Ç.Đ.Á. 1-319-622-5511
Índice
natural_image
Simple diagram with three horizontal lines inside a rectangle (no text or symbols)natural_image
Simple diagram with a rectangle containing three horizontal lines and one vertical line, no text or symbols present.natural_image
Line drawing of hands installing or adjusting a component inside a cabinet (no text or symbols)natural_image
Simple line drawing of a microwave oven with a door and base, labeled A (no text or symbols on the device itself)natural_image
Simple line drawing of a rectangular device with internal components and a labeled arrow (A), no text or symbols present.International Division
Amana Appliances
2800 220th Trail
PO Box 8901
Amana, Iowa 52204-0001
EE.UU.
natural_image
Simple diagram with three horizontal lines inside a rectangle (no text or symbols)natural_image
Simple diagram with a rectangle containing three horizontal lines and one vertical line, no text or symbols present.natural_image
Line drawing of hands installing or adjusting a component inside a device (no text or symbols)natural_image
Simple line drawing of a microwave oven with a door and base, labeled A (no text or symbols on the device itself)natural_image
Simple line drawing of a device with labeled component A, no text or symbols presentA. Event de sortie
International Division
Amana Appliances
2800 220th Trail
P.O. Box 8901
Amana, Iowa 52204-0001
Etats-Unis
natural_image
Simple diagram with a rectangle containing three horizontal lines and one vertical line, no text or symbols present.natural_image
Line drawing of hands holding a component inside a device (no text or symbols)natural_image
Simple line drawing of a microwave oven with a door and label A (no text or symbols on the device itself)A—Aletta del filtro
natural_image
Simple line drawing of a device with labeled component A, no text or symbols presentA—Sfiato
International Division
Amana Appliances
2800 220th Trail
PO Box 8901
Amana, Iowa 52204-0001
USA
natural_image
Simple diagram with a rectangle containing three horizontal lines and one vertical line, no text or symbols present.natural_image
Simple diagram with a rectangle containing three horizontal lines and one vertical line, no text or symbols present.natural_image
Line drawing of hands installing or adjusting a component inside a storage unit (no text or symbols)natural_image
Simple line drawing of a microwave oven with a door and label A (no text or symbols on the device itself)A—Filterlipje
natural_image
Simple line drawing of a device with labeled component A, no text or symbols presentInternational Division
Amana Appliances
2800 220th Trail
P.O. Box 8901
Amana, Iowa 52204-0001
U.S.A.
Tel: 1-800-843-0304 in de V.S.
Tel: 1-319-622-5511 buiten de V.S.
Innhold
natural_image
Simple diagram with a rectangle containing three horizontal lines and one vertical line, no text or symbols present.natural_image
Simple diagram with a rectangle containing three horizontal lines and one vertical line, no text or symbols present.Avbrudd under drift
Brukeralternativer
- Åpne ovnsdøren.
natural_image
Line drawing of hands installing or adjusting a component inside a device (no text or symbols)natural_image
Simple line drawing of a microwave oven with a door and base, labeled A (no text or symbols on the device itself)A—Filtertapp
natural_image
Simple line drawing of a device with labeled component A, no text or symbols presentA—Lufteventil
International Division
Amana Appliances
2800 220th Trail
PO Box 8901
Amana, Iowa 52204-0001
USA
Telefon: 1-800-843-0304 i USA
Telefon: 1-319-622-5511 utenfor USA.
Índice
natural_image
Four technical line drawings of electrical connectors and socket components (no text or symbols)230 V-16 A 230 V-13 A
Terminal Equipotencial Externo de Ligação à Terra
natural_image
Simple diagram with a rectangle containing three horizontal lines and one vertical line, no text or symbols present.natural_image
Simple diagram with a rectangle containing three horizontal lines and one vertical line, no text or symbols present.natural_image
Line drawing of hands installing or adjusting a component inside a storage unit (no text or symbols)natural_image
Simple line drawing of a microwave oven with a door and vent, labeled A (no text or symbols on the device itself)natural_image
Simple line drawing of a device with labeled component A, no text or symbols presentInternational Division
Amana Appliances
2800 220th Trail
PO Box 8901
Amana, Iowa 52204-0001
E.U.A.
1-800-843-0304 (nos E.U.A.)
1-319-622-5511 (fora dos E.U.A.)
Sisältö
Mallin tunnistus
Mallin tunnistus
Mikroaaltoteho....199
natural_image
Simple diagram with a rectangle containing three horizontal lines and one vertical line, no text or symbols present.Käytön keskeytys
natural_image
Line drawing of hands holding a cable or connector inside a device (no text or symbols)natural_image
Simple line drawing of a microwave oven with a door and labeled component A (no text or symbols beyond label)natural_image
Simple line drawing of a device with labeled component A, no text or symbols presentInternational Division
Amana Appliances
2800 220th Trail
PO Box 8901
Amana, Iowa 52204-0001
USA
1-800-843-0304 USA:ssa
natural_image
Simple diagram with four horizontal lines inside a rounded rectangle (no text or symbols)natural_image
Simple diagram with a rectangle containing three horizontal lines and one vertical line extending downward (no text or symbols)Driftspaus
natural_image
Line drawing of hands installing or adjusting a component inside a device (no text or symbols)natural_image
Simple line drawing of a microwave oven with a door and vent, labeled A (no text or symbols on the device itself)A—Filterflik
natural_image
Simple line drawing of a rectangular device with labeled points A and internal components (no text or symbols beyond labels)International Division
Amana Appliances
2800 220th Trail
PO Box 8901
Amana, Iowa 52204-0001
USA
1-800-843-0304, inom USA
- Contents Model Identification
- Microwave Power
- IMPORTANT SAFETY INSTRUCTIONS
- Recognize this symbol as a SAFETY message
- Warning
- Caution
- SAVE THESE INSTRUCTIONS
- PRECAUTIONS TO AVOID POSSIBLE EXPOSURE TO EXCESSIVE MICROWAVE ENERGY
- External Equipotential Earthing Terminal
- Unpacking Equipment
- Equipment Placement
- Radio Interference
- Power Level Pads
- TIME ENTRY
- Pads 1-0
- RESET
- START
- Power-up Display
- Interrupting Operation
- Canceling Mistakes
- Preprogrammed Times and Cook Level
- Operating Preprogrammed Pads
- Reviewing Preprogrammed Pads
- Manual Time Entry
- Preprogrammed Number Pads
- Multiple Heating Stages
- Deactivating Preprogrammed Pad
- Reactivating Preprogrammed Pad
- User Options
- Numbered Display Options
- Pads () = Factory Settings
- Utensil Check Test
- Changing Oven Light Bulb
- Tools and Bulb
- Cleaning Interior, Exterior, and Door
- Cleaning Splatter Shield
- Cleaning Air Intake Filter
- Cleaning Discharge Air Vents
- INTERNATIONAL COMMERCIAL MICROWAVE OVEN
- LIMITED ONE YEAR WARRANTY
- LIMITED THREE YEAR WARRANTY
- FIRST YEAR
- SECOND THROUGH THIRD YEAR
- OWNER'S RESPONSIBILITIES:
- ITEMS NOT COVERED:
- WARRANTY LIMITATIONS:
- WARRANTY IS VOID IF:
- IN NO EVENT SHALL AMANA APPLIANCES BE LIABLE FOR INCIDENTAL OR CONSEQUENTIAL DAMAGES\*
- International Division
- Indhold
- Modelidentifikation
- Brugerindstillinger
- Åbn ovndøren.
- ìáāaénéêÜ óeâyç ăéá Õiýníiõò ìteâñiêõiüûùí
- Éaèañéóiüò Ößëöniõ ÅéoáãuãPò ÁYnáEaèañéóiüö Ößëöniõ ÅéoáãuãPò ÁYná
- Dñiói÷P Dñiói÷P
- Índice
- Innhold
- Avbrudd under drift
- Brukeralternativer
- Terminal Equipotencial Externo de Ligação à Terra
- Sisältö
- Mallin tunnistus
- Käytön keskeytys
- Driftspaus
Brand : AMANA
Model : RCS1050MPB
Category : Microwaves