
Dry L WDH-20 - Dehumidifier WILFA - Free user manual and instructions
Find the device manual for free Dry L WDH-20 WILFA in PDF.


| Product Type | Dehumidifier |
| Brand | Wilfa |
| Model | Dry L WDH-20 |
| Capacity (Extraction) | 20 L/day (at 30°C, 80% RH) |
| Tank Capacity | 2.5 L |
| Power Consumption | 280 W |
| Airflow | 150 m³/h |
| Dimensions (W x H x D) | 34 x 50 x 24 cm |
| Weight | 10 kg |
| Noise Level | 40 dB |
| Operating Temperature Range | 5°C - 35°C |
| Refrigerant | R134a |
| Moisture Removal | Compressor-based |
| Control Type | Electronic with digital display |
| Functions | Continuous drainage, auto defrost, timer, humidity setpoint, fan speed |
| Filters | Washable pre-filter |
| Safety Features | Auto shut-off when tank full, overheat protection |
| Maintenance | Clean filter monthly, empty tank regularly |
| Energy Efficiency | Energy class A |
| Spare Parts Availability | Filters and tanks available from Wilfa |
Frequently Asked Questions - Dry L WDH-20 WILFA
User questions about Dry L WDH-20 WILFA
0 question about this device. Answer the ones you know or ask your own.
Ask a new question about this device
Download the instructions for your Dehumidifier in PDF format for free! Find your manual Dry L WDH-20 - WILFA and take your electronic device back in hand. On this page are published all the documents necessary for the use of your device. Dry L WDH-20 by WILFA.
USER MANUAL Dry L WDH-20 WILFA
natural_image
White portable air purifier with ventilation grille (no visible text or symbols)Wilfa Dry L
Dehumidifier
Bruksanvisning
Bruksanvisning
Operating Instructions
LES ALLE ANVISNINGER F∅R BRUK
LÄS IGENOM ALLA INSTRUKTIONER INNAN PRODUKTEN ANVÄNDS
LÆS ALLE VEJLEDNINGER INDEN BRUG
LUE OHJEET HUOLELLISESTI ENNEN KÄYTTÖÄ
READ ALL INSTRUCTIONS BEFORE USING
natural_image
Illustration of hands operating a refrigerant appliance with cooling system (no text or symbols)⑤ VIFTEHASTIGHET-knapp
natural_image
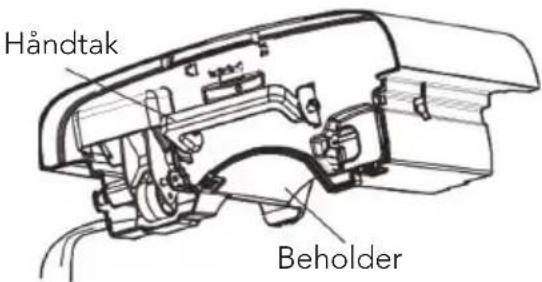
Illustration of hands operating a refrigerant appliance with cooling fins and a paper holder (no text or symbols)- Tøm beholderen med den ene hånden på håndtaket øverst på beholderen og den andre hånden under beholderen.
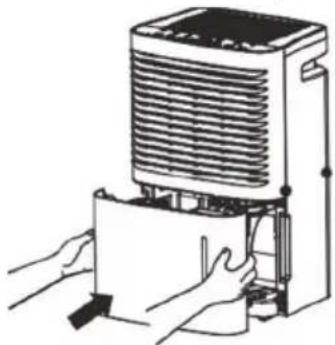
- Plasser beholderen i luftavfukteren i henhold til pilretningen.
natural_image
Illustration of hands operating a refrigerant appliance with a paper holder (no text or symbols visible)natural_image
Technical line drawing of an appliance internal structure, showing exploded and assembled views (no text or symbols)OBS!
natural_image
Technical line drawings of two industrial air purifiers with cooling fans and a bucket (no text or labels)RENGJ∅RING OG VEDLIKEHOLD
ADVARSEL:
natural_image
Line drawing of a hand cleaning a large industrial air conditioner unit (no text or symbols)2. Vannbeholder
natural_image
Illustration of hands operating a refrigerant appliance with cooling fins and a paper holder (no text or symbols)natural_image
Illustration of hands operating a refrigerant appliance with a paper holder (no text or symbols visible)natural_image
Illustration of hands operating a refrigerant appliance with a paper holder (no text or symbols visible)Alternativ 2 Dräneringsslang
natural_image
Technical line drawing of a refrigerant system with internal components and wiring (no text or symbols)natural_image
Technical line drawings of two industrial air purifiers with cooling fans and a bucket (no text or labels)RENGÖRING OCH UNDERHÅLL
WARNING:
natural_image
Line drawing of a hand cleaning a portable air conditioner unit (no text or symbols)2. Vattenbehållare
natural_image
Illustration of hands operating a refrigerant appliance with cooling fins and a paper outlet (no text or symbols)natural_image
Illustration of hands operating a refrigerant appliance with a paper holder and cooling unit (no text or symbols)natural_image
Illustration of hands operating a refrigerant appliance with a paper holder (no text or symbols visible)natural_image
Technical line drawing of an industrial cooling unit with internal components and external piping (no text or symbols)BEMÆRK:
natural_image
Technical line drawings of two industrial air purifiers with cooling fans and a bucket (no text or labels)RENG∅RING OG VEDLIGEHOLDELSE
ADVARSEL:
natural_image
Line drawing of a hand cleaning a large industrial air conditioner unit (no text or symbols)2. Vandbeholder
natural_image
Illustration of hands operating a refrigerant appliance with cooling fins and a paper outlet (no text or symbols)PAINIKKEIDEN TOIMINNOT
① Virtapainike
natural_image
Illustration of hands operating a refrigerant appliance with a paper holder (no text or symbols visible)natural_image
Illustration of hands operating a refrigerant appliance with a paper holder (no text or symbols visible)natural_image
Technical line drawing of an industrial air conditioning unit with internal components and external piping (no text or symbols)HUOMIO:
natural_image
Technical line drawing of a refrigerated industrial device with cooling fins and a cup (no text or symbols)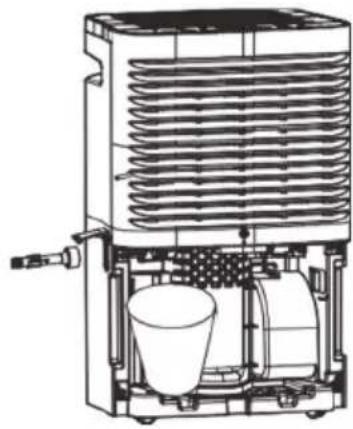
natural_image
Technical line drawing of an industrial air conditioning unit with cooling fins and a bucket (no text or labels)PUHDISTUS JA HUOLTO
VAROITUS:
natural_image
Line drawing of a hand cleaning a large industrial air conditioner unit (no text or symbols)2. Vesisäiliö
Safety Precautions 5
The refrigerant....6
Warning:....6
Operation Area 8
Parts Name 9
Check Before Operation....10
Operation Method....11
Basic Functions of the Buttons....11
Other Instructions....13
Drainage Option....14
Clean and Maintenance 16
Troubleshooting....19
Malfunction Codes....21
SAFETY PRECAUTIONS
- This appliance can be used by children aged from 8 years and above and persons with reduced physical, sensory or mental capabilities or lack of experience and knowledge if they have been given supervision or instruction concerning use of the appliance in a safe way and understand the hazards involved.
• Children shall not play with the appliance. - Cleaning and user maintenance shall not be made by children without supervision.
- Before operation, please check the power cord if it complies with the requirement indicated on the nameplate.
- Before cleaning, please turn it off and unplug the dehumidifier.
- Make sure the power cord is not pressed by any hard object.
- Do not remove the power plug or move unit by pulling the power cord.
- Do not use any heating application near the dehumidifier.
- Do not remove the power plug in wet hands.
- Please use grounded power cord and make sure it's well connected and not damaged.
- Do not place the dehumidifier under dripping objects.
- Memory function is included in this dehumidifier. When nobody is taking care of the unit, please turn it
off and remove the power plug or disconnect power.
- Do not repair or disassemble the unit by yourself.
- If abnormal condition occurs (e.g. burned smell), please disconnect power at once and then contact local dealer.
- Do not use an extension cord.
- The appliance shall be installed in accordance with national wiring regulations.
- If the supply cord is damaged, it must be replaced by the manufacturer, its service agent or similarly qualified persons in order to avoid a hazard.
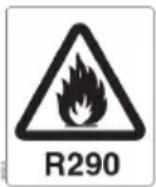
- To realize the function of the air conditioner unit, a special refrigerant circulates in the system. The used refrigerant is the fluoride R290, which is specially cleaned.
- The refrigerant is flammable and inodorous. Furthermore, it can lead to explosion under certain conditions.
- Compared to common refrigerants, R290 is a nonpolluting refrigerant with no harm to the ozonosphere. The influence upon the greenhouse effect is also lower. R290 has got very good thermodynamic features which lead to a really high energy efficiency. The units therefore need a less filling.
- Please refer to the nameplate for the charging quantity of R290.
WARNING:
- Appliance filled with flammable gas R290.
- Appliance shall be installed, operated and stored in a room with a floor area
larger than 11m2.
- The appliance shall be stored in a room without continuously operating ignition sources. (for example: open flames, an operating gas appliance or an operating electric heater.)
- The appliance shall be stored in a well-ventilated area where the room size corresponds to the room area as specified for operation.
- The appliance shall be stored to prevent mechanical damage from occurring.
- Ducts connected to an appliance shall not contain an ignition source.
- Keep any required ventilation openings clear of obstruction.
- Do not pierce or burn.
- Be aware that refrigerants may not contain an odour.
- Do not use means to accelerate the defrosting process or to clean, other than those recommended by the manufacturer.
- Servicing shall be performed only as recommended by the manufacturer.
- Should repair be necessary, contact your nearest authorized Service Centre.
- Any repairs carried out by unqualified personnel may be dangerous.
- Compliance with national gas regulations shall be observed.
OPERATION AREA
- This dehumidifier is intended for indoor residential applications only. It should not be used for commercial or industrial applications.
- Place the dehumidifier on a smooth and level floor.
- A dehumidifier operating indoors will have no effect in drying an adjacent enclosed area, such as a closet.
- Place the dehumidifier in an area where the temperature will not below 5°C or above 35°C.
- Allow at least 30-45 cm of air space on all sides of the unit.
- Close all doors, windows and other outside openings of the room to improve the working effect.
- Please keep the air inlet/outlet clean and not blocked.
- Do not use a dehumirifier in a bathroom.
- Avoid direct sunlight.
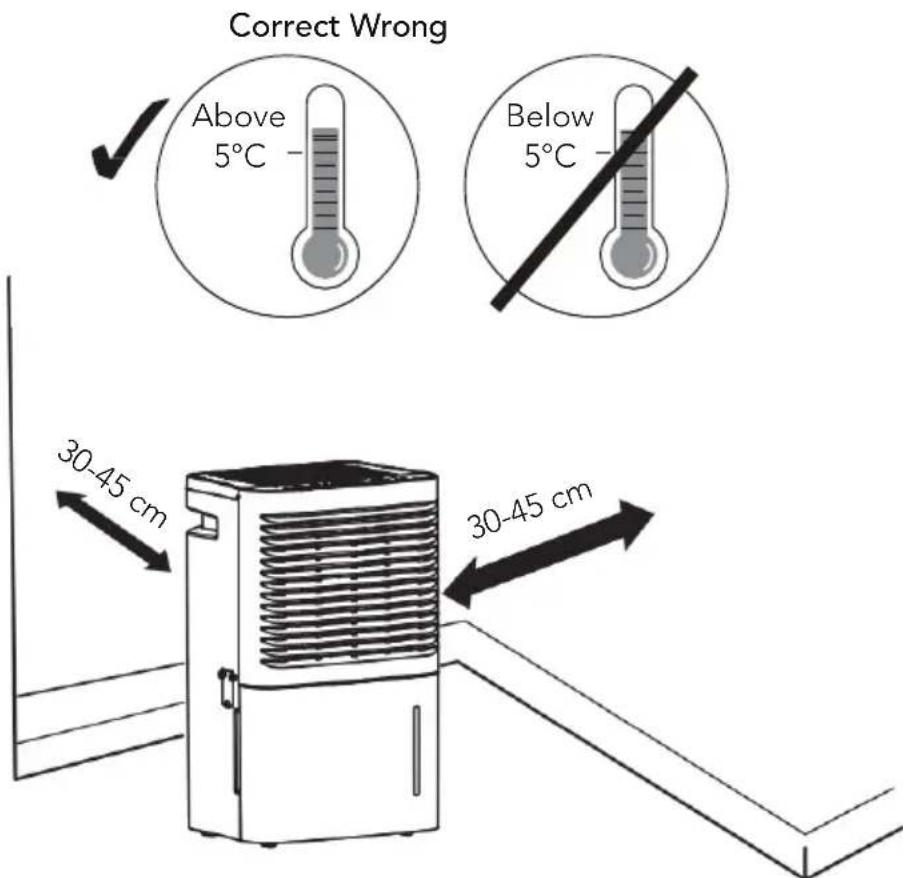
NOTICE:
The dehumidifier has rollers to aid placement. Do not attempt to roll the dehumidifier on carpet or over objects. Otherwise, water may spill out from the bucket or the dehumidifier may get stuck by the objects.
PARTS NAME
Front Side
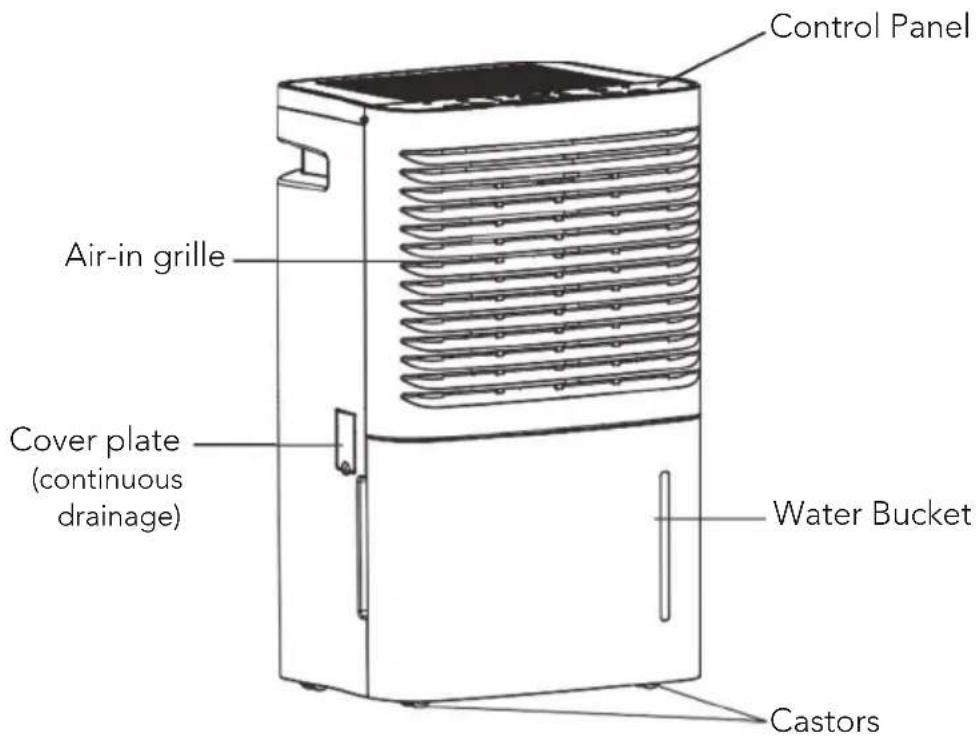
Back Side
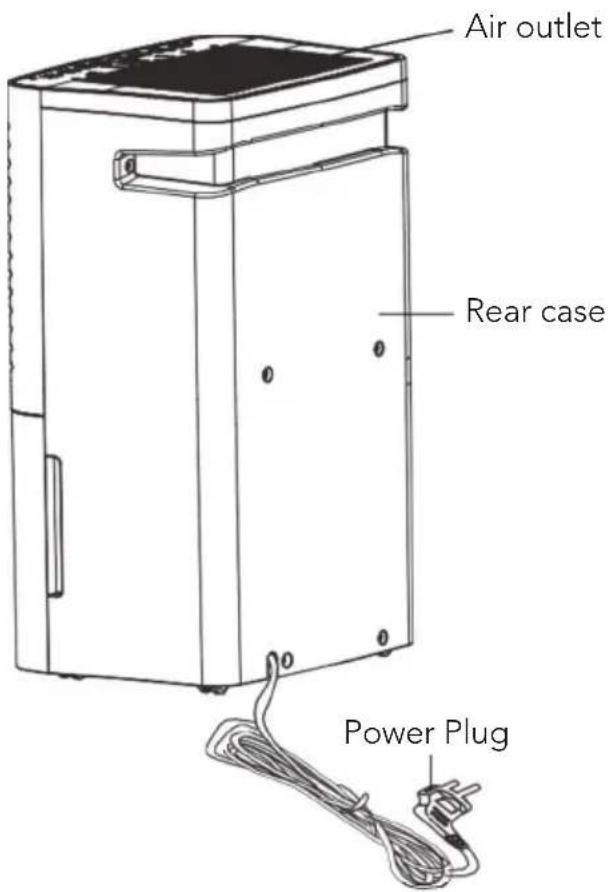
Before operation, please first check whether float is properly placed.
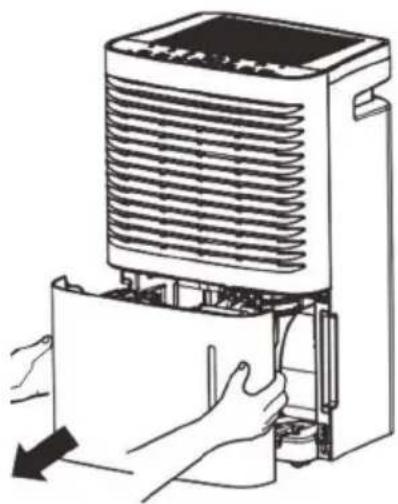
Below are the checking steps:
- Hold the handles on both sides of the water bucket and pull it out following the arrow direction.
natural_image
Illustration of hands operating a refrigerant appliance with cooling fins and a door panel (no text or symbols)- Check whether float in the water bucket is properly placed. It might have been moved a little after long-time transportation. If it's not placed properly, move it to the correct position by hand.
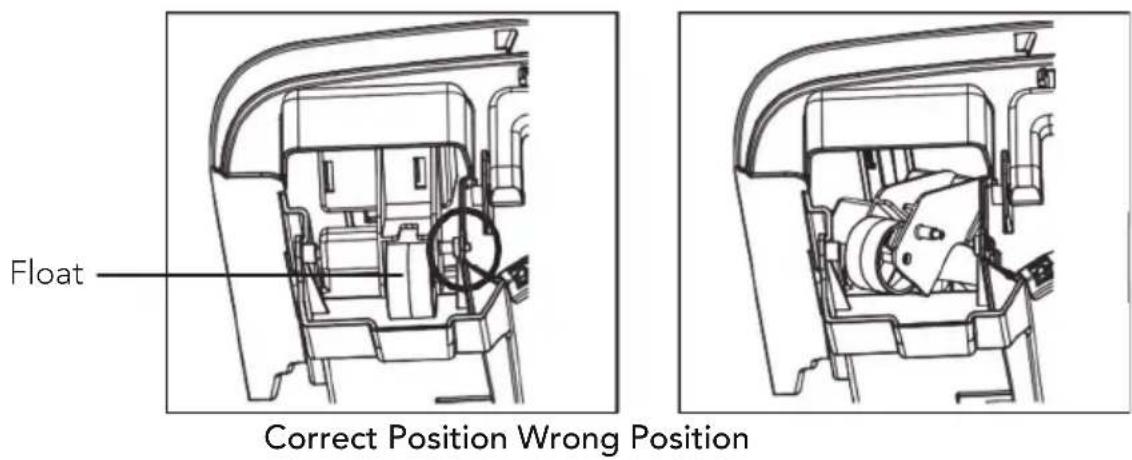
- Replace the bucket as instructed in step 1.
OPERATION METHOD
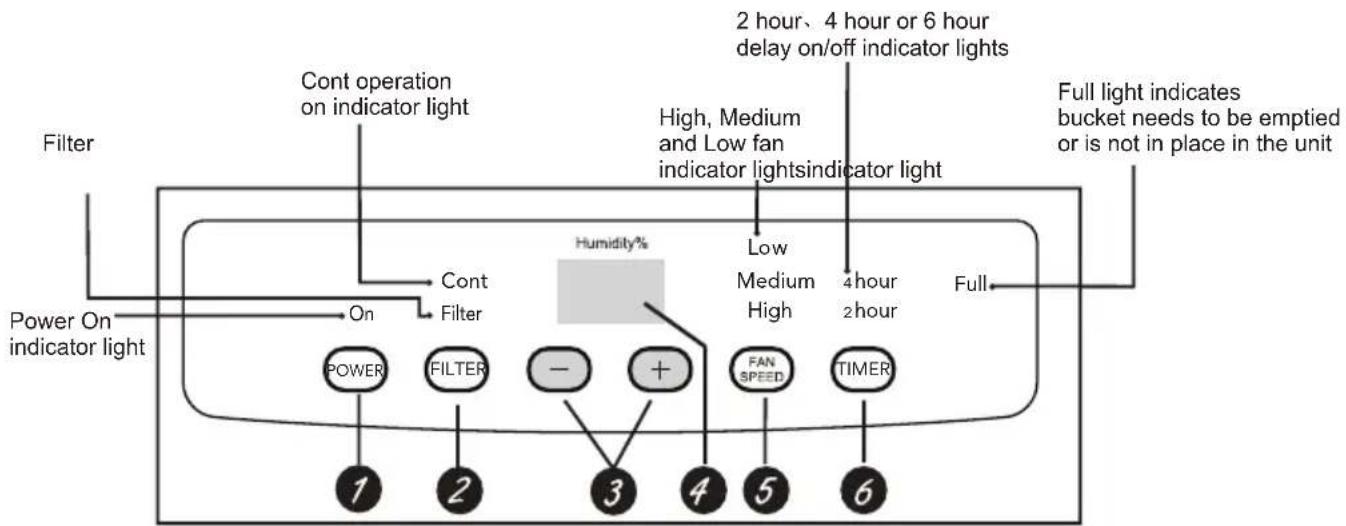
flowchart
graph TD
    A["Filter"] --> B["Power On indicator light"]
    B --> C["On Cont Filter"]
    C --> D["Cont operation on indicator light"]
    D --> E["2 hour, 4 hour or 6 hour delay on/off indicator lights"]
    E --> F["Full light indicates bucket needs to be emptied or is not in place in the unit"]
    F --> G["Full"]
    H["Power On indicator light"] --> I["POWER FILTER"]
    I --> J["1"]
    I --> K["2"]
    L["Cont"] --> M["3"]
    N["High, Medium and Low fan indicator lights"] --> O["Low Medium High"]
    P["4 hour 2 hour"] --> Q["Full"]
    R["FAN SPEED"] --> S["3"]
    T["TIMER"] --> U["4"]
    V["3"] --> W["5"]
    X["6"] --> Y["6"]
Notes:
• Water bucket must be correctly installed for the dehumidifier to operate.
- Do not remove the bucket while unit is in operation.
- If you want to use drain hose to drain water away, please install the hose according to section "Drainage method".
• Each time pressing the effective button on the control panel will give out a "beep" sound.
- When power is connected, power indicator on the control panel will be on and dehumidifier gives out a "beep" sound simultaneously.
Basic Functions of the Buttons
① POWER Button
Press this button to turn on/off dehumidifier,
② FILTER Button
Press this button to turn oft Filter Cleaning Indicator. (When dehumidifier has been operating for 250 hours, Filter Cleaning Indicator will be lit up to remind user of filter cleaning.) The filter should be checked for regular maintenance every two weeks disregarding of use.
③ +/- Button
Under free drying mode press these buttons to adjust set humidity. Invalid under other modes.
- Pressing + button will increase humidity while pressing - button will decrease humidity. The display range of humidity is 35%\~80%. Each pressing will increase/decrease humidity by 5%.
- Continuous Dehumidify Setting: This function can be set by pressing CONTINUOUS button.
Attention: When selecting CO mode, drain hose has to be installed. Otherwise, unit will stop when water bucket is full.
- When setting Timer On or Timer Off, press these buttons to adjust time. For specific details, please refer to Timer Button description below.
- When unit is in operation, holding + and - button simultaneously for 3s can lock buttons. If this function is turned on. Button Locked Indicator will be on and display window shows LC, which will blink for 3 times. Then ambient humidity is displayed again. To turn off this function, hold + and - button simultaneously for 3s and the indicator will be off.
④ Display
Shows the set % humidity level while setting, then shows the actual room % humidity level.
⑤ FAN SPEED Button
Pressing this button can set fan speed circularly as: High, Medium, Low. Corresponding indicator will be on for ejach fan speed.
⑥ TIMER Button
Under ON status, press this button and select 2h timer, 4h timer or 6h timer OFF. Under OFF status, press this button and select 2h timer, 4h timer, 6h timer ON. When setting "2h" or "4h" timer ON/timer OFF, the corresponding timer indicator will be on. When setting "6h" timer ON/timer OFF, these two indicators will be on at the same time.
Other Instructions
1. Alarm Warning
If bucket is full or not locked into place for over 3 min, buzzer will go off for 10s to remind you to empty bucket or put it back into the correct place.
2. Auto Stop
When bucket is full, removed or not placed correctly or the humidity is 5% lower than the set humidity, unit will automatically stop.
3. Memory Function
If power is lost, all of the control settings are remembered. So when power is restored, the unit will start back up in the settings it was in when power was lost.
4. Bucket full light
This indicates that bucket is full or removed or not placed correctly.
5. Clean the Filter On indicator light
When dehumidifier has been operating for 250 hours, filter cleaning indicator will be lit up to remind user of filter cleaning.
6. Low ambient temperatures
Note that the dehumidifying process takes longer at low ambient temperatures. Users are recommended to increase the room temperature for higher (dehumidifying) efficiency.
DRAINAGE OPTION
Option 1 Emptying Manually
NOTICE:
- Do not remove the bucket when unit is in operation or has just stopped. Otherwise it may cause some water to drip on the floor.
-
Do not use the hose if using water bucket to collect water. When the hose is connected, water will be drained out through it instead of into the bucket.
-
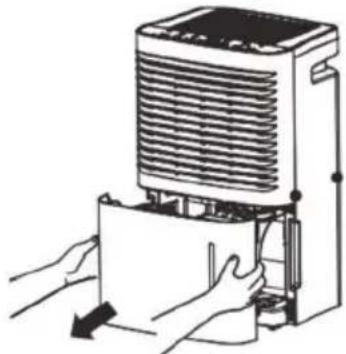
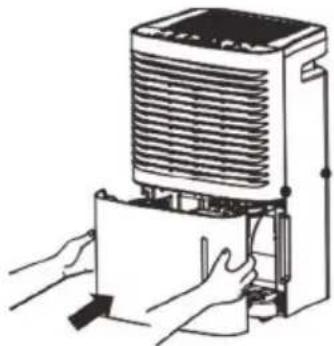
Hold the handles on both sides of the water bucket and pull it out following the arrow direction. (Attention: Pull out the bucket carefully in case the water may spill out from the bucket and onto the floor.)
natural_image
Illustration of hands operating a refrigerant appliance with cooling unit (no text or symbols visible)- Empty the bucket by grasping the handle on the top of bucket with one hand and grasping the bottom of bucket with the other hand.
- Replace bucket in the dehumidifier according to the arrow direction.
natural_image
Illustration of hands operating a refrigerant appliance with a paper holder (no text or symbols visible)Option 2 Gravity Drain Hose
-
Hose is not provided, so user shall prepare it in advance.
-
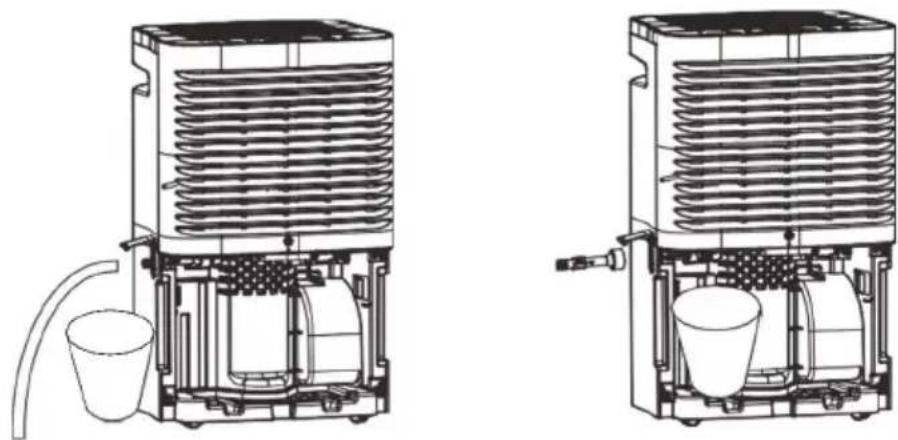
Remove bucket from the unit as instructed. Open the drainage cover and then install the drainage joint on the drainage outlet tightly along the arrow direction.
NOTICE:
The drainage joint is with sealing gasket. Before installing the drainage joint, reinstall the gasket on the drainage joint if it dropped. Otherwise, there will be water leakage phenomenon.
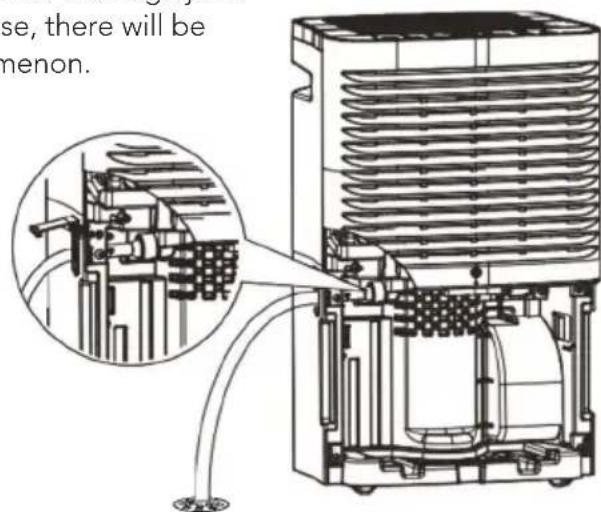
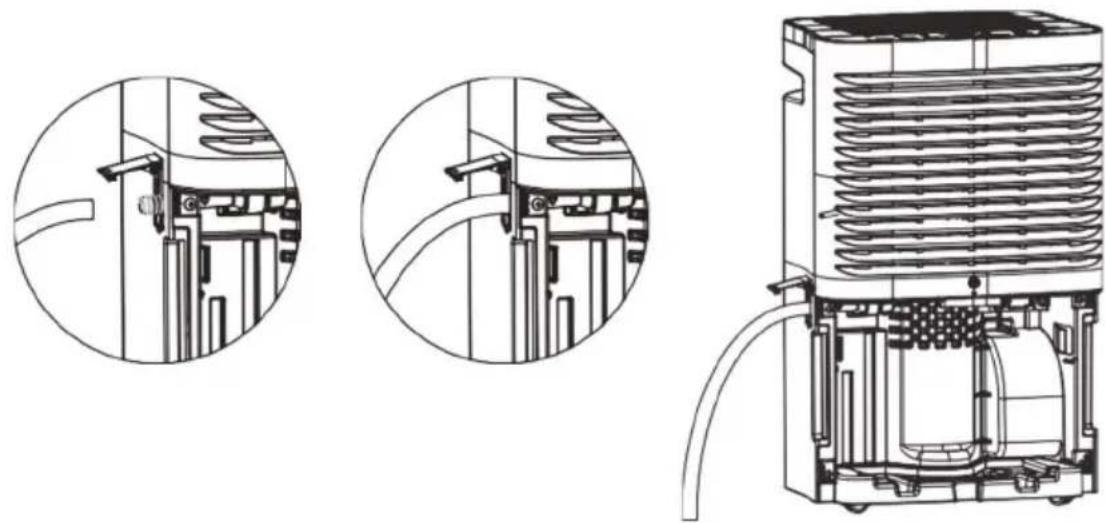
- Insert the drainage pipe into the drainage joint.
natural_image
Technical line drawing of a refrigerant or industrial device showing internal components and external housing (no text or symbols)NOTICE:
Make sure the drain hose goes through the bucket's drain hole and is placed downward. Lead the hose to the floor drain and then cover the hole with a lid. Note that drain hose should not be pressed, otherwise water cannot be drained out.
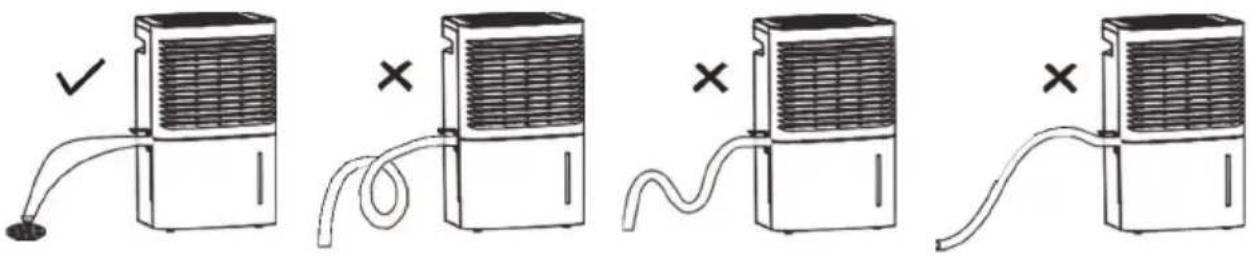
When you want to take off the drain hose and drainage joint, prepare a receptacle to collect water from the nozzle.
natural_image
Technical line drawings of two industrial air purifiers with cooling fans and a bucket (no text or labels)CLEAN AND MAINTENANCE
WARNING:
- Before cleaning, turn oft the dehumidifier and disconnect power. Otherwise it may lead to electric shock.
- Do not wash the dehumidifier with water, or it may lead to electric shock.
- Do not use volatile liquid (such as thinner or gasoline) to clean dehumidifier.
Otherwise it will damage unit's appearance.
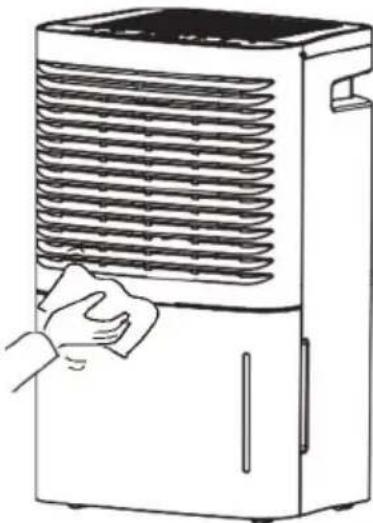
1. Grille and Case
To clean the case:
When there is dust on the case, use soft towel to dust it off; When the case is very dirty (greasy), use mild detergent to clean it.
To clean the grille: Use a dust catcher or brush.
natural_image
Line drawing of a hand cleaning a large industrial air conditioner unit (no text or symbols)2. Water Bucket
Every few weeks, clean the bucket to prevent growth of mold, mildew and bacteria. Use soft brush to clean the bucket and then rinse it.
To remove:
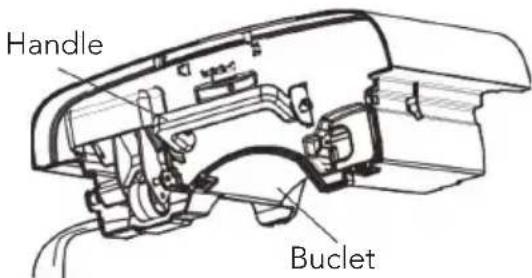
(1) Direct the rotor shaft of handle to the hole of buckle plate. Pull the bucket plate at the handle side by following the arrow direction. Remove the handle. (shown in Fig.1)
(2) Press down 4 buckles around the water bucket. Lift up the drain lid. (shown in Fig.2)
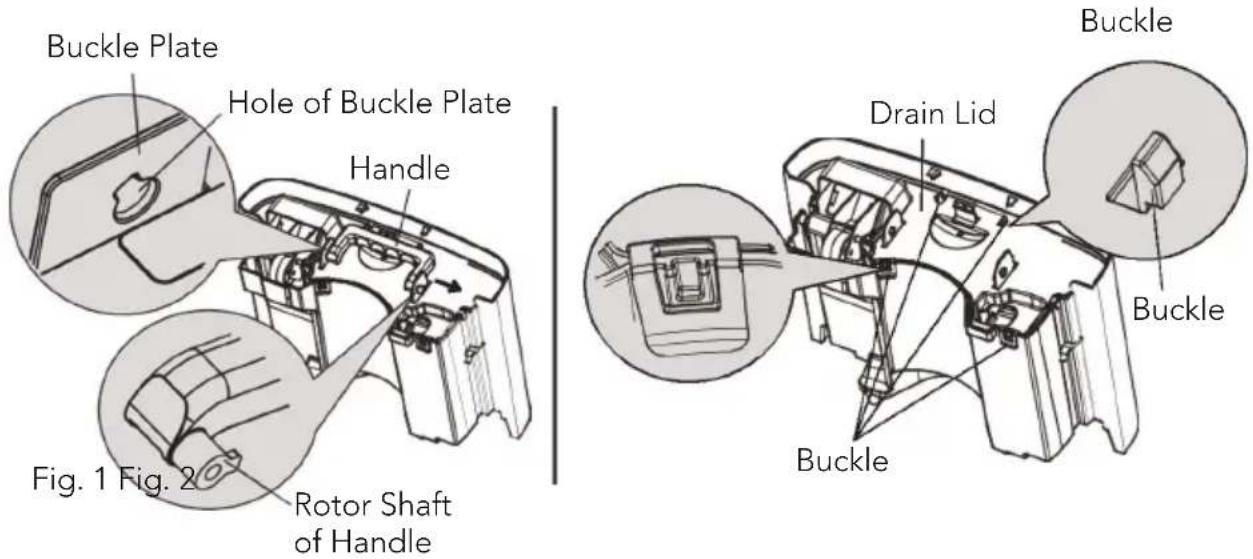
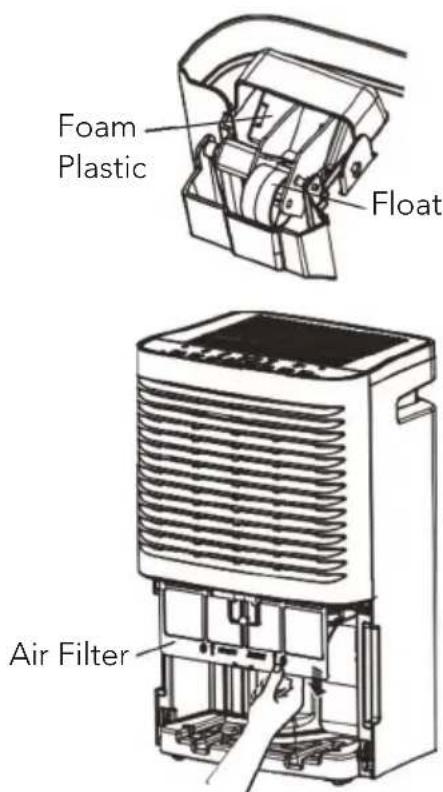
(3) After cleaning, replace the drain lid and handle and make sure the float of water bucket is placed properly. The side with foam plastic should be beneath the drain lid. Do not remove the foam plastic on the float.
3. Air Filter
Dehumidifier will remind you to clean the air filter when it has been operating for 250 hours. If it is used in dusty places, clean the air filter more often.
To remove:
Remove the bucket. Grasp the filter edge, and pull it straight down and out.
To clean:
Clean the filter in warm, soapy water. Rinse it and let the filter dry before replacing it.
WARNING:
- Do not operate the dehumidifier without a filter. Otherwise the evaporator will catch dust and affect unit's performance.
- Do not dry the air filter with fire or electric hair dryer. Otherwise the air filter may be unshaped or caught on fire.
- Don't use dust catcher or brush to clean the air filter. Otherwise the air filter may be destroyed
Check Before Use-season
- Check whether air outlet is blocked.
- Check whether power plug and power socket are in good condition.
- Check whether air filter is clean.
- Check whether drain hose is damaged.
Care After Use-season
- Disconnect power.
- Clean air filter and case.
- Clean dust and obstacle of the dehumidifier.
• Empty the water bucket.
Long-time Storage
If you won't use the dehumidifier tor a long time, we suggest that you follow the steps below in order to maintain the unit in good condition.
- Make sure the bucket is clear of water and drain hose is removed.
- Unplug the dehumidifier and pack the power cord.
- Clean the unit and wrap it well to prevent the gathering of dust.
TROUBLESHOOTING
- Not all the following problems are malfunctions.
| Problem Possible Causes | |
| Dehumidifier is not operating.Controls cannot be set. | Unit is operating in an area where temperature is higher than 35°C or lower than 5°C.Bucket is full. |
| Noise suddenly rises during operation. | Noise will rise if compressor has just started.Power supply problem.Unit is placed on uneven floor. |
| Humidity does not drop. | Area to be dehumidified is too large. The capacity of your dehumidifier may not be adequate.Doors are open.There might be some device producing vapor in the room. |
| Little or no effect in dehumidifying | Room temperature is too low.Humidity level may be improperly set.If unit is operating in a room where temperature is from 5 to 15 °C, it will start to defrost automatically. Compressor will stop for a brief period of time (fan will operate in high fan speed). When unit finishes defrosting, it will be back to normal operation. |
| When first operated, the air emitted has musty-odor. | Due to temperature rising of heat exchanger, the air may have some strange smell at the beginning. |
| Unit has noises. • There might be some noise if unit is operating on wooden floor. | |
| Swooshing sound is heard • Normal. This is the sound of the flow of refrigerant. | |
- Problem of Water Leakage.
| Problem Possible Causes Solution | ||
| When using drain hose, there is water in the bucket. | Examine the drainage joint. Connect the drainage joint well. | |
| Drain hose is not correctly installed. | Clear the obstacle from the drain hose. | |
| Drain hose is not correctly installed. | Remove the drain hose and replace it. Be sure that the hose is correctly installed. | |
- Dehumidifier does not start.
| Problem Possible Causes | Solution | |
| Power indicator is not lit when power is connected. | Power is not supplied for the dehumidifier or the power plug is not well inserted. | Check if power is lost. If yes, wait for the power to restore.If not, check whether the power circuit or power socket has been damaged.Check whether power plug is loosen.Check whether power cord is damaged. |
| Fuse is blown. Replace the fuse. | ||
| Bucket full indicator is lit up. | Bucket is not properly placed.Water is full in the bucket.Bucket has been removed. | Empty the bucket and replace it. |
| Unit can function normally but it can not start up. | Humidity is set too high. | If you want the air drier, press - button to lower the figure or CO button for unit to dehumidify continuously. |
- Dehumidifier does not dry air as intended.
| Problem Possible Causes | Solution | |
| Bad dehumidifying performance. | Check whether there is any obstacle around the unit. | Make sure there is no curtain shutter or furniture that blocks the dehumidifier. |
| Air filter is dusty and blocked. Clean the filter. | ||
| Doors and windows are left open. | Make sure all doors and windows and other opening to the outside have been closed. | |
| Room temperature is too low. | Warm temperature is good for dehumidification. Low temperature will reduce unit's working effect. This unit should be working in a place where temperature is above 5°C. | |
Malfunction Codes
- Unit's Malfunction Codes.
| No. | Malfunction Name | Display Code | Unit's Condition Possible Causes |
| Display Window | |||
| 1 | Ambient Temperature Sensor Malfunction | F1 | • Ambient temperature sensor is loosen or is poorly connected with the terminal of display board. |
| • Some element of display board may have been put upside down and cause short circuit. | |||
| • Ambient temperature sensor is damaged. | |||
| • Display board is damaged. | |||
| 2 | Tube Temperature Sensor Malfunction | F2 | • Temperature sensor on the evaporator is loosen or is poorly connected with the terminal of display board. |
| • Some element of display board may have been put upside down and cause short circuit. | |||
| • Temperature sensor on the evaporator is damaged. | |||
| • Display board is damaged. | |||
| 3 | Humidity Sensor Malfunction | L1 | • Humidity sensor is short-circuited.• Humidity sensor is damaged.• Display board is damaged. |
| 4 | Freon-lacking protection | F0 | • Refrigerant is leaking.• System is blocked |
| 5 | High-temperature over load protection | H3 | • Ambient operation condition is bad.• The evaporator and condenser are blocked with filth.• The system is abnormal. |
Guarantee
Wilfa issues a 5 years guarantee on this product from the day purchase is done.
Guarantee covers production failure or defects that arise during guarantee period. Buying receipt of the product is proof of guarantee. When claiming guarantee, the shop where the product is bought is to be contacted.
Guarantee is valid only for products that is bought and used in private household.
Guarantee is not valid if the product is used commercially. Guarantee is not valid if the product is misused, used by negligence, if not following instructions given by Wilfa, if modified or if unauthorized reparation is done. Guarantee is also not valid for normal wear of the product, misuse, lack of maintenance, use of wrong electrical voltage or:
- Overloading of product
- Parts which is normally worn
- Filter, battery or other parts you can expect being replaced regularly. These instructions are also available at our website www.wilfa.com
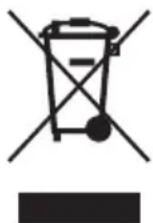
This marking indicates that this product should not be disposed with other household wastes throughout the EU. To prevent possible harm to the environment or human health from un-controlled waste disposal, recycle it responsibly to promote the sustainable reuse of material resources. To return your used device, please use the return and collection systems or contact the retailer where the product was purchased. They can take this product for environmental safe recycling.

- Wilfa Dry L
- ⑤ VIFTEHASTIGHET-knapp
- OBS!
- RENGJ∅RING OG VEDLIKEHOLD
- ADVARSEL:
- Vannbeholder
- Alternativ 2 Dräneringsslang
- RENGÖRING OCH UNDERHÅLL
- WARNING:
- Vattenbehållare
- BEMÆRK:
- RENG∅RING OG VEDLIGEHOLDELSE
- Vandbeholder
- PAINIKKEIDEN TOIMINNOT
- ① Virtapainike
- HUOMIO:
- PUHDISTUS JA HUOLTO
- VAROITUS:
- Vesisäiliö
- SAFETY PRECAUTIONS
- OPERATION AREA
- NOTICE:
- PARTS NAME
- OPERATION METHOD
- Notes:
- Basic Functions of the Buttons
- ① POWER Button
- ② FILTER Button
- ③ +/- Button
- ④ Display
- ⑤ FAN SPEED Button
- ⑥ TIMER Button
- Other Instructions
- Alarm Warning
- Auto Stop
- Memory Function
- Bucket full light
- Clean the Filter On indicator light
- Low ambient temperatures
- DRAINAGE OPTION
- Option 1 Emptying Manually
- Option 2 Gravity Drain Hose
- CLEAN AND MAINTENANCE
- Grille and Case
- Water Bucket
- Air Filter
- Check Before Use-season
- Care After Use-season
- Long-time Storage
- TROUBLESHOOTING
- Malfunction Codes
- Guarantee
Brand : WILFA
Model : Dry L WDH-20
Category : Dehumidifier