
Tørr S DH-18 - Dehumidifier WILFA - Free user manual and instructions
Find the device manual for free Tørr S DH-18 WILFA in PDF.


| Product Type | Dehumidifier |
| Brand | Wilfa |
| Model | Tørr S DH-18 |
| Dimensions (W x D x H) | 310 x 230 x 535 mm |
| Weight | 11.6 kg |
| Power Supply | 220-240 V / 50 Hz |
| Power Consumption (Dehumidifying) | 360 W |
| Power Consumption (Heating) | 530 W |
| Dehumidifying Capacity | 18 litres/day (at 30°C, 80% RH) |
| Water Tank Capacity | 3.0 litres (auto shutdown at 2.70 litres) |
| Tank Full Indicator | Red light and 15 beeps |
| Adjustable Humidity Range | 40% to 80% RH (in 5% steps) |
| Timer | 24-hour programmable on/off |
| Fan Speeds | High and low |
| Heating Function | Yes, additional heating element |
| Low Temperature Operation | Yes, with automatic defrost (cycles vary by temperature) |
| Operating Temperature Range | +5 °C to +35 °C |
| Portable | Yes, with wheels |
| Energy Efficient | Low power consumption |
| Continuous Drainage | Yes, via included pipe |
| Air Filter Cleaning | Vacuum or wash with warm water |
| Storage | Empty tank, fold cord, clean filter, store dry |
| WEEE Compliance | Yes, separate disposal required |
Frequently Asked Questions - Tørr S DH-18 WILFA
User questions about Tørr S DH-18 WILFA
0 question about this device. Answer the ones you know or ask your own.
Ask a new question about this device
Download the instructions for your Dehumidifier in PDF format for free! Find your manual Tørr S DH-18 - WILFA and take your electronic device back in hand. On this page are published all the documents necessary for the use of your device. Tørr S DH-18 by WILFA.
USER MANUAL Tørr S DH-18 WILFA
natural_image
Exterior view of a modern stainless steel modular device with three wheels (no visible text or symbols)Wilfa Tørr S
Dehumidifi er
Bruksanvisning
Bruksanvisning
Operating Instructions
DH-18


LES ALLE ANVISNINGER F∅R BRUK
LÄS IGENOM ALLA INSTRUKTIONER INNAN PRODUKTEN ANVÄNDS
LÆS ALLE VEJLEDNINGER INDEN BRUG
LUE OHJEET HUOLELLISESTI ENNEN KÄYTTÖÄ
READ ALL INSTRUCTIONS BEFORE USING
Sikkerhetsadvarsler
natural_image
Row of eight simple icons including sun, home, battery, and crown (no text or labels)Indikatorlys

Indikatorlys for full tank
24 timers timerinnstilling.
natural_image
Diagram of a device with red arrows indicating direction, no text or symbols presentnatural_image
Diagram of a mechanical component with red arrow indicating downward motion and falling droplets (no text or symbols)MERK
natural_image
Diagram of a device with red arrows indicating directional movement or force, no visible text or symbolsnatural_image
Diagram of a structural frame with red arrows indicating direction, no text or symbols presentnatural_image
Illustration showing a hand pouring liquid into a solar panel and another holding a tilted rectangular object (no text or symbols)natural_image
Diagram of a structural frame with red arrows indicating direction, no text or symbols presentP. 10
natural_image
Technical line drawing of a mechanical device with attached cable and housing (no text or symbols)natural_image
Row of eight simple icons including sun, home, grid, alarm, power, and crown (no text or labels)Indikeringslampa

natural_image
Diagram of a device with red arrows indicating direction, no text or symbols presentnatural_image
Diagram of a mechanical component with red arrow indicating downward motion and blue droplets at base (no text or symbols)OBS!
natural_image
Diagram of a device with red arrows indicating direction, no visible text or symbolsnatural_image
Diagram of a structural frame with red arrows indicating direction, no text or symbols presentnatural_image
Illustration of a faucet spraying water into a solar panel, with another hand holding a plug (no text or symbols)natural_image
Diagram of a structural component with red arrows indicating direction, no text or symbols presentP. 10
natural_image
Technical line drawing of a mechanical device with attached components (no text or symbols)natural_image
Row of eight simple icons including sun, home, grid, power button, and crown (no text or labels)Indikatorlys

Indikatorlys for fuld beholder
natural_image
Diagram of a device with red arrows indicating motion or force, no visible text or symbols2 Tøm afl øbsvandet.
natural_image
Diagram of a mechanical component with a red arrow indicating downward motion and falling droplets (no text or symbols)BEMÆRK!
natural_image
Diagram of a mechanical device with red arrows indicating direction (no text or symbols)Løbende vandtømning
natural_image
Diagram of a structural frame with red arrows indicating direction, no text or symbols presentnatural_image
Illustration showing a hand pouring liquid into a water droplet on a solar panel, with another hand holding a tilted object (no text or symbols)natural_image
Diagram of a building interior with red arrows indicating direction, no text or symbols presentS. 10
Opbevaring af affugteren
natural_image
Technical line drawing of a mechanical device with attached components (no visible text or symbols)natural_image
Row of eight simple icons including sun, home, grid, power button, and crown (no text or labels)Merkkivalot

natural_image
Diagram of a device with red arrows indicating motion or force, no visible text or symbolsnatural_image
Diagram of a mechanical component with a red arrow indicating downward motion and falling droplets (no text or symbols)HUOMAA
natural_image
Diagram of a mechanical device with red arrows indicating direction, no visible text or symbolsnatural_image
Diagram of a building interior with red arrows indicating movement or force, no text or symbols presentnatural_image
Illustration of a faucet spraying water into a solar panel, with another hand holding a curved object above it (no text or symbols)natural_image
Diagram of a building interior with red arrows indicating direction, no text or symbols presentS. 10
natural_image
Technical line drawing of a mechanical device with a coiled cable and control panel (no text or symbols)When using the unit, please observe the following safety precautions:
- Unplug the powder cord before cleaning or storing.
- Do not submerge the unit in water or place it close to water.
- Do not put the unit close to heat-generating devices or near fl ammable and hazardous materials.
- Do not put your fingers or any objects into the intake or discharge ducts.
- Do not sit or stand on the unit.
- Empty out the water that collects in the tank as necessary.
- Do not use the dehumidifi er in a closed area such as inside a cupboard as it may cause a fi re.
- Install the drain pipe so that it runs downward to ensure that condensed water can be drained continuously.
- If the supply cord is damaged, it must be replaced by the manufacturer, its service agent or similarly qualified persons in order to avoid a hazard.
- This appliance can be used by children aged from 8 years and above and persons with reduced physical, sensory or mental capabilities or lack of experience and knowledge if they have been given supervision or instruction concerning use of the appliance in a safe way and if they understand the hazards involved. Children shall not play with the appliance. Cleaning and user maintenance shall not be made by children without supervision.
- Keep instructions for future reference.
Functions
Powerful dehumidifying effect
Taking advantage of refrigeration technology, the dehumidifier removes superfluous moisture from the air to decrease the humidity in the room and keep indoor air dry and comfortable.
Portable dehumidifi er
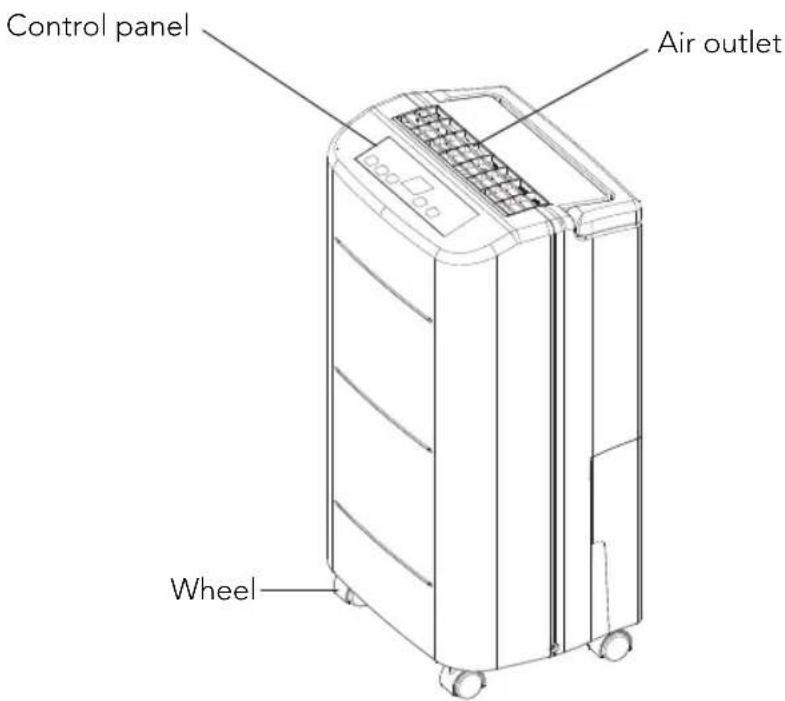
The dehumidifi er is designed to be compact and lightweight. Wheels on the base of the unit make it easy to move from room to room.
Low temperature operation with automatic defrost
When the unit is running at a room temperature of between +5 °C and +12 °C, it will stop to defrost every 30 minutes.
When the unit is running at a room temperature of between +12 °C and +20 °C, it will stop to defrost every 45 minutes.
Adjustable humidistat
Adjust the desired humidity level using the humidistat.
Timer on/off
Programme the unit to switch on and off automatically.
Energy effi cient
The unit has a low power consumption.
Specifications
| Model | DH-18 |
| Power supply | 220-240V / 50Hz |
| Capacity | 18 litres/day |
| Power consumption | 360 W |
| Heating power consumption | 530 W |
| Water tank capacity | 3.0 litres(automatic shutdown at 2.70 litres) |
| Weight (kg) | 11.6 |
| Dimensions (W x D x H) | 310 x 230 x 535 mm |
The dehumidifying capacity is rated at a room temperature of 30 °C with a relative humidity of 80%.
Product diagram
Front
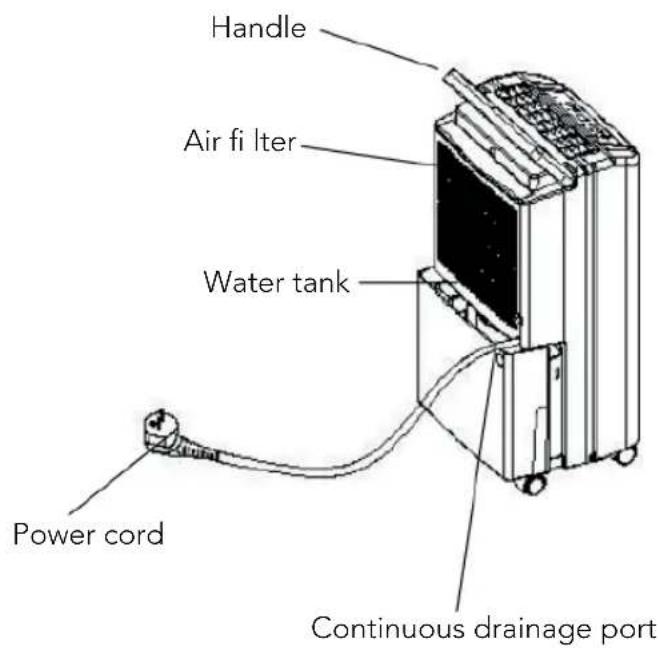
Back
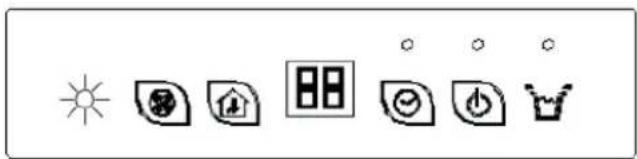
Directions for use
natural_image
Row of eight simple icons including sun, battery, home, grid, alarm, power, and crown (no text or symbols)Indicator lights

Tank full indicator light
The tank full indicator light turns red when the drainage tank is full. If this light is on, empty out the water in the drainage tank and ensure that the tank is positioned properly.


Power indicator light
The power indicator light turns green when the unit is plugged in, regardless of whether or not the unit is operating.


Timer indicator light
The timer indicator light turns green when you set a time at which the unit is to switch on or off automatically.

Adjustable humidity indicator light (humidistat)
The adjustable humidity indicator light turns green when you set the humidity level.


Fan speed indicator light
The right fan indicator light (above the small fan icon) turns green when you set the unit to run at low fan speed.
The left fan indicator light (above the large fan icon) turns red when you set the unit to run at high fan speed.

Heat indicator light
Heat indicator light - turns green when this function is selected.

Humidity level and timer two-digit display
The two-digit indicator has three functions:
- When the unit is plugged in, it will show the humidity level in the room.
- When you set the humidity, it will show the humidity that you have selected.
- When you set the unit to switch on and off at certain times, the times are shown here.
- When the ambient humidity is less than 35%, it will read "LO".
- When the ambient humidity is greater than 95%, it will read "HI".
P.6
Push button functions

Power button
Press the button once to start. The default humidity level is 60%. Press the button again to stop the unit.

Timer push button
24-hour timer setting.
Press the button to set times when the unit will turn on and off. To delete the timer settings, press this button to adjust the time to 00.

Adjustable humidity push button (humidistat)
Press this button to set the desired humidity level in the room. This can be set to 60%, 65%, 70%, 75%, 80%, 40%, 45%, 50%, 55% and 60%. When the relative humidity in the room is lower than the selected humidity, the unit will stop automatically.

Fan speed push button
Press the button to set the desired fan speed. It can be set to high or low speed.
Heating push button
Press the button to switch on the additional heating element. Adding extra heat to the room will reduce the humidity more quickly.
Use
1 Turning the unit on:
When the unit is plugged in, a buzzer will beep. The humidity indicator will show the default humidity level of 60% at low fan speed.
Never stop the unit by pulling out the power cord.
Press to start.
2 Open the air outlet manually
Before starting the unit, ensure that the air outlet is open. If the air outlet is closed, the unit may overheat.
3 Turning the unit off:
Press ☐ to stop dehumidifi cation.
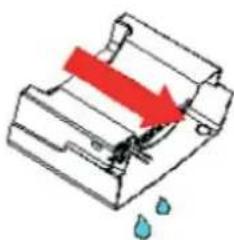
Emptying the drainage water
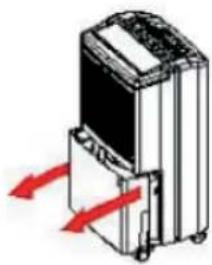
When the drainage tank is full, the tank full indicator light will turn on, operation will stop automatically and the buzzer will beep 15 times to alert the user that the water needs to be emptied from the drainage tank.
Emptying the drainage tank
1 Lightly press on the sides of the tank with both hands and pull the tank out carefully.
natural_image
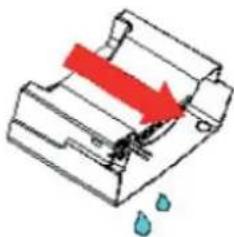
Diagram of a device with red arrows indicating motion or force, no visible text or symbols2 Empty out the drainage water.
natural_image
Diagram of a mechanical component with red arrows indicating direction and blue droplets at the base (no text or symbols)NB
Do not remove the fl oat from the water tank. The water full sensor will no longer be able to measure the water level accurately without the fl oat and water may leak from the water tank.
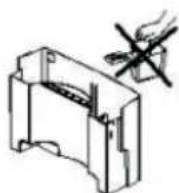
2 If the drainage tank is dirty, wash it with cold or lukewarm water. Do not use detergent, scouring pads, chemically treated dust cloths, gasoline, benzene, thinner or other solvents, as these may scratch and damage the tank and cause water leakage.
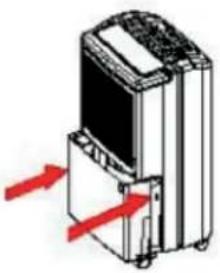
3 When replacing the drainage tank, press the tank firmly into place with both hands. If the tank is not positioned properly, the "TANK FULL" sensor will be activated and the dehumidifier will not operate.
natural_image
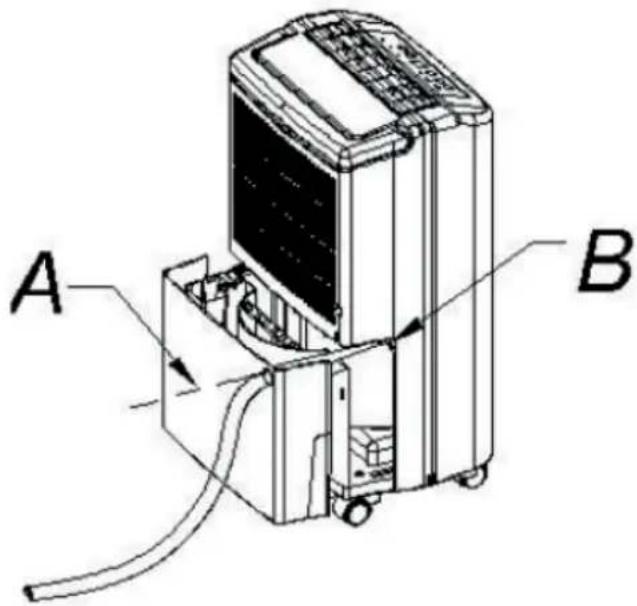
Diagram of a mechanical device with red arrows indicating motion or force direction (no text or symbols)Continuous water drainage
The unit features a continuous drainage port. Using the enclosed pipe, the water in the drainage tank can be drained continuously through this port so that the unit is drained continuously.
Maintenance
Cleaning the dehumidifi er
To clean the unit casing
Wipe with a soft, damp cloth.
To clean the air filter
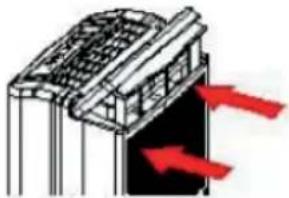
1 Remove the air filter.
natural_image
Diagram of a structural frame with red arrows indicating direction, no text or symbols present2 Clean the air filter.
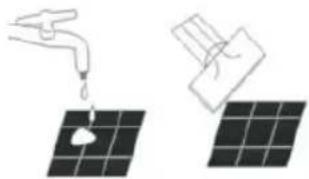
Run a vacuum cleaner lightly over the surface of the air fi liter to remove dirt. If the air fi liter is exceptionally dirty, wash it with warm water and a mild cleaning agent and dry thoroughly.
natural_image
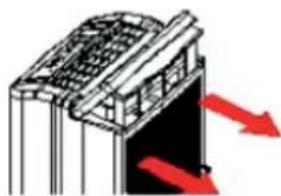
Illustration of a faucet spraying water onto a solar panel, with another hand holding a curved object above (no text or symbols)3 Put the air filter back. Insert the filter into the unit.
natural_image
Diagram of a structural frame with red arrows indicating direction, no text or symbols presentP. 10
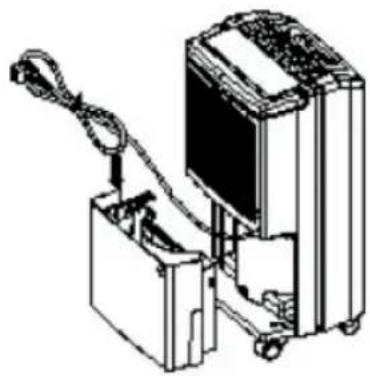
Storing the dehumidifi er
When the unit is not to be used for a long period of time and you want to store it, please proceed as follows
1 Empty out any water in the drainage tank.
2 Fold up the power cord and put it in the water tank.
natural_image
Technical line drawing of a mechanical device with attached components (no text or symbols)3 Clean the air filter.
4 Store in a dry place.
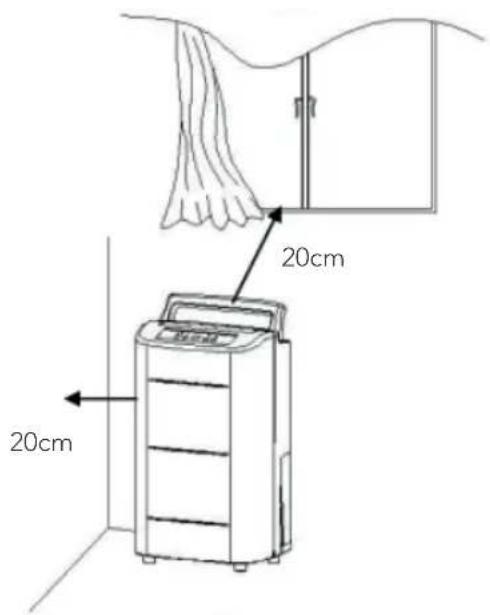
Clearance
Maintain the minimum clearance around the dehumidifi er when the unit is operating as shown in the illustration on the right.
Troubleshooting
If one of the following problems occurs, please check below before calling customer service.
| Problem Possible cause Solution | ||
| The unit is not working | Has the power cord become disconnected? | Plug the power cord into the socket. |
| Is the tank full indicator light fl ashing? (The tank is full or positioned incorrectly.) | Empty out the water from the drainage tank and then replace | |
| Is the temperature in the room above 35 °C or below 5 °C? | The safety function is activated and the unit cannot be started. | |
| The dehumidifying function is not working | Is the air fi lter clogged? | Clean the air fi lter as described under "Cleaning the dehumidifi er". |
| Is the intake duct or discharge duct blocked? | Remove the blockage from the discharge or intake duct. | |
| No air is discharged | Is the air fi lter clogged? | Clean the air fi lter as described under "Cleaning the dehumidifi er". |
| The unit is making a noise | Is the unit tilted or unsteady? | Move the unit to a level, stable surface. |
| Is the air fi lter clogged? | Clean the air fi lter as described under "Cleaning the dehumidifi er". | |
Under the Waste Electrical and Electronic Equipment Directive (WEEE), such waste must be collected separately and processed. If in future you need to discard this product, please do not throw it out with your normal rubbish. Please send this product to a collection point where one is available.

in homes since 1948

- Wilfa Tørr S
- Sikkerhetsadvarsler
- Indikatorlys
- MERK
- 10
- Indikeringslampa
- OBS!
- Indikatorlys for fuld beholder
- BEMÆRK!
- Løbende vandtømning
- 10
- Opbevaring af affugteren
- Merkkivalot
- HUOMAA
- Functions
- Powerful dehumidifying effect
- Portable dehumidifi er
- Low temperature operation with automatic defrost
- Adjustable humidistat
- Timer on/off
- Energy effi cient
- Product diagram
- Directions for use
- Indicator lights
- Tank full indicator light
- Power indicator light
- Timer indicator light
- Adjustable humidity indicator light (humidistat)
- Fan speed indicator light
- Heat indicator light
- Humidity level and timer two-digit display
- Push button functions
- Power button
- Timer push button
- Adjustable humidity push button (humidistat)
- Fan speed push button
- Use
- Turning the unit on:
- Open the air outlet manually
- Turning the unit off:
- Emptying the drainage water
- Emptying the drainage tank
- NB
- Continuous water drainage
- Maintenance
- Storing the dehumidifi er
- Clearance
- Troubleshooting
Brand : WILFA
Model : Tørr S DH-18
Category : Dehumidifier