JSM1018 - Jigsaw Ferm - Free user manual and instructions
Find the device manual for free JSM1018 Ferm in PDF.


| Product type | Jigsaw |
| Brand | Ferm |
| Model | JSM1018 |
| Supply voltage | 230 V |
| Frequency | 50 Hz |
| Power consumption | 750 W |
| Protection class | Class II (double insulation) |
| IP protection rating | IP20 |
| No-load speed | 800 - 3000/min |
| Max cutting thickness (wood) | 110 mm |
| Blade stroke length | 20 mm |
| Max cutting angle | 45° |
| Net weight | 2,6 kg |
| Sound pressure level (Lpa) | 89,0 dB(A) |
| Sound power level (Lwa) | 102,0 dB(A) |
| Vibration level | 14,56 m/s² |
| Box contents | Jigsaw, 3 saw blades, Allen key, parallel guide, vacuum adapter, manual |
| Blades supplied | Coarse teeth (wood), medium teeth (wood), fine teeth (plastic, aluminium, steel) |
| Speed control | Electronic with rotary knob (positions 1 to 6) |
| Pendulum motion | 3 adjustable levels (0, I, II, III) |
| Laser pointer | Yes, adjustable |
| Vacuum connection | Yes, with included adapter |
| Parallel guide | Yes, included |
| Maintenance and cleaning | Clean with a soft, damp cloth; do not use solvents; keep ventilation slots clean |
| Safety | Switch lock, double insulation, safety switch, blade guard |
| Spare parts and repairability | Contact service center; parts diagram available at the end of the manual |
| Warranty | See attached warranty certificate |
Frequently Asked Questions - JSM1018 Ferm
User questions about JSM1018 Ferm
0 question about this device. Answer the ones you know or ask your own.
Ask a new question about this device
Download the instructions for your Jigsaw in PDF format for free! Find your manual JSM1018 - Ferm and take your electronic device back in hand. On this page are published all the documents necessary for the use of your device. JSM1018 by Ferm.
USER MANUAL JSM1018 Ferm
GB Subject to change
natural_image
Close-up of a hand using a tool to adjust or install a mechanical component (no visible text or symbols)Fig. 2a
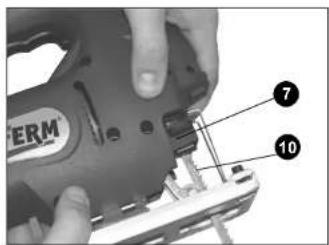
Fig. 2b

Fig. 3a

Fig. 3b

02 Ferm Ferm 119
Spare parts list
No. Description Position
| 408794 Pendulum switch 1 | ||
| 407955 Roller complete 3 until 8, 10, 20, 21 | ||
| 408790 Carbon brush set 13 | ||
| 408791 Stator 15 | ||
| 800607 Bearing 607 16 | ||
| 408792 Rotor 17 | ||
| 800627 Bearing 627 18 | ||
| 403816 Big gear 24 | ||
| 408793 Speed control 46 | ||
| 407961 Switch 48 | ||
| 407962 | Dust collector adapter | 53 + 55 |
| 407847 Parallel guide | 57 | |

Fig. 4

Fig. 5

Fig. 6

natural_image
Close-up of hands holding a cylindrical object with labeled points A and B (no text or symbols beyond labels)Fig.7
natural_image
Mechanical assembly diagram showing a cutting tool interacting with a bracket and metal component (no text or symbols visible)Fig. 8

Fig. 9

natural_image
Close-up of a mechanical component with numbered annotation (14) and arrows pointing to features, no readable text or symbols present.Fig. 10
Ferm 03118 Ferm
JIGSAW
The numbers in the following text correspond with the pictures at page 2 - 3.

Read this manual carefully, before using the machine. Ensure that you know how the machine works, and how it should be operated. Maintain the machine in accordance with the instructions, and make certain that the machine functions correctly. Store this manual and other enclosed documentation with the machine.
Applications
The jigsaw can be used to cut workpieces of various materials (wood, aluminium, plastic, metal etc.) precisely to size and in any desired shape.
Contents
- Machine information
- Safety instructions
- Assembly instructions
- Operation
- Maintenance
1. MACHINE INFORMATION
Technical specifications
| Voltage 230 V~ | |
| Frequency 50 Hz | |
| Input power 750 W | |
| IP Class IP20 | |
| Tool Class II, double insulated | |
| Speed, no load 800-3000/min | |
| Max. cutting capacity wood 110 mm | |
| Max. cutting stroke 20 mm | |
| Cutting angle | 0 - 45° |
| Machine weight | 2.6 kg |
| Lpa Sound pressure level | 89.0 dB(A) |
| Lwa Sound power level | 102.0 dB(A) |
| Vibration | 14.56 m/s ^2 |
Package contents
1 Jigsaw
3 Saw blades
1 Allen key
1 Parallel saw guide
1 Vacuum cleaner adapter
1 User manual
1 Warranty card
1 Safety instructions
Check the machine and accessories for transport damage.
Product information
Fig. 1 + 2b
- Speed control
- Interlocking knob
- Switch
- Connection point vacuum cleaner
- Allen key
- Bottom plate
- Saw buckle
- Pendulum
- Guard
- Saw blade
- Laser switch
2. SAFETY INSTRUCTIONS
In this manual and/or on the machine the following symbols are used:

Read the users manual.

In accordance with essential applicable safety standards of European directives.

Class II machine - Double insulation - You don't need any earthed plug.

Denotes risk of personal injury, loss of life or damage to the tool in case of non-observance of the instructions in this manual.

Denotes risk of electric shock! Always check that the power supply corresponds to the voltage on the rating plate.

Immediately unplug the plug from the mains electricity in the case that the cord gets damaged and during maintenance

Caution! Laser beam! Never look into the light beam and never aim the laser at a person when it is switched on.

The number of revolution of the machine can be electronically set.

Dust collection

Wear a dust mask. Working with wood, metals and other materials may produce dust that is harmful to health. Do not work with material containing asbestos!

Hard materials such as steel, aluminium, plastic.

Soft materials such as wood.

Accuracy.

Faulty and/or discarded electrical or electronic apparatus have to be collected at the appropriate recycling locations.
Special safety instructions
Before using the appliance:
- Check the following points:
- Does the voltage of the motor (230 V) correspond with the mains voltage?
- Are the feeder cable and plug in good condition: sturdy, without loose bits or damage?
- Has the saw blade lost any teeth and is it showing cracks or fractures?
- If so, replace the saw blade immediately.
• Is there enough room under the workpiece so that the saw blade does not come into contact with the floor or work table as it moves up and down?
- Do the teeth of the saw blade point upwards?
• Always wear protective goggles when using the appliance.
- Maintain the appliance carefully.
- Do not use the appliance in a wet environment.
- Do not use the appliance for material which contains asbestos.
- Never leave the jigsaw unattended.

Check that the switch is not interlocked in the 'On' position
Using the appliance
- Clamp the workpiece that you will be sawing in firmly into place.
- Remove any wood residue that is near or stuck to the surface of the saw blade; do not use your hand for this. Switch the appliance off before removing any residue!
• Always switch the jigsaw on in idle, i.e. switch the jigsaw on before bringing it into contact with the workpiece.
- When sawing the wood watch out for knots, nails, cracks and/or dirt deposits.
CE KONFORMITETSERKLÆRING (DK)
CEO Ferm BV Quality Manager Ferm Global
These can cause the saw blade to jam dangerously. Also watch out for this with waste wood. This often requires less careful sawing, so there is a danger that you may not be quite so careful about watching out for irregularities in the wood.
- Do not saw workpieces that are thicker than the length of the saw blade.
- Do not touch metal parts of the jigsaw when sawing in walls or floors in which there could be electricity cables. Hold the jigsaw tightly with both hands on the plastic grip so that you do not touch parts that could become live if you accidentally saw through an electricity cable.
- When you have finished sawing, switch off the appliance first and wait until the saw blade comes to a standstill before removing it from the workpiece.
- Do not use long extension cables.
- Keep the guard in place while the jigsaw is in use.
Turn the appliance off immediatey in the event of:
- A faulty mains plug, mains flex or flex damage;
• A faulty switch; - Sparking in the carbon brushes or ring fire in the commutator;
- Smoke or smell from scorched insulation.
Safety tips for the laser beamer
- Never look into the light beam of the laser.
- Never point the light beam of the laser at humans or animals.
- Do not point the light beam of the laser at strongly reflecting material. Hazard from reflected light.
- Only have repairs made to the laser beamer by qualified personnel / professional repair specialists.
- Do not insert any hard objects into the laser optics.
- Clean the laser optics with a soft, dry brush.
Electrical safety

Always check that the mains voltage is the same as on the type plate of the machine.

The machine is double insulated; therefore, no earth connection is required.
Replacement of powercords or plugs
Immediately dispose of old cords and plugs once they have been replaced. It is dangerous to plug a loose power cord into a mains power socket.
Use of extension leads
Only ever use approved extension leads that are suitable for the power rating of the machine. The minimum core thickness is 1.5 mm^2 . Whenever using a reel extension lead, always fully unroll the lead.
3. ASSEMBLY INSTRUCTIONS
Selecting the saw blade
The jigsaw is supplied with 3 saw blades, each with different teeth. the profile and the teeth vary according to the material that you want to saw. A fine tooth will give you a smooth and precise saw cut.
Use a narrow profile if you want to saw curves or if you are going to saw figures. The maximum saw capacity in wood is 70mm with the enclosed saw blades. With special saw blades, this machine can saw work pieces till 110mm . To select the right saw, proceed as follows:
- First of all try a saw blade with coarse teeth.
- If you don't get a smooth and precise saw cut, try a saw blade with a finer tooth.
- For plastic, aluminium and steel always use a saw blade with a very fine tooth.
In general you will work faster but less precisely with a coarse tooth than with a fine tooth. For an optimum result always make sure the saw blade is sharp.
The jigsaw is suitable for all commercially available saw blades).
| Saw blade | Type of workpiece |
| Coarse Wood | |
| Medium Wood | |
| Fine Plastic, aluminium, steel | |
| Very fine Cutting curves (wood) |
Assembling saw blade
Fig. 2a + 2b

Before assembling the saw blade check that the mains plug has been removed from the socket.
Replacing/inserting the saw blade:
• Pull the lever (7) upwards
- Insert the saw blade (teeth in cutting direction) into the stroke rod until it latches. While inserting the saw blade, pay attention that the back of the saw blade is positioned in the groove of the guide roller.
- Release the lever; the saw blade (10) is locked.
Ejecting the saw blade:
- To eject the saw blade pull the lever upwards and at the same time remove the saw blade out of the machine.
Adjusting the bottom plate
Fig. 3a + 3b
Adjust the angle of the bottom plate (6) as follows:
A. Loosen the socket head screws (12) with the Allen key supplied.
B. Pull the bottom plate back slightly to unlock it.
C. Turn the bottom plate to the right or left in the desired sawing angle.
You can read this on the protractor (13). The maximum sawing angle is 45^ .
D. Push the bottom plate forward again to interlock it.
E. Tighten the socket head screws (12) again.
4. OPERATION
Operation
Fig. 4
Press the switch in to put the jigsaw into operation. The switch can be interlocked with the interlocking knob. This is done as follows:
A. Press the switch in.
B. Keep the switch pressed in and press the interlocking knob in. The jigsaw will now continue to run.
Release the interlocking by pressing the switch in again.
Speed control
Fig. 5
The speed of the saw blade can be controlled with the rotary knob at the top of the jigsaw. The higher the position, the higher the speed. The highest position is 6. The ideal sawing speed will depend on the profile and the tooth of the saw blade and on the material you want to saw. For soft materials, select a reasonably high speed and a coarse tooth. If you want to saw hard materials, select a lower speed and a fine tooth.
Pendulum setting
Fig. 1 + 6
For an optimum sawing result you must set the way in which the teeth of the saw blade grip the material. You do this by adjusting the pendulum (8).
- Soft material (wood, plastics etc.): set the pendulum to level II or III. For a sharp saw cut, use pendulum level 0 or I.
- Medium-hard material (hardwood, aluminium etc.): set the pendulum depending on the application. For thin material use pendulum level 0, or I if you are working with rasps or knives.
- Hard material (steel etc.): set the pendulum to level 0.
• Curves: set pendulum to level 0.
You can adjust the pendulum level while the appliance is in operation.
Dust-collection
Fig. 7
To keep the work surface clean, the jigsaw is equipped with a connection for dust extraction. You can connect your vacuum cleaner to this. Use the vacuum cleaner adapter supplied for this.
Guard
The jigsaw is fitted with a guard.
Laser beamer
Laser beamer in use
The leading beam of the laser beamer makes sawing in straight lines much easier:
a) along a drawn line, or
b) by aligning it to a fixed point marked on the workpiece.
The range of the laser beam, depending on the environmental light, is about 65 cm.
Adjusting the laser beam
Fig. 10
- Transport handling and heavy use can affect the precision of the laser beam.
• The laser beam itself can be easily adjusted. - Hold the blade of the jigsaw against a straightedge or perfectly straight plank.
- Switch the laser on.
- Check whether the laser beam runs parallel along the edge of the straightedge or plank.
- If the laser beam is out of alignment, proceed as follows:
- Loosen the 3 screws on the front side of the laser a few turns.
- Hold the blade of the jigsaw against a straightedge or perfectly straight plank.
- Correct the laser such that it runs dead straight along the edge.
• Again tighten the 3 screws.
Sawing
- Switch on the jigsaw.
- Place the bottom plate of the appliance on the workpiece.
- Move slowly towards the previously drawn sawing line and press the jigsaw forward slowly. Press the bottom plate firmly against the workpiece. If you do not do this the jigsaw is likely to vibrate and the saw blade will break.

Let the jigsaw do the work. Do not press too hard on the jigsaw.
Parallel saw guide
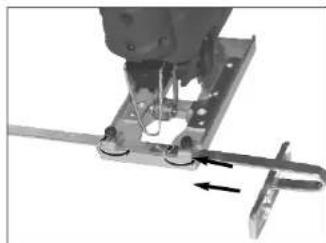
Fig. 8
If you want to make a saw cut that runs parallel to the edge of the plank, use the parallel saw guide supplied. You do this as follows:
- Loosen the screws on the front of the bottom plate.
- Slide the parallel saw guide through the openings at the side of the bottom plate.
- Determine the distance between the saw cut and the side of the workpiece.
- Secure the guide at this distance with the screws.
If the required distance between saw cut and side is 5 cm, set the indicator '5' on the guide exactly above the saw blade. - Tighten the screws again.
Sikkerhedsplade
If the starting position of the workpiece to be sawn is not the side, or if no hole has been drilled, you must cut in. To do this, proceed as follows:
- Put the jigsaw on the rounded front of the bottom plate
- Switch on the appliance and slowly lower the jigsaw until it touches the workpiece.
- Let the jigsaw cut into the workpiece gently without forcing it.
- When you are through the workpiece, take the jigsaw out of the hole.
- Place the appliance in the normal position in the sawn hole and continue the saw cut.
You can also cut in by first drilling a hole in the workpiece. To do this, use a bit that makes a hole big enough for the saw blade. Now you can carry out the steps described under 'Sawing'.
5. MAINTENANCE

During maintenance and cleaning always remove the mains plug from the socket. Never use liquids when cleaning electrical parts of the jigsaw.
Maintain the jigsaw regularly to prevent unnecessary problems. This will ensure that your appliance remains in optimum condition.
- Keep the bottom plate clean so that no inaccuracies occur during sawing.
- Keep the outside of the jigsaw clean so that all moving parts can move accurately and without wear.
- Keep the ventilation slots of the motor clean so that these do not overheat.
- If the carbon brushes are worn the jigsaw will run noisily and unevenly. In the end the jigsaw will no longer work. Have the carbon brushes replaced by an authorized service centre.
- Lubricate the saw blade guide regularly.
Malfunctions
| The electric motor is getting hot. | The motor is being overloaded by workpieces that are too big.The motor is defective. | Saw at a lower speed so that the motor can cool down.Contact the service address on the warranty card. |
| The appliance does not work. | The mains connection has been broken.The switch is damaged. | Check the power cord for damage.Contact the service address on the warranty card. |
| It is very difficult to move the workpiece along the saw blade in a straight line and the saw cut is uneven.The workpiece is starting to vibrate violently during sawing.The appliance runs noisily and/or very unevenly. | The saw blade is warped or blunt.The saw blade is overheated or distorted.The carbon brushes are worn. | Replace the saw blade.Replace the saw blade. |
Cleaning
Regularly clean the machine housing with a soft cloth, preferably after each use. Keep the ventilation slots free from dust and dirt. If the dirt does not come off use a soft cloth moistened with soapy water. Never use solvents such as petrol, alcohol, ammonia water, etc. These solvents may damage the plastic parts.
Faults
Should a fault occur, e.g. after wear of a part, please contact the service address on the warranty card. In the back of this manual you find an exploded view showing the parts that can be ordered.
Environment
To prevent damage during transport, the appliance is delivered in a solid packaging which consists largely of reusable material. Therefore please make use of options for recycling the packaging.

Faulty and/or discarded electrical or electronic apparatus have to be collected at the appropriate recycling locations.
Warranty
The warranty conditions can be found on the separately enclosed warranty card.
3. MONTERING AF TILBEH∅R
Valg af sav
CEDECLARATION OF CONFORMITY (GB)
We declare under our sole responsibility that the FJS-750L
is in conformity with the following standards or standardized documents:
EN55014-1, EN55014-2, EN60745-1, EN60745-2-11, EN60825-1, EN61000-3-2, EN61000-3-3
in accordance with the regulations
98/37/EC, 73/23/EEC, 89/336/EEC, 2002/95/EC, 2002/96/EC
from 01-04-2007
ZWOLLE NL
CEO Ferm BV Quality Manager Ferm Global
It is our policy to continuously improve our products and we therefore reserve the right to change the product specification without prior notice.
Ferm BV • Lingenstraat 6 • 8028 PM Zwolle • The Netherlands
STICHSÄGE
CE ERKLÆRING AV ANSVARSFORHOLD (N)
CEO Ferm BV Quality Manager Ferm Global
Skift/sett inn sagbladet:
CEO Ferm BV Quality Manager Ferm Global
CEO Ferm BV Quality Manager Ferm Global
- De motor is defect.
CEO Ferm BV Quality Manager Ferm Global
CEO Ferm BV Quality Manager Ferm Global
The range of the laser beam, depending on the environmental light, is about 65 cm.
Justering av lasern
Fig. 10
CEO Ferm BV Quality Manager Ferm Global
CEO Ferm BV Quality Manager Ferm Global
CEO Ferm BV Quality Manager Ferm Global
- Spare parts list
- JIGSAW
- Applications
- Contents
- MACHINE INFORMATION
- Package contents
- Product information
- Fig. 1 + 2b
- SAFETY INSTRUCTIONS
- Special safety instructions
- Using the appliance
- CE KONFORMITETSERKLÆRING (DK)
- Safety tips for the laser beamer
- Electrical safety
- Replacement of powercords or plugs
- Use of extension leads
- ASSEMBLY INSTRUCTIONS
- Selecting the saw blade
- Assembling saw blade
- Replacing/inserting the saw blade:
- Ejecting the saw blade:
- Adjusting the bottom plate
- Fig. 3a + 3b
- OPERATION
- Operation
- Fig. 4
- Speed control
- Fig. 5
- Pendulum setting
- Fig. 1 + 6
- Dust-collection
- Fig. 7
- Guard
- Laser beamer
- Laser beamer in use
- Adjusting the laser beam
- Fig. 10
- Sawing
- Parallel saw guide
- Fig. 8
- Sikkerhedsplade
- MAINTENANCE
- Cleaning
- Faults
- Environment
- Warranty
- MONTERING AF TILBEH∅R
- Valg af sav
- CEDECLARATION OF CONFORMITY (GB)
- STICHSÄGE
- CE ERKLÆRING AV ANSVARSFORHOLD (N)
- Skift/sett inn sagbladet:
- Justering av lasern
Brand : Ferm
Model : JSM1018
Category : Jigsaw