RSM1014 - Jigsaw Ferm - Free user manual and instructions
Find the device manual for free RSM1014 Ferm in PDF.


| Brand | Ferm |
| Model | RSM1014 |
| Type | Jigsaw |
| Voltage | 18 V (lithium-ion battery) |
| No-load speed | 800-2400 min⁻¹ |
| Wood cutting capacity | 100 mm |
| Metal cutting capacity | 8 mm |
| Stroke length | 25 mm |
| Weight | 2.9 kg |
| Sound pressure level | 85.6 dB(A) |
| Sound power level | 96.6 dB(A) |
| Vibration | 12.27 m/s² |
| Package contents | 1 saw, 1 wood blade, 1 Allen key, manual, warranty card |
| Compatible battery type | CDA1051 (18V Li-Ion) |
| Compatible charger | CDA1052 or CDA1054 |
| Swivel handle | Yes, 90° |
| LCD screen | Yes, with remaining time and battery charge indicator |
| Variable speed | Yes, electronic |
| Adjustable base | Yes, longitudinally |
| Blade attachment | Tool-free, by loop |
| Safety switch | Yes (lock-off) |
| Screen backlight | Yes |
| Allen key storage | In battery compartment |
Frequently Asked Questions - RSM1014 Ferm
User questions about RSM1014 Ferm
0 question about this device. Answer the ones you know or ask your own.
Ask a new question about this device
Download the instructions for your Jigsaw in PDF format for free! Find your manual RSM1014 - Ferm and take your electronic device back in hand. On this page are published all the documents necessary for the use of your device. RSM1014 by Ferm.
USER MANUAL RSM1014 Ferm
natural_image
Exterior view of a modern office building (no signage)GB ) USERS MANUAL 04
natural_image
Line drawing of a mechanical clamp or clamp device with a hand operating it, showing motion direction (no text or symbols)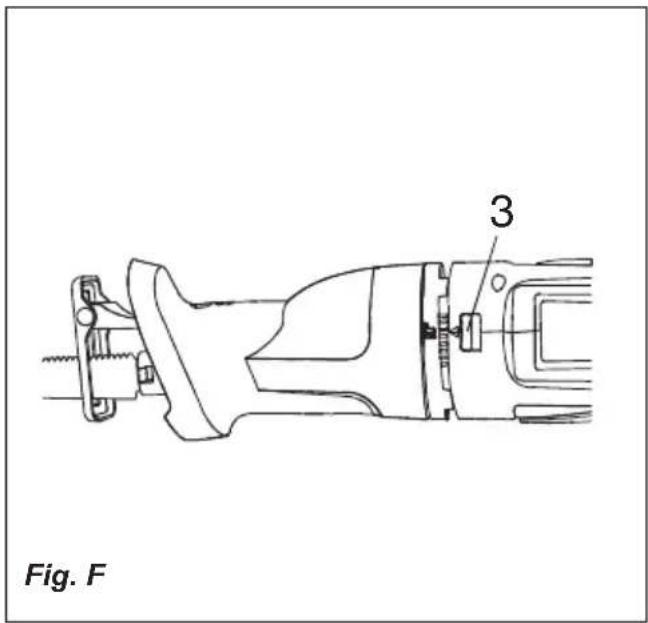


natural_image
Technical line drawing of a mechanical component inside a housing, showing internal parts and no text or symbols.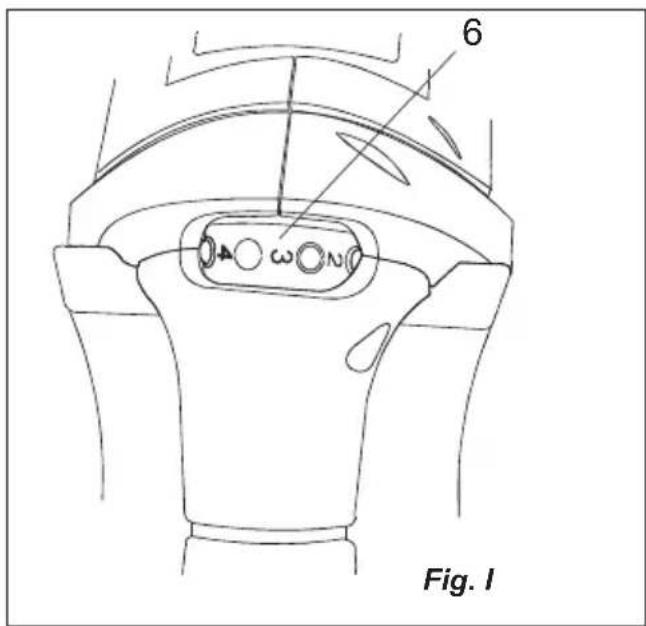
RECIPROCATING SAW
Thank you for buying this Ferm product.
By doing so you now have an excellent product, delivered by one of Europe's leading suppliers. All products delivered to you by Ferm are manufactured according to the highest standards of performance and safety. As part of our philosophy we also provide an excellent customer service, backed by our comprehensive Warranty. We hope you will enjoy using this product for many years to come.
The numbers in the text refer to the diagrams on pages 2-3.

Read the operating instructions carefully before using this device. Familiarize yourself with its functions and basic operation. Service the device as per the instructions to ensure that it always functions properly. The operating instructions and the accompanying documentation must be kept in the vicinity of the device.
Contents
- Machine information
- Safety instructions
- Mounting accessories
- Operation
- Service & maintenance
1. MACHINE INFORMATION
Technical specifications
| Voltage | 18 V | --- |
| Speed, no load | 800-2400/min | |
| Max. cutting capacity wood | 100 mm | |
| Max cutting capacity metal | 8 mm | |
| Max. cutting stroke | 25 mm | |
| Weight | 2.9 kg | |
| Lpa Sound pressure level | 85.6 dB(A) | |
| Lwa Sound power level | 96.6 dB(A) | |
| Vibration | 12.27 m/s | 2 |
Contents of packing
1 Reciprocating saw
1 Saw blade for wood
1 Hex key
1 Operating instructions
1 Safety instructions
1 Warranty card
Check the appliance, any loose parts and accessories for damage caused during transport.
Product information
Fig. A
- Foot plate
- Saw buckle
- Handgrip rotation button
- Display
- Lock off knob
- Speed control
- On/Off switch
- Battery release button
- Footplate mounting screws.
2. SAFETY INSTRUCTIONS
Explanation of the symbols

Denotes risk of personal injury, loss of life or damage to the tool in case of non-observance of the instructions in this manual.

Indicates electrical shock hazard.

The number of revolution of the machine can be electronically set.

Wear a dust mask. Working with wood, metals and other materials may produce dust that is harmful to health. Do not work with material containing asbestos!
Safety instructions
The machine must not be damp and must not be operated in a wet environment. Wear protective gloves and sturdy footwear.

Do not saw materials containing asbestos!!!
- Wear protective goggles when working with materials which produce large amounts of chips.
- Wear a protective mask when sawing other fibrous materials.
- Remove adjusting keys and wrenches before turning the tool on.
- Secure your workpiece with clamps.
- Move machine towards the workpiece only when switched on.
• Always hold machine with both hands and ensure that you have a safe footing while working. - The machine may be operated only with the foot plate mounted. When sawing, the foot plate must always rest on the workpiece.
- Incorrect handling may damage the machine. Therefore always comply with the following instructions.
- Use only sharp saw blades in perfect condition; replace cracked, distorted or blunt saw blades immediately.
• Machine should only be switched on with blade installed. - Select tools, stroke rate and pendulum actions according to material, Take care to maintain a constant reed rate.
- Do not attempt to stop the saw blade with lateral pressure after switching off.
• Only use genuine accessories.
3. MOUNTING ACCESSORIES

Prior to mounting an accessory always remove the battery.
Assembling saw blade
Fig. B
To assemble the saw, proceed as follows:
- Slide the saw buckle clamp (2) inward and hold.
- Place the saw in the saw buckle. Make sure that the teeth point downwards.
- Push the saw as far into the buckle as possible.
- Secure the saw by gently releasing the saw buckle clamp.
Adjusting the foot plate position
Fig. C
When the blade loses its sharpness at some sections of it's cutting edge, reposition the foot plate to use a sharp, unused portion of its cutting edge.
Besides this, the foot plate can also be used for adjusting maximum saw depth, especially useful when sawing in hollow walls.
- The footplate can be extended by loosening the two footplate mounting screws (9) using the 4 mm hexagon key and then pulling the footplate out to the required length.
Ensure the footplate adjustment screws are secure before resuming work.
Connecting and removing the battery
Fig. A+D
- Insert the battery into the base of the appliance, as shown on the illustration. Push the battery until it latches in.
- Press the locking button (8) on either side before removing the battery, and disengage the battery from the base of the appliance.
Only use batteries of the following type. Using any other batteries could cause serious injury or damage the tool.
• CDA1051: FPB-1800L, 18V Lithium-Ion
• CDA1053: FPB-1800N, 18V NiMH
The following chargers can be used to charge these batteries.
• CDA1052: FPL-1800 (Lithium-Ion and NiMH)
• CDA1054: FPL-1800N (NiMH only)
4. OPERATION

Always follow the safety notes and the relevant safety code.

Make sure that the saw blade does not rest on or touch any objects when the machine is switched on.
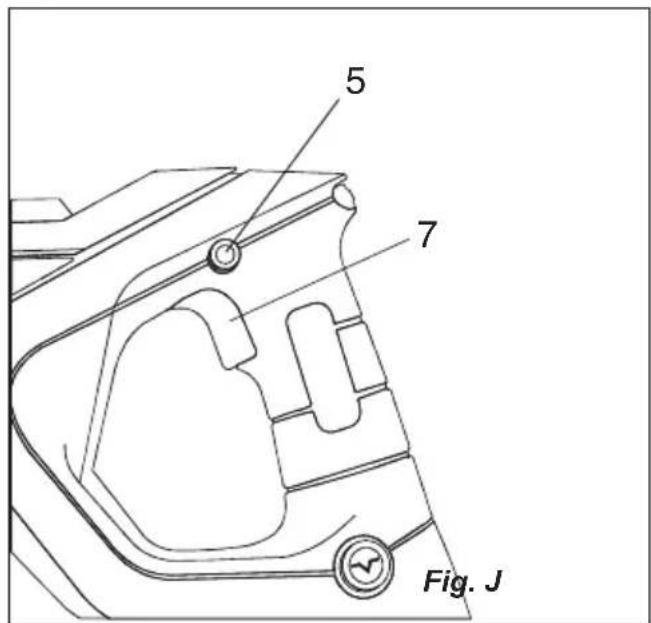
Switching on and off
Fig. J
- This machine is equipped with a safety switch (5).
- Start the machine by pressing the "lock off" button (to disengage the switch) and switch on the machine.
- Release the (On/Off) switch (7) to switch the machine off.
Speed control
Fig. 1
- During operation and whilst the machine is at rest the stroke rate (speed) can be selected using the thumbwheel (6).
- The stroke rate required depends upon the material conditions. The optimal setting should be determined in use.
• After working for longer periods at low speed you should allow the machine to cool down by running it at maximum speed with no-load for approx. 3 minutes.
Sawing tips
- Adjust saw blade and stroke rate to suit the material to be processed. For right radius curves it is best to use a narrow saw blade. Apply coolant or lubricant to deal with the fluttering produced along the cut line when sawing metal.
- Check wood, chip boards, building materials etc, for foreign bodies (nails, screws etc.), before sawing and remove them, if necessary.
- Clamp material well. Do not support the workpiece with hand or foot. Do not touch objects or the floor with the saw running (danger of backlash).
- Put the footplate on the surface of the workpiece, and saw through it with constant contact pressure or feed. If the saw blade seizes switch the machine off immediately. Spread the gap with a suitable tool and pull out the saw blade.
• After finishing work, switch off the machine and only put down after it has come to a complete standstill.
Plunge cutting
Fig. E
- Plunge cutting may only be used on soft materials such as wood, aerated concrete, gypsum plaster boards, etc.
• However, this requires a certain practise and is only possible with short saw blades. - Place the saw onto the workpiece and switch it on.
- Ensure that the bottom edge of the footplate rests on the workpiece surface as shown.
- Slowly saw into the workpiece at an angle, moving the saw to a vertical position and continue to saw along the cutting line.
- Switch the saw off and lift off the workpiece when the work is complete.
Flush sawing
- Elastic bi-metal saw blades allow you to saw protruding objects (e.g, water pipes, iron bars, etc,) nearby the wall.
- Apply the saw blade directly to the wall and bend slightly so that the footplate rests against the wall.
- Switch the machine on and saw off the workpiece keeping constant lateral pressure against the wall.
Rotatable handle
Fig. F
The handle can be rotated in 90° steps to the machine housing. Slide the rotation button (3) backwards and rotate the handle to the desired position. Make sure the handle locks in position before use.
LCD display
Fig. G
This machine is equipped with a LCD display.
- To turn the display on, press the display button (10) once. To turn the display off, press the display button again.
- The clock (11) and minutes (12) remaining icons indicate the number of minutes of running time that are available before the battery requires recharging (Lithium-Ion battery only)
- The battery icon (13) indicates the amount of charge remaining in the battery. Each charge bar displayed indicates approximately 10% charge remaining in the battery. A total of 10 charge bars indicates a fully charged battery.
- Press the backlight button (14) to switch the backlight of the display on. Press it again to switch the backlight of the display off.
Hex key storage
Fig. H
The included hex key can be stored in the battery compartment.
5. SERVICE & MAINTENANCE

Make sure that the machine is not live when carrying out maintenance work on the motor.
The machines have been designed to operate over a long period of time with a minimum of maintenance. Continuous satisfactory operation depends upon proper machine care and regular cleaning.
Cleaning
Keep the ventilation slots of the machine clean to prevent overheating of the engine. Regularly clean the machine housing with a soft cloth, preferably after each use. Keep the ventilation slots free from dust and dirt. If the dirt does not come off use a soft cloth moistened with soapy water. Never use solvents such as petrol, alcohol, ammonia water, etc. These solvents may damage the plastic parts.
Lubrication
The machine requires no additional lubrication.
Faults
Should a fault occur, e.g. after wear of a part, please contact the service address on the warranty card. In the back of this manual you find an exploded view showing the parts that can be ordered.
Environment
To prevent damage during transport, the appliance is delivered in a solid packaging which consists largely of reusable material. Therefore please make use of options for recycling the packaging.

Faulty and/or discarded electrical or electronic apparatus have to be collected at the appropriate recycling locations.
Warranty
The warranty conditions can be found on the separately enclosed warranty card.
SÄBELSÄGE
1. MACHINE-INFORMATIE
Technische specificaties
• CDA1053: FPB-1800N, 18V NiMH
• CDA1053: FPB-1800N, 18V NiMH
• CDA1053: FPB-1800N, 18V NiMH
• CDA1053: FPB-1800N, 18V NiMH
• CDA1053: FPB-1800N, 18V NiMH
5. SERVICE OG VEDLIKEHOLD

CE
DECLARATION OF CONFORMITY FPRS-1800 Reciprocating Saw
(GB) We declare under our sole responsibility that this product is in conformity and accordance with the following standards and regulations:
(D) Der Hersteller erklärt eigenverantwortlich, dass dieses Produkt den folgenden Standards und Vorschriften entspricht:
(NL) Wij verklaren onder onze volledige verantwoordelijkheid dat dit product voldoet aan, en in overeenstemming is met, de volgende standaarden en reguleringen:
(F) Nous déclarons sous notre seule responsabilité que ce produit est conforme aux standards et directives suivants:
(E) Declaramos bajo nuestra exclusiva responsabilidad que este producto cumple con las siguientes normas y estándares de funcionamiento:
(P) Declaramos por nossa total responsabilidade que este produto está em conformidade e cumpre as normas e regulamentações que se seguem:
(I) Dichiariamo, sotto la nostra responsabilità, che questo prodotto è conforme alle normative e ai regolamenti seguenti:
(S) Vi garanterar på eget ansvar att denna produkt upp-fyller och följer följande standarder och bestämmelser:
(FIN) Vakuutamme yksinomaan omalla vastuullamme, että tämä tuote täyttää seuraavat standardit ja säädökset:
(N) Vi erklærer under vårt eget ansvar at dette produktet er i samsvar med følgende standarder og regler:
(DK) Vi erklærer under eget ansvar, at dette produkt er i overensstemmelse med følgende standarder og bestemmelser:
(H) Felelősségünk teljes tudatában kijelentjük, hogy ez a termék teljes mértékben megfelel az alábbi szabványoknak és előírásoknak:
(CZ) Na naši vlastní zodpovědnost prohlašujeme, že je tento výrobek v souladu s následujícími standardy a normami:
(SK) Vyhlasujeme na našu výhradnú zodpovednosť, že tento výrobok je v zhode a súlade s nasledujúcimi normami a predpismi:
(SLO) S polno odgovornostjo izjavljamo, da je ta izdelek v skladu in da odgovarja naslednjim standardom terpredpisom:
(PL) Deklarujemy na własną odpowiedzialność, że ten produkt spełnia wymogi zawarte w następujących normach i przepisach:
(LT) Prisiimdami visą atsakomybę deklaruojame, kad šis gaminys atitinka žemiau paminėtus standartus arba nuostatus:
(LV) Apgalvojam ar visu atbildību, ka šis produkts ir saskaņā un atbilst sekojošiem standartiem un nolikumiem:
(EST) Deklareerime meie ainuvastutusel, et see toode on vastavuses ja kooskõlas järgmiste standardite ja määrustega:
(RO) Declarăm prin aceasta cu răspunderea deplină că produsul acesta este în conformitate cu următoarele standarde sau directive:
(HR) Izjavljujemo pod vlastitom odgovornol,šu da je strojem ukladan sa slijedešim standardima ili standardiziranim dokumentima i u skladu sa odredbama:
(SB) Pod punom odgovornošću izjavljujemo da je usaglašen sa sledećim standardima ili normama:
(RUS)Под свою ответственность заявляем, что данное изделие соответствует следующим стандартам и нормам:
(UA) На свою власну відповідальність заявляемо, що дане обладнання відповідає наступним стандартам і нормативам:
(GR) Δηλώνουμε υπεύθυνα ότι το προϊόν αυτό συμφωνεί και τηρεί τους παρακάτω κανονισμούς και πρότυπα:
EN55014-1, EN55014-2, EN60745-1, EN60745-2-11 EN61000-3-2, EN61000-3-3
98/37/EC, 2004/108/EC, 2002/95/EC, 2002/96/EC, 2006/95/EC
Zwolle, 01-01-2008

Quality Manager Ferm Global
It is our policy to continuously improve our products and we therefore reserve the right to change the product specification without prior notice.
Ferm BV • Lingenstraat 6 • 8028 PM • Zwolle The Netherlands
GB Subject to change
- RECIPROCATING SAW
- Thank you for buying this Ferm product.
- The numbers in the text refer to the diagrams on pages 2-3.
- Contents
- MACHINE INFORMATION
- Technical specifications
- Contents of packing
- Product information
- Fig. A
- SAFETY INSTRUCTIONS
- Explanation of the symbols
- Safety instructions
- MOUNTING ACCESSORIES
- Assembling saw blade
- Fig. B
- Adjusting the foot plate position
- Fig. C
- Connecting and removing the battery
- Fig. A+D
- OPERATION
- Switching on and off
- Fig. J
- Speed control
- Fig. 1
- Sawing tips
- Plunge cutting
- Fig. E
- Flush sawing
- Rotatable handle
- Fig. F
- LCD display
- Fig. G
- Hex key storage
- Fig. H
- SERVICE & MAINTENANCE
- Cleaning
- Lubrication
- Faults
- Environment
- Warranty
- SÄBELSÄGE
- MACHINE-INFORMATIE
- Technische specificaties
- SERVICE OG VEDLIKEHOLD
- CE
- DECLARATION OF CONFORMITY FPRS-1800 Reciprocating Saw
- EN55014-1, EN55014-2, EN60745-1, EN60745-2-11 EN61000-3-2, EN61000-3-3
Brand : Ferm
Model : RSM1014
Category : Jigsaw