E2303 - Smartphone SONY - Free user manual and instructions
Find the device manual for free E2303 SONY in PDF.

User questions about E2303 SONY
0 question about this device. Answer the ones you know or ask your own.
Ask a new question about this device
Download the instructions for your Smartphone in PDF format for free! Find your manual E2303 - SONY and take your electronic device back in hand. On this page are published all the documents necessary for the use of your device. E2303 by SONY.
USER MANUAL E2303 SONY
Screen protection....8
Starting your device for the first time....8
Why do I need a Google™ account?......9
Charging your device.... 10
Multiple user accounts.... 11
Petites applications....20
Widgets.... 21
Appareil photo....86
One-touch Setup.... 117
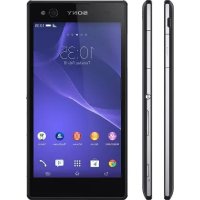
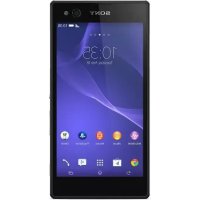
- Charging/Notification light
- Proximity/Light sensor
- Ear speaker
- Front camera lens
- Nano SIM card slot cover
- Power key
- Volume/Zoom key
- Camera key
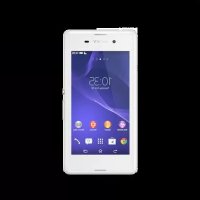
- Loudspeaker
-
Main microphone
-
Main camera lens
- Camera light
- GPS antenna area
- NFC ^TM detection area
- Headset jack
- Second microphone
- Charger/USB cable port
- Wi-Fi/Bluetooth antenna area
- Memory card slot cover
Assembly
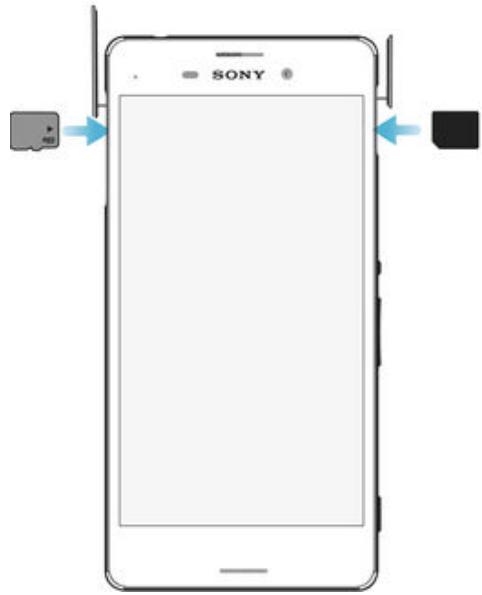
! Your device only supports nano SIM cards.
text_image
SONYTo insert the nano SIM card
To prevent damage to your device, do not insert a nano SIM card that has been directly cut from a USIM card.
1 Detach the nano SIM card slot cover.
2 Insert the nano SIM card into the nano SIM card slot.
3 Re-attach the cover.
! If you insert a nano SIM card while the device is powered on, the device restarts automatically.
To insert the memory card
1 Detach the memory card slot cover.
2 With the gold coloured contacts facing down, insert the memory card into the memory card slot, then re-attach the memory card slot cover.
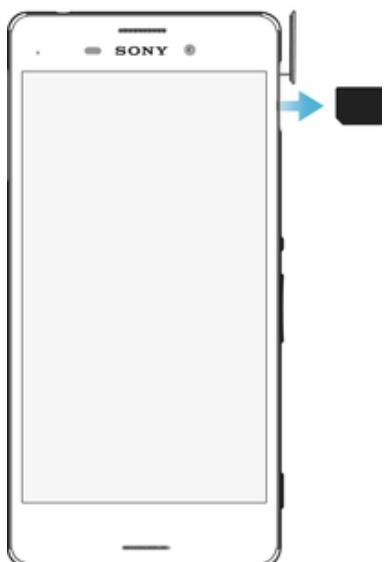
To remove the nano SIM card
text_image
SONY1 Detach the nano SIM card slot cover.
2 Press the nano SIM card inwards until it makes a clicking sound and then release it immediately.
3 Draw the nano SIM card fully outwards and remove it.
4 Re-attach the cover.
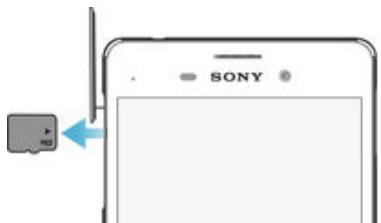
To remove the memory card
text_image
SONY1 Turn off the device and detach the memory card slot cover.
2 Press the memory card inwards and then release it immediately.
3 Draw the memory card fully outwards and remove it.
4 Remove the memory card from the slot and re-attach the cover.

Instead of turning off the device, you can leave it on and unmount the memory card under Réglages by tapping Stockage > Démonter la carte SD.
Screen protection
! Before using your device, remove the transparent protection film by pulling up on the protruding tab.
It is recommended to protect your device with a Sony-branded screen cover or protector intended for your Xperia™ model. The use of third party screen protection accessories may prevent your device from working by covering sensors, lenses, speakers, or microphones and it can invalidate the warranty.
Starting your device for the first time
The first time you start your device, a setup guide opens to help you configure basic settings, sign in to online accounts and personalise your device. For example, if you have a Sony Entertainment Network account, you can sign in to it here and get set up straight away.

You can also access the setup guide later from the Settings menu. To access the setup guide on a device with multiple users, you must be logged in as the owner, that is, the primary user.
To turn on the device
Make sure that the battery is charged for at least 30 minutes before you turn on the device for the first time.
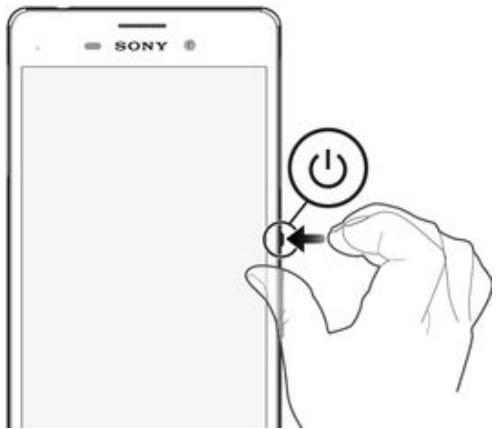
text_image
SONY1 Press and hold down the power key ⏻ until the device vibrates.
2 Enter your SIM card PIN when requested, then tap √.
3 Wait a while for the device to start.
To turn off the device
1 Press and hold down the power key ⏻ until the options menu opens.
2 In the options menu, tap Éteindre.
! It may take a while for the device to shut down.
Why do I need a Google™ account?
Your Xperia™ device from Sony runs on the Android™ platform developed by Google™. A range of Google™ applications and services is available on your device when you purchase it, for example, Gmail™, Google Maps™, YouTube™ and the Play Store™ application, which gives you access to the Google Play™ online store for downloading Android™ applications. To get the most out of these services, you need a Google™ account. For example, a Google™ account is mandatory if you want to:
- Download and install applications from Google Play™.
- Synchronise email, contacts and the calendar using Gmail™.
- Chat with friends using the Hangouts™ application.
- Synchronise your browsing history and bookmarks using the Google Chrome™ web browser.
- Identify yourself as the authorised user after a software repair using Xperia™ Companion.
- Remotely find, lock or clear a lost or stolen device using the my Xperia™ or Android™ Device Manager services.
For more information about Android ^™ and Google ^™ , go to http://support.google.com.
It is crucial that you remember your Google™ account username and password. In some situations, you may need to identify yourself for security reasons using your Google™ account. If you fail to give your Google™ username and password in such situations, your device is locked. Also, if you have more than one Google™ account, make sure to enter the details for the relevant account.
To set up a Google ^TM account on your device
1 From your Écran d'accueil, tap 🟢.
2 Find and tap Réglages > Comptes > Ajouter un compte > Google.
3 Follow the registration wizard to create a Google™ account, or sign in if you already have an account.
You can also sign in to or create a Google™ account from the setup guide the first time you start your device. Or you can go online and create an account at www.google.com/accounts.
Charging your device
Your device has an embedded, rechargeable battery that should be replaced only by Sony or an authorised Sony repair centre. You should never try to open or take apart the device yourself. Opening the device can cause damage that voids your warranty.
The battery is partly charged when the device is shipped from the factory. Depending on how long your device was in the box before you purchased it, the battery level may be quite low. It is therefore recommended that you charge the battery for at least 30 minutes before starting up your device for the first time. You can still use your device while it is charging. To read more about how to improve the battery performance, see Gestion de la batterie et de l'alimentation on page 130.
After immersing your device in water or after getting the USB port wet, make sure the USB port is dry before you insert a USB cable into the port, for example, to charge your device or connect it to a computer.
After exposure to water, the USB port dries out naturally after a number of hours. If you don't want to wait for the port to dry naturally, you can shake any excess moisture from the USB port and then use a micro-fibre cloth to wipe away any remaining moisture.
To dry the USB port
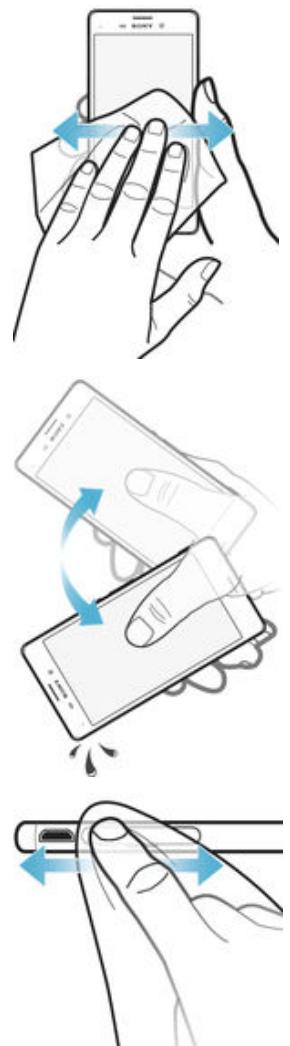
text_image
Illustration showing three-step smartphone touch-and-drop process: holding, moving, and interacting with a finger.1 Using a micro-fibre cloth, wipe away any excess moisture from your device.
2 With the device held firmly and the USB port facing downwards, shake the device vigorously at least 15 times.
3 If moisture is still visible in the USB port, shake the device again several times.
4 Use a micro-fibre cloth to wipe away any remaining moisture from the USB port.
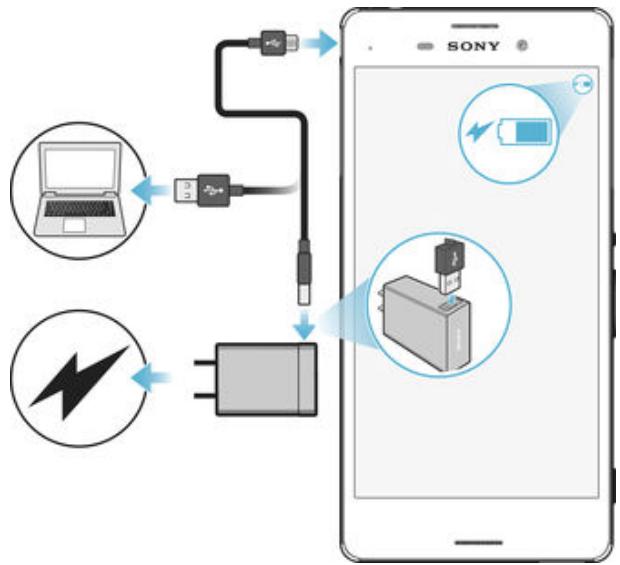
To charge your device
flowchart
graph TD
    A["Switch"] --> B["USB Cable"]
    B --> C["Device"]
    D["Laptop"] --> E["USB Cable"]
    E --> F["Device"]
    G["Battery"] --> H["Device"]
    I["Black Battery"] --> J["Device"]
1 Plug the charger into a power outlet.
2 Plug one end of the USB cable into the charger (or into the USB port of a computer).
3 Plug the other end of the cable into the micro USB port on your device, with the USB symbol facing up. The notification light illuminates when charging begins.
4 When the device is fully charged, disconnect the cable from your device by pulling it straight outwards. Make sure not to bend the connector.
The USB connector does not go all the way into the USB charging port on your device. Part of the USB connector is still visible when it's connected to the charger.
If the battery is completely discharged, it may take a few minutes before the notification light illuminates and the charging icon ↗ appears.
Battery notification light status
| Green | The battery is charging and the battery charge level is greater than 90% |
| Red | The battery is charging and the battery charge level is less than 15% |
| Orange | The battery is charging and the battery charge level is less than 90% |
Multiple user accounts
Your device supports multiple user accounts so that different users can log in separately to the device and use it. Multiple user accounts work well in situations where you share the same device with other people or lend your device to someone to use for a while. The user who sets up the device for the first time becomes the owner of the device. Only the owner can manage the accounts of other users. Apart from the owner account, there are two different types of accounts:
• Regular User: This account type is suitable for someone who regularly uses your device.
- Guest User: Enable the guest account option for someone who just wants to use your device temporarily.
! Some features are only available to the owner. For example, only the owner can allow downloads from sources other than Google Play™.
About the Regular User account
By adding Regular User accounts, you can allow different users to have different home screens, wallpapers and general settings. They also get separate access to applications and memory storage for files such as music and photos. You can add up to three regular user accounts on your device.
To add a regular user account
1 Make sure you are logged in as the owner, that is, the user who set up the device for the first time.
2 From your Home screen, tap 🎯.
3 Find and tap Réglages > Utilisateurs > Ajouter utilisateur.
4 Tap OK > CONFIGURER. The screen locks and an icon representing the newly added user appears in the top right corner.
5 Unlock the screen, for example, by swiping or entering your PIN.
6 Follow the on-screen instructions to complete the procedure.
You can also add a regular user account from the status bar on any screen. Just drag the status bar downwards using two fingers and tap the user icon, then tap Ajouter utilisateur.
To allow a regular user to make phone calls and use SMS
1 Make sure you are logged in as the owner.
2 From your Home screen, tap 🎯.
3 Find and tap Réglages > Utilisateurs.
4 Tap ✿ beside the name of the relevant user, then drag the slider beside Autoriser appels téléphoniques/SMS to the right.
To delete a regular user account from your device
1 Make sure you are logged in as the owner.
2 From your Home screen, tap 🎯.
3 Find and tap Réglages > Utilisateurs.
4 Tap ✿ beside the name of the user that you want to delete, then tap Supprimer l'utilisateur > Supprimer.
About the Guest User account
If someone just wants to use your device temporarily, you can enable a guest account for this user. In guest mode, your device starts up as a freshly installed system with only the pre-installed apps. Once your guest is finished using your device, you can wipe the session clean so that the next guest can start fresh. The guest user account is pre-installed and cannot be deleted.
To set up the guest user account
1 Make sure you are logged in as the owner, that is, the user who set up the device for the first time.
2 From your Home screen, tap 🎯.
3 Find and tap Réglages > Utilisateurs > Invité.
4 Follow the on-screen instructions to complete the procedure.
You can also set up a guest user account from the status bar on any screen. Just drag the status bar downwards using two fingers and tap the user icon, then tap Ajouter un invité.
To allow the guest user to make phone calls
1 Make sure you are logged in as the owner.
2 From your Home screen, tap 🎨.
3 Find and tap Réglages > Utilisateurs.
4 Tap ≙ beside Invité, then drag the slider beside Autoriser les appels téléphoniques to the right.
To clear the guest session data
1 Make sure you are logged in as a guest user.
2 From your Home screen, tap 🎯.
3 Find and tap Réglages > Utilisateurs.
4 Find and tap Supprimer la session Invité.
5 Tap Supprimer.
You can also clear the guest session from the status bar on any screen. Just drag the status bar downwards using two fingers and tap the user icon, then tap Supprimer la session Invité.
Switching between multiple user accounts
To switch between multiple user accounts
1 To view the list of users, drag the status bar downwards using two fingers, then tap the user icon at the top right of the screen.
2 Tap the icon representing the user account that you want to switch to.
3 If a password has been set for the account, enter this password to log in. Otherwise, just unlock the screen.
When you switch to the guest account, tap Recommencer if you want to wipe the previous session or tap Oui, continuer to continue the previous session.
Settings for multiple user accounts
There are three different types of settings on devices with multiple users:
- Settings that can be changed by any user and affect all users. Examples include language, Wi-Fi®, Airplane mode, NFC and Bluetooth®.
- Settings that only affect an individual user account. Examples include automatic data syncing, screen lock, various accounts added, and wallpaper.
- Settings that are only visible to the owner and affect all users, for example, VPN settings.
Apprendre les bases
natural_image
Illustration of a finger pointing at the smartphone screen with Sony logo and motion lines (no text or symbols on the diagram itself)natural_image
Illustration of a hand touching a Sony button on a smartphone screen (no text or symbols on the device)text_image
Custom order Chrome Play Store Messaging Phone Music Album Movies PlayStation What's New Camera Facebook News from Socialife YouTube Email Calendar Contacts Settings Alarm & clock Maps Toolstext_image
Album Skip account setup? Settings Call Calendar Today - Apr 24 5 M T W T F 29 30 31 1 2 3 5 6 7 8 9 10 11 1 2 5 4 3Petites applications
text_image
Google WHAT'S NEW Calling my girlfriend Movie A Five Of Playing it... Boom 1 Album Video Album Settings What's New 2text_image
SONY 16:31 Monday 4 May Connected to PC Connected to Media Player mode (MTP) Install sc the wire The latest software is ready to be installed... Screened or captured. Touch to the other Set up Make a phone Make a phonetext_image
ICE - In Case of Emergency Andy My name, picture and medical info is shown in ICE view Medical information Allergies Tetracycline Medication Waran Donor Yes ICE contacts ICE - Lily Ellen Ackland Create new Use existing contactstext_image
Hotmail Inbox 4 Today Outlook.com Team 1:32 PM Please sign in to your Outlook.com acco... Hello Alice Honey, We noticed some unusual activit... Friday Best of MSN Mar 27 Alice, here is your Weekly Roundup The latest news and trends from MSN View in brow... 2 weeks ago Best of MSN Mar 19 Welcome to the Best of MSN Newsletter Welcome to the Best of MSN View in browser Privat... Yahoo! Eurosport Mar 19 Newsletter: Follow these instructions simply reply to this email....to complete sig...text_image
1 Primary C Coursera Hi alice, we have recommended courses... Recommended Courses For alice View G Google Google Account password changed Alice Honey Hi Alice. The password for... C Coursera Hi alice, we have recommended courses... coursera logo Recommended Courses... C Coursera Hi alice, we have recommended courses... coursera logo Learn Something New Ex... C Coursera Hi alice, we have recommended courses... coursera logo Recommended Courses... C Coursera Hi alice, we have recommended courses... coursera logo View all courses? Recom...text_image
Music Song Artist PM.AM Recordings - EDM (Electronic Dance) THE VIOKE GOMBERS 00:20 / 05:03 1 2 3 4 5 6 7 8 9 10 11 12text_image
Music Listen next The Shanghai Art Song Artist Song ArtistAppareil photo multiple
text_image
June 2010 - March 2012 1 2 3 4 5 6 July 2003 - August 2009text_image
PlayMemories Online Get started with Sony online storage All content Favorites Videos Places Hidden Camera effects Folders Faces Devices Settings Facebooktext_image
Places 1 2 3 4 5 6Service Video Unlimited
text_image
Smart Connect™ ACCESSORIES EVENTS Night Music on the go Music at home 6 2 3 4 5text_image
1 2 3 4 5 6 7 08:30 Weekdays 09:00 +text_image
Diagram showing a tool interacting with a device, labeled with parts 1 and 2, and a blue arrow indicating direction.© 2015 Sony Mobile Communications Inc.