
STK 16 B2 - Doorbell SILVERCREST - Free user manual and instructions
Find the device manual for free STK 16 B2 SILVERCREST in PDF.

| Product type | Wireless design doorbell |
| Brand | SilverCrest |
| Model | STK 16 B2 |
| Range (open area) | 150 m |
| Transmission frequency | 434 MHz |
| Transmission power | <10 dBm |
| Power supply transmitter | 1 CR2032 battery (3 V ===) |
| Power supply receiver | 3 AA/LR6 batteries (1.5 V ===) |
| Maximum sound volume | approx. 73 dB (at 1 m) |
| Protection rating (transmitter) | IP44 |
| Number of ringtones | 16 |
| Signal types | Acoustic, optical, both |
| Volume setting | 4 levels (very high, high, medium, low) |
| Transmitter/receiver synchronization | Yes, automatic or manual |
| Connection to existing doorbell | Possible (voltage 4-12 V) |
| Package contents | Transmitter, receiver, batteries (AA and CR2032), screws, wall plugs, 5 door plates, instruction manual |
| Warranty | 3 years |
| Maintenance and cleaning | Clean the exterior with a soft, dry cloth |
| Main safety instructions | Use specified batteries, do not swallow, keep out of reach of children |
| Intended use | Wireless transmission of doorbell signal, non-professional use |
Frequently Asked Questions - STK 16 B2 SILVERCREST
User questions about STK 16 B2 SILVERCREST
0 question about this device. Answer the ones you know or ask your own.
Ask a new question about this device
Download the instructions for your Doorbell in PDF format for free! Find your manual STK 16 B2 - SILVERCREST and take your electronic device back in hand. On this page are published all the documents necessary for the use of your device. STK 16 B2 by SILVERCREST.
USER MANUAL STK 16 B2 SILVERCREST
Assembly, operating and safety instructions
DK
TRÄDL∅SD∅RKLOKKE
flowchart
graph TD
    A["Circle"] --> B["Square 1"]
    B --> C["Curved Arrow"]
natural_image
Simple line drawing of a door frame with no text or symbols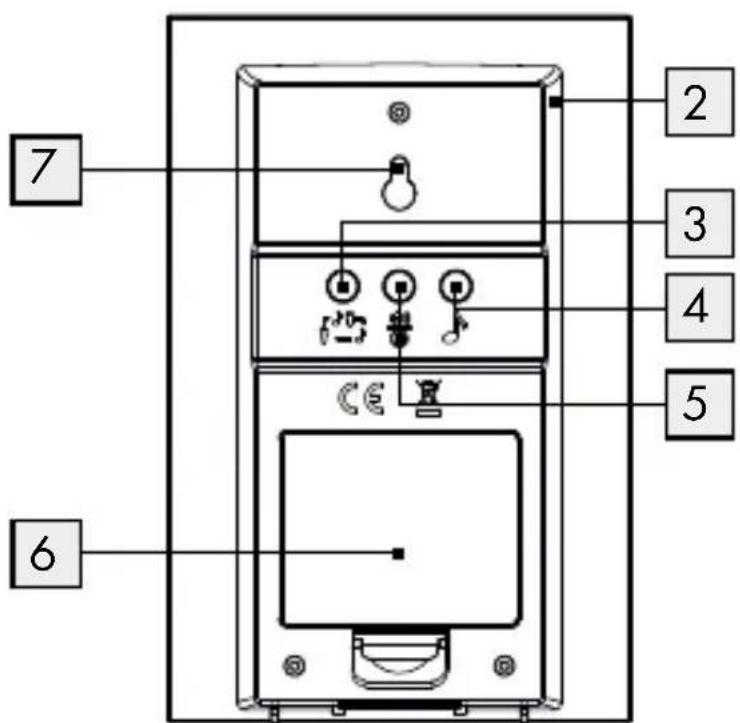
flowchart
graph TD
    A["•"] --> B["9"]
    C["•"] --> D["10"]


Introduction......Page 6
Intended use ......Page 6
Parts and features......Page 6
Included items....Page 7
Technical data Page 8
Safety Page 9
General safety information....Page 9
Safety instructions for batteries/rechargeable batteries......Page 10
Assembly Page 12
Preparing for use Page 12
Inserting / replacing the batteries ......Page 12
Synchronising transmitter/receiver......Page 13
Setting the signal type....Page 14
Setting the volume Page 15
Selecting the chime......Page 15
The procedure for connecting the transmitter to existing bell
system or existing doorbell button....Page 16
Connecting the transmitter to a existing bell system....Page 16
Connecting a existing doorbell button ......Page 17
Troubleshooting......Page 17
Cleaning and maintenance......Page 18
Simplified EU declaration of conformity......Page 19
Warranty Page 20
Premium Wireless Doorbell
- Introduction
We congratulate you on the purchase of your new product. You have chosen a high quality product. The instructions for use are part of the product. They contain important information concerning safety, use and disposal. Before using the product, please familiarise yourself with all of the safety information and instructions for use. Only use the product as described and for the specified applications. If you pass the product on to anyone else, please ensure that you also pass on all the documentation with it.
Intendeduse
This product is intended for the wireless transmission of the doorbell signal. The product is not intended for commercial use.
Parts and features
Receiver
1 Signal indicator
2 Speaker
3 Signal type selector button (acoustic, optical, optical and acoustic signal)
4 Melody selection button
5 Volume/Synchronisation button
6 Battery compartment cover
7 Hanger
8 Battery compartment
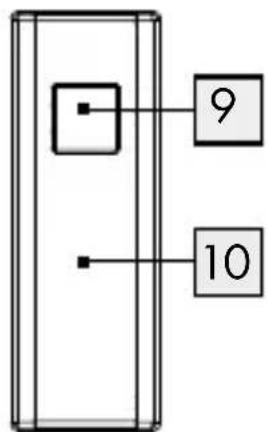
Transmitter
9 Chime button
10 Name plate
11 Lock
12 Holder (for wall mounting)
13 Battery compartment
14 Inner cover
Mounting
15 Screw
16 Rubber cover
17 Screw
18 Dowel
19 Cable exit hole
20 Cable holder
Includeditems
1 Transmitter
1 Receiver
3 Batteries 1.5 V= ± direct current), type AA (receiver)
1 Battery 3 V= (direct current)(transmitter) , type CR2032 (transmitter)
3 Screws (for transmitter and for mounting the receiver on a wall)
3 Dowels
5 Name plates (for the doorbell)
1 Operating instructions
- Technicaldata
Range: 150 m (unobstructed area)
Transmission frequency: 434 MHz
Transmission power: <10 dBm
Battery types: Receiver: 3 x 1.5 V = (direct current) (type AA/LR6), Transmitter: 1 x 3 V = (direct current) (type CR2032)
Receiver: Audible signal volume (at maximum volume setting): approx. 73 dB (at a distance of 1 m from the device)
Ingress protection rating
of the transmitter: IP44 (splash water proof)

Safety

WARNING!
Read all safety information and instructions!
STORE ALL SAFETY INFORMATION AND INSTRUCTIONS IN A SAFE PLACE IN CASE YOU NEED TO REFER TO THEM AGAIN IN THE FUTURE!

General safety information
This product can be used by children aged from 8 years and above and persons with reduced physical, sensory or mental capabilities or lack of experience and knowledge if they have been given supervision or instruction concerning use of the product in a safe way and understand the hazards involved. Children shall not play with the product. Cleaning and user maintenance shall not be made by children without supervision.
- Check that all parts are in sound condition. If you use damaged parts when assembling the device, you risk injury.

Safety instructions for batteries / rechargeable batteries
■ DANGER TO LIFE! Keep batteries / rechargeable batteries out of reach of children. If accidentally swallowed seek immediate medical attention.
DANGER OF EXPLOSION! Never recharge non-
rechargeable batteries. Do not short-circuit batteries/rechargeable batteries and/or open them.
Overheating, fire or bursting can be the result.
Never throw batteries / rechargeable batteries into fire or water.
Do not exert mechanical loads to batteries / rechargeable batteries.
Risk of leakage of batteries / rechargeable batteries
Avoid extreme environmental conditions and temperatures, which could affect batteries / rechargeable batteries, e.g. radiators / direct sunlight.
If batteries / rechargeable batteries have leaked, avoid contact with skin, eyes and mucous membranes with the chemicals! Flush immediately the affected areas with fresh water and seek medical attention!
WEAR PROTECTIVE GLOVES! Leaked or dam-

aged batteries / rechargeable batteries can cause burns on contact with the skin. Wear suitable protective gloves at all times if such an event occurs.
In the event of a leakage of batteries / rechargeable batteries, immediately remove them from the product to prevent damage.
Only use the same type of batteries / rechargeable batteries. Do not mix used and new batteries / rechargeable batteries.
■ Remove the batteries / rechargeable batteries if the product will not be used for a longer period.
Risk of damage of the product
■ Only use the specified type of battery / rechargeable battery!
- Insert batteries / rechargeable batteries according to polarity marks (+) and (-) on the battery / rechargeable battery and the product.
- Clean the contacts on the battery / rechargeable battery and in the battery compartment before inserting!
■ Remove exhausted batteries / rechargeable batteries from the product immediately.

WARNING!
Do not ingest the battery, chemical burn hazard.
The product contains a coin/button cell battery. If the coin/button cell battery is swallowed, it can cause severe internal burns in just 2 hours and can lead to death.
- Keep new and used batteries away from children.
If the battery compartment does not close securely, stop using the product and keep it away from children.
If you think batteries might have been swallowed or placed inside any part of the body, seek immediate medical attention.
Assembly
Note: You will need a screwdriver and a drill to assemble the product. Note: Only use the screws and dowels supplied for the assembly of the product.
Mount the receiver (see Fig. D)
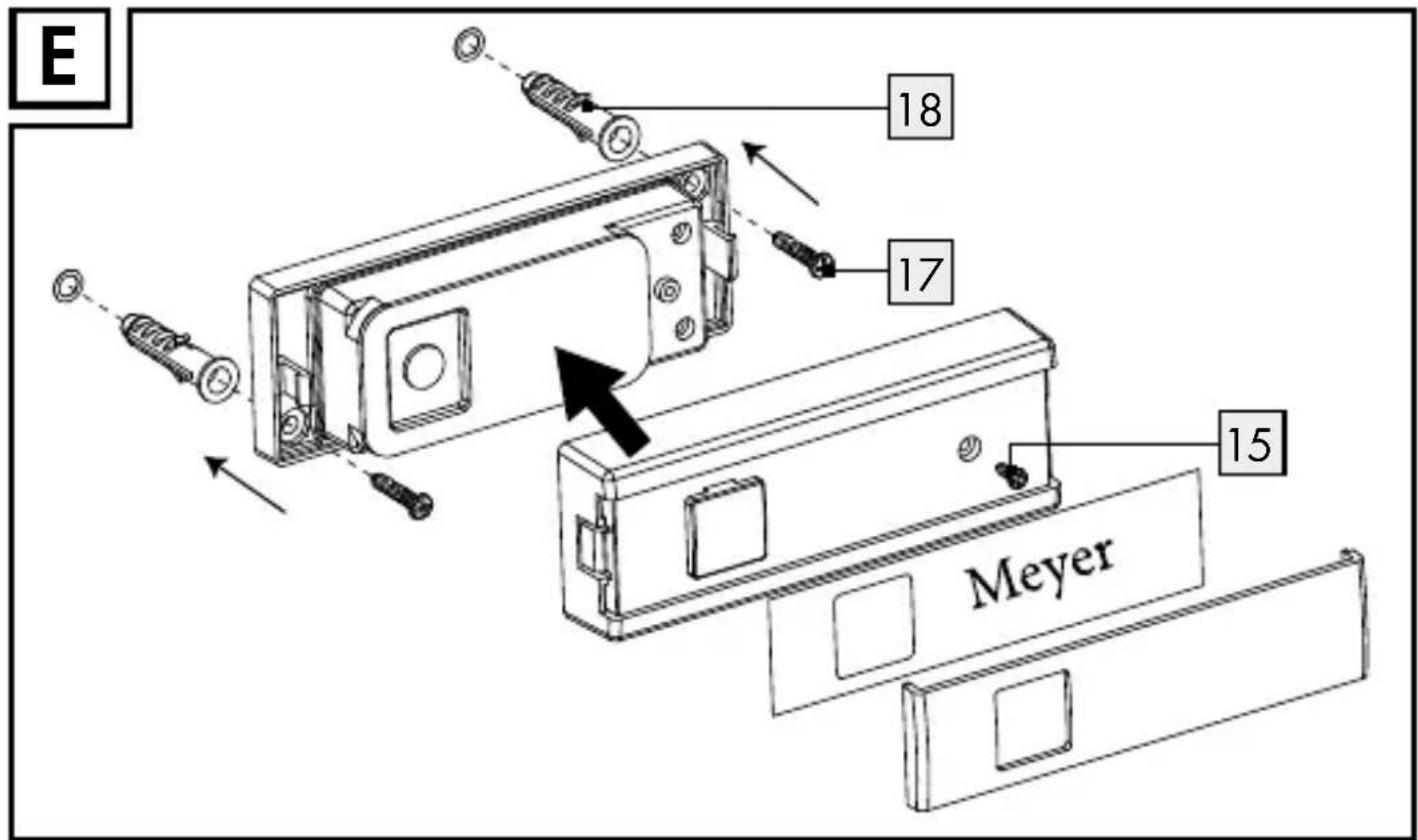
Mount the transmitter (see Fig. E)
● Preparing for use
For first time use, please remove the protective foil from the name plate of the transmitter and insert your name plate into the recess on the transmitter.
Replace the protective foil on the transmitter.
- Inserting / replacing the batteries
☐ Insert the batteries to provide power to the product before preparing it for use.
CAUTION! Use the indicated battery types only. Failure to observe this advice may result in damage to the product.
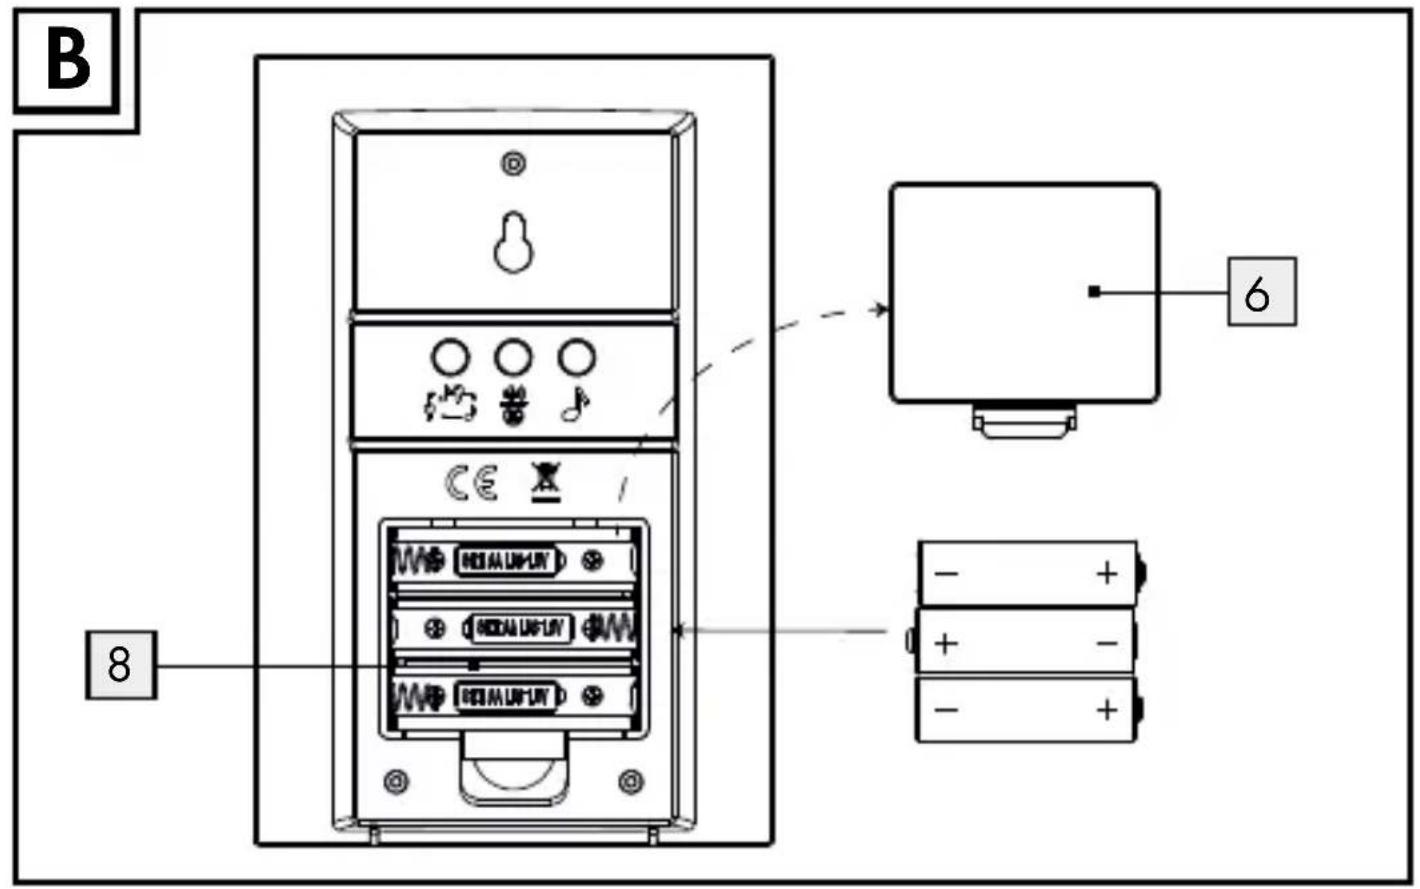
Receiver (see Fig. B):
☐ Remove the battery compartment cover 6 from the back of the receiver.
☐ Remove the used batteries, if present.
☐ Insert 3 batteries (1.5 V = direct current), type AA).
Note: Ensure correct polarity. This is indicated in the battery compartment 8.
☐ Close the battery compartment cover 6.
Transmitter:
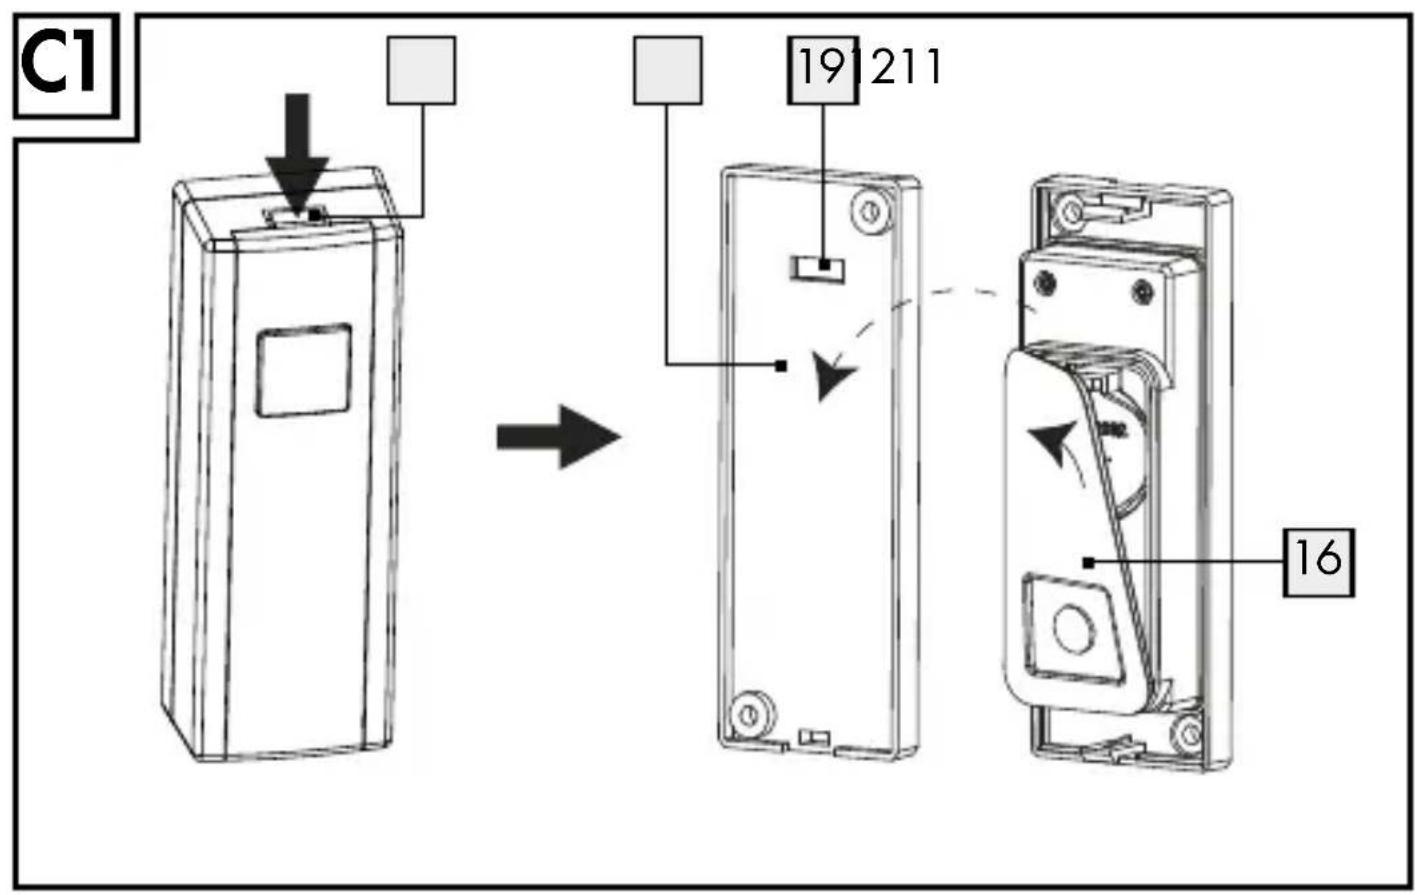
☐ Remove the name plate from the holder 12 by pressing the lock 11 and remove the rubber cover 16 (see fig. C1).
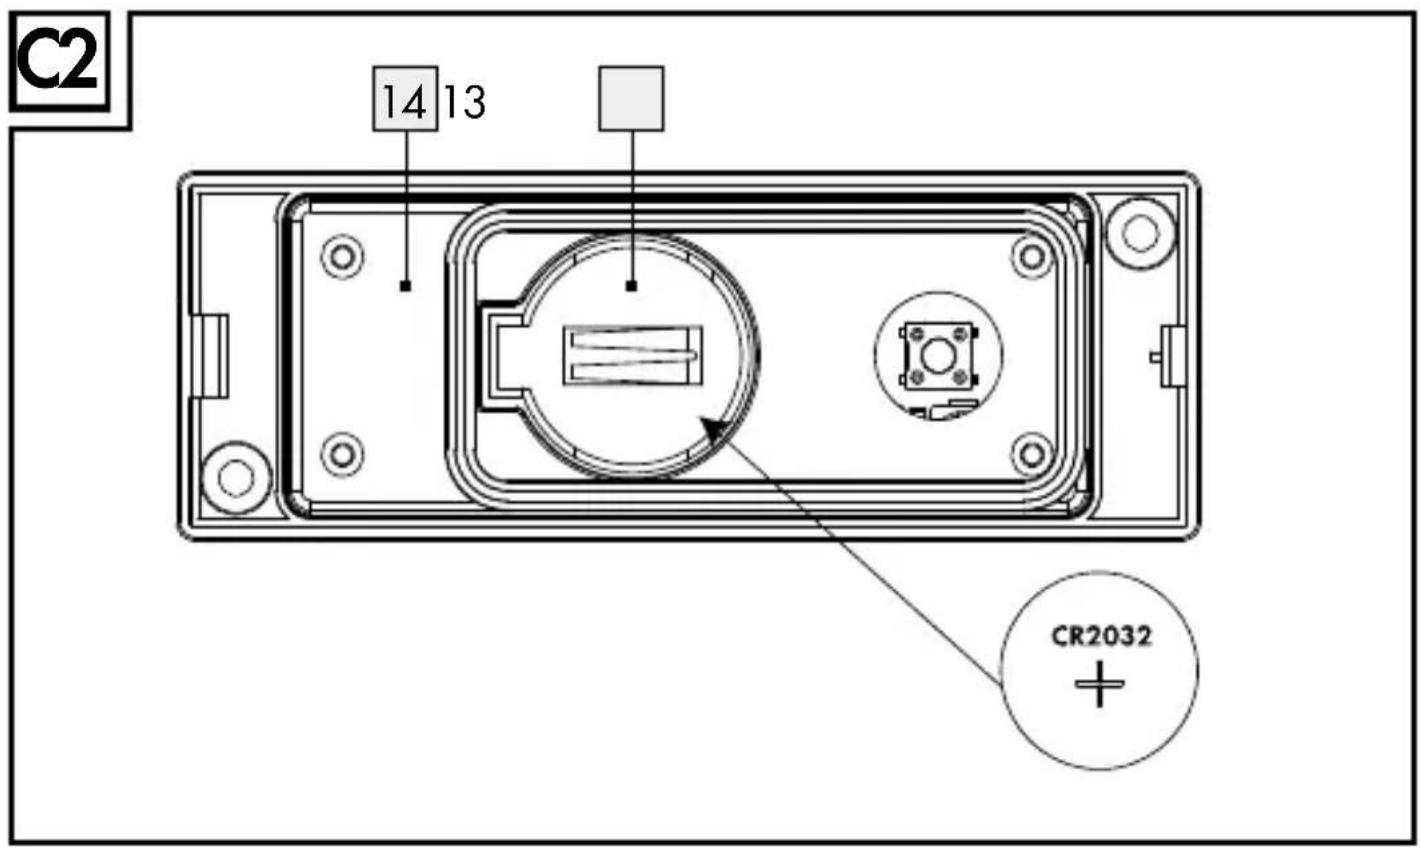
☐ Remove the used batteries, if present (see fig. C2).
☐ Insert a battery (3 V = direct current), type CR 2032). The side marked "+" must face upwards.
☐ Install the rubber cover 16, close the holder 12 of the transmitter back on to the back of the product.
Fasten the holder, screw 15 of the transmitter back on to the back of the product & name plate.
The transmitter battery compartment with the holder must be installed by the screw 15 while in use. If the holder is damaged, stop using the product.
- Synchronising transmitter/receiver
The product works on 434 MHz which is a quite common frequency. To ensure that the function gets no influenced be doorbells in the neighborhood, the transmitter and the receiver hence have to be synchronized in regard of the encryption. Every transmitter is working with a different encryption of the signal.
Synchronise the transmitter and receiver as follows:
☐ As soon as the batteries are installed, the receiver enters synchronizing mode for approx. 2 minutes. During the synchronizing mode, the signal indicator 1 steadily lights up in blue color.
☐ You can also manually enter synchronising mode by holding the synchronising button 5 for approx. 3 seconds.
☐ The signal indicator 1 on the receiver will steadily light up for approx. 1 minute, to indicate that the receiver is in synchronizing mode.
☐ Press the chime button 9 of the transmitter, while the receiver is in synchronise mode. If the receiver receives the signal, the steady blue light of the signal indicator 1 flickers 6 times to indicate that the synchronization is successful.
- Setting the signal type
The receiver can indicate the reception of a door signal either both optically and acoustically, acoustically or optically.
☐ Using the signal type selector button 3, select whether the signal is to be indicated both optically and acoustically or acoustically or optically.
☐ Press the signal type selector button 3 once. An acoustical signal will sound up and the afterwards the signal indicator 1 will flash. The receiver will now indicate the door signal acoustically and optically. Press again the signal type selector button 3. An acoustical signal will sound. The receiver will now indicate the
door signal acoustically. Press again the signal type selector button 3. The receiver will now indicate the door signal in an optical way.
When the battery of receiver is drained, signal indicator will flash. You can replace the used battery with a new one of the same type.
- Setting the volume
☐ Press the volume button 5 until the desired volume is reached. There are a total of 4 possible volume settings: very loud, loud, medium, soft.
- Selecting the chime
Note: The product has 16 different chimes.
☐ Press the melody selection button 4. The first audible signal sounds.
☐ Press the melody selection button 4 again to move on to the next audible signal.
☐ Repeat this process until you have selected your desired audible signal. The last-selected audible signal is automatically stored.
- The procedure for connecting the transmitter to existing bell system or existing doorbell button
☐ Remove the holder 12 by pressing the lock 11 from the back of the transmitter and remove the rubber cover 16 (see fig. C1).
☐ Open the inner cover 14 by cross head screw driver (see fig. F).
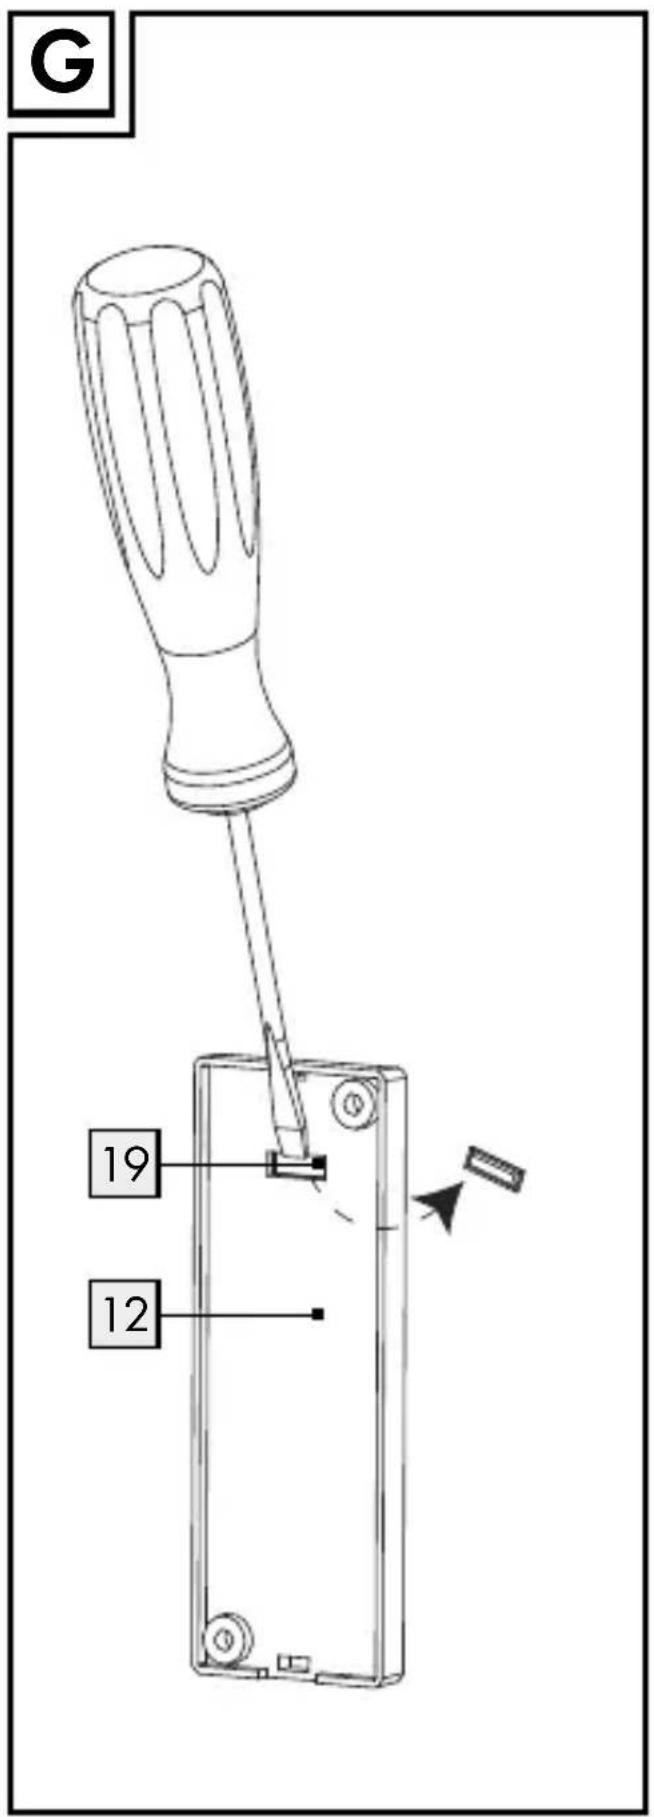
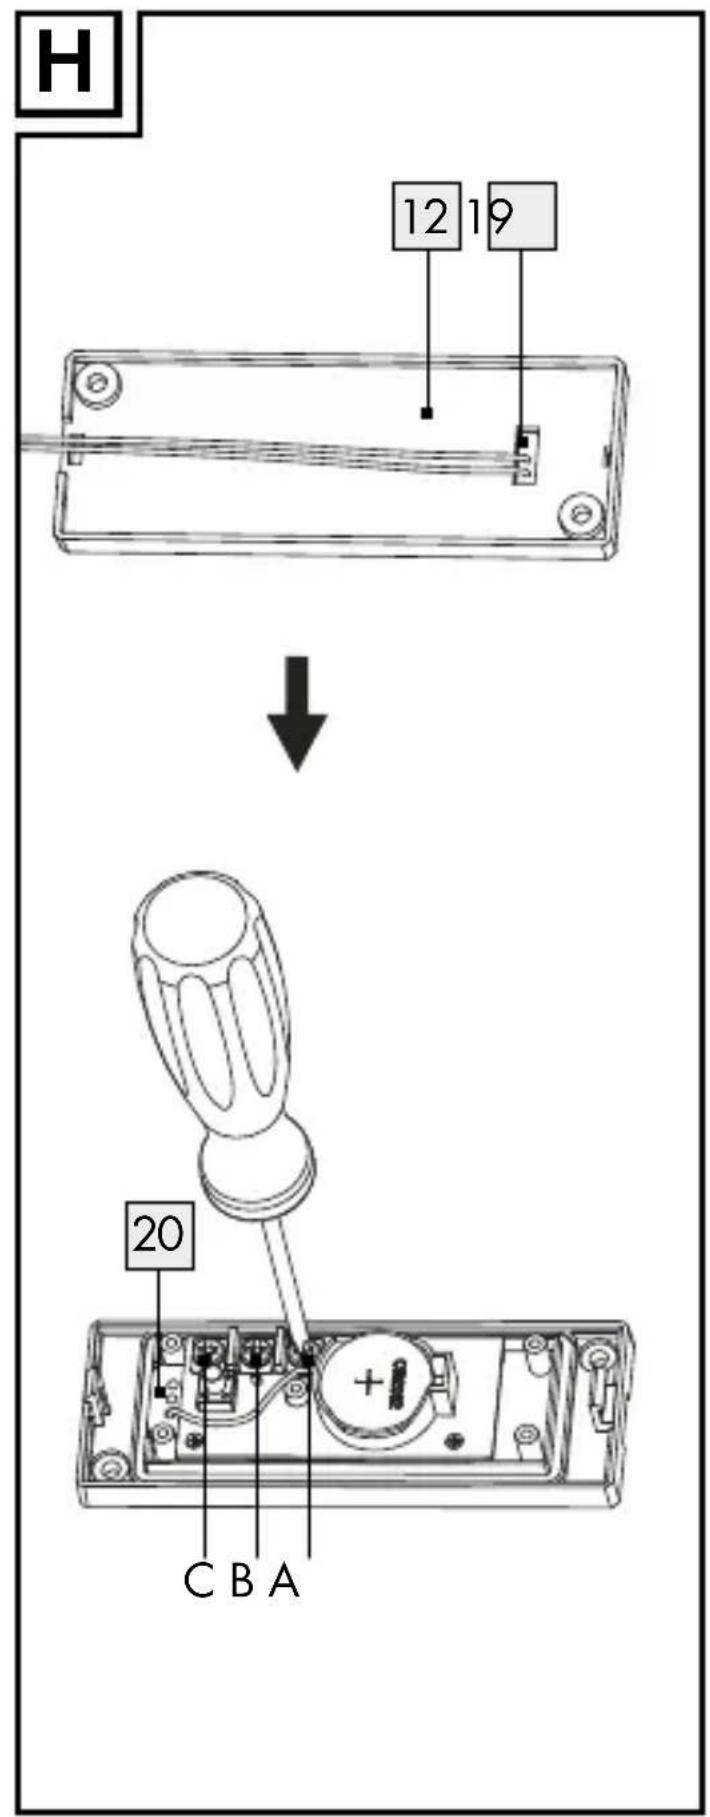
☐ Remove the plastic clip of cable exit hole 19 with a flat head screw driver (see fig. G).
☐ Insert the cable through cable holder 20 and cable exit hole 19 (see fig. H).
☐ Connect cable to the terminals A and C (for connecting to existing doorbell) or the terminals B and C (for connecting to existing door bell button) by using screw driver (see fig. H).
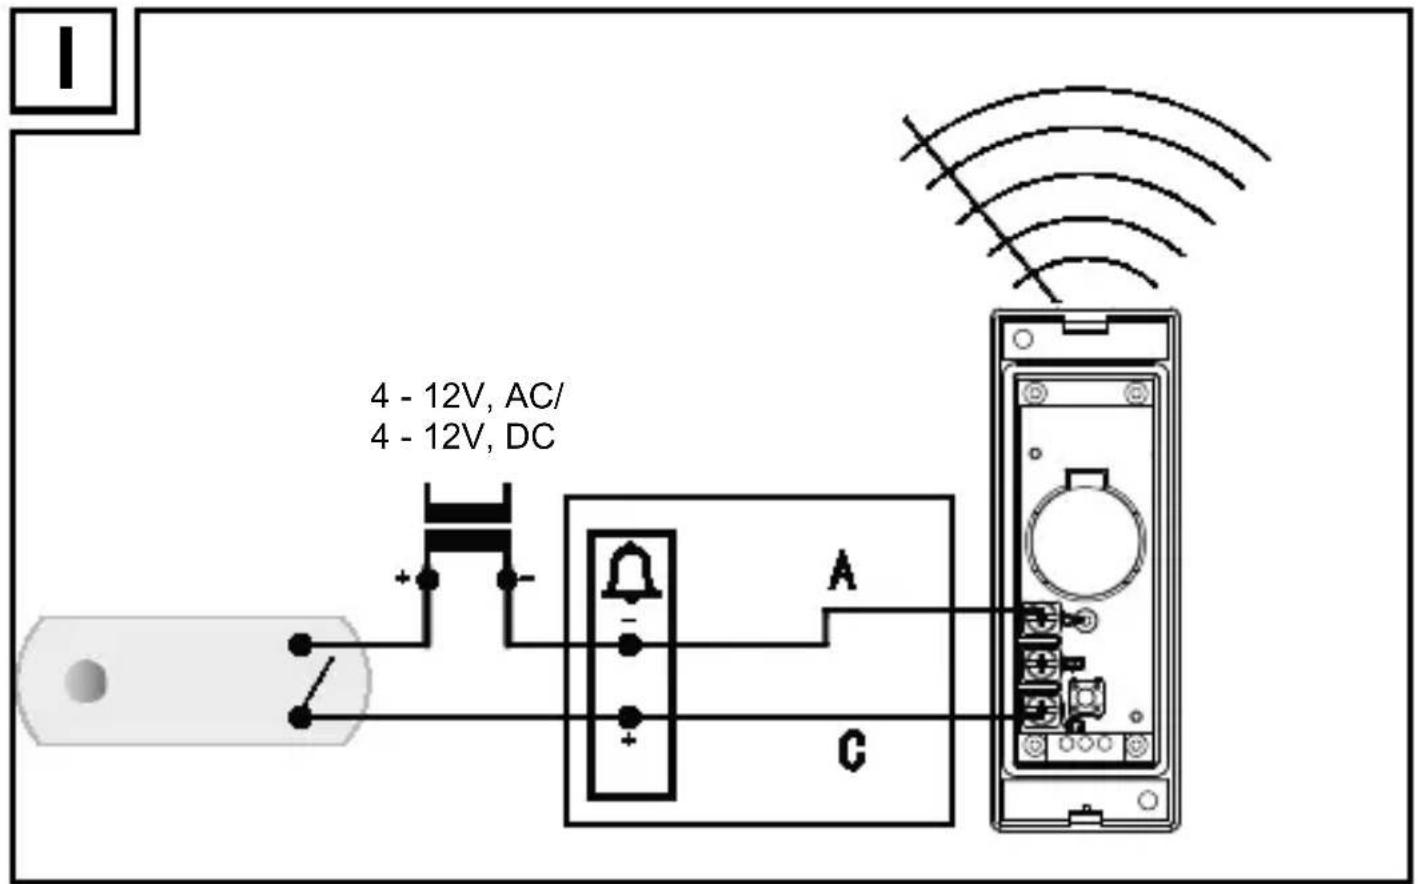
- Connecting the transmitter to a existing bell system (see Fig. I)
Extension of an already existing doorbell system:
An already existing doorbell system can be extended with this product.
The operating voltage of the doorbell system must be between 4–12 V. It makes no difference whether this comes from direct current or 50 Hz alternating current. In the event that you are dealing with an existing doorbell system using direct current, you must connect the positive terminal of the doorbell to contact C of the transmitter and the negative terminal to contact A of the transmitter.
IMPORTANT! Never reverse polarity. This can damage the product. The connection terminals A and C, found on the circuit board of the transmitter as shown in fig. I must be connected directly to the electrical connection terminals of the signal generators (e.g. bell). The button of the transmitter may also be used for this type of operation.
Note: Contact a qualified electrician in case of problems during installation.
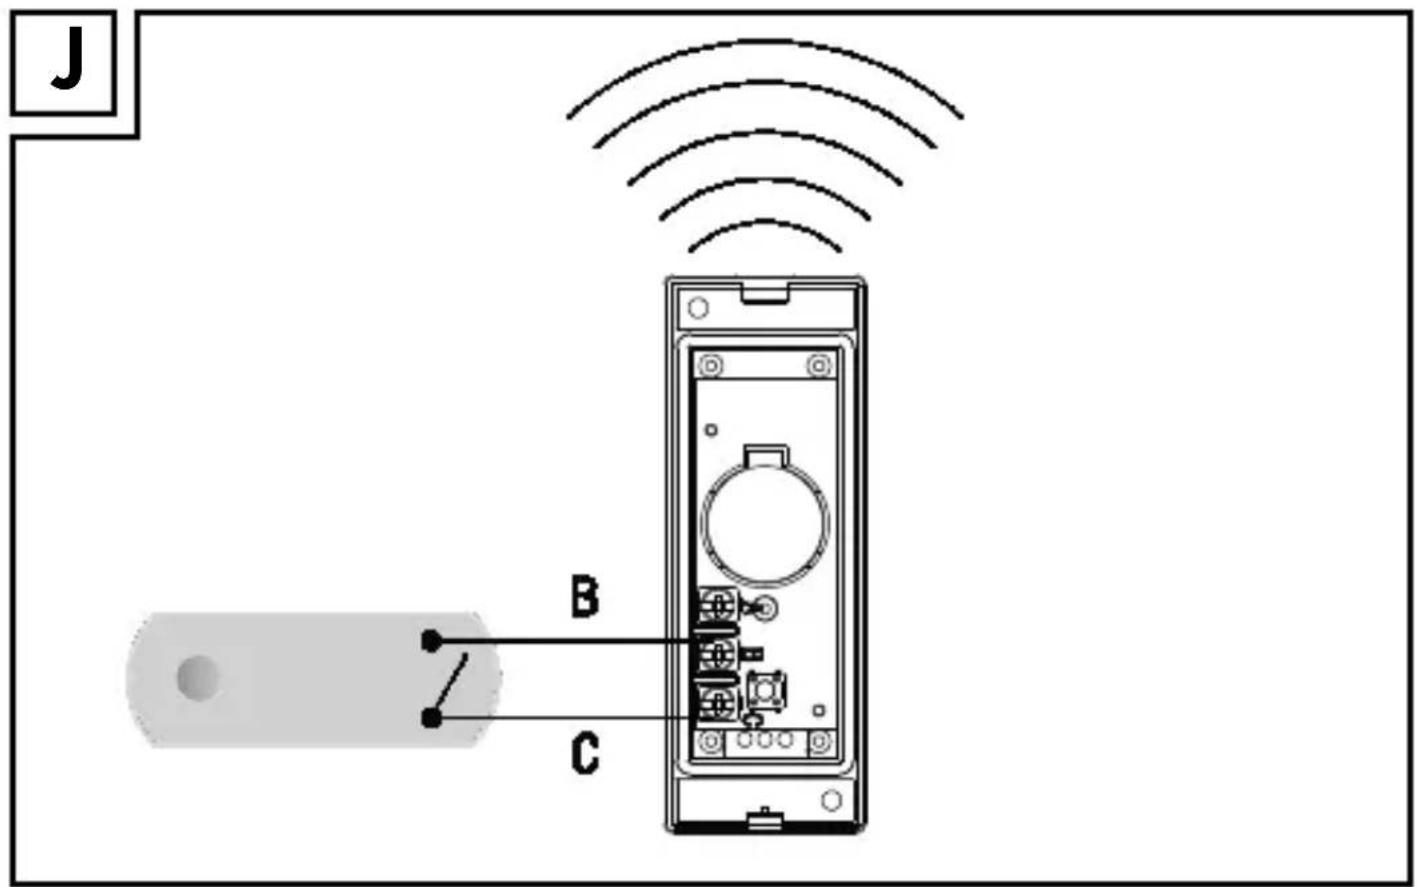
- Connecting a existing doorbell button (see Fig. J)
The separate bell button must not be connected to the existing door-bell system. The battery must remain in the transmitter. The B and C terminals are to this purpose with a two-core cable connected to the bell push. The bell push may only be connected to the transmitter.
●Troubleshooting
After the influence of extraordinary environmental conditions (e.g. a strong electromagnetical field) the function of the product may be affected. In this case, please take off the batteries of the transmitter and the receiver for approximately 2 minutes. Then proceed again as described in the section "Synchronising the transmitter / receiver".
Electrostatic discharges may lead to malfunctions. If such malfunctions do occur, remove the batteries for a short time and then replace them
again. Then proceed again as described in the section "Synchronising the transmitter/receiver".
- Cleaning and maintenance
■ Under no circumstances should you use liquids or detergents, as these will damage the product.
☐ The product should only be cleaned on the outside with a soft dry cloth.
●Disposal
The packaging is made entirely of recyclable materials, which you may dispose of at local recycling facilities.
Observe the marking of the packaging materials for waste separation, which are marked with abbreviations (a) and numbers (b) with following meaning: 1–7: plastics / 20–22: paper and fibreboard / 80–98: composite materials.

The product and packaging materials are recyclable, dispose of it separately for better waste treatment. The Triman logo is valid in France only.

Contact your local refuse disposal authority for more details of how to dispose of your worn-out product.
To help protect the environment, please dispose of the product properly when it has reached the end of its useful life and not in the household waste. Information on collection points and their opening hours can be obtained from your local authority.
Faulty or used batteries / rechargeable batteries must be recycled in accordance with Directive 2006/66/EC and its amendments. Please return the batteries / rechargeable batteries and / or the product to the available collection points.
Environmental damage through incorrect disposal of the batteries / rechargeable batteries!
Batteries / rechargeable batteries may not be disposed of with the usual domestic waste. They may contain toxic heavy metals and are subject to hazardous waste treatment rules and regulations. The chemical symbols for heavy metals are as follows: Cd = cadmium, Hg = mercury, Pb = lead. That is why you should dispose of used batteries / rechargeable batteries at a local collection point.
● Simplified EU declaration of conformity
Hereby, OWIM GmbH & Co. KG, Stiftsbergstraße 1, DE-74167 Neckarsulm, GERMANY, declares that the product (Premium Wireless Doorbell HG00783A / HG00783B), is in compliance with Directives 2014/53/EU.
The full text of the EU declaration of conformity is available at the following internet address: www.owim.com
- Warranty
The product has been manufactured to strict quality guidelines and meticulously examined before delivery. In the event of product defects you have legal rights against the retailer of this product. Your legal rights are not limited in any way by our warranty detailed below.
The warranty for this product is 3 years from the date of purchase. Should this product show any fault in materials or manufacture within 3 years from the date of purchase, we will repair or replace it – at our choice – free of charge to you.
The warranty period begins on the date of purchase. Please keep the original sales receipt in a safe location. This document is required as your proof of purchase. This warranty becomes void if the product has been damaged, or used or maintained improperly.
The warranty applies to defects in material or manufacture. This warranty does not cover product parts subject to normal wear, thus possibly considered consumables (e.g. batteries) or for damage to fragile parts, e.g. switches, rechargeable batteries or glass parts.