
SSM 300 B1 - Hand blender SILVERCREST - Free user manual and instructions
Find the device manual for free SSM 300 B1 SILVERCREST in PDF.

| Product Type | Hand Blender |
| Brand | SilverCrest |
| Model | SSM 300 B1 |
| Power Rating | 300 W |
| Speed Settings | 2 speed levels + turbo boost |
| Blade Material | Stainless Steel |
| Shaft Material | Stainless Steel |
| Handle Material | Plastic, soft-grip |
| Immersion Depth | Up to 20 cm |
| Weight | Approx. 0.6 kg |
| Dimensions (L x W x H) | 40 x 6 x 6 cm |
| Cord Length | 1.2 m |
| Dishwasher Safe Parts | Blender shaft, whisk attachment (if present) |
| Care Instructions | Wipe handle with damp cloth; rinse shaft under running water |
| Safety Features | Overheat protection, non-slip handle |
| Accessories Included | Measuring beaker (600 ml), whisk attachment |
| Spare Parts Availability | Contact SilverCrest customer service |
| Repairability Index | Moderate; spare parts available for key components |
| Guarantee | 2 years |
Frequently Asked Questions - SSM 300 B1 SILVERCREST
User questions about SSM 300 B1 SILVERCREST
0 question about this device. Answer the ones you know or ask your own.
Ask a new question about this device
Download the instructions for your Hand blender in PDF format for free! Find your manual SSM 300 B1 - SILVERCREST and take your electronic device back in hand. On this page are published all the documents necessary for the use of your device. SSM 300 B1 by SILVERCREST.
USER MANUAL SSM 300 B1 SILVERCREST
User manual and service information
HD
Instrucii de deservire si informai cu privare la service-are
CN
natural_image
Black cylindrical object with a gray arrow pointing to a small inset image, no visible text or symbols.English 2
Hrvatski 14
Română....27
Български 40
Ελληνικά 53
Deutsch....66
Table of Contents
- Introduction....3
- Intended use....3
- Package contents.... 3
- Technical specifications .... 4
4.1. SO time....4
4.2. Cool-down time 4
- Safety instructions ....4
- Copyright....9
- Before you start....9
7.1. Fitting the purée attachment 9
7.2. Removing the purée attachment....9
- Getting started 10
- Cleaning 10
- Storage when not in use 11
- Troubleshooting.... 11
- Environmental regulations and disposal information.... 11
- Conformity notes .... 11
- Warranty information .... 12
1. Introduction
Thank you for choosing a SilverCrest product. These Operating Instructions contain important instructions on safety, operation and disposal of the device. Before using the device, read all the operating and safety instructions and only use the device as described in the instructions.
2. Intended use
This stick blender is a household appliance and must be used exclusively for chopping and puréeing various boneless foodstuffs. It may not be used outdoors or in tropical climates. The stick blender has not been designed for corporate or commercial applications. Use the stick blender in domestic environments for private applications only. Any other use does not correspond to the intended use. This stick blender fulfils all relevant norms and standards relating to CE conformity. In the event of any modification to the stick blender that was not approved by the manufacturer, compliance with these standards is no longer guaranteed. The manufacturer shall not be liable for any damage or malfunctions resulting from such modifications.
Observe the regulations and laws in the country of use.
3. Package contents
Remove the stick blender and all the accessories from the packaging. Remove the packaging material and check that all components are complete and undamaged. If you find anything missing or damaged, please contact the manufacturer.
• Motor unit with power cable and plug
• Purée attachment with blades
• These operating instructions
These operating instructions have a fold-out cover. On the inside of the cover is a diagram of the SilverCrest SSM 300 B1 stick blender with all its control elements numbered. You can keep this page folded out whilst reading the different chapters of these operating instructions. This allows you to refer to the relevant controls at any time. The meanings of the numbers are as follows:
| 1 On button (normal speed) | |
| 2 On button (TURBO speed) | |
| 3 | Motor unit |
| 4 | Purée attachment |
4. Technical specifications
| Manufacturer TARGA GmbH | |
| Name SilverCrest SSM 300 B1 | |
| Power supply 220-240 VAC, 50/60 | Hz |
| Power consumption 300 W | |
| SO time 1 minute | |
| Length of power cord approx. 150 cm | |
| Safety class |  |
| Dimensions (H x W x D) approx. 377 x 65 x 65 mm | |
| Weight inc. purée attachment approx. 668 g |
The technical data and design may be changed without prior notice.
4.1. SO time
The SO time (short operating time) indicates how long the stick blender can be operated without the motor overheating and getting damaged. The short operating time for the stick blender is 1 minute.
4.2. Cool-down time
After the maximum operating time of up to 1 minute, allow the device to cool for at least 1 minute before continuing to purée/mix.
5. Safety instructions
Before you use this appliance for the first time, please read the following notes in this manual and heed all warnings, even if you are familiar with handling electronic devices and household appliances. Keep these operating instructions in a safe place for future reference. If you sell the device or give it away, pass on the operating instructions at the same time. The operating instructions are part of the product.
Explanation of symbols used

DANGER! This symbol and the word "Danger" denote a potentially dangerous situation. Ignoring it can lead to severe injury or even death.

WARNING! This symbol denotes important instructions for the safe operation of the stick blender and the safety of the user.

DANGER! This symbol denotes danger for human health and risk of death and/or risk of damage to equipment due to electric shock.

Risk of fire! This symbol warns that fires could start if the warning is left unheeded.

This symbol indicates that you should never immerse the motor unit (3) in water.

This symbol designates products whose physical and chemical composition has been tested and found to be non-hazardous to health when used in contact with food in accordance with the requirements of Ordinance EU 1935/2004.

This symbol denotes further information on the topic.
Predictable misuse
- The stick blender must not be used for chopping very hard foodstuffs. This includes, for example, frozen foods, coffee beans, grains and spices. It cannot be used for processing chocolate.
• Non-food substances should not be processed.
This could damage the stick blender.
Children and persons with disabilities
- This appliance must not be used by children. The stick blender and its power cord should be kept out of the reach of children. Make sure that children are supervised and do not play with this
appliance. Keep the purée attachment (4) out of the reach of children to ensure that they cannot injure themselves with it.

DANGER! Packaging material is not a toy. Do not allow children to play with plastic bags. There is a risk of suffocation. Keep the device out of the reach of children.
- This device may be used by persons with reduced physical, sensory or mental capabilities and/or who have no experience in, or knowledge of, using such appliances providing they are supervised or have been instructed in how to use the appliance safely and have understood the associated risks.

DANGER! Risk of injury
- Disconnect the stick blender from the mains before assembling, disassembling or cleaning it. The same applies when you are not using it and during thunderstorms. There is a danger of injury!
- Wait for the blades on the purée attachment (4) to stop before removing the motor unit (3). Never put your hands near the blades while they are turning. There is a danger of injury!
- Be careful when cleaning the stick blender! The blades on the purée attachment (4) are very sharp. There is a danger of injury!
- After switching off, wait for the blades to stop moving before removing the stick blender from the food. There is a danger of injury!
- Never put your hands near the blades of the purée attachment (4) while they are moving or put objects, loose clothing or long hair near the blades. There is a danger of injury!

DANGER: Risk of electric shock
- Only connect the stick blender to the mains power once the motor unit (3) and the purée attachment (4) are fitted together. There is a risk of electric shock!
- Only connect the stick blender to a properly installed, easily accessible wall outlet whose mains voltage corresponds to that on the rating plate. After connecting the appliance, the wall outlet must still be easily accessible so that you can remove the mains plug quickly in the event of an emergency.
- Never operate the stick blender near a bath tub, a shower or a full sink.
- The power cord and the mains plug must not be damaged. Never replace a damaged power cord, instead contact customer services (see chapter on "Warranty information"). There is a risk of electric shock in the case of damaged power cords.
- Never open the housing of the motor unit (3). It does not contain any replaceable parts. Opening the housing can expose you to the risk of electric shock.
- If you notice any smoke, unusual noises or strange smells, immediately unplug the mains plug from the socket. If this occurs, the stick blender should no longer be used until it has been inspected by authorised service personnel. Never inhale smoke from a possible device fire. If you do inadvertently inhale smoke, seek medical attention. Inhaling smoke can be bad for your health, there is a risk of injury!
- Make sure that the power cord cannot be damaged by sharp edges or hot spots. Do not trap or squash the power cord. Always hold the power cord by the mains plug and never pull on the cord itself. Always lay the power cord so it does not present a trip hazard. There is a danger of injury!
- Always disconnect the device from the mains supply if it is left unattended and before assembling, disassembling or cleaning, or if there is a problem with the device. There is a risk of electric shock!

Never immerse the motor unit (3) in water and do not allow liquid to penetrate into the casing of the motor unit (3).
- If liquid does penetrate into the casing of the motor block (3), unplug the mains plug from the socket and consult customer services (see chapter on “Warranty information”). There is a risk of electric shock!
- Never touch the motor unit (3), the power cord or the mains plug with wet hands. There is a risk of electric shock!
- Disconnect the stick blender from the mains immediately after use. The device is only without electrical power if the mains plug is disconnected. There is a risk of electric shock!

DANGER: Risk of fire
After the maximum operating time of up to 1 minute, allow the device to cool for at least 1 minute before continuing to purée/mix. Afterwards, wait for it to cool down. There is a risk of fire.
6. Copyright
All the contents of this operating instructions are protected by copyright and provided to the reader for information only. Copying data and information without the prior explicit written consent of the author is strictly forbidden. This also applies to any commercial use of the contents and information. All texts and diagrams are up-to-date as of the date of printing. Subject to change without notice.
7. Before you start
Remove the SSM 300 B1 stick blender and all accessories from the packaging and check that the package contents are complete. Remove all protective films. Keep the packaging material away from children and dispose of appropriately.
Before first use, clean the stick blender carefully as described in the chapter on "Cleaning".
Dry all parts completely before assembling the stick blender.
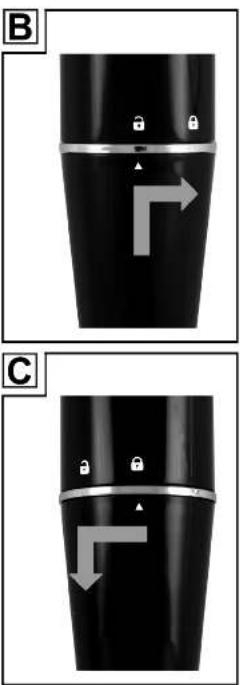
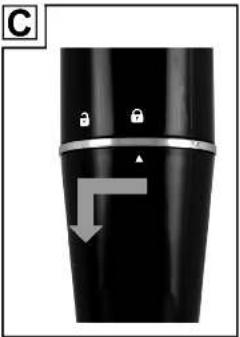
The motor unit (3) has the following markings: and there is an arrow marking (▲) on the purée attachment (4). These markings help you fit and remove the purée attachment (4).

natural_image
Close-up of a black cylindrical object with three white lock icons and a triangular pointer, no text or symbols visible.7.1. Fitting the purée attachment
- Place the motor unit (3) on the purée attachment (4) so that the arrow marking (▲) points to the open lock on the motor unit (3). See figure B.
- Now twist the purée attachment (4) clockwise until the arrow marking (▲) points to the closed lock on the motor unit (3). You should hear and feel the purée attachment (4) click into place.
7.2. Removing the purée attachment
- Twist the purée attachment (4) anticlockwise until the arrow marking ▲ on the purée attachment (4) points to the open lock 🔒 on the motor unit (3). See figure C.
- Now remove the motor unit (3) from the purée attachment (4).
8. Getting started
The stick blender is suitable for the following applications
chopping and puréeing fruit and vegetables in soups, sauces and dips
mixing drinks
making milkshakes

It is recommended that you adjust the speed of the stick blender to the food you are processing. Use normal speed for soft foods and the TURBO speed for harder foods.
If possible, put the food you wish to chop in a tall, narrow container with a flat bottom. This is perfect to achieve even puréeing results. Of course, you can also use the stick blender in a normal saucepan.
In order to avoid injuries from the rotating blades, only switch the stick blender on once the purée attachment (4) is in the food.
Mix or purée your food as follows:
- Put the food to be processed in a suitable container or saucepan.
- Place the purée attachment (4) into the food vertically.
- Start the stick blender using one of the On switches (1) or (2) depending on your requirements and keep the selected button pressed while mixing or puréeing. If the purée attachment (4) sticks to the bottom of the container, release the button briefly and then continue mixing.
- To ensure even processing of the mix, move the stick blender gently backwards and forwards.
- When you have the results you require, release the On switch (1) or (2) while the purée attachment (4) is still in the mixture.
- Wait until the blades have stopped moving before removing the purée attachment (4) from the puréed food.
9. Cleaning

Warning about damaging the unit! Do not use abrasive or astringent detergents or tools which could scratch the surface (e.g. metal sponges). Otherwise you could damage the stick blender.

It is recommended that you clean the purée attachment (4) right after you use it to avoid the food drying on it. Rinse the purée attachment (4) off straight-away with cold water, especially if you have been processing very salty foods.
- Unplug the mains plug from the wall socket.
- Remove the purée attachment (4) from the motor unit (3).
- Clean the motor unit (3) with a slightly damp cloth and then dry it carefully.
- The purée attachment (4) can be washed up in water. After use, rinse it with plenty of clean water to remove food residues. Then dry it carefully.
• Alternatively, the purée attachment (4) can also be cleaned in the dishwasher.
10. Storage when not in use
If the stick blender is not to be used for an extended period, store it in a clean and dry place out of the reach of children.
11. Troubleshooting
If your stick blender does not work as normal, follow the instructions below to try to solve the problem. If working through the tips below does not fix the fault, please contact our hotline (see "Warranty information" section).
The stick blender does not work.
- The mains plug is not plugged in. Insert the mains plug into a mains socket.
- The mains socket is defective. Test the appliance in a different mains socket that you are certain is working.
The blades do not turn / turn slowly
- The motor unit (3) and the purée attachment (4) are not fitted together correctly. Disconnect the device from the mains and check the fitting.
- Is there an obstacle in the mix container? Remove it.
- The food you are mixing is too hard or too tough.
12. Environmental regulations and disposal information

natural_image
Symbol of a trash bin crossed with no text or numbers, representing waste sorting or disposal (no text present)Devices marked with this symbol are subject to the European Directive 2012/19/EU. All electrical and electronic devices must be disposed of separately from household waste at official disposal centres. Avoid damage to the environment and risks to your personal health by disposing of the device properly. For further information about proper disposal, contact your local government, disposal bodies or the shop where you bought the device.
Dispose of all packaging in an environmentally friendly manner. Cardboard packaging can be taken to paper recycling centres or public collection points for recycling. Any film or plastic contained in the packaging should be taken to your public collection points for disposal.
13. Conformity notes

This appliance has been approved for compliance with the basic and other relevant requirements of the Low-voltage Directive 2014/35/EU, the EMC Directive 2014/30/EU, the ErP Directive 2009/125/EC and the RoHS Directive 2011/65/EU.
In order to receive the complete EU declaration of conformity, please send an e-mail to the following e-mail address: ce@targa.de
14. Warranty information
Warranty of TARGA GmbH
Dear Customer,
This device is sold with three years warranty from the date of purchase. In the event of product defects, you have legal rights towards the seller. These statutory rights are not restricted by our warranty as described below.
Warranty conditions
The warranty period commences upon the date of purchase. Please keep the original receipt in a safe place as it is required as proof of purchase. If any material or manufacturing faults occur within three years of purchase of this product, we will repair or replace the product free of charge as we deem appropriate.
Warranty period and legal warranty rights
The warranty period is not extended in the event of a warranty claim. This also applies to replaced and repaired parts. Any damage or defects discovered upon purchase must be reported immediately when the product has been unpacked. Any repairs required after the warranty period will be subject to charge.
Scope of warranty
The device was carefully manufactured in compliance with stringent quality guidelines and subjected to thorough testing before it left the works. The warranty applies to material and manufacturing faults. This warranty does not cover product components which are subject to normal wear and which can therefore be regarded as wearing parts, or damage to fragile components such as switches, rechargeable batteries or components made of glass. This warranty is void if the product is damaged, incorrectly used or serviced. To ensure correct use of the product, always comply fully with all instructions contained in the user manual. The warnings and recommendations in the user manual regarding correct and incorrect use and handling of the product must always be observed and complied with. The product is solely designed for private use and is not suitable for commercial applications. The warranty is rendered void in the event of incorrect handling and misuse, if it is subjected to force, and also if any person other than our authorised service technicians interfere with the device. No new warranty period commences if the product is repaired or replaced.
Submitting warranty claims
To ensure speedy handling of your complaint, please note the following:
- Before using your product for the first time, please read the enclosed documentation carefully. Should any problems arise which cannot be solved in this way, please call our hotline.
- Always have your receipt, the product article number as well as the serial number (if available) to hand as proof of purchase.
- If it is not possible to solve the problem on the phone, our hotline support staff will initiate further servicing procedures depending on the fault.

Service

Phone: 020 - 70 49 04 03
E-Mail: service.GB@targa-online.com

Phone: 01-4370121
E-Mail: service.IE@targa-online.com

Phone: 027 78 11 03
E-Mail: service.MT@targa-online.com

Phone: 02 - 20 09 025
E-Mail: service.CY@targa-online.com
IAN: 275167

Manufacturer
Please note that the following address is not a service address. First contact the service point stated above.
TARGA
GmbH
Coesterweg 45
59494 SOEST
GERMANY
Popis sadržaja
- Uvod.... 15
- Namjenska uporaba 15
- Isporučena oprema 15
- Tehničke karakteristike 16
4.1. KR vrijeme....16
natural_image
Close-up of a black cylindrical object with three white lock icons and a triangular pointer, no text or symbols visible.7.1. Montiranje nastavka za usitnjavanje
- Postavite motorni sklop (3) na nastavak za usitnjavanje (4) tako da je oznaka strelice (▲) usmjerena prema otvorenom lokotu 📄 na motornom sklopu (3). Vidi sliku B.
- Okrenite nastavak za usitnjavanje (4) nadesno tako da oznaka strelice (▲) dode ispod zatvorenog lokota 📄 na motornom sklopu (3). Morate čuti i osjetiti da se nastavak za usitnjavanje (4) uglavio.
7.2. Demontiranje nastavka za usitnjavanje
- Okrenite nastavak za usitnjavanje (4) nalijevo tako da oznaka strelice ▲ na nastavku za usitnjavanje (4) dođe ispod otvorenog lokota 📄 na motornom sklopu (3). Vidi sliku C.
- Skinite motorni sklop (3) s nastavka za usitnjavanje (4).