
SFN 1.5 A1 - Gps SILVERCREST - Free user manual and instructions
Find the device manual for free SFN 1.5 A1 SILVERCREST in PDF.

| Product Type | Outdoor Handheld GPS Unit |
| Brand | SilverCrest |
| Model | SFN 1.5 A1 |
| Dimensions (W x H x D) | 52 x 83.3 x 17.3 mm |
| Weight | 57 g |
| Power Supply | 5 V via USB cable |
| Battery Type | Li-polymer, 5 V, 750 mAh |
| Battery Runtime | Up to 17 hours (backlight off) |
| Charging Time | Up to 5 hours via USB |
| Display | Backlit, 128 x 128 pixels |
| GPS Receiver | GSC3F-7990, accuracy up to 10 m |
| Memory | 32 MB, 25000 trackpoints, up to 50 routes with 2500 waypoints (50 per route) |
| USB Port | USB 2.0, compatible with USB 1.1 |
| Water Resistance | IPX-4 (splashproof from any direction) |
| Operating Temperature | +5 to +35 °C |
| Operating Humidity | < 85 % RH |
| System Requirements | Windows 7, Vista or XP; Pentium III; 256 MB RAM; 1 GB hard disk; USB port; CD/DVD drive; Internet connection for maps |
| Key Functions | Route recording, track back, POI saving, homing mode, compass, altimeter, speed, distance, calorie counter, stopwatch |
| Mounting Options | Handlebar mount (included) and arm belt (included) |
| Maintenance | Clean with dry cloth; do not use solvents |
| Warranty | 3 years |
Frequently Asked Questions - SFN 1.5 A1 SILVERCREST
User questions about SFN 1.5 A1 SILVERCREST
0 question about this device. Answer the ones you know or ask your own.
Ask a new question about this device
Download the instructions for your Gps in PDF format for free! Find your manual SFN 1.5 A1 - SILVERCREST and take your electronic device back in hand. On this page are published all the documents necessary for the use of your device. SFN 1.5 A1 by SILVERCREST.
USER MANUAL SFN 1.5 A1 SILVERCREST
www.lidl-service.com
GPS para outdoor SFN 1.5 A1
TARGA GMBH
Coesterweg 45 D-59494 Soet
Outdoor Handheld GPS Unit
User manual and service information
PT
Computador GPS para o
exterior
natural_image
Technical line drawing of a mechanical clamp or bracket assembly with a cylindrical base and a circular component above (no text or symbols)
natural_image
Technical line drawing of a mechanical clamp or bracket assembly with a cylindrical base and a circular component above (no text or symbols)
Outdoor Handheld GPS Unit
User manual and service information
Contents
Introduction 75
Intended Use 75
Trademark information....75
Package contents 76
Overview 76
Technical specifications 77
GPS device....77
System requirements....77
Safety instructions 78
Getting started 79
Charging the battery....79
Installing the bike mount 80
Wearing the GPS on the arm belt 82
Overview of menu navigation 83
"POI" Menu....83
"Route Plan" Menu 84
"Track Back" Menu 85
"Settings" menu....86
Operation....90
Switching the GPS device on/off....90
Setting the language....90
Setting the time zone....90
GPS screens and displays 91
Recording/riding a route 93
POIs 94
Homing mode....95
Advanced Functions 96
Transferring data to the PC 96
"Guider Application" PC software....96
Troubleshooting 104
Maintenance / cleaning 105
Environmental regulations and disposal information 106
Conformity Notes 106
Warranty and Service Information 107
Introduction
Thank you for purchasing the SFN 1.5 A1 GPS Outdoor Computer. This GPS device allows you to go on a voyage of discovery on two wheels. This GPS device has a USB port which you can use to charge the device and exchange data with your PC. The GPS device is also weatherproof to the IPX-4 standard.
Intended Use
The GPS device is intended solely for orientation purposes while out and about. Any use other than that mentioned above does not correspond to the intended use.
The manufacturer accepts no liability if:
- the GPS device is not used in accordance with the intended use;
- the GPS device is damaged or operated when incomplete or modified;
- devices are connected which cannot charge the device via the USB port or transfer data to or from a PC. Check the documentation for the device you wish to connect to make sure.
The GPS device may only be used for private purposes, not industrial or commercial ones. Furthermore, the GPS device may not be used in tropical climates. The GPS device fulfils all relevant norms and standards relating to CE conformity. Any modifications to the GPS device other than recommended changes by the manufacturer may result in these standards no longer being met.
Observe the regulations and laws in the country of use.

Please always bear in mind that the Road Traffic Act always has priority over the guide arrow on your GPS device. Never let it distract you on the road. Do not operate the device while riding.
The guide arrow merely shows the direct route to your destination. As your GPS device does not contain any map information and you need to use passable routes, you need to find a route which comes as close as possible to the guide direction. If, for example, the arrow points the wrong way up a one-way street, you may not proceed.
Trademark information
Microsoft®, Windows® and the Windows Logo are registered trademarks of Microsoft Corporation.
USB® is a registered trademark of USB Implementers Forum, Inc.
Package contents
• GPS Outdoor Computer SFN 1.5 A1
- USB cable
- 8 cable ties
- Rubber non-slip mat
- Handlebar mount
- GPS holder
- Arm belt
• CD-ROM with driver and software
- This User's Manual
If any items are missing or damaged, please phone our hotline. You will find the phone number in the last chapter, "Warranty and Service Information".
Overview
These operating instructions have a fold-out cover. On the inside of the cover is a numbered diagram of the GPS device. The meanings of the numbers are as follows:
1 Menu / Back button
2 Display
3 Rails for GPS holder (on both sides)
4 ▶ button
5 Confirmation / POI / Mode selection button
While a menu is displayed, press this button to confirm a selection or input.
Press this button to show the POI selection menu while the device is running.*
Hold the button down to display a mode selection menu (record route, pause, stop recording).*
6 USB port (behind protective cover)
7 ◀ button
8 On/Off button
Backlight on/auto off/off button
* At least 4 GPS satellite signals need to be received for these options to work.
Technical specifications
GPS device
Dimensions (W x H x D) 52 x 83.3 x 17.3 mm
Weight 57 g
Input voltage 5 V via USB cable
Display Backlit, 128 x 128 pixel resolution
Battery Li-polymer battery, 5 V, 750 mAh
Run time when fully charged Max. 17 hours with display backlight switched off
Charging current Max. 200 mA
Charge time from empty via USB up to 5 hours
GPS receiver/chip GSC3F-7990, accuracy up to 10 m
Memory 32 Mb, 25000 trackpoints, up to 50 routes with 2500
waypoints total (50 waypoints per route)
USB port USB 2.0, compatible to USB 1.1
Operating temperature +5 to +35 °C
Operating humidity < 85 % RH
IPX degree of protection IPX-4 (splashproof from any direction)
System requirements
To obtain optimum use from your GPS device, you need to use it with the PC software supplied on CD. Your PC needs to meet the following requirements:
- Operating system: Windows® 7, Windows® Vista or Windows® XP *
• Pentium III or compatible processor
• Minimum 256 MB RAM
• 1 GB of available hard disk space
• USB port (USB 2.0 recommended) - CD or DVD drive
- Internet connection for map display in the PC software (this may incur extra costs to you)
Safety instructions
Before you use this device for the first time, please read the following notes in this manual and heed all warnings, even if you are familiar with handling electronic devices. Keep these operating instructions in a safe place for future reference. If you sell the GPS device or give it away, pass on the operating instructions at the same time.

This symbol denotes important information for the safe operation of the product and user safety.
This symbol denotes further information on the topic.

General safety instructions
- This GPS device is not destined for use by persons (including children) with reduced physical, sensorial or mental capabilities and/or who have no experience in, or knowledge of, using this appliance: for their own safety they should be supervised by a competent person or given instructions on how to use the appliance. Children and persons with disabilities should be supervised to ensure that they do not expose themselves to any danger.
- Keep the product, its accessories and packaging material away from toddlers. Small parts can represent choking hazards. Please also note that there is a risk of suffocation if airways are blocked by the packaging films.
- If you notice smoke or unusual noises or smells, disconnect all cables immediately. If this occurs, the device should no longer be used and should be inspected by an expert. Never inhale smoke from a possible device fire. If you do inadvertently inhale smoke, seek medical attention. Smoke inhalation can be damaging to your health.
- Repairs are required if this device is damaged in any way, for example, if the device housing is damaged, if liquid has permeated into on the product, if objects have fallen into the product, if the product does not work normally or if the product has been dropped. Contact the service hotline for repairs. Do not attempt to repair the product yourself to avoid any danger.
- This device uses a high-end Lithium-Polymer battery. The rechargeable battery may only be removed or replaced by an authorised service centre. Otherwise there is the risk of fire and short-circuit.

Operating environment/environmental conditions
- Do not place any heavy objects on the housing, otherwise you risk seriously damaging your device.
- The GPS device is not suitable for use in high-temperature or high-humidity conditions and must be kept free of dust. Operating temperature and operating humidity: 5 °C to 35 °C, max. 85 % RH.
- If the GPS device is exposed to wide temperature fluctuations condensation can form and cause moisture which can produce a short circuit. If this occurs, use the GPS device only after it has reached the ambient temperature.
- Make sure that no fire hazards (e.g. burning candles) are placed on or near the device. Otherwise there is the risk of fire and short-circuit.
Getting started
Charging the battery

Please charge the battery for at least five hours before first use of the GPS device.
- Open the cover for the USB port (6).
- Connect the small end of the USB cable supplied to the USB port (6) and the other end to the USB port on your computer.

It may be that your computer needs to be switched on so that there is power to the computer USB port to charge your GPS device. Not all computers provide power to the USB port when they are switched off.
As soon as your GPS device is charging, the screen will switch on. A "Welcome" message will appear for a few seconds, followed by a PC connection display with a battery charge icon.
Battery charge display
A battery symbol consisting of a number of bars appears on the display (2) while your GPS device is charging. The number of bars indicates the battery charge level:
 | battery fully charged. You can disconnect the device from the computer. |
 | battery 2/3 charged. |
 | battery 1/3 charged. |
| [8SXT] | battery empty. It takes about 5 hours to charge the battery completely. |
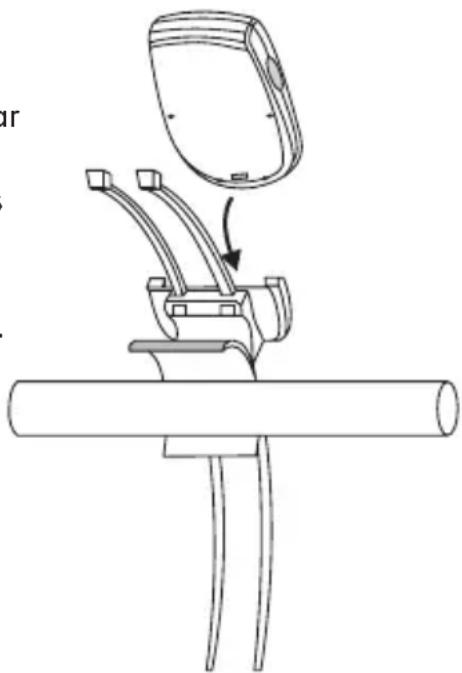
Installing the bike mount
You can fit the GPS device to the handlebar of your bike. This allows you to operate it at any time and keep your eye on the display (2).
Fitting the GPS device in the bike mount
- Place the back of the GPS holder on the front of the handlebar mount ("cross to cross"). Make sure you hold the handlebar mount so that the semicircular insert for the handlebar is aligned horizontally, like the handlebar, and guide 2 of the 8 cable ties through the square holes at the top and bottom through the handlebar mount (see diagram on the right). The cable ties need to be fed through the handlebar mount to make sure the GPS holder and the handlebar mount are firmly fixed together.
Keep the remaining cable ties in a safe place. You can use them if you want to fix the handlebar mount to a different bike.
natural_image
Technical line drawing of a mechanical clamp or bracket assembly with a cylindrical base and a circular component above (no text or symbols)
If you cannot feed the cable ties through both components, the GPS holder is fitted to the handlebar mount rotated by 90^ . The unlock lever on the GPS holder should be parallel to the cable ties.
- Wrap the slightly ribbed side of the non-slip rubber mat around the handlebar (with the smooth side pointing at the handlebar mount) and fit the semicircular insert on the handlebar mount to it. Make sure that the unlock lever on the GPS holder is pointing downwards and the bowl in which the GPS device is placed is pointing towards the bike rider (not in the direction of travel!).
- Feed the tongues of the cable ties around the handlebar and through the cube-shaped locking mechanism of the cable tie. The teeth on one side of the cable tie (the other side is smooth) need to be on the inside, i.e. pointing at the handlebar. Do not pull the cable ties tight just yet.

When you guide the cable ties through and tighten them slightly, if you do not hear a slight 'tearing' noise then the cable ties are the wrong way round (with the teeth facing outwards). In this case, remove the cable tie from the closing mechanism and re-insert it properly.
-
Place your GPS device in the bowl of the GPS holder. The display (2) should point at the rider and the USB port (6) should face down. This means making sure the two rails on the holder are fitted into the correct slots (3) on the device and pushing the device down until you hear it click into place.
-
Get onto your bike. You can now adjust the device to the optimum position on the handlebar and tip it slightly so you can see the display (2). Pull the cable ties tight.

We recommend that you tighten the cable ties using a tool (e.g. pliers) and cut off the excess with scissors.

If you want to use your GPS device on another bike in future, you can either use the arm belt or cut the cable ties with a tools (e.g. wire cutters) and use two new cable ties to fit it to the new bicycle. 8 cable ties are supplied. If required, you can buy more cable ties from hardware or electrical stores.
Removing the GPS device from the bike mount
To remove your GPS device from the bike mount, proceed as follows:
- Press the unlock lever on the GPS holder and, at the same time, pull the GPS device up out of the GPS holder.
Wearing the GPS on the arm belt
If you wish, you can wear your GPS device on your arm. A special arm belt is provided which is adjustable and can be worn over clothing. It has a pocket with a see-through window for the GPS device.
To wear the GPS device in the arm belt, proceed as follows:
- The pocket with the see-through window has Velcro on both sides which goes around the arm belt. Open the Velcro on one side.
- Fit your GPS device into the pocket. Make sure that you can see the display (2) through the window and that the top of the device is pointing into the direction of travel.
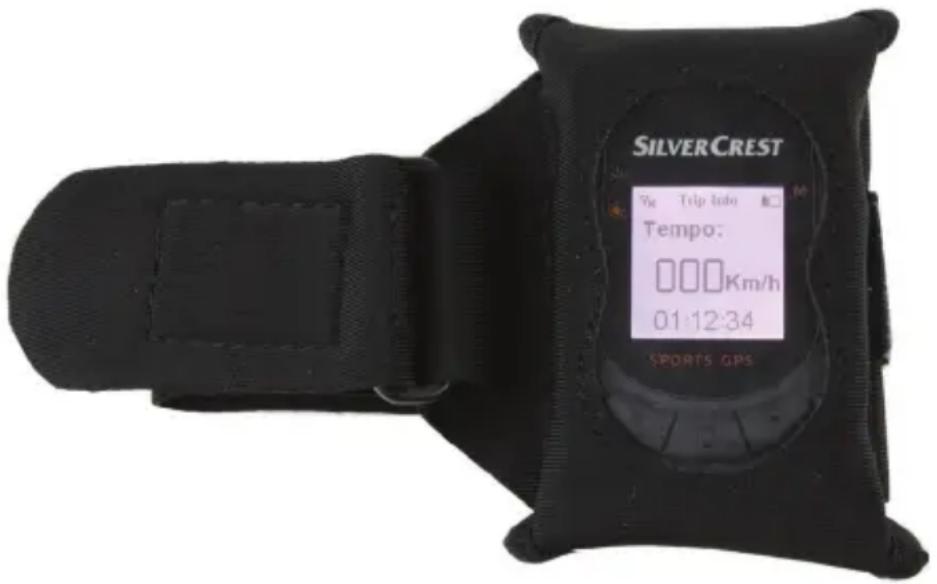
- Close the Velcro again.
- Strap the arm belt loosely around your left or right forearm with the see-through window pointing up.
- Feed the long end around your arm and through the clip at the short end of the arm belt.
- Pull the long end all the way through and affix it with the Velcro.
You can then press the buttons on the GPS device through the window or the pocket as before.
Overview of menu navigation
Below is an overview of the menu structure of the GPS device and a brief explanation of the individual options. To open the menu, press the Menu button (1). To select an option in the menu, press the ◀ and ▶ button (4 and 7). Press the confirmation button (5) to open or select the highlighted option.
"POI" Menu
In the "POI" menu, you can select a POI you have previously defined and manage it.
| Menu level (1) | Menu level (2)(POIs) | Menu level(3) | Description |
| POI 0 Type Date | Time1 DIRECT / | SEQUENCE | Select the POI you want from the POI list.You can differentiate the POIs based onthe type and the date/time. The POI typeis represented by the symbol that youselected when you set the POI. Once youhave made your selection, you can godirectly to the POI (DIRECT) or go to eachof the POIs in turn until you reach theselected POI (destination) (SEQUENCE). |
| 1 Type Date Time2 | DIRECT /SEQUENCE | ||
| 2 Type Date Time3 | DIRECT /SEQUENCE | ||
| ... ... |
"Route Plan" Menu
The "Route Plan" menu allows you to select a route plan you have previously defined on the PC using the "Guider Application" software provided. See "Plan tab" on page 99.
| Menu level (1) | Menu level (2)(Route plans) | Menu level (3) | Description |
| Route plan 01 | Name1 DIRECT / | SEQUENCE | Select the route plan you want from the route plan list. You can differentiate the route plans based on their names. Next you can go directly to the destination (DIRECT) or go to each of the waypoints in turn (SEQUENCE). If you select option “DIRECT”, the guide arrow shows you the direct route to your destination as the crow flies. |
| 02 Name2 DIRECT / SEQUENCE | |||
| 03 Name3 DIRECT / SEQUENCE | |||
| ... |
"Track Back" Menu
In the "Track Back" menu, you can select a route you have previously ridden (and recorded) in order to retrace it.
| Menu level (1) Menu level (2) Menu level (3) Description | |||
| Routes Date Time | 1 Backward / | Forward | Select the route you want from the route list. You can differentiate the routes based on the date and the time. Once you have made your selection, you can decide whether to ride the route in the normal direction ("Forward") or in the reverse direction ("Backward"). |
| Date Time2 Backward / Forward | |||
| Date Time3 Backward / Forward | |||
| ... ... | |||
"Settings" menu
In the "Settings" menu, you can define the preferences for your GPS device to customise the device to your personal needs. As the "Settings" menu is very extensive, the table below takes up two pages. A description of the following functions can be found on the right-hand page:
| Menu level (1) | Menu level (2) | Menu level (3) | Menu level (4) |
| Settings Homing mode On / Off | |||
| Clear Data POI No/Yes | |||
| Route Plan No/Yes | |||
| Track Back No/Yes | |||
| Power Mode Backlight Manual / Auto Suspend Disabled / 10 Min / 30 Min / 60 Min | |||
| Time Zone UTC+00 UTC+01 ... | |||
| Calibration | |||
| Unit Km / Mile | |||
| User Profile My Weight | |||
| Age | |||
| Gender Male / Female | |||
| Description | |
| Open this sub-menu and select the "On" option to be taken straight home. To do this, you need to have assigned the house symbol to a POI. Or select "Off" to cancel. Once you exit the menu by pressing the Menu button (1), the GPS device will show you the way home. | |
| Open this sub-menu and select the "Yes" option to clear all the POIs stored on the GPS device. Or select "No" to cancel. | |
| Open this sub-menu and select the "Yes" option to clear all the route plans stored on the GPS device. Or select "No" to cancel. | |
| Open this sub-menu and select the "Yes" option to clear all the track back routes stored on the GPS device. Or select "No" to cancel. | |
| You can use this function to extend the battery runtime of your GPS device. Select the "Backlight" option and press the On/Off button (8) to have the screen permanently back-lit, or press the button again to get it to switch off automatically after the time set. As soon as you press another button, the screen back-lighting switches on again for the time set. If you select the "Auto Suspend" option, the GPS device automatically powers off after the set time to save the battery. | |
| In this menu, you can set the time zone for your location so you can synchronise the time correctly. In the UK, for example, select "GMT" for winter time and "GMT+1" for summer time. | |
| This function allows you to carry out a new satellite search and location find if you get the impression that the data shown is inaccurate. Slowly turn the device in horizontal then in vertical motion as indicated by the animation on the display (2). This process may take a few minutes. You need to be outside or no GPS satellites will be received. We recommend that you calibrate the device if you have not used it for an extended period. | |
| You can set the unit of measurement for the distances here. You can choose between kilometres (km) and miles (sm). | |
| Use the ◀ and ▶ buttons (4 and 7) to edit the digits, the menu button (1) to select the digit and the confirmation button (5) to enter your weight so that the unit can calculate the calories you are burning when riding. | |
| Use the ◀ and ▶ buttons (4 and 7) to edit the digits, the menu button (1) to select the digit and the confirmation button (5) to enter your age so that the unit can calculate the calories you are burning when riding. | |
| Use the ◀ and ▶ buttons (4 and 7) to edit the digits, the menu button (1) to select the digit and the confirmation button (5) to enter your gender so that the unit can calculate the calories you are burning when riding. |
| Menu level (1) | Menu level (2) | Menu level (3) | Menu level (4) |
| Info Setting Info | Select ODO / Dist | / Speed / GPS Info / Compass / Time Elapsed / Altimeter / Calorimeter / Avg. Speed / Max. Speed | |
| Auto Scroll Disabled | / 2 Sec. / 4 Sec. / 6 Sec. | ||
| Stopwatch | |||
| Language Language list | |||
| Version | |||
| Description | |
| You can use this option to select the information screens that you can toggle through using the ◀ and ▶ buttons (4 and 7) while you are riding. If, for example, you are not in training and do not need the calorie display, select the "Calorimeter" option and press the confirmation button (5) to hide the tick next to this option. The calorie display is no longer available while you are riding. | |
| Using this option, you can select whether to scroll between the information screens automatically or manually. Select "Disabled" to switch between the information screens manually. Or set a delay time after which the device automatically switches to the next screen. This option means that you can see the distance covered, the speed, the compass, etc. in sequence while you are riding without having to press a single button. | |
| Select this option to show the stopwatch. Press the confirmation button (5) to start time measurement. Press the confirmation button (5) again to stop time measurement. Time measurement is accurate to 1/100 second. Press the Menu button (1) to reset the stopwatch. You can then start the stopwatch again if you want. | |
| Use this option to define the menu and screen language for the GPS device. Press the ◀ and ▶ buttons (4 and 7), select the language you want and then press the confirmation button (5). | |
| This option allows you to display the firmware version on the GPS device. This information is required if, for example, you need to contact the hotline. |
Operation
Switching the GPS device on/off
How to switch the GPS device on:
- Hold the on/off button (8) down for about 1 second.
This powers the device on, and a "Welcome" message appears.
The first time you switch it on, the calibration screen appears and the device searches for available GPS satellites to determine its location. Slowly turn the device in horizontal then in vertical motion as indicated by the animation on the display (2). This process may take a few minutes. You need to be outside or no GPS satellites will be received [the display (2) shows the Yx symbol].
Otherwise, the first information screen selected for display appears (normally the "ODO" screen).
How to switch the GPS device off:
- Hold the on/off button (8) down for about 1 second.
The message "ByeBye" appears and the device switches off.
Setting the language
By default, all screen displays and menus are shown in English. However, if you wish to select another language, proceed as follows (the device must be switched on already):
- Press the Menu button (1). The main menu appears (initially in English).
- Press the ◀ and ▶ buttons (4 and 7) several times until the "Settings" option is highlighted and then press the confirmation button (5).
- Press the ◀ and ▶ buttons (4 and 7) several times until the "Language" option is highlighted and then press the confirmation button (5).
- Press the ◀ and ▶ buttons (4 and 7) several times until the language you want is highlighted and then press the confirmation button (5).
- Press the Menu button (1) several times to hide the menu and return to GPS mode.
Setting the time zone
You need to select your time zone to ensure the time is displayed correctly. Proceed as follows (the device must be switched on already):
- Press the Menu button (1). The main menu appears.
- Press the ◀ and ▶ buttons (4 and 7) several times until the "Settings" option is highlighted and then press the confirmation button (5).
-
Press the ◀ and ▶ buttons (4 and 7) several times until the "Time Zone" option is highlighted and then press the confirmation button (5).
-
Press the ◀ and ▶ buttons (4 and 7) several times until the time zone you want is highlighted and then press the confirmation button (5). In the UK, for example, select "GMT" for winter time and "GMT+1" for summer time.
- Press the Menu button (1) several times to hide the menu and return to GPS mode.
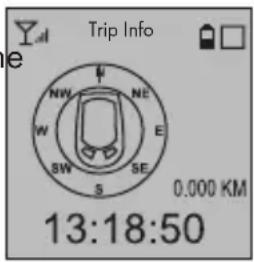
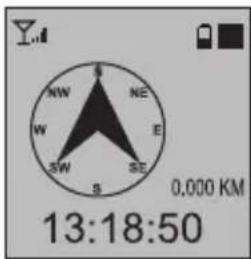
GPS screens and displays
The following screen views are available in GPS mode. Each of these screens contains specific information. Press the ◀ and ▶ (4 and 7) buttons to toggle between the various screens in series.
- The signal strength display _all appears in the top left-hand corner. This shows the reception quality of the GPS satellite signal. The higher the number of bars, the better the signal quality and thus the more accurate the location. The symbol indicates that fewer than 4 satellites are being received and no location can be determined.
- The battery level ⏻ and the mode symbol □ are shown in the top-right corner.
Status of mode symbol:
☐: Informative GPS mode. Your route is not recorded while you are riding. But you can read off the odometer, your speed, your geographical location, your direction of travel from the compass and the travel time in real time (see below).
□ flashing: Route recording.
■: GPS guidance mode. Follow the guide arrow of the compass screen to get to the programmed destination.
• Additional information depends on the screen selected.

Only the first 6 of the screens below are visible by default. The other screens, marked with a *, can be activated via the menu. See "Info Setting" on page 88.
ODO: Distance:

Distance travelled
Current time
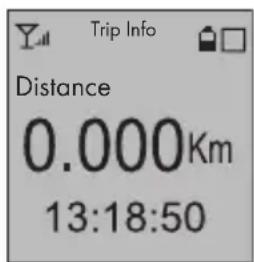
Distance to destination

You need to have programmed a route for the "Distance" screen to show any data. When a route is entered, the remaining distance to the destination is displayed. Otherwise, the display shows 0.000 km (or the equivalent in the unit of measurement set).
Speed:
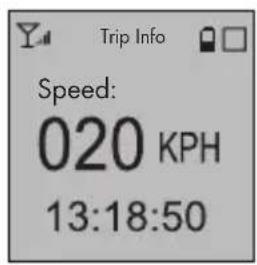
Speed
GPS Info:
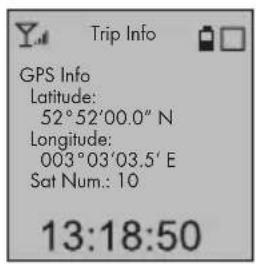
Number of GPS satellites received
Compass: Time Elapsed:
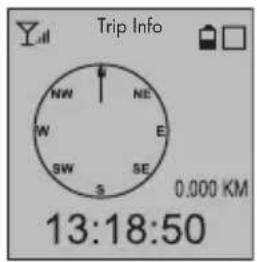
Direction of travel up
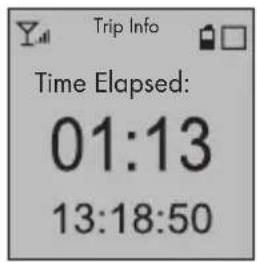
Time elapsed since start
Altimeter*: Calorimeter*:
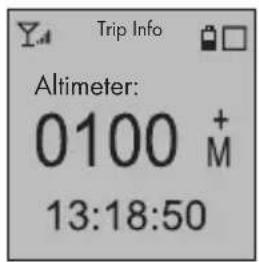
height above sea level (a minus sign appears for heights below sea level, e.g. the Dead Sea)
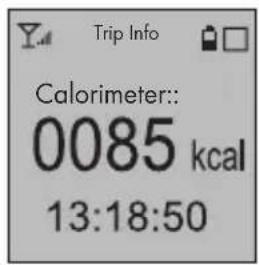
Calories burnt so far
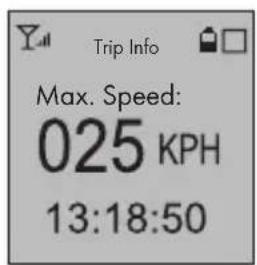
Average Speed*: Maximum Speed*:
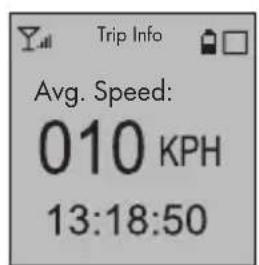
Average speed Maximum speed
* In order to display these screens, you need to have activated them in "Info Setting" in the "Settings" menu. See page 88.
Recording/riding a route

The GPS receiver needs to receive at least four GPS satellites for you to be able to adjust the following settings. This is indicated by the signal strength indicator in the top left-hand corner of the display (2).
While you are riding, you can use the confirmation button (5) in each of the available screen views to record your route at any time. The GPS device saves the waypoints you pass. You can then access the routes later and ride them in either direction using the arrow guide. This means you need never stray from your route, even in thick forest or darkness.
You can use the screen symbols to control route recording or display.
How to record a route:
- Press and hold the confirmation button (5) for 3 seconds. This brings up a pop-up menu showing the symbols ▶, ▪ and ■.
▶: Start. Starts route recording or playback.
III: Pause. Temporarily pauses route recording.
■: Stop. Stops route recording or playback.
-
Press the ◀ and ▶ button (4 and 7) to select the ▶ icon (start) and press the confirmation button (5) to start recording.
-
Ride the selected route. If you fancy a break along the way, hold the confirmation button (5) down for three seconds in order to show the pop-up menu again, select the ■ symbol (pause) and press the confirmation button (5) to pause recording temporarily.
At the end of your break when you want to carry on with your ride, hold the confirmation button (5) down for three seconds in order to show the pop-up menu again, select the symbol (start) and press the confirmation button (5). Your GPS device continues recording the current route (no new route is created).
- Once you have reached your destination, you can stop recording your route. Hold the confirmation button (5) down for three seconds to display the pop-up menu, press the ◀ and ▶ buttons (4 and 7), select the ■ symbol (Stop) and press the confirmation button (5) to stop recording and save the route.

The routes are automatically saved with the date and time of the recording as a filename. In order to keep an overview of the list of routes in the future and make sure you do not ride the wrong route by accident, we recommend editing the routes using the PC software supplied and renaming them so that they are clear. Example: Station to lake.
How to ride a recorded route:
-
In any screen view, press the Menu button (1) to display the main menu. Press the ◀ and ▶ buttons (4 and 7), select the "Track Back" option and then press the confirmation button (5). This displays a list of recorded routes.
-
Press the ◀ and ▶ buttons (4 and 7), select the route you want and then press the confirmation button (5). This brings up a selection menu with "Backward" and "Forward" options.
Select "Backward" to ride the route backwards, i.e. from the destination to the starting point.
Select "Forward" to ride the route forwards, i.e. from the start to the destination point.
This brings up a compass with a guide arrow pointing in the direction to go. If a screen other than the compass appears, press the ◀ and ▶ buttons (4 and 7) and select the compass screen.
Distance to destination
If the guide arrow points right, you need to turn right until it is pointing forwards again. If the guide arrow points left, you need to turn left until it is pointing forwards again. Once you have reached your destination, a picture of a bike rider next to a chequered flag flashes for a few seconds. The device then switches back to a normal compass display (with no route guidance).
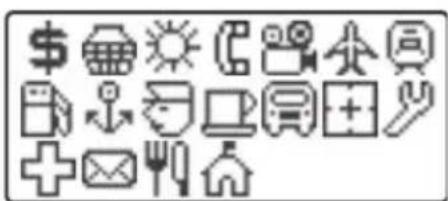
POIs
POI means 'point of interest', i.e. a place that could be important. POIs can be banks, railway stations, airports or sights, restaurants, cafés and other facilities.
Your GPS device allows you to save various locations as POIs and even to classify them.
How to save your location as a POI:

The GPS receiver needs to receive at least four GPS satellites for you to be able to adjust the following settings. This is indicated by the signal strength indicator in the top left-hand corner of the display (2).
-
In any screen view, press the confirmation button (5) to bring up a selection menu of POI symbols.
-
Press the ◀ and ▶ buttons (4 and 7) and select the symbol which best describes the current location (e.g. the sun for a beach).
-
Press the confirmation button (5) to save the current location as a POI. Or press the Menu button (1) to cancel.
How to ride to a POI at a later date:
- In any screen view, press the Menu button (1) followed by the confirmation button (5). This opens the POI menu.
- Press the ◀ and ▶ buttons (4 and 7), select the POI you want and then press the confirmation button (5). Then select the option "DIRECT" to be taken to it.
The compass display with a guide arrow appears. Follow the guide arrow to get to the POI. If a screen other than the compass appears, press the ◀ and ▶ buttons (4 and 7) and select the compass screen.

The guide arrow merely shows the direct route to your POI. As your GPS device does not contain any map information and you need to use passable routes, you need to find a route which comes as close as possible to the guide direction. If the arrow points left through a fenced-off field, you can go straight on and take the next turning on the left.
Homing mode
"Homing mode" is a special function on your GPS device which can take you directly home at any time.

To use the homing mode, you need to first define your home as a POI with the house symbol 📁.
How to get homing mode to take you home:
- Press the Menu button (1) to display the menu.
- Press the ◀ and ▶ buttons (4 and 7), select the "Settings" option and then "Homing mode".
- Press the ◀ and ▶ buttons (4 and 7), select the "On" option and then press the confirmation button (5).
- Exit all open menus by pressing the Menu button (1) several times.
The compass display with a guide arrow appears. Follow the guide arrow to get to home. If a screen other than the compass appears, press the ◀ and ▶ buttons (4 and 7) and select the compass screen.
Advanced Functions
Transferring data to the PC
You can transfer recorded routes from your GPS device to your PC and manage them using the PC software supplied. You can analyse the routes you have ridden and design new routes or POIs on the map and transfer them to your GPS device.
To use the PC software supplied on CD, your PC must meet the requirements set out in the "System requirements" section (see page 77).
Connecting the GPS device to your PC
- Open the cover for the USB port (6).
- Connect the small end of the USB cable supplied to the USB port (6) and the other end to the USB port on your computer.
The screen of the GPS device then switches on. A "Welcome" message will appear for a few seconds, followed by a PC connection display. (When powering the device with a USB power adapter, a battery charge indicator appears.)
"Guider Application" PC software
- Insert the CD-ROM supplied into the CD or DVD drive of your computer.
- Open the content of the CD in Windows and double click on the file "Guider-Targa.exe". This opens up the "Guider Application" program in the map view. The program is in English by default. (Depending on the security settings of your operating system, you may get a message that the publisher of the software could not be identified and asking whether you really want to run the program. Of course, there is no risk in running this program.)

If you do not wish to start the program from CD every time, you can copy the file "Guider-Targa.exe" to a folder on the local hard drive of your PC or even the Desktop. This makes it quick and easy to start in the future.
- When running the program for the first time, the user interface appears in English. Click on the "Track data" tab at the top and select the language you want for the program's user interface from the "Language" pull-down list.
Downloading data from GPS device to Guider application
In the "Plan", "POI" and "Track" tabs, there is a "Device Operations" box with a button. Open one of these tabs and click on the button. This downloads the relevant data from the GPS device.
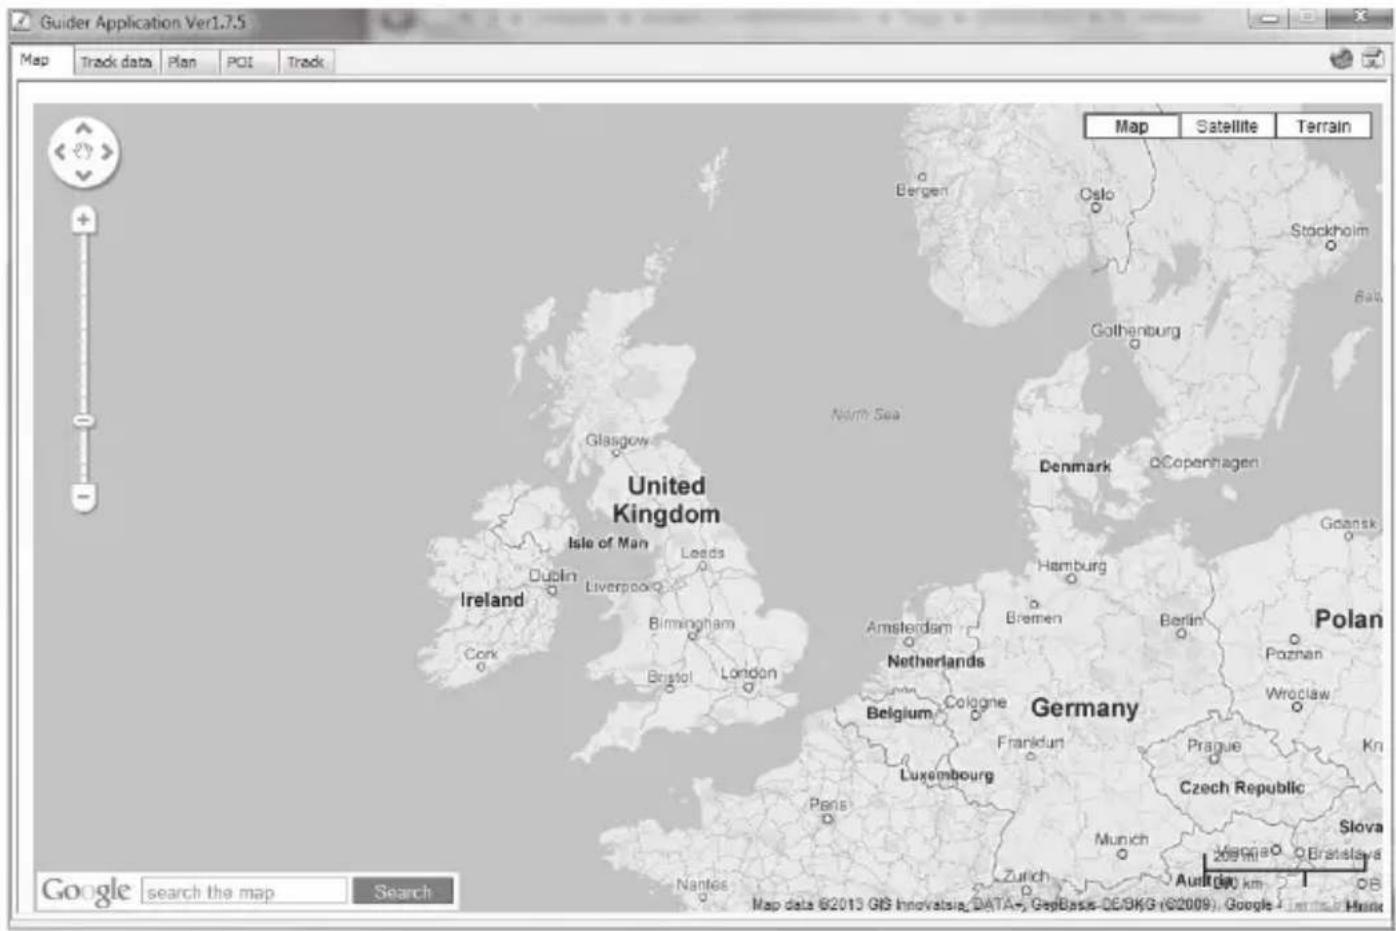
"Map" tab

Your PC has to be connected to the Internet for the maps to be displayed. The Internet connection may incur additional costs to you.
This view is the same as Google Maps. See the Google Maps online help for a detailed description of the map functions. Use the buttons in the top right-hand corner to switch between map, satellite and terrain views.
"Track data" tab
In this window, you can select the program language and display data on routes you have ridden and recorded with the GPS device in graphic form.
To view the diagrams, you first need to download the routes from the GPS device and select a route in the "Track" tab.

line
| Date | Altitude (m) | Speed (km/h) | | ---------- | ------------ | ------------ | | 2012/11/14 | 105.5 | 0.6 | | 2012/11/14 | 103.5 | 0.8 | | 2012/11/14 | 108.5 | 3.0 | | 2012/11/14 | 107.5 | 3.2 | | 2012/11/14 | 109.5 | 3.6 | | 2012/11/14 | 109.5 | 3.8 || Language | You can set the program language here. |
| Path Altitude | Check the box to show a diagram showing altitude (above sea level) over time. |
| Path Speed | Check the box to show a diagram showing speed over time. |
| HRM | This function is not available in the current version of the GPS device. |
| Unit Setting | You can set whether to have altitude and speed figures in metric or imperial here. |
"Plan" tab
In this window, you can plan one or more routes (maximum 50) on the map and upload the individual waypoints you wish to use onto your GPS device. You can then get on your bike and trace the route.

Your PC has to be connected to the Internet for the maps to be displayed. The Internet connection may incur additional costs to you.
In the map view ("Search map" field), search for the place you wish to start your route.

| Map | Double-click on the map to define the starting point for the route.Click on bends and turnings to add more waypoints. The waypoints are listed on the right in numerical order with latitude and longitude information. You can set a maximum of 50 waypoints per route. Your starting point counts as a waypoint, is assigned number 0 and shown in red. |
| Device Operations | Click on the  button to download existing routes from the GPS device to the PC.Click on the button to download existing routes from the GPS device to the PC.Click on the  button to upload routes defined in this window to the GPS device. button to upload routes defined in this window to the GPS device. |
| File Operations | Click on the  button to save the current route.Click on the button to save the current route.Click on the  button to open a saved route for editing or uploading to the GPS device. button to open a saved route for editing or uploading to the GPS device. |
| Route list | Click on a title in the list to select the route in question and display on the map. The titles shown here correspond to the saved routes.Right-click on a title in the list to add a new route, edit or delete an existing route or delete all routes from the list.You can set up to 50 routes and upload them to your GPS device. |
| Waypoint list | The waypoints are numbered in sequence. The longitude and latitude of each waypoint is given.Right-click on a waypoint in the list to edit (move) or delete it or to remove all waypoints from the list. This function also allows you to define another waypoint as the starting point for your route.We recommend you to set a waypoint every 2 or 3 km (even if the route path is straight with no curves).You can set up to 49 waypoints plus the destination point per route. |
In the route or waypoint list, right-click on a route or waypoint to manage it. You can add routes, rename ("Modify") or delete them or remove all routes from the list ("Clear All"). You can add rename waypoints ("Modify") or delete them or remove all waypoints from the list ("Clear All"). You can also define the selected waypoint as a starting point.
"POI" tab
The "POI" tab contains a list of the POIs you have saved on your GPS device during the trip. The POIs are shown on the map with the same symbol you defined when you entered the individual POIs.

Your PC has to be connected to the Internet for the maps to be displayed. The Internet connection may incur additional costs to you.
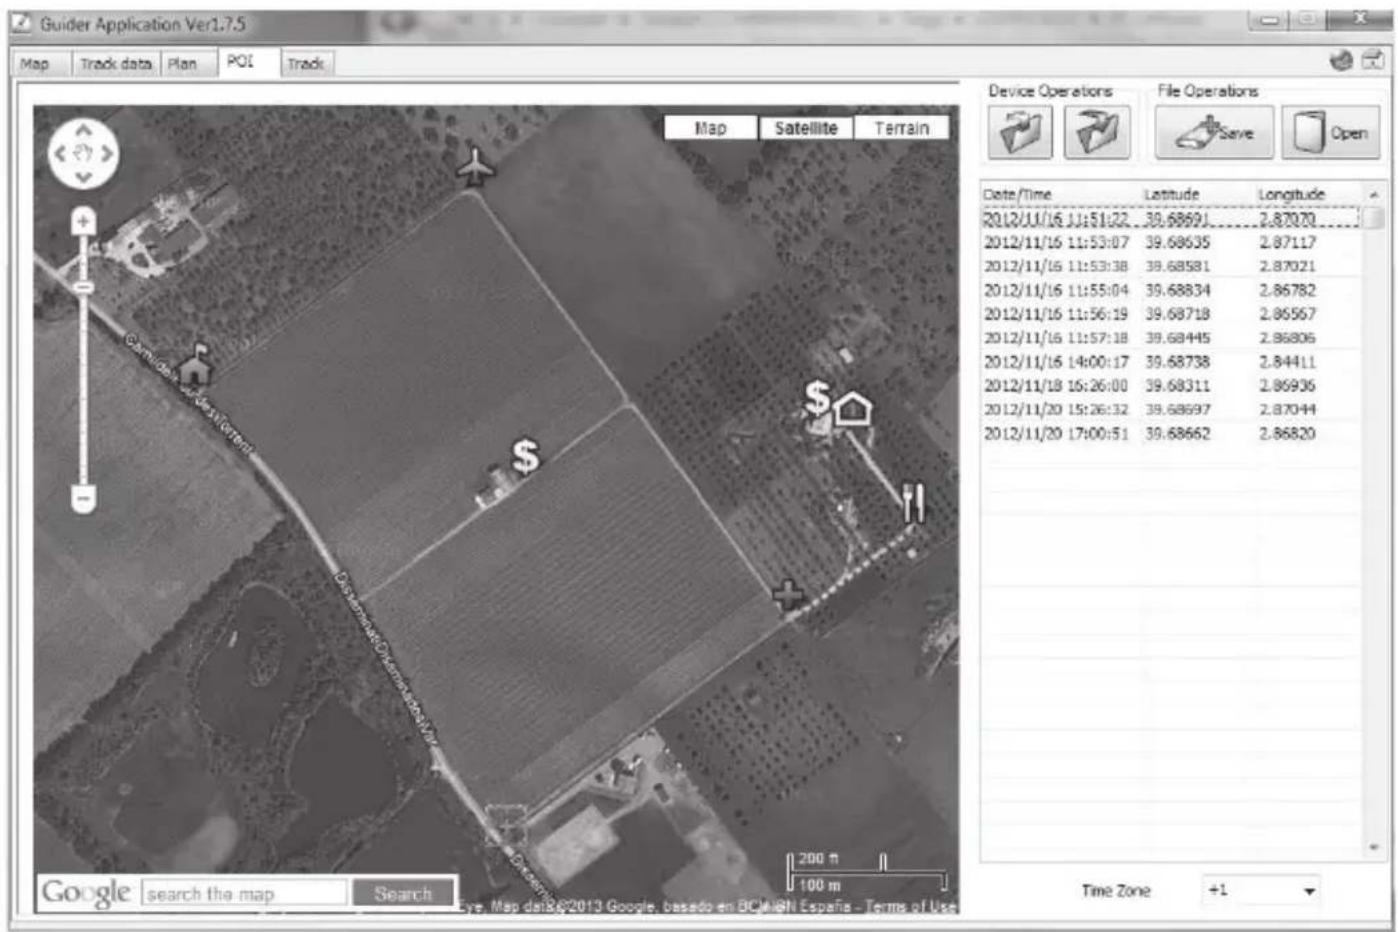
| Device Operations | Click on the  button to download existing POIs from the GPS device to the PC.Click on the button to download existing POIs from the GPS device to the PC.Click on the  button to upload the POI list shown in this window to the GPS device. button to upload the POI list shown in this window to the GPS device. |
| File Operations | Click on the "Save" button to save the POI list shown in this window.Click on the "Open" button to open a POI list for editing or uploading to the GPS device. |
| POI list | Click on a POI in the list to select it and display on the map. Text appears showing the date and time the POI was saved.Right-click on a POI in the list to delete it or to remove all POIs from the list. |
In the POI list, right-click on a POI to manage it. You can delete POIs or remove all POIs from the list ("Clear All").
"Track" tab
You can manage all the routes you have ridden in the "Track" tab. On the left hand side, there is a list of all the routes, with all the waypoints associated with the selected route on the right.
| Route list | The routes are numbered in sequence (Track0, Track1, etc.) The date and time of each route is given.Right-click on a route in the list to edit or delete it or to remove all routes from the list. The "Modify" option allows you to rename the route and assign it a different colour. It is helpful to use multiple colours when you have downloaded several routes that overlap or are located close each other. The different colours help you distinguish them easier in map view ("Display" button). |
| Device Operations | Click on thebutton to download existing routes from the GPS device to the PC. |
| Display | Click on the "Display" button to display the current route in the "Map" tab. |
| Clear All | Click on the "Clear All" button to delete all routes from the map view. |
| File Operations | Click on the "Save" button to save the route list shown in this window.Click on the "Open" button to open a saved route list for editing. |
| Track Summaries | This section shows you the date and time of the start and finish of all routes. You cannot edit this information. |
| Routes | In this section, you can see the number of trackpoints recorded for the route and the distance covered in km and miles. |
| Time Zone | You can select the time zone of your location from the pull-down list. |
Right-click on a route in the route list to manage it. You can rename ("Modify") or delete routes or remove all routes from the list ("Clear All").

The waypoints on the right-hand side of the window have been recorded by the GPS device and are a fixed part of the downloaded route. You cannot edit them.
Troubleshooting
You can solve most common problems yourself using the following sections. If the problem pers after checking the suggested solutions, please contact our Service Hotline (see page 107). Do not attempt to repair the product yourself.
Cannot switch GPS device on.
- Recharge the battery. See "Charging the battery" on page 79.
- If you have connected the GPS device to a computer, it is in PC connection mode and it cannot be operated using the buttons. Disconnect the device from the PC.
The GPS device does not respond.
- If you have connected the GPS device to a computer, it is in PC connection mode and it cannot be operated using the buttons. Disconnect the device from the PC.
- If the GPS device is not connected to a PC and still does not respond, you can try to reset it. To do this, hold the ◀ button (7) and the on/off button (8) down at the same time. The device will then start up with its factory settings: the menu language is English and all user-defined settings are deleted. Only the routes you have recorded and the POIs you have saved are retained after a reset.
The GPS device is not showing any data.
- The GPS device needs to receive at least four GPS satellites to determine your current position and track movements. You need to have a clear view of as much sky as possible. Narrow roads, tall buildings made of reinforced concrete and factories, subways, tunnels, etc. impede satellite reception. Change your location and try again.
The GPS device does not show the routes I have ridden.
- First, you need to start route recording manually. See "Recording/riding a route" on page 93.
- You have already saved a lot of waypoints or routes on the device and the memory is full. Free up memory by going to Menu / Settings / Clear data and deleting any data you do not need, or transfer the data on the device to your PC using the "Guider Application" software supplied and then clear the data via the menu.
The "Guider Application" software does not show any maps or data.
- Your PC needs to be connected to the Internet for the software to be able to load the maps from Google Maps or Google Earth and show your route data.
Maintenance / cleaning

Disconnect all cables from the GPS device before cleaning it, otherwise you risk seriously damaging your GPS device.
The device does not contain any parts that require user maintenance. Never open the housing of the GPS device in order to avoid any danger. Make sure that the components do not get dirty. To clean the GPS device, use a dry cloth. Never use any solvents or cleaners that may damage the plastic housing. For more stubborn dirt, use a slightly damp cloth.
Environmental regulations and disposal information
Devices marked with this symbol are subject to European Directive 2002/96/EC. All electrical and electronic devices must be disposed of separately from household waste at official disposal centres. Proper disposal of old devices prevents damage to the environment or your health. For further information about proper disposal, contact your local council, recycling centre or the shop where you bought the device.
The built-in rechargeable battery cannot be removed for disposal.
Dispose of all packaging in an environmentally-friendly manner. Boxes can be recycled with waste paper collections or handed in to public collection points. Films and plastics included in the original packaging can be disposed of via your local waste disposal company in an environmentally-friendly way.
Conformity Notes

This device complies with the basic and other relevant requirements of the EMC Directive 2004/108/EC, the Low-voltage Directive 2006/95/EC and the RoHS II Directive 2011/65/EU. The corresponding Declaration of Conformity can be found at the end of this User Manual.
Warranty and Service Information
Dear Customer,
This device is sold with three years warranty from the date of purchase. In the event of product defects, you have legal rights towards the seller. These statutory rights are not restricted by our warranty as described below.
Warranty conditions
The warranty period commences upon the date of purchase. Please keep the original receipt in a safe place as it is required as proof of purchase. If any material or manufacturing faults occur within three years of purchase of this product, we will repair or replace the product free of charge as we deem appropriate.
Warranty period and legal warranty rights
The warranty period is not extended in the event of a warranty claim. This also applies to replaced and repaired parts. Any damage or defects discovered upon purchase must be reported immediately when the product has been unpacked. Any repairs required after the warranty period will be subject to charge.
Scope of warranty
The device was carefully manufactured in compliance with stringent quality guidelines and subjected to thorough testing before it left the works. The warranty applies to material and manufacturing faults. This warranty does not cover product components which are subject to normal wear and which can therefore be regarded as wearing parts, or damage to fragile components such as switches, rechargeable batteries or components made of glass. This warranty is void if the product is damaged, incorrectly used or serviced. To ensure correct use of the product, always comply fully with all instructions contained in the user manual. The warnings and recommendations in the user manual regarding correct and incorrect use and handling of the product must always be observed and complied with. The product is solely designed for private use and is not suitable for commercial applications. The warranty is rendered void in the event of incorrect handling and misuse, if it is subjected to force, and also if any person other than our authorised service technicians interfere with the device. No new warranty period commences if the product is repaired or replaced.
Submitting warranty claims
To ensure speedy handling of your complaint, please note the following:
- Before using your product for the first time, please read the enclosed documentation or online help carefully. Should any problems arise which cannot be solved in this way, please call our hotline.
- Always have your receipt, the product article number as well as the serial number (if available) to hand as proof of purchase.
- If it is not possible to solve the problem on the phone, our hotline support staff will initiate further servicing procedures depending on the fault.

Service

Phone: 0207 - 3650744
E-Mail: service.GB@targa-online.com

Phone: 01 - 2421583
E-Mail: service.IE@targa-online.com

Phone: 800 - 62175
E-Mail: service.MT@targa-online.com

Phone: 800 - 92496
E-Mail: service.CY@targa-online.com
IAN: 85816

Manufacturer
Please note that the following address is not a service address. First contact the service point stated above.
TARGA GmbH
Coesterweg 45
59494 Soest
Germany
GPS-Outdoor-Computer
natural_image
Technical line drawing of a mechanical clamp or bracket assembly with a cylindrical base and a circular component above (no text or symbols)
EU-Declaration of Conformity
Adress: Targa GmbH
Lange Wende 41
59494 Soest, Germany
Product: GPS Computer
Model: Silvercrest SFN 1.5 A1
IAN: 85816
The product complies with the requirements of the following European directives:
2004/108/EC Electromagnetic Compatibility
2006/95/EC Low Voltage directive
2011/65/EU Restriction of the use of certain hazardous
substances in electrical and electronical equipment
Compliance was proved by the application of the following standards:
EMC: EN 55022:2006 +A1:2007
EN 55024:1998 +A1:2001 +A2:2003
Safety: EN 60950-1 :2006 +A11 :2009
ROHS: EN 50851:2012
Soest, 28th of January
2012
Matthias Klauke, Managing Director

- GPS para outdoor SFN 1.5 A1
- Outdoor Handheld GPS Unit
- User manual and service information
- Contents
- Introduction 75
- Intended Use 75
- Package contents 76
- Overview 76
- Technical specifications 77
- Safety instructions 78
- Getting started 79
- Overview of menu navigation 83
- Operation....90
- Advanced Functions 96
- Troubleshooting 104
- Environmental regulations and disposal information 106
- Conformity Notes 106
- Warranty and Service Information 107
- Introduction
- Intended Use
- Trademark information
- Package contents
- Overview
- Technical specifications
- GPS device
- System requirements
- Safety instructions
- General safety instructions
- Operating environment/environmental conditions
- Getting started
- Charging the battery
- Battery charge display
- Installing the bike mount
- Fitting the GPS device in the bike mount
- Removing the GPS device from the bike mount
- Wearing the GPS on the arm belt
- Overview of menu navigation
- "POI" Menu
- "Route Plan" Menu
- "Track Back" Menu
- "Settings" menu
- Operation
- Switching the GPS device on/off
- How to switch the GPS device on:
- How to switch the GPS device off:
- Setting the language
- Setting the time zone
- GPS screens and displays
- Recording/riding a route
- How to record a route:
- How to ride a recorded route:
- POIs
- How to save your location as a POI:
- How to ride to a POI at a later date:
- Homing mode
- Advanced Functions
- Transferring data to the PC
- Connecting the GPS device to your PC
- "Guider Application" PC software
- Downloading data from GPS device to Guider application
- "Map" tab
- "Track data" tab
- "Plan" tab
- "POI" tab
- "Track" tab
- Troubleshooting
- Cannot switch GPS device on.
- The GPS device does not respond.
- The GPS device is not showing any data.
- The GPS device does not show the routes I have ridden.
- The "Guider Application" software does not show any maps or data.
- Maintenance / cleaning
- Environmental regulations and disposal information
- The built-in rechargeable battery cannot be removed for disposal.
- Conformity Notes
- Warranty and Service Information
- Warranty conditions
- Warranty period and legal warranty rights
- Scope of warranty
- Submitting warranty claims
- Service
- Manufacturer
- GPS-Outdoor-Computer
- EU-Declaration of Conformity
Brand : SILVERCREST
Model : SFN 1.5 A1
Category : Gps