
M02TW12E - Toaster MATSUI - Free user manual and instructions
Find the device manual for free M02TW12E MATSUI in PDF.


| Product Type | 2 Slice Toaster |
| Brand | Matsui |
| Model | M02TW12E |
| Power Consumption | 750 W |
| Mains Supply | 230 V ~ 50 Hz |
| Number of Toast Slots | 2 |
| Browning Control Settings | 6 levels (1 = lightest, 6 = darkest) |
| Cancel Button | Yes, to stop toasting immediately |
| Crumb Tray | Removable for easy cleaning |
| Dimensions (Approx.) | 27 cm (W) x 16 cm (D) x 18 cm (H) |
| Weight (Approx.) | 1.2 kg |
| Main Body Material | Plastic with stainless steel accents |
| Power Cord Length (Approx.) | 0.8 m |
| Auto Pop-Up | Yes, toasting lever pops up when done |
| Safety Features | Auto shut-off, non-slip feet, cool-touch exterior (limited) |
| Cleaning | Wipe body with damp cloth; empty crumb tray regularly; do not immerse in water |
| Intended Use | Indoor household use only |
| Warranty (Typical) | 1 year (check retailer) |
Frequently Asked Questions - M02TW12E MATSUI
User questions about M02TW12E MATSUI
0 question about this device. Answer the ones you know or ask your own.
Ask a new question about this device
Download the instructions for your Toaster in PDF format for free! Find your manual M02TW12E - MATSUI and take your electronic device back in hand. On this page are published all the documents necessary for the use of your device. M02TW12E by MATSUI.
USER MANUAL M02TW12E MATSUI
natural_image
White modern toaster with a flat body and side grilles, no visible text or symbols.2 SLICE TOASTER
INSTRUCTION MANUAL
GB
2 SKIVERS BR∅DRISTER
INSTRUKSJONSHÄNDBOK
NO
BRÖDROST FÖR 2 SKIVOR
BRUKSANVISNING
SE
2-PALAN LEIVÄNPAAHDIN
KÄYTTÖOHJE
FI
2 SKIVERS BR∅DRISTER
BETJENINGSVEJLEDNING
DK
Contents
GB
Safety First! 5
Unpacking....30
Product Overview....31
First Time Use....31
Toasting Bread 32
Removing Crumbs From the Toaster....34
Other Functions....34
How to Clear a Piece of Blocked Bread....35
Cleaning and Maintenance....35
Specifications....35
Innhold
NO
Sikkerhet først! 10
Pakke opp 36
Produktoversikt....37
Førstegangsbruk 37
Riste brød....38
- For your continued safety and to reduce the risk of injury or electric shock, please follow all the safety precautions listed below.
- Read all the instructions carefully before using the appliance and keep them for future reference.
- Retain the manual. If you pass the appliance onto a third party, make sure to include this manual.
- Check that the voltage marked on the rating label matches your mains voltage.
Damage
- Please inspect the appliance for damage after unpacking.
- Do not continue to operate the appliance if you are in any doubt about it working normally, or if it is damaged in any way - switch off, withdraw the mains plug and consult your dealer.
Location of Appliance
• This appliance is intended for indoor household use and similar applications such as:
- farm houses and by clients in hotels, motels and other residential type environment;
- bed and breakfast type environment;
- catering and similar non-retail applications.
Temperature
- Avoid extreme degrees of temperature, either hot or cold. Place the appliance well away from heat sources such as radiators or gas/electric fires.
- Avoid exposure to direct sunlight and other sources of heat.
- Do not touch hot surfaces. Temperature of accessible surfaces may be very high when the appliance is operating.
Naked Flames
- Never place any type of candle or naked flame on the top of or near the appliance.
Moisture
- To reduce the risk of fire, electric shock or product damage, do not expose this appliance to rain, moisture, dripping or splashing. No objects filled with liquids, such as vases, should be placed on the appliance.
- If you spill any liquid into the appliance, it can cause serious damage. Switch it off at the mains immediately and withdraw the mains plug.
Ventilation
- To prevent the risk of electric shock or fire hazard due to overheating, ensure that curtains and other materials do not obstruct the ventilation vents.
- Do not install or place this appliance in a bookcase, built-in cabinet or in another confine space. Ensure the appliance is well ventilated.
Safety
- The appliance is not intended to be operated by means of an external timer or separate remote-control system.
• Always disconnect the appliance from the mains supply before moving the appliance. - In the interests of safety and to avoid unnecessary energy consumption, never leave the appliance unattended for long periods of time, e.g. overnight, while on holiday or while out of the house. Disconnect the mains plug from the mains socket.
- Bread may burn. Your appliance must not be used near or below curtains or other combustible materials. It must be watched when in use.
- Only place toast bread in your appliance. Do not attempt to toast any pastry or bread product which is filled with a fruit or sugary filling (pop tarts etc). The stuffings may leak from the appliance and cause damage to your appliance with the possible risk of a fire occurring.
-
Oversize food, metal foil packages or utensils must not be inserted in the appliance as they may cause fire or electric shock.
-
Don’t attempt to dislodge food while the appliance is operating.
• Take the bread out carefully after toasting to avoid injuries. - Do not use the appliance for uses other than its intended use.
• This appliance is designed for indoor, household use only.
Mains Cable
• Make sure the appliance is not resting on top of the mains cable, as the weight of the appliance may damage the mains cable and create a safety hazard.
- Do not let the mains cable overhang the edge of the work surface or allow it to touch hot surfaces or sources of heat or flame.
- If the mains cable is damaged it must be replaced by the manufacturer, its service agent, or similarly qualified persons in order to avoid a hazard.
Supervision
- This appliance can be used by children aged from 8 years and above and persons with reduced physical, sensory or mental capabilities or lack of experience and knowledge if they have been given supervision or instruction concerning use of the appliance in a safe way and understand the hazards involved. Children shall not play with the appliance. Cleaning and user maintenance shall not be made by children without supervision.
- Keep the appliance and its cord out of reach of children less than 8 years old.
- Never let anyone especially children push anything into the holes, slots or any other openings in the case – this could result in a fatal electric shock.
Service
- To reduce the risk of electric shock, do not remove screws. The appliance does not contain any user-serviceable parts. Please leave all maintenance work to qualified personnel.
- Do not open any fixed covers as this may expose dangerous voltages.
Maintenance
- Ensure to unplug the appliance from the mains socket before cleaning.
- Allow the appliance to cool completely before cleaning or storing.
- Do not use any type of abrasive pad or abrasive cleaning solutions as these may damage the appliance’s surface.
• Do not use liquids to clean the appliance.
Thank you for purchasing your new Matsui 2 slice toaster.
We recommend that you spend some time reading this instruction manual in order to fully understand all the operational features offered.
Read all the safety instructions carefully before use and keep this instruction manual for future reference.
Unpacking
Remove all items from the packaging. Retain the packaging. If you dispose of it please do so according to local regulations.
The following items are included:

natural_image
Line drawing of a standard 3D toaster with a side handle and grille (no text or symbols)The Main Unit
Instruction Manual
Product Overview

- Toast Slots
- Toasting Level
- Browning Control
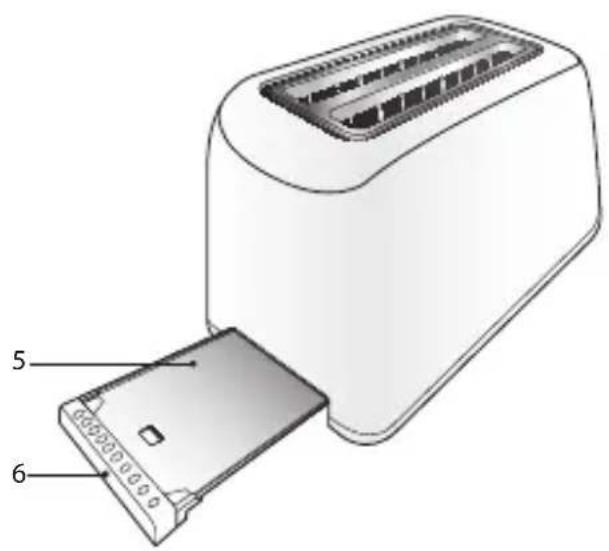
- CANCEL Button
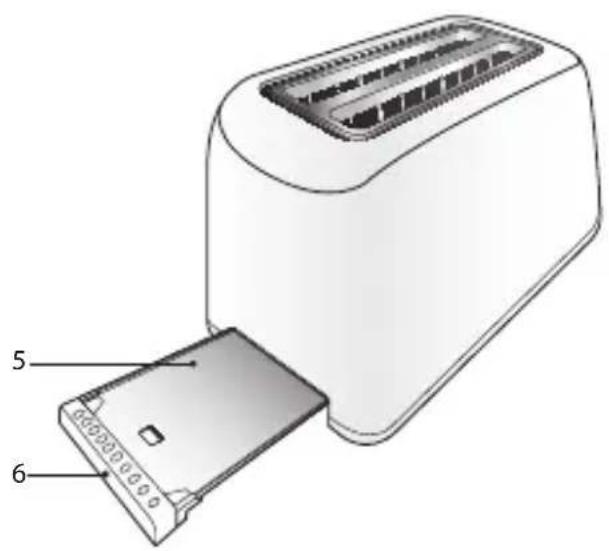
- Crumb Tray
- Crumb Tray Handle
First Time Use
Please note there may be manufacturing residue or oil remaining in the toaster or on the heating element. An odour may be noticed the first time you use it. This is normal and will not occur after using your toaster several times.

The first time you use your toaster, we suggest that you operate it without bread.
Toasting Bread
To prevent jamming do not use your toaster with torn slices of bread. Make sure the size and thickness of the bread slices fit easily into the toast slots. Always watch your toaster when in use. Never leave your toaster unattended.
- Plug the mains plug into the mains socket.
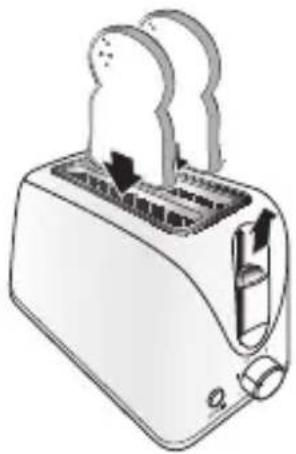
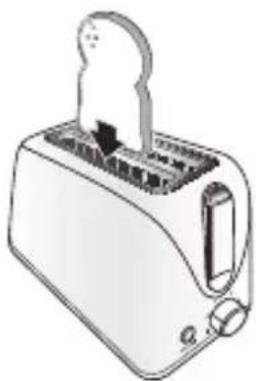
- Put 2 slices of bread into the bread slots.

natural_image
Hand inserting a plug into a wall socket with a black cable (no text or symbols)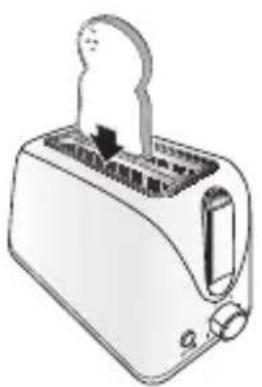
natural_image
Illustration of a standard 3D toaster with handle and grille (no text or symbols)
natural_image
Illustration of a standard 3D toaster with a handle and grille (no text or symbols)
• If toasting two slices, they should be similar in size, thickness and freshness.
- For optimum browning, always place the bread as close as possible to the centre of the slots.
• Make sure the crumb tray is completely inserted before use.
- Select the level of browning by turning the Browning Control. There are 6-setting levels:


area
| Label | Value | | --------------- | ----- | | Lightest Darkest | 1 | | (6) | 6 |

- Select a lower position (i.e. 1 or 2) for light browning, especially for toasting only one slice or for dry (old) bread. Note that the toasting colour for one slice will be darker than that for two slices at the same level.
- If you have initially toasted some bread, the toaster elements will be hot, so when you put more bread into the toaster it may brown faster than the first slices that were toasted, even if the Browning Control is set to the same level.
-
The higher the number for the browning level, the higher the chance of burning the toast.
-
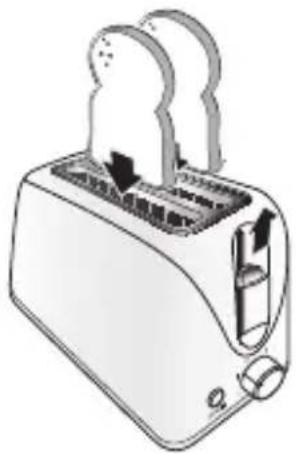
Lower the toasting lever until it clicks. The toaster will begin at once.

- Only when the toaster is connected to the mains power, can the toasting lever be locked in the downward position.
- During the toasting process, you may observe the toasting colour. Press the CANCEL button to cancel the operation at any time if you are satisfied with the colour.

natural_image
Illustration of a hand inserting a card into a toaster into a tray (no text or symbols)- Once the bread has been toasted to the preset browning level, the toasting lever will automatically pop up which means your toast is ready.
natural_image
Illustration of a toaster with cooling effect and handle (no text or symbols)GB
Other Functions
Cancel
If the toaster starts to smoke, press the CANCEL button to stop toasting immediately. Remove all protective wrapping prior to putting the bread into the toaster. Avoid toasting the food with extremely runny ingredients such as butter. The bread slot is only applicable for toasting regular bread slices. Do not toast irregular sized bread.
Removing Crumbs From the Toaster
- First unplug the mains plug from the mains socket.
- Slide the crumb tray out by holding the crumb tray handle.
- Empty the crumbs into the bin and clean the crumb tray.

natural_image
Illustration of a hand inserting a card into a device with an arrow indicating the process (no text or symbols present)
• The metal part may be hot.
• Let the crumb tray dry thoroughly before reinserting it back into the toaster.
- Ensure the crumb tray is completely inserted before using your toaster again.
How to Clear a Piece of Blocked Bread
- Unplug the mains plug from the mains socket.
- Allow the toaster to fully cool down.
- Push the toasting lever down then release.
- Gently dislodge the blockage with a non-metallic object, for example the handle of a wooden spoon.

Ensure you don't make contact with the heating elements, as you may damage them.
- Lift the toasting lever to remove the blockage.
Cleaning and Maintenance
Unplug the mains plug from the mains socket and allow the toaster to cool down before cleaning.
Do not use harsh cleaners or solvents as they may damage the casing.
The body of the toaster should be cleaned using a cloth dampened with warm water. Make sure you do not allow water to seep into the controls or heating elements.
When not in use, the mains cable may be wound under the bottom of the toaster.
Specifications
| Model M02TW12E | |
| Mains Supply | 230V~50Hz |
| Power Consumption | 750W |
Features and specifications are subject to change without prior notice.
Takk for at du kjøpte ny Matsui 2 skivers brødrister.
natural_image
Line drawing of a modern toaster with a grater and handle (no text or symbols)Hovedenheten

Bruksanvisning
Produktoversikt

- Brødskivespor
- Varmenivå
- Bruningskontroll
- AVBRYT-knapp
- Smulebrett
- Smulebretthåndtak
Førstegangsbruk
natural_image
Hand holding a cable with an arrow indicating force or direction (no text or symbols)natural_image
Illustration of a standard 3D toaster with handle and grille (no text or symbols)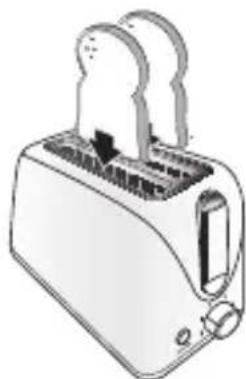
natural_image
Illustration of a standard 3D toaster with a handle and grille (no text or symbols)
natural_image
Illustration of a hand inserting a card into a toaster into a tray (no text or symbols)- Så snart brødet er blitt ristet til det forhåndsinnstilte bruningsnivået, spretter brødskivespaken automatisk opp som tegn på at brødskivene er ferdig ristet.
natural_image
Illustration of a toaster with cooling effect and heat exchanger (no text or symbols)NO
Andre funksjoner
Avbryt
natural_image
Illustration of a hand inserting a card into a mobile device (no text or symbols visible)!
natural_image
Line drawing of a standard 3D toaster with no text or symbolsHuvudenhet
Bruksanvisning
Produktöversikt

natural_image
Hand inserting a plug into a wall socket with a cable (no text or symbols)
natural_image
Illustration of a standard 3D toaster with handle and grille (no text or symbols)
natural_image
Illustration of a toaster with a handle and grille (no text or symbols)
natural_image
Illustration of a hand using a toaster to press or install a tray (no text or symbols visible)natural_image
Illustration of a toaster with cooling effect and heat exchanger (no text or symbols)SE
Andra funktioner
Avbryt
natural_image
Illustration of a hand inserting a card into a device with a black arrow indicating the process (no text or symbols present)!
natural_image
Line drawing of a standard 3D toaster with a handle and grille (no text or symbols)Laite

Käyttöopas
natural_image
Hand holding a cable with an arrow indicating force or direction (no text or symbols)FI
natural_image
Illustration of a toaster with handle and grille (no text or symbols)
natural_image
Illustration of a standard 3D toaster with a handle and grille (no text or symbols)
natural_image
Illustration of a hand inserting a card into a toaster (no text or symbols visible)natural_image
Illustration of a toaster with handle and side panel (no text or symbols)Muut toiminnot
FI
Peruuta
natural_image
Illustration of a hand inserting a card into a device with a scroll, showing no text or symbols.!
natural_image
Line drawing of a standard 3D toaster with a handle and grille (no text or symbols)Hovedenheden

Brugervejledning
Produktoversigt

natural_image
Hand inserting a plug into an electrical outlet (no text or symbols visible)
natural_image
Illustration of a standard 3D toaster with handle and grille (no text or symbols)
natural_image
Illustration of a standard 3D toaster with a handle and grille (no text or symbols)DK

area
| Region | Value | |---|---| | (1) | Low | | (6) | High |
natural_image
Illustration of a hand inserting a griddle into a toaster (no text or symbols)natural_image
Illustration of a toaster with handle and cooling effect (no text or symbols)Andre funktioner
Annuller
natural_image
Illustration of a hand inserting a card into a device with a scroll, showing no text or symbols.
The symbol on the product or its packaging indicates that this product must not be disposed of with your other household waste. Instead, it is your responsibility to dispose of your waste equipment by handing it over to a designated collection point for the recycling of waste electrical and electronic equipment. The separate collection and recycling of your waste equipment at the time of disposal will help conserve natural resources and ensure that it is recycled in a manner that protects human health and the environment. For more information about where you can drop off your waste for recycling, please contact your local authority, or where you purchased your product.
NO
GB www.knowhow.com/knowledgebank
NO www.elkjop.no/support
www.lefdal.com/support
SE www.elgiganten.se/support
FI www.gigantti.fi/support
DK www.elgiganten.dk/support
- Contents
- Innhold
- Damage
- Location of Appliance
- Temperature
- Naked Flames
- Moisture
- Ventilation
- Safety
- Mains Cable
- Supervision
- Service
- Maintenance
- Unpacking
- Product Overview
- First Time Use
- Toasting Bread
- Other Functions
- Cancel
- Removing Crumbs From the Toaster
- How to Clear a Piece of Blocked Bread
- Cleaning and Maintenance
- Produktoversikt
- Førstegangsbruk
- NO
- Andre funksjoner
- Avbryt
- !
- Produktöversikt
- SE
- Andra funktioner
- Muut toiminnot
- FI
- Peruuta
- Produktoversigt
- Andre funktioner
- Annuller
Brand : MATSUI
Model : M02TW12E
Category : Toaster