
Sol THW-2000 - Heating appliance WILFA - Free user manual and instructions
Find the device manual for free Sol THW-2000 WILFA in PDF.


| Product Type | Infrared Heater |
| Brand | Wilfa |
| Model | Sol THW-2000 |
| Power Settings | 1000W (single element) / 2000W (both elements) |
| Voltage | 220-240 V, 50 Hz (Class I, earthed) |
| Mounting Type | Wall-mounted (bracket included) |
| Adjustable Angle | 10° to 32° tilt |
| Control | Pull chain switch (0-1-2-1-0 cycle) |
| Safety Features | Anti-tilt switch, overheat protection, splash-proof design |
| Usage Location | Indoor and outdoor (plug must be indoors) |
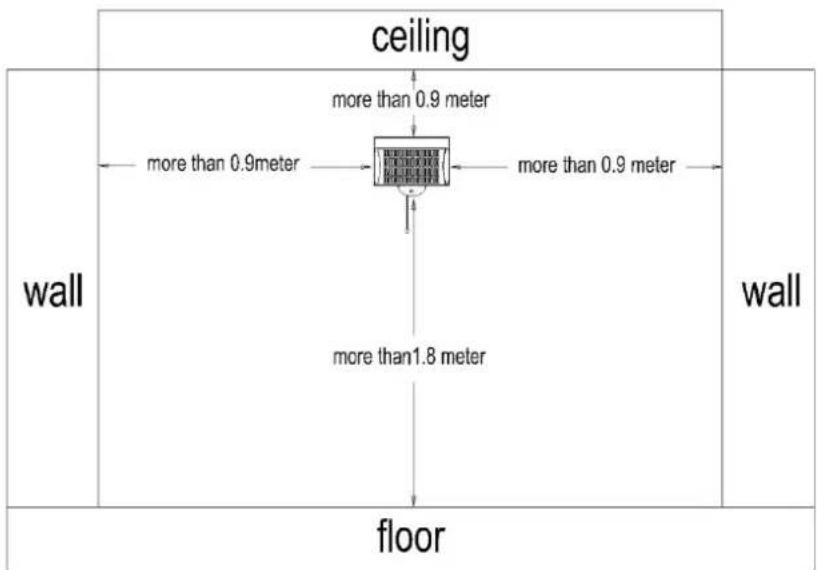
| Clearance Requirements | At least 0.9 m from sides and top, min 1.8 m above floor |
| Heating Elements | Two quartz tubes |
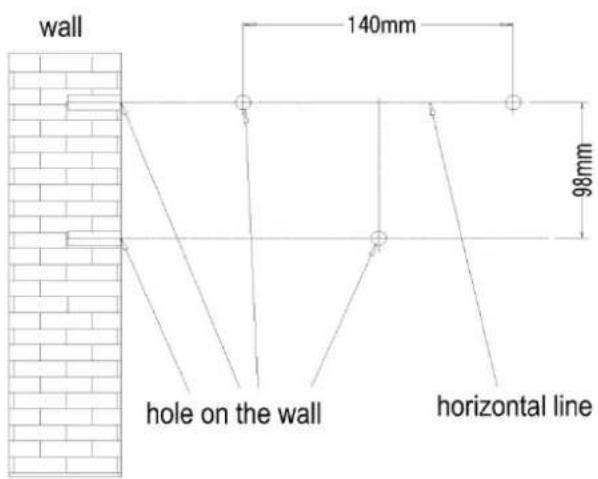
| Installation | Requires 4 holes (140 mm horizontal spacing, 98 mm vertical spacing) |
| Rated Power | 2000 W max |
| Material | Metal casing with safety grille |
| Warranty | Standard manufacturer warranty (void if misused) |
| Maintenance | No special maintenance; clean with dry cloth, do not immerse |
| Spare Parts | Contact authorized service center |
Frequently Asked Questions - Sol THW-2000 WILFA
User questions about Sol THW-2000 WILFA
0 question about this device. Answer the ones you know or ask your own.
Ask a new question about this device
Download the instructions for your Heating appliance in PDF format for free! Find your manual Sol THW-2000 - WILFA and take your electronic device back in hand. On this page are published all the documents necessary for the use of your device. Sol THW-2000 by WILFA.
USER MANUAL Sol THW-2000 WILFA
natural_image
Exterior view of a modern outdoor heating unit with visible heat sinks and ventilation (no text or symbols)THW-2000 terrasse heater
NO BRUKSANVISNING
SE BRUKSANVISNING
DK BRUGSANVISNING
FI KÄYTTÖOHJE
GB INSTRUCTION MANUAL
WWW.WILFA.COM
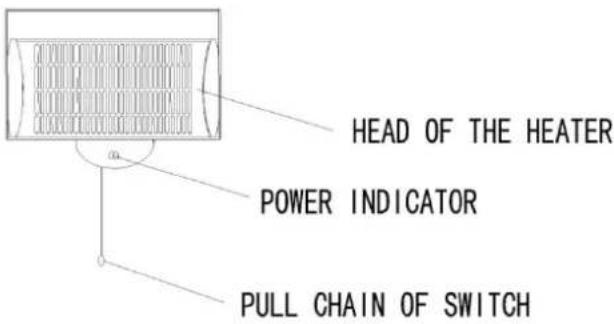
Illustrasjon 1
Delebeskrivelse
1 Varmedel/element
2 Varmeinnstilling
3 Bryter
1- ADVARSLER
illustrasjon 3
illustrasjon 4
natural_image
Technical line drawing of two mechanical components with angular dimension标注 (22°), no readable text or symbols present.Illustrasjon 3
tighten the bolt again with screw driver
natural_image
Technical line drawing of a mechanical component with curved blades and a central shaft (no text or symbols)step3
natural_image
Technical line drawing of a mechanical component with curved and straight sections, no text or symbols presentstep2
loose the bolt with screw driver
step1
Illustrasjon 4
5 - BRUK
Vy 2.
Vy 3.
natural_image
Technical line drawing of two mechanical components with angular dimension标注 (22°), no readable text or symbols present.Vy 3.
tighten the bolt again with screw driver
natural_image
Technical line drawing of a mechanical component with curved blades and a central shaft (no text or symbols)step3
natural_image
Technical line drawing of a mechanical device with a curved handle and cylindrical shaft (no text or symbols)step2
loose the bolt with screw driver
step1
Vy 4.
5-ANVÄNDA UTRUSTNINGEN
Fig. 2
[Tekst til Fig. 2:
ceiling = Loft
wall = Væg
floor = Gulv
more than 0.9 meter = mindst 0,9 m
more than 1.8 meter = mindst 1,8 m]
Fig. 3
[Tekst til Fig. 3:
[Tekst til Fig. 4:
plastic expanded pin = Ekspansionsbolt i plast wall = Væg
screw = Skrue]
natural_image
Technical line drawing of two mechanical components with angular dimension标注 (22°), no readable text or symbols present.Fig. 3
flowchart
graph LR
    A["tighten the bolt again with screw driver"] --> B["step3"]
    B --> C["steep 2"]
    C --> D["steep 1"]
    D --> E["loose the bolt with screw driver"]
Fig. 4
5-BETJENING
kuva 3
natural_image
Technical line drawing of two mechanical components with angular dimension标注 (22°), no readable text or symbols present.Kuva 3
Kuva 4
5 - KÄYTTÖ
Thank you for purchasing this infrared heater. We hope you will be completely satisfied with this product. To ensure this, please read these instructions carefully before use and keep them in a safe place.
5- WARNINGS
■ In order to avoid overheating, do not cover the heater
■ Do not place the appliance close to curtains and other combustible materials.
■ This electrical appliance complies with technical safety and electromagnetic compatibility standards.
■ Never touch your heater when in operation (risk of burns).
■ Never touch it with wet hand.
■ Never rotate the heating part of the appliance during operation. To change the tit angle of the heating part, we advise you to wait for 15 minutes after the appliance has been switched off.
■ Never place anything on your heater's safety guard as this may cause overheating (e.g. towels)
■ Never use your appliance to dry washing.
■ Switch off your appliance:
- After use
- In the event of malfunction
- Before cleaning it.
■ Never operate your appliance if it has fallen over.
■ Never dismantle your appliance. An incorrectly repaired appliance maybe dangerous to the user. If you encounter any problems, please take it to one of the Approved Service Centers in our customer service network
The warranty will be void in the event of damage arising from improper use.
■ Do not use this heater in the immediate surrounding of a bath, a shower or a swimming pool.
This movable appliance is designed for use in gardens, and can be used indoor and outdoor. The warranty will not apply to appliances used for professional usage. Although the heater may be used outdoors, the main plug must only be connected to the supply indoors.
The heater is provided with an anti-tilt switch will switch off the heater if it is overturned, and will switch it on again automatically when it is restored to its upright position.
■ the appliance is not to be used by children or persons with reduced physical, sensory or mental capabilities, or lack of experience and knowledge, unless they have been given supervision or instruction
■ children being supervised not to play with the appliance
■ If the supply cord is damaged, it must be replaced by the manufacturer, its service agent or similarly qualified persons in order to avoid a hazard.
2-VOLTAGE
Before using the appliance at the first time, ensure that your mains voltage corresponds to voltage indicated on the appliance. It is a class I appliance and must be earthed.
3-SAFETY
CAUTION: Before fitting or removing the appliance, ensure that the heater's power line supplying the heater is disconnected. Check that the power line is connected to a 30mA differential circuit breaker.
This appliance is designed for use in gardens, and any room in your house, including those where there is a risk of splashing. The installation and use
of your appliance must comply with the applicable standards in your country.
■ When it is switch on, an electrical heating appliance reaches very high temperature libel to cause burns. Make sure that all other users are aware of the risks.
■ If you have any doubts concerning installation possibilities for this heater, please consult a qualified electrician.
■ Children, the elderly and the infirm may not always be aware of the danger involved in using electrical appliances. Never allow this appliance to be used without supervision.
■ The appliance must be positioned so that the plug is accessible.
■ If the supply cord is damaged, it must be replaced by the manufacturer or its service agent or similar qualified person in order to avoid a hazard
■ Do not use this heater with a programmer, timer or any other device that switches the heater on automatically, since a fire risk exists if the heater is covered or positioned incorrectly.
■ Do not place the appliance close to curtains and other combustible materials.
■ The heater must not be located immediately below a socket-outlet.
■ The heater must be installed at least 1,8 m above the floor.
In order to avoid overheating, do not cover the heater. Do not place the appliance close to curtains and other combustible materials.
4- HOW TO MOUNT THE HEATER ON WALL
WARNING: Heater should be located on the wall where no combustible material is above the heater, and other sides of the heater should be at least 3 feet (0.9m) away from the nearby combustible material.
■ Before installing your appliance, you must disconnect the electrical supply at the circuit breaker.
Before using the heater, install it on the wall first, here are the steps for the installation:
4-1. When mounted, enough space must be left around the heater. See view.2
view 2.
4-2. draw two horizontal lines on the wall, the distance between the two lines is 98mm, then drill two holes at each horizontal line, be sure to make four holes diameter just as the same as that of the plastic expanded pin(included separately in the plastic bag in the gift box), and the depth of the holes just as the length of the plastic expanded pin, two holes distance at the upper horizontal line should be 140 mm. and should be central symmetry with the hole at the lower line. see view.3
view 3.
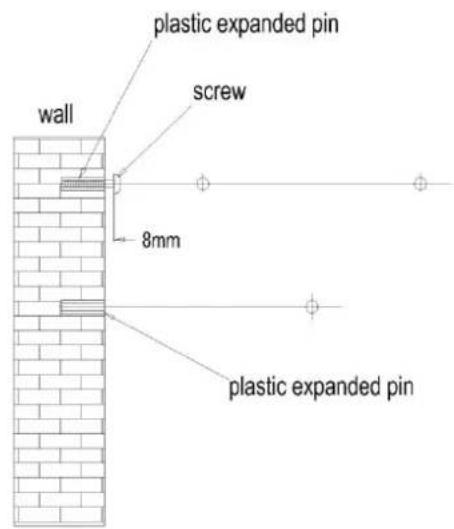
4-3. Insert the plastic expanded pin into the three holes on the wall. See view.4
view 4.
4-4. Fix two screws to the upper expanded pin, Keep the tips of the screws out for 8mm. See view. 4
4-5. Hand up the heater through the tip of the screw on the wall, and slide into the key slot in the back of the heater, then tighten the heater on wall with a screw through the lower hole in the heater and the plastic pin on the wall.
5-OPERATION
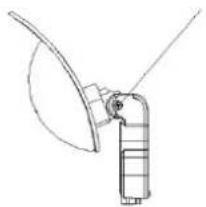
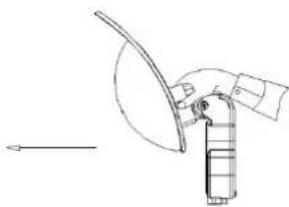
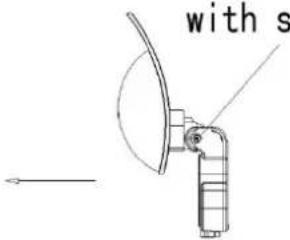
5-1. Heater head angle adjusting.
According to the request of use angle,
the angle for the heater head can be adjusted at 10^ to 32^ (view 3.)
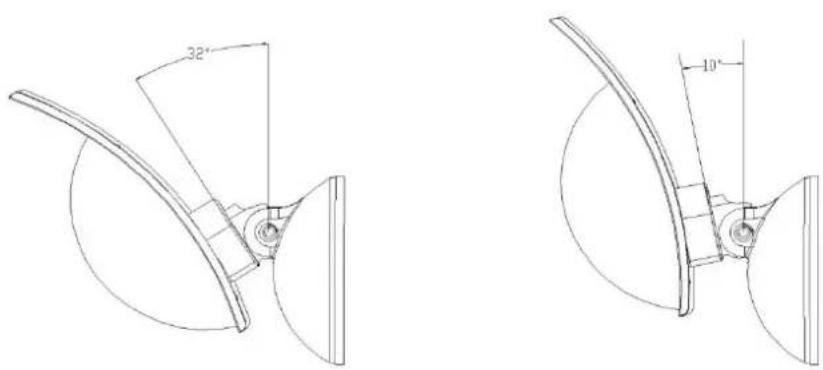
view 3
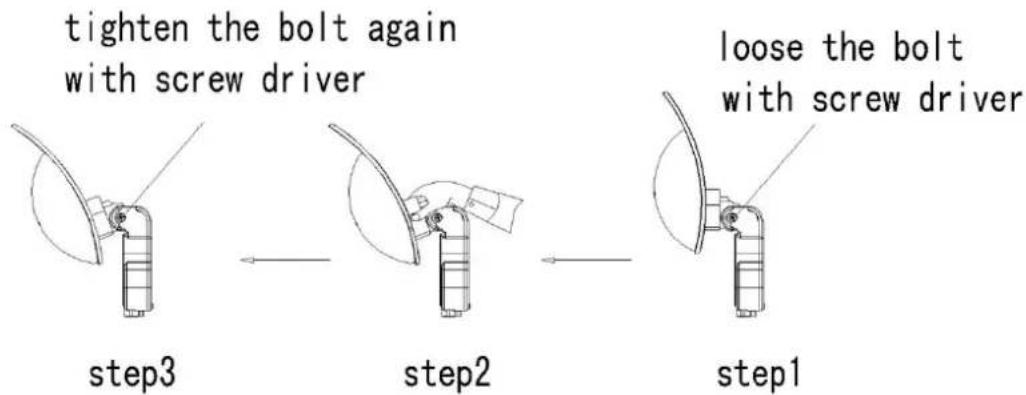
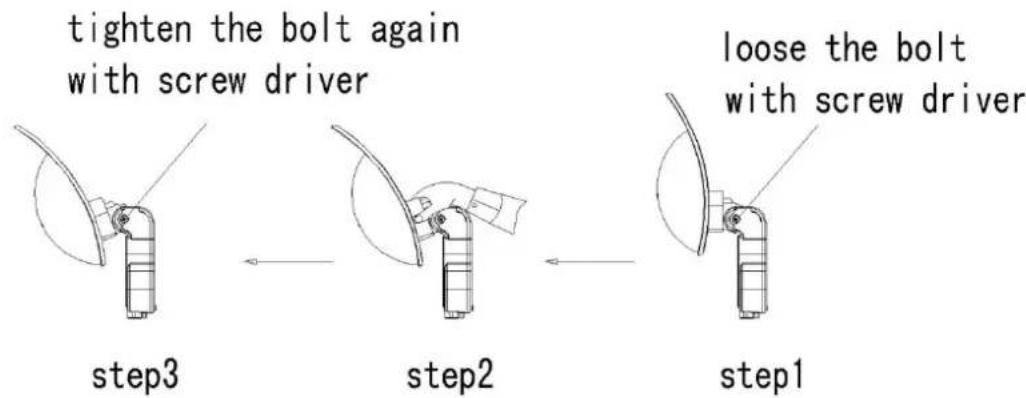
When doing adjusting, you should follow the three steps below (view4):
-
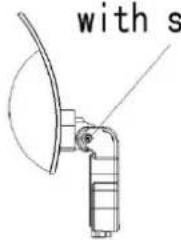
First loose the bolt in the joint with a screwdriver,(see step1)
-
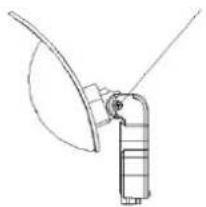
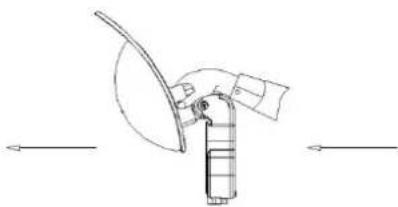
Take the linker by the hand and turn it up or down as you want,(see step2)
-
Tighten the bolt again with the screwdriver.(see step3)
Warning: Always remember you have to wait for 15 minutes after the appliance has been switched off before changing the tit angle of the heater head.
tighten the bolt again with screw driver
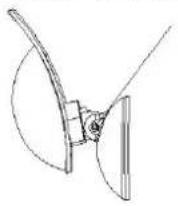
step3
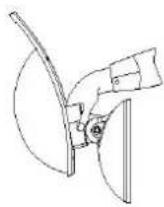
step2
loose the bolt with screw driver
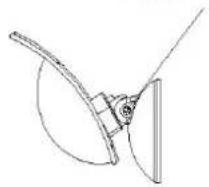
step1
view 4.
5-2. Power setting
The appliance is switched on by means of the pull chain switch, when you are pulling the switch, at the same time you can choice the power settings by reading the figure “0”, “1”, “2” from the little window of the heater body, one figure occurs after each pulling, and they occur in the turn of 0, 1, 2, 1, 0.
And in the full turn each figure means below:
0, means the heater off,
1, means the upper heating tube element on and the power 1000W,
2, means the two heating tube elements on and the power 2000W,
1, means the lower heating tube element on and the power 1000W,
0, means the second turn begin and the heater off again.
6-MAINTENANCE
Your appliance dose not requires any particular maintenance. However, in the event of a malfunction, please consult an Approved Service Center.
- THW-2000 terrasse heater
- Delebeskrivelse
- 1- ADVARSLER
- illustrasjon 4
- - BRUK
- 5-ANVÄNDA UTRUSTNINGEN
- 5-BETJENING
- kuva 3
- - KÄYTTÖ
- 5- WARNINGS
- 2-VOLTAGE
- 3-SAFETY
- 4- HOW TO MOUNT THE HEATER ON WALL
- ■ Before installing your appliance, you must disconnect the electrical supply at the circuit breaker.
- 5-OPERATION
- 5-1. Heater head angle adjusting.
- 5-2. Power setting
- 6-MAINTENANCE
Brand : WILFA
Model : Sol THW-2000
Category : Heating appliance