
Chef 7945 - Vacuum sealer OBH NORDICA - Free user manual and instructions
Find the device manual for free Chef 7945 OBH NORDICA in PDF.


| Brand | OBH Nordica |
| Model | Chef 7945 |
| Product Type | Vacuum Sealer |
| Power | 120 W |
| Voltage | 220-240 V ~ 50 Hz |
| Start Package | 1 x Food Sealer roll large (3 m x 28 cm), 5 x Food Sealer bags large (28 cm x 40 cm) |
| Functions | Vacuum & Seal, Pulse, Moist, Dry, Gentle, Normal, Canister, Manual Seal, Cancel |
| Vacuum Channel | Captures fluid from bag |
| Seal Strip | Removable |
| Gaskets | Upper and lower, removable |
| Bag Knife | Included for cutting roll |
| Hose Connection | For canister and bottle sealing |
| Release Buttons | For opening/closing cover |
| Cord Storage | Under appliance |
| Cleaning | Wipe exterior with damp cloth; sealing strip and lower gasket removable for rinsing; Teflon tape replaceable |
| Safety Features | Do not immerse; keep away from children; use only original parts; RCD recommended |
| Optional Accessories | Rolls (7953, 7954), bags (7955, 7956), canisters (7957), bottle sealer (7960), lunch box (7961), marinating box (7962) |
| Guarantee | 2 years limited (Sweden, Norway, Denmark, Finland) |
| Weight | Approx. 2.5 kg |
Frequently Asked Questions - Chef 7945 OBH NORDICA
User questions about Chef 7945 OBH NORDICA
0 question about this device. Answer the ones you know or ask your own.
Ask a new question about this device
Download the instructions for your Vacuum sealer in PDF format for free! Find your manual Chef 7945 - OBH NORDICA and take your electronic device back in hand. On this page are published all the documents necessary for the use of your device. Chef 7945 by OBH NORDICA.
USER MANUAL Chef 7945 OBH NORDICA
DESIGNING GOOD LIFE
Food Sealer CHEF
Keep your food fresh up to 5 times longer

Making good!
1 x Food Sealer roll large - 3 m x 28 cm
5 x Food Sealer bags large - 28 cm x 40 cm
OBH Nordica Denmark A/S
2750 Ballerup
Visiting address: Tempovej 27
Phone: +45 43 350 350
Direct: +45 43 350 367
www.obhnordica.dk
Tekniske data
OBH Nordica 7945
220-240 V\~ 50 Hz
120 W
Startpakke
1 x Food Sealer roll large - 3 m x 28 cm
5 x Food Sealer bags large - 28 cm x 40 cm
sidene av apparatet.
med hanntilkoblingen som medfølger i pakningen til vakuumpakkeren. Trykk deretter den ene tilkoblingen fast på apparatets slangetilkobling (7) og den andre enden i hullet på vakuumbeholderens lokk.
Anbefaling for oppbevaring
BEGRENSET GARANTI for OBH Nordica
Garantien
1 x Food Sealer roll large - 3 m x 28 cm
5 x Food Sealer bags large - 28 cm x 40 cm
1 x Food Sealer roll large - 3 m x 28 cm
5 x Food Sealer bags large - 28 cm x 40 cm
- Read the instruction manual carefully before use and save it for future use.
- Plug the appliance to a household outlet of 220-240 V only, and use the appliance only for the intended use.
- Always unplug the appliance from the mains supply when not in use.
- The appliance must not be immersed in water or any other liquids.
- This appliance can be used by children aged 8 years and over and persons with reduced physical, sensory or mental capabilities or lack of experience and knowledge, if they have been given supervision or instruction concerning the use of the appliance in a safe way by a person responsible for their safety and they understand the hazards involved.
- Children should be supervised to ensure that they do not play with the appliance. Children are not always able to understand potential risks.
Teach children a responsible handling of electrical appliances.
- Cleaning and maintenance shall not be made by children, unless they are over the age of 8 and supervised.
- Keep the appliance and the cord out of reach of children under the age of 8.
- Check that the cord is not hanging over the edge of the table.
- Do not place the appliance on or near hotplates, open fire or the like.
-
The appliance should only be used under supervision.
-
Do not touch the heating element when it is hot.
- Make sure that liquid is not aspirated into the pumping system of the appliance.
- Only use original parts from OBH Nordica.
- Always examine appliance, cord and plug for damage before use. If the supply cord is damaged, it must be replaced by the manufacturer, his service agent or a similarly qualified person in order to avoid a hazard.
- For additional protection the installation of a residual current device (RCD) with a rated residual operating current not exceeding 30 mA is recommended. Ask your installer for advice.
- The appliance is for domestic use only.
- If the appliance is used for other purposes than intended or is it not handled in accordance with the instruction manual, the full responsibility for any consequences will rest with the user. Any damages of the product are not covered by the warranty.
Congratulations on your purchase!
This Food Sealer will change your purchasing routines and way of storing produce. Once you have tried vacuum packing pack your produce, it will become an invaluable part of your cooking.
Oxygen is the worst enemy of fresh produce!
The biggest reason that food loses nutrients, consistency, taste and quality is oxygen. Oxygen also causes freezer burns on food stored in the freezer and enables the development of micro-organisms. This is why the use of conventional storage methods such as storage in regular plastic bags and containers is not optimal because they actually lock in the air together with the food.
Vacuum packing removes the oxygen, thereby sealing in the taste and the food is kept fresh longer. Removing oxygen and storing food properly in either the refrigerator or freezer can also inhibit the growth of micro-organisms that can later develop into mould, yeast and bacteria.
With OBH Nordica's Food Sealers, you save both time and money!
OBH Nordica Food Sealers let you save food up to five times longer than with conventional storage methods. This means that you can:
- Save money by buying economy or family size packages and vacuum pack them for later use - no waste.
- Save time by preparing large portions and freezing in portion sizes straight in vacuum bags.
You will also save time when you use the Food Sealer to marinate meat and fish. Vacuum packing opens the meat's/fish's pores so that the marination process only takes a few minutes instead of hours.
Moreover, by removing the air from the packaging, you avoid freezer burn on the produce.
Important!
Vacuum packing is not the same as preserving and cannot prevent food from getting old; however, it can delay the process.
Vacuum packing is not a substitute for refrigeration and freezing. Chilled goods must still be stored in a refrigerator or freezer after vacuum packing.
If the temperature in the refrigerator is above +4°C for an extended period of time, it promotes the formation of harmful micro-organisms, so the temperature should be below +4°C.
Food can advantageously be stored in the freezer (preferably at -17°C or lower). Even if it does not kill all micro-organisms, it inhibits their growth.
Parts of the Food Sealer
- Vac & seal - for vacuum packing and sealing.
- Pulse - (Note that this function should only be used for bags). Push the button to start vacuum packing. Repeat until the desired results have been achieved. Then push "Manual seal" to seal. Normal or gentle vacuum pressure can be selected.
- Moist - provides a shorter vacuum process for wet or moist produce. Dry - provides a longer vacuum process for dry produce without moisture (default time is “Dry”).
- Gentle - for soft and delicate produce that needs less vacuum pressure.
Normal - for regular produce (default pressure is "Normal"). - Canister - is used only when vacuum packing in a canister.
- Manual Seal - this button has two functions:
- for sealing of plastic in rolls.
- during vacuum packing (Vac & seal), this button stops the pump immediately and then seals the bag.
-
Hose connection - for canisters and bottle sealing.
-
CANCEL - stops an on-going process.
- Air extraction - Do not cover the intake with the vacuum bag when vacuum packing/sealing.
- Vacuum channel - place the open end of the bag in the vacuum channel. The air is sucked out of the bag and the vacuum channel captures any fluid from the bag.
- Seal strip - seals the bag (removable).
- Lower gasket - removable.
- Upper gasket - removable.
- Sealing unit + Teflon tape - seals the vacuum bag.
- Bag knife - remove the knife from the console and pull the knife along the plastic roll at the desired length.
- Release buttons for opening and closing of cover.
Use
Produce a vacuum bag from a plastic roll
Place the appliance on a flat surface and connect the plug to a wall socket (the signal lights Normal and Dry are illuminated).
- Open the appliance and take out the bag knife. Pull out

a suitable length of the plastic and run the knife along the bag as shown. Adjust the length so that there is at least 7 cm between the bag's contents and the opening of the vacuum bag. Only use plastic rolls from OBH Nordica.
- Then place the short end of the plastic over the sealing
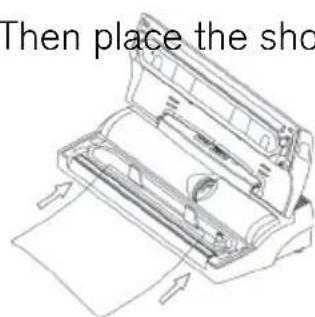
unit and down into the vacuum channel, make sure the entire short end reaches down into the vacuum channel.
- Close the cover and push firmly until you hear a click
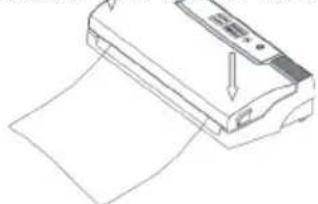
from both sides of the appliance.
- Push on the Manual Seal button to begin sealing; the signal light turns on.
Once the signal light turns off, the sealing is done.
- Push in the release buttons on both sides of the
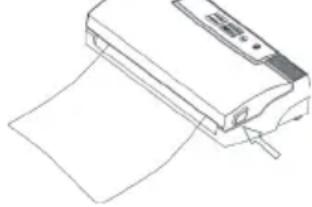
appliance to open the cover of the appliance. Remove the now finished vacuum bag. The vacuum bag is now ready to use for vacuum packing. Let the appliance rest for 1 minute between each vacuum process to avoid overheating and prevent the bag from being sealed too soon.
Important tips when vacuum packing
- Do not put in too much ingredients in the vacuum bag/vacuum canister. Leave at least 7 cm between the content in the vacuum bag and the bag opening.
- Make sure that the vacuum bag is dry in the bag opening as the bag will not be properly sealed otherwise.
- Extend the bag opening before it is placed against the sealing unit to remove any folds and unevenness.
- Do not place sharp objects such as fish bones and hard shells in the vacuum bag as they can penetrate the bag. Use vacuum canisters for this purpose.
- During the vacuum packing process, liquid and other particles can unintentionally end up in the vacuum pump, which can clog the pump and damage the appliance. To prevent this, we recommend that liquid contents be frozen in freezer-resistant containers before it is vacuum packed in a vacuum bag or vacuum canister. Note that if liquid is vacuum packed directly in a vacuum canister without being pre-frozen, the canister can be damaged and crack when it is in the freezer. Also refer to the section "Preparation guide for various kinds of produce".
- If you are going to vacuum pack meat or other moist contents, some paper towels can be placed between the contents and the bag opening. When vacuum packing flour, grain and other powder contents, a coffee filter can be placed between the contents and the bag opening. Make sure the paper/filter is not placed in the seal.
- Note that vacuum packed perishables must be stored in the refrigerator or freezer. Remember that vacuum packing is not the same thing as preserving, but rather only extends the shelf life.
- Keep in mind that food that has a high fat content can spoil if it is stored too warm.
- Vacuum packing of fruit and vegetables, such as apples, bananas, potatoes and root vegetables does not extend their shelf life if they are not peeled first.
Vacuum packing
Vacuum packing with a vacuum bag
-
Place the appliance on a flat surface and connect the plug to a wall socket (the signal lights Normal and Dry are illuminated).
-
Place the contents to be vacuum packed in a vacuum bag, leaving at least 7 cm between the contents and the opening of the vacuum bag. Only use vacuum bags/plastic rolls from OBH Nordica.
- Make sure the opening of the vacuum bag is clean, dry and free from folds.
- Place the vacuum bag opening over the sealing unit
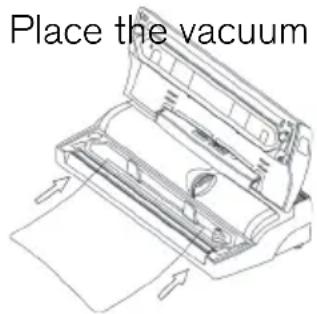
and down in the vacuum channel. Make sure that the air intake is not covered by the vacuum bag.
- Close the cover and push firmly until you hear a click

from both sides of the appliance.
- Choose the speed depending on what will be vacuum packed: select the "Dry" button for dry contents or the "Moist" button for delicate/moist contents.
- Then push the "Normal" button for non-delicate contents, or the "Gentle" button for soft and delicate contents.
- Push the Vac & Seal button; the signal light turns on and the vacuum process begins. Once the vacuum packing is done, the Manual Seal button also turns on and the bag is sealed. Once the sealing is done, the signal light turns off.
Note: This appliance achieves a very high vacuum pressure during the vacuum packing process. To keep delicate contents from begin ruined by the high pressure, keep an eye on the vacuum bag and push the Manual Seal button if you want to stop the process earlier. The appliance then stops pumping and begins sealing the vacuum bag.
- Push in the release buttons on both sides of the
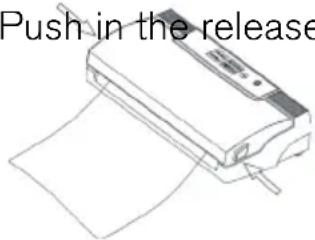
appliance to open the cover of the appliance. Remove the bag with the vacuum packed contents. Let the appliance rest for 1 minute between each vacuum process to avoid overheating and prevent the bag from being sealed too soon.
- Wipe off any liquid and particles in the vacuum channel after each vacuum packing process.
- Be sure that no liquid is sucked into the appliance. Damage arising from this is not covered by the right of return.
Pulse function
This function is used mainly for vacuum packing when a small vacuum force is desired, such as for tomatoes, crisps or the like. Or when vacuum packing moist produce or sauces when one wants to remove only a little air from the bag and then stop the appliance before the liquid is compressed.
Push the “Normal” button for non-delicate contents, or “Gentle” for soft and delicate contents.
Then push the Pulse button repeatedly until the desired results have been achieved. Then seal the bag by pushing the Manual Seal button. Once the signal light turns off, the bag is sealed.
After finished use, unplug the appliance from the wall socket. Do NOT push down the appliance's cover so that it locks; this is to keep the gaskets from deforming, which can affect the functioning of the appliance.
Thawing and heating of vacuum packed contents in vacuum bags
The vacuum bags from OBH Nordica can be used in a microwave oven and can also be simmered in water.
Open the bag by cutting off a corner of the bag so that air can enter if the vacuum bag is to be thawed/warmed in a microwave oven. The bags may not be used to cook food in, but rather are only intended for use when thawing/warming.
The bag can be warmed up by placing it in a pot of simmering water.
NOTE! Never re-use bags that have been used in a microwave oven or have been in simmering water.
Vacuum packing with canister (accessory 7957)
- Place the appliance on a flat surface and connect the plug to a wall socket (the signal lights Normal and Dry are illuminated).
- Make sure the vacuum canister and its top are clean and dry.
- Place the produce in the vacuum canister, but do not exceed the maximum level. Put on the top of the vacuum canister.
- Switch one of the hose's connectors (female
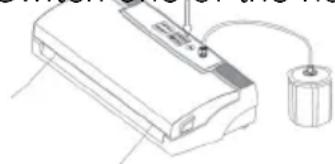
connector) with the male connector that comes in the Vacuum Sealer package. Then push the one connector on to the appliance's hose connection (7) and the other end in the hole on the vacuum canister's top.
-
Choose the speed depending on what will be vacuum packed: push the "Normal" button for normal speed, or the "Gentle" button for delicate contents and a gentler speed. The "Gentle" setting is especially useful for soft and sensitive produce.
-
Turn the top's lock to the "SEAL" position.
-
Close the cover on the appliance and push firmly until you hear a click from both sides of the appliance. Push the Canister button and the vacuum packing process begins immediately.
- Push on the top with your hand at the beginning of the process to avoid air leakage between the vacuum canister and top.
- The appliance automatically stops when enough vacuum pressure has been achieved. The Canister light then turns off and the vacuum process is thereby done.
- Push on the top with your hand and pull the vacuum hose out of the top. Be careful to make sure that the lock on the top points to "SEAL" when you pull out the hose.
- To test the result, try lifting the top.
- Turn the top's lock from "SEAL" to "OPEN" to open the vacuum canister's top. You can then lift off the top.
- The vacuum canister can be cleaned and washed in a dishwasher (not the top) after use. Read more under "Cleaning and maintenance".
- NOTE! The vacuum canister and top may not be used in a microwave oven.
Vacuum packing with lunch box (accessory 7961)
-
Place the appliance on a flat surface and connect the plug to a wall socket (the signal lights Normal and Dry are illuminated).
-
Make sure the lunch box and its top are clean and dry.
-
Place the produce in the lunch box, but make sure that there is around 1 cm up to the edge. Put the top on the vacuum canister and make sure it is on properly.
-
Remove the connector from the one end of the enclosed hose so that the hose has two "male connectors". Push the one male connector on the appliance's hose connection (7) and then put the other one on the adapter. Then push the adapter on to the top's vacuum connector.
-
Choose the speed depending on what will be vacuum packed: push the "Normal" button for normal speed, or the "Gentle" button for delicate contents and a gentler speed. The "Gentle" setting is especially useful for soft and sensitive produce.
-
Close the cover on the appliance and push firmly until you hear a click from both sides of the appliance. Push the Canister button and push on the top with your hand at the beginning of the process to avoid air leakage between the lunch box and top. The vacuum packing process begins immediately.
-
When the grey rubber button on the adapter goes down, enough vacuum pressure has been achieved. Lift off the adapter from the vacuum connection on the top and then test the result by trying to lift the top.
-
When the top is to be removed, lift the grey rubber gasket in the top's vacuum connection to release the vacuum. The top can then be lifted off.
-
The lunch box and top can be washed in the top basket of a dishwasher after use.
-
The lunch box and top can be used in a microwave oven, but remember that the vacuum must be released before it can be placed in a microwave oven. The lunch box can also be stored in the freezer, but does not retain the vacuum.
If the vacuum process does not succeed, it may be due to the following:
- there is liquid/food under the edge of the top. Always make sure that the box and the top's edges are clean and dry.
- liquid/food has entered the adapter. If so, the adapter must be scrapped.
- the hose is leaking in one of the ends. Check that they form a seal around the connections.
- food particles have gotten stuck under the grey rubber gasket in the middle of the top. Lift it carefully and clean it off.
- when vacuum packing in a canister, the cover of the appliance must be kept closed.
Vacuum packing with marinating box (accessory 7962)
-
Place the appliance on a flat surface and connect the plug to a wall socket (the signal lights Normal and Dry are illuminated).
-
Make sure the vacuum canister, its top and gaskets are clean and dry.
-
Place the produce in the vacuum canister, but do not exceed the canister's maximum level. Put on the top of the vacuum canister.
-
Switch one of the hose's connectors (female connector) with the male connector that comes in the Vacuum Sealer package. Then push the one connector on to the appliance's hose connection (7) and the other end in the hole on the vacuum canister's top.
-
Choose the speed depending on what will be vacuum packed: push the "Normal" button for normal speed, or the "Gentle" button for delicate contents and a gentler speed. The "Gentle" setting is especially useful for soft and sensitive produce.
-
Close the cover on the appliance and push firmly until you hear a click from both sides of the appliance. Push the Canister button and the vacuum process begins immediately. Push on the top with your hand at the beginning of the process to avoid air leakage between the vacuum canister and top. Note that the container is compressed somewhat during the vacuum process, which may cause a creaking noise to arise. This is normal and nothing that affects the results.
-
The appliance automatically turns off after around 1 minute and the Canister lamp thereby turns off.
-
Push on the top with your hand and pull the vacuum hose out immediately when the appliance turns off.
-
When the canister is under pressure, this is indicated by the "Pressure indicator" button being compressed.
-
To test the vacuum seal, try lifting the top.
-
To open the top of the vacuum canister, push the "Vacuum release" button on the top to release the pressure, then the top can be lifted off.
-
The vacuum canister can be cleaned and washed in a dishwasher (not the top) after use. Never use solvents when cleaning.
-
If it looks like dirt has gotten under the white protective cover on the underside of the top, the protective cover can be removed and washed by hand. Then wipe off the underside of the vacuum canister's top with a wet rag before the protective cover is put back on. Check that the protective cover is properly in place. Note that the entire top cannot be washed by hand, only the white protective cover.
- Note! The vacuum canister and top may not be used in a microwave oven.
Produce that has been vacuum packed in a vacuum canister and stored in a refrigerator is kept fresh up to five times longer than non-vacuum packed produce. Before the produce is consumed, first check the status of the vacuum pressure in the canister. If the “Pressure Indicator” button is compressed, the canister is still under pressure. If not, the produce should be checked carefully before being eaten.
If the canister is stored in a freezer, the vacuum pressure holds up to one month. The produce can, however, of course be stored longer in the freezer even if the canister is not under pressure. Check the status of the vacuum pressure according to the earlier instructions.
Marinate under vacuum pressure
The marinating process is hastened if carried out under vacuum pressure since the vacuum pressure opens the pores of the produce and thereby absorbs the marinade faster. This means that marinating only takes a few minutes instead of hours.
Marinating in a vacuum bag
Pour the marinade in a vacuum bag together with the produce and vacuum pack according to earlier descriptions. Be careful to add enough marinade so that it covers all of the contents. For best results, marinate for at least 30 minutes in the vacuum bag before you cut open the bag.
Marinating in a canister (accessory 7957)
For an even more effective marinating process, marinate fish/meat in a vacuum canister according to the description below:
- Place the appliance on a flat surface and connect the plug to a wall socket (the signal lights Normal and Dry are illuminated).
- Make sure the vacuum canister and its top are clean and dry.
- Place the marinade together with fish/meat in the vacuum canister; be careful to not exceed the maximum level. Put on the top of the vacuum canister.
- Switch one of the hose's connectors (female connector) with the male connector that comes in the vacuum sealer package. Then push the one connector on to the appliance's hose connection (7) and the other end in the hole on the vacuum canister's top.
-
Make sure that the top's lock is in the "OPEN" position.
-
Push on the top with your hand at the beginning of the sealing process to avoid air leakage between the vacuum canister and top.
- Close the cover on the appliance and push firmly until you hear a click from both sides of the appliance. Push the Canister button and the vacuum process begins immediately. The appliance automatically stops when enough vacuum pressure has been achieved.
- Let the marinated produce rest under vacuum pressure in the canister for 30 seconds.
- Then push the release buttons on the side of the appliance and lift the cover a little to release air from the canister.
- Repeat steps 5 to 9 four times for the best results.
- After the fourth repetition, turn the top's lock to "SEAL" and let the produce marinate under vacuum pressure for 20 minutes. This makes it easier for the marinade to permeate the produce.
- Push on the top with your hand and pull the vacuum hose out of the top. Turn the top's lock from "SEAL" to "OPEN" to open the vacuum canister's top. You can then lift off the top.
Marinating in a marinating box (accessory 7962)
-
Place the appliance on a flat surface and connect the plug to a wall socket (the signal lights Normal and Dry are illuminated).
-
Make sure the vacuum canister, its top and gaskets are clean and dry.
-
Place the marinade together with fish/meat in the vacuum canister; be careful to not exceed the maximum level. Put on the top of the vacuum canister.
-
Switch one of the hose's connectors (female connector) with the male connector that comes in the Vacuum Sealer package. Then push the one connector on to the appliance's hose connection (7) and the other end in the hole on the vacuum canister's top.
-
Push on the top with your hand at the beginning of the process to avoid air leakage between the vacuum canister and top. Note that the container is compressed somewhat during the vacuum process, which may cause a creaking noise to arise. This is normal and nothing that affects the results.
-
Close the cover and push firmly until you hear a click from both sides of the appliance. Push the Canister button and the vacuum process begins immediately.
-
When the canister is under pressure, this is indicated by the "Pressure indicator" button being compressed.
-
The appliance automatically turns off after around 1 minute and the Canister lamp thereby turns off.
-
Let the marinated meat/fish rest in the container under vacuum pressure for 30 seconds.
-
Push the "Vacuum release" button on the canister's top and then repeat steps 5-9 above four times for the best results.
-
After the fourth repetition, let the meat/fish marinate under vacuum pressure for around 20 minutes. This makes it easier for the marinade to permeate the meat.
-
To open the top of the vacuum canister, push the "Vacuum release" button on the top to release the pressure, then the top of the vacuum canister can be lifted off.
- The vacuum canister can be cleaned and washed in a dishwasher (not the top) after use. Never use solvents when cleaning.
- If it looks like dirt has gotten under the white protective cover on the underside of the top, the protective cover can be removed and washed by hand. Then wipe off the underside of the vacuum canister's top with a wet rag before the protective cover it put back on. Check that the protective cover is properly in place. Note that the entire top cannot be washed by hand, only the white protective cover.
- NOTE! The vacuum canister and top may not be used in a microwave oven.
Date marking the marinating box
On the top of the vacuum canister, you can easily set the packing date and month by pushing the markers to the current date.
Preparation guide for various kinds of produce
Meat and fish:
For the best results, the produce should be pre-frozen for around 1-2 hours before they are vacuum packed to retain succulence and texture. If it is not possible to pre-freeze the produce, place a paper towel between the meat/fish and the bag opening. Be careful that the paper does not end up in the seal.
Note that the meat may look darker when it has been vacuum packed since the oxygen is removed during the process.
Vegetables:
Vegetables should be blanched before they are vacuum packed since all vegetables emit gases during storage. Blanching also stops the enzyme process that can make the vegetables lose colour and taste.
Peel the vegetables and then blanch them by dipping them in boiling water and cooking them until they have softened somewhat, but are still crisp. Then place them directly in cold water to stop the boiling process. Then let them drip dry before they are vacuum packed.
When vegetables are to be frozen, they should first be pre-frozen for 1-2 hours. Separate them out on a piece of baking paper or the like to keep them from freezing together in a clump. Then place the frozen vegetables in a vacuum bag and vacuum seal the bag. Then place the vacuum bag in the freezer. Note! Fresh mushrooms, onions and garlic should never be vacuum packed due to the risk of anaerobic bacteria.
Leafy vegetables:
For the best results, a vacuum canister should be used for vacuum packing of leafy vegetables. Rinse the vegetables and let them dry on a paper towel or the like. Then vacuum pack them in a vacuum canister and store in the refrigerator.
Fruit:
Fruit with a peel should be peeled before being vacuum packed. Feel free to pre-freeze fruit for 1-2 hours before being vacuum packed. Spread them out on a piece of baking paper or the like so they do not freeze together in a clump. Then vacuum pack them in a vacuum bag and place in the freezer. If you want to keep them in the refrigerator, you should vacuum pack them in a vacuum canister.
Baked goods:
If you want to vacuum pack soft baked goods, you are recommended to use a vacuum canister to preserve their form. If you want to use a vacuum bag, however, you should pre-freeze the baked goods for 1-2 hours before hand. Of course, pastry dough, pies and cake mixes can be vacuum packed for later use.
Hard cheese:
To keep cheese fresh, vacuum pack it if you are not going to use it for a few days. Take an extra large vacuum bag so that you can re-use the bag if you want to vacuum pack the same cheese again. Note! Soft cheese should not be vacuum packed due to the risk of anaerobic bacteria.
Powder and flour:
To keep particles from entering the vacuum pump, a coffee filter or paper towel should be placed between the contents in the vacuum bag and the bag opening. Make sure that the filter/paper does not enter the seal. You can also vacuum pack the contents in their original packaging by putting the original package and its contents in a vacuum bag and then sealing the vacuum bag.
Snacks:
If you have left over snacks, they stay fresh longer if they are vacuum packed. For the best results, a vacuum canister should be used when vacuum packing to keep them from being crushed.
Liquids:
Before you vacuum pack a liquid, such as soup or broth, pre-freeze the liquid in a freezer-resistant container or ice cube form until the liquid is completely frozen. Then remove the frozen liquid from the form and vacuum pack it in a vacuum bag or vacuum canister. Then place the vacuum bag/vacuum canister in the freezer. Note that if liquid is vacuum packed directly in a vacuum canister without being pre-frozen, the canister can be damaged and crack when it is in the freezer.
General rules when handling food
- Always wash your hands, surfaces and other utensils that will be used when handling and vacuum packing the food.
- As soon as you have packed perishables, they should be promptly refrigerated or frozen; do not store them at room temperature.
• Produce that has been warmed or thawed should be promptly consumed. - Tinned food or factory vacuum packed food that has been opened can be vacuum packed again. Follow the instructions in the user manual and store the produce as recommended.
- Do not eat thawed produce that has been stored at room temperature for more than 5 hours.
- Spread the vacuum packs out in the refrigerator or freezer so that they are cooled faster.
• Note that vacuum packing is not the save as preserving food.
Storing recommendations
| Type of produce | Storage Recommendation | mmended storage accessory | Shelf life upon vacuum packing | Shelf life without vacuum packing |
| Meat and fish | ||||
| Beef Freezer Vacuum bag 2-3 years 6 months | ||||
| Pork Freezer Vacuum bag 2-3 years 6 months | ||||
| Lamb Freezer Vacuum bag 2-3 years 6 months | ||||
| Poultry Freezer Vacuum bag 2-3 years 6 months | ||||
| Minced meat Freezer Vacuum bag 1 year 4 months | ||||
| Fish Freezer Vacuum bag 2 years 6 months | ||||
| Cheese | ||||
| Cheddar Refrigerator Vacuum bag/vacuum canister | 4-8 months 1-2 weeks | |||
| Parmigiana | Refrigerator Vacuum bag/vacuum canister | 4-8 months 1-2 weeks | ||
| Vegetables | ||||
| Asparagus | Freezer Vacuum bag 2-3 years 8 months | |||
| Broccoli | Freezer Vacuum bag 2-3 years 8 months | |||
| Cabbage | Freezer Vacuum bag 2-3 years 8 months | |||
| Corn Freezer Vacuum bag 2-3 years 8 months | ||||
| Peas | Freezer Vacuum bag 2-3 years 8 months | |||
| Lettuce/spinach | Refrigerator | Vacuum canister | 2 weeks | 3-6 days |
| Fruit | ||||
| Apricots | Freezer Vacuum bag 1-3 years 6-12 months | |||
| Plums | Freezer Vacuum bag 1-3 years 6-12 months | |||
| Peaches | Freezer Vacuum bag 1-3 years 6-12 months | |||
| Nectarines | Freezer Vacuum bag 1-3 years 6-12 months | |||
| Berries | ||||
| Raspberries Refrigerator Vacuum | Refrigerator Vacuum | um canister 1 week 1-3 days | ||
| Blackberries Refrigerator Vacuum | Refrigerator Vacuum | um canister 1 week 1-3 days | ||
| Strawberries Refrigerator Vacuum | Refrigerator Vacuum | um canister 1 week 1-3 days | ||
| Blueberries Refrigerator Vacuum | Refrigerator Vacuum | um canister 2 weeks 3-6 days | ||
| Cranberries Refrigerator Vacuum | Refrigerator Vacuum | um canister 2 weeks 3-6 days | ||
| Baked goods | ||||
| Bagels Freezer | Vacuum bag | 1-3 years 6-12 months | ||
| Bread Freezer | Vacuum bag 1-3 years 6-12 months | |||
| Cookies Room temperature | Vacuum canister 3-6 weeks 1-2 weeks | |||
| Biscuits/ crackers | Room temperature | Vacuum canister 3-6 weeks 1-2 weeks | ||
| Groceries | ||||
| Grain Room temperature | Vacuum bag/vacuum canister | 1-2 years 6 months | ||
| Pasta Room temperature | Vacuum bag/vacuum canister | 1-2 years 6 months | ||
| Rice Room temperature | Vacuum bag/vacuum canister | 1-2 years 6 months | ||
| Flour Room temperature | Vacuum bag/vacuum canister | 1-2 years 6 months | ||
| Sugar Room temperature | Vacuum bag/vacuum canister | 1-2 years 6 months | ||
| Nuts | ||||
| Almonds Room temperature | Vacuum bag/vacuum canister | 2 years 6 months | ||
| Peanuts Room temperature | Vacuum bag/vacuum canister | 2 years 6 months | ||
| Sunflower seeds Room temperature | Vacuum bag/vacuum canister | 2 years 6 months | ||
| Coffee | ||||
| Coffee beans Freezer Vacuum | um bag 2-3 years 6 months | |||
| Coffee beans Room temperature | Vacuum bag/vacuum canister | 1 year | 3 months | |
| Ground coffee Freezer Vacuum | um bag 2 years 6 months | |||
| Ground coffee Room temperature | Vacuum bag/vacuum canister | 5-6 months | 1 month | |
| Liquids | ||||
| Soup Freezer Vacuum | um bag/vacuum canister | 1-2 years 3-6 months | ||
| Sauces Freezer Vacuum | um bag/vacuum canister | 1-2 years 3-6 months | ||
| Stew Freezer Vacuum | um bag/vacuum canister | 1-2 years 3-6 months | ||
Cleaning and maintenance
Always unplug the appliance before cleaning and maintenance.
Cleaning the appliance:
- Do not dip the appliance or its cord into water or other liquids.
- Do not use scouring cleaners as the material can be damaged.
- Use a moist rag and some mild dish washing liquid to remove food particles and dust from around the appliance's components. Wipe dry with a towel or the like.
- Clean the appliance's sealing strip and the lower gasket by carefully pulling them off of the appliance. Rinse them in water and let them dry properly before they are put back on. Be careful to place them correctly so that air does not leak upon use. The upper gasket can be wiped off with a moist rag. Should a gasket break, it must be replaced with a new one (which can be ordered from OBH Nordica at +46-8-629-2500).
Cleaning vacuum bags:
- Wash the vacuum bags in warm water and a little dish washing liquid.
- If the vacuum bags are to be washed in a dishwasher, turn the vacuum bags inside out and place them in the upper basket of the dishwasher so that the entire bag's surface comes in contact with water.
- Let the vacuum bags dry properly after cleaning.
NOTE! Due to the risk of infection, never re-use vacuum bags that have contained raw meat, raw fish or fat. Never re-use bags that have been used in a microwave oven or have been simmered in water.
Cleaning of vacuum canisters:
- The vacuum canister can be cleaned in warm water and dish washing liquid. The actual canister can be washed in the upper basket of a dishwasher.
- The top can be wiped off with a moist rag. Note! Do not dip the top in water.
- Make sure that all parts are completely dry before re-use.
Replacement of Teflon tape
If the heating unit's Teflon tape has been damaged or come loose, it must be replaced with a new one (which can be ordered from OBH Nordica at +46-8-629-2500).
Make sure that the appliance is unplugged and has fully cooled. Open the cover and then pull off the damaged Teflon tape. Then carefully pull off the protective strip from the new tape. Be careful so that the tape does not stick to anything or stick together. Hold the tape in both ends and attach one end slightly to the left/right of the heating unit and then extend the tape over the entire unit. Check that there are no folds or air bubbles on the tape and that it covers the entire unit.
Storage:
- Store the appliance on a level surface out of reach of children.
- Do not push down the cover so that it locks for storage; this is to prevent the appliance's gaskets from becoming deformed.
- The cord can be rolled up in the cord holder under the appliance.
Troubleshooting
| Problem Cause/solution | |
| Nothing happens when I try to vacuum seal the bag. | Check that the appliance is plugged in to a wall socket.Check if there is any damage to the cord.Check that the vacuum bag is correctly placed in the appliance (see earlier instructions). |
| The appliance does not seal the vacuum bag after the vacuum process. | There is a built-in vacuum sensor in the appliance.The appliance does not switch over to sealing if sufficient pressure has not been achieved in the vacuum process.Check the sealing strip and remove any dirt.Check the gaskets and remove the lower one for cleaning if necessary. If they are damaged, they need to be replaced with new ones.The vacuum bag may leak. Check the bag by sealing it with a little air and then lowering it into water. If bubbles come from the bag, it is leaking. Reseal the bag or use a new one.Dirt or liquids in the bag opening can make it difficult to seal the bag. Open the bag and wipe off around the opening before it is placed level over the sealing strip. |
| There is air left after the vacuum packing process. | Leaks along the seal may be due to folds, liquid or particles. Wipe off the bag opening/cover before sealing is begun. Dirt or liquids in the bag opening can make it difficult to seal the bag. Open the bag and wipe off around the opening before it is placed level over the sealing unit.Make sure the bag opening is over the sealing unit and in the vacuum channel.Check that the gaskets are whole, clean and sit correctly.The vacuum bag may leak. Check the bag by sealing it with a little air and then lowering it into water. If bubbles come from the bag, it is leaking. Reseal the bag or use a new one. Only use vacuum bags/canisters from OBH Nordica.Check if there are holes in the vacuum bag. Do not vacuum pack contents that can damage the bag (such as fish bones, hard shells, etc.).It is recommended to leave around 7 cm between the produce and the bag opening. But, if there is too much air between the produce and the bag opening, it may be difficult to get all the air out of the bag during the vacuum packing process. If so, a piece of the bag can be cut off to make it shorter. |
| Air enters the bag after sealing. | Leaks along the bag edge can be caused by folds, crumbs, food, etc. Open the bag again and wipe the inside of the bag opening clean. Extend the opening before it is placed over the sealing unit.Natural gases can be released from fruit and vegetables. Dispose of the bag with the contents if you suspect that the produce is spoiled.Check if there are holes in the bag. Do not vacuum pack hard produce with sharp edges (such as nutshells), but if so, wrap them in paper towels before they are vacuum packed. |
| The vacuum bag melts. | Open the cover of the appliance and let the sealing unit and its heater cool a few minutes.Only use bags, canisters and plastic rolls from OBH Nordica. |
| The vacuum canister cannot be used to vacuum pack. | Make sure the vacuum hose is correctly connected to the appliance and the top.Check that the top's lock is in the “SEAL” position.Use your hand to push on the top and the hose at the beginning of the sealing process so that air does not leak out.Make sure that the vacuum canister is not damaged. If so, switch to a new canister.Make sure the edge of the top is clean and dry. |
Scrapping of used appliances

By law, electric and electrical and electronic appliances must be collected and parts of them recycled. Electrical and electronic appliances marked with the symbol for waste management must be scrapped at a municipal recycling station.
OBH Nordica LIMITED GUARANTEE
The Guarantee
OBH Nordica guarantees this product against any manufacturing defect in materials or workmanship during 2 years within Sweden, Norway, Denmark and Finland, starting from the initial date of purchase or delivery date.
This manufacturer's commercial guarantee covers all costs related to restoring the proven defective product so that it conforms to its original specifications, through the repair or replacement of any defective part and the necessary labour. At OBH Nordicas choice, a replacement product may be provided instead of repairing a defective product. OBH Nordicas sole obligation and your exclusive resolution under this guarantee are limited to such repair or replacement.
Conditions & Exclusions
OBH Nordica shall not be obliged to repair or replace any product which is not accompanied by a valid proof of purchase. The defective product may be returned to the store of purchase.
This guarantee applies only for products purchased and used for domestic purposes and will not cover any damage which occurs as a result of misuse, negligence, failure to follow OBH Nordica instructions, or a modification or unauthorised repair of the product, faulty packaging by the owner or
mishandling by any carrier. It also does not cover normal wear and tear, maintenance or replacement of consumable parts, or the following:
- using the wrong type of water or consumable
- mechanical damages, overloading
- damages or poor results specifically due to wrong voltage or frequency as stamped on the product ID or specification
- ingress of water, dust or insects into the product
- scaling (any de-scaling must be carried out according to the instructions for use)
- damage as a result of lightning or power surges
- damage to any glass or porcelain ware in the product
- accidents including fire, flood, etc
- professional or commercial use
Consumer Statutory Rights
OBH Nordica's commercial guarantee does not affect the Statutory Rights a consumer may have or those rights that cannot be excluded or limited, nor rights against the retailer from which the consumer purchased the product. This guarantee gives a consumer specific legal rights, and the consumer may also have other legal rights which vary from Country to Country. The consumer may assert any such rights at his sole discretion.
These instructions are also available on our website www.obhnordica.com.
OBH Nordica AB
Löfströms allé 5
SE-172 66 Sundbyberg, Sweden
Phone +46-8-629 25 00
www.obhnordica.com
Technical data
OBH Nordica 7945
220-240V\~50Hz
120W
Start package
This appliance includes a start package that contains the following:
1 x Food Sealer roll large - 3 m x 28 cm
5 x Food Sealer bags large - 28 cm x 40 cm
The following accessories can be purchased where the appliance was purchased:
Food Sealer roll 2 rolls: 3 m x 22 cm model no. 7953
Food Sealer roll 2 rolls: 3 m x 28 cm model no. 7954
Vacuum bags 50 pcs., 22x30 cm model no. 7955
Vacuum bags 35 pcs., 28x40 cm model no. 7956
Canister 3 pcs. (1x450 ml, 1x1100 ml, 1x1750 ml) model no. 7957
Bottle sealer 2 pcs. model no. 7960
Lunch box 2 pcs. (1x600 ml, 1x800 ml) model no. 7961
Marinating box 2.8 litre model no. 7962

OBH Nordica reserves the right to continuous changes.



- FOOD SEALER CHEF
- OBH NORDICA DENMARK A/S
- TEKNISKE DATA
- STARTPAKKE
- BEGRENSET GARANTI FOR OBH NORDICA
- GARANTIEN
- CONGRATULATIONS ON YOUR PURCHASE
- OXYGEN IS THE WORST ENEMY OF FRESH PRODUCE
- WITH OBH NORDICA'S FOOD SEALERS, YOU SAVE BOTH TIME AND MONEY
- IMPORTANT
- PARTS OF THE FOOD SEALER
- USE
- PRODUCE A VACUUM BAG FROM A PLASTIC ROLL
- IMPORTANT TIPS WHEN VACUUM PACKING
- VACUUM PACKING
- VACUUM PACKING WITH A VACUUM BAG
- PULSE FUNCTION
- THAWING AND HEATING OF VACUUM PACKED CONTENTS IN VACUUM BAGS
- VACUUM PACKING WITH CANISTER (ACCESSORY 7957)
- VACUUM PACKING WITH LUNCH BOX (ACCESSORY 7961)
- VACUUM PACKING WITH MARINATING BOX (ACCESSORY 7962)
- MARINATE UNDER VACUUM PRESSURE
- MARINATING IN A VACUUM BAG
- MARINATING IN A CANISTER (ACCESSORY 7957)
- MARINATING IN A MARINATING BOX (ACCESSORY 7962)
- DATE MARKING THE MARINATING BOX
- PREPARATION GUIDE FOR VARIOUS KINDS OF PRODUCE
- MEAT AND FISH
- VEGETABLES
- LEAFY VEGETABLES
- FRUIT
- BAKED GOODS
- HARD CHEESE
- POWDER AND FLOUR
- SNACKS
- LIQUIDS
- GENERAL RULES WHEN HANDLING FOOD
- CLEANING AND MAINTENANCE
- CLEANING THE APPLIANCE
- CLEANING VACUUM BAGS
- CLEANING OF VACUUM CANISTERS
- REPLACEMENT OF TEFLON TAPE
- STORAGE
- SCRAPPING OF USED APPLIANCES
- OBH NORDICA LIMITED GUARANTEE
- THE GUARANTEE
- CONDITIONS & EXCLUSIONS
- CONSUMER STATUTORY RIGHTS
- OBH NORDICA AB
- TECHNICAL DATA
- START PACKAGE
Brand : OBH NORDICA
Model : Chef 7945
Category : Vacuum sealer