
Pro 7963 - Vacuum sealer OBH NORDICA - Free user manual and instructions
Find the device manual for free Pro 7963 OBH NORDICA in PDF.


| Product Type | Vacuum Sealer |
| Brand | OBH Nordica |
| Model | Pro 7963 |
| Power Supply | 220-240V ~ 130W |
| Vacuum Pressure Settings | Normal, Gentle |
| Sealing Time Settings | Normal, Moist, Extend |
| Functions | Vacuum & Seal, Pulse Vacuum, Manual Seal, Canister Mode, Cancel |
| Bag Material Compatibility | OBH Nordica original film and pre-made bags |
| Container Compatibility | Yes (with hose) |
| Included Accessories | 1 film roll (3m x 28cm), 5 vacuum bags (28x40cm) |
| Optional Accessories | Film rolls, bags, containers, bottle sealer, lunch boxes |
| Gaskets | Upper and lower, removable for cleaning |
| Sealing Element | Teflon tape, replaceable |
| Cleaning | Wipe with damp cloth; wash gaskets in water |
| Safety Features | Auto shut-off, do not immerse, use original parts |
| Warranty | 2 years limited (Sweden, Norway, Denmark, Finland) |
| Dimensions (approx.) | 40 x 20 x 10 cm |
| Weight (approx.) | 1.5 kg |
Frequently Asked Questions - Pro 7963 OBH NORDICA
User questions about Pro 7963 OBH NORDICA
0 question about this device. Answer the ones you know or ask your own.
Ask a new question about this device
Download the instructions for your Vacuum sealer in PDF format for free! Find your manual Pro 7963 - OBH NORDICA and take your electronic device back in hand. On this page are published all the documents necessary for the use of your device. Pro 7963 by OBH NORDICA.
USER MANUAL Pro 7963 OBH NORDICA
DESIGNING GOOD LIFE
Food Sealer PRO
Keep your food fresh up to 5 times longer

Making good!
Bruksanvisning - svenska......sida 4 - 22
vakuumpåsen.
OBH Nordica Denmark A/S
2750 Ballerup
Visiting address: Tempovej 27
Phone: +45 43 350 350
Direct: +45 43 350 367
www.obhnordica.dk
Tekniske data
OBH Nordica 7963
220-240 V \~
130 watt
Startpakke
BEGRENSET GARANTI for OBH Nordica
Garantien
OBH Nordica Norway AS
Postboks 5334, Majorstuen
0304 Oslo
Tlf: 22 96 39 30
www.obhnordica.no
Tekniske data
OBH Nordica 7963
220-240V \~
130 watt
Startpakke
- Read the instruction manual carefully before use and save it for future use.
- Plug the appliance to a household outlet of 220-240 V only, and use the appliance only for the intended use.
- Always unplug the appliance from the mains supply when not in use.
- The appliance must not be immersed in water or any other liquids.
- This appliance can be used by children aged 8 years and over and persons with reduced physical, sensory or mental capabilities or lack of experience and knowledge, if they have been given supervision or instruction concerning the use of the appliance in a safe way by a person responsible for their safety and they understand the hazards involved.
- Children should be supervised to ensure that they do not play with the appliance. Children are not always able to understand potential risks. Teach children a responsible handling of electrical appliances.
- Cleaning and maintenance shall not be made by children, unless they are over the age of 8 and supervised.
- Keep the appliance and the cord out of reach of children under the age of 8.
- Check that the cord is not hanging over the edge of the table.
- Do not place the appliance on or near hotplates, open fire or the like.
-
The appliance should only be used under supervision.
-
Do not touch the heating element when it is hot.
- Make sure that liquid is not aspirated into the pumping system of the appliance.
- Only use original parts from OBH Nordica.
- Always examine appliance, cord and plug for damage before use. If the supply cord is damaged, it must be replaced by the manufacturer, his service agent or a similarly qualified person in order to avoid a hazard.
- For additional protection the installation of a residual current device (RCD) with a rated residual operating current not exceeding 30 mA is recommended. Ask your installer for advice.
- The appliance is for domestic use only.
- If the appliance is used for other purposes than intended or is it not handled in accordance with the instruction manual, the full responsibility for any consequences will rest with the user. Any damages of the product are not covered by the warranty.
Congratulations with your new appliance!
This Food Sealer will make you change your purchasing habits and your way of storing food. When you have tried to vacuum pack your food, this will be an unavoidable part of your cooking.
Oxygen s the worst enemy of fresh food!
The main reason why food looses nutritional value, texture, taste and quality is oxygen. Oxygen also causes freezer damage to food kept in the freezer and enables the development of micro-organisms. Consequently, the traditional way of storing food, such as in ordinary plastic bags or containers, is not the optimum solution, as they encase air together with the food.
Since vacuum packing removes oxygen it seals the taste and the food is kept fresh much longer. Removal of oxygen and preservation of food in the correct way in the refrigerator or in the freezer will also stunt the growth of micro-organisms that will at a later stage turn into mildew, yeast and bacteria.
With OBH Nordica's Food Sealers you will save time and money!
OBH Nordica Food Sealer means that you can store food up to 5 times longer than by using ordinary storage methods. Consequently, you will:
Save money by bulk buying and vacuum pack for later use – without any loss. Save time by preparation of big quantities and freezing in portions direct in vacuum bags.
You will also save time by using a Food Sealer for pickling meat and fish. The vacuum pack opens the pores of the meat/fish, which means that the pickling process takes only a few minutes instead of hours.
Furthermore, by eliminating air in the packing, you avoid freezer damage to the raw materials.
Important!
Vacuum packing is not the same as preservation and cannot prevent food from ageing. It will, however, delay the process.
Vacuum packing is not a substitute for cooling or freezing. Refrigerated goods shall still be kept in the refrigerator or in the freezer after vacuum packing.
If the temperature of the refrigerator is more than +4°C for a certain period of time, this will advance the creation of dangerous micro-organisms; so the temperature should be kept below +4°C .
You can keep food in the freezer (preferably at -17° C or less). Even if not all micro-organisms are killed, it will hinder the growth.
Parts of the appliance
- Vacuum & seal button - for vacuum packing and sealing.
- Pulse vacuum button - press the button to start vacuum packing, press again to finish. Repeat until the wanted result has been reached. Please note that this function is only applicable for bags. Next, press "Manual seal" to seal.
- Sealing time - Choose time for the vacuum packing process (preset time is "Normal").
Normal: for dry raw materials with no moist for short vacuum packing process.
Moist: for wet bags or moist raw materials.
Extend: for wet bags and raw materials including sauce, for longer vacuum packing process. - Pressure button - for selection of two different vacuum pressures:
Normal: for normal raw materials.
Gentle: for soft and sensitive raw materials that require less vacuum pressure. -
Canister button - only for vacuum packing in containers.
-
Manual seal button - this button has two functions:
- sealing of clingfilm.
- during vacuum packing (Vacuum & seal) this button stops the pump immediately and then seals the bag.
- Tube coupling - for containers and sealing of bottles.
- Cancel button - finishes an ongoing process.
- Progress display - shows that the appliance is on and that the lid is closed and that the vacuum process in on. If the display is flashing, wait until it stops before activating the process.
- Air suction - Do not cover the inlet with the vacuum bag during vacuum packing/sealing.
- Vacuum channel - position the open end of the bag in the vacuum channel. Air is let out of the bag and the vacuum channel collects possible liquid from the bag.
- Sealing brake - for sealing of the bag (removable).
- Lower gasket - removable
- Upper gasket
- Sealing element + teflon tape - seals the vacuum bag.
- Bag knife - remove the knife from the console and pull the knife along the clingfilm till the length you want.
- Handle - press down the handle to lock the lid and lift it to reopen.
How to use the appliance
How to make a vacuum bag of film
Position the appliance on an even surface and plug to a wall outlet (the signal lamps Sealing/Normal and Pressure/Normal will go on).
- Open the appliance and remove the bag knife. Roll out a
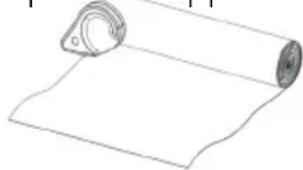
suitable length of clingfilm and pull the bag knife along the bag as illustrated. Adapt the length so as to leave at least 7 cm between the contents of the bag and the opening of the vacuum bag. Only use original film from OBH Nordica.
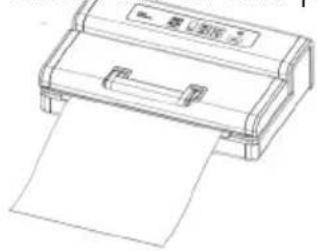
- Put the short end of the film on top of the sealing

brake and make sure that the entire short end is in the vacuum channel.
- Close the lid and press the handle completely.
-
Press the Manual Seal button to start the sealing. The progress display counts down from 9 to 0. The zero flashes for a few seconds and the Manual Seal lamp goes off and the sealing is ready.
-
Lift the handle to open the lid. Remove the finished

vacuum bag. The vacuum bag is now ready to be used for vacuum packing.
Important advice as to vacuum sealing
- Do not put too many ingredients in the vacuum bag/vacuum container. Leave at least 7 cm between the contents of the vacuum bag and the bag opening.
- Make sure that the opening of the vacuum bag is completely dry, as if not, the bag will not be correctly closed.
- Stretch the bag opening before positioning it against the sealing strip in order to remove any possible wrinkles and irregularities.
- Do not put sharp objects such as fishbones or hard shells in the vacuum bag, as such objects may penetrate the bag. Use vacuum containers for such objects.
- During the vacuum sealing process liquids and other particles my inadvertently enter the vacuum pump, which may cause the pump to stop and damage the appliance. In order to prevent this, we recommend that you freeze liquid products in a freezer box prior to vacuum packing in a vacuum bag or vacuum container. Note that if liquid is vacuum packed direct in a vacuum container without having been frozen, the container may be damaged and crack when stored in the freezer. See the section "Preparation of various raw materials".
- If you want to vacuum pack meat or other humid products, put some paper towel between the contents and the bag opening. For vacuum packing of flour, cereals and other powdered products, you can put a coffee filter between the contents and the bag opening. Make sure not to position the paper/filter in the sealing itself.
- Note that vacuum packed fresh food should be kept in the refrigerator or the freezer. Remember that vacuum sealing is not the same as preservation; it simply increases the shelf life.
- Remember that food with a high fat content can be rancid if kept in a too warm environment.
• Vacuum packing of fruits and vegetables such as e.g. apples, bananas, potatoes and root crop will not prolong the shelf life if they have not been shred.
Vacuum packing with a vacuum bag
-
Position the appliance on an even surface and plug to a wall outlet (the signal lamps Sealing/Normal and Pressure/Normal will go on).
-
Put the ingredients to be vacuum packed in a vacuum bag, but leave at least 7 cm between the contents and the bag opening. Only use original vacuum bags/film from OBH Nordica.
-
Make sure that the opening of the vacuum bag is clean, dry and without any wrinkles.
-
Position the opening of the vacuum bag on top of the sealing strip (12) and in the vacuum channel (11). Check that the air inlet (10) is not covered by the vacuum bag.
-
Close the lid and press the handle completely.
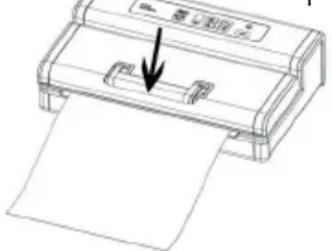
- Press the Sealing button to select the speed depending on the product to be vacuum packed: Choose "Normal" for dry raw materials, "Moist" for fragile/moist contents and a more gentle speed. The "Extend" setting is in particular suitable for soft raw materials and raw materials with a sauce.
- Next, press the Pressure button to choose "Normal" for not sensitive raw materials, or "Gentle" for soft and sensitive raw materials.
- Press the Vacuum & Seal button. The signal lamp for Vacuum & Seal goes on and the progress display counts down from 9 to 0. When the vacuum process is ready, also the Manual Seal button goes on and the bag is being sealed. The progress display counts down from 9 to 0. Now the zero will flash for a few seconds and the lamps go off.
Note: The appliance reaches a very high vacuum pressure during the vacuum sealing process. In order to avoid that sensible contents is influenced by the high pressure, keep an eye also on the vacuum bag and press the Manual Seal button, if you want to interrupt the process before time. In such case, the appliance turns off the pumping and switches to sealing of the vacuum bag.
- Lift the handle to open the lid and remove the vacuum bag.

- Wipe off any possible liquid or particles in the vacuum channel after each vacuum packing process.
- Make sure that no liquid is aspirated into the appliance. Any consequential damages will not be covered by the warranty.
Pulse/Vacuum function
This function is preferred for vacuum packing, when you want a slight vacuum effect such as e.g. tomatoes, chips or similar. Or, if you have moist raw materials or a sauce, where you just want to drain air from the bag and then stop the appliance before the liquid is compressed.
Press the Sealing button to select the speed depending on the product to be vacuum packed: Choose “Normal” for dry raw materials, “Moist” for fragile/moist contents and a more gentle speed. The “Extend” setting is in particular suitable for soft raw materials and raw materials with a sauce.
Press the Pulse Vacuum button several times until you get the wanted result. Press the Manual Seal button to seal the bag. The progress display counts down from 9 to 0, the zero flashes for a few seconds and the lamps go off.
After use, unplug from the wall outlet. Press the handle of the appliance, but do not switch off the appliance in order to avoid the packages being deformed, which may affect the functioning of the appliance.
Defrosting and heating of vacuum packed products in a vacuum bag The vacuum bags from OBH Nordica can be used in a microwave oven and can even simmer in water.
Open the bag by cutting a corner of the bag to let air get in, if the vacuum bag is to be defrosted/heated in a microwave oven. Do not use the bags for preparation of food, unless they are particularly made for defrosting/heating.
The bag can be heated by putting it in a sauce pan with simmering water.
NOTE! Never reuse bags that have been treated in the microwave oven or that have been simmering in water.
Vacuum packing with a vacuum container
-
Position the appliance on an even surface and plug to a wall outlet (the signal lamps Sealing/Normal and Pressure/Normal will go on).
-
Make sure that the vacuum container and the lid are clean and dry.
-
Put the raw materials in the vacuum container, but be careful not to exceed the maximum level. Put the lid on the vacuum container.
-
Press to engage one end of the vacuum tube
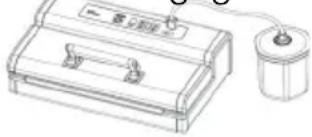
(positioned in the groove on the back side of the appliance) the tube coupling of the appliance and the other end in the opening of the lid of the vacuum container. If you use the tube delivered with the container and you have an adapter, you should first remove it. Consequently, the tube to be used, should have two "taps".
- Press the Vacuum button to select the speed depending on the product to be vacuum packed: Choose "Normal" for normal speed or "Gentle" for fragile contents and a more gentle speed. The "Gentle" setting is in particular suitable for soft and sensible raw materials.
- Turn the lock of the lid to "SEAL" position.
- Press the Canister button. The vacuum packing process starts directly.
- Press the lid with your hand at the beginning of the process to avoid air leakage between the vacuum box and the lid.
- The appliance stops automatically once a sufficient vacuum pressure has been reached. The progress display counts down from 9-0. The canister lamp goes off and "0" flashes in the display for a few seconds. Now the vacuum process is ready.
- Press the lid with your hand and pull out the vacuum tube from the lid. Make sure that the lock of the lid points at "SEAL", when you pull out the tube.
- To test the result, try to lift the lid.
- Turn the lock of the lid from "SEAL" to "OPEN" in order to open the lid of the vacuum container. You can now remove the lid.
- The vacuum container can be cleaned and washed in the dishwasher (not the lid) after use. Read more in "Cleaning and maintenance".
- NOTE! The vacuum container and the lid must not be used in a microwave oven.
Vacuum packing with lunch boxes
- Position the appliance on an even surface and plug to a wall outlet (the signal lamps Sealing/Normal and Pressure/Normal will go on).
-
Make sure that the lunch box and the lid are clean and dry.
-
Put the raw materials in the lunch box, but be sure that there is about 1 cm to the top. Put the lid on the vacuum container and make sure tat it is properly secured.
- Press to engage one end of the vacuum tube (positioned in the tube groove on the back of the appliance) on the tube coupling of the appliance and the other end on the adapter. Press the adapter against the vacuum coupling of the lid. NOTE! If you use the tube delivered with the lunch box and you have an adapter, you should first remove it. Consequently, the tube to be used should have two "taps".
- Press the Vacuum button to select the speed depending on the product to be vacuum packed: Choose "Normal" for normal speed or "Gentle" for fragile contents and a more gentle speed. The "Gentle" setting is in particular suitable for soft and sensible raw materials.
- Press the Canister button. Press the lid with your hand at the beginning of the process to avoid air leakage between the lunch box and the lid. The vacuum packing process starts immediately.
- When the grey rubber button on the adapter goes down, sufficient vacuum pressure has been reached. Remove the adapter from the vacuum coupling on the lid and next test the result by trying to lift the lid.
- To remove the lid, lift the grey rubber gasket at the vacuum coupling of the lid to release the vacuum. Now you can remove the lid.
- The lunch box and the lid can be washed in the upper basket of the dishwasher after use.
- The lunch box and the lid can be used in a microwave oven, but remember that the vacuum should be let out before putting it in the microwave oven. You can even keep the lunch box in the freezer, but the vacuum will be lost.
If the vacuum process does not succeed, this could be due to the following:
- there is liquid/food scrap under the edge of the lid. Make sure that the box and the edges of the lid are dry and clean.
- liquid/food scrap has penetrated into the adapter. If this is the case, the adapter should be discarded.
- the tube is leaking at one end or the other. Check that they seal tightly on the couplings.
- impurities have stuck under the grey rubber gasket in the middle of the lid. Lift it carefully and clean it.
How to pickle under vacuum pressure
The pickling process is speeded up if done under vacuum pressure, since the vacuum pressure opens the pores of the raw materials and absorbs the marinade faster. This means that the pickling only takes a few minutes instead of hours.
Pickling in a vacuum bag
Keep the marinade in a vacuum bag together with the raw materials and vacuum pack according to the above instructions. Be careful to add sufficient marinade in order that all raw materials are covered. To get the best result,
pickle for at least 30 minutes in the vacuum bag before you cut open the bag.
Pickling in a vacuum container
For an even more efficient pickling process, pickle fish/meat in a vacuum container according to the following description:
- Position the appliance on an even surface and plug to a wall outlet (the signal lamps Sealing/Normal and Pressure/Normal will go on).
- Make sure that the vacuum container and the lid are clean and dry.
- Pour the marinade with fish/meat into the vacuum container and take care not to exceed the maximum level. Put the lid on the vacuum container.
- Press to engage one end of the vacuum tube (positioned in the tube groove on the back of the appliance) on the tube coupling of the appliance and the other end on the lid of the vacuum container. If you use the tube delivered with the container and you have an adapter, you should first remove it. Consequently, the tube to be used should have two "taps".
- Make sure that the lock of the lid is in position "OPEN".
- Press the lid with your hand at the start of the sealing process to avoid air leakage between the vacuum container and the lid.
- Press the Pressure button to select the speed depending on the product to be vacuum packed: Choose "Normal" for normal speed or "Gentle" for fragile contents and a more gentle speed. The "Gentle" setting is in particular suitable for soft and sensible raw materials.
- Press the Canister button and the vacuum process starts immediately. The appliance stops automatically once a sufficient vacuum pressure has been reached. The progress display counts down from 9-0. The canister lamp goes off and "O" flashes in the display for a few seconds.
- Let the pickled raw materials rest under vacuum pressure in the container for 30 seconds.
- Now lift the handle to let air get out of the container.
- Repeat points 8 to 10 four times to get the best result.
- After the 4th repetition, turn the lock of the lid to "SEAL" and leave the raw materials to pickle under vacuum pressure for about 20 minutes. This makes the penetration of the marinade into the raw materia easierl.
- Press the lid with your hand and pull out the vacuum tube from the lid. Turn the lock of the lid from "SEAL" to "OPEN" in order to open the lid of the vacuum container. You can now remove the lid.
Preparation guide for various raw materials
Meat and fish:
To get the best result, the raw materials should be pre-frozen for about 1 to 2 hours prior to vacuum packing in order to preserve juiciness and texture. If it is not possible to pre-freeze the raw materials, put some paper towel between the meat/fish and the bag opening. Make sure that the paper does not stick in the sealing.
Note that beef may have an even darker colour when vacuum packed, as oxygen is removed during the process.
Vegetables:
Vegetables should be blanched before vacuum packing, since all vegetables emit gas during storing. The blanching further stops the enzyme process, which means that the vegetables loose colour and taste.
Peel the vegetables and blanch them by immersing them in boiling water and let them boil till they soften a little, but are still crispy. Next, immerse in cold water to stop the boiling process. Let the vegetables drain before vacuum packing.
When freezing vegetables, let them pre-freeze for 1-2 hours. Position the vegetables separately on baking paper or similar to prevent them from turning into a frozen lump. Put the frozen vegetables in a vacuum bag and vacuum seal the bag. Next, put the vacuum bag in the freezer. Note! Never vacuum pack fresh mushrooms, onion and garlic because of the risk of anaerobic bacteria.
Leaf vegetables:
For the best result, use a vacuum container for vacuum packing of leaf vegetables. Rinse the vegetables and let them dry on paper towel or similar. Vacuum pack later in a vacuum container and keep in the refrigerator.
Fruit:
Fruit with skin shall be peeled before vacuum packing. We recommend that you pre-freeze for 1-2 hours before vacuum packing. Position the fruit separately on baking paper or similar to prevent them from turning into a frozen lump. Vacuum pack later in a vacuum bag and keep in the refrigerator. If you want to keep it in the refrigerator, vacuum packing should be made in a vacuum container.
Bread and cakes:
If you want to vacuum pack soft bread and cakes, we recommend that you use a vacuum container to preserve the shape. On the other hand, if you want to use a vacuum bag, we recommend that you pre-freeze bread and cakes for 1-2 hours. It is of course also possible to vacuum pack cake dough, pies and cake mix for later use.
Hard cheese:
To keep the cheese fresh, vacuum pack it if you are not going to use the cheese within a couple of days. Use a very big vacuum bag, so that you can reuse the bag if you want to vacuum pack the same cheese again. Note! Soft cheese should not be vacuum packed because of the risk of anaerobic bacteria.
Powder and flour:
In order to prevent particles from getting into the vacuum pump, we recommend that you put a coffee filter or paper towel between the contents in the vacuum bag and the bag opening. Make sure that the filter/paper does not get into the sealing. You can even vacuum pack the raw materials in the original packaging by putting the original packaging and the contents in a vacuum bag and then seal the vacuum bag.
Snacks:
If there are any snacks left, they will keep longer if vacuum packed. To get the best result, use a vacuum container for vacuum packing to prevent crushing.
Liquid:
Before you vacuum pack liquid, e.g. soups and bouillon, pre-freeze the liquid in a freezer resistant container or an ice cube tray until the liquid is fully frozen. Next, remove the frozen liquid from the tray and vacuum pack it in a vacuum bag or a vacuum container. Next, put the vacuum bag/vacuum container in the freezer. Note that if liquid is vacuum packed direct in a vacuum container without having been frozen, the container may be damaged and crack when stored in the freezer.
General rules when handling foodstuffs
- Always wash your hands, surfaces and any utensil to be used when handling and vacuum packing.
- As soon as fresh food has been packed, put it in a refrigerator or a freezer immediately and do not keep it in room temperature.
- Raw materials that are warmed or defrosted shall be consumed immediately.
- Tinned and factory vacuum packed food that has been opened can be vacuum packed again. Follow the instructions in the manual and store the raw materials in accordance with the recommendations.
- Do not eat defrosted raw materials that have been kept in room temperature for more than 5 hours.
- Spread the vacuum packages in the refrigerator or the freezer to ensure a fast cooling.
- Note that vacuum packaging is not the same as preservation.
Recommendations for storing
| Type of raw material | Storing Recommendation | mmendation storage accessory | Shelf-life at vacuum packing | Shelf-life without vacuum packing |
| Meat and fish: | ||||
| Beef Freezing | Vacuum bag 2-3 years 6 months | |||
| Pork Freezing | Vacuum bag 2-3 years 6 months | |||
| Lamb Freezing | Vacuum bag 2-3 years 6 months | |||
| Poultry Freezing | Vacuum bag 2-3 years 6 months | |||
| Forcemeat Freezing | Vacuum bag 1 year 4 months | |||
| Fish Freezing Vacuum bag 2 years 6 months | ||||
| Cheese | ||||
| Cheddar Refrigerator Vacuum | bag/vacuum container | 4-8 months 1-2 weeks | ||
| Parmesan Refrigerator Vacuum | bag/vacuum container | 4-8 months 1-2 weeks | ||
| Vegetables | ||||
| Asparagus Freezing Vacuum bag 2-3 years 8 months | ||||
| Broccoli Freezing Vacuum bag 2-3 years 8 months | ||||
| Cabbage Freezing Vacuum bag 2-3 years 8 months | ||||
| Sweet corn Freezing Vacuum bag 2-3 years 8 months | ||||
| Peas Freezing Vacuum bag 2-3 years 8 months | ||||
| Lettuce/spinach | Refrigerator Vacuum container 2 weeks 3-6 days | |||
| Fruit: | ||||
| Apricots Freezing Vacuum bag 1-3 years 6-12 months | ||||
| Plums | Freezing Vacuum bag 1-3 years 6-12 months | |||
| Peaches | Freezing Vacuum bag 1-3 years 6-12 months | |||
| Nectarines | Freezing | Vacuum bag 1-3 years 6-12 months | ||
| Berries | ||||
| Raspberries | Refrigerator Vacuum container 1 week 1-3 days | |||
| Blackberries | Refrigerator Vacuum container 1 week 1-3 days | |||
| Strawberries | Refrigerator | Vacuum container | 1 week | 1-3 days |
| Blueberries | Refrigerator Vacuum container 2 weeks 3-6 days | |||
| Cranberries | Refrigerator Vacuum container 2 weeks 3-6 days | |||
| Bread and cakes | ||||
| Bagels | Freezing Vacuum bag 1-3 years 6-12 months | |||
| Bread | Freezing Vacuum bag 1-3 years 6-12 months | |||
| Cookies Room temperature | Vacuum container 3-6 weeks 1-2 weeks | |||
| Biscuits | Room temperature | Vacuum container 3-6 weeks 1-2 weeks | ||
| Processed food | ||||
| Grains | Room temperature | Vacuum bag/vacuum container | 1-2 years 6 months | |
| Pasta Room temperature | Vacuum bag/vacuum container | 1-2 years 6 months | ||
| Rice | Room temperature | Vacuum bag/vacuum container | 1-2 years 6 months | |
| Flour Room temperature | Vacuum bag/vacuum container | 1-2 years 6 months | ||
| Sugar | Room temperature | Vacuum bag/vacuum container | 1-2 years 6 months | |
| Nuts | ||||
| Almonds Room | temperature | Vacuum bag/vacuum container | 2 years 6 months | |
| Peanuts Room | temperature | Vacuum bag/vacuum container | 2 years 6 months | |
| Sun flower seeds | Room temperature | Vacuum bag/vacuum container | 2 years 6 months | |
| Coffee | ||||
| Coffee beans | Freezing Vacuum | bag 2-3 years 6 months | ||
| Coffee beans | Room temperature | Vacuum bag/vacuum container | 1 year 3 months | |
| Coffee powder | Freezing Vacuum | bag 2 years 6 months | ||
| Coffee powder | Room temperature | Vacuum bag/vacuum container | 5-6 months 1 month | |
| Liquid | ||||
| Soup Freezing | Vacuum bag/ | vacuum container | 1-2 years 3-6 months | |
| Sauce Freezing | Vacuum bag/ | vacuum container | 1-2 years 3-6 months | |
| Stew Freezing | Vacuum bag/ | vacuum container | 1-2 years 3-6 months | |
Cleaning and maintenance
Always unplug before cleaning and maintenance.
Cleaning of the appliance:
- Never immerse the appliance or the cord in water or any other liquid.
- Do not use scouring detergents, as this might damage the material.
- Use a damp cloth and a small amount of washing-up liquid to remove any residues and dust around the components of the appliance. Wipe with a hand towel or similar.
- Clean the sealing strip of the appliance and the lower gasket by carefully loosening them from the appliance. Rinse in water and let dry completely before putting them back. Be careful that they are positioned correctly in order to avoid any air leakage during use. The upper gasket can be wiped with a damp cloth. If a gasket is damaged it should be replaced by a new one (to be ordered with OBH Nordica 08-629 25 00).
Cleaning of vacuum bags:
- Clean the vacuum bags in warm water and a small amount of washing-up liquid.
- If the vacuum bags are to be washed in a dishwasher, turn the vacuum bags inside out and put them in the upper basket of the dishwasher to ensure that the entire surface of the bag is in contact with water.
- Let the vacuum bags dry thoroughly after cleaning.
NOTE! Due to risk of infection, never reuse vacuum bags that have been used for raw meat, raw fish or fat. Never reuse bags that have been treated in the microwave oven or that have been simmering in water.
Cleaning of vacuum containers:
- The vacuum container can be cleaned in warm water with a washing-up liquid. The container itself can be washed in the upper basket of the dishwasher.
- Wipe the lid with a damp cloth. Note! Do not immerse the lid in water.
- Be sure that all parts are completely dry before you use the appliance.
Changing of teflon tape
If the teflon tape of the heating element has been damaged or loosened, it should be replaced by a new one (can be ordered at OBH Nordica 08-629 2500).
Make sure that the appliance is unplugged and that the appliance is absolutely cool. Open the lid by means of the handle and remove the damaged teflon tape. Now carefully remove the protection strip from the new tape. Take care that the tape does not stick to anything. Hold the tape in both ends and fasten one end a little to the left/right side of the heating element and stretch the tape all over the element. Check for possible wrinkles or air bubbles on the tape and make sure that it covers the entire element.
Storing:
- Store the appliance on an even surface out of the reach of children.
- Do not press the lid so it locks when storing in order to prevent deformation of the gaskets of the appliance.
- Wind the cord into the cord winding device under the appliance.
Troubleshooting
| Problem Reason/solution | |
| Nothing happens when I try to vacuum seal the bag. | Check that the switch has been plugged to a wall outlet.Check the cord for any damage.Check that the vacuum bag is positioned correctly in the appliance (see previous instructions). |
| The appliance does not seal the vacuum bag after the vacuum process. | The appliance comprises a built-in sensor. The appliance does not switch over to sealing, if the necessary pressure has not been reached during the vacuum process.Check the sealing strip and remove any possible impurities.Check the gaskets and remove the lower one for cleaning when needed. If they have been damaged, they should be replaced.The vacuum bag may leak. Check the bag by sealing it with some air in it and immerse it in water. If the bag emits bubbles, it is leaking. Seal the bag again or use a new one.Dirt or liquid in the bag opening can make it difficult to seal the bag. Open the bag and wipe round the opening before you put it horizontally on top of the sealing strip. |
| There is air after the vacuum packing process. | Leakage along the sealing can be due to wrinkles, liquid or particles. Wipe the bag opening/the lid before sealing. Dirt or liquid in the bag opening can make it difficult to seal the bag. Open the bag and wipe round the opening before you put it horizontally on top of the sealing strip.Check that the bag opening is above the sealing strip and in the vacuum channel.Check that the gaskets are complete, clean and positioned correctly.The vacuum bag may leak. Check the bag by sealing it with some air in it and immerse it in water. If the bag emits bubbles, it is leaking. Seal the bag again or use a new one. Only use original vacuum bags/containers from OBH Nordica.Check whether there is a hole in the vacuum bag. Do not vacuum pack products that may damage the bag (such as e.g. fishbones, hard shells etc.)We recommend that there is a gap of 7 cm between the raw materials and the opening of the bag. However, if there is too much air between the raw materials and the opening of the bag, it may be difficult to empty the bag completely for air during the vacuum sealing process. If so, you could cut a part of the bag to make it shorter. |
| Air penetrates into the bag after sealing. | Leakage along the edge of the bag may be due to wrinkles, crumbs, food etc. Open the bag again and clean the inner side of the bag opening. Stretch the opening before putting it above the sealing strip.Natural gases may be emitted from fruit and vegetables. Close the bag with contents, if you think that the raw material has been damaged.Check whether there is a hole in the bag. Never vacuum pack hard raw materials with sharp edges (such as e.g. nut shells). If so, wrap it in kitchen paper before vacuum packing. |
| The vacuum bag is melting. | Open the lid of the appliance and let the sealing strip and its element cool for a couple of minutes.Only use original bags, containers and film from OBH Nordica. |
| The vacuum container cannot be vacuum packed. | Check that the vacuum tube has been properly connected to the appliance and the lid.Check that the lock of the lid is in position "SEAL".Press with your hand on top of the lid and the tube coupling at the beginning of the sealing processCheck that the vacuum container has not been damaged. If so, use a new container.Check that the edge of the lid is clean and dry. |
Disposal of the appliance

Legislation requires that all electrical and electronic equipment shall be collected for reuse and recycling. Electrical and electronic equipment marked with the symbol indicating separate collection of such equipment must be returned to a municipal waste collection point.
OBH Nordica LIMITED GUARANTEE
The Guarantee
OBH Nordica guarantees this product against any manufacturing defect in materials or workmanship during 2 years within Sweden, Norway, Denmark and Finland, starting from the initial date of purchase or delivery date.
This manufacturer's commercial guarantee covers all costs related to restoring the proven defective product so that it conforms to its original specifications, through the repair or replacement of any defective part and the necessary labour. At OBH Nordicas choice, a replacement product may be provided instead of repairing a defective product. OBH Nordicas sole obligation and your exclusive resolution under this guarantee are limited to such repair or replacement.
Conditions & Exclusions
OBH Nordica shall not be obliged to repair or replace any product which is not accompanied by a valid proof of purchase. The defective product may be returned to the store of purchase.
This guarantee applies only for products purchased and used for domestic purposes and will not cover any damage which occurs as a result of misuse, negligence, failure to follow OBH Nordica instructions, or a modification or unauthorised repair of the product, faulty packaging by the owner or mishandling by any carrier. It also does not cover normal wear and tear, maintenance or replacement of consumable parts, or the following:
- using the wrong type of water or consumable
- mechanical damages, overloading
- damages or poor results specifically due to wrong voltage or frequency as stamped on the product ID or specification
- ingress of water, dust or insects into the product
- scaling (any de-scaling must be carried out according to the instructions for use)
- damage as a result of lightning or power surges
- damage to any glass or porcelain ware in the product
- accidents including fire, flood, etc
- professional or commercial use
Consumer Statutory Rights
OBH Nordica's commercial guarantee does not affect the Statutory Rights a consumer may have or those rights that cannot be excluded or limited, nor rights against the retailer from which the consumer purchased the product. This guarantee gives a consumer specific legal rights, and the consumer may also have other legal rights which vary from Country to Country. The consumer may assert any such rights at his sole discretion.
These instructions are also available on our website www.obhnordica.com.
OBH Nordica AB
Löfströms Allé 5
SE-174 66 Sundbyberg
Phone +46 08-629 25 00
www.obhnordica.com
Technical data
OBH Nordica 7963
220-240V \~
130 watt
Start package
The appliance comprises a start package containing the following:
1 x film roll - 3 m x 28 cm
5 x vacuum bags - 28 cm x 40 cm
The following accessories can be bought in the shop:
Film 2 rolls 3 m x 22 cm......model no. 7953
Film 2 rolls 3 m x 28 cm......model no. 7954
Vacuum bags 50 pieces, 22x30 cm......model no. 7955
Vacuum bags 35 pieces, 22x30 cm......model no. 7956
Container 3 pieces (1x450 ml, 1x1100 ml, 1x1750 ml)......model no. 7957
Bottle sealer 2 pieces....model no. 7960
Lunch box 2 pieces (1x600 ml, 1x800 ml)......model no. 7961
CE
These instructions are subject to alterations or improvements.



- FOOD SEALER PRO
- OBH NORDICA DENMARK A/S
- TEKNISKE DATA
- STARTPAKKE
- BEGRENSET GARANTI FOR OBH NORDICA
- GARANTIEN
- OBH NORDICA NORWAY AS
- CONGRATULATIONS WITH YOUR NEW APPLIANCE
- OXYGEN S THE WORST ENEMY OF FRESH FOOD
- WITH OBH NORDICA'S FOOD SEALERS YOU WILL SAVE TIME AND MONEY
- IMPORTANT
- PARTS OF THE APPLIANCE
- HOW TO USE THE APPLIANCE
- HOW TO MAKE A VACUUM BAG OF FILM
- IMPORTANT ADVICE AS TO VACUUM SEALING
- VACUUM PACKING WITH A VACUUM BAG
- PULSE/VACUUM FUNCTION
- VACUUM PACKING WITH A VACUUM CONTAINER
- VACUUM PACKING WITH LUNCH BOXES
- HOW TO PICKLE UNDER VACUUM PRESSURE
- PICKLING IN A VACUUM BAG
- PICKLING IN A VACUUM CONTAINER
- PREPARATION GUIDE FOR VARIOUS RAW MATERIALS
- MEAT AND FISH
- VEGETABLES
- LEAF VEGETABLES
- FRUIT
- BREAD AND CAKES
- HARD CHEESE
- POWDER AND FLOUR
- SNACKS
- LIQUID
- GENERAL RULES WHEN HANDLING FOODSTUFFS
- CLEANING AND MAINTENANCE
- CLEANING OF THE APPLIANCE
- CLEANING OF VACUUM BAGS
- NOTE! DUE TO RISK OF INFECTION, NEVER REUSE VACUUM BAGS THAT HAVE BEEN USED FOR RAW MEAT, RAW FISH OR FAT. NEVER REUSE BAGS THAT HAVE BEEN TREATED IN THE MICROWAVE OVEN OR THAT HAVE BEEN SIMMERING IN WATER
- CLEANING OF VACUUM CONTAINERS
- CHANGING OF TEFLON TAPE
- STORING
- DISPOSAL OF THE APPLIANCE
- OBH NORDICA LIMITED GUARANTEE
- THE GUARANTEE
- CONDITIONS & EXCLUSIONS
- CONSUMER STATUTORY RIGHTS
- OBH NORDICA AB
- TECHNICAL DATA
- START PACKAGE
- CE
Brand : OBH NORDICA
Model : Pro 7963
Category : Vacuum sealer