
CHVF210 - Vacuum sealer Champion - Free user manual and instructions
Find the device manual for free CHVF210 Champion in PDF.


| Product Type | Vacuum Sealer |
| Brand | Champion |
| Model | CHVF210 |
| Dimensions (Approx.) | 16.5 x 6.5 x 4.0 inches |
| Weight (Approx.) | 4.6 lbs |
| Power | 120W |
| Voltage | 120V / 60Hz |
| Material | Stainless steel and ABS plastic |
| Sealing Bar Width | 12 inches |
| Vacuum Power | 8-10 mmHg |
| Functions | Dry & moist food, pulse, seal only, marinate, jar sealer accessory compatible |
| Bag Compatibility | Up to 10-inch wide rolls or pre-cut bags |
| Cutter & Roll Storage | Built-in bag cutter and roll storage compartment |
| Control Type | Touch button panel with LED indicators |
| Maintenance | Wipe exterior with damp cloth; removable drip tray for easy cleaning |
| Safety Features | Overheat protection, automatic shut-off after 2 minutes idle |
| Warranty | 1 year limited |
| Included Accessories | 3 rolls (8x20 ft), 2 quart bags, user manual |
| Spare Parts Availability | Sealing gasket and vacuum pump replacement kits available online |
| Repairability | Consumer replaceable parts: sealing gasket, fuse; professional repair for motor |
Frequently Asked Questions - CHVF210 Champion
User questions about CHVF210 Champion
0 question about this device. Answer the ones you know or ask your own.
Ask a new question about this device
Download the instructions for your Vacuum sealer in PDF format for free! Find your manual CHVF210 - Champion and take your electronic device back in hand. On this page are published all the documents necessary for the use of your device. CHVF210 by Champion.
USER MANUAL CHVF210 Champion
EN - English
SE - Svenska
DK - Danske
NO - Norsk
FI - Suomi
Thank you for buying the Champion vacuum preservation system. In order to make the best use of this appliance and use it safely, please read these introductions carefully before use and keep them for future reference.
EN
SAFEGUARDS & TIPS
Please read and follow the safety instruction carefully before you use the product for the first time.
- Check if the local power supply voltage matches the voltage indicated on this appliance before use.
- Do not operate the appliance with a damaged power cord or plug.
- Do not operate the appliance if there's any malfunctions or damage of the product. if the cord or the appliance is damaged, it must be returned to an authorized service center.
- To disconnect the power, unplug the power cord from the electrical outlet. Do not disconnect by pulling on the power cord.
- If the supply cord is damaged, it must be replaced by the manufacturer, or it's service agent or similarly qualified person in order to avoid a hazard.
- Do not use an extension cord with the appliance.
- When the appliance is not in use or need to be cleaned, unplug cord from the power outlet first.
- Do not use the appliance on wet or hot surfaces, or near a power source.
- Do not immerse any part of the appliance, power cord or plug in water or other liquid.
- Use only accessories or attachments recommended by the manufacture.
- Use the appliance only for its intended use. Don't use the product outside the work area.
- Close supervision is required when children use the appliance. Do not play with the appliance as a toy.
- Intervals for 40 seconds is recommended every time after seal.
WELCOME
You are about to enjoy the freshness benefits of Champion CHVF210. The Champion CHVF210 system is designed to remove air and extend freshness up to 7 times longer than conventional storage methods. Keep your CHVF210 appliance at home, and you will soon discover its convenience and versatility.
Exposure to air can cause food to lose flavor and nutrition, it can also encourage the growth of bacteria and yeast which will cause the food to spoil. The Champion CHVF210 vacuum packaging system removes air and seals flavor and freshness.
- Save money: With the Champion vacuum sealing system, you can buy in bulk or when food is on sale and vacuum package your food in your desired portions size without wasting food.
- Save time: Cook ahead for the week, prepare meals and save them in Champion vacuum bags.
• Marinate in minutes: Vacuum packaging opens up the pores of food so you can get that great-marinated flavor in just 20 minutes instead of overnight. - Make entertaining easy: Prepare your favorite dishes and festival feast in advance so you can spend quality time with your guests.
- Enjoy seasonal or specialty foods: Keep highly perishable or infrequently used items fresh longer.
• Control portions for dieting: Vacuum package sensible portions and write calories and/or fat content on the bag. - Protect non-food items: Keep camping and boating supplies dry and organized for outings, protect polished silver from tarnishing by minimizing exposure to air.
STRUCTURE & FUNCTIONS
1) "Vac/Seal" button: Press this bottom to vacuum and seal bag (intervals for 40 seconds is recommended each time)
2) “Seal” button (with LED): Press this button to seal bag (intervals for 40 seconds is recommended each time)
3) "Food"button: it has two setting mode (Dry and Moist). The default mode is Dry, when you press the button, it changes to Moist model. You can choose the mode according to the food type.
4) “Mode” button: it has two setting modes (Normal and Gentle). The default mode is Normal. When the food is crumbly, you can press the button, then the vacuum mode is changed to Gentle. You can manually control the degree of vacuum by pressing “Seal” button at any time, the food will be sealed automatically.
(Note: if the power is interrupted, this setting will return to a preset standard mode).
5) "Stop" button: allows user to stop the process at anytime.


1)3)5) 4) 2)
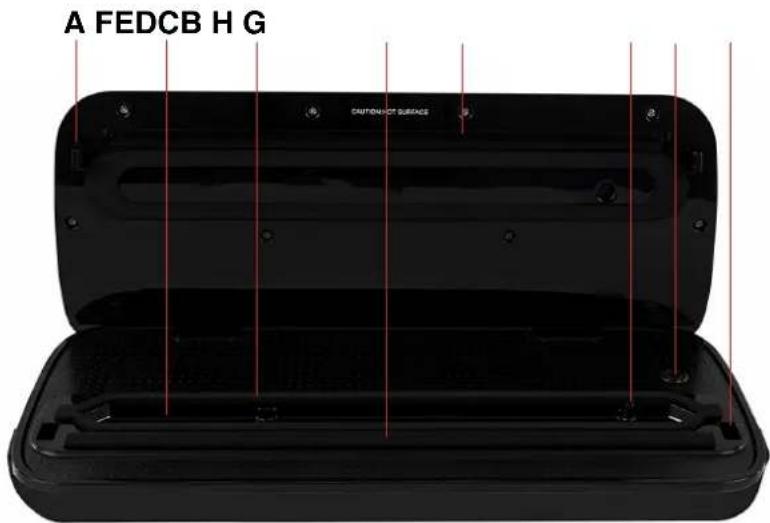
A. Locking Hook: Press the cover down until it clicks to lock the bag into place.
B. Vacuum Chamber: The bag must be placed within the vacuum chamber for the vacuum.
C. Lower gasket: Airproof the vacuum area and prevent leaking for the vacuum.
D. Rubber Lip: make seal flat.
E. Sealing Bar: 3mm width sealing bar make good seal.
F. Vacuum nozzle: When pumping external vacuum canister, wine stopper or other accessories, insert the hose into the nozzle. Do not block the nozzle when in use.
G. Release button: Press the release buttons at two sides, then open the appliance and take out the sealed food.
H. Canister button: Press this button, the appliance begins to vacuum package the canister until the process is completed.

OPERATION INSTRUCTIONS
A. Put the opening of the bag in the vacuum chamber. Ensure the bag does not cover the vacuum nozzle.
B. Press the cover down, click sound indicate the locking hooks locks correctly, then the next step is the vacuum or seal process.
C. Press "Release Buttons" to open the appliance and take out the sealed food.
SEAL VACUUM BAGS
1) Plug the appliance in and switch it on.
2) Insert the opening of the bag into the vacuum chamber as the above pictures.
3) Press down the latches of two sides at the same time until two click sounds heard.
4) Press the "Seal" button and you will find the LED will light, When the Led light disappears, the seal is done.
5) Press "Release Button" to open the appliance, then take out the sealed bag
PRESERVATION WITH VACUUM BAG
1) Plug the appliance in and switch it on.
2) Put the items that you want to preserve inside the bag.
3) Clean and straighten the opening of the bag, make sure there are no wrinkle on the opening.
4) Insert the opening of the bag into the vacuum chamber as the above pictures
5) Press down the latches of two sides at the same time until two click sounds heard.
6) Press the "Vacuum/Seal" button and the LED will light, then the bag will be automatically vacuumed and sealed. When the LED light disappears, the process is completed.
7) Press the release buttons at two sides, then take out the sealed items.
Note: If the food is wet, please choose "Moist" mode.
HELPFUL HINTS
- Do not overfull the bags, leave enough length at the opening of the bag so that it can be placed in the vacuum chamber easily.
- Ensure that the opening the bag is not wet. A wet bag may be difficult to melt and seal tightly.
- Vacuum seal cannot completely replace the refrigeration and freeze, perishable foods still need to be refrigerated or frozen.
- Make the opening of plastic bags clean and flat, no foreign objects or folds allowed, otherwise it will cause difficulty or leak during seal.
- To prevent wrinkles in a seal when vacuum sealing bulky items, gently stretch bag flat while inserting into the vacuum chamber and hold it until the pump begins to work.
- When you are vacuum sealing items with sharp edges (dry spaghetti, etc.), protect the bag from punctures by wrapping item in soft cushioning material, such as tissue paper, you may need a canister or container instead of a bag.
- When using accessories, remember to leave 2.5cm of space at top of canister or container.
- Pre-freeze fruits and blanch vegetables before vacuum sealing for the best results.
- Intervals for 40 seconds after seal or vacuum is recommended.
- If you are unsure whether your bag was sealed properly, just reseal the bag.
- For best results, use Champion bags.
CARE AND CLEANING
• Always unplug the unit before cleaning.
- Don't immerse the appliance in water on other liquid for cleaning.
- Do not use abrasive cleaners to clean, because it is easy to scratch the surface of the appliance.
- Wipe the outside of the appliance with a damp cloth or sponge with mild soap if necessary.
• To clean the vacuum chamber, wipe away any food or liquid with a tissue paper.
• Dry thoroughly before using again.
TROUBLESHOOTING
Nothing happens when you try to vacuum package:
- Check if the power cord is tightly plugged into electrical outlet.
- Check if the power cord is damaged.
- Check if electrical outlet is working by plugging in another appliance.
- Make sure the latches are in the locked position.
- Make sure bag is placed correctly inside vacuum chamber.
- Allow the appliance to cool for 40 seconds before using it again
Note: To prevent overheating of the appliance, allow the appliance to cool for 40 seconds before using it again, and keep the cover open.
Air is still in the bag after vacuum:
- Make sure the opening of the bag is placed entirely inside vacuum chamber.
- Examine the bag if it leaks. Seal bag with air, then immerse it in water and apply pressure, bubbles indicate a leak, use a new bag if bubbles appear.
- Check the seal of the bag. A wrinkle in the bag along the seal may cause leakage and allow air to re-enter, just cut bag and reseal.
- Do not attempt to make your own side seams for the bag, the bags are manufactured with special side seams, which are sealed all the way to the outer edge. Making your own side seams may cause leakage and allow air to re-enter.
Air was removed from the bag, but no air has re-entered:
- Examine seal of bag. A wrinkle along the seal may cause leakage and allow air to enter, simply cut bag and reseal.
- Sometimes moisture or food material (such as juices, grease, crumbs, powders, etc.) along seal prevents bag from sealing properly. Cut bag, wipe top inside of bag and reseal.
- If you vacuum package sharp food items, bag may have been punctured, use a new bag if there is a hole. Cover sharp food items with a soft cushioning material, such as a tissue paper, and reseal.
- If there's air still in the bag, fermentation or the release of natural gases from inside the foods may have occurred, when this happens, food may have begun to spoil and should be discarded.
The bag melts:
- If the bag melts, rubber lip may have become too hot, always wait at least 5 minutes for appliance to cool down before you vacuum package another item.
IMPORTANT:
• To avoid possible illness, do not reuse bags after storing raw meats, raw fish or greasy foods.
- Do not reuse bags that have been micro waved or simmered.
Note: Allow hot foods to cool to room temperature before vacuum packaging, otherwise, contents may bubble up out of canister.
STORAGE GUIDE & TECNICAL DATA
| In the fridge (5±2°C) No vacuum Vacuum | ||
| Red Meat 3-4 days 8-9 days | ||
| White Meat 2-3 days 6-8 days | ||
| Fish 1-3 days 4-5 days | ||
| Cooked Meat 3-5 days 10-15 days | ||
| Soft Cheese 5-7 days 20 days | ||
| Hard/Semi Hard Cheese 1-5 days 60 days | ||
| Fruits 5-7 days 14-20 days | ||
| Vegetables 1-3 days 7-10 days | ||
| Soup 2-3 days 8-10 days | ||
| Pasta/Rice leftover 2-3 days 6-8 days | ||
| Cream Desserts | 2-3 days 8 days |
| Room Temperature (25 ± 2°C) No | vacuum Vacuum | |
| Fresh Bread 1-2 days 8-10 days | ||
| Biscuits 4-6 months 12 months | ||
| Uncooked Pasta/Rice 5-6 months 12 months | ||
| Flour 4-6 months 12 months | ||
| Dry Fruits 3-4 months 12 months | ||
| Ground Coffee 2-3 months 12 months | ||
| Loose Tea 5-6 months 12 months | ||
| Milk Tea 1-2 months 12 months |
| In the Freezer (-18±2°C) No vacuum | Vacuum | |
| Meat 4-6 months 15-20 months | ||
| Fish 3-4 months 10-12 months | ||
| Vegetables 8-10 months 8-24 months |
• Rated Voltage: 220V AC
• Rated Frequency: 50\~60Hz
• Rated Power: 110W
• Sealing Time: 6\~-10 Seconds
• VAC/Sealing Time: 10\~20 Seconds
• Vacuum Power: -0.8 bar
• Dimensions: Length: 360mm Width: 150mm Height: 78mm
• N.W.: 1,4kg
• G.W.: 2,0kg
Correct Disposal of this product
This marking indicates that this product should not be disposed with other household wastes throughout the EU. To prevent possible harm to the environment or human health from uncontrolled waste disposal, recycle it responsibly to promote the sustainable reuse of material resources.

1)3)5) 4) 2)
Designed in Sweden | Assembled in China


![graph TD A["CHAMPION"] --> B["Stop"] A --> C["Made"] A --> D["Food"] A --> E["Seal"] A --> F["Vocation"]](/content/2026/05/865313/images/6a439d7d3b91c23dd85857d36cf64b45a980332086ed7538f94c40f9ed8352e2.jpg)
1)3)5) 4) 2)
Designed in Sweden | Assembled in China



![graph LR A["CHAMPION"] --> B["Top"] A --> C["Mid"] A --> D["Mid"] A --> E["Seal"] A --> F["Lead"]](/content/2026/05/865313/images/7e6358f29a1061a1855cd3ffd12534544ee52ec1a91ea15336dc9d4a10523d2a.jpg)
1)3)5) 4) 2)
A. Låsekrok: Press lokket ned til det klikker for å låse posen på plass.
B. Vakuumkammer: Posen må plasseres inne i vakuumkammeret for å kunne vakuumeres.
C. Nedre pakning: Gjør vakuumområdet lufttett og forhindrer lekkasjer i vakuumet.
D. Gummikant: Gjør forseglingen flat.
E. Forseglingsflate: 3mm bred forseglingsflate garanterer tett forsegling.
F. Vakuummunnstykke: Ved pumping av en ekstern vakuumbeholder, bruk av vinstopper eller annet tilbehør, koble sammen slangen og munnstykket. Ikke blokker munnstykket når det er i bruk.
G. Release-knappen: Trykk på «release»-knappen på begge sider, åpne apparatet og ta ut den forseglede maten.
H. Canister-knappen: Trykk på denne knappen, og apparatet begynner å vakuumpakke beholderen til prosessen er fullført.
BRUKSANVISNING
Designed in Sweden | Assembled in China

Designed in Sweden I Assembled in China


- EN
- SAFEGUARDS & TIPS
- WELCOME
- STRUCTURE & FUNCTIONS
- OPERATION INSTRUCTIONS
- SEAL VACUUM BAGS
- PRESERVATION WITH VACUUM BAG
- HELPFUL HINTS
- CARE AND CLEANING
- TROUBLESHOOTING
- NOTHING HAPPENS WHEN YOU TRY TO VACUUM PACKAGE
- AIR IS STILL IN THE BAG AFTER VACUUM
- AIR WAS REMOVED FROM THE BAG, BUT NO AIR HAS RE-ENTERED
- THE BAG MELTS
- IMPORTANT
- CORRECT DISPOSAL OF THIS PRODUCT
- BRUKSANVISNING
Brand : Champion
Model : CHVF210
Category : Vacuum sealer