
60 IF - Cooker EICO - Free user manual and instructions
Find the device manual for free 60 IF EICO in PDF.


| Product Type | Induction Hob (Built-in) |
| Model / Identifier | Elco 60 IF / EIFW 60 |
| Number of Cooking Zones | 4 |
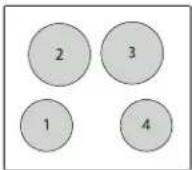
| Cooking Zone Diameters | Front Left: 180 mm, Rear Left: 210 mm, Rear Right: 210 mm, Front Right: 180 mm |
| Minimum Pan Detection Diameter | 100 mm for 180 mm zones, 110 mm for 210 mm zones |
| Power Levels | 9 (1–9) plus Booster (P) |
| Booster Function | Provides extra power for 10 minutes; activates by pressing E key after setting level |
| Keep Warm Function | Two preset temperatures: 42°C and 70°C |
| Automatic Cooking (Go & Stop) | Starts at full power, then reduces to preselected level |
| Stop & Go Function | Temporarily pauses all cooking zones and reactivates with same settings |
| Recall Function | Restores last settings after accidental switch-off |
| Timer | 1–99 minutes; automatically turns off selected cooking zone |
| Egg Timer / Reminder | Countdown reminder without cooking zone activation |
| Control Panel Lock | Prevents unintentional changes; unlock by simultaneous press of B (lower right) and E key |
| Safety Switch (Auto-Off) | Power Level 1: 10h, 2-3: 5h, 4: 4h, 5: 3h, 6-7-8: 2h, 9: 1h |
| Residual Heat Indicator | Displays '_i' when zone temperature > 50°C after switch-off |
| Pan Detection | Hob only works with suitable cookware; shows symbol if no pan present |
| Electrical Connection | 230V~50/60 Hz (1Ph+N or 2Ph) or 400V~50/60 Hz (2Ph+N); cable H05VV-F/H05RR-F |
| Cleaning Instructions | Use scraper for residues; mild detergents and paper towel; no abrasive sponges |
| Energy Efficiency (Hob EC electric) | 171.50 Wh/kg (for 60 IF model) |
Frequently Asked Questions - 60 IF EICO
User questions about 60 IF EICO
0 question about this device. Answer the ones you know or ask your own.
Ask a new question about this device
Download the instructions for your Cooker in PDF format for free! Find your manual 60 IF - EICO and take your electronic device back in hand. On this page are published all the documents necessary for the use of your device. 60 IF by EICO.
USER MANUAL 60 IF EICO
natural_image
Pure black background with a small white triangular shape at the bottom (no text or symbols)
natural_image
Dark image with a small white triangular shape at the bottom left (no text or symbols)Eico 60 IFEico 70 IF EIFW 60EIFW 70

natural_image
Dark image with a small white triangular shape at the bottom left (no text or symbols)Eico 80 IF EIFW 80
CE

natural_image
Four dark gray circles arranged in a 2x2 grid with a small triangular pointer at the bottom (no text or symbols)Eico 60 IF
EIFW 60

natural_image
Four gray circles arranged in a 2x2 grid with a small triangular shape at the bottom (no text or symbols)Eico 70 IF
EIFW 70
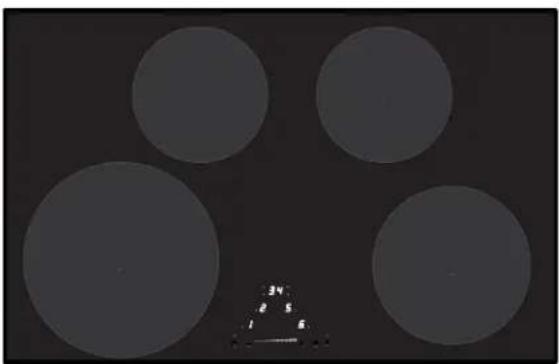
natural_image
Four large gray circles arranged in a triangular pattern on a dark background, with a small labeled triangle below (no text or symbols)Eico 80 IF
EIFW 80
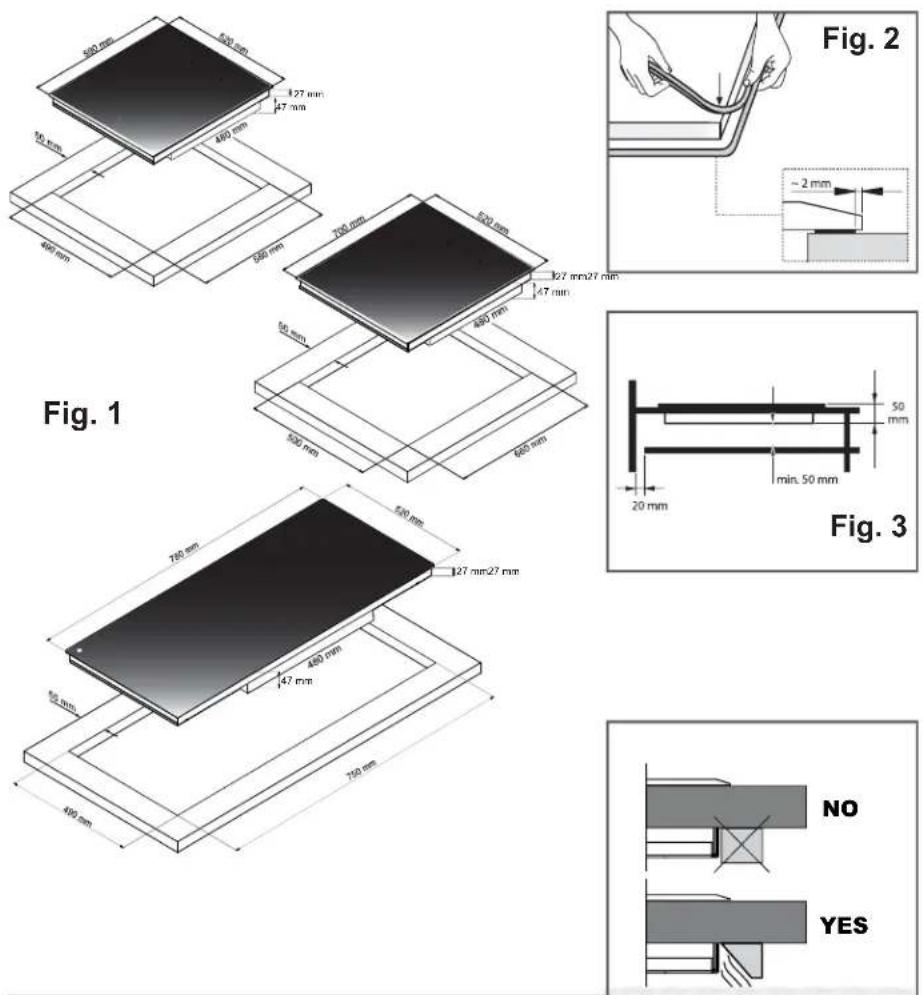
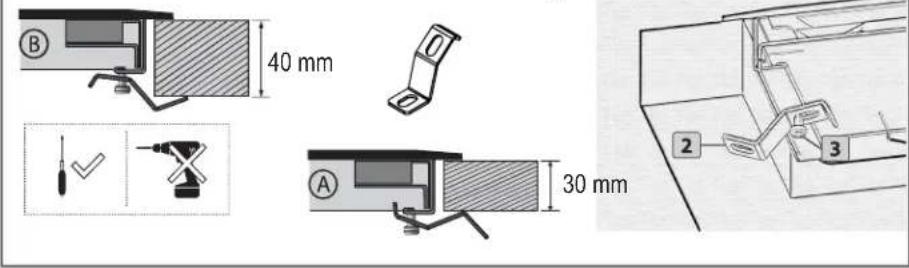
Fig. 4
| 4 Zone | |||||
| Land Mains Connection Cable diameter Cable Protection calibre | |||||
| DK S | 400V~50/60 Hz | 2 Ph + N | 4 x 1.5 mm ^2 | H 05 VV - FH 05 RR - F | 16 A* |
| NO | 230V~50/60 Hz | 2 Ph | 3 x 2.5 mm ^2 | H 05 VV - FH 05 RR - F | 25 A* |
| DK S | 230V~50/60 Hz | 1 Ph + N | 3 x 2.5 mm ^2 | H 05 VV - FH 05 RR - F | 25 A* |
(* ) calculated with the simultaneous factor following the standard EN 60 335-2-6/1990


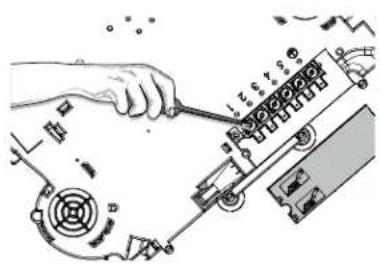
Fig. 6

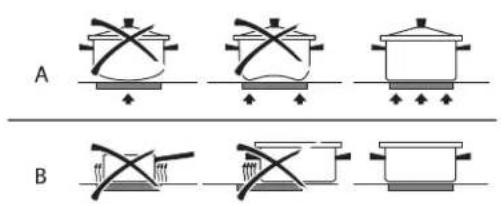
Fig. 7
DK
A - ON/OFF key > switch the appliance on or off.
B - Cooking zone display> Identification cooking zone activated.
C - Cooking zone display> Slider display power level.
D - Bridge key
E - Booster key
F - Timer display > increase/decrease timer value.

FI
natural_image
Illustration of a hand using a power tool on a flat surface, labeled 'Fig. 8' (no text or symbols on the diagram itself)Induction Hob user instructions
EN
GENERAL INFORMATION
Carefully read this use and maintenance manual, where important information about installation, use and maintenance safety is provided. Keep this manual for future reference. Any installation operation (electric connections) shall be performed by specialized personnel, in compliance with all standards and regulations in force.
SAFETY WARNING
The use of flat-bottomed pots, with a diameter equal to or slightly bigger than the heated area, is recommended. (Fig.6). Do not use pots that have a rough base, in order to prevent the hob thermal surface from being scratched. This appliance is not intended for use by children or infirm people without supervision.
IMPORTANT
- Avoid the overflow of liquids by reducing the heat supply when boiling or warming liquids.
- Do not leave any heating element switched on, if there are no pots, or if the pots are empty.
- Once cooking is completed, turn the concerned heating element off, by using the control shown below.
- This appliance is not intended for use by people (children included) with limited physical, sensorial or mental abilities, or lacking of experience and knowledge, unless they are supervised or well instructed about the use of the appliance, by a person who is responsible for their safety.
- Children should be supervised to assure that they do not play with the appliance.
- If the hob surface is cracked, turn the appliance off and disconnect it from the electric network, so as to avoid the possibility of electric shock.
INSTALLATION INSTRUCTIONS
These installation instructions are intended for a specialized installer and are meant as guidelines for the hob installation, adjustment and maintenance, in compliance with any regulations and standards in force. If a built-in oven or any other appliance generating heat is to be mounted directly under the vitro-ceramic hob, IT IS NECESSARY THAT SUCH AN APPLIANCE (the oven) AND THE VITRO-CERAMIC HOB ARE PROPERLY INSULATED. Failure to comply with this precaution might result in the incorrect operation of the TOUCH CONTROL system.
- Positioning:
This household appliance has been designed for built-in installation onto a worktop, as shown in the figure (Fig.1). Use sealing material along the whole perimeter (Fig.2) (Cut dimensions- Fig.1). This operation is necessary in order to prevent any liquid from entering inside the hob, being that the flatness of the top, the glass and their coupling cannot be assured. Fix the appliance on the worktop by using the 4 supports, taking the work top thickness into account (Fig.4). If, after installation, the lower part of the appliance is accessible from the lower part of the cabinet, it will be necessary to mount a spacing panel at the distances given (Fig.3). If the appliance is installed under an oven, this step will not be necessary.
• Electric connections (Fig.5):
- The installation of this appliance and the connection to the electrical network should be entrusted only to an electrician perfectly to the fact of the normative regulations and which respects them scrupulously.
- Protection against the parts under tension must be ensured after the building-in.
- The data of connection necessary are on the stickers place on the hob casing near the connection box.
- The connection to the main must be made using an earthed plug or via an omnipolar circuit breaking device with a contact opening of at least 3 mm.
- The electrical circuit must be separated from the network by adapted devices, for example: circuit breakers, fuses or contactors.
- If the appliance is not fitted with an accessible plug, disconnecting means must be incorporated in the fixed installation, in accordance with the installation regulations.
- The cord must be positioned so that it does not touch any of the hot parts of the hob or even.
Caution!
This appliance has only to be connected to a network 230 V\~50/60 Hz.
Connect always the earth wire.
Respect the connection diagram.
The connection box is located underneath at the back of the hob casing. To open the cover use a medium screwdriver. Place it in the slits and open the cover.
Caution!
Be careful that the cables are correctly engaged and tightenet.
We cannot be held responsible for any incident resulting from incorrect connection or which could arise from the use of an appliance which has not been earthed or has been equipped with a faulty earth connection.
USE AND MAINTENANCE
- Maintenance (Fig.8):
Remove any food residue and grease drops from the cooking surface, by using the special scraper provided on request.
Clean the heated area in the best way possible, using suitable products and a paper towel, wipe with water and a clean cloth.
Through the use of the special scraper (optional), promptly remove any pieces of aluminum foil and plastic material, which might have accidentally melted, or sugar or food remains, and/or remains of sugary foods, from the heated surface. In this way, any possible damage to the surface is prevented.
The use of abrasive sponges or irritating chemical cleaners, such as sprays for ovens or cleaning agents is not allowed under any circumstance.
- Use:
Use the touch control system in the corresponding position according to individual cooking needs. Keep in mind that the higher the number, the more heat is produced.
• Function (Fig.7):
A - On/Off key
B - Cooking zone selection key and display
C - Slider key (increase and decrease power level)
D - Keep warm key
E - Booster key
F - Timer key
- Switching the cooking top on:
Press key A (ON/OFF) to switch the top on and on all the display will show the symbol , with a led point blinking. The control unit remains active for 10 seconds. If no cooking zone is selected within this time, the cooking top switches off automatically.
- Pan detection:
The pan detection ensures a perfect safety, this induction doesn't work if no cookware is the cooking zone. cookware is removed, the display shows the symbol and disappear when the cookware is repositioned on the cooking zone, continuing with the previous settings. After use, always bring power to 0 (do not leave the active symbol). If the symbol should appear on one of the cooking area displays, it means that:
1) The recipient being used is not suitable for induction cooking.
2) The diameter of the recipient used is inferior to that allowed by the appliance.
3) No recipient is present.
| MODEL | POSITION | DIAMETER | MINIMUM DIAMETER DETECTION |
| Eico 60 IF EIFW 60 | Front left | 180 mm | 100 mm |
| Rear left | 210 mm | 110 mm | |
| Rear right | 210 mm | 110 mm | |
| Front right | 180 mm | 100 mm | |
| Eico 70 IF EIFW 70 | Front left | 210 mm | 110 mm |
| Rear left | 210 mm | 110 mm | |
| Rear right | 210 mm | 110 mm | |
| Front right | 210 mm | 110 mm | |
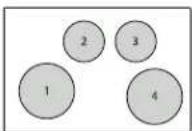
| Eico 80 IF EIFW 80 | Front left | 260 mm | 120 mm |
| Rear left | 180 mm | 100 mm | |
| Rear right | 180 mm | 100 mm | |
| Front right | 210 mm | 110 mm |
- Switching the cooking area on:
Press key B (select zone) for select the desired cooking, on the activate zone the display will indicating the activation of the plate and will be given a ☐ with the led point fixt.
To select the power with the slider E, slide your finger on the slider zone. You can already have a direct access if you put your finger directly on the chosen level. The power of the single cooking zone can be adjusted in 9 different positions and will be shown on the relative luminous display with a number from "1 to 9".
- Control panel lock:
You can lock the controls to prevent the risk of unintentional changes (cleaning, etc.). Switch on the cook top with A key.
Press simultaneously the display B in the lower right corner and the E key, after the beep, press again the display B in the lower right corner. All displays B will show the symbol I.
To temporarily unlock, press simultaneously the dispaly B in the lower right corner and press E key for 3 seconds, wait for the beep, you can now use the hob, turned off and restart the next block will be restored.
To unlock the touch control, press simultaneously the display B in the lower right corner and the E key, after the beep, press the E key again. All displays will show the letter and the hob will switch off.
- Residual heat:
If the temperature of the cooking zone is still high (over 50°) after it has been switched off, the relative display B will indicate the _i signal (residual heat). The signal will only switch off when the burn risk in no longer present.
- Switching the cooking area off:
To switch a cooking zone off, press simultaneously the C (-) and key D (+) of the relative zone, or press the key C (-) until reaching position .
- Switching off the hob:
To turn off the appliance entirely hold down the A (On/Off) key.
- Keep warm function:
The hob has two programs with pre-set temperatures for Maten food warm, the first program has a temperature of 42 degrees while the second has a temperature of 70 degrees.
To set this function, select the desired cooking zone with the B button then press D. Setting the program on the display 42 degrees, which is above the D key, the symbol will appear in the display and below a line ,while pressing the D key will be set to 70 degrees and the program will be displayed and a line below
- Booster function:
The booster function grants a boost of booster to the select cooking zone. Booster is foreseen for example to heat up rapidly big quantities of water and work during 10 minutes.
To activate it select the cooking zone and slide your finger to increase the power level that press the E key and the display will show the symbol P.
• Automatic cooking function:
All the cooking zone are equipped with an automatic Go & Stop cooking device. The cooking zone starts at full power during a certain time, than reduces automatically its power on the preselected level.
Select the required cooking zone and act on the slider
until you get to level 9, by pressing the + button will appear in the letter R. Once inserted the function by acting on the slider you can reduce the evel of power, then you will see alternating on the display of the cooking zone letter R and its set power level.
- Stop & Go function:
This function enables to temporarily stop cooking on each cooking zone and reactivate it with the same amount of power previously selected.
To enable this feature, when you select a cooking zone and set the power level, press the B button on the top left and top right, you will see two symbols. To disable this feature, press the same buttons again.
- Recall function:
If, during operation, you accidentally turn off the cooker, you can recall the last setting. To enable this feature (move quickly), turn the hob using the A button On / Off and then simultaneously press the rear cooking zones.
- Timer :
This feature allows you to set the time (from 1 to 99 minutes) to automatically turn off the cooking zone selected. Activate a cooking area and adjust the power. Enable the timer on the display by pressing F. The display will show the symbol and the LED on the selected zone set on one corner of the F display will flash. Scroll bar slider CIF set the desired value (eg 3 min.), Press display which will display the scroll bar slider back and set the desired value (eg, 23min.) On the display and confirm by pressing F If you wish to confirm a time less than 10min timer. (eg 3 min.) Confirm by pressing twice on the display F. The timer will automatically turn off the cooking area and you will hear a beep that can be turned off by pressing any of the commands
- Egg Timer / Reminder:
This feature allows you to set a reminder sound.
To access this feature none of the cooking areas shall be in operation. Turn on the stove using the A button, activate the timer by pressing the display area F and adjust any time between 1 to 99 minutes as described in the previous paragraph TIMER. After confirmation of the memorandum, the LED will remain active on the F key and the display with the time previously set. At this point you can turn back the hob with the A button and adjust the cooking zones. When the timer expires you will hear a beep that can be turned off by pressing any of the commands.
With the reminder you can not access the active timer.
- Safety switch:
The appliance has a safety switch that automatically switches off the cooking zones when they have been operating for a certain amount of time at a given power level.
| POWER LEVEL | OPERATING TIME LIMIT (hours) |
| 1 | 10 |
| 2 - 3 | 5 |
| 4 | 4 |
| 5 | 3 |
| 6 - 7 - 8 | 2 |
| 9 | 1 |
TIPS ON SAVING ENERGY
- Use a lid whenever possible to minimise heat loss.
- Select a smaller pan when cooking small quantities. A smaller pan uses less energy than a larger pan with very little in it.
• Cook with as little water as possible. - Once food has come to the boil or the oil in the pan is hot enough for frying, reduce the heat to a lower setting.
- Use a pressure cooker to reduce cooking times.
DISPOSAL OF OLD ELECTRICAL APPLIANCES

The European Directive 2002/96/EC on Waste Electrical and Electronic Equipment (WEEE), requires that old household electrical appliances must not be disposed of in the normal unsorted municipal waste stream. Old appliances must be collected
separately in order to optimise the recovery and recycling of the materials they contain and reduce the impact on human health and the environment. The crossed-out dustbin symbol on the product reminds you of your obligation regarding separated waste collection. Consumers should contact their local public service or their local dealer for more information on the correct disposal of exhausted household appliances.
THE MANUFACTURER DECLINES ALL RESPONSIBILITY FOR EVENTUAL DAMAGES CAUSED BY BREAKING THE ABOVE WARNINGS. THE WARRANTY IS NOT VALID IN THE CASE OF DAMAGE CAUSED BY FAILURE TO COMPLY WITH THE ABOVE-MENTIONED WARNINGS.
| Information for household electric hobsIn acc. with regulation (EU) No. 66/2014 | |||
| Model name / identifier | Elco 60 IF / EIFW 60 Elco 70 IF / EIFW 70 Elco 80 IF / EIFW 80 | ||
| Type of hob | built-in | built-in | built-in |
| Number of cooking zones and/or areas | 4 | 4 | 4 |
| Heating technologyInduction cooking zones and cooking areas, radiant cooking zones. | 1. = Induction2. = Induction3. = Induction4. = Induction | 1. = Induction2. = Induction3. = Induction4. = Induction | 1. = Induction2. = Induction3. = Induction4. = Induction |
| For circular cooking zones: diameter of useful surface area/cooking zoneFor non-circular cooking zones or areas: length and width of useful surface area per electric cooking zone or areamm | 1. = ∅ 1802. = ∅ 2103. = ∅ 2104. = ∅ 180 | 1. = ∅ 2102. = ∅ 2103. = ∅ 2104. = ∅ 210 | 1. = ∅ 2602. = ∅ 1803. = ∅ 1804. = ∅ 210 |
| Energy consumption per cooking zone or areacalculated per kg (ECelectric cooking)Wh/kg | 1. = 172,002. = 171,003. = 171,004. = 172,00 | 1. = 171,002. = 171,003. = 171,004. = 171,00 | 1. = 191,002. = 172,003. = 172,004. = 171,00 |
| Energy consumption for the hob calculated per kg(ECelectric hob)Wh/kg | 171,50 | 171,00 | 176,50 |
Eico 60 IF/EIFW 60
Eico 70 IF/EIFW 70

Eico 80 IF/EIFW 80


- DK
- FI
- Induction Hob user instructions
- EN
- GENERAL INFORMATION
- SAFETY WARNING
- IMPORTANT
- INSTALLATION INSTRUCTIONS
- - Positioning:
- • Electric connections (Fig.5):
- Caution!
- USE AND MAINTENANCE
- - Maintenance (Fig.8):
- - Stop & Go function:
- - Recall function:
- - Timer :
- - Egg Timer / Reminder:
- - Safety switch:
- TIPS ON SAVING ENERGY
- DISPOSAL OF OLD ELECTRICAL APPLIANCES
Brand : EICO
Model : 60 IF
Category : Cooker