
7601 - Meat Grinder OBH NORDICA - Free user manual and instructions
Find the device manual for free 7601 OBH NORDICA in PDF.


| Product Type | Meat Grinder Attachment |
| Brand | OBH Nordica |
| Model | 7601 |
| Compatible Kitchen Machines | OBH Nordica 6681, 6682 |
| Included Grinding Plates | Fine, Medium, Coarse |
| Additional Accessories | Sausage filler set (stuffing tube, grinder plate), Kebbe maker set (cone disk, kebbe mould) |
| Knife Type | Wear-resistant stainless steel |
| Food Tray | Included |
| Pusher | Included |
| Assembly Ring | Included |
| Power Source | Via kitchen machine (230V household outlet) |
| Overheat Protection | Built-in thermostat, auto shut-off if overloaded |
| Cleaning | Wash all parts except motor in warm soapy water; do not immerse motor part |
| Lubrication | Grease screw conveyor, knife, and plates with vegetable oil to prevent corrosion |
| Safety Precautions | Unplug before assembly/disassembly; handle knife carefully (sharp); do not immerse motor; use only pusher |
| Warranty | According to current law; requires purchase receipt; return to store |
| Manufacturer Contact | OBH Nordica Denmark A/S, Ole Lippmanns Vej 1, 2630 Taastrup, Denmark |
| Intended Use | Domestic only |
Frequently Asked Questions - 7601 OBH NORDICA
User questions about 7601 OBH NORDICA
0 question about this device. Answer the ones you know or ask your own.
Ask a new question about this device
Download the instructions for your Meat Grinder in PDF format for free! Find your manual 7601 - OBH NORDICA and take your electronic device back in hand. On this page are published all the documents necessary for the use of your device. 7601 by OBH NORDICA.
USER MANUAL 7601 OBH NORDICA
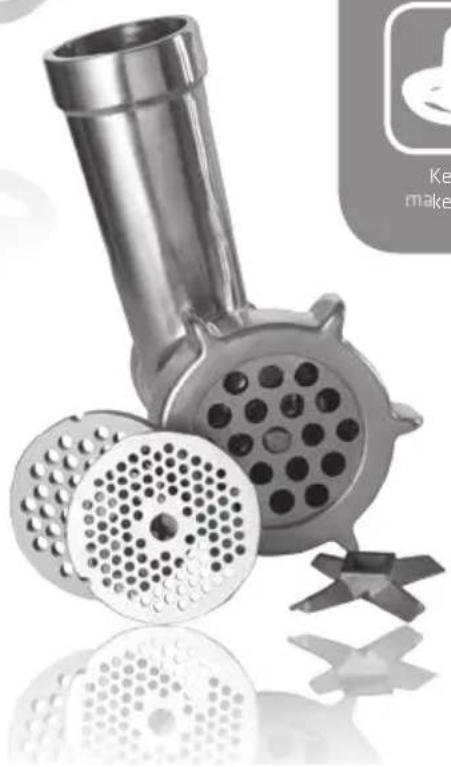
meat grinder //
for kitchen machines
types 6681 and 6682 //

3 discs for
meat grinding //

Sausage
filler set //

Kebbe
maker set //

Wear resistant
knife //

Food tray //
Instruction manual – english ...... page 19 – 22

OBH Nordica Denmark A/S
Ole Lippmanns Vej 1
2630 Taastrup
Tlf: 43 350 350
www.obhnordica.dk

OBH Nordica Sweden AB
Box 58
163 91 Spånga
Tel 08-445 79 00
www.obhnordica.se
CE
OBH Nordica Norway AS
Postboks 5334, Majorstuen
0304 Oslo
Tlf: 22 96 39 30
Faks: 22 96 39 40
www.obhnordica.no


Lihamyllyn käyttö
Meat grinder for 6681 and 6682
Before use
The meat grinder and its accessories are only to be used in kitchen machine OBH Nordica 6681 or kitchen machine OBH Nordica 6682. For operation of the kitchen machines, please see the instruction manuals.
Before you use the meat grinder and the accessories for the first time, please read the instruction manual carefully and save it for future use. Wash all parts in warm water with a washing-up liquid before use.
The meat grinder comprises the following parts:
- Meat grinder compartment
- Meat tray
- Screw conveyor
- Knife
- Grinder plates: Fine, medium, coarse
- Assembly ring
- Pusher
- Accessories for sausages
- Stuffing tube
- Grinder plate
- Kebbe plate

How to use the meat grinder
Before use, wash the meat grinder compartment and accessories in warm soapy water. Rinse well and wipe thoroughly.
Position the kitchen machine on an even and stable surface. Set the speed selector at "0" and make sure that the kitchen machine is not plugged in the mains supply when mounting accessories. If necessary, press the release handle and put the mixer head in a vertical position.
Insert the screw conveyor in the meat grinder compartment with the short shaft pointing outwards and mount the knife onto the shaft of the screw conveyor. When mounting the knife, be careful to position the knife correctly, i.e. the flat side of the knife facing outwards towards
the grinder plate. Next, mount the grinder plate you want on the screw conveyor – take care that the notch of the grinder plate is positioned correctly opposite the corresponding groove in the meat grinding compartment. Finally, mount the assembly ring at the end of the meat grinder compartment.
Always check that the kitchen machine is not plugged during mounting or demounting of the meat grinder.
Mount the meat grinder on the kitchen machine by first removing the cover of the joint part of the meat grinder by pulling the cover upwards in the direction of the arrow. Mount the joint part of the meat grinder on the opening of the kitchen machine to the meat grinder and turn the meat grinder counter-clockwise until it engages. Mount the meat tray on the feed hopper. Position the bowl under the outlet of the meat grinder for collection of the ground meat. Plug the kitchen machine in the mains supply and the meat grinder is ready for use.
We recommend that you always start at the lowest speed and gradually increase the speed to the wanted one between 1 and 6. Note: The meat shall be without any bones, and frozen meat shall be defrosted before grinding. Cut the meat in adequate pieces before it is pushed down the feed hopper by means of the pusher, one piece at a time. Be careful not to press too hard. Always use only the pusher to stuff the meat into the meat grinder.
In order to completely empty the meat grinder of remaining meat, we recommend that you let a few slices of white bread pass through.
When the grinding is done, switch off and unplug the appliance.
Remove the meat grinder from the kitchen machine by pressing the release button at the left side of the meat grinder and turn, at the same time, the meat grinder clockwise. Put the cover back in place by pressing the button at the left side of the joint part of the meat grinder and pressing the cover back in place at the same time. Demount the assembly ring by unscrewing it from the meat grinder compartment and remove the accessory.
How to use the sausage-making accessory
Position the screw conveyor in the meat grinder compartment with the short shaft pointing outwards and mount the knife on the shaft of the screw conveyor. When mounting the knife, be careful to position it correctly, i.e. the flat side of the knife facing outwards. Next, mount the sausage disk on the screw conveyor. Make sure to position the notch of the sausage disk correctly opposite the corresponding groove in the meat grinding compartment. Mount the stuffing tube and mount the assembly ring by screwing it onto the end of the meat grinder compartment.
Always check that the kitchen machine is not plugged during mounting or demounting of the meat grinder.
Mount the meat grinder on the kitchen machine by first removing the cover of the joint part of the meat grinder by pulling the cover upwards in the direction of the arrow. Mount the joint part of the meat grinder on the opening of the kitchen machine and turn the meat grinder counterclockwise until it engages. Mount the meat tray on the feed hopper. Plug the kitchen machine in the mains supply and the meat grinder with the stuffing tube is ready for use.
Put the ingredients in the meat tray. Use the pusher to push the ingredients down the feed hopper a little at a time. Do not push too hard. Always use only the pusher to push the ingredients down into the meat grinder.
Soak the sausage casing in lukewarm water for 10 minutes and roll the wet casing onto the sausage stuffer. If the sausage casing sticks to the stuffing tube, wet the casing with a little water.
As the sausage casing gets filled, pull it off the stuffing tube and take care not to overfill the casing. Twist the casing to the sausage size you want.
How to use the kebbe accessory
Kebbe is a traditional middle-east dish consisting primarily of lamb and bulgur wheat. Grind the mixture and pass it through the meat grinder with the kebbe accessory. The blend is cut into small “puches” which are then stuffed with a meat blend. The “pouches” are closed in both ends and deep fried.-
Mount the screw conveyor in the meat grinder compartment with the short shaft facing outwards and mount the cone disk and the kebbe mould on the shaft of the screw conveyor. Make sure to position the notch of the cone disk correctly opposite the corresponding groove in the meat grinding compartment. Mount the joint ring by screwing it onto the end of the meat grinder compartment.
Mount the meat grinder on the kitchen machine by first removing the cover of the joint part of the meat grinder by pulling the cover upwards in the direction of the arrow and then turning the meat grinder counter-clockwise until it engages. Next, position the meat tray on the feed hopper. Plug the kitchen machine and the meat grinder with the kebbe accessory is ready for use.
Overheating
The kitchen machine is equipped with a thermostat that ensures a long lifetime of the appliance and which will be activated if the motor is overcharged. If the thermostat is activated, switch off the appliance and unplug from the mains supply and wait for about 20 minutes before restarting the appliance.
Cleaning and maintenance
Always unplug from the mains supply before cleaning. Remove the meat grinder compartment from the kitchen machine and demount all parts of the meat grinder compartment. Wash all parts in warm water with a washing-up liquid. Wipe all parts thoroughly before putting aside the meat grinder and the accessories.
The screw conveyor, the knife and the grinder plates should be greased with vegetable oil to avoid corrosion.
IMPORTANT: NEVER IMMERSE THE MOTOR PART IN WATER OR ANY OTHER LIQUID.
Safety instructions
- Read the instruction manual carefully before use, and save it for future use.
-
Plug the appliance to a household outlet of 230V only, and use the appliance only for the intended use.
-
Always unplug the appliance from the mains supply when disorder is experienced, when not in use, when parts are applied or removed from the appliance and before cleaning and maintenance.
- The appliance must not be immersed in water or other liquids.
- This appliance is not intended for use by persons (including children) with reduced physical, sensory or mental capabilities, or lack of experience and knowledge, unless they have been given supervision or instruction concerning the use of the appliance by a person responsible for their safety.
- Children should be supervised to ensure that they do not play with the appliance. Children are not always able to understand potential risks. Teach children a responsible handling of electrical appliances.
- Check that the cord is not hanging over the edge of the table.
- Do not place the appliance on or near hotplates, open fire or the like.
- The appliance should only be used under supervision.
- Be careful to handle the appliance correctly. The appliance shall be handled with care, when the knife is removed from the meat grinder, as the knife is extremely sharp! Be very careful when handling the knife, in particular during use and cleaning.
- Always examine appliance, cord and plug for damage before use. If the supply cord is damaged, it must be replaced by the manufacturer, his service agent or a similarly qualified person in order to avoid any hazard.
- The electrical installation must comply with the current legislation concerning additional protection in the form of a residual current device (RCD) with a rated residual operating current not exceeding 30 mA). Check with your installer.
- The appliance is for domestic use only.
- If the appliance is used for other purposes than intended, or is it not handled in accordance with the instruction manual, the full responsibility for any consequences will rest with the user. Any damages to the product or other things are not covered by the warranty.
Warranty
Warranty according to current law. Any claim shall be accompanied by the cash receipt with purchase date. When raising a claim the appliance must be returned to the store of purchase.
OBH Nordica Denmark A/S
Ole Lippmanns Vej 1
DK-2630 Taastrup
Tel: +45 43 350 350
www.obhnordica.dk
CE
These instructions are subject to alterations or improvements.


Brand : OBH NORDICA
Model : 7601
Category : Meat Grinder