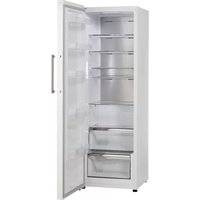
USER MANUAL SKS 458 Scandomestic
English ...... Page 11
Deutch page 18
natural_image
Mechanical assembly diagrams showing progressive assembly of a bracket component (no text or symbols)
Fejlfinding
Before using, please read the Operating Manuel carefully.
Please go through this manual before use.
Thank you for purchasing our products.
Attention:
- Please understand the safety instructions before use.
- Please keep this manual well after reading it for further reference.
- Notice will not be given if this manual is altered due to product improvement.
1 WARNING Keep ventilation openings, in the appliance enclosure or in the built-in structure, clear of obstruction.
2 WARNING Do not use mechanical devices or other means to accelerate the defrosting process, other than those recommended by the manufacturer.
3 WARNING Do not damage the refrigerant circuit.
4 WARNING Do not use electrical appliances inside the food storage compartments of the appliance, unless they are of the type recommended by the manufacturer.
5 The appliance has to be unplugged after use and before carrying out user maintenance on the appliance.
6 This appliance is not intended for use by persons (including children) with reduced physical, sensory or mental capabilities, or lack of experience and knowledge, unless they have been given supervision or instruction concerning use of the appliance by a person responsible for their safety.
7 Children should be supervised to ensure that they do not play with the appliance.
8 If the supply cord is damaged, it must be replaced by the manufacturer, its service agent or similarly qualified persons in order to avoid a hazard.
9 Please abandon the refrigerator-freezer according to local regulators for it use flammable blowing gas and refrigerant.
10 Disconnect the power supply before replacing the lamp.
11 Please according to local regulations regarding disposal of the appliance for its flammable refrigerant and blowing gas. Before you scrap the appliance, please take off the doors to prevent children trapped.
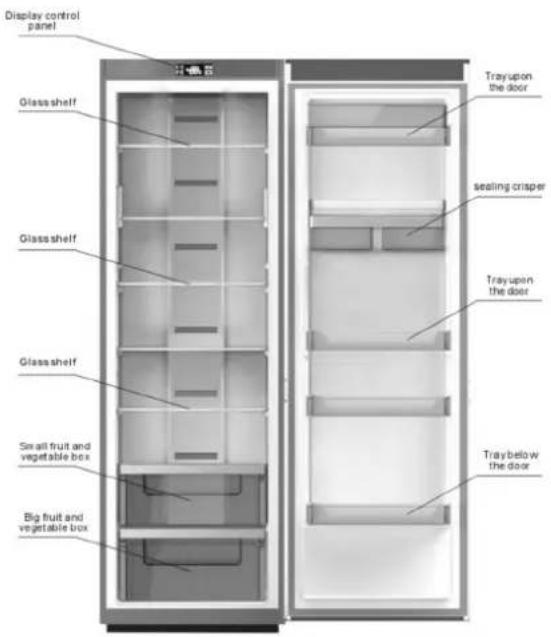
Names of the components
Apologizing for some features and accessories of the refrigerator you brought might not accord with the illustrations, refer to the packing list in the refrigerator please.
Preparation before using
Warning
- Except the solutions recommended by the manufacturer, do not use mechanical equipment or other means to accelerate defrosting.
- Except the types recommended by the manufacturer, do not use electrical appliance inside food closet.
- The refrigerator is provided with R600a refrigerant and cyclopentane foaming material, and both are combustible materials. Obsolete refrigerator should be isolated from fire and combustion treatment is forbidden.
New refrigerator
- Remove all packing materials before using, including bottom seating washer and foam pads and gummed paper inside;
- Use warm and wet cleaning cloth to wipe the refrigerator's interior and exterior (add a little detergent in the warm water and use clean water to clean up);
- Prepare a separating grounding receptacle with both polarities. Do not share multi-purpose socket with other electrical appliances;
- Connect earth wire. Earth electrode of the socket must be equipped with a reliable grounding wire.
Transportation and placement of the refrigerator
Transportation
- Do not invert, traverse, press and shake the refrigerator. When moving the refrigerator, angle of inclination shall not be larger than 45irc .
- When moving, do not make excessive pressure to the door or top cover, otherwise deformation will occur.
- Slightly remove the refrigerator backward (less than 20irc ) to rear truckle roll a short distance.
Placement
- Place the refrigerator at a ventilative place, far away from heat source and direct sunlight. In order to avoid rust or reduce insulation result, please do not place it at damp and watered place.
- Top space for the refrigerator shall not be less than 30 cm. Distance against two sides shall not be less than 10 cm, Distance against to the wall shall not exceed 75 mm, providing convenience to open and close the door and disperse the heat.
- Place the refrigerator on a flat and solid floor. (if it is not stable, you can regulate the regulating legs)
Attention
Make sure the power line is not pressed by the refrigerator or other articles.
Before connect the power line, make sure the voltage range of the refrigerator accord with that of the power supply.
Correct application of the refrigerator
Ensure that the refrigerator is placed correctly and stably.
Be aware of all safety matters needing attention.
- Connect the electricity
After connecting electricity, it will enter into ex-factory state.
- Put food into the refrigerator
Suggestion: after working a time, the refrigerator will arrive store temperature or after the first stop of the compressor, put food into it, which is beneficial to retain freshness.
Note: if the set temperature is altered or new food is put in, temperature inside the box will achieve the balance after a time, which is determined by the temperature alteration degree, temperature of ambient environment, opening frequency, quantity of the food inside and so on.
Function introduction
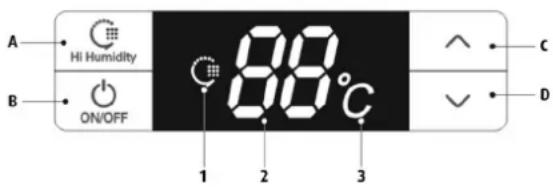
Keys
A. Hi Humidity: High Humidity Mode
B. ON/OFF: start up or shut down the system
C. Increase temperature of the cooling chamber
D. Decrease temperature of the cooling chamber
Names of functions of display screen
1 High Humidity figure
2 Temperature region digitron
3 Temperature (D) figure
Display control
- Power on for the first time: all shines for three seconds with ringing of start bell. Defaulting temperature of the cooling chamber is 5D.
Normal operation display:
Temperature display region: when there is a failure, it will show failure codes by turn at a priority order; without failure, it will show the set temperature.
High Humidity figure: shine when the system is under High Humidity Mode.
Display control:
1 Under the normal pattern, it will not shine any more after thirty seconds without opening and key operation;
2 When the door is under open state, the display will shine all the time and it will stop shining thirty seconds after the door is closed.
3 When a failure happens and it is within "Failure Code", the screen will shine for one time and stop to shine after thirty seconds (if the buzzer has been ringing for a long time, press any key to cancel the failure bell);
User Mode operation
Start-up and shutdown
Under start-up mode, press and hold ON/OFF key (B key) for three seconds, the start bell will ring and the system will be shut down immediately;
Under shutdown mode, press and hold ON/OFF key (B key) for three seconds, the start bell will ring and the system will be started immediately.
Press ON/OFF key for three seconds to shut down the system and the display screen will not show any more. Except ON/OFF key (B key), other keys will stop responding, and compressor, door lamp and other loads will be shut down immediately;
Press ON/OFF key for three seconds to start up the system. Before starting, if the system is at High Humidity Mode, the High Humidity figure will shine, otherwise the system will only shine the set temperature and all loads will run the mode having been set before shutdown.
All following functions must be worked under start state.
High Humidity Mode
When the system is not at High Humidity Mode, press and hold Hi Humidity key (A key) for three seconds to start the High Humidity Mode and High Humidity figure will be lit up.
When the system is at High Humidity Mode, press and hold Hi Humidity key (A key) for three seconds to exit from the High Humidity Mode and High Humidity figure will not shine any more.
When starting High Humidity Mode, cooling chamber will work under High Humidity state to improve relative humidity of the air inside the cooling chamber.
Set the temperature of the cooling chamber
Press temperature regulation keys (C key) and (D key) to set the temperature inside the chamber and the set temperature will shine. The setting range is between 2 to 8 (non-periodic temperature regulation); it will exit from the system in five seconds and the setting will take effect. (within five seconds after finishing the setting, press A key or B key to affirm the setting state manually and make the setting valid.)
Illuminating lamp control
When open cooling chamber's door, cooling chamber's illuminating lamp will shine. When close cooling chamber's door, cooling chamber's illuminating lamp will not shine any more.
Door-opening hint and door-opening alarming control
When open the door, the music will ring for one time. If refrigerator chamber door has been open for 120 seconds, it will ring warning bell, and the bell will ring per 2 seconds till the door is closed. Press any key to cancel the door-opening warning.
Power-interruption memory and initial power-up state
- When meet power interruption, the refrigerator can memory operating mode and state before automatically; When power up, it will recover to the state before interruption and run the mode having been set before interruption.
- Initial power-up state: the set temperature of cooling chamber is 5 and the system is not at High Humidity Mode.
- Memory: include set temperature of cooling chamber, "High Humidity" Mode and cumulative working hours of compressor.
For example, if the system has a power failure under High Humidity state, it will continue to work at "High Humidity" mode after recovery.
High temperature warning of the refrigerating chamber
When the temperature of the cooling chamber has been above 15°C for six hours, high temperature warning will ring. The buzzer will ring per second for ten times and then ten times every thirty minutes, and temperature display region will show failure code (E9); the ringing will stop when the temperature of the cooling chamber is below 10°C. Press any key to cancel the warning buzzer (if it does not buzz after thirty minutes). But the failure code display state is not canceled, until the failure is solved.
Failure hint
Note: when there is a failure, the system will display all machine failures' codes by turn. The warning will be automatically canceled after recovery of the failure or press any key to cancel the warning. When failure happens, it is a priority to show failure code till failure recovery, otherwise the set temperature and High Humidity state cannot be displayed.
If a failure has been displayed all the time and automatic recovery fails, please contact After-sale Department or professional maintenance personnel.
Force defrosting
Press and hold "temperature regulation" keys and for three seconds to enter into Force Defrosting Mode. High position of LED temperature region always shows "3" with no display in the low position. When entering into Force Defrosting Mode, the compressor will be stopped immediately. When working under Force Defrosting Mode or the exiting condition is satisfied, press and hold "temperature regulation" keys and for three seconds to exit from the Force Defrosting Mode.
Matters needing attention
Do not arbitrarily dismantle or repair. Choose the repair shops designated by the manufacturer to replace the accessories.
Use standard professional three-hole power socket (above 10A). Socket grounding must be good.
In order to avoid fire, please do not use combustible solvents nearby the refrigerator. Pesticide
In order to avoid destroy, fire and other accidents, please do not put anything combustible, explosive, volatile and strongly corrosive into the refrigerator. In order to avoid freezing, rupture and other losses, please do not put the bottles with fluids or sealing containers into the refrigerating box.
In order to avoid accidental harm caused by closing a child inside or refrigerator falling, do not allow the children to enter into or climb the refrigerator.
Do not put the heavy things on the refrigerator, otherwise it will easily fall and cause harm.
Do not put too much food into the refrigerator.
Do not open the door and drawers for a long time or frequently open the door and drawers, otherwise it would weaken the efficiency of the complete machine and increase operating load.
When the refrigerator is not at normal operation or is destroyed, please cut off the power and inform local service center.
Do not splash the water on the top or back of the refrigerator, otherwise it would reduce insulation effect.
Attention:
The product is a household refrigerator. According to the national standards, household refrigerator is only applicable to store food and cannot be used for other purpose such as storing blood, drugs, biological products, etc.
Refrigerator maintenance
Cleaning
Fingerprints are easily left on its exterior. Use a dry towel to wipe up.
Periodically clean the dust both at the back of and under the refrigerator.
Refrigerator interior should be cleaned frequently so as to avoid foreign odor. After the power is cut off, use soft towel and neutral detergent to clean and wipe with the clean water.
Do not use the following products to clean refrigerator interior:
- Alkaline or alkalescent detergents; (may cause the inner liner and plastic components to crack)
- Soap powder, benzine, amyl acetate, alcohol, etc.; (may destroy the plastic components)
- If cooking oil or seasonings blot on the refrigerator's external surface, please clean it immediately. (may cause the plastic components to crack)
Lamps and replacement
If the illuminating lamp occur failure, please contact professional personnel for home service.
Halt
Non-use within a long time. Please plug off the power to avoid electric shock or fire due to power line aging; clean up refrigerator interior; open the door for a time and close it after the interior become completely dry.
Power failure: Reduce opening times as many as possible; you'd better not to put fresh food in it.
Discard: When discard unused refrigerator, door seal must be dismantled off, so that the children would not be closed in it by accident.
Door Right-Left Change
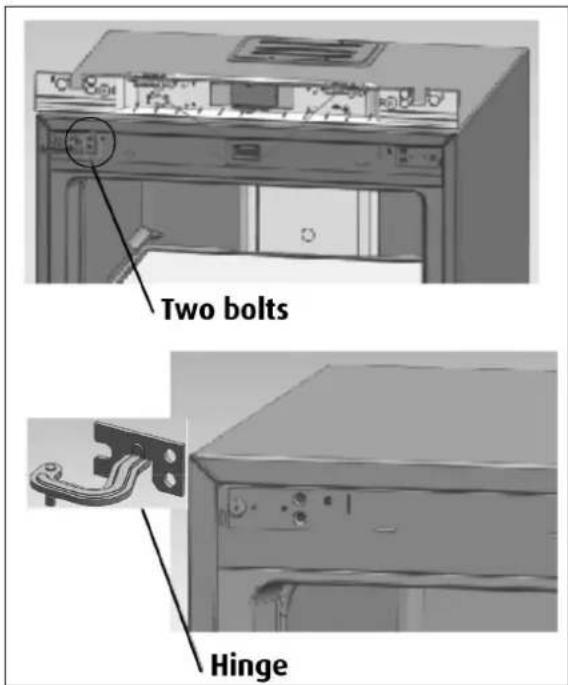
1 Remove the two nut caps and two hinge cover plates from the top beam(open the door toward right)

2 Remove decorating components from the top beam

3 Remove the two bolts fixed with hinges, pull the hinges out from one side and dismantle the door at the same time. As last, take the hinges out from the door.
4 Reassemble the lower hinge axis: dismantle the original hinge axis and assemble it at the graphic position.

natural_image
Mechanical assembly diagrams showing four stages of a bracket component, no text or symbols present
5 Reassemble the upper hinges axis: dismantle the hinge axis and assemble by rotating it from the other end of the screw hole.
6 Install the upper hinges fixed leg (on the left) at the right side.
7 Install the lower hinge at the right side of the refrigerator
8 Install the upper hinges into the relative axle holes on the right (upon the door) at first, then place the door on the lower hinges, press upper hinges into hinge fixed legs and fix the upper hinges at last.
9 Install top-beam decoration, nut caps and hinge cover plates

Non-failure phenomenon
Within the capillary tubes, refrigerant fluid flows very fast, sometimes carries few air bubbles, which might cause irregular noises at the entrance. If the refrigerator is under quick-refrigeration state, opening the refrigerating chamber will produce sound of the wind, that is the sound of high-speed rotation of the fan.
When air humidity is relatively high, areas around the door may be damp and you can clean it with a dry cloth.
Technical parameters and electricity schematic
Parameter alterations due to product improvement and technical upgrading, we would not issue any prior notice. Please refer to the nameplate at the back of the refrigerator.
Klima class SN/ST/T
Volt/frequens 220-240V/50hz
Energy class A+
Gross volume 261 ltr.
Refrigerant R600a
Weight 82 kg.

Troubleshooting
Before overhaul, please read following content carefully
If the situation still exist after checking all believe matters, please contact our company's After-sale Department.
The damaged power cord must be replaced by maintenance personnel appointed by our company for the sake of safety.
| Problem Possible cause | |
| The Cooler does not operate. Not plugged in. | The appliance is turned off.The circuit breaker tripped or a blown fuse. |
| The Cooler is not cold enough. Check the temperature control setting. | External environment may require a higher setting.The door is opened too often.The door is not closed completely.The door gasket does not seal properly. |
| Turns on and off frequently. The room temperature is hotter than normal.A large amount of contents has been added to the Cooler.The door is open too often.The door is not closed completely.The temperature control is not set correctly.The door gasket does not seal properly. |
| The light does not work. Not plugged in. | The circuit breaker tripped or a blown fuse.The light switch is "OFF". |
| Vibrations. Check to assure that the Cooler is level. | |
| The Cooler seems to make too much noise | The rattling noise may come from the flow of the refrigerant, which is normal. As each cycle ends, you may hear gurgling sounds caused by the flow of refrigerant in your Cooler.Contraction and expansion of the inside walls may cause popping and crackling noises.The Cooler is not level. |
| The door will not close properly. The Cooler is not level. | The door was reversed and not properly installed.The gasket is dirty.The shelves are out of position. |
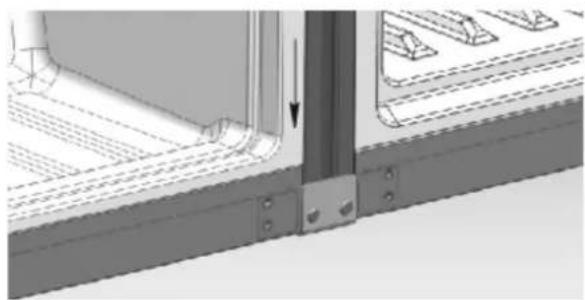
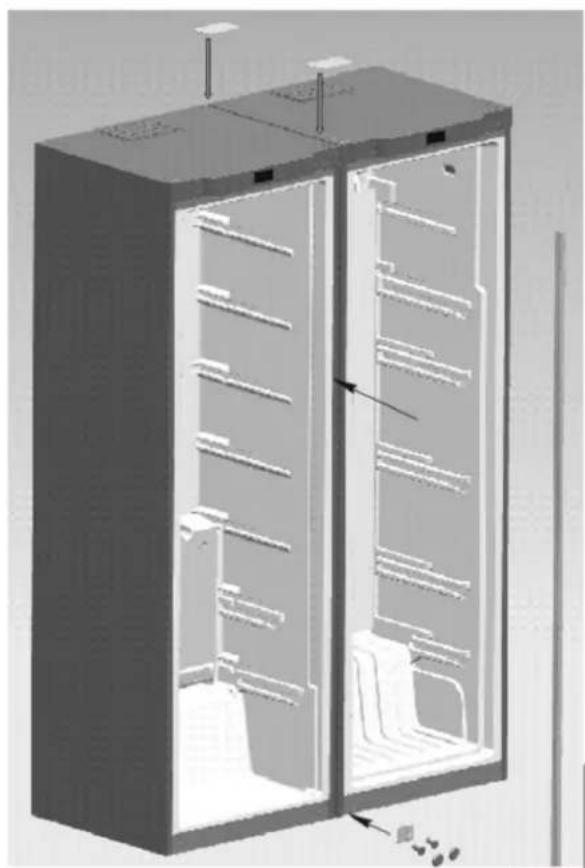
Side by side mounting.
It is possible to mount the cabinets side by side. The mounting kit is optional and can be ordered from your dealer.

natural_image
3D mechanical assembly diagram showing two stacked components with mounting holes and directional arrows (no text or symbols)

natural_image
Technical diagram showing a metal bracket with bolt holes and a separate mounting bracket, no text or symbols present.

natural_image
3D mechanical component with mounting holes and a downward arrow indicator (no text or symbols)
natural_image
Technical diagram of a mechanical assembly with a bracket and mounting holes (no text or symbols)

natural_image
3D rendering of a server rack cabinet with multiple shelves and a door, showing internal structure (no text or symbols visible)
natural_image
3D cutaway view of a refrigerator showing internal compartments and doorways (no text or labels)

natural_image
3D architectural or mechanical component detail showing structural beams and mounting brackets (no visible text or symbols)
natural_image
Mechanical assembly diagrams showing four stages of a bracket component being assembled (no text or symbols present)