
SKF340WD - Refrigerator Scandomestic - Free user manual and instructions
Find the device manual for free SKF340WD Scandomestic in PDF.


| Product Type | Freestanding fridge-freezer combination |
| Brand | Scandomestic |
| Model | SKF340WD |
| Climate Class | SN (10-32°C), N (16-32°C), ST (16-38°C), T (16-43°C) |
| Refrigerant | R600a (isobutane), flammable |
| Energy Efficiency Class (Light) | G |
| Temperature Control | Digital electronic panel |
| Fridge Temperature Range | 2°C to 8°C (adjustable), OFF mode available |
| Freezer Temperature Range | -18°C to -24°C (adjustable) |
| Functions | Smart, Fast Cooling, Fast Freezing, Vacation, Door Alarm, Power Cut Memory, Power-on Delay, Over-temperature Alarm |
| Interior Features | Shatterproof glass shelves, vegetable drawer with humidity regulator, bottle shelf, ice cube tray, freezer element |
| Door Hinges | Reversible (right or left), adjustable |
| Lighting | Vertical LED, replaceable only by professional |
| Defrosting | Fridge: automatic; Freezer: manual (defrost when frost ~10 mm) |
| Net Capacity | Refer to rating plate (not specified in manual) |
| Power Supply | AC voltage as per rating plate, must be grounded |
| Leveling | Adjustable feet at front |
| Noise Level | Normal operating sounds (humming, gurgling, clicks) |
| Accessories Included | Bottle shelf, ice cube tray, vegetable drawer, glass shelves |
| Compliance | CE, Low Voltage Directive, EMC |
| User Manual Languages | DA, EN, SV (and machine-translated others) |
Frequently Asked Questions - SKF340WD Scandomestic
User questions about SKF340WD Scandomestic
0 question about this device. Answer the ones you know or ask your own.
Ask a new question about this device
Download the instructions for your Refrigerator in PDF format for free! Find your manual SKF340WD - Scandomestic and take your electronic device back in hand. On this page are published all the documents necessary for the use of your device. SKF340WD by Scandomestic.
USER MANUAL SKF340WD Scandomestic
natural_image
Pure electrical circuit lines without any symbolsnatural_image
Recycling symbol with three arrows forming a triangle (no text or numbers)natural_image
Pure electrical circuit lines without any symbolsnatural_image
Warning symbol of a flame inside a triangle (no text or numbers)natural_image
Simple line drawing of a knob with bidirectional arrow indicating rotation (no text or symbols)1 Sikkerhedsglas hylder
2 Crisper Cover
3 Crisper
4 Fryseskuffer
5 Justerbare födder
6 Dørhylder
Funktioner
A Digital temperatur display
B Hurtig køling ikon
C Hurtig frys ikon
D Ferie ikon
E Smart ECO ikon
F Køleafdeling knap
G Fryseafdeling knap
H Funktionsknap
I OK-knap
natural_image
3D mechanical assembly diagram showing a bracket with mounting holes and internal components (no text or symbols)natural_image
3D technical illustration of a mechanical assembly with exploded view of components (no text or symbols)natural_image
Diagram of a mechanical assembly with components and mounting holes (no text or symbols)natural_image
Illustration of a refrigerator with open door and shelves (no text or symbols)natural_image
Technical illustration of a mechanical bracket with mounting holes and a separate bracket (no text or symbols)natural_image
3D rendering of a refrigerator with open door and side panel (no text or symbols)natural_image
Exterior view of a modern office building (no signage)natural_image
Pure electrical circuit lines without any symbolsnatural_image
Technical diagram of two parallel electronic device modules with connectors and ports (no text or symbols)natural_image
Two views of a mechanical component before and after modification, showing internal features and mounting holes (no text or symbols)Fjern lejet og de to stops fra det nederste sæt det i den position, som vist på følgen

natural_image
Mechanical assembly diagram showing a metal frame with a black arrow indicating a specific component (no text or symbols present)natural_image
Two identical mechanical components with flanged ends and cylindrical tops, shown side by side (no text or symbols)natural_image
Close-up of a mechanical device with a black arrow pointing to a component, no visible text or symbolsnatural_image
Pure technical line drawing of a mechanical assembly without any text, numbers, or symbolsnatural_image
Silhouette of a customer wearing a headset and using a laptop (no text or symbols)- Read this user manual before using the product for the first time. It will he maintain it properly and extend its life.
- Save the user manual for later use if this should become necessary and ensure are followed if the product changes hands.
This user manual contains safety instructions, operating instructions, installation instruction troubleshooting tips, etc.
Before calling for service:
- Review the troubleshooting tips section. This will help you solve some of the problems yourself.
- If you cannot solve the problems yourself, call for help from professional techn
When you call:
Must you state the full reference of the device (model, type, serial number). This rating plate attached to the appliance. It can be placed both inside the product must state where and which retailer the product was purchased from, as well as
Unauthorized calling of technical service:
Before service is called, the possible errors are checked, it is possible to rectify demand for rectification is unjustified, it is the customer's responsibility to pay the with calling for service.
Right of complaint for household use:
The complaint deadline covers only brand new products purchased in Denmark. The valid according to the legislation from the date of purchase, when a receipt, bill presented, from which the date of purchase appears. The right to complain only material or workmanship. Functional failure of the products due to installation cond covered by the right of complaint. The right of complaint does not restrict the to the legislation.
The right to complain does not include:
- Normal wear and tear, faults or damages caused directly or indirectly as a remishandling, abuse, careless handling, insufficient maintenance, faulty installation, in connection, voltage variations or electrical disturbances or by repairs carried out Scandomestic A/S authorized technicians.
- Faults or damage resulting from commercial or other use of products intended households.
- Compensation for any consequential damage, including damage to other objects, etc., unless otherwise determined by law.
Transport damage:
Transport damage that is detected at the time of the dealer's delivery to the client matter between the customer and the dealer. In cases where the customer himself responsible for the transport of the product, the supplier assumes no obligations in transport damage. Possibly. Transport damage must be reported immediately and no hours after the item has been delivered. Otherwise, the customer's claim may be
Important!
Please be aware that, as a result of constant development and updating of the manufacturer may make changes without prior notice.
This is an original manual
Safety instructions
Your safety and that of others important.
Please read this user manual carefully before using for your own safety and that of others. To avoid mistakes and accidents, it is important to ensure who uses the product is familiar with its operatic features. Keep the user guide and ensure that it the product if it is moved or sold so that all product throughout its life are properly informed a product's use and safety.
For safety reasons, the safety rules in this user observed, as the manufacturer is not responsible for caused by omission. All safety messages will be for safety word which may be “DANGER”, “WARNING” “CAUTION.”
These words mean:
DANGER
An imminently dangerous situation. Serious injury or may result if instructions are not followed immedia
WARNING
A potentially hazardous situation which, if not avoi result in serious injury or death.
CAUTIOUS
A potentially hazardous situation that could result or minor injuries if the situation is not eliminated
All safety messages tell what the potential hazard reduce the risk of injury and what can happen if instructions are not followed.
Safety of children and vulnerable people
- This product can be used by children aged 8 above. Persons with reduced physical, sensory or capabilities and lack of experience and knowledge the product if they have been given supervision instruction in using the product in a safe way understand the potential hazards.
- Children must be supervised to ensure that the with the product.
- Cleaning and maintenance must not be carried children under the age of 8 and only under s
- Keep all packaging far away from children. The suffocation.
- If you dispose of the product, pull the power socket. Cut the connection cable (as close to t possible) and remove the door to prevent children getting electric shocks or being trapped inside.
- If this product is to replace an older product latch (latch) on the door or lid, be sure to latch unusable before disposing of the old product prevents the product from becoming a potential for a child.
General safety
WARNING! Keep ventilation openings in the product in the built-in structure clear of obstructions.
WARNING! Do not use mechanical devices or other speed up the defrosting process.
WARNING! Always follow the manufacturer's instructi the defrosting process.
WARNING! Do not use pointed or sharp objects to frost and ice from the freezer.
WARNING
WARNING! Do not damage the refrigerant circuit.
WARNING! Do not use other electrical appliances (makers) inside the product unless approved by the manufacturer.
WARNING! Do not touch the bulb if it has been time, as it may be very hot.
WARNING! When placing the product, ensure that cord is not pinched or damaged.
WARNING! Portable multi-sockets can overheat during and cause a fire. Therefore, never place portable behind the product.
WARNING! Do not store explosive substances, e.g. cans with flammable propellant in this product.
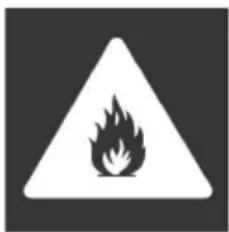
WARNING! The product contains the refrigerant isok (R600a). It is a natural gas that neither damages layer nor increases the greenhouse effect. It is fla can ignite if leaked.
- Ensure that none of the components of the circuit are damaged during transport and install product.
- Avoid open flames and sources of ignition. Tho ventilate the room where the product is located
- It is dangerous to modify this product in any damage to the cord may cause a short circuit, electric shock.
- This product is intended to be used in house applications such as:
- staff kitchens in shops, offices and other work environments.
- farms and by customers in hotels, motels and residential environments.
- bed and breakfast.
- catering.
- All electrical components (plug, power cord, com etc.) must only be replaced by an authorized s or qualified service personnel.
- The bulb supplied with products with light is that can only be used with the supplied produce be used for other household lighting.
- The power cord must not be extended.
- Make sure the power plug is not pinched or back of the product. A pinched or damaged pl overheat and cause a fire.
• Make sure you can get to the product's power
- Do not pull on the power cord.
- If the power plug is loose, do not insert the risk of electric shock or fire.
- You must not operate the produkt in a dark
- This product is heavy. Therefore, care must be moving and installing it.
- Do not remove or touch items from the freez hands are damp/wet as this may cause frostbite damage.
- Avoid exposing the product to direct sunlight.
Daily use
- Do not place hot food or hot objects in the
- Do not place food directly against the rear wa
- Frozen foods must not be refrozen once they thawed.
- Store prepackaged frozen food in accordance with instructions on its packaging.
- The product's storage recommendations must be observed. See relevant instructions on the packag
- Do not place carbonated beverages in the free carbonation creates pressure on the container, which cause it to explode and cause damage to the
- Popsicles can cause frostbite if eaten directly from freezer.
- Observe the following instructions to avoid food poor shelf life:
- Opening the door for long periods can cause a increase in the temperature in the product's cor
- Regularly clean all surfaces that may come into food.
- Clean water tanks (if applicable) if they have in for 48 hours. Flush the water system connected supply if no water has been suctioned for 5
- Store raw meat and fish in suitable containers refrigerator so that it does not come into cont drip onto other foods.
- Two-star freezer compartment (if available in the suitable for storing pre-frozen foods, storing or cream and making ice cubes.
- One-, two- and three-star compartments (if present in the
product) are not suitable for freezing fresh food
- If the product is left empty for long periods, product, defrost, clean and leave the door open bacteria and fungus from developing inside the
Care and cleaning
- Before maintenance, the product must be switch the power plug removed from the socket.
- Do not clean the product with metal objects.
- Do not use sharp objects to remove frost from Use a plastic scraper.
- Regularly check the drain in the refrigerator for water. If necessary, clean the drain.
- If the drain is blocked, water will accumulate of the product, which may run the risk of sp floor.
Installation
Important! Follow the instructions in the specific e connection section carefully.
- Unpack the product and check for damage. Do the product if it is damaged. Immediately report damage to the place of purchase. In that case, keep the packaging.
- It is recommended to wait at least 4 hours before connecting the product so that the oil can flow compressor.
- There should be sufficient air circulation around to avoid overheating. To achieve adequate ventilation
follow the instructions relevant to the installation product.
- The product must not be placed close to heat as radiators, stoves or stoves.
- Make sure the power plug is accessible after product.
Service
- All electrical work or service should be carried qualified electrician or competent person.
- This product must be serviced by an authorized center and only original spare parts must be used
Energy saving
- Do not place hot food in the product.
- Do not pack food too close to each other as proper air circulation.
- Ensure that food does not touch the back of compartment.
- If the power goes out, do not open the doo
- Do not open the door(s) too often, as this may be temperature inside the product.
- Do not keep the door(s) open for too long;
- Do not set the thermostat to exceed the recc temperatures.
This manual is machine translated
Correct disposal of this product

natural_image
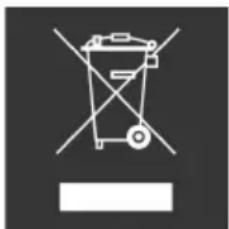
Pure electrical circuit lines without any symbolsThe symbol on the product or on its packaging indicates that it is not be treated as household waste. Instead, it must be handed appropriate collection point for the recycling of electrical and electronic equipment. By ensuring that this product is disposed of correctly, to prevent potential negative consequences for the environment and health. For more detailed information on recycling this product, your local authority, your household waste center or the store
purchased the product.
Warnings for disposal
Refrigerant and insulating materials are flammable. When the product is scrapped, be kept away from any source of fire. When the refrigerator is to be scrapped and the gasket of the door and shelves are removed. Place the doors and she away from the product to prevent a child from being trapped.
Environmental protection
This product does not contain ozone-depleting gases in its refrigerant circuit or in. The product must not be disposed of together as household waste. The insulating flammable gases: the product must be disposed of according to the product's reg damaging the cooling unit, especially the heat exchanger.
Packaging materials

natural_image
Recycling symbol with three arrows forming a triangle (no text or numbers)Materials with this symbol are made from environmentally friendly that can be recycled. By disposing of the packaging correctly in applicable regulations, you help to protect the environment.
WARNING!
The packaging can be dangerous for children!
Plastic parts are marked with the international standard abbreviations:
PE - polyethylene, e.g. the wrapping film
PS - polystyrene, e.g. the upholstery material
POM - polyoxymethylene, e.g. plastic clip
PP - polypropylene, e.g. the salt funnel
ABS - acrylonitrile-butadiene-styrene, e.g. control panel.
Electrical and electronic equipment (EEE) contains materials, components and substance dangerous and harmful to human health and the environment when waste electric equipment (WEEE) is not disposed of properly.
natural_image
Pure electrical circuit lines without any symbolsProducts marked with this symbol are electrical and electronic eq crossed-out dustbin symbolizes that waste from electrical and elect equipment must not be disposed of together with unsorted house, but must be collected separately.
To this end, all municipalities have established collection schemes electrical and electronic equipment can be handed in free of ch recycling stations or other collection points or collected directly from households. F must be obtained from the municipality's technical administration.
WARNING!
natural_image
Warning symbol of a flame inside a triangle (no text or numbers)During use, service and disposal of the product, pay attention to the left side, which are usually located on the back of the pre-compressor) and are yellow or orange in color. It is the warning hazard. There are flammable materials in the refrigerant piping and please keep far away from fire sources during use, service and
Transport instructions
The product may only be transported upright. The delivered packaging must be in transport.
If the product was laid down during transport, it must not run for the following system to settle after the product has been returned to the correct position.
Failure to follow the above instructions may result in damaging the product. The be held responsible if these instructions are ignored. The product must be protect moisture and other atmospheric influences.
IMPORTANT: Care must be taken when cleaning / lifting the product to avoid touching the capacitor's metal wires at the back of the product as you may injure your fingers and have a product.
IMPORTANT: This appliance is not intended to be stacked with other appliances. Do not attempt to sit or stand on top of your device as it is not intended for such use. You may product.
IMPORTANT: Make sure that the power cable is not stuck under the product du transporting / moving the product to avoid the power cable being cut, broken o When placing your appliance, be careful not to damage your floor, pipes, wall co move the product by pulling the lid or handle. Do not allow children to play tamper with the settings. Our company declines any responsibility if the instructions
Before use
Before using the product, you must do the following:
- Remove all packaging from the product and dispose of it in accordance with
- If the side walls and doors are covered with protective film, this must also
- Thoroughly examine the product for any transport damage after unpacking. In the complaints, you must contact the retailer where you purchased the product.
- Clean the inside of the product and accompanying accessories (see section on
Location
Setup
The product must be placed in a dry and well-ventilated room, far away from radiators, ovens and direct sunlight. If this is not possible, we recommend that y board and keep a minimum distance to the heat source of:
- Stoves and ovens, 3 cm.
• Wood-burning stoves, 30 cm.
The product must stand stable and level. The floor under the product must not this is the case, the floor must be reinforced.
Ventilation
During operation, the cabinet emits heat to the surroundings. The hot air must be otherwise the compressor will have to work more, which will result in increased You must never cover the ventilation openings.
See under section "Installation" for more information on space requirements for the
Room temperature and climate class
The product is intended to stand in a certain climate class. Set it up in a pla temperature corresponds to the product's climate class, which is indicated on the
SN (Extended Temperate):
This refrigerator/freezer is intended for use at an ambient temperature between 10
N (Tempered):
This refrigerator/freezer is intended for use at an ambient temperature between 16
ST (Subtropical):
This refrigerator/freezer is intended for use at an ambient temperature between 16
T (Tropical):
This refrigerator/freezer is intended for use at an ambient temperature between 16
Note! The product is fully functional within the temperature range from the state operation in a temperature range other than the specified climate class, the product maintain the desired temperatures or be fully functional.
Leveling the product

natural_image
Simple line drawing of a knob with bidirectional arrow indicating rotation (no text or symbols)The product must stand stable and level. Leveling is important for the product to close and seal the doors properly. If you experience problems with the product not working properly, it may be because it is simply standing unevenly.
Accurate leveling is ensured by adjusting the leveling feet at the bottom of the product. Something can also advantageously be put in underneath to compensate for unevenness.
Connect the product
After installation, you should wait at least 4 hours before switching on the product and putting it into use. This is because during transport it may happen that some of the oil from the compressor flows into the cooling system.
The product should be thoroughly cleaned inside before it is used for the first time (read more under section on Cleaning).
Before connecting, check that the voltage and frequency indicated on the rating plate correspond to your home power supply. The product must be grounded. The power supply cable is equipped with a plug for this purpose. If the household outlet is not earthed, the product must be connected to a separate earth connection in accordance with current regulations and a qualified electrician must be contacted.
The manufacturer disclaims any responsibility if the above safety measures are not observed.
This product complies with the E.E.C. Directives.
Save energy
Here are some good tips on how you can save energy:
• Make sure the food is cold before placing it in the refrigerator or freezer compartment.
- Frozen goods can be advantageously placed in the refrigeration department for thawing. Thereby, the cold from the frozen food is utilized.
- Make sure to place the product in a dry and ventilated room. It must not be left in direct sunlight or near heat sources.
- Frost increases energy consumption and the freezer compartment should therefore be defrosted regularly. A rule of thumb is that when there is 10mm . frost, the freezer should be defrosted.
- Do not open the door of the freezer or refrigerator compartment more than absolutely necessary.
Changing the lamp
The LED lamp is used by the refrigerator for lighting, which features low energy consumption and long service life. In case of any abnormality, please contact the after-sales personnel for visiting service. The lamps can only be replaced by the manufacturer.
| Lighting (LED) | |
| Lamp type: 2 Vertical LEDEnergy Efficiency Class (Light): GThe light source in this product can only be replaced by a professional. | |
Cleaning the product
Below is a general description of how to clean your product.
Before using the product for the first time, the interior and all interior accessories washed.
For hygienic reasons, the interior of the product, including internal accessories, sho regularly.
Course of action
- Switch off the product/pull out the power plug.
• Take all frozen-/ refrigerated food out of the product and put them in a cc - For the freezer compartment, wait until the frost layer has thawed.
- Use a soft cloth and lukewarm water with a little ph-neutral dish soap to c
• Dry the product thoroughly. - All door seals and the like must be washed with clean water and then drie
• After cleaning: connect the product and switch it on. - Put the frozen- and refrigerated food back into the product.
Important!
- Do not use abrasive cleaners such as sand, chloride or acidic cleaners and sc
- Do not use steel or scouring sponges as these can scratch the surfaces.
- Shelves and drawers must not be washed in the dishwasher as they may be
Warning! the product must not be connected to the mains during cleaning.
Danger of electric shock! Before cleaning, the product must be switched off or the plug removed from the socket. Never clean the product with a steam cleaner.
Danger of electric shock! Moisture can accumulate in electrical components. Hot vapors can lead to damage to plastic parts. The product must be dry before it is used again.
Drain hole cleaning
To avoid defrosting water overflowing into the product, you must regularly clean refrigerator. Use a cloth and mild detergent to clean the hole.
Smell
If you experience an unpleasant odor from your product, you can do the followi
- Switch off the product/pull out the power plug.
• Empty the product of food. - Wipe all packaging with a cloth.
- Food that has a strong odor is wrapped in airtight packaging to prevent odo
- Switch the product back on and place the food back in the cabinet.
- Keep an eye on whether a new smell develops in the cupboard afterwards.
Defrosting of the product
Below is a general description of how to defrost your product.
Refrigerated products
Over time, frost can form on the back wall of the refrigerator. This is complete by the water in the air in the refrigerator.
The refrigerator compartment is designed to automatically defrost. The ice on the and run via the defrost water channels and the drain hole into the evaporation from the compressor will evaporate the water.
Note! Always make sure to keep the defrost water gutters and drain hole clear passage of the thawed water.
Freozen products
Frost will form in the freezer over time. Unless the freezer section has the Nol not defrost automatically. Rhymes are perfectly normal. It is important that the free energy consumption increases the more frost there is. In addition, frost also has the performance of the freezer.
Beware! Sharp objects and knives must not be used to remove frost or ice. This can damage the inside of the products and refrigerant piping.
Course of action:
- Switch off the product/pull out the power plug.
• Take the food out and put it in a cool place (possibly in a cool bag with - Remove the shelves, drawers and similar (does not apply to all models).
- Keep the door or lid open and place a bowl or similar so that it can col of the product.
- When there is no more ice in the product, defrosting is complete and the i dried.
- Connect the product and switch on the product.
- Let the product run until it reaches the recommended temperature.
- Put the food back.
In case of prolonged non-use
If the product is not to be used for an extended period of time, you must:
- Switch off the product/pull out the power plug.
• Take the food out. - Clean the product (See section on Cleaning).
- Leave the door open to avoid bad odors developing.
Instructions for storage in the refriger
The optimum temperature in the refrigeration department is 4^ C. If the temperature refrigeration department is too hot, the food runs the risk of spoiling too quickly too cold, the food risks freezing or drying out. The refrigeration department is in storage
Due to air circulation in the refrigeration department, there is a slight difference each area of the refrigeration department. Therefore, different types of food should be placed according to best shelf life and to minimize food waste.
We recommend the following:
Door shelves
The refrigerator door is the warmest place. It is therefore best to store food tl cold.
Food such as dressing, ketchup, soda and sauces can be placed here.
Top shelf in the fridge
Beverages and preserves such as jam, sun-dried tomatoes and mustard are placed
The top shelf is the warmest shelf. Therefore, it is best to place preserves such other vinegar products such as beetroot, Asian and cucumber.
Middle shelf in the fridge
The middle shelf is ideal for leftovers and cold cuts. In addition, it is also the place dairy products such as milk, cheese and butter. Milk must be stored at a milk can also be advantageously placed on the bottom shelf.
Bottom shelf in the fridge
The bottom shelf is the coldest place in the refrigerator. It is therefore the best food. Advantageously place meat, fish and poultry, which must be stored at a m
The vegetable drawer
The vegetable drawer is the perfect place to store fruit and vegetables because the humidity is higher here than in the rest of the fridge.
We recommend keeping fruit and vegetables separate. This is because there are s contain substances that can promote the ripening process of the surrounding veget
Outside the fridge
There is some food that does not need to be refrigerated at all or that is n cold. These are, for example, tomatoes, avocados, bananas and garlic/onions.
Tips and advice for storing fresh produce in the cold storage
For good food hygiene and best shelf life, it is recommended to follow these t
- Do not place hot food or hot liquids in the refrigerator. Allow the food to the cupboard.
- Food should be packed in storage boxes or covered with plastic film. This is color and freshness of the food.
- Fruit and vegetables must be thoroughly cleaned and placed in the vegetable humidity helps to extend shelf life.
- Avoid food coming into contact with the back wall of the cabinet, as this c and food risks freezing to the back wall.
Instructions for food storage in the
The optimum temperature in the freezer section is -18^ and is intended for long colder it is, the better the quality and shelf life of the frozen food. If the food freezes more slowly and the food quality decreases.
Information on freezing capacity can be found on the product nameplate.
When starting up for the first time or starting up after a period of non-use, started 6 hours before food is placed in the freezer compartment.
The freezer compartment is intended for the following:
- For storing deep-frozen foods.
• For freezing fresh food. - For making ice cubes.
Important! Always make sure the freezer door is completely closed. If the door is not closed properly, the food dries out and the freezer freezes. Moreover, it also increases power cc
How to use the ice cube box:
Place the ice cube box in the uppermost position in the freezer so that it fre
Freezer room and stars
All freezers, freezers and chest freezers have a star rating between 1 and 4. The indicates how efficient the freezer is at freezing.
- 1 star: Freezers with 1 star can maintain a temperature of -6^ and are suitable for short storage (3-4 days).
- 2 stars: Freezers with 2 stars can maintain a temperature of -12^ and are storage (1-2 weeks).
- 3 stars: Freezers with 3 stars can maintain a temperature of -18^ and are suitable for longer storage (>1 month).
- 4 stars: Freezers with 4 stars can freeze food and maintain a temperature of -18^ . Suitable for longer storage (>1 month).
Wrap food correctly
Before food is placed in the freezer compartment, it must be wrapped so that or dry out. Only use packaging that is approved for the freezer.
The following materials are suitable for wrapping: Film foil, aluminum foil, freezer freezer bags.
The following materials are not suitable for wrapping: Wrapping paper, cellophane, used shopping bags.
Follow these steps for proper wrapping:
- Wrap the food in suitable packaging
- Press the air out of the packaging
- Seal the packaging
- Mark the packaging with contents and date to keep an eye on the storage
Freezing fresh food
The following foods are suitable for freezing: Fish and shellfish, baked goods, pou herbs, fruit and vegetables, cheese, butter, ready meals and leftovers.
Food not suitable for freezing: Salad, eggs, yoghurt, condensed milk, creme fraiche
For best shelf life, we recommend the following tips and advic fresh food:
- The optimum temperature in the freezer is -18^ .
- Only use fresh and unblemished food for freezing.
- The goods must be packed airtight so that they do not lose their flavor or
- Freezing larger quantities of food must be placed in the lower compartment. particularly quickly and the quality of the food is preserved.
- Fish and meat can be advantageously cut into smaller pieces for faster freezir
- Only use packaging that is suitable for going into the freezer.
- Do not let fresh produce come into contact with the frozen to avoid a rise latter.
- Do not overfill the freezer. If the freezer is full, the air will not be able
Storage of frozen foods
To ensure a long shelf life of your frozen foods, you should:
- that the frozen food you buy has been adequately stored by the retailer.
- Ensure that frozen food is transferred directly from the store to the freezer possible time.
- Do not open the freezer too often or leave the door open longer than nec opening lowers the temperature in the freezer and the food deteriorates quick
- When defrosted, food cannot be refrozen.
Shelf life of frozen products
The shelf life of frozen food depends on the type of food.
At a temperature of -18^ , it generally applies to:
- Fruit and vegetables, 10-12 months
- Cheese, 3-4 months
• Baked goods, 2-8 months
• Minced meat, 4 months - Poultry, 3-9 months
- Pork, 3-6 months
• Whole pieces of beef, 1 year - Lamb, 1.5 years
- Lean game, 1.5 years
• Ready meals, 1-3 months
• Fatty fish, 1-2 months - Lean fish, 3-6 months
Thawing deep-frozen goods
Frozen foods must be thawed gently to best preserve quality and reduce the gr. Depending on the type and purpose of use, the following methods can be used
The refrigerator
Bacteria develop more slowly in the refrigerator than at room temperature. Theref hygienic thawing method.
The kitchen table
If the food is wrapped in a freezer bag, you can advantageously put it in a the risk of the development of bacteria, food must not be left on the kitchen
The microwave oven
If you don't have much time, you can use a microwave that has a defrosting used, the food must be prepared immediately to avoid the development of danger
Important! Frozen products that have been completely or partially thawed must not be refrozen. They should be cooked in advance, after which it can be frozen again.
Functions
The product can be equipped with the following functions. However, there is a whether it is a refrigerator, freezer or combi cabinet.
Super freeze function
The Superfreeze function is useful if you need to freeze a large amount of food product has been switched off for a long time.
The temperature becomes significantly colder and the food is frozen so quickly the nutritional values, appearance and taste are preserved.
Note! When superfreeze is activated, the compressor works constantly and the operating noise can therefore be somewhat louder than normal.
Vacation mode feature
If you are going on holiday or do not intend to use the product for a long to an energy-saving holiday mode.
Important! When holiday mode is switched on, no food may be stored in the compartment.
Door alarm
The product is equipped with a door alarm that goes off if the door to the long time.
Resume feature
In the event of a power failure, the product will resume the previously set sta failure when the power is restored.
Minus 15°C function
The product is approved for storage in a dry environment with an ambient tem is because the product is equipped with a compressor that generates heat and the oil does not harden/clump at cold temperatures.
Although the product can stand down to -15^ , energy consumption will be diffe given. When the product is set at a different temperature than that prescribed the energy consumption is no longer in accordance with what is given on the
The product's climate class has no influence on compressors technically developing of the product's extra features that it can stand down to an ambient temperatu
Furthermore, there is no climate class that covers down to -15^ C.
Normal accessories
The product can be equipped with the following accessories
Bottle shelf
The bottle shelf is intended for horizontal storage of bottles to save space. It bottles, cans and juice.
The shelves in the product can be adjusted in height. Hold one end of the sit out.
Shatterproof glass shelves
This product comes with adjustable, shatterproof glass shelves. To adjust, pull out
lift the front part and pull out the shelf.
Vegetable drawer
The vegetable drawer is ideal for storing fruit and vegetables. Pull out the draw vegetables in the drawer.
Vegetable drawer with humidity regulator
The vegetable drawer is ideal for storing fruit and vegetables. To create the optimal vegetable drawer is equipped with a humidity regulator.
The humidity is adjusted by pushing the regulator either to the right or to the
- For large quantities of fruit and vegetables, set the humidity to low.
- For small amounts of fruit and vegetables, set the humidity to high.
Ice cube tray
1 Fill the tray with drinking water and place it in the freezer.
2 To loosen the ice cubes, the ice cube tray can be briefly submerged under Alternatively, the tray can also be turned slightly.
Freezer element
The product can be equipped with a freezing element that can be removed and cooling bag.
In the event of a power failure or fault, the freezing element prevents heating short period.
Installation
Ventilation condition
The position you select for the refrigerator installation should be well-ventilated and Do not locate the refrigerator near a heat source such as cooker, and avoid it guaranteeing the refrigeration effect while saving energy consumption. Do not locate in the damp place, so as to prevent the refrigerator from rusting and leaking the total space of the room in which the refrigerator is installed being divided charge amount of the refrigerator shall not be less than 8 g/ M3.
Note: The amount of refrigerant charged for the refrigerator can be found on th
Heat dissipation space
When working, the refrigerator gives off heat to surroundings. Therefore, at least above the product.
Level ground
Place the refrigerator on the solid and flat ground (floor) to keep it stable, or vibration and noise. When the refrigerator is placed on such flooring materials as polyvinyl chloride, the solid backing plates should be applied underneath the refriger prevent color change due to heat dissipation.
Heat dissipation area
When in operation, the product emits heat to the surroundings. Therefore, it is sufficient ventilation, so that the product can get rid of excess heat.
If the product is built into a cabinet, the product needs ventilation. The more the product in the cabinet, the better it can get rid of the heat.
We recommend that there should be at least 30 mm of free space above and
Description of the product

1 Fridge shelves
2 Crisper Cover
3 Crisper
4 Freezer drawers
5 Adjustable Feet
6 Refrigerator door racks
Due to technological innovations, the product descriptions in this manual not be completely consistent with y-product. Detailed information is in accordance with the final product.
Control panel functions
Electronic control panel

Functions
A Digital temperature display
B Fast cooling icon
C Fast freezing icon
D Vacation icon
E Smart ECO icon
F Fridge button
G Freezer button
H Function button
I OK-button
The display panel is designed on th
door
When the refrigerator system is connected to power supply for the first time, a panel gets illuminated for 2s, and the system runs in the Smart mode by defa. When all the doors are close, the display gets extinguished automatically if no 1 minutes. When the display is off, it will light up if any door is opened or a The following key operations are valid only when the keys are unlocked and get display.
Fridge temperature setting
Press the Temp. Zone key to select the fridge zone, with the corresponding icon press the Temp. key to adjust the temperature, finally press the OK/Lock or wa above temperature setting.
The fridge temperature setting cycles as following:
$$ 5 \rightarrow 6 \rightarrow 7 \rightarrow 8 \rightarrow O F F \rightarrow 2 \rightarrow 3 \rightarrow 4 \rightarrow 5; $$
OFF refers to Fridge Off, and when OFF takes effect, the fridge will stop cool in. Take foods out of the fridge compartment before setting this function.
Freezer temperature setting
Press the Temp. Zone key to select the freezer zone, with the corresponding ic press the Temp. key to adjust the temperature, finally press the OK/Lock or the above temperature setting.
The freezer temperature setting cycles as following:
$$ - 1 8 \rightarrow - 1 7 \rightarrow - 1 6 \rightarrow - 2 4 \rightarrow - 2 3 \rightarrow - 2 2 \rightarrow - 2 1 \rightarrow - 2 0 \rightarrow - 1 9 \rightarrow - 1 8 $$
Smart
1 When the Smart function is enabled, the temperature of the fresh food comp controlled at ^ C4 and that of the freezer compartment, ab -that8 foods can be the best conditionwhile the refrigerator is running more efficiently and with be
- Under the Smart mode, the fresh food compartment temperature and the free temperature are subject to no change.
2 Start the Smart function
- Press the Function key to select Smart until the corresponding icon gets flicked the OK key within 5s for confirmation. If the OK is not pressed within 5s, invalidated.
3 Exit the Smart function
- Under the Smart mode, press the Function key to select Smart until the core flickering, and then press the OK key for confirmation. The Smart function with
- When the Vacation or Fast Freezing or Fast Cooling function is enabled, the disabled automatically.
Fast Cooling
1 When this function is enabled, the fridge temperature is automatically, so with that temperature reduced in the rapid manner, so that foods can be kept in free nutrition not lost.
• Under the Fast Cooling mode, the fridge temperature is subject to no adjustn
2 Enabling the Fast Cooling function
- Press the Function key to select Fast Cooling until the corresponding icon get:
press the OK/Lock key within 5s for confirmation. If the OK is not pressed be invalidated.
3 End the Fast Cooling function
- Under the Fast Cooling mode, press the Function key to select Fast Cooling corresponding gets flickering, and then press the OK key for confirmation. The get exited.
- When the Vacation or Smart function is enabled, the Fast Cooling function will automatically.
Fast Freezing
1 When the Fast Freezing function is enabled, the freezer temperature will be 32^ C automatically, and after 26 hours of running, the Fast Freezing function go down the freezer temperature in a rapid manner is beneficial to the prevent against lost and the preservation of freshness.
• Under the Fast-Freezing mode, the freezer temperature is subjected to no adju
2 Start the Fast-Freezing function
- Press the Function key to select Fast Freezing until the corresponding icon ge press the OK key within 5s for confirmation. If the OK key is not pressed be invalidated.
3 End the Fast-Freezing function
• After a cumulative running period of 26 hours, the Fast Freeze function will
- Under the Fast Freezing mode, press the Function key to select Fast Freezing corresponding icon gets flickering, and then press the OKkey for confirmation, function will get exited.
- When the Smart function is enabled, the Fast-Freezing function will be disabled
Vacation
1 When the Vacation function is enabled, the freezer temperature will beC. cWhr you are out for a quite long time, you can set the Vacation function to running with low energy consumption, while ensuring the fresh food compartment undesirable smell and the freezer compartment operates normally.
- Be sure to take out all foods from the fresh food compartment before setting
• Under the Vacation mode, the fridge temperature is subject to no change.
2 Start the Vacation function
- Press the Function key to select Vacation until the corresponding icon gets flip press the OK key within 5s for confirmation. If the OK is not pressed with invalidated.
3 End the Vacation function
- Under the Vacation mode, press the Function key to select Vacation until the flickering, and then press the OK key for confirmation. The Vacation function
- When the Smart or Fast Cooling function is enabled, the Vacation function will automatically.
Power cut memory
In case of power failure, the refrigerator will maintain the operating state before power supply is restored.
Power-on delay
In order to protect the refrigerator compressor from being damaged in the case failure (i.e., less than 5 minutes), the compressor will not be started immediately on.
Over-temperature alarm (only after power outage)
When the refrigerator system is powered on, if the freezer sensor temperature ^ C is digits of the freezer zone get flickering on the display. The freezer temperature any key is pressed, and the normal display will be restored when any key is
Door open alarm
If the fridge door is open for more than 3 minutes, buzzer alarms will be co can be stopped when any key is pressed, but will be restored after 3 minutes. The alarms will not be lifted until the door is closed.
Fault alarm
In case E0,E1,E2,EH, or EC is displayed on the operation panel, it indicates fault. Please contact the aftersales person for visiting service in such case.
Adjustment of the fridge air regulating lever
The cool air entering the fresh food storage compartment will gradually increase lever is adjusted from the MIN. to MAX position.
Reversing the door swing
If necessary, the door can be changed from right to left hinged.
Warning! Before you work on the appliance, always pull the mains plug out of in order to avoid damages to persons and property execute the change of the persons.
We recommend leaving the change of the door stop to experts.
Before you start with the modifications, here is some general info:
Always pay attention to the number of shims on the bearing pins and screws.
Position the doors always so that they close tightly

natural_image
3D mechanical assembly diagram showing a bracket with mounting holes and a clamping mechanism (no text or symbols)Unscrew the cover of the door hinges and

natural_image
3D technical illustration of a mechanical assembly with exploded view and mounting features (no text or symbols)Unplug the cable. Unscrew the 4 screws th upper hinge and remove it. Take off the l ground cable of the hinge. Insert the cable in the opening on the top of the applianc door jack and the cover of the small end
Put the door jack and the cable connect opening on the door and then attach the

natural_image
Illustration of a computer monitor with ports and buttons, no visible text or symbolsLoosen the screws as shown in the figure to remove the gap cover on the top side appliance. Remove the small end cap cover and take out the door socket and the cat (if such is present).
Put the door socket in the round opening

natural_image
Close-up of a metallic bracket or panel with no visible text or symbolsand attach the small end cap cover
natural_image
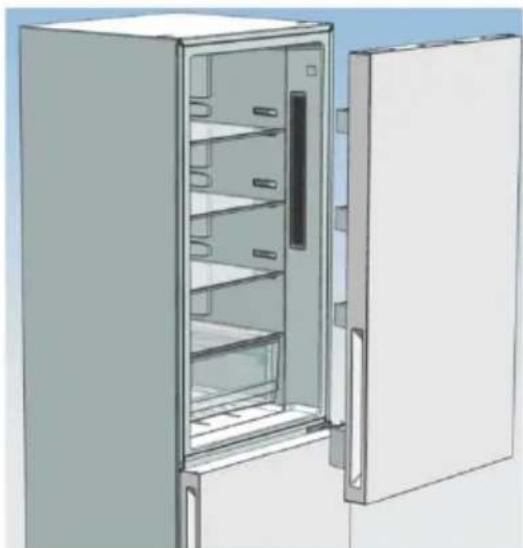
Illustration of a refrigerator with open door and shelves (no text or symbols)Raise the refrigerator door about 50 mm, i remove it from the appliance.

natural_image
Technical illustration of a mechanical bracket with mounting holes and a handle (no text or symbols)Loosen the 3 screws that hold the middle then remove it.

natural_image
Illustration of a refrigerator with open door and side panel (no text or symbols)Raise the freezer door about 50 mm, so remove it from the fridge.

natural_image
Exterior view of a modern office building (no signage)Remove the adjustable front stands below the hinge. Then, loosen the 4 screws that ho hinge and remove it from the fridge.
The removal of the doors is now finished.
natural_image
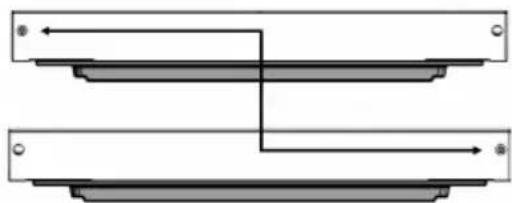
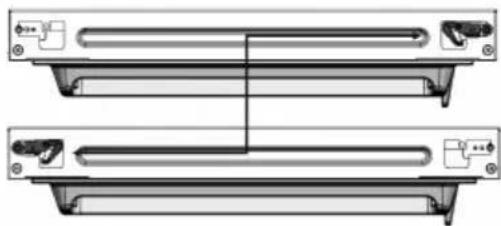
Pure electrical circuit lines without any symbolsInstall the removed parts on the opposite s appliance. Pull the door socket, as shown in following figure, and install it in the respect on the other side.
natural_image
Technical diagram of two parallel electronic components with mounting holes and connectors (no text or symbols)Remove the screws from the stopper, as sh following figure, and install it on the oppos the door

natural_image
Two views of a mechanical component before and after modification, showing bolt holes and mounting holes (no text or symbols)Remove the shaft and the two stoppers from hinge and ins tall it in the position, as follows following figure.

natural_image
Mechanical assembly diagram showing a metal frame with a highlighted component and mounting brackets (no text or symbols)Install the refrigerator and freezer doors on opposite side.
Remove the adjustable stand in the front, a below. Then, install the lower hinge on the fridge and tighten the screws.

natural_image
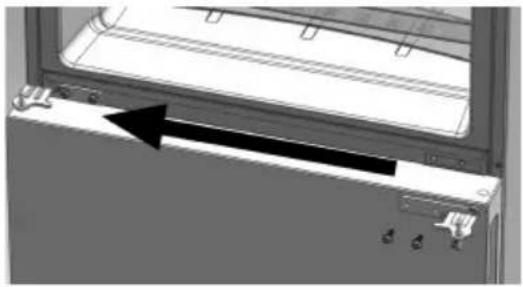
Two identical mechanical components with flanged ends and cylindrical tops, shown side by side (no text or symbols)Install the shorter adjustable stand in the f side where the lower hinge is. By turning can adjust the height on this s de of the it is levelled out.
natural_image
Close-up of a mechanical device with a black arrow pointing to a component, no visible text or symbolsAttach the freezer door 180° and then install opposite side of the appliance. Attach the 1 with the 3 corresponding screws.
Attach the refrigerator door and install the on the opposite side of the appliance. Atta hinge with the 4 corresponding screws. A s loop of the ground cable with one of the Afterwards, connect the cable link. Attach th hinge cover with a screw
Install the gap cover on the opposite side appliance and tighten the screw

natural_image
Pure mechanical assembly diagram showing a bracket with mounting holes and a separate plate (no text or symbols)Finally, check for the right alignment of the that they close properly on all sides. If ne the stands in the front for a fully horizon of the appliance.
If you have tilted the appliance by more 1 please wait 4 hours before you connect the to the mains supply
Normal running sounds
All products have different "operating sounds," which can sometimes seem annoying completely normal functional sounds.
These are normal sounds:
Light humming
This sound originates from the engine and can occasionally become louder when started.
Gargling/rippling sound or slight hum
Originates from the coolant circulating through the pipes.
Clicks
Small clicks can always be heard when electronic cards start or stop the compre
Light background noise
If the product has a fan (depending on the model), the air circulating inside the slight background noise.
Avoid noise
If you find that the sounds are louder than usual, this can be due to several most of them yourself without a visit from a service technician.
The product is not stable
If the product is tilted, it can affect the circulation of refrigerant. Adjust on the something underneath.
The door does not close tightly
If the door of the product does not close tightly, the compressor has to work temperature down. Make sure to close the door properly or get a service techn sealing strip.
The product is too close to a wall
The compressor emits small vibrations. If the product is too close to the wall, increase. Fix it by moving the product further away from the wall.
Trouble shooting
If you have problems with your product, you may be able to remedy it yourself
Warning! Before troubleshooting, disconnect the power supply. Only a qualified service technician may carry out troubleshooting that is not covered in this manual.
The product does not work
The power plug is not plugged in or is loose. The fuse has blown or is defe Unplug and plug it back in.
Check the fuse and replace if necessary. if defective. Mains faults must be recti. Please refer to the section on temperature setting.
Strange smell
Is there rotten food in the cupboard? Do you need to clean the product? Is stored?.
Throw away rotten food. Clean the product. Wrap food with strong flavor.
The product does not cool enough
Do you place hot food in the product? Do you often open the door? Is the near a heat source? Is there good ventilation?
Is the temperature setting too high? Allow the food to cool before placing it i and closing the door. Place the product away from heat sources.
Ensure good ventilation around the cabinet. Set the temperature according to the temperature.
The door does not close properly
The shelves do not fit properly. Items are in the way/too many items in the leveled. Place the shelves properly. Reposition the items. Adjust on the leveling f
Water on the floor
The drain hole is blocked. Clean drain hole.
Small drops of water or frost form on the back wall of the product
This is completely normal, because it is a particularly cold and humid place in water droplets and frost condense during the product's normal operation.
Certain foods do not freeze completely
It is normal for foods that contain a lot of sugar, fat or alcohol not to free partially soft (ice cream, fruit juice, etc.)
The frozen meat has white stripes
Check whether the temperature is set correctly and not at a temperature that is the meat has not been stored in the freezer for too long.
It is difficult to open the door
It is normal for the door to be a little difficult to open, especially if it has negative pressure is created to ensure that the door is completely closed. Wait opening it again.
Any repair of the product must be carried out:
Either by your dealer, or by a qualified professional who is recognized for this
Note: If the above descriptions cannot be used for troubleshooting, do not disassemble and repair it yourself. Repairs carried out by inexperienced persons may cause damage or serious contact the local store where your purchase was made. This product must be
authorized engineer and only original spare parts should be used.
When the appliance is not in use for long periods, disconnect the power supply clean the appliance and leave the door open to prevent unpleasant smells.
Information when contacting service

natural_image
Silhouette of a customer wearing a headset and using a laptop (no text or symbols)You are welcome to contact our after-sale service department if questions about our products that you cannot resolve yourself or needs repair.
Often problems can be remedied by using the section on "Troub Solutions." Contact our service department if this is not the case sure to find the best solution and try to avoid unnecessary ser
Due to safety reasons, only trained specialist personnel may carry out repairs on to complain about the product expires if repairs or changes are made by person not given authorization or if non-original spare parts are used.
We offer the purchase of original spare parts in accordance with the relevant re environmentally friendly design. See the appendix for the minimum period during v are available to repair the product.
Information about the complaint period and conditions can be found on our website department or your dealer.
Contact information can be found on our website www.scandomestic.dk or in the
We recommend that you have the product's model number and serial number re: after-sales service department.
Both parts can be found on the product's type plate, which is inside the product. On some products it may be necessary to remove the vegetable drawer
Write down the information before contacting service.
Technical data
Keep the energy label together with the user manual and other documents for I Further technical information about climate class, refrigerant and volume can be fo plate.
More information about your product can be found at www.scandomestic.dk or by code below. By scanning the QR code with your smartphone, you will get to a product register for energy labels. Here you will find more technical data about
Energy calculations and tests.
The product is energy tested as free standing.
It may occur or can be expected that the energy consumption will be higher if a cabinet element and thus has lower ventilation.
Information regarding after sales
Access to professional repair, such as websites, addresses, contact information:
Model number: SKF340WD
| Address | Scandomestic A/S | QR-code |  |
| Contact number | 0045 7242 5571 | ||
| Homepage | www.scandomestic.dk | ||
| Relevant information for ordering spare parts, directly or through other channels provided by the manufacturer, importer or authorised representative; | info@scandomestic.dk | ||
| The minimum period during which spare parts, necessary for the repair of the appliance, are available; (years) | 7 | ||
| Instruction on how to find the model information in the product database, as defined in Regulation (EU) 2019/2019 by means of a weblink that links to the model information as stored in the product database or a link to the product database and information on how to find the model identifier on the product.) | www.scandomestic.dk | ||
| Minimum duration of the guarantee offered by the supplier (months) | 12 | ||
Note: The address or contact phone number of the service site is subject to change without prior notice. Please confirm whether the service station is a directly affiliated one of our company when requiring services.
CE declaration of conformaty

This appliance has been manufactured to the strictest standards and complies with all
applicable legislations, Low Voltage Directive (LVD) and Electromagnetic Compatibility (EMC).
Kära kund
natural_image
Pure electrical circuit lines without any symbolsnatural_image
Recycling symbol with three arrows forming a triangle (no text or numbers)natural_image
Pure mechanical diagram of a trash bin with no text or symbolsnatural_image
Warning symbol of a flame inside a triangle (no text or numbers)SN (Extended Temperate):
natural_image
Simple diagram of a knob with bidirectional arrow indicating rotation (no text or symbols)Funktioner
A digital temperaturdisplay
B Snabbkylningsikon
C Snabbfrysningsikon
D Holiday ikon
E Smart ECO-ikon
F Kylskåpsknapp
G Frysfackknapp
H Funktionsknapp
I OK-knappen
natural_image
3D mechanical assembly diagram showing a bracket with mounting holes and internal components (no text or symbols)natural_image
3D technical illustration of a mechanical assembly with exploded view of components (no text or symbols)natural_image
Diagram of a mechanical assembly with components and mounting holes (no text or symbols)natural_image
Illustration of a refrigerator with open doors and shelves (no text or symbols)natural_image
Technical illustration of a mechanical bracket assembly with mounting holes and a tool (no text or symbols)natural_image
Illustration of a refrigerator with open door and side panel (no text or symbols)natural_image
Exterior view of a modern office building (no signage)natural_image
Pure electrical circuit lines without any symbolsnatural_image
Technical diagram of two parallel electronic device modules with connectors and ports (no text or symbols)natural_image
Two views of a mechanical component before and after modification, showing circular holes and mounting holes (no text or symbols)natural_image
3D mechanical assembly diagram showing a bracket with mounting holes and a highlighted component (no text or symbols)natural_image
Two identical mechanical components with flanged ends and cylindrical tops, shown side by side (no text or symbols)natural_image
Close-up of a mechanical device with a black arrow pointing to a component, no visible text or symbolsnatural_image
Pure technical line drawing of a mechanical assembly without any text, numbers, or symbolsnatural_image
Silhouette of a customer wearing a headset and using a laptop (no text or symbols)


- Funktioner
- Before calling for service:
- When you call:
- Unauthorized calling of technical service:
- Right of complaint for household use:
- The right to complain does not include:
- Transport damage:
- Important!
- Safety instructions
- Your safety and that of others important.
- These words mean:
- DANGER
- WARNING
- CAUTIOUS
- Safety of children and vulnerable people
- General safety
- Daily use
- Care and cleaning
- Installation
- Service
- Energy saving
- Correct disposal of this product
- Warnings for disposal
- Environmental protection
- Packaging materials
- WARNING!
- Transport instructions
- Before use
- Location
- Setup
- Ventilation
- Room temperature and climate class
- SN (Extended Temperate):
- N (Tempered):
- ST (Subtropical):
- T (Tropical):
- Leveling the product
- Connect the product
- Save energy
- Changing the lamp
- Cleaning the product
- Course of action
- Drain hole cleaning
- Smell
- Defrosting of the product
- Refrigerated products
- Freozen products
- Course of action:
- In case of prolonged non-use
- Instructions for storage in the refriger
- We recommend the following:
- Door shelves
- Top shelf in the fridge
- Middle shelf in the fridge
- Bottom shelf in the fridge
- The vegetable drawer
- Outside the fridge
- Instructions for food storage in the
- The freezer compartment is intended for the following:
- How to use the ice cube box:
- Freezer room and stars
- Wrap food correctly
- Follow these steps for proper wrapping:
- Freezing fresh food
- For best shelf life, we recommend the following tips and advic fresh food:
- Storage of frozen foods
- Shelf life of frozen products
- Thawing deep-frozen goods
- The refrigerator
- The kitchen table
- The microwave oven
- Functions
- Super freeze function
- Vacation mode feature
- Door alarm
- Resume feature
- Minus 15°C function
- Normal accessories
- Bottle shelf
- Shatterproof glass shelves
- Vegetable drawer
- Vegetable drawer with humidity regulator
- Ice cube tray
- Freezer element
- Ventilation condition
- Heat dissipation space
- Level ground
- Heat dissipation area
- Description of the product
- Control panel functions
- Electronic control panel
- Fridge temperature setting
- Freezer temperature setting
- Smart
- Fast Cooling
- End the Fast Cooling function
- Fast Freezing
- Start the Fast-Freezing function
- End the Fast-Freezing function
- Vacation
- Start the Vacation function
- End the Vacation function
- Power cut memory
- Power-on delay
- Over-temperature alarm (only after power outage)
- Door open alarm
- Fault alarm
- Adjustment of the fridge air regulating lever
- Reversing the door swing
- Normal running sounds
- These are normal sounds:
- Light humming
- Gargling/rippling sound or slight hum
- Clicks
- Light background noise
- Avoid noise
- The product is not stable
- The door does not close tightly
- The product is too close to a wall
- Trouble shooting
- The product does not work
- Strange smell
- The product does not cool enough
- The door does not close properly
- Water on the floor
- Certain foods do not freeze completely
- The frozen meat has white stripes
- It is difficult to open the door
- Any repair of the product must be carried out:
- Information when contacting service
- Technical data
- Energy calculations and tests.
- Information regarding after sales
- CE declaration of conformaty
- Kära kund
Brand : Scandomestic
Model : SKF340WD
Category : Refrigerator