
SD 92 - Refrigerator Scandomestic - Free user manual and instructions
Find the device manual for free SD 92 Scandomestic in PDF.


| Product Type | Freestanding Refrigerator |
| Brand | Scandomestic |
| Model | SD 92 |
| Dimensions (H x W x D) | 180 cm x 60 cm x 65 cm |
| Weight | Approx. 60 kg |
| Electrical Supply | 220-240 V, 50 Hz |
| Energy Class | A+ |
| Annual Energy Consumption | Approx. 200 kWh |
| Total Net Volume | 200 L |
| Refrigerator Net Volume | 180 L |
| Freezer Net Volume | 20 L |
| Climate Class | N-ST |
| Noise Level | 42 dB(A) |
| Refrigerant Type | R600a |
| Adjustable Thermostat | Yes |
| Interior Light | Yes, LED |
| Number of Shelves | 3 glass shelves |
| Number of Door Balconies | 3 |
| Egg Tray | Yes |
| Defrosting | Manual (refrigerator), Automatic (freezer) |
| Reversible Door | Yes |
| Cleaning Instructions | Wipe with damp cloth; avoid abrasive cleaners |
| Safety Features | Stability brackets, proper ventilation required |
| Spare Parts Availability | Contact Scandomestic service |
| Repairability Index | 6.5 / 10 (estimated) |
Frequently Asked Questions - SD 92 Scandomestic
User questions about SD 92 Scandomestic
0 question about this device. Answer the ones you know or ask your own.
Ask a new question about this device
Download the instructions for your Refrigerator in PDF format for free! Find your manual SD 92 - Scandomestic and take your electronic device back in hand. On this page are published all the documents necessary for the use of your device. SD 92 by Scandomestic.
USER MANUAL SD 92 Scandomestic
TRANSPORTATION AND INSTALLATION
1 Place on level floor and remove the bottom packing, in order to decrease the shock and noise.
The angle between the compartment body and ground should be no more than 45^
2 Enough space should be left between the freeze and the wall for ventilation.
3 Place the freezer away from heat source and do not expose to direct sunshine.
4 Do not install where there is moisture or where it can easily be splashed by water.
5 Do not place the freezer in environment prone to freezing.
6 The appliance should not be used in open air and should not be exposed to rain.
ADJUSTMENT AND RUNNING
1 Adjustment of temperature: The storing temperature can be adjusted by the thermostat of the compartment. The thermostat should be adjusted according to different environment temperature and the food by rotating the knob of the thermostat. The knob rotates clockwise from "1" to "7"(or direction arc)and the inside temperature turns down in summer (anti-clockwise rotation)and up in winter(clockwise rotation). It is usually fixed to a certain point before leaving the factory. Do not adjust too often or touch the other parts.
2 Trial running: plug in and wait. The marked drop in temperature within half an hour indicates that the freezer works properly.
The compressor should be left to run for a period of time(6 hours in summer 4 hours in winter) before putting the food in.
SAFETY PRECAUTIONS
1 The freezer should use a single 3-pin socket with (13A)fuse. A multi -plug outlet should not be used.
2 You should install a suitable automatic voltage regulator not less than 500w when the voltage is outside the range from 187V to 242V.
3 The sockets of the freezer should be connected to stable fixed connection. Under no circumstance should the wiring be connected to such facilities as water pipe, gas pipe and so on.
4 Once power is cut off, wait for at least 5 minutes before plugging in again to avoid damaging the compressor or the system.
5 Do not put combustible, explosive or volatile dangerous articles, heavily corrosive acid or alkali of liquid in glassware into the freezer.
6 Children should be kept away from the freezer to avoid damage to the inner container or any accidents being incurred
7 If the power cable damages, for avoid dangerous, must by manufactory or its maintain a set or similar profession job the personnel replaces.
FREEZING METHODS
1 Do not put too much food into the freezer or exceed the loading line.
2 proper space should be allowed between foods to ensure cooling air circulation.
3 Never use corrosive detergent, hot water, or washing power to clean the freezer.
4 Do not use water to scour the freezer. Do not use hard brushes or wire brushes to clean the freezer.
5 Do not use metal or sharp tools for defrosting.
6 Do not use electric heaters to heat up and defrost.
7 The green lamp is a power indicating lamp. When the power is on, the lamp will be on.
TROUBLE SHOOTING:
The design and production comply with the relative security standard of China. If you find it does not work as usual, please examine and handle it according to the following table first. If the situation does not improve, you must contact our after-sale service center or our special repair division to examine and repair the appliance.
The following problems are not causes of breakdown:
There is a sound of liquid flowing in the freezer It is the sound of refrigerant flowing in the circulating pipeline of the refrigerating system.
- It is normal.
Too noisy
- The freezer is not installed in a level ground.
- Change the position.
The refrigerating system does not work for a It is an indicator of high quality for its long time but the inside temperature is very good insulation and low cooling retention low.
- It is normal.
| Trouble Possibilities Check up Solutions Remarks | |||||
| Compressor does not work | Power is off The fuse is broken Check the fuse Replace the fuse if it is necessary plea- | se contact after-sales service for repair | |||
| The circuit of input and output is out of use | Make sure that the power is on | Check the circuit with electric instrument | |||
| The thermostat knob is not in the proper position | Check the thermostat Rotate the thermo-statto the proper position | Ask for professional help | |||
| Compres-sor keeps on working | The temper- rature inside is too high | Frost on the evaporator is too thick | Check whether the frost is thicker than 6-8mm | Defrost regularly | |
| The door is being ope-ned too frequently | Reduce the times of opening | ||||
| Too much food has been stored at once | Take out some of the food | ||||
| The temper- rature inside is OK | The ambient tempera-ture is too high .while the thermostat indica-tes a small number | Make sure whether the knob is indica-ting at the "5-6"(or deeper) | Adjust the thermostat knob | The thermostat knob on"2-4"is better(or proper) | |
| The thermostat does not work | Replace the thermo-stat | Ask for after-sales service | |||
| Too noisy The floor is not level Make sure that the | freezer is level | Put pad under the castors | |||
| The screw in fan or condenser is loose The screw is loose Rotate | the fixed screw | ||||
| The refrigerating circuits touch each other | Separate them | ||||
Circuit diagram

- Power Plug 2. Transformer 3.Heater Strip 4.Switch
5.LED Lighting 6.Thermostat 7.Motor Protector
8.Compressor 9.Starter 10.Fan motor 11.Running Capacitor

- Power Plug 2. Transformer 3.Heater Strip 4.Switch
5.LED Lighting 6.Thermostat 7.Motor Protector
8.Compressor 9.Starter 10.Fan motor 11.Running Capacitor

- Power Plug 2. Transformer 3. Heater Strip 4. Switch of LED
5.Switch of Top Light 6.LED Lighting 7.Ballast 8.Top Light - Thermostat 10 Motor Protector 11. Compressor 12. Starter
13.Fan motor 14.Running Capacitor
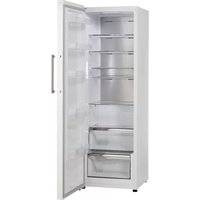


Brand : Scandomestic
Model : SD 92
Category : Refrigerator