721-235 - Lawn mower Meec Tools - Free user manual and instructions
Find the device manual for free 721-235 Meec Tools in PDF.


| Product Type | Hand cylinder mower (push reel mower) |
| Brand | Meec Tools |
| Model | 721-235 |
| Cutting Height Range | 19 – 70 mm (adjustable via roller height) |
| Cutting Height Adjustment | Raising or lowering the cutting height roller; both ends must be set to same height |
| Blade Adjustment | Front and back screws move fixed blade relative to blade drum; adjust in 1/16 turn increments |
| Blade Design | Fixed blade + rotating blade drum |
| Power Source | Manual (push operation, no motor) |
| Handle Assembly | Two-piece bottom handle with pins; top handle attaches separately |
| Safety Features | Keep hands/feet away from drum; never run; mow across slopes; do not use on wet grass; wear safety gloves; inspect before use |
| Recommended User Age | 18 years or older (or under supervision) |
| Function Check Method | Turn mower upside down, insert paper between fixed blade and drum, turn drum by hand – paper should be cut cleanly along full length |
| Cleaning | Remove grass/dirt with dry cloth or brush; do not flush with water |
| Lubrication | Apply WD-40 or similar lubricant to blades, drum shaft, and wheel axles regularly |
| Storage | Clean, dry place; do not leave outdoors |
| Production Date | 2013-11-20 |
| Manufacturer | Jula AB |
| Languages in Manual | Swedish, Norwegian, Polish, English |
Frequently Asked Questions - 721-235 Meec Tools
User questions about 721-235 Meec Tools
0 question about this device. Answer the ones you know or ask your own.
Ask a new question about this device
Download the instructions for your Lawn mower in PDF format for free! Find your manual 721-235 - Meec Tools and take your electronic device back in hand. On this page are published all the documents necessary for the use of your device. 721-235 by Meec Tools.
USER MANUAL 721-235 Meec Tools
natural_image
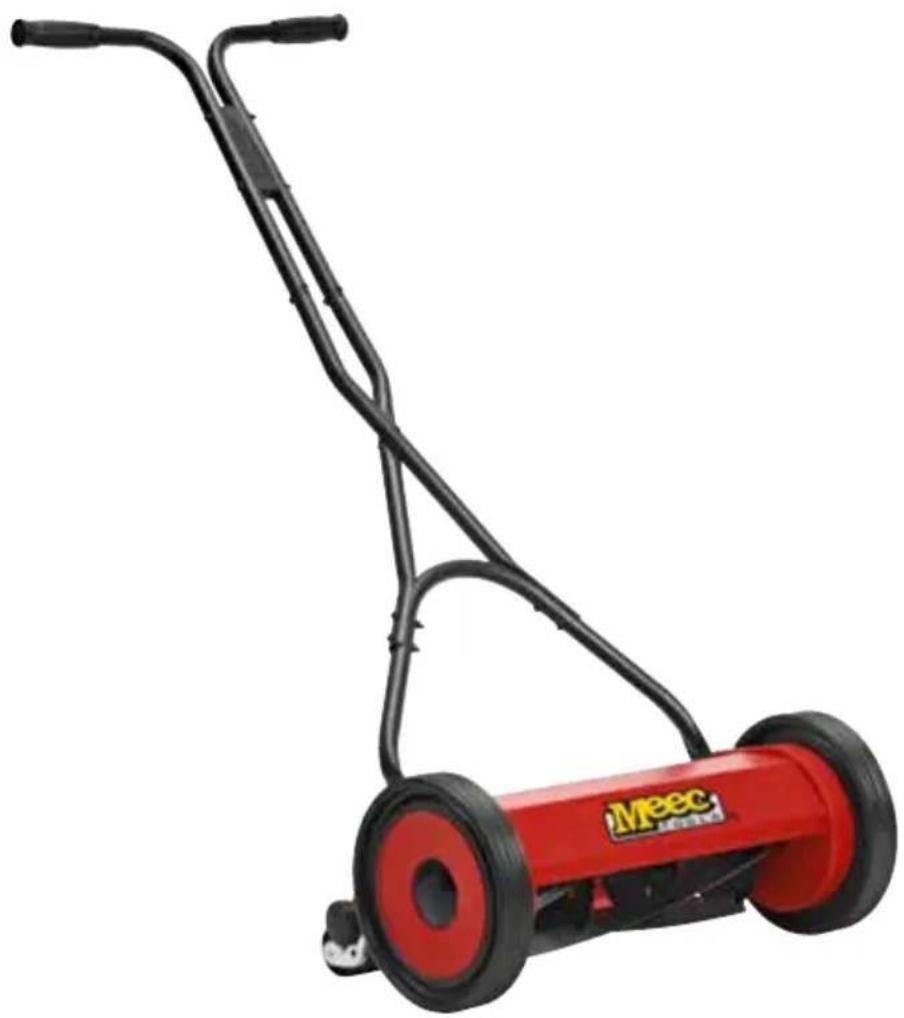
Red Meec lawn mower with black handle and wheels (no text or symbols visible)SE Bruksanvisning för handgräsklippare
NO Bruksanvisning for håndgressklipper
PL Instrukcja obsługi kosiarki ręcznej
EN User Insttruktions for Hand Cylinder Mower
SE - Bruksanvisning i original
NO - Bruksanvisning i original
EN - Operating instructions in original
DATE OF PRODUCTION: 2013-11-20
© JULA AB
SVENSKA....5
SÄKERHETSANVISNINGAR....5
LÄS BRUKSANVISNINGEN NOGGRANT INNAN ANVÄNDNING! 5
MONTERING ....5
MONTERING AV NEDRE HANDTAG 5
MONTERING AV HANDTAG 6
HANDHAVANDE 6
INSTÄLLNING AV KLIPPHÖJD 6
INSTÄLLNING AV KNIVAR 7
FUNKTIONSKONTROLL 7
UNDERHÅLL 7
NORSK 8
SIKKERHETSANVISNINGER 8
LES BRUKSANVISNINGEN N∅YE F∅R BRUK! 8
MONTERING 8
MONTERING AV NEDRE HÄNDTAK....8
MONTERING AV HÅNDTAK 9
BRUK....9
INNSTILLING AV KLIPPEH∅YDE 9
INNSTILLING AV KNIVENE 10
FUNKSJONSKONTROLL 10
VEDLIKEHOLD 10
POLSKI 11
ZASADY BEZPIECZEŃSTWA 11
PRZED UŻYCIEM UWAŻNIE PRZECZYTAJ INSTRUKCJĘ OBSŁUGI! 11
MONTAŻ 11
MONTAŻ DOLNEGO UCHWYTU....11
MONTAŻ UCHWYTU 12
OBSŁUGA 12
REGULACJA WYSOKOŚCI KOSZENIA....12
REGULACJA NOŻY 13
KONTROLA DZIAŁANIA....13
KONSERWACJA 13
ENGLISH 14
SAFETY INSTRUCTIONS....14
READ THE OPERATING INSTRUCTIONS CAREFULLY BEFORE USE. 14
ASSEMBLY....14
FITTING THE BOTTOM HANDLE 14
FITTING THE HANDLES 15
OPERATION....15
ADJUSTING THE CUTTING HEIGHT....15
ADJUSTING THE BLADES 16
FUNCTION CHECK....16
MAINTENANCE 16
SÄKERHETSANVISNINGAR
LÄS BRUKSANVISNINGEN NOGGRANT INNAN ANVÄNDNING!
natural_image
Technical line drawing of a mechanical clamp or bracket assembly (no text or symbols)HANDHAVANDE
INSTÄLLNING AV KLIPPHÖJD
natural_image
Technical line drawing of a mechanical clamp or bracket assembly (no text or symbols)BRUK
INNSTILLING AV KLIPPEH∅YDE
INNSTILLING AV KNIVENE
FUNKSJONSKONTROLL
natural_image
Technical line drawing of a mechanical clamp or bracket assembly (no text or symbols)OBSŁUGA
REGULACJA WYSOKOŚCI KOSZENIA
Save these instructions for future reference.
- Read these instructions carefully before assembly and use. Persons who are not familiar with these instructions must not use the machine.
- Carefully inspect the area where the machine is to be used and remove any stones, wires, bones or other foreign objects.
- Keep your hands, feet and other parts of your body away from the drum – risk of serious personal injury.
- Never run with the machine. Make sure you always have a good footing on sloping ground. Mow across slopes, never up or down.
- Do not use the machine in wet grass.
- Avoid running into obstacles, such as trees and fences etc. This can cause personal injury and/or serious material damage.
- Do not use the machine if you are barefoot or wearing open shoes.
- Always check before using the machine that it is working properly and undamaged. Do not use the machine if it is damaged.
- Wear safety gloves when assembling, using, cleaning, and carrying out maintenance.
- Persons younger than 18 should only use the machine under supervision.
- Follow all the instructions and safety instructions to ensure that the machine is working properly and safely.
ASSEMBLY
FITTING THE BOTTOM HANDLE
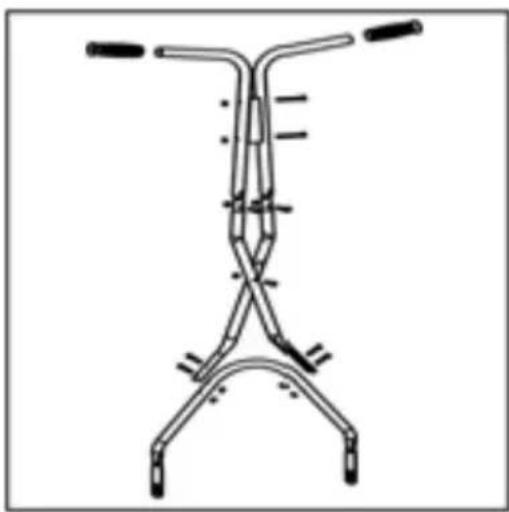
The box contains handle parts and assembly parts.
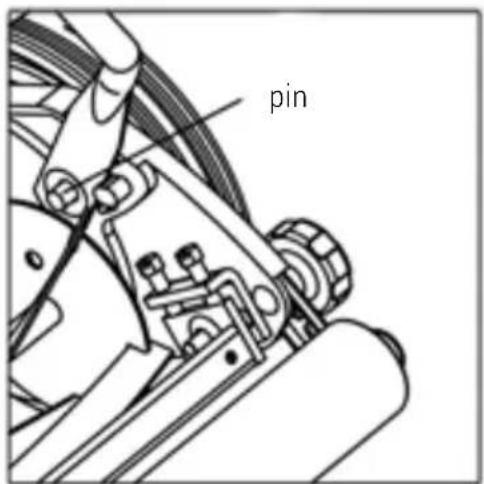
- Fit the bottom handle on the machine by aligning the two holes over the pins on the sides of the machine.
FITTING THE HANDLES
natural_image
Technical line drawing of a mechanical device with two arms and a central hub (no text or symbols)OPERATION
ADJUSTING THE CUTTING HEIGHT
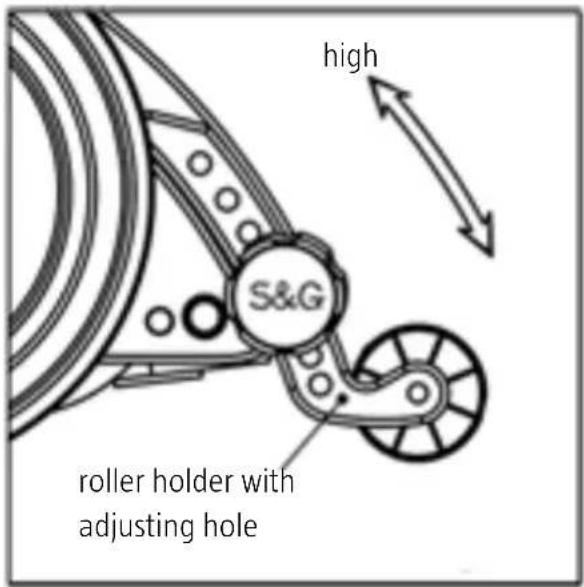
The cutting height is adjusted from 19 to 70 mm by raising or lowering the cutting height roller. Always adjust both ends of the rollers to the same height, otherwise the machine will cut unevenly.
-
The bottom hole sets the lowest cutting height, the top hole sets the highest cutting height.
-
Set a cutting height to suit the lawn. A very low cutting height can only be used on smooth lawns.
ADJUSTING THE BLADES
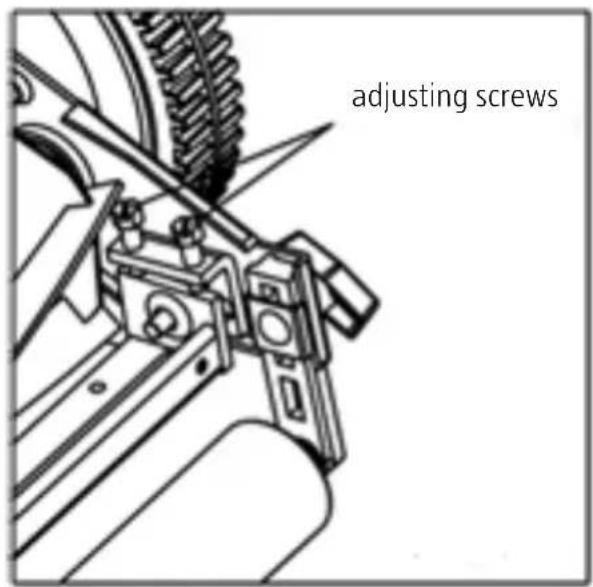
The screws at the front move the fixed blade away from the blade drum and the back screws move the fixed blade towards the blade drum.
Only turn the adjusting screws in very small steps - 1/16 of a turn produces a large displacement.
Always adjust on both sides of the machine.
FUNCTION CHECK
- Turn the machine upside down.
- Insert a piece of printing paper or newspaper between the fixed blade and the blade drum, and carefully turn the drum by hand.
All the blades should cut the paper along the full length of the fixed blade and the drum should rotate smoothly.
MAINTENANCE
- Do not flush the machine with water. Always remove any grass and dirt from the wheels, rollers and blades with a dry cloth or brush after use.
- Store the machine in a clean, dry place. Do not leave the machine outside after use.
- Apply lubricant, e.g. WD-40, regularly on the blades, drum shaft and wheel axles.
Jula reserves the right to make changes. In the event of problems, please contact our service department.
www.jula.com
- SVENSKA....5
- SÄKERHETSANVISNINGAR....5
- LÄS BRUKSANVISNINGEN NOGGRANT INNAN ANVÄNDNING! 5
- MONTERING ....5
- MONTERING AV NEDRE HANDTAG 5
- MONTERING AV HANDTAG 6
- HANDHAVANDE 6
- INSTÄLLNING AV KLIPPHÖJD 6
- INSTÄLLNING AV KNIVAR 7
- FUNKTIONSKONTROLL 7
- UNDERHÅLL 7
- NORSK 8
- SIKKERHETSANVISNINGER 8
- LES BRUKSANVISNINGEN N∅YE F∅R BRUK! 8
- MONTERING 8
- MONTERING AV NEDRE HÄNDTAK....8
- MONTERING AV HÅNDTAK 9
- BRUK....9
- INNSTILLING AV KLIPPEH∅YDE 9
- INNSTILLING AV KNIVENE 10
- FUNKSJONSKONTROLL 10
- VEDLIKEHOLD 10
- POLSKI 11
- ZASADY BEZPIECZEŃSTWA 11
- PRZED UŻYCIEM UWAŻNIE PRZECZYTAJ INSTRUKCJĘ OBSŁUGI! 11
- MONTAŻ 11
- MONTAŻ DOLNEGO UCHWYTU....11
- MONTAŻ UCHWYTU 12
- OBSŁUGA 12
- REGULACJA WYSOKOŚCI KOSZENIA....12
- REGULACJA NOŻY 13
- KONTROLA DZIAŁANIA....13
- KONSERWACJA 13
- ENGLISH 14
- SAFETY INSTRUCTIONS....14
- READ THE OPERATING INSTRUCTIONS CAREFULLY BEFORE USE. 14
- ASSEMBLY....14
- FITTING THE BOTTOM HANDLE 14
- FITTING THE HANDLES 15
- OPERATION....15
- ADJUSTING THE CUTTING HEIGHT....15
- ADJUSTING THE BLADES 16
- FUNCTION CHECK....16
- MAINTENANCE 16
- SÄKERHETSANVISNINGAR
- LÄS BRUKSANVISNINGEN NOGGRANT INNAN ANVÄNDNING!
- HANDHAVANDE
- INSTÄLLNING AV KLIPPHÖJD
- BRUK
- INNSTILLING AV KLIPPEH∅YDE
- INNSTILLING AV KNIVENE
- FUNKSJONSKONTROLL
- OBSŁUGA
- REGULACJA WYSOKOŚCI KOSZENIA
- ASSEMBLY
- FITTING THE BOTTOM HANDLE
- FITTING THE HANDLES
- OPERATION
- ADJUSTING THE CUTTING HEIGHT
- ADJUSTING THE BLADES
- FUNCTION CHECK
- MAINTENANCE
Brand : Meec Tools
Model : 721-235
Category : Lawn mower