
B23T-7 LED - Screen FUJITSU - Free user manual and instructions
Find the device manual for free B23T-7 LED FUJITSU in PDF.

| Product Type | LED Monitor |
| Screen Size | 23 inches (58.4 cm) |
| Resolution | 1920 x 1080 (Full HD) |
| Contrast Ratio | 1000:1 (typical) |
| Brightness | 250 cd/m² (typical) |
| Response Time | 5 ms (GtG) |
| Viewing Angles | 178°/178° (horizontal/vertical) |
| VESA Mount | 100 mm x 100 mm |
| Inputs | VGA, DVI, HDMI |
| Power Consumption | 25 W (typical), <0.5 W (standby) |
| Power Supply | Internal |
| Dimensions (with stand) | 544 x 390 x 190 mm |
| Dimensions (without stand) | 544 x 330 x 50 mm |
| Weight (with stand) | 4.5 kg |
| Energy Class | A+ |
| Cleaning | Use a soft lint-free cloth; avoid solvents |
| Safety | Use a grounded outlet; do not open the casing |
| Spare Parts Availability | Contact Fujitsu support; limited availability |
| Repairability Index | 5.8 / 10 (estimated) |
Frequently Asked Questions - B23T-7 LED FUJITSU
User questions about B23T-7 LED FUJITSU
0 question about this device. Answer the ones you know or ask your own.
Ask a new question about this device
Download the instructions for your Screen in PDF format for free! Find your manual B23T-7 LED - FUJITSU and take your electronic device back in hand. On this page are published all the documents necessary for the use of your device. B23T-7 LED by FUJITSU.
USER MANUAL B23T-7 LED FUJITSU
Congratulations your purchase of an innovative product from Fujitsu.
Latestinformationaboutourproducts,tips,updatesetc.canbefoundon theInternetat:" http://www.fujitsu.com/fts/"
You can find driver updates at: "http://support.ts.fujitsu.com/download"
Should you have any technical questions, please contact:
- ourHotline/ServiceDesk(seetheServiceDesklistorvisit: "http://support.ts.fujitsu.com/contact/servicedesk")
- Yoursalespartner
- Yoursalesoffice
WehopeyouenjoyworkingwithyournewFujitsusystem!
FUJITSU
Publishedby/ContactaddressintheEU
Fujitsu Technology Solutions GmbH
80807Munich, Germany
"http://www.fujitsu.com/fts/"
Copyright
© F u juTtechnologySolutionsGmbH2014.Allrightsreserved.
PublicationDate
03/2014
OrderNo.:A26361-K1496-Z320-1-7619,edition1
FUJITSUDisplayB23T-7LED
OperatingManual
YourLCDscreen...5
Importantnotes7
Gettingstarted11
Operation19
Notesonergonomiccolouradjustment31
Troubleshooting32
Explanatoryinformationabout
standardISO9241-30734
Technicalspecification35
Remarks
Notes on the product description meet the design requirement of Fujitsu and are provided for the purposes of comparison. The actual result may differ due to several factors. Subject to technical changes without prior notification. Fujitsu accepts no responsibility for technical editorial mistakes or omissions.
Trademarks
FujitsuandtheFujitsulogoareregisteredtrademarksofFujitsuLimitedorits subsidiariesintheUnitedStatesandothercountries.
Microsoft and Windows are trademarks or registered trademarks of the Microsoft Corporation in the United States and/or other countries.
VESA, DDC and DPMS are registered trademark of Video Electronics Standards Association.
All other trademarks specified here are the property of their respective owners.
Copyright
Nopartofthispublicationmaybecopied,reproducedortranslatedwithout thepriorwittenconsentofFujitsu.
No part of this publication may be saved or transmitted by any electronic means withoutthewrittenconsentofFujitsu.
Contents
YourLCDscreen....5
Targetgroup 5
Furtherinformation 6
Notationalconventions....6
Important notes 7
Safetyinstructions 7
Powercable 8
Transportingthedevic e 8
Cleaning the device 9
CEmarking 9
Disposalandrecyclin g 10
Getting started 11
Unpacking and checking the delivery 11
Setting up the device 11
Setting up an ergonomic video workstation 12
Mounting the monitor base 14
Adjustingheight 15
Adjustingtheinclination 15
Adjustingtherotation 15
Removing monitor base 16
Connecting the device 16
Connecting cables to the computer 18
Operation 19
Switchingth e device on and off 19
Notesonpower management 21
Changingthe monitorsettings....21.
Changingth e monitor settings with the buttons of the control panel 22
Changingth e monitorsettings usingtheOSDmenu 25...
OSDmenufunctions 26
Adjusting the brightness and contrast 27...
Selecting the application mode 27..
Setting the screendisplay 28
Adjusting the volume 28
Setting colour temperature and colours 29....
Setting the OSD menu 29
Advanced setting functions 30.
Displayinginformation 30.
Noteson ergonomic colour adjustment ....
Troubleshooting 32
Explanatory information about standard ISO 9241-307 34
Technical specification 35
VESA-DDC-compatible VGA interface 36
Preset operating modes 36
Mostfrequentoperatingmodes.... 36
SUB D port 37
DVI-Dport 38
DisplayPortsocket 39
YourLCDscreen...
hasawholerangeofusefulfeaturesandfunctions,e.g.:
- TFTdisplay(ThinFilmTransistor;activematrix)
- minimalspacerequirement sthankstoslimcasing
- optimumergonomic characteristics (totally distortion-free, excellent picture definition and colour purity right into the corners)
•highdegreeofbrightne ssandgoodcontrast
•maximumresolutionof1920x1080
•presentationofupto1 6.7millioncolours(inconjunctionwithanappropriatedisplayadapter)
- automaticscanningofhorizontalfrequenciesfrom30to82kHzandrefreshrates (vertical frequencies) from 48 to 76 Hz (absolutely flicker-free)
•digitalscreencontr olwithmicroprocessorforstoring31differentdisplaymodes
- freelyadjustablecolouralignmentformatchingthescreencolourstothe coloursofvariousinputandoutputdevices
- convenientopera tionviaintegratedOSD(On-Screen-display)menu
• VESA-DDCcompatibility
• VESA-FPMPMI.com patibility(FlatPanelMonitorPhysicalMountingInterface)-Mountingdevice forswivelarmorsimilaraccessory
- Plug&Playcapability
•digitalvideo inputs(DVlandDisplayPort)withHDCP
• power management for reducing power consumption when the computer is not in use
•Compliancew iththerecommendationsaccordingtoTCO6.0
• the monitor fulfills all GS ("Geprüfte Sicherheit", Certified Security) requirements.
ThisoperatingmanualcontainsimportantinformationyourequiretostartupandrunyourLCDmonitor.
Controloft heLCDmonitorrequires:adisplayadapter(screencontroller)withaVGAinterface,ora digitaldi splayadapterwithaDVIinterface,oravideosignalsourcewithaDisplayPortinterface.
Themonito rprocessesthedatasuppliedtoitbythedisplayadapter. Thedisplayadapterorthe associateddriversoftwareisresponsibleforsettingthemodes(resolutionandrefreshrate).
Whenputting the monitor into operation for the first time, the screen display should be optimally adapted to the display adapter used and adjusted in accordance with your needs (see chapter "Changingthemonitorsettings", Page 21.
Target group
Youdon'tneedtobean"expert"toperformtheoperationsdescribedhere.
Nonetheless, it is important to always observ the safety notes given in the operating instructions for the computer and in this manual.
In the event of any problems, please contact your sales office or our Service Desk.
Furtherinformation
Detailsofhowyousettheresolutionandrefreshrateareprovidedinthedocumentation foryourdisplayadapterandtheassociateddriversoftware.
Forergonomicreasons, were recommendascreenresolutionof1920x1080pixels.
Becauseofthetechnologyused(activematrix)anLCDmonitorprovidesatotally flicker-freepictureevenwitharefreshrateof60Hz.
Notationalconventions
 | Payparticularattentiontotextmarkedwiththissymbol.Failureretoobserve these warnings could pose risk to health, damage the device or lead to loss of data. The warranty will be invalidated if the device becomes defective through failure to observ the warnings. | |
 | Indicates important information for the proper use of the device. | |
| [1988] | Indicates an activity that must be performed | |
| [2000] | Indicates a result | |
| indicates data entered using the keyboard in a program dialogue or the command line, e.g. your password (Name 123) or a command used to start a program (start.exe) | ||
| indicates information that is displayed on the screen by a program, e.g.: Installation is complete. | ||
 | indicates• terms and texts used in asoftware interface, e.g.: Clickon Save• names of programs or files, e.g. Windows or setup.exe. | |
| indicates• cross-reference to another section, e.g. "Safety information"• cross-references to an external source, e.g. a web address: For more information, goto" http://www.fujitsu.com/fts/"• Names of CDs, DVDs and titles or designations of other materials, e.g.: "CD/DVDDrivers & Utilities" or "Safety" Manual | ||
 | indicates a button on themonitor, e.g: MENU | |
 | indicates terms and texts that are emphasised or highlighted, e.g.: Do not switch off the device | |
Importantnotes
In this chapter you will find information regarding safety which it is essential to take note of when working with your device.
Safetyinstructions
Thisdevicecomplieswit htherelevantsafetyregulationsfordataprocessingequipment, includingelectronicof fice machines for use in an office environment. If you have anyquestionsaboutwhe therthedevicecanbeusedintheintendedenvironment, pleasecontactyoursal esofficeorourServiceDesk.
- Thedisplaysurfaceof becarefulwiththedis thedeviceissensitivetopressureandscratches. Youshouldtherefore playsurfaceinordertoavoidlastingdamage(scratches).
- If the device is brought into the installationsite from acold environment, condensation can form. Before operating the device, wait untilitis absolutely dry and has reached approximately the same temperature at the installationsite.
- Wheninstalling an doperatingthe device, please observethenotesonenvironmental conditions in Chapter "Technical specification", Page 35 as well as the instructions in Chapter "Setting upanergonomicvideoworkstation", Page 12.
• To ensure sufficient ventilation, the air inlet and outlet openings of the device must be kept clear.
•The device autom aically sets itself to the correct voltage within the range from 100V to 240V. Makesurethatt helocalmains voltage is neither higher nor lower than this range.
- Ensure that the powers octon the device and themains outlet are freely accessible.
•TheON/OFFbut tondoesnotdisconnectthemonitorfromtheACvoltage.Tocompletely disconnectfromtheACvoltage,youmustremovethepowerplugfromthepowersocket.
- The device is equipped with powerercable that complies with safety standards.
•Usethesuppl iedpowercableonly.
- Laythecablesinsuchawaythattheydonotcreateahazard(dangerefripping) and cannot be damaged. When connecting the device, observe the relevant notesinchapter" Connectingthedevice",Page16.
- Nodatatra nsfercablessshouldbeconnectedordisconnectedduringathunderstorm.
- Makesurethatnoobjects(e.g.jewellerychains,paperclips,etc.)orliquidsget insidethedevice(dangerofelectricshock,shortcircuit).
•Thedevic eisnotwaterproof! Neverimmersethedeviceinwaterandprotect itfroms praywater(rain,seawater).
- Inanemergency(e.g.damagedcasing,operationcontrolsorcables,penetration ofliquidsorforeignmatter),switchoffthedevice,disconnectthepowerplug andcontactyoursalesoutletorourServiceDesk.
- Repairs to the device must only be performed by qualified technicians. Unauthorised opening and in correct repair may greatly endanger the user (electric shock, fire risk).
- Only use the screen resolution settings and refresh rates specified in Chapter "Technical specification", Page 35. Otherwise you may damage the device. If you are in any doubt, contact your sales outlet or our Service Desk.
- Use a screensaverwithmovingimagesandactivatethepowermanagementfor yourmonitortopreventstillimagesfrom"burningin".
- If you operate the device with the swivel armor as similar accessory, it must not be turned through 180^ .
- The device may only be operated in wide format (0° landscape mode) and high format (90° portrait mode). The buttons are located at the bottom in the middle of the monitor in wide format (0° landscape mode) and the left-hand side of the monitor in high format (90° portrait mode).
- Storethismanualclosetothedevice.Ifyoupassthedeviceontothird parties,youshouldpassthismanualonwithit.
- Werecommendthatyouplaceyourdeviceonadurable,non-slipsurface.Inview of the many different finishes and varnishes used on furniture, it is possible that the feetofthedevicemaymarkthesurfacetheystandon.
- Avoidusinghighvolumesforalongperiodoftime,topreventcausingdamagetoyourhearing.
- Warningagainstexcessivevolumefromheadphones:excessivevolumefromheadphones cancausehearingloss.Settingtheequalisertothemaximumvalueincreases the headphonesoutputvoltageandthusincreasesthesoundpressure.
Powercable
Usethesuppliedpowercableonly.
Usethefollowingguidelinesifitisnecessarytoreplacetheoriginalcableset.
•Thefemale/malereceptaclesofthecordsetmustmeetIEC60320/CEE-22requirements.
- The cable has to be HAR-certified or VDE-certified. The mark HAR or VDEwillappearontheoutersheath.
- Fordeviceswhicharemountedonadeskortable,typeSVTorSJTcablesetsmaybe used. For devices which sit on the floor, type SJT type cable sets may be used.
- Thecablesetmustbeselectedaccordingtotheratedcurrentforyourdevice.
- Ifnecessary, replace the original power cable with a regular grounded 3-core mains lead.
Transportingthedevice

Transport all parts separately in their original packaging or in a packaging which protectsthemfromknocksandjolts,tothenewsite.
Donotunpackthemuntilalltransportationmanoeuvresarecompleted.
If the device is brought from a cold environment into the room where it will be used, condensationmayoccur. Beforeoperatingthedevice, waituntilitisabsolutelydry and hasreachedapproximatelythesametemperatureastheinstallationsite.
Cleaningthedevice

Switchoffthedeviceandunplugthepowerplug.
Donotcleananyinteriorpartsyourself,leavethisjobtoaservicetechnician.
Donotuseanycleaningagentsthatcontainabrasivesormaycorrodeplastic.
Ensure that noliquidentersthedevice.
Thedisplaysurfaceofth itonlyusingasoft, sli
edeviceissensitivetopressureandscratches.Clean ghtlymoistenedcloth.
Thesurfaceofthecasin has been moistenedinm
gcanbecleanedwithadrycloth. If particularlydirty, useacloththat illdomesticdetergentandthencarefullywrungout.
CEmarking
The shipped version of this device complies with the requirements of European Union directives 2004/108/EC "Electromagnetic compatibility", 2006/95/EC "Low voltage directive" and 2009/125/EC "EcodesignDirective".
Disposalandrecycling
This device has been manufactured as far as possible from materials which can be recycled or disposed of in such a way that the environment is not damaged. The device may be taken back after use to be reused or recycled, provided that it is returned in a condition that be fits its intended use. Any components not reclaimed will be disposed of in an environmentally acceptable manner.
The device must be disposed of in accordance with the local regulations for disposal of special waste.
If you have any questions on disposal, please contact your local sales office or our ServiceDesk,orcontactoneofthefollowingdirectly:
| Germany | Belgium | Switzerland |
| FujitsuTechnologySolutionsGmbHRemarketingandRecyclingD-33106PaderbornTel.:+495251/81801 0Fax:+495251/81801 5"http://fujitsu.com/fts/remarketing" | RECUPELBoulevardReyers,80B-1030BrusselsTel.:+322/7068616Fax:+322/7068613E-Mail:info@recup el.be"http://www.recupel.be" | SWICOSchweizerischerWirtschaftsverbandderInformations-,Kommunikations-undOrganisationstechnikAlistofthe SWICceptance locationscanbefoundat:"http://www.swico.ch" |
| Asia | USA | |
| Taiwan:EnvironmentalProtectionAdministrationExecutiveYuanR.O.C."http://recycle.epa.gov.tw" | FujitsuAmerica,Inc.1250E.ArquesAvenueSunnyvale,CA94085U.S.A.PhoneNo.:(408)746-6000 |
Youcanalsofindmoreinformationonthisat "http://www.fujitsu.com/fts/about/fts/environment-care/".
Gettingstarted
Unpackingandcheckingthedelivery

Thedisplaysurfaceofthedeviceissensitivetopressureandscratches. Alwaysholdthedevicebythecasing!
The completed device package includes:
•onemonitor
•oneDVIcable
•oneVGAcable
•oneUSBcable
•oneaudiocable
•onepowercable
•oneCDwithsoftwareanddocumentation
•oneWarrantyBooklet
• one"QuickStartGuide"flyer
•one"Safety/Regulations"manual
▶ Unpackalltheindividualparts.
▶ Check the contents of the package for any visible damage caused during transport.
▶ Check whether the delivery conforms to the details in the delivery note.
▶ Should you discover that the delivery does not correspond to the delivery note, notify your localsalesoutletimmediately.

Donotdiscardtheoriginalpackingmaterialofthedevices. Youmayneedthe packaginginthefutureifyouneedtotransportyourdevice.
Setting up the device

To ensure sufficient ventilation, the air inlet and outlet openings of the device must be kept clear.
Settingupanergonomicvideoworkstation
flowchart
graph TD
    A["Component 1"] --> B["Component 2"]
    B --> C["Component 3"]
    C --> D["Component 4"]
    style A fill:#f9f,stroke:#333
    style B fill:#ccf,stroke:#333
    style C fill:#cfc,stroke:#333
    style D fill:#fcc,stroke:#333
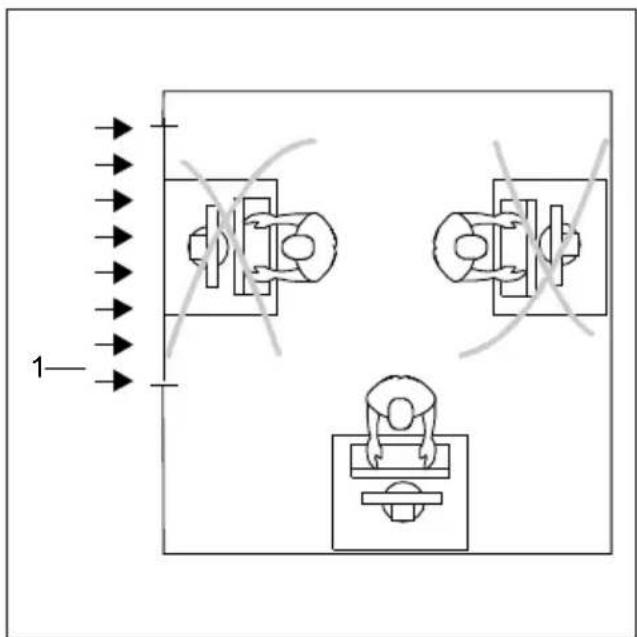
▶ Donotpositionthevideoworkstation oppositeawindow(1).
natural_image
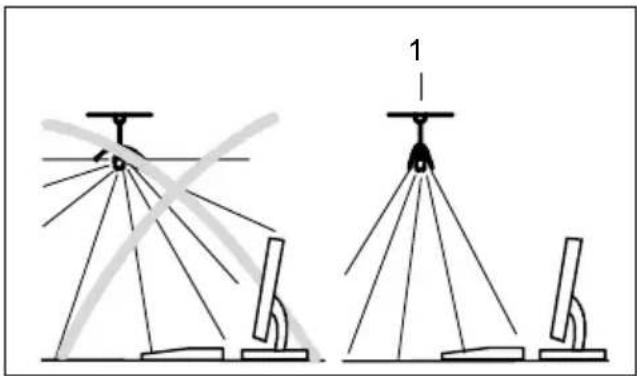
Diagram showing two configurations of a surveying instrument with multiple tripod supports and a scale, no text or symbols present.▶ Positionthemonitoroutsidethereach ofalightsource(1).
natural_image
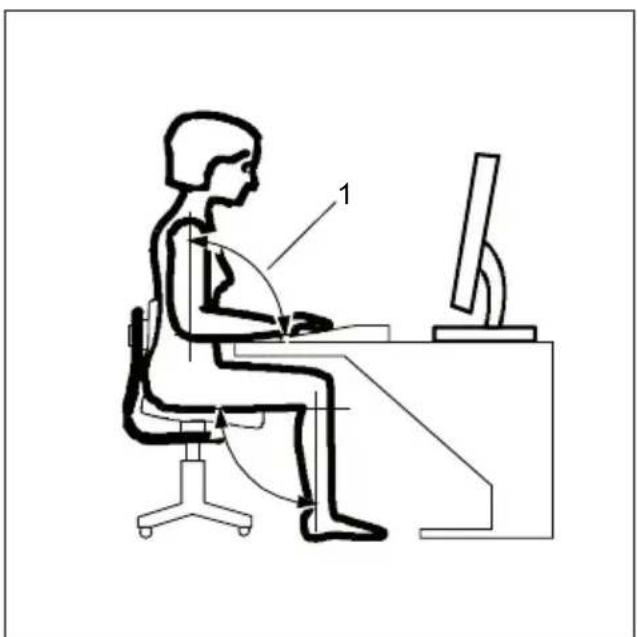
Line drawing of a person sitting at a desk using a computer (no text or symbols present)▶ Positionthekeyboardwhereitis easiesttoreach(1).

▶ Positionthemonitorsothatheeyedistance tothescreen(1)isaround50cm.
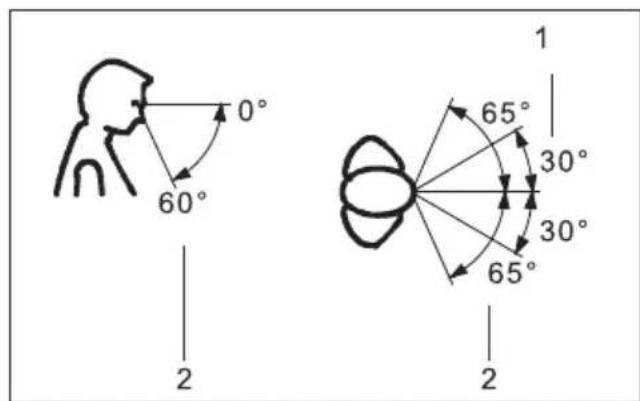
▶ Positionthemonitorforoptimumviewing (1). Themonitorshouldunderno circumstancesfalloutsidethepermissible viewingspace(2).

Dependingonthesituation, it may be advisable to use as well as armor as similar accessory (VESAFPMPMI), which are available from specialist dealers. For this purpose the monitor base must be removed beforehand as described in chapter "Removing monitor base", Page 16.
Mountingthemonitorbase

Donotremovetheretainingsplintuntilyouhavesecuredthebaseplateon themonitorandmoveditintotheoperatingposition.
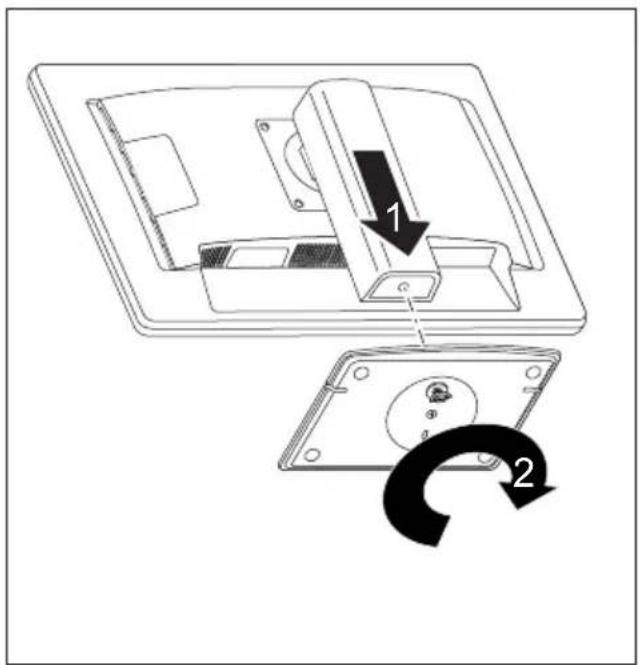
▶ Insertthebaseplateonthefoot(1).
▶ Securethebaseplatewiththescrew(2).
▶ Placethemonitorintheoperatingposition.
Adjustingheight

The height adjustment is fixed in the transport position.
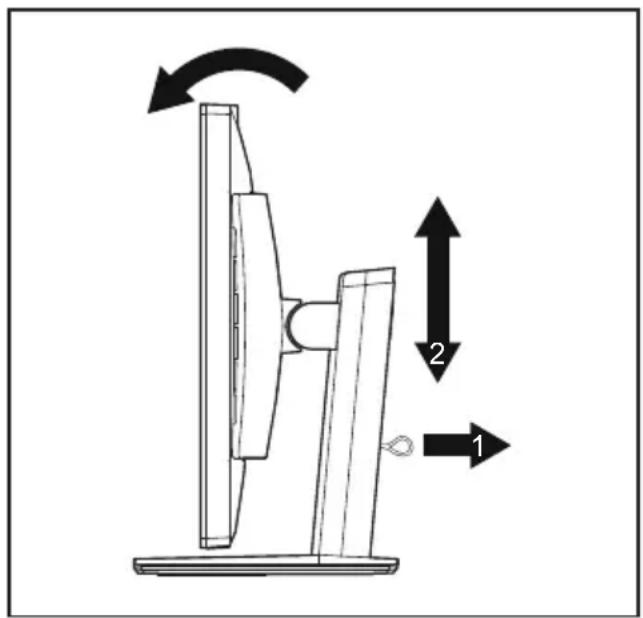
▶ To free the fixing, remove the locking pin on the flange(1).
→ Theheightofthemonitorcanbeadjusted byapproximately130mm.
▶ Graspthemonitorwithbothhandson therightandleftedgeofthecasing andmoveitupordown(2).
Adjustingthei nclination
The inclination of the monitor can be adjusted by -3° (forwards) and +35° (backwards) from its vertical position.
▶ Holdthemonitorwithbothhandsontheleftandrightsidesofthecasing andmoveittothedesiredangle.
Adjustingtherotation
Themonitorcanberotatedby±170°.
▶ Graspthemonitorwithbothhandsontherightandleftedgeofthecasing andturnittothedesiredposition.
Removingmonitorbase
Before you can use a swivel arm or a similar accessory, you must remove the monitor base.

Thedisplaysurfaceissusceptibletoscratching!
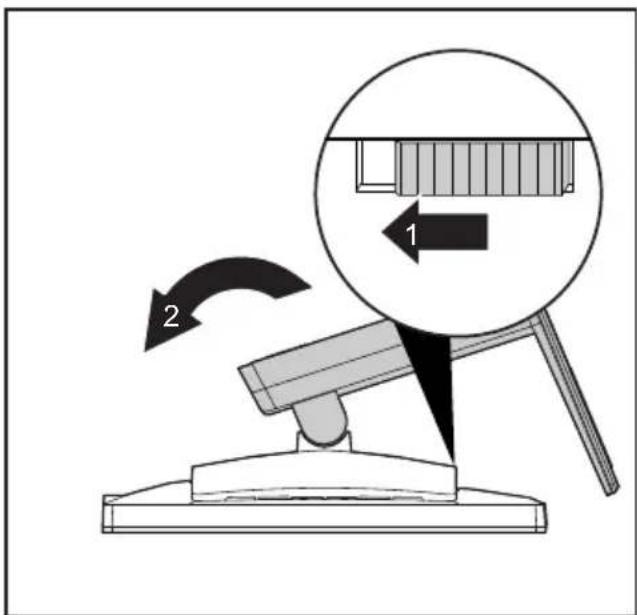
▶ Switchoffthemonitorandpullthepower plugoutofthepowersocket.
▶ Laythemonitoronitsfaceonasoftsurface.
▶ Disconnectallcables.
▶ Releasethebasestandbymovingtheslider inthedirectionofthearrow(1)andholdit whileliftingthecompletebasestandup(2).
→ Youcannowmountaswivelarmora similaraccessoryinaccordancewithVESA FPMPMIusingaholespacingof100mm.

Forinstructionsonhowtomounttheswivelarmorasimilaraccessory, please seethedocumentationfortheswivelarmorsimilaraccessory.
Connecting the device

Please observe the safety information in "Important notes", Page 7.
CEconformanceandoptimumpicturequalityareguaranteedonlyif youusethedatacablessupplied.
▶ Switchoffthemonitorandthecomputer.
▶ Disconnectthepowerplugfromthecomputer.
Connectingcablestothemonitor
Thedatacablessuppliedhavetwo15-pinD-SUBconnectorsortwo24-pinDVI connectorsforconnectiontothemonitorandtothecomputer.
Information on the computer connections and interfaces is contained in the operatingmanualforthecomputer.
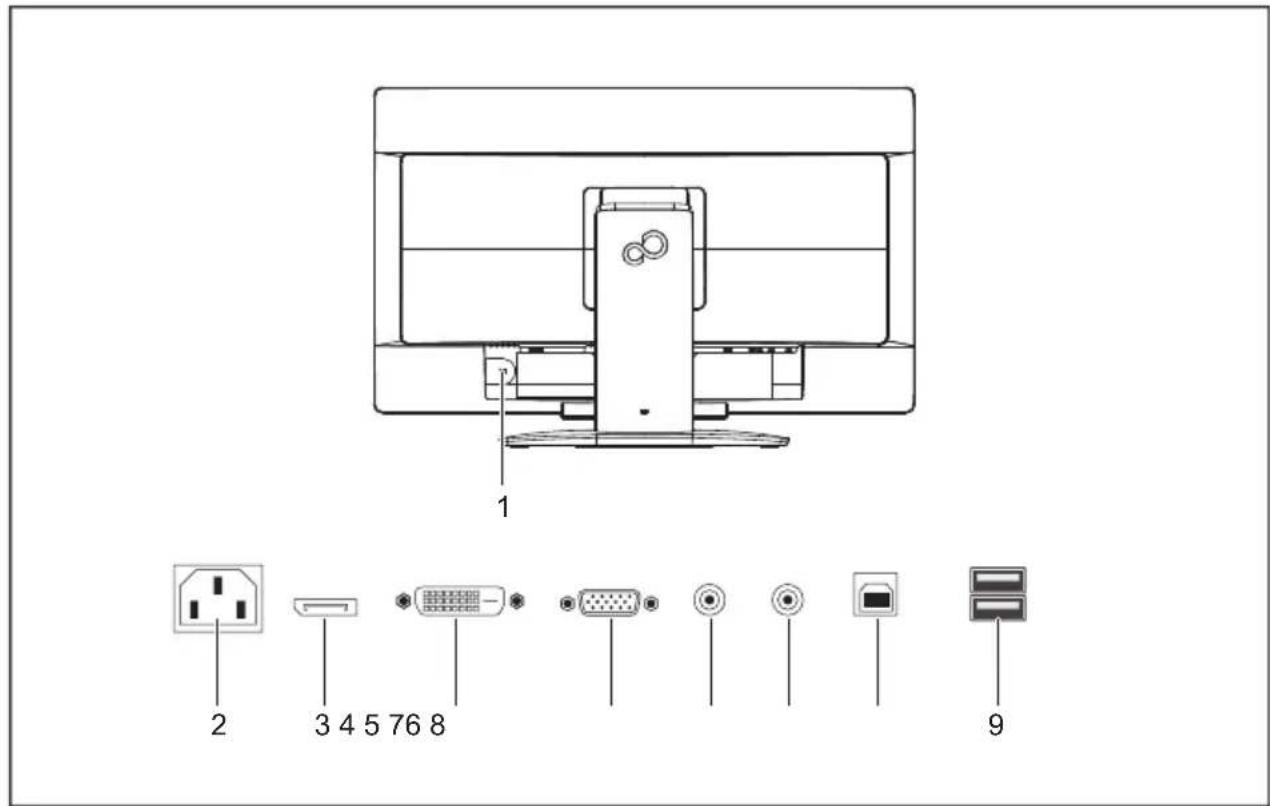
1=Securityslotfor"SecurityLock"
6=AUDIO-INsocket
2=ACconnectorsocket
7=AUDIO-OUTsocket
3=DisplayPortsocket
8=USB2.0(upstream)
4=DVI-Dsocket(DVI)
9=USB2.0(downstream)
5=D-SUBsocket(VGA)
▶ Select the appropriate data cable for your computer.
ConnectoneoftheconnectorsofthedataabletotheDVI-DorDisplayPortsocketofthe monitorandsecuretheDVI-Dplug-inconnectionbytighteningthesafetyscrews.

Themonitorautomaticallydetectstheinput(VGA,DVI,DisplayPort) whenonlyonesignalsourceisconnected.
▶ Insert one connector of the audio line into the AUDIO IN socket (6) on the monitor and makes sureitis properly engaged.
▶ Plug the power cable supplied into the power connector of the monitor.
PlugthesuppliedUSB2.0cableintotheUSB2.0(upstream)socket(8)andthe otherendofthecableintoaUSB2.0socketonthecomputer.

ConnecttheUSBkeyboardandUSBmousedirectlytothePC,astheUSBconnector socketofthemonitorisswitchedoffinPCenergy-savingmode.

Alock(SecurityLock) can be mounted in these security slot to protect the monitor against the ASecuritylock is not supplied with the monitor.
Connectingcablestothecomputer
Information on the computer connections and interfaces is contained in the operating manual for your computer.
Connectthedatacabletothe(active)monitorportonthecomputerandsecure theplug-inconnectionbytighteningthesafetyscrews.
▶ Insert the other plug of the audio cable in the audio output of the computer.
Plugthepowerconnectorofthemonitorintoaproperlygroundedmainsoutlet.
▶ Plug the power connector of the computer into a properly grounded mains outlet.

If your computer has two monitor ports ("onboard" screen controller and separate graphicscard), the monitor port for these separate graphics card is as standard.
Operation
Switchingthedeviceonandoff
Versionwithbuttons
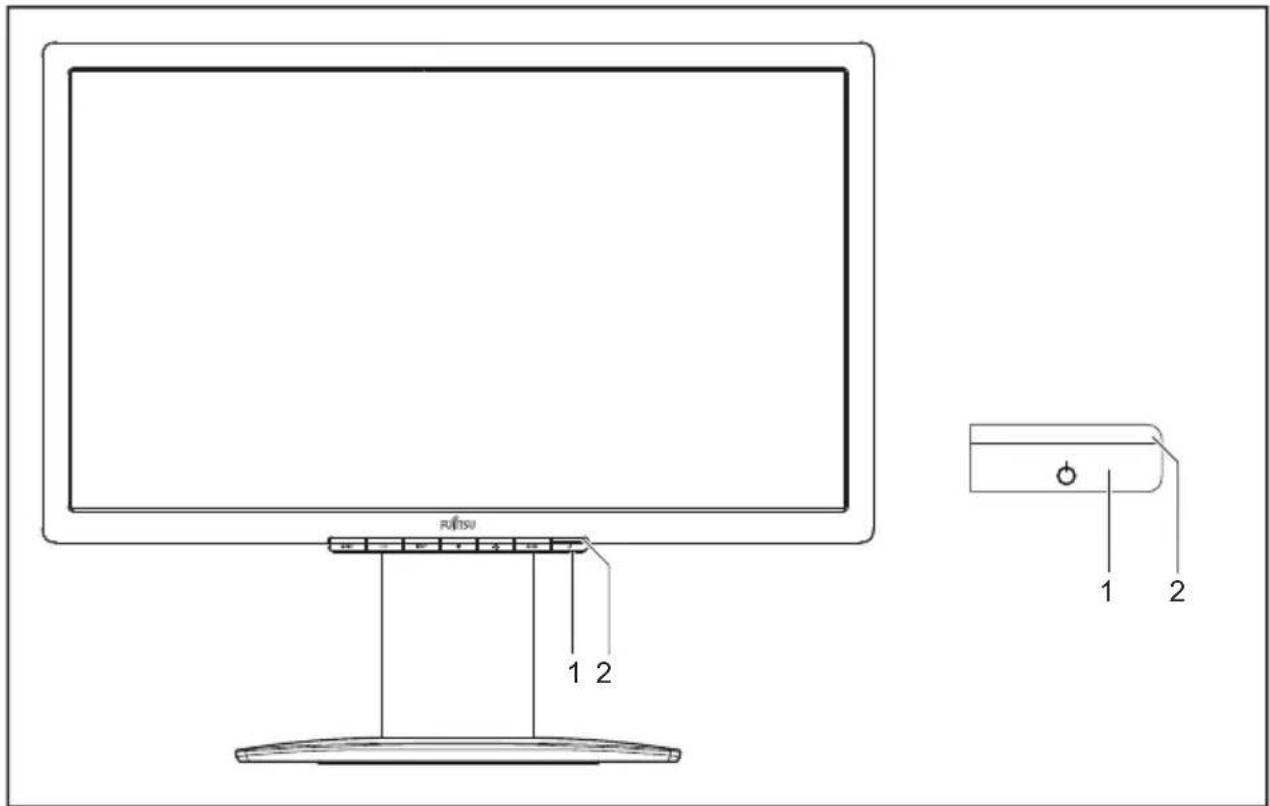
1=ON/OFFbutton2=Powersupplyindicator
Versionwithtouchsensors
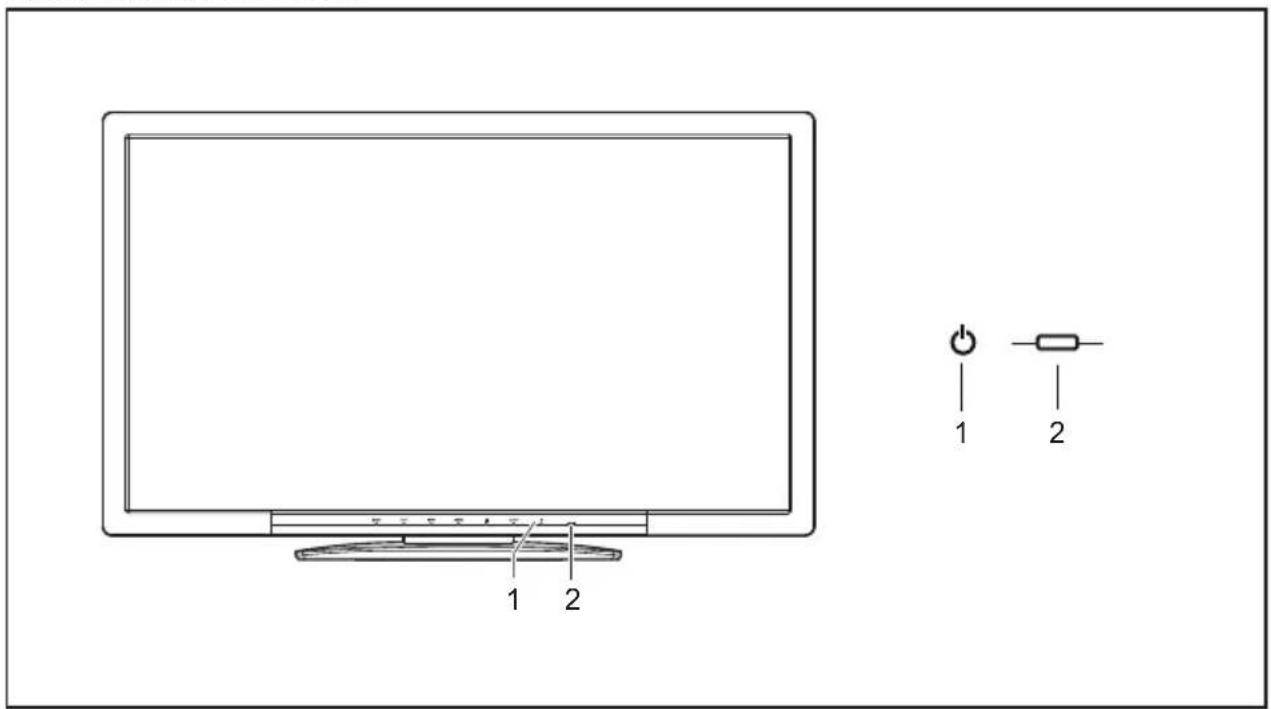
1=On/Offtouchsens or
2=Powerindicator
ThecolouroftheLEDindicatorchangesasfollows:
| LEDindicatorStatus | |
| blue | Monitorandcomputerareswitchedon(normalmode). |
| green | Monitorandcomputerareswitchedon(ECOmode). |
| orange | Monitornotreceivingavideosignal. |
| doesnotlightup | Monitorisswitchedoff. |
▶ Switch the device on using the ON/OFF button (1) or the ON/OFF touch sensor (1).
Notesonpowermanagement
If your computer is equipped with power management (powersaving mode), the monitor can fully support this function. The monitor thereby distinguishes between the individual power saving modes of the computer (standbymode, suspend mode and OFF mode).
| StageOperation | Powersavingmode | ||
| Normal | ECO | ||
| PowersupplyindicatorLight | tsupblueLitgreenillumina | tedorange | |
| DisplayMax.brightness | typ.200cd/m 2 | unlit | |
| Typicalpower consumption(without USBandaudio) | 23W19Wreducedto<0.3 | 5W | |
If the computer detects inactivity (no input) it sends an appropriate signal to the monitor to reduce the power consumption (power saving mode). The power indicator of the monitor changes colourtoshowthechangeinstatus.ECOoperationisthepresetfactorydefault.
Onceaninputismadeatthecomputerthescreencontentsarerestored.

Fordetailedinformationonhowenergy-savingmodeoperates, pleasereferto theoperatingmanualortechnicalmanualofthecomputer.
Changingthemo nitorsettings
When putting the monitor into operation for the first time, the screen display should be optimally adapted to the display adapter used.
Changingthemonitorsettingswiththebuttons ofthecontrolpanel
i
Dependingonthemodel,thecontrolpanelwilleitherhavebuttonsortouch sensors.Inthefollowingsections,onlybuttonswillbementioned.However, thetextalsoappliestomodelswithtouchsensors.
Thebuttonsonthecontrolpanelhavemultiplefunctions.WhentheOSD menuisactive,thecurrentmeaningofthebuttonsisshowndirectly overthebuttonsontheedgeofthescreen.
Thedisplay(softkeyicon)overthebuttonsvariesdependingonthesub-menuchosen.
| KeyFunction | |
| MENU | CallupOSDmenu |
| ECO | Activate/deactivateECOoperatingmode |
| INPUT | Selectinputsignal(digital/analog) |
| Adjustvolume | |
| Adjustbrightness | |
| AUTO | Performauto-adjustmentofthemonitorwithanaloginput |
| Monitor:switchingon/off |
| Softkeyicon | Function |
| ↑ | Selectingthenextmenuitem(sub-menu) |
| ↓ | Selectingthepreviousmenuitem(sub-menu) |
| → | Openingtheselectedsub-menuGoingtothenextsetting |
| ← | Goingtotheprevioussetting |
| — | Decreasingthesetvalue |
| + | Increasingthesetvalue |
| √ | Acceptingtheappliedsettingsandreturningtomainmenu |
| ⇐ | Cancellingtheappliedsettingsandreturningtomainmenu |
| × | ExitingOSDmenu |
| ✕ | Loudspeaker:switchingoff/on |
i
When the OSD menu is not activated, you can apply the following settings directly:
SelectOSDIanguage
When an OSD menu button is activated for the first time, the language selection window will appear:
▶ Pressthe ↑ buttonorthebuttontochoosethedesiredlanguage.
▶ Pressthe √ buttontoconfirm.

AfterselectingtheOSDlan guageforthefirsttime,youcanchange itatanytimeintheOSD.
Activate/deactivateECOoperatingmode

The power consumption of the device can be decreased by reducing the brightness of the picture.
▶ Pressthe ECO buttonoswitchtheECOoperatingmodeonoroff.
→ The message ECO Mode on or ECO Mode off is displayed.
If the ECO operating mode is activated, the following OSD settings are changed:
| Mode | Office |
| Color | 6500K |
| Brightness | reduced |
After the ECO operating mode is switched off, the brightness previously set by the user is restored.
Selectingth inputsignal
▶ Pressthe INPUT button to open the Input select setting window.
▶ Pressthe ↑ button or the ↓ button to select the desired monitor connection (VGA, DVI or DP).
▶ Press the √ button to confirm or the ↻ button to cancel.

ThissettingwindowcanalsobecalledupwhentheOSDmenuislocked.
Adjustingthevolume
▶ Press the 📄 button to open the Volume setting window.
▶ Pressthe — button or the + button to set the desired volume for the built-in speakers.
▶ Pressthe % buttontoactivate/deactivatethemutefunction.
▶ Pressthe × buttontoclosethemenu.
Adjustingthebrightness
▶ Press the ⚙ button to open the Brightness setting window.
▶ Pressthe — buttonorthebuttontosetthedesiredbrightness.
▶ Pressthe × buttontoclosethemenu.
Performingauto-adjustmentofthemonitor

Thisfunctionisonlyintendedforanalogueimagetransmission(VGA).
▶ Pressthe AUTO buttonforabout1second.
→ TheAutoProcessingm essageappears.
Picturequalityandpositionaresettooptimumvaluesforyoursystem.
LockingtheOSDme nu
TheOSDmenucanbelockedtopreventaccidentalorunauthorisedchangestothemonitorsettings.
▶ Pressthe [MENU] buttonandkeepitpressedforafewsecondswhileyouswitchthe monitoronusingtheON/OFFbuttonortheON/OFFtouchsensor.
→ ThemessageOSD locked/unlockedisdisplayed.

Pleaseprocee dinthesamemannertoreleasethelockedOSDmenuagain.
LockingtheON/OFFbuttonorON/OFFtouchsensor
The ON/OFF button or ON/OFF touch sensor can be locked to prevent accidental orunauthorisedchangestothescreensettings.
▶ Pressthe ECO button and INPUT button at the same time for a few seconds.
→ The message Power button locked / unlocked is displayed.

InordertounlocktheON/OFFbuttonorON/OFFtouchsensor,dothesameagain.
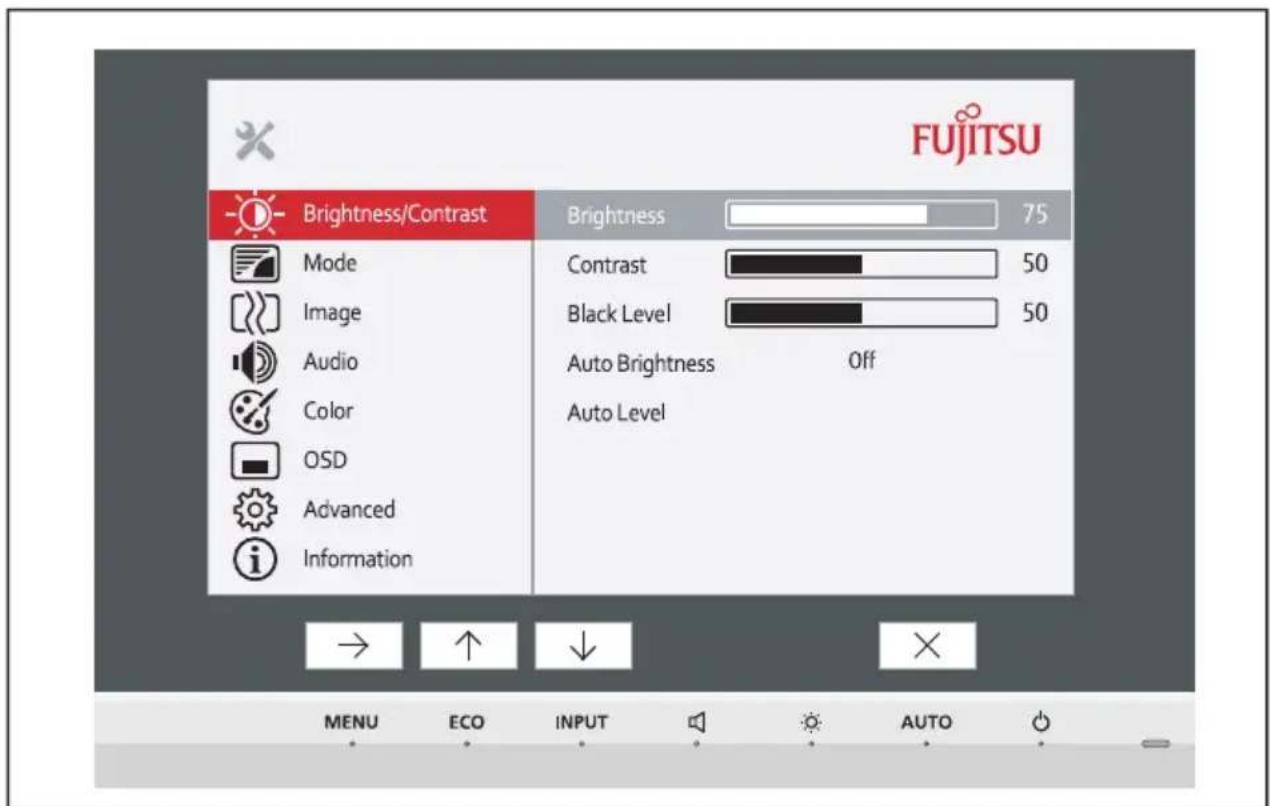
ChangingthemonitorsettingsusingtheOSDmenu
With the button on the control panel, you can call up and set the integrated OSD (On-Screen Display) menu.

The English menu names are used in the following description (default setting).
TheOSDmenuofyourdevicemaydifferinseveralwaysfrom thefunctionalscope described.
Thesoftke yiconsmaydeviatefromthoseshownhere.
▶ Pressthe MENU buttontoactivatetheOSDmenu.
→ TheOSDmenuappears,withmenuitemsforthesettingfunctions.
The first menu item (Brightness/Contrast) is highlighted and the associated functions are visible in the right-hand menu field.
▶ Press the ↑ button or ↓ button to highlight another icon (e.g. Image).
▶ Pressthe → buttontoselectthehighlightedicon.
→ The Image setting window will be displayed.
▶ Pressthe × buttonoclosetheOSDmenu.
▶ Press the ↑ button or ↓ button to highlight another function.
▶ Pressthe + buttonorthebuttontochangethesetting.
▶ Pressthe √ buttonosavethechangeorthebuttonontoquitthe functionwithoutmakingachange.

If you wish to change other settings, select the corresponding function from the OSD main menu. All the settings options in the main menu are described below.
OSDmenufunctions

The OSDmenuforanaloguemonitoroperationisdescribedbelow. During digitaloperationsomefunctionsarenotavailable, astheyarenotrequired duethedigitaltransmissiontechnologyused.
Adjustingthebrightnessandcontrast
| CalluptheBrightness/Contrastsettingwindow | |
| Brightness | SetthebrightnessofthedisplayWiththisfunctionyouchangethebrightnessofthebackgroundlighting. |
| Contrast | SetthecontrastofthedisplayWiththisfunctionyoumodifythecontrastofbrightcolourtones. |
| Blacklevel | SetthebrightnessofthedisplayWiththisfunctionyoumodifythecontrastofdarkcolourtones. |
| ACR | Enable/disabledynamiccontrastThisfunctionimprovesthecontrastbyautomaticallycontrollingthebackgroundlightinginrelationtotheimagebeingdisplayed.This setting can only be configured inVideoapplication mode. |
| Autolevel | AdjustthesignallevelWiththisfunctionyoucanautomaticallysetthecontrast.Thefunctionisexecutedusing→. |

If the contrast is set too high, bright surfaces can no longer be distinguished from very bright surfaces. If the contrast is set too low, the maximum brightness will not be achieved.
Selectingtheapplicationmode
| CalluptheModesettingwindow | |
| Dmode | SettingforDICOMsimulation(thevaluesforcolorandACRarelocked: color=7500K, ACR=off) |
| sRGB | PredefinedsettingforsRGB(reducedbrightness) |
| Office | Officesett ing (the values for color and sharpness can be adjusted) |
| Photo | Predefined setting for photo (colour, sharpness) |
| Video | Predefined setting for video (color, sharpness, ACR) |
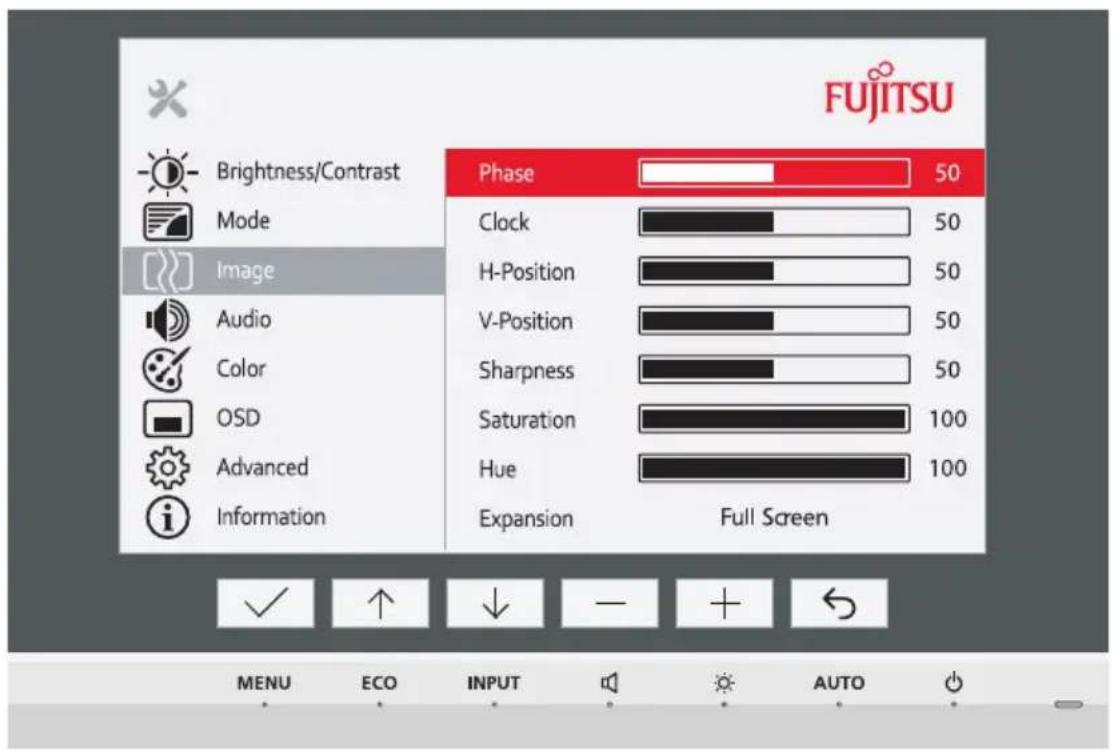
Settingthescreendisplay
| [XX] | OpentheImagesettingwindow |
| Phase | EliminatepicturedisturbanceWith this function you fine-tune your monitor to eliminate picture disturbance. |
| Clock | SetsynchronisationWiththisfunctionyouadjustthepicturewidthtoeliminateverticalpicture disturbances. |
| H-Position | AdjustthehorizontalpositionWiththisfunctionyoumovethepicturetotheleftortotheright. |
| V-Position | AdjusttheverticalpositionWiththisfunctionyoumovethepictureupordown. |
| Sharpness | Adjust the sharpness of the picture for the Photo and Video modes. |
| Expansion | AdjustthepicturesizeFullscreen=selectionoffullscreenmodeKeep aspect = maximum picture size without distortion |
Adjustingthevolume
| CalltheAudiosettingwindow | |
| Volume | Setthevolumeforplaybackwiththeintegratedloudspeakers |
| Mute | Switchtheloudspeakersofforon |
| Input | Selectingth eaudioinputsignal(DP,PCAudio) |
Settingcolourtemperatureandcolours
| OpeningtheColorsettingwindow | |
| SelectthecolourtemperatureThe"warmth"ofthescreencoloursissetusingthecolourtemperature.The colourtemperatureismeasuredinKelvin(K).Youcanchoosebetween6500 K, 7500 K, 9300 K, Native and Custom Color.The options Native and Custom Color are only available in the Office setting mode.Youcanchangethecolourratiosofthebasiccolours(red,green,blue)as requiredusingCustomColor. You can use toselectthecolourchannels.The 6500K setting is recommended for general Windows applications.In the Native and Custom Color settings, the full colour space of the LCD panelcanbeused. |
SettingtheOSDmenu
| CalluptheOSDwindo w | |
| Language | SelectingthelanguagefortheOSDmenuWiththisfunctionyouselectthelanguagefortheOSDmenu.ThedefaultsettingisEnglish. |
| Timeout | Settingthedis playdurationoftheOSDmenuWiththisfunct ionyoucanselectavaluefrom10to120seconds.Ifthesetime expireswithoutasettingbeingmade,theOSDmenuis automaticallyhidden. |
| Rotation | AdjusttheorientationoftheOSDmenu.ThisfunctioncanbeusedtoturntheOSDmenuthrough90°.ThisfunctionmakesiteasiertoreadtheOSDmenuwhilethepivotfunction isbeingused.Thissettingisavailableonlyonmonitorsthathaveamanualpivotfunction. |
Advancedsettingfunctions
| CallinguptheAdvancedwindow | |
| Inputselect | SelecttheinputsignalThisfunctionisusedtoselecttheinputsignal(VGA,DVlorDP).Thisisonconditionthatthedisplayadaptersupportsthisfunction. |
| Overdrive | Activating/deactivatingtheoverdrivefunctionThisfunctioncanbeusedtoimprovethefocusinfastmovingimages.This setting can only be configured inVideoapplication mode. |
| DDC-CI | Activating/deactivatingtheDDC-CIfunctionDDC-CI(DisplayDataChannel-CommandInterface)DatacanbeexchangedthroughtheconnectionbetweenthePCandthe display. |
| Factoryrecall | ActivatethefactorysettingsWiththisfunctionallsettingsareresettothefactorysettingson reconfirmation.Thefunctionisexecutedusing →. The AutoProcessingmessageisdisplayed viaaVGAdatacable.Thelanguageselectionmenuappears. |
Displayinginformation
| i | CalltheInform ationsettingwindowThisfunctiond isplaysdetailssuchasthemodeldesignation,serialnumber,resolution,H /VfrequencyandECOmode. |
Notesonergonomiccolouradju stment

If you select colours forthemonitor in your application programmes, taken note of the information below.
The primary colours blue and red on dark background donot produce the minimum required contrast of 3:1 and are therefore not suitable for continuous text and data entry.
When using several colours for characters and background and giving the primary colours full modulation, you can obtain very suitable colour combinations (seethefollowingtable):
| Background | Characters | |||||||
| blackwhite | purpleblue | cyangreen | yellowred | |||||
| black | + | + | - | + | + | + | - | |
| white | + | + | + | - | - | - | + | |
| purple | + | + | - | - | - | - | - | |
| blue | - | + | - | + | - | + | - | |
| cyan | + | - | - | + | - | - | - | |
| green | + | - | - | + | - | - | - | |
| yellow | + | - | + | + | - | - | + | |
| red | - | + | - | - | - | - | + | |
+Colourcombination verysuitable
-Colourcombinationnotsuitablebecausecolourhuesaretooclosetogether,thincharacters are not identifiable or rigorous focusing is demanded of the human eye.
Troubleshooting
Should an error occur, first check the following points. If the distortion is still not eliminated, themonitor should, if possible, be checked on another computer.
If you cannot solve the problem, please contact our Service Desk.
| Havingthisproblem?Checkthefollowingpoints: | |
| NoscreendisplayPowerindicatordoesnotlightup | ▶ Checkwhetherthepowercableonthe monitorisconnectedcorrectly.▶ Checkwhetherthecomput erisswitchedon. |
| NoscreendisplayPowerindicatorislit | ▶ Check whether the computer is switched on.▶ Checkwhetherthedatacableforthe monitoriscorrectlyattachedtothemonitor portonthecomputer.▶ Pressanykeyonthecomputerkeyboard. Thecomputermaybeinpowersaving mode.▶ Alterthebrightnessand/orcontrastuntilyou getapicture. |
| Message:NoSignal | ▶ Checkwhetherthedatacableforthe monitoriscorrectlyattachedtothemonitor portonthecomputer.▶ Check whether the computer is switched on. |
| Message:Frequencyoutofrange:#kHz/##HzPleasechangethedisplaymode to1920x1080with60Hz | Theinputsign al(horizontalfrequency and refreshrate )atthedisplayedinputdoesnot correspondt othetechnicaldataforthemonitor.▶ Adjustthev ideofrequencyrangeusingthe computerso ftware(seedocumentationfor thecompute rordisplayadapter).▶ Setadifferentscreenresolutionusingthe computersoftware(seedocumentationfor thecomputerordisplayadapter). |
| Picturepositionnotcorrect | Themonitorrecognisesanundefinedmode(see chapter" Technicalspecification",Page35).▶ Pressthe AUTO buttontoconductthe auto-adjustmentofthescreen. |
| Pictureisshaking | ▶ Checkwhetherthedatacableforthe monitoriscorrectlyattachedtothemonitor portonthecomputer.▶ Pressthe AUTO buttontoconductthe auto-adjustmentofthescreen. |
| Pictureiswronglyadjusted | ▶ Run theFactoryRecallfunctionintheOSD menu.TheAutoProcessingmessageappears. |
| Picturedisturbances(verticallines) | ▶ Pressthe AUTO buttontoconductthe auto-adjustmentofthescreen. |
| Picturedisturbances(horizon tallines,picture noise) | ► Pressthe AUTO buttontoconductthe auto-adjustmentofthescreen. |
| Thescreenbecomesdarker | Thebackgroundlightinghasalimitedlifetime. Ifyourmonitordisplayshouldbecometoodark, thebackgroundlightingwillhavetobereplaced. ► ContactourServiceDesk. |
Explanatoryinformationabout standardISO9241-307
Permanentlyunlitorlitpixels
Today's production techniques cannot guarantee an absolutely fault-free screen display. Depending on the total number of pixels (resolution), there may be a few constantly lit or unlit pixels or subpixels.
| Pixel | Apixelconsistsof3subpixels,normallyred,greenandblue.Apixelis thesmallestelementthatcanbegeneratedbycompletefunctionalityof thedisplay. |
| Subpixel | A subpixel is a separately addressable internal structure within a pixel that enhancesthepixelfunction. |
The maximum permitted number of faulty pixels is stipulated in the international standard ISO9241-307. In accordance with standard ISO9241-3, LCD monitors by Fujitsu comply with Class II for low resolutions and Class I for resolutions of 1680x1050 (1764000 pixel) and higher.
Examples:
A flat-screen monitor with a resolution of 1280 x 1024 has 1280 x 1024 = 1310720 pixels. Each pixel consistsofthreesubpixels(red, greenandblue), sotherearealmost3.9millionsubpixelsintotal. AccordingtoISO9241-3(ClassII), amaximumof3litand3unlitpixelsplus7litor13unlitsubpixels, or a corresponding combination, may be faulty (1 lit subpixel counts as two unlit subpixels).
A flat-screen monitor with a resolution of 1920 x 1080 has 1920 x 1080 = 2073600 pixels. Each pixel consistsofthreesubpixels(red, greenandblue), sotherearealmost6.2millionsubpixelsintotal. AccordingtoISO9241-3(ClassI), amaximumof2litand2unlitpixelsplus5litor10unlitsubpixels, or a corresponding combination, may be faulty (1 lit subpixel counts as two unlit subpixels).
Technicalspecification

Condensationisnotpermitted, neitherintheratedrangeofoperation norinthelimitrangeofoperation.
ProductnameB23T-7LED
ModelnameDY23T-7
Dimensionsandweight
Visiblediagonals58.4cm
Dotpitch0.2652mm
| Width509mmlmagesize | ||
| Height | 286mm | |
| Maximumresolution | 1920x1080 | |
| Dimensions incl. monitor base | Width550mm | |
| Height (min.) | 357mm | |
| Depth | 204mm | |
| Weight(wit houtpackaging) | 6.2kg | |
| Storabledisplaymodes | 31 | |
| Pixel fault classes according to ISO9241-307 | Class | I |
| Electricaldata | ||
| Video | Analog | positive, 0.7Vss, 75 Ω |
| Digital | DisplayPort/DVI-D with HDCP | |
| Synchronisation | Separate Sync. TTL, positiveor negative | |
| Horizontalfrequency | 30 kHz ... 82 kHz (multi-scanning) | |
| Refreshrate | 48Hz....76Hz | |
| Maximumpixelrate | VGA:165MHz | |
| Digital:165MHz | ||
| Powersupply | automatic switching 100 V – 240 V, 50/60 Hz | |
| Totalpowerconsumption (without audio,USB) | Normaloperation | 23W |
| ECO operatingmode | 19 W | |
| Power savingmode | <0.35W | |
| Soundoutput | 2.0 Wleft; 2.0Wright | |
Environmentalconditions
Environmentclass3K2,DINIEC721
| Ratedrangeofoperation | 15°C....35°C |
| Humidity | 15%....85% |
| Limitrangeofoperation | 5°C....35°C |
| Humidity | 15%....85% |
VESA-DDC-compatibleVGAinterface
YourmonitorisequippedwithaVESA-DDC-compatibleVGAinterface.VESA-DDC(Video ElectronicsStandardAssociation,DisplayDataChannel)isusedasthecommunications interfacebetweenthemonitorandthecomputer.Ifthecomputerisequippedwitha VESA-DDC-compatibleVGAinterface,itcanautomaticallyreadthedataforensuring optimumoperationfromthemonitorandselecttheappropriatesettings.
Presetoperatingmodes

Thepictureposit ionandsizehavebeensettooptimumvaluesatthefactoryforthe operatingmodesl istedabove.Dependingonthedisplayadapterused,itmaybe necessarytoadj ustthedisplaypositionorsize.Inthiscase,youcchangeand savethesettin gs(seechapter" Changingthemonitorsettings",Page21).
Forergonomic reasons, ascreenresolutionof1920x1080pixelsisrecommended. Because of the technology used (activematrix), an LCD monitor provides a totallyflicke r-freepicture, even with arefreshrate of 60Hz.
Mostfrequentoperatingmodes
| ScreenresolutionRefreshrate | |
| 640x480 | 60/75Hz |
| 720x40070Hz | |
| 800x600 | 60/75Hz |
| 1024x768 | 60/75Hz |
| 1280x72060Hz | |
| 1280x1024 | 60/75Hz |
| 1366x76860Hz | |
| 1440x90060Hz | |
| 1600x90060Hz | |
| 1680x105060Hz | |
| 1920x108060Hz | |
| 1920x120060Hz |
SUBDport
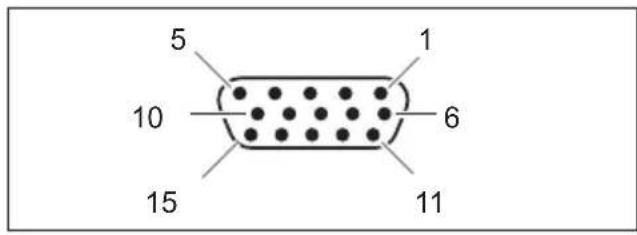
| PinMeaning | |
| 1Videoinputred | |
| 2Videoinputgreen | |
| 3Videoinputblue | |
| 4 | Ground |
| 5 | Ground |
| 6Videogroundred | |
| 7 | Videogroundgreen |
| 8Videogroundblue | |
| 9 | +5V(DDC) |
| 10 | Sync.ground |
| 11 | Ground |
| 12 | DDCData |
| 13H.sync | |
| 14V.sync | |
| 15 | DDCClock |
DVI-Dport
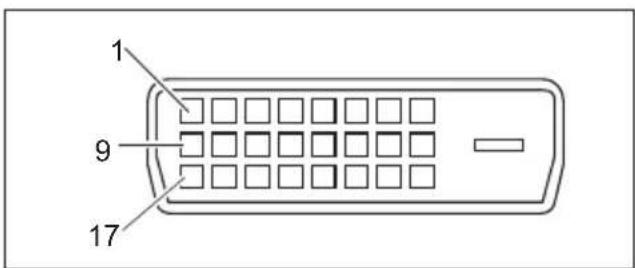
| PinMeaning | |
| 1 | TMDSData2- |
| 2 | TMDSData2+ |
| 3 | TMDSData2/4Shield |
| 4notconnected | |
| 5 | notconnected |
| 6 | DDCClock |
| 7 | DDCData |
| 8 | AnalogVertica I S y n c |
| 9 | TMDSData1- |
| 10 | TMDSData1+ |
| 11 | TMDSData1/ 3Shield |
| 12notconnec | ted |
| 13notconnec | ted |
| 14+5VPower | |
| 15Earth | |
| 16HotPlu | gDetect |
| 17 | TMDSData0- |
| 18 | TMDSData0+ |
| 19 | TMDS Data0/5Shield |
| 20not | connected |
| 21no | tconnected |
| 22 | TMDSClockShield |
| 23 | TMDSClock+ |
| 24 | TMDSClock- |
DisplayPortsocket
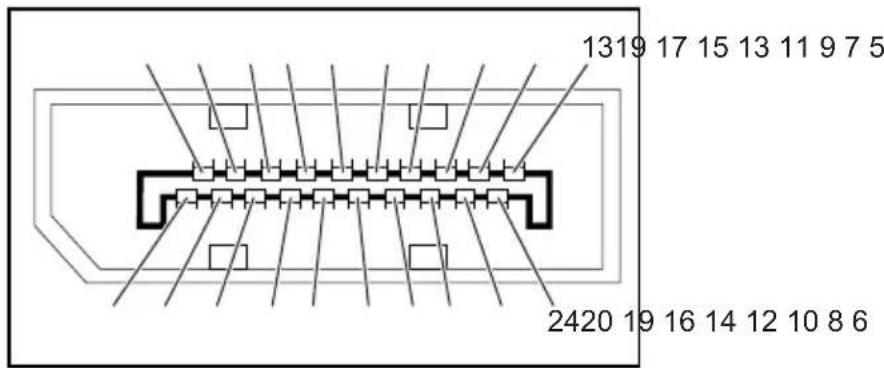
| PinMeaning | |
| 1 | Lane3(negative) |
| 2 | E a r |
| 3 | Lane3(positive) |
| 4 | Lane2(negative) |
| 5 | Earth |
| 6 | Lane2(positive ) |
| 7 | Lane1(negative) |
| 8 | E a r |
| 9 | Lane1(positive) |
| 10 | Lane0(nega tive) |
| 11 | Earth |
| 12 | Lane0(positive) |
| 13 | Connectedtoearth |
| 14 | Connectedtoearth |
| 15 | Auxiliary channel (positive) |
| 16 | Earth |
| 17 | Auxiliary channel (negative) |
| 18 | HotPlugDetect |
| 19 | ReturnforPower |
| 20 | Power for connector (3.3V500mA) |
- Congratulations your purchase of an innovative product from Fujitsu.
- FUJITSU
- FUJITSUDisplayB23T-7LED
- Remarks
- Trademarks
- Copyright
- Contents
- YourLCDscreen....5
- Important notes 7
- Getting started 11
- Operation 19
- Noteson ergonomic colour adjustment ....
- Troubleshooting 32
- Explanatory information about standard ISO 9241-307 34
- Technical specification 35
- YourLCDscreen...
- Target group
- Furtherinformation
- Importantnotes
- Safetyinstructions
- Powercable
- Transportingthedevice
- Cleaningthedevice
- CEmarking
- Disposalandrecycling
- Gettingstarted
- Unpackingandcheckingthedelivery
- Setting up the device
- Settingupanergonomicvideoworkstation
- Mountingthemonitorbase
- Adjustingheight
- Adjustingthei nclination
- Adjustingtherotation
- Removingmonitorbase
- Connecting the device
- Connectingcablestothemonitor
- Connectingcablestothecomputer
- Operation
- Switchingthedeviceonandoff
- Notesonpowermanagement
- Changingthemo nitorsettings
- Changingthemonitorsettingswiththebuttons ofthecontrolpanel
- SelectOSDIanguage
- Activate/deactivateECOoperatingmode
- Selectingth inputsignal
- Adjustingthevolume
- Adjustingthebrightness
- Performingauto-adjustmentofthemonitor
- LockingtheOSDme nu
- LockingtheON/OFFbuttonorON/OFFtouchsensor
- ChangingthemonitorsettingsusingtheOSDmenu
- OSDmenufunctions
- Notesonergonomiccolouradju stment
- Troubleshooting
- Explanatoryinformationabout standardISO9241-307
- Permanentlyunlitorlitpixels
- Examples:
- Technicalspecification
- ProductnameB23T-7LED
- Dimensionsandweight
- VESA-DDC-compatibleVGAinterface
- Presetoperatingmodes
- SUBDport
Brand : FUJITSU
Model : B23T-7 LED
Category : Screen