
P26W-5 ECO - Screen FUJITSU - Free user manual and instructions
Find the device manual for free P26W-5 ECO FUJITSU in PDF.

| Product Type | LED Monitor |
| Brand | Fujitsu |
| Model | P26W-5 ECO |
| Screen Size | 26 inches (66 cm) |
| Aspect Ratio | 16:10 |
| Resolution | 1920 x 1200 (WUXGA) |
| Brightness | 300 cd/m² |
| Contrast Ratio | 1000:1 (typical) |
| Response Time | 5 ms (gray-to-gray) |
| Viewing Angle | 170° horizontal / 160° vertical |
| Color Support | 16.7 million colors |
| Connectivity | 1 x VGA, 1 x DVI-D, 1 x DisplayPort |
| Power Consumption | 35 W (typical), <0.5 W (standby) |
| Energy Efficiency Class | A+ (EU Eco-label) |
| Dimensions (with stand) | 615 x 405 x 210 mm |
| Weight (with stand) | 6.5 kg |
| VESA Mount | 100 x 100 mm |
| Adjustability | Height, tilt, swivel, pivot |
| Speakers | 2 x 2W integrated |
| Environmental Certifications | EPEAT Gold, TCO 6.0 |
Frequently Asked Questions - P26W-5 ECO FUJITSU
User questions about P26W-5 ECO FUJITSU
0 question about this device. Answer the ones you know or ask your own.
Ask a new question about this device
Download the instructions for your Screen in PDF format for free! Find your manual P26W-5 ECO - FUJITSU and take your electronic device back in hand. On this page are published all the documents necessary for the use of your device. P26W-5 ECO by FUJITSU.
USER MANUAL P26W-5 ECO FUJITSU
...anytechnicalquestionsorproblems?
Pleasecontact:
- our Service Desk
•yoursalespartner
•yoursalesoffice
The latest information about our products, useful tips, updates etc. is available on our website:" http://ts.fujitsu.com/support/"
FurtherinformationcanbefoundintheServiceDesklist:
"http://ts.fujitsu.com/support/servicedesk.html"
FUJITSU
Copyright
© Fujitsu Technology Solutions 2009
2009/09
Published by
Fujitsu Technology Solutions GmbH
http://ts.fujitsu.com/support
All rights reserved, including intellectual property rights. Technical data subject to modifications and delivery subject to availability. Any liability that the data and illustrations are complete, actual or correct is excluded. Designations may be trademarks and/or copyrights of the respective manufacturer, the use of which by third parties for their own purposes may infringe the rights of such owner. For further information see http://ts.fujitsu.com/terms_of_use.html
Order-No. Fujitsu Technology Solutions: A26361-K1254-Z220-1-7619, Edition 2
Notesonergonomiccolouradjustment22
Troubleshooting 23
NotesregardingtheDINENISO
13406-2standard 25
Technical specification 26
Windows7, WindowsVistaandWindowsXPareregisteredtrademarksofMicrosoftCorporation.
VESA, DDC and DPMS are registered trademark of Video Electronics Standards Association.
All other trademarks referred to in this publication are trademarks of the respective owners, whose legal protection is hereby recognised.
Copyright©FujitsuTechnologySolutionsGmbH2009
Allrights, including rightsoftranslation, reproductionbyprinting, copyingorsimilar methods, ofthewholedocumentorpartsthereof, arereserved.
Offenderswillbelieablefordamages.
All rights reserved, including rights created by patent grant or registration of a utility model or design.
Subjecttoavailabilityandtechnicalmodifications.
Noliabilityforcontentorprintingerrors.
Contents
YourLCDscreen....1
Targetgroup 1
Furtherinformation 2
Notationalconventions....2
Important notes 3
Safetyinstructions 3
Powercable 4
Transportingthedevic e 4
Cleaning the device 4
CEmarking 5
Power Management 5
Disposalandrecycling 5
Gettingstarted 6
Unpacking and checking the delivery 6
Settingupthedevice 6
Setting up an ergonomic video workstation 7
Adjustingheight 9
Adjustingtheinclination 9
Removingmonitor base 10
Connecting the device 10
Connecting cables to the monitor 11
Connecting cables to the computer 13
Operation 14
Switchingth e device on and off 14
Notesonpower management 15
Changingthe monitorsettings....16.
Changingth e monitor settings with the buttons of the control panel 16
Changingth e monitorsettings using the OSD menu 18
Adjusting the brightness and contrast 19....
Selecting the application mode 19
Adjusting the picturesize and position 20...
Adjusting the volume 20
Settingcolourtemperature and colours 20...
Setting functions 21
Displaying information 21
Noteson ergonomic colour adjustment ....
Troubleshooting 23
Notes regarding the DIN EN ISO 13406-2 standard 25
Technical specification 26
VESA-DDC-compatible VGA interface 27
Preset operating modes 27
Most frequent operating modes 27
Video/TV operating modes using DVI and HDMI 27
SUBDport 28
DVI-Dport 29
HDMIport 30
YourLCDscreen...
hasawholerangeofusefulfeaturesandfunctions,e.g.:
- TFTdisplay(ThinFilmTransistor;activematrix)
- minimalspacerequirementstha nkstoslimcasing
- optimumergonomic characteristics (totally distortion-free, excellent picture definition and colour purity right into the corners)
•highdegreeofbrightnessandg oodcontrast
•highresolution(1920x1200)
•presentationofupto16.7milli oncolours(inconjunctionwithanappropriatedisplayadapter)
- automaticscanningofhorizontalfrequenciesfrom30to82kHzandrefreshrates(verticalfrequencies)from56to76Hz(absolutelyflicker-free)
•digitalscreencontrollerwithm icroprocessorforstoring36differentdisplaymodes
- freelyadjustablecolouralignmentformatchingthescreencolourstothe coloursofvariousinputandoutputdevices
- convenientoperationviainteg ratedOSD(On-Screen-display)menu
• VESA-DDC compatibility
•VESA-FPMPMIcompatibility(Fla Mountingdeviceforswivelarman tPanelMonitorPhysicalMountingInterface)-dwallbracket
- Plug&Playcapability
•digitalvideoinputs(DVIandHD MI)withHDCP
• power management for reducing power consumption when the computer is not in use
•CompliancewiththerecommendationsaccordingtoTCO'03
- the monitor fulfills all GS ("Geprüfte Sicherheit", Certified Security) requirements.
Thisoperatingmanualcontainsim portant information you require to start up and run your LCD monitor.
Agraphicscard(displayadapter)withVGAinterfaceoradigitaldisplayadapterwithDVIinterfaceorvideosignalsourcewithHDMlin interfaceisrequiredtocontroltheLCDmonitor.Themonitorprocessesthedatasuppliedtoi tbythedisplayadapter.Thedisplayadapterortheassociateddriversoftwareisresponsible forsettingthemodes(resolutionandrefreshrate).
Whenputtingthemonitorintoop erationforthefirsttime,thescreendisplayshouldbe optimallyadaptedtothedispla yadapterusedandadjustedinaccordancewithyour needs(seechapter" Changingth emonitorsettings",Page16).
Target group
You don't need to be an "expert" to perform the operations described here. However, please observe the safety information given in the operating instructions for the computer and in this manual.
Intheeventofanyproblemsoccurring,pleasecontactyoursalesoutletorourServiceDesk.
Furtherinformation
Detailsofhowyousettheresolutionandrefreshrateareprovidedinthedocumentation foryourdisplayadapterandtheassociateddriversoftware.
Forergonomicreasons, ascreenresolutionof1920x1200pixelsisrecommended.
Becauseofthetechnologyused(activematrix)anLCDmonitorprovidesatotally flicker-freepictureevenwitharefreshrateof60Hz.
Notationalconventions
 | Payparticularattentiontotextmarkedwiththissymbol.Failureretoobserve these warnings could pose risk to health, damage the device or lead to loss of data. The warranty will be invalidated if the device becomes defective through failure to observ the warnings. | |
 | Indicates important information for the proper use of the device. | |
| ▶ | Indicates an activity that must be performed | |
| ↳ | Indicates a result | |
| This font | indicates data entered using the keyboard in a program dialogue or command line, e.g. your password (Name 123) or command used to start a program (start.exe) | |
| This font | indicates information that is displayed on the screen by a program, e.g.: Installation is complete. | |
| This font | indicates terms and texts used in as software interface, e.g.: Clickon Save names of programs or files, e.g. Windows or setup.exe. | |
| "This font" | indicates cross-reference to another section, e.g. "Safety information" cross-reference to an external source, e.g. a web address: Formore information, goto "http://ts.fujitsu.com" Names of CDs, DVDs and titles or designations of other materials, e.g.: "CD/DVDDrivers & Utilities" or "Safety" Manual | |
| Abc | indicates a key on the keyboard, e.g.: F10 | |
| This font | indicate serms and text that are emphasized or highlighted, e.g.: Do not switch off the device | |
Importantnotes
In this chapter you will find information regarding safety which it is essential to take note of when working with your device.
Safetyinstructions
Thisdevicecomplieswiththere levantsafetyregulationsfordataprocessingequipment, includingelectronicofficema chinesforuseinanofficeenvironment.Ifyouhaveany questions,contactyoursales outletorourServiceDesk.
- Thedisplaysurfaceofthedevi be carefulwiththedisplaysur ceissensitivetopressureandscratches. You should therefore faceinordertoavoidlastingdamage(scratches).
- If the device is brought into the installationsite from a cold environment, condensation can form. Before operating the device, wait until it is absolutely dry and has reached approximately the same temperature at the installationsite.
- Wheninstallingandoperatin gthedevice,pleaseobservethenotesonenvironmental conditionsinChapter" Technicalspecification",Page26aswellastheinstructionsin Chapter" Settingupanergon omicvideoworkstation",Page7.
• To ensure sufficient ventilation, the air inlet and outlet openings of the device must be kept clear. - The device automatically set makesure that the local mains sits self to the correct voltage within the range from 100V to 240V. voltage is neither higher nor lower than this range.
- Ensure that the powers octon the device and themains outlet are freely accessible.
•TheON/OFFswitchdoesnotdi fullyfromthemainssupply, sconnectthemonitorfromthemainsvoltage.Todisconnect disconnectthepowerplugfromthesocket. - The device is equipped with powerercable that complies with safety standards.
•Usethesuppliedpowercableo nly. - Laythecablesinsuchawaythattheydonotcreateahazard(dangeroftripping) and cannot be damaged. When connecting the device, observe the relevant notesinchapter" Connectingthedevice",Page10.
•Nodatatransfercablesshou ldbeconnectedordisconnectedduringathunderstorm. - Makesurethatnoobjects(e.g.jewellerychains,paperclips,etc.)orliquidsget insidethedevice(dangerofelectricshock,shortcircuit).
•The device is not waterproof! Never immersethed device in water and protect it from spray water (rain, se awater). - Inemergencies(e.g. damagedcasing,elementsorcables,penetrationof liquidsorforeignmatter),switchoffthedevice,disconnectthepowerplugand contactyoursalesoutletorourServiceDesk.
•Repairstothedevicemusto andincorrectrepairmaygr nly be performed by qualified technicians. Unauthorised opening eatly endanger the user (electric shock, fire risk). - Only use the screen resolution settings and refresh rates specified in Chapter "Technical specification", Page 26. Otherwise you may damage the device. If you are in any doubt, contact your sales outlet or our Service Desk.
- Useascreensaverwithmovi ngimagesandactivatethepowermanagementfor yourmonitortopreventsti llimagesfrom"burningin".
-
If you operate the device with the swivel armor wall bracket, it must not be turned by 180^ .
-
Thedevicemayonlybeoperatedinthewideformat(0°landscapemode). Thebuttonsof thecontrolpanelarelocatedatthebottominthemiddleofthemonitor.
- Storethismanualclosetothedevice.Ifyoupassthedeviceontothird parties,youshouldpassthismanualonwithit.
- Werecommendthatyouplaceyourdeviceonadurable,non-slipsurface.Inview of the many different finishes and varnishes used on furniture, it is possible that the feetofthedevicemaymarkthesurfacetheystandon.
- To ensure sufficient ventilation, the air supply and air outlet openings of themonitormustneverbeblocked.
Powercable
Usethesuppliedpowercableonly.
Usethefollowingguidelinesifitisnecessarytoreplacetheoriginalcableset.
•Thefemale/malereceptaclesofthecordsetmustmeetIEC60320/CEE-22requirements.
- The cable has to be HAR-certified or VDE-certified. The mark HAR or VDEwillappearontheoutersheath.
- Fordeviceswhicharemountedonadeskortable,typeSVTorSJTcablesetsmaybe used. For devices which sit on the floor, only SJT type cable sets may be used.
- Thecablesetmustbeselectedaccordingtotheratedcurrentforyourdevice.
- Ifnecessary, replace the original power cable with a regular grounded 3-core mains lead.
Transportingthedevice

Transport all parts separately in their original packaging or in a packaging which protectsthemfromknocksandjolts,tothenewsite.
Donotunpackthemuntilalltransportationmanoeuvresarecompleted.
If the device is brought from a cold environment into a room where it will be used, condensation may occur. Before operating the device, wait until it is absolutely dry and has reached approximately the same temperature as the installation site.
Cleaningthe device

Switchoffthedeviceandunplugthepowerplug.
Donotcleananyinteriorpartsyourself,leavethisjobtoaservicetechnician.
Donotuseanycleaningagentsthatcontainabrasivesormaycorrodeplastic.
Ensure that noliquidentersthedevice.
Thedisplaysurfaceofthedeviceissensitivetopressureandscratches.Clean itonlyusingasoft,slightlymoistenedcloth.
The surface of the casing can be cleaned with a dry cloth. If particularly dirty, use a cloth that has been moistened in mild domestic detergent and then carefully wrungout.
CEmarking

TheshippedversionofthisdevicecomplieswiththerequirementsofEEC directives2004/108/EC"Electromagneticcompatibility"and2006/95/EC "Lowvoltagedirective".
PowerManagement
The FujitsuLCDmonitorisequipped with a power management system which, when in 0W energy-saving mode, reduce the power consumption to 0W.
Disposalandrecycling
This device has been manufactured as far as possible from materials which can be recycled or disposed of in such a way that the environment is not damaged. The device may be taken back after use to be reused or recycled, provided that it is returned in a condition that be fits its intended use. Any components not reclaimed will be disposed of in an environmentally acceptable manner.
The device must be disposed of in accordance with local regulations for disposal of special waste. Thescreenbackgroundlightingcontainsmercury. Youmustobservetheapplicable handlinganddisposalsafetyregulationsforfluorescenttubes.
If you have any questions on disposal, please contact your local sales office or our ServiceDesk,orcontactoneofthefollowingdirectly:
| Germany | Belgium | Switzerland |
| FujitsuTechnologySolutionsGmbHRemarketingandRecy clingD-33106Paderborn, GermanyTel.:+495251/8180 10Fax:+495251/818015"http://ts.fujitsu.com/wvm" | RECUPELBoulevardReyers,80B-1030BrusselsTel.:+322/7068616Fax: +322/7068613E-mail: info@recupel.be"http://www.recupel.be" | SWICOSchweizerischerWirtschaftsverbandderInformations-,Kommunikations-undOrganisationstechnik(SwissTradeAssociationfor Information,CommunicationsandOrganisationalTechnology).ForalistofSWICO disposalsites,see:"http://www.swico.ch" |
| Asia | USA | |
| Taiwan: Environmental ProtectionAdministrationExecutiveYuan,R.O.C."http://recycle.epa.gov.tw" | FujitsuAmericaInc.1250E.ArquesAvenueSunnyvale,CA94085,U.S.A.Contact: BerndHenningPhoneNo.:(408)329-6737FaxNo.:(408)746-8299 |
Information onthissubjectisalsoavailableonthelnternetat"
http://ts.fujitsu.com/recycling".
Gettingstarted
Unpackingandcheckingthedelivery

Thedisplaysurfaceofthedeviceissensitivetopressureandscratches. Alwaysholdthedevicebythecasing!
Thecompleteddevicepackageincludes:
•onemonitor
•onedatacable(D-SUB)
▶ Unpackalltheindividualparts.
▶ Checkthecontentsofthepackag eforanyvisibledamagecausedduringtransport.
▶ Checkwhetherthedeliveryconformstothedetailsinthedeliverynote.
▶ Should you discover that the delivery note, notify your localsales out very does not correspond to the delivery let immediately.
Donotdiscardtheoriginalpack packaginginthefutureifyou
ingmaterialofthedevices.Youmayneedthe needtotransportyourdevice.
Setting up the device

Toensuresufficientventilat ion, theairinletandoutletopenings of thedevicemustbekeptclear.
Settingupanergonomicvideoworkstation
flowchart
graph TD
    A["Component 1"] --> B["Component 2"]
    B --> C["Component 3"]
    C --> D["Component 4"]
    style A fill:#f9f,stroke:#333
    style B fill:#ccf,stroke:#333
    style C fill:#cfc,stroke:#333
    style D fill:#fcc,stroke:#333
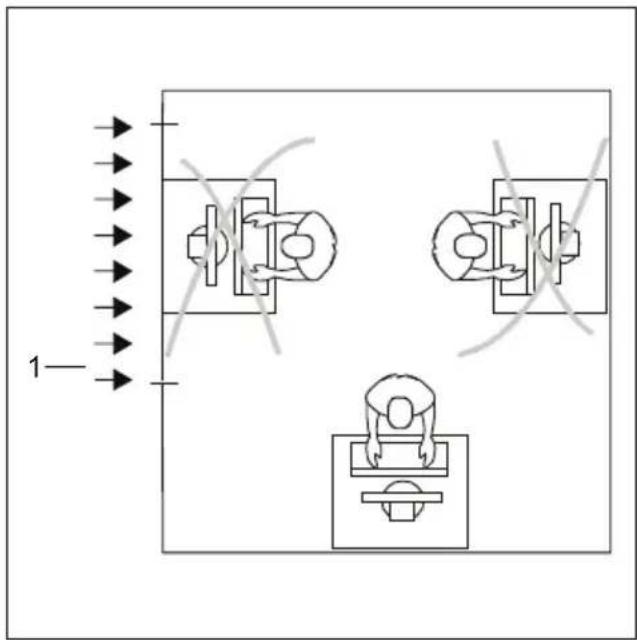
▶ Donotpositionthevideoworkstation oppositeawindow(1).
natural_image
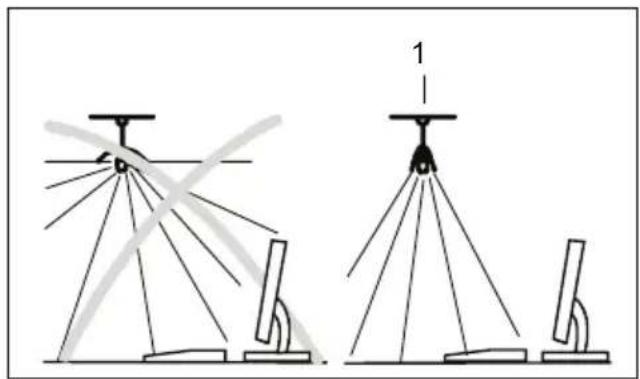
Diagram showing two configurations of a radar or surveying instrument with multiple axes and a labeled component (no text or symbols present)▶ Positionthemonitoroutsidethereach ofalightsource(1).
natural_image
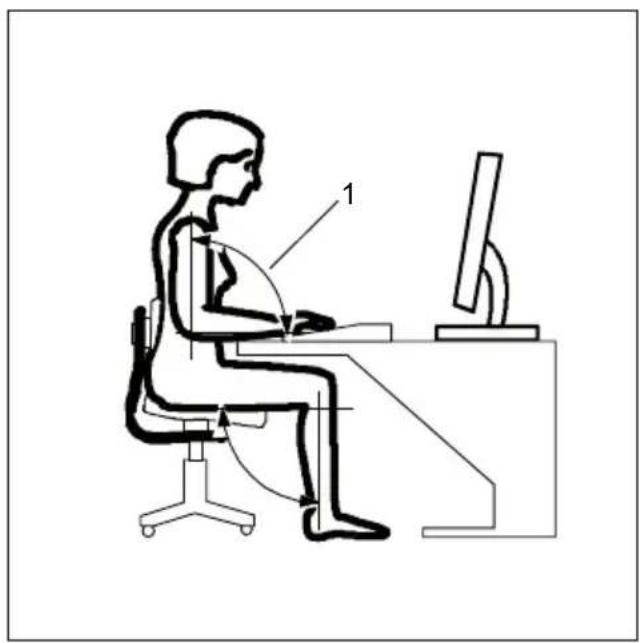
Line drawing of a person sitting at a desk using a computer (no text or symbols present)▶ Positionthekeyboardwhereitis easiesttoreach(1).
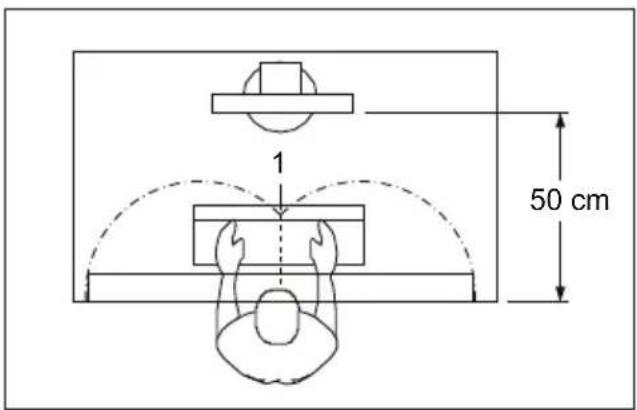
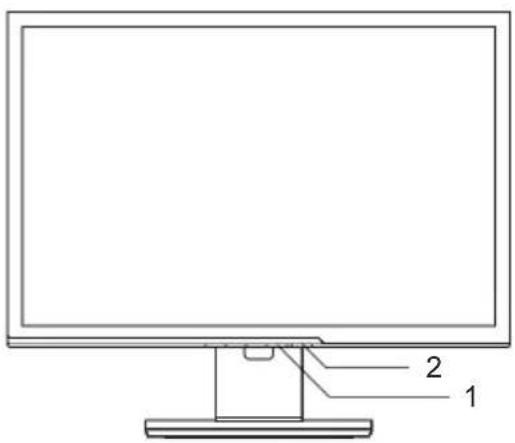
▶ Positionthemonitorsothatheeyedistance tothescreen(1)isaround50cm.
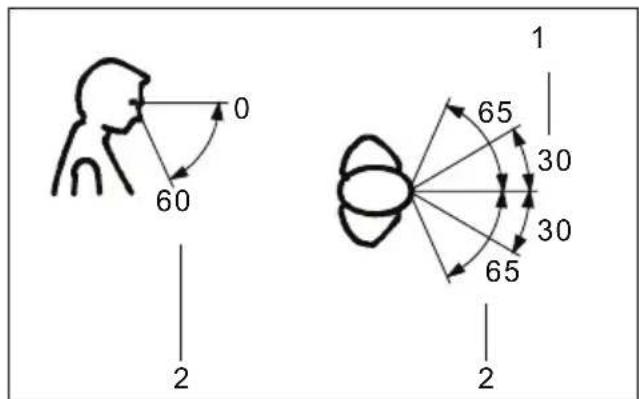
▶ Positionthemonitorforoptimumviewing (1). Themonitorshouldunderno circumstancesfalloutsidethepermissible viewingspace(2).

Dependingonthesituation, it may be advisable to use as a swivel armor wall bracket (VESAFPMPMI), which are available from specialist dealers. For this purpose the monitor bas must be removed before hand as described in Chapter "Removing monitor base", Page 10.
Adjustingheight

Theheightadjustmentisfixedinthetransportposition.
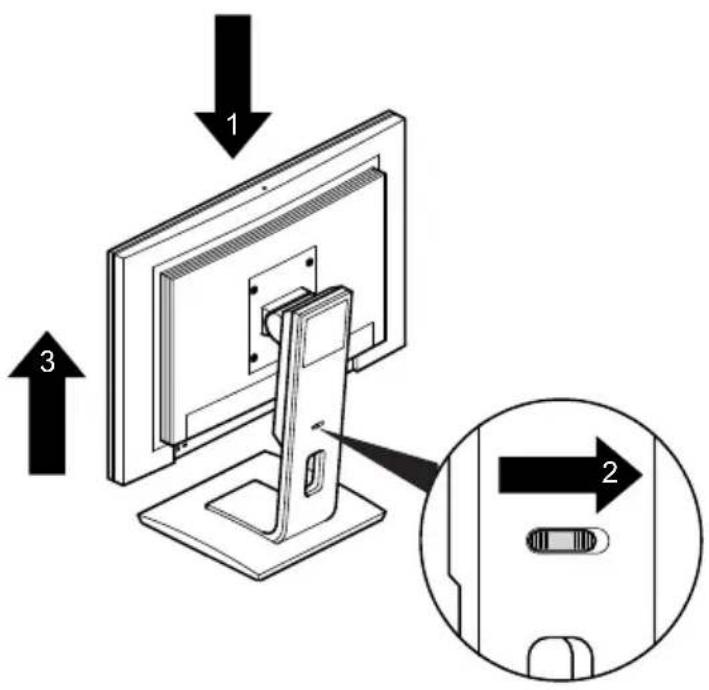
▶ Tofreetheimmobilisation, hold themonitorpresseddown(1).
▶ Thenpresstheslid einthedirectionofthearrow(2)andreleasethemonitoragain(3).
→ Theheightofthemonitorcanbeadjustedbyapproximately120mm.
▶ Graspthemonitorwi thbothhandsattheleftandrightedgesofthe housingandmovei tupordown.
Adjusting the inclination
The inclination of the monitorkan be adjusted by -5° (forward) and +25° (back) from its vertical position.
▶ Holdthemonitorwithbothhandsontheleftandrightsidesofthecasing andmoveittothedesiredangle.
Removingmonitorbase
Beforeyoucanuseaswivelarmorawallbracket,youmustremovethemonitorbase.

Thedisplaysurfaceissusceptibletoscratching!

natural_image
Technical line drawing of a computer monitor with a stand and internal component, showing alignment lines (no text or symbols)▶ Switchoffthemonitorandpullthepower plugoutofthepowersocket.
▶ Laythemonitoronitsfaceonasoftsurface.
▶ Removethecoveranddisconnectallcables.
▶ Removethescrews(1)ontherear ofthemonitor.
→ Youcannowmountaswivelarmor awallbracketasperVESAFPMPMI with100mmholespacing.

Forinstructionsonhowtomounttheswivelarmorwallbracket,pleasesee thedocumentationfortheswivelarmorwallbracket.
Connectingthedevice

Please observe the safety information in "Important notes", Page 3.
CEconformanceandoptimumpicturequalityareguaranteedonlyif youusethedatacablessupplied.
▶ Switchoffthemonitorandthecomputer.
▶ Disconnectthepowerplugfromthecomputer.
Connectingcablestothemonitor
Themonitorportsareprotectedbyacover.
Thesupplieddatacableshavetwo15-pinD-SUBconnectorsortwo24-pinDVI connectors for connection to the monitor and to the computer.
Information on the computer connections and interfaces is contained in the operating manual for the computer.
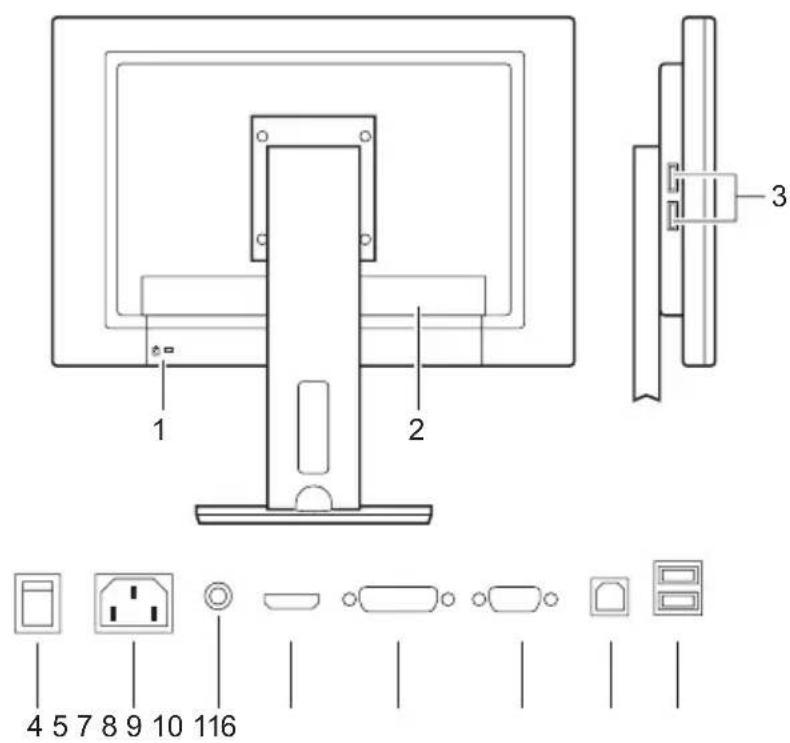
1=Securityslotfor"KensingtonLock"
3=USBOUT(Upstream)
2=Coverposition
▶ Removethecover.
▶ Select the appropriate data cable for your computer.
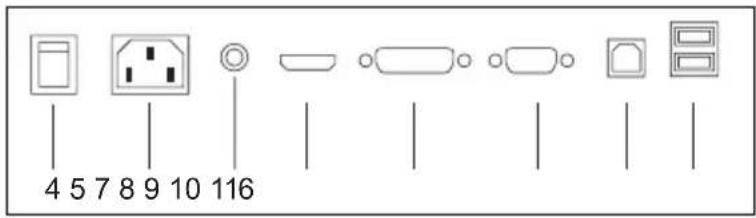
| 4=0Wswitch | 8=DVI-Dsocket(DVI) |
| 5=Powerconnector | 9=D-SUBsocket(VGA) |
| 6=AUDIO-INsocket | 10=USBIN (Downstream) |
| 7 = H D M I s o c k e t | 11 = USB OUT (Upstream) |
▶ Connectoneof t he connectors of the data cable to the D-SUB socket or the DVI-D socket or the HDMIsocketof t hemonitorandsecuretheplugconnectionbytighteningtheretainingscrews.

Themonitorau tomaticallydetectstheinputwhenonlyonesignalsourcesisconnected.
▶ Insert one plug of the audio line in the AUDIO IN socket on the monitor and makesureitisproperlyengaged.
▶ Plug the power cable supplied into the power connector of the monitor.
▶ Plug the supplied USB cable into the USB IN socket (10) and the other end of the cable into a USB socket of the computer.

Connect the USB keyboard and USB mouse directly to the PC, as the USB connector socket of the monitor is switched off in energy-saving mode.
▶ Securethecoverovertheconnections.

A lock (Kensington Lock) can be mounted in the security slot to protect the monitor against theft. A Kensington lock is not supplied with the monitor.
Connectingcablestothecomputer
Information on the computer connections and interfaces is contained in the operating manual for your computer.
Connectthedatacabletothe(active)monitorportonthecomputerandsecure theplug-inconnectionbytighteningthesafetyscrews.
▶ Insert the other plug of the audio cable in the audio output of the computer.
▶ Plug the power connector of the monitor into a properly grounded mains outlet.
▶ Plug the power connector of the computer into a properly grounded mains outlet.

If your computer hastwomonitorports("onboard" screen controller and separate graphics card), the monitor port for the separate graphics card is active as standard.
Operation
Switchingthedeviceonandoff
1=Powerindicator2=ON/OFFswitch

Pressthebuttonsfromthebottomup.
ThecolouroftheLEDindicatorchangesasfollows:
| LEDindicatorStatus | |
| blueMonitorandcomputerareswitchedon. | |
| orange | Monitorisnotreceivingavideosignalorisinpowersavingmode. |
| doesnotlightup | Monitorisswitchedoff(orisin0Wenergy-savingmode) |
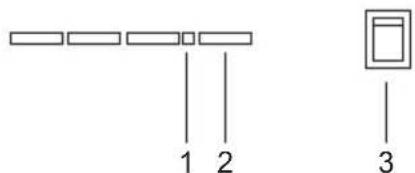
1=Powerindicator
3=0Wswitch
2=ON/OFFswitc h

The "0" setting of the 0W switch (3) on therear activates energy-saving mode (0W operating mode), the switch setting "1" switchestocompatible energy-saving mode < 1W. This setting may be necessary on some PCs if the monitor remains dark in the 0W operating mode.
▶ Switch the device on uOFF switch(2)e ON
Notesonpowermanagement
If your computer is equipped with power management (power-saving mode), the monitor can fully support this function. Here the monitor does not distinguish between the individual energy-saving modes of the computer (standbymode, suspendmode and OFF mode), asitiscapable of immediately switching into the mode with the highest energy-saving effect.
| StageOperation | Powersavingmode | |||
| Normal | ECO | 0W | Compatible | |
| Powersupply indicator | LightsupblueLightsupblueisunlitLightsuporange | |||
| MonitorMax.brightness | typ.200cd/m ^2 | Unlit | Unlit | |
| Powerconsumption (typical) | P24W-5 :90 WP26W-5 :110 W | P24W-5 :55WP26W-5 :70W | reducedto0W | reducedto <1 W |
If your computer detects inactivity (no input) it sends an appropriate signal to the monitor to reduce the power consumption (energy-saving mode). The power indicator of the monitor changes colour to indicate the status change. ECO and 0 W are the preset factory defaults.
Onceaninputismadeatthecomputerthescreencontentsarerestored.

Fordetailedinformationonhowenergy-savingmodeoperates, pleasereferto theoperatingmanualortechnicalmanualofthecomputer.
Changingthemonitorsettings
When putting the monitor into operation for the first time, the screen display should be optimally adapted to the display adapter used.
Changingthemonitorsettings withthebuttons ofthecontrolpanel

Thebuttonsofthecontrolpanelhavetwofunctions.WiththeOSDmenunot activated,youcanmakethefollowingsettingsdirectly:

1=SELECT/MENUbutton
2=Forwards/ECObutton
3=Back/INPUTbutton
4=EXIT/AUTObutton
5=Powerindicator
6=ON/OFFswitch
Performingauto-adjustmentofthemonitor
▶ Pressthe EXIT / AUTO buttonforabout1second.
→ TheAutoProcessingmessageappears
Picturequalityandpositionaresettooptimumvaluesforyoursystem.
Selectinginputsignal(D-SUB/DVI-D/HDMI)
▶ PresstheBack/ INPUT button to call up the Input selectsetting window.
▶ PresstheForwards/ECObuttonortheBack/desiredmonitorconnection(VGA,DVIorHDMI). INPUT buttontoselectthe

ThissettingwindowcanalsobecalledupwhentheOSDmenuislocked.
Activate/deactivateECOoperatingmode

The power consumption of the device can be decreased by reducing the brightness of the picture.
▶ PresstheForwards/ECObuttontoswitchtheECOoperatingmodeonoroff.
→ ThemessageActionwasexecutedappears. IftheECOoperatingmodeisactivated, the followingOSDsettingsarechanged:
| Mode | Office |
| Colour | 6500K |
| temperature | |
| Brightness | reduced |
After the ECO operating mode is switched off, the brightness previously set by the user is restored.
LockingtheOSDmenu
The OSD menu can be locked to prevent accidental or unauthorised changes to the monitor settings.
▶ Pressandholdthe SELECT/MENU buttonforafewsecondswhileyouswitch onthemonitorwiththeON/OFFswitch.
→ TheActionwasexecutedmessageappears.

Please proceed in the samemann to release the locked OSD menu again.
LockingtheON/OFFbutton
TheON/OFFswitchcanbelockedtopreventaccidentalorunauthorised changestothemonitorsettings.
▶ PresstheForwards/ECObuttonandtheBack/timeandkeepthempressedforafewseconds.
INPUT buttonatthesame
→ ThemessageActionwasexecutedappears.

Please proceed in the samemann to release the locked ON/OFF switch again.
ChangingthemonitorsettingsusingtheOSDmenu
With the button on the control panel, you can call up and use the integrated OSD (On-Screen Display) menu.

The OSD menu is available in various languages. The English menu names are used in the following description (default setting). You can select another language using the OSD Language function in the OSD Setup menu.
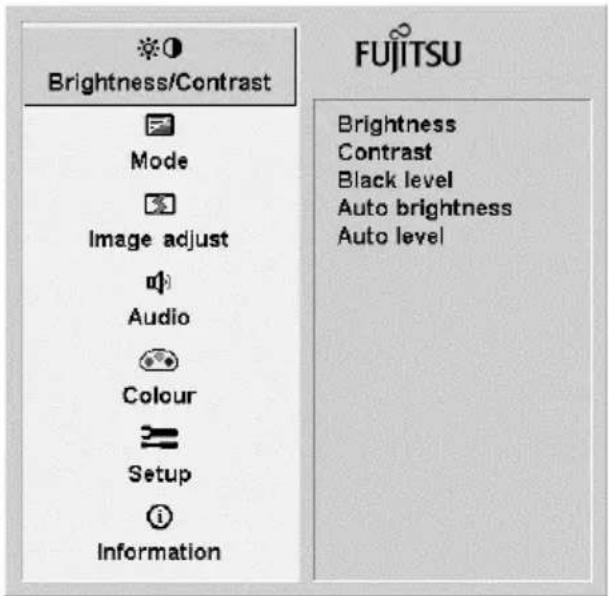
▶ Pressthe SELECT/MENU button to activate the OSD menu.
→ Themainmenuappears, withicons forthesettingfunctions.
The first symbol, (Brightness/Contrast), is highlighted and the associated functions are visible in the right-hand menu field.
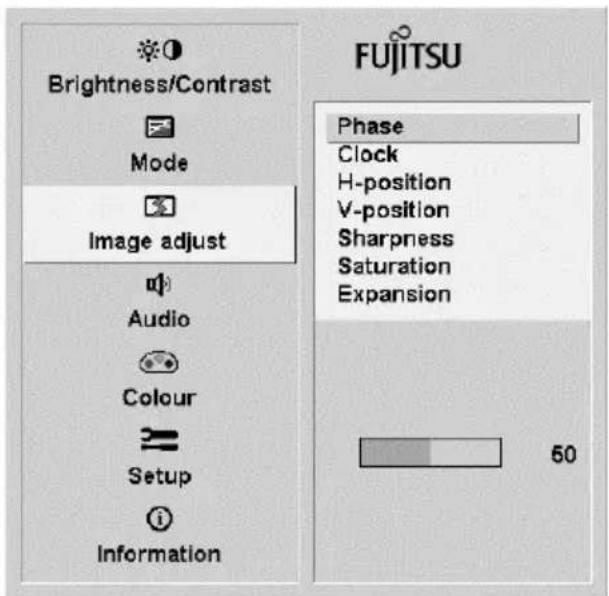
▶ PresstheForwards/ECObuttonor theBack/ INPUT buttontohighlight anothericon(e.g.Imageadjust).
▶ Pressthe SELECT/MENU button to select the highlighted icon.
→ TheImageadjustsetupwindowwill bedisplayed.
▶ PresstheForwards/ECObuttonor theBack/ INPUT buttonohighlight anotherfunction.
▶ Pressthe SELECT/MENU button to select the highlighted function.
▶ PresstheForwards/ECObuttonor theBack/ INPUT buttonohighlight anotherfunction.
▶ Pressthe EXIT/AUTO button to exit the function.
▶ PresstheForwards/ECObuttonorthe Back/ INPUT buttontohighlightanother functionorpressthe EXIT/AUTO button toreturntothemainmenu.
Allchangesarestoredautomatically.

If you want to change other settings, select the corresponding function from the OSD main menu. All possible adjustment so the main menu are described in the following.
Adjustingthebrightnessandco ntrast
| CalluptheBrightness/Contrastsettingwindow | |
| Brightness | SetthebrightnessofthedisplayWiththisfunctionyouchangethebrightnessofthebackgroundlighting.YoucanseewhethertheECOoperatingmodeisactiveunderthebarfordisplayingthebrightnesssetting. |
| Contrast | SetthecontrastofthedisplayWiththisfunctionyoumodifythecontrastofbrightcolourtones. |
| Blacklevel | SetthebrightnessofthedisplayWiththisfunctionyoumodifythecontrastofdarkcolourtones. |
| AutoBrightness | AutomaticbrightnesscontrolThisfunctionisusedtoautomaticallycontrolthebrightnessofthebackgroundlightingusingthelightsensor.On=ThebrightnessisadjustedaccordingtotheambientbrightnessOff=Thebrightnessisadjustedmanuallybytheuser |
| Autolevel | AdjustthesignallevelWiththisfunctionyoucanautomaticallysetthecontrast.Thefunctionisexecutedwiththe SELECT/MENU button. |
If the contrast is set too high, bright surfaces can no longer be distinguished from very brightsurfaces. If the contrast is too low, the maximum brightness will not be achieved.
Selectingtheapplicationmode
| CalluptheModesettingwindow | |
| Office | Office presets (the settings for colour and sharpness can be adjusted) |
| Photo | Photopresets(colour,sha rpness,saturation) |
| Video | Video presets (colour, sharpness, saturation) |
Adjusting the picturesize and position
| CalltheImageadjustsettingwindow | |
| Phase | EliminatepicturedisturbanceWith this function you fine-tune your monitor to eliminate picture disturbance. |
| Clock | SetsynchronisationWiththisfunctionyouadjustthepicturewidthtoeliminateverticalpicture disturbances. |
| H-Position | AdjustthehorizontalpositionWiththisfunctionyoumovethepicturetotheleftortotheright. |
| V-Position | AdjusttheverticalpositionWiththisfunctionyoumovethepictureupordown. |
| Sharpness | Adjust the sharpness of the picture for thePhotoandVideomodes. |
| Saturation | Adjusts the colour saturation for thePhoto,VideoandGamemodes. |
| Expansion | AdjustthepicturesizeFullscreen=selectionoffullscreenmodeKeep aspect=maximum picture size without distortion (only for PC image)16:9=16:9widescreenformat(Video/TVpictureonly)4:3=4:3format(Video/TVpictureonly) |
Adjustingthevolume
| CalltheAudiosettingwindow | |
| Volme | Setthevolumeforplaybackwiththeintegratedloudspeakers |
| Mute | Switchtheloudspeakersoffo r on |
Settingcolourtemperature andcolours
| CalltheColoursettingwindow | |
| SelectthecolourtemperatureThe "warmth" of the screen colours is set using the colour temperature. The colourtemperatureismeasuredinK(=Kelvin).Youcanchoosebetween sRGB, 6500 K, 7500 K, 9300 K, Native and Custom Colour.The options sRGB, Native and Custom colour are only available in the Office settingmode.In the user-defined setting you can change the colour ratios of the basic colours(red,green,blue)asrequired. |
Settingfunctions
| CalluptheSetupsettingswindow | |
| Inputselect | SelecttheinputsignalThisfunctionisusedtoselecttheinputsignal(VGA,DVlorHDMI).Thisfunctionisusedtoselecttheinputsignal(VGA,DVI,HDMI,CVBS,S-VideoorYPbPr).Thisisonconditionthatthedisplayadaptersupportsthisfunction. |
| Language | SetthelanguagefortheOSDmenuWiththisfunctionyouselectthelanguagefortheOSDmenu.ThedefaultsettingisEnglish. |
| DDC-CI | Activate/deactivatetheDDC-CION=TheDDC-CIfunctionisactivated(defaultsetting)Off=TheDDC-CIfunctionisdeactivated |
| OSDHposition | SetthehorizontalpositionoftheOSDmenuWiththisfunctionyoumovetheOSDmenutotheleftortotheright. |
| OSDVposition | SettheverticalpositionoftheOSDmenuWiththisfunctionyoumovetheOSDmenuupordown. |
| OSDTimeout | SetthedisplaydurationoftheOSDmenuWiththisfunctionyouselectavaluefrom10to120seconds.Ifthesetimeexpireswithoutasettingbeingmade,theOSDmenuis automaticallyfadedout. |
| Factoryrecall | ActivatethefactorysettingsWiththisfunctionallsettingsareresettothefactorysettingswithout promptingforconfirmation.Thefunctionisexecutedwiththe SELECT/MENU button.TheAutoProcessingmessageappears. |
Displayinginformation
| i | CalltheInformationsettingw | indow |
| Withthisfunctionthemodeld frequency,inputsignalandp displayed. | esignation,serialnumber,resolution,H/Volarityofthesynchronisationsignalare |
Notesonergonomiccolouradju stment

If you select colours forthemonitor in your application programmes, take note of the information below.
The primary colours blue and red on dark background donot produce the minimum required contrast of 3:1 and are therefore not suitable for continuous text and data entry.
When using several colours for characters and background and giving the primary colours full modulation, you can obtain very suitable colour combinations (seethefollowingtable):
| Background | Characters | |||||||
| blackwhite | purpleblue | cyangreen | yellowred | |||||
| black | + | + | - | + | + | + | - | |
| white | + | + | + | - | - | - | + | |
| purple | + | + | - | - | - | - | - | |
| blue | - | + | - | + | - | + | - | |
| cyan | + | - | - | + | - | - | - | |
| green | + | - | - | + | - | - | - | |
| yellow | + | - | + | + | - | - | + | |
| red | - | + | - | - | - | - | + | |
+Colourcombination verysuitable
-Colourcombinationnotsuitablebecausecolourhuesaretooclosetogether,thincharacters are not identifiable or rigorous focusing is demanded of the human eye.
Troubleshooting
Should an error occur, first check the following points. If the distortion is still not eliminated, themonitor should, if possible, be checked on another computer.
If you are unable to solve the problem, please inform our Service Desk.
| Havingthisproblem?Checkthefollowingpoints: | |
| NoscreendisplayPowerindicatordoesnotlightup | ▸ Checkwhetherchangingthe0Wswitchon thereartosetting1curestheproblem.▸ Checkwhetherthepowercable onthe monitorisconnectedcorrect ly.▸ Checkwhetherthecomputerisswitchedon. |
| NoscreendisplayPower indicatorislit | ▸ Checkwhetherthecomputerisswitchedon.▸ Checkwhetherthedatacableforthe monitoriscorrectlyattachedtothemonitor portonthecomputer.▸ Pressanykeyonthecomputerkeyboard. Thecomputermaybeinpowersaving mode.▸ Alterthebrightnessand/orcontrastuntilyou getapicture. |
| Message:NoSignal | ▸ Checkwhetherthedatacableforthe monitoriscorrectlyattachedtothemonitor portonthecomputer.▸ Checkwhetherthecomputerisswitchedon. |
| Message:Frequencyoutofrange:##kHz/##HzPleasechangethedisplaymode to1920x1200with60Hz | Theinputsignal(horizontalfrequency and refreshrate)atthedisplayedinputdoesnot correspondtothetechnicaldataforthemonitor.▸ Adjustthevideofrequencyrangeusingthe computersoftware(seedocumentationfor thecomputerordisplayadapter).▸ Setadifferentscreenre solutionusingthe computersoftware(seed ocumentationfor thecomputerordisplay adapter). |
| Picturepositionnotcor rect | The monitor recognises an undefined mode (see chapter"Technicalspecification",Page26).▸ PresstheEXIT/AUTObuttontoperform auto-adjustmentofthescreen. |
| Pictureisshaking | ▸ Checkwhetherthedatacableforthe monitoriscorrectlyattachedtothemonitor portonthecomputer.▸ PresstheEXIT/AUTObuttontoperform auto-adjustmentofthescreen. |
| Picture is wrongly adjusted | ▸ Press theSELECT/MENUbuttonto activatetheFactoryRecallfunction.TheAutoProcessingmessageappears. |
| Picturedisturbances(vertical lines) | ► Pressthe EXIT/AUTO buttonoperform auto-adjustmentofthescreen. |
| Picturedisturbances(horizontallines,picture noise) | ► Pressthe EXIT/AUTO buttonoperform auto-adjustmentofthescreen. |
| Thescreenbecomesdarker | Thebackgroundlightinghasalimitedlifetime. Ifyourmonitordisplayshouldbecometoodark, thebackgroundlightingwillhavetobereplaced. ► PleasecontactourServiceDesk. |
Notesregardingthe DINENISO13406-2standard
Permanentlyunlitorlitpixels
The standard of production technique today cannot guarantee an absolutely fault-free screen display. A few isolated constant lit or unlit pixels (picture elements) may be present. The maximum permitted number of pixels faults stipulated in the international standard ISO 13406-2 (Class II).
Examples:
A 24" or 26" flat-screen monitor with a resolution of 1920 x 1200 has 1920 x 1200 = 2304000 pixels. Each pixel consists of three subpixels (red, green and blue), so there are almost 6.9 millions subpixels i total. In accordance with ISO 13406-2 (Class II), a maximum of 10 pixels and 12 subpixels may be defective.
| Pixel | Apixelconsistsof3subpixels,normallyred,greenandblue.Apixelis thesmallestelementthatcanbegeneratedbycompletefunctionalityof thedisplay. |
| Subpixel | Asubpixelisaseparatelyaddressableinternalstructurewithinapixelthat enhancesthepixelfunction. |
| ClusterAclustercontain | instwoormoredefectivepixelsorsubpixelsin a 5 x 5 pixel block. |
Technicalspecification

Condensationisnotpermitted, neitherintheratedrangeofoperation norinthelimitrangeofoperation.
P24W-5P26W-5
Dimensionsandweight
Visiblediagonals61cm64,9cm
Dotpitch0,27mm0,287mm
| Width518,4mm | 550,1mm | ||
| Height | 324,0mm | 343,8mm | |
| Maximumresolution | 1920x1200 | 1920x1200 | |
| Dimensionsincl. monitorbase | Width565mm | 600mm | |
| Height | 435mm | 457mm | |
| Depth | 229mm | 229mm | |
| Weight(withoutpackaging) | approx.10,0kg | 10,5kg | |
| Storabledisplaymodes | 25 | 25 | |
| Pixelerrorclasses according to ISO13406-2 | Class | II | II |
Electricaldata
| Video | Analog | positive,0.7Vss, 75 Ω | |
| Digital | DVI-D/HDMIwithHDCP | ||
| Synchronisation | Separate Sync. TTL, positive or negative | ||
| Horizontal frequency | 28 kHz .... 80 kHz (multi-scanning) | ||
| Refreshrate | 50Hz....75Hz | ||
| Maximumpixelrate | 165MHz | ||
| Powersupply | switches automatically | ||
| 100V–240V, 50Hz–60Hz | |||
| Overallpowerdraw(withoutaudio) | Normal operation | 90 W | 110 W |
| ECO operatingmode | 55W | 70W | |
| Energy-savingmode(0W operatingmode) | 0 W | 0 W | |
| Soundoutput | 2.0Wleft;2.0Wright | ||
Environmentalconditions
| Environmentclass3K2,DINIEC721 | |
| Ratedrangeofoperation | 15^ .... 35^ |
| Humidity | 20% .... 85% |
| Limitrangeofoperation | 5^ .... 35^ |
| Humidity | 20% .... 85% |
VESA-DDC-compatibleVGAinterface
YourmonitorisequippedwithaVESA-DDC-compatibleVGAinterface.VESA-DDC(Video ElectronicsStandardAssociation,DisplayDataChannel)isusedasthecommunications interfacebetweenthemonitorandthecomputer.Ifthecomputerisequippedwitha VESA-DDC-compatibleVGAinterface,itcanautomaticallyreadthedataforensuring optimumoperationfromthemonitorandselecttheappropriatesettings.
Presetoperatingmodes

Thepicturepositionandsizehavebeenoptimisedatthefactoryfortheoperating modes listed above. Depending on the graphics card used, it may be necessary toadjustthedisplaypositionorsize.Inthiscaseyoucanchangeandsavethe settings(seechapter" Changingthemonitorsettings",Page16).
Forergonomicreasons, ascreenresolutionof1920x1200pixelsisrecommended. Duethetechnologyused(activematrix)anLCDmonitorprovidesatotally flicker-freepictureevenwitharefreshrateof60Hz.
Mostfrequentoperatingmodes
| HorizontalfrequencyRefreshrateScreenresolution | ||
| 31.5kHz70Hz720x400 | ||
| 31.5kHz60Hz640x480 | ||
| 37.5kHz75Hz640x480 | ||
| 37.9kHz60Hz800x600 | ||
| 46.9kHz75Hz800x600 | ||
| 48.4kHz60Hz1024x768 | ||
| 60.0kHz75Hz1024x768 | ||
| 65.0kHz60Hz1680x1050 | ||
| 74.0kHz60Hz1920x1200 | ||
Video/TVoperatingm odesusingDVlandHDMI
| Screenresolution | Refreshrate | Aspectratio |
| 720x480i* | 60Hz | 4:3/16:9 |
| 720 x 480 p | 60 Hz | 4:3/16:9 |
| 720x576i* | 50Hz | 4:3/16:9 |
| 720 x 576 p | 50 Hz | 4:3/16:9 |
| 1280x720p | 50/60Hz | 16:9 |
| 1920x1080i | 50/60Hz | 16:9 |
| 1920x1080p | 50/60Hz | 16:9 |
*OnlypossiblewithHDMI
SUBDport
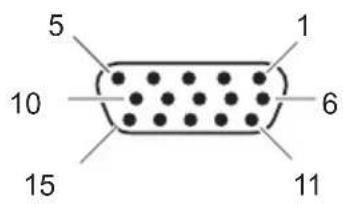
| PinMeaning | |
| 1Videoinputred | |
| 2Videoinputgreen | |
| 3Videoinputblue | |
| 4 | Ground |
| 5 | Ground |
| 6Videogroundred | |
| 7 | Videogroundgreen |
| 8Videogroundblue | |
| 9 | +5V(DDC) |
| 10 | Sync.ground |
| 11 | Ground |
| 12 | DDCData |
| 13H.sync | |
| 14V.sync | |
| 15 | DDCClock |
DVI-Dport
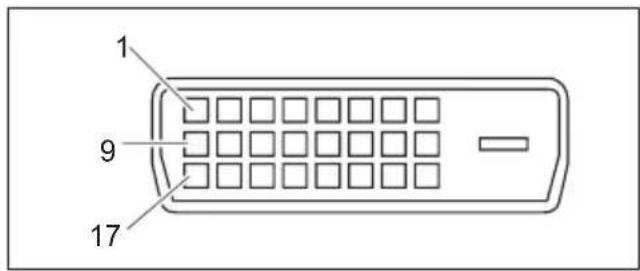
| PinMeaning | |
| 1 | TMDSData2- |
| 2 | TMDSData2+ |
| 3 | TMDSData2/4Shield |
| 4notconnected | |
| 5 | notconnected |
| 6 | DDCClock |
| 7 | DDCData |
| 8 | AnalogVerticalSync |
| 9 | TMDSData1- |
| 10 | TMDSData1+ |
| 11 | TMDSData1/3Shield |
| 12notconnected | |
| 13notconnected | |
| 14+5VPower | |
| 15Earth | |
| 16HotPlugDetect | |
| 17 | TMDSData0- |
| 18 | TMDSData0+ |
| 19 | TMDSData0/5Shield |
| 20notconnected | |
| 21notconnected | |
| 22 | TMDSClockShield |
| 23 | TMDSClock+ |
| 24 | TMDSClock- |
HDMIport
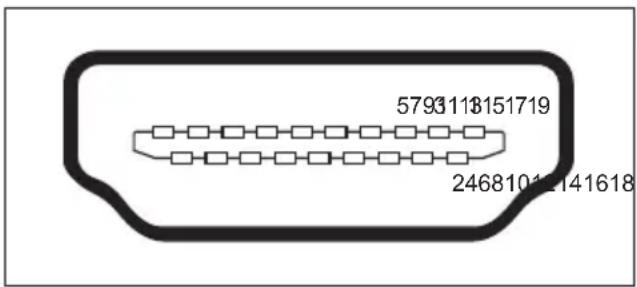
| PinMeaning | |
| 1 | TMDSData2+ |
| 2 | TMDSData2Shield |
| 3 | TMDSData2- |
| 4 | TMDSData1+ |
| 5 | TMDSData1Shield |
| 6 | TMDSData1- |
| 7 | TMDSData0+ |
| 8 | TMDSData0Shield |
| 9 | TMDSData0- |
| 10 | TMDSClock+ |
| 11 | TMDSClockShield |
| 12 | TMDSClock- |
| 13 | CEC |
| 14 | N.C. |
| 15 | SCL |
| 16 | SDA |
| 17 | DDC/CECGround |
| 18+5VPower | |
| 19Hotplugdetect | |

- FUJITSU
- Copyright
- Published by
- NotesregardingtheDINENISO
- Contents
- YourLCDscreen....1
- Important notes 3
- Gettingstarted 6
- Operation 14
- Noteson ergonomic colour adjustment ....
- Troubleshooting 23
- Notes regarding the DIN EN ISO 13406-2 standard 25
- Technical specification 26
- YourLCDscreen...
- Target group
- Furtherinformation
- Importantnotes
- Safetyinstructions
- Powercable
- Transportingthedevice
- Cleaningthe device
- CEmarking
- PowerManagement
- Disposalandrecycling
- Gettingstarted
- Unpackingandcheckingthedelivery
- Setting up the device
- Settingupanergonomicvideoworkstation
- Adjustingheight
- Adjusting the inclination
- Removingmonitorbase
- Connectingthedevice
- Connectingcablestothemonitor
- Connectingcablestothecomputer
- Operation
- Switchingthedeviceonandoff
- Notesonpowermanagement
- Changingthemonitorsettings
- Changingthemonitorsettings withthebuttons ofthecontrolpanel
- Performingauto-adjustmentofthemonitor
- Selectinginputsignal(D-SUB/DVI-D/HDMI)
- Activate/deactivateECOoperatingmode
- LockingtheOSDmenu
- LockingtheON/OFFbutton
- ChangingthemonitorsettingsusingtheOSDmenu
- Notesonergonomiccolouradju stment
- Troubleshooting
- Notesregardingthe DINENISO13406-2standard
- Permanentlyunlitorlitpixels
- Technicalspecification
- VESA-DDC-compatibleVGAinterface
- Presetoperatingmodes
- SUBDport
- DVI-Dport
Brand : FUJITSU
Model : P26W-5 ECO
Category : Screen