
TSA8036 - Heating Teesa - Free user manual and instructions
Find the device manual for free TSA8036 Teesa in PDF.


| Product Type | Oil-filled radiator |
| Rated Power | 2000 W |
| Power Supply | 220-240 V, 50/60 Hz |
| Number of Fins | 9 |
| Heating Modes | 3 (800 W / 1200 W / 2000 W) |
| Thermostat | Adjustable with automatic temperature control |
| Safety Features | Tip-over switch, overheat protection |
| Material | Metal + plastic |
| Power Cord Length | 145 cm |
| Handle | Yes |
| Cord Storage | Yes |
| Power Indicator | Yes |
| Assembly | Castors included, must be attached before use |
| Cleaning | Wipe with soft damp cloth, do not use detergents |
| Usage | Indoor household use only, upright position |
| Room Size | Minimum 5 m² |
Frequently Asked Questions - TSA8036 Teesa
User questions about TSA8036 Teesa
0 question about this device. Answer the ones you know or ask your own.
Ask a new question about this device
Download the instructions for your Heating in PDF format for free! Find your manual TSA8036 - Teesa and take your electronic device back in hand. On this page are published all the documents necessary for the use of your device. TSA8036 by Teesa.
USER MANUAL TSA8036 Teesa
flowchart
graph TD
    A["Initial Roll"] --> B["Close-up of Component"]
    B --> C["Arrow to Top"]
    C --> D["Close-up of Component"]
    D --> E["Arrow to Top"]
    E --> F["Close-up of Component"]
    F --> G["Arrow to Top"]
    G --> H["Final Assembly"]
flowchart
graph TD
    A["Cut into components"] --> B["Assembly"]
    B --> C["Adjustment to part"]
    C --> D["End"]
Thank you for purchasing TEESA appliance. Please read this operation instruction carefully before use, and keep it for future reference. Producer does not take responsibility for damages caused by inappropriate handling and use of the product.
SAFETY INSTRUCTIONS
In order to reduce the risk of injuries or damages, follow basic safety precautions applied when using any electrical device, including the following:
- Read this instruction manual carefully, even if you are familiar with the appliance. Keep the manual for future reference.
- Do not use the product for purposes different from displayed in this operating manual.
- Before connecting the device to power supply socket, make sure the voltage indicated on the appliance corresponds to the voltage in the power supply socket.
• ALWAYS turn off the device and disconnect it from the mains supply:
• if it's not operating correctly
• if there's an uncommon voice when using
- before cleaning
- when not in use
- Note: during first use, the device may give off peculiar smell and fumes from heating and isolation elements – it is a normal phenomenon.
- During first use or when they are turned on after having not been used for a long period of time, the device may initially emit a sound – it is a normal phenomenon, it will stop after a while.
- When you disconnect the power cord of the device, grasp and pull the plug, not the cord/cable.
- Place the device on flat, stable and heat resistant surface. Use in upright position only and do not leave unattended!
- Keep the device and its cord/cable away from heat, water, moisture, sharp edges and any other factor which may damage the appliance or its cord.
- Do not handle/use the device with wet or moist hands. Do not place it the device in water or any liquid, nor use it in humid or wet environments/rooms. Do not use this heater in the immediate surroundings of a bath, a shower or a swimming pool!
- Do not use heater near flammables, explosives, varnish, glue or heat sensitive items.
- Do not cover the device or block its ventilation grilles (danger of overheating); keep them free from obstacles (at least 1 meter away). Do not place the device up against walls, furniture, curtains, etc. Place it in a properly ventilated place.
• Do not use the heater to dry clothes.
- Do not use the appliance in rooms less than 5m^2 area.
- Do not place the heater directly beneath power mains socket.
• Do not use in dusty environments.
- When not in use, store in clean, cool and dry area. Remember to cool the heater before storing.
- Protect the product from strong impact and mechanical stress.
- Keep the device out of the reach of children. Do not leave children unsupervised with the product.
- This appliance may be used by children who are above 8 years old and by persons with reduced physical, sensory or mental capabilities, or lack of experience and knowledge, if they are supervised and guided by a person who is responsible for their safety in a
cautious manner, and all the safety precautions are understood and followed. Children should not play with this device. Children should not perform cleaning and servicing of the device unsupervised.
- Pay attention! The surface of this device will get hot. To avoid burns and personal injury, do not let bare skin touch hot surfaces. Use handles when moving the product. Closely supervise any children and pets when in use.
- Do not route power cord underneath the heater or in front of air ventilation grilles.
• Do not insert anything into the ventilation grill!
• ALWAYS disconnect the product form the mains supply when it is not in use.
• DO NOT use this device if the cord or the plug is damaged, or the appliance is broken. - Do not attempt to repair this appliance yourself. Only authorized and qualified personnel may repair this device. Never disassemble this device.
- This heater is filled with a precise quantity of special oil. In case of an oil leakage, contact an authorized service point for repair. Do not repair this device yourself!
• Fixed power cable may only be replaced in an authorized service point.
• Appliance for indoor and household use only. - Clean this device in accordance to instructions listed in "Cleaning and Maintenance" section. Keep the heater clean. Do not allow any objects to enter any ventilation or exhaust opening as this may cause electric shock, fire or damage to the heater.
ASSEMBLING CASTORS
Before use, mount the attached castors to the body of the heater.
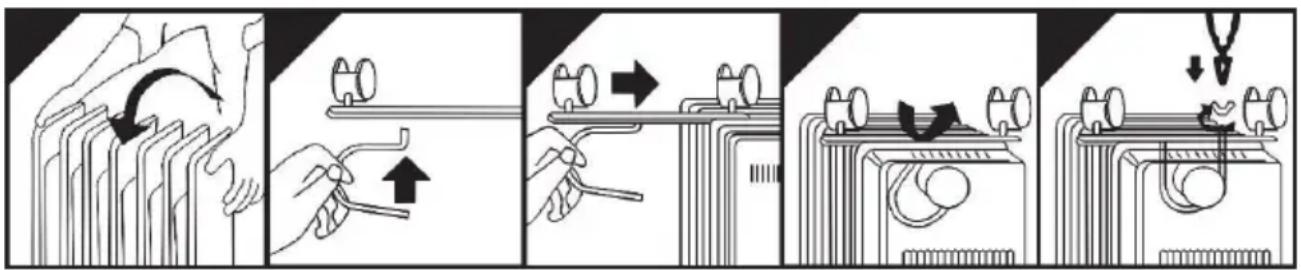
- Place the radiator body upside-down on a safe, stable surface.
- Position the wheel base assemblies between the end fins on the front and at the end of the heater.
- Attach them to the heater using the U-bolts and wing nuts supplied.
- Tighten the wheel nuts.
Note: Do not overtighten as it may cause the damage of heater flange.
- Turn the heater the right way up.
WARNING:
• Do not operate without castors attached.
- Operate the heater only in an upright position (castors on the bottom); any other position could create hazardous situation.
OPERATION
- Before using the heater, make sure it is placed on a flat and stable surface.
- Insert the plug of the heater's power cord into a suitable power mains socket.
- Use the mode selection knob to choose desired work mode (power indicator lights up):
• +low (800 W)
• II - medium (1200 W)
• III - lgih (2000 W)
-
Use the thermostat switch to select desired temperature setting.
-
The operating temperature is selected by a combination of the power mode knob and thermostat. The hottest setting will be when the heater is at the third heating setting (III) and thermostat is turned to maximum.
-
Automatic temperature control: When the desired room temperature has been reached, the thermostat knob should be turned slowly anti-clockwise until the thermostat is heard to click off and the light on the power switch is off. After this the heater will keep the air temperature in the room at the set temperature by switching on and off automatically.
-
If you want to change the room temperature setting, rotate the thermostat knob clockwise to raise the temperature, or counter clockwise to lower it.
-
This heater includes an overheat protection system that shuts off the heater when parts of the heater are getting excessively hot.
-
To completely turn the heater off, rotate power/mode knob to "0", thermostat knob to minimum, and remove plug from the power mains socket.
IMPORTANT: The heater is equipped with a safety function which will switch off the heater in case of accidental overheating. If the overheat protection is activated, remove the cause of overheating. Allow the heater to cool and remove anything restricting the airflow before using the heater again, the heater will automatically turn on again once it's cooled down and ready to resume operation.
The device is equipped with a tip over switch. If the heater is tilted or knocked down, the tip over switch is used to switch off the heater.
NOTE:
- The power lamp will be on if the temperature is below the setting of the thermostat.
- For optimum benefit, close windows and doors.
- Do not cover the ventilation holes as this will cause overheating and will activate the cut out.
CLEANING AND MAINTENANCE
Clean your device regularly.
- Always unplug the heater from the wall socket and allow it to cool down before cleaning.
- Clean the outside of the heater by wiping with a soft, slightly damp cloth and buff with a dry cloth.
- Do not use any detergents or abrasives and do not allow any water to enter the heater.
- Before storing the heater, wind the cable round cable storage bobbin and place the heater in a clean and dry place.
SPECIFICATION
Rated power: 2000 W
Fins: 9
Fins size: 120 x 550 mm
3 heating modes
Adjustable thermostat
Automatic control temperature
Casing material: metal + plastic
Power indicator
Handle
Cord storage
Tip-over switch
Protections against: overheat
Power cord length: 145 cm
Power supply: 220-240 V, 50/60 Hz

English
Correct Disposal of This Product
(Waste Electrical & Electronic Equipment)


(Applicable in the European Union and other European countries with separate collection systems) This marking shown on the product or its literature, indicates that it should not be disposed with other household wastes at the end of its working life. To prevent possible harm to the environment or human health from uncontrolled waste disposal, please separate this from other types of wastes and recycle it responsibly to promote the sustainable reuse of material resources. Household users should contact either the retailer where they purchased this product, or their local government office, for details of where and how they can take this item for environmentally safe recycling. Business users should contact their supplier and check the terms and conditions of the purchase contract. This product should not be mixed with other commercial wastes for disposal.
Made in China for LECHPOL ELECTRONICS Sp. z o.o. Sp.k., ul. Garwolińska 1, 08-400 Miętne.
flowchart
graph TD
    A["Start"] --> B["Step 1: Insert a spring component"]
    B --> C["Step 2: Insert a spring component with a handle"]
    C --> D["Step 3: Insert a spring component with a handle, then to form a housing component"]
    D --> E["Step 4: Insert a spring component with a handle, then to form a housing component with a hook and drop"]
    E --> F["End"]
flowchart
graph TD
    A["Start: Surgical Tool"] --> B["Step 1: Dissection"]
    B --> C["Step 2: Dissection with T-shaped Lens"]
    C --> D["Step 3: Dissection with T-shaped Lens"]
    D --> E["Step 4: Surgery with T-shaped Lens"]
    E --> F["End: Surgery with T-shaped Lens"]
flowchart
graph TD
    A["Start: Hand press or spring"] --> B["Step 1: Insert spring into frame"]
    B --> C["Step 2: Insert spring into tray"]
    C --> D["Step 3: Insert spring into door"]
    D --> E["Step 4: Insert spring into cabinet"]
    E --> F["Step 5: Insert spring into washer"]
    F --> G["End: Close-up assembly with weights and a hook"]
flowchart
graph TD
    A["Start: Hand Rolling"] --> B["Step 1: Insert spring"]
    B --> C["Step 2: Insert spring with tools"]
    C --> D["Step 3: Insert spring with tools and cutting"]
    D --> E["Step 4: Cut spring with tools and cuts"]


Brand : Teesa
Model : TSA8036
Category : Heating