
RTC-513RIP - Uncategorized HYUNDAI - Free user manual and instructions
Find the device manual for free RTC-513RIP HYUNDAI in PDF.

| Product Type | Stereo System with Radio, CD/MP3 Player, Cassette Player, Turntable, USB Recording |
| Brand | Hyundai |
| Model | RTC-513RIP |
| Power Supply | AC 230V, 50Hz |
| Power Consumption | 19W |
| Output Power | 2 x 2.5W |
| Weight (Net) | 8.1 kg |
| Radio Bands | AM: 526-1606 KHz, FM: 87.5-108 MHz |
| Turntable Speeds | 33, 45, 78 RPM |
| Turntable Type | Full-size, belt-drive |
| Playable Discs | CD, CD-R, CD-RW, MP3 |
| USB Playback | MP3 files |
| Cassette Player | Accepts C60-C90 cassettes (C120 not recommended) |
| Recording Functions | USB recording from Radio, CD, Cassette, Phono, Aux In |
| Inputs | Aux In (RCA), Phono (via turntable) |
| Outputs | Headphone jack (3.5mm) |
| Antenna | FM wire antenna (back), AM internal |
| Safety Features | Transit screw for turntable protection; no user-serviceable parts; do not expose to rain or moisture |
| Cleaning Instructions | Clean cabinet with soft dry cloth; CD lens with soft cloth from center outward; stylus cover removal |
| Waste Disposal | Do not dispose as household waste; recycle at designated collection points |
Frequently Asked Questions - RTC-513RIP HYUNDAI
User questions about RTC-513RIP HYUNDAI
0 question about this device. Answer the ones you know or ask your own.
Ask a new question about this device
Download the instructions for your Uncategorized in PDF format for free! Find your manual RTC-513RIP - HYUNDAI and take your electronic device back in hand. On this page are published all the documents necessary for the use of your device. RTC-513RIP by HYUNDAI.
USER MANUAL RTC-513RIP HYUNDAI
natural_image
Exterior view of a black electronic device with control knobs and a digital display (no visible text or symbols)NÁVOD K POUŽITÍ / NÁVOD NA POUŽITIE INSTRUKCJA OBSŁUGI / INSTRUCTION MANUAL BEDIENUNGSANLEITUNG / HASZNÁLATÍ ÚTMUTATÓ
RÁDIO, CD/MP3 PŘEHRÁVAČ A GRAMOFON RÁDIO, CD/MP3 PREHRÁVAČ A GRAMOFÓN RADIO, ODTWARZACZ CD/MP3 I GRAMOFON RADIO, CD/MP3 PLAYER AND PHONOGRAPH RADIO, CD/MP3-PLAYER UND PLATTENSPIELER TELJES SZTEREÓRENDSZER SZTEREÓ RÁDIÓ AM/FM, USB-KÓDOLÁS, CD/MP3-LEJÁTSZÓ, KAZETTÁS MAGNÓ, TELJES ÉRTÉKÚ LEMEZJÁTSZÓ
UPOZORNĚNÍ
Z DŮVODU ZAMEZENÍ RIZIKA POŽÁRU NEBO ZRANĚNÍ ELEKTRICKÝM PROUDEM, NEPOUŽÍVEJTE TUTO ZÁSTRČKU S PRODLUŽOVACÍMI KABELY, ZÁSUVKAMI A JINÝMI KONCOVÝMI ZAŘÍZENÍMI, POKUD DO NICH ZÁSTRČKU NELZE ZCELA ZASUNOUT TAK, ABY VIDLICE NEBYLY ODKRYTÉ. Z DŮVODU ZAMEZENÍ RIZIKA POŽÁRU NEBO ZRANĚNÍ ELEKTRICKÝM PROUDEM NEVYSTAVUJTE TOTO ZAŘÍZENÍ DEŠTI ANI VLHKOSTI.

natural_image
Line drawing of a vintage air conditioner unit with bidirectional arrows indicating rotation (no text or symbols)natural_image
Pure mechanical diagram showing a lever and pivot mechanism without any text or symbols- K OCHRANĚ GRAMOFONU PŘED POŠKOZENÍM BĚHEM DOPRAVY JE VPRAVO NAHOŘE OD TALÍŘE GRAMOFONU STŘÍBRNÝ PŘEPRAVNÍ ŠROUB.
- PŘED PŘEHRÁVÁNÍM POMOCÍ ŠROUBOVÁKU ZCELA ZAŠROUBUJTE PŘEPRAVNÍ ŠROUB VE SMĚRU HODINOVÝCH RUČIČEK (ŠROUB KLESÁ). TÍM ODEMKNETE TALÍŘ GRAMOFONU.
- POKUD CHCETE GRAMOFON OPĚT ZAMKNOUT ZA ÚČELEM PŘEPRAVY, VYŠROUBUJTE ŠROUB PROTI SMĚRU HODINOVÝCH RUČIČEK.
POUŽÍVÁNÍ VSTUPU AUX IN
natural_image
Diagram of a device with a central rectangular component and two arrows indicating direction (no text or symbols)Obr. 1
natural_image
Isometric line drawing of a mechanical device with a pencil and screw (no text or symbols)Obr. 2
natural_image
Hand holding a mechanical component with an upward arrow, no text or symbols present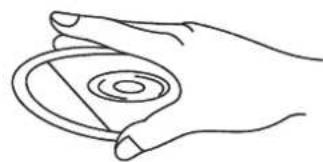
natural_image
Line drawing of a hand holding a circular object with concentric rings (no text or symbols)natural_image
Line drawing of two hands holding a circular object (no text or symbols)

natural_image
Symbol of a trash bin with crossed lines indicating no waste or restriction, and a solid rectangle below (no text or labels)DÔLEŽITÉ BEZPEČNOSTNÉ POKYNY
natural_image
Diagram of a portable radio device with bidirectional arrows indicating signal flow (no text or symbols)natural_image
Diagram of a mechanical or electrical component with a downward arrow and plus symbol (no text or labels)- K OCHRANE GRAMOFÓNU PRED POŠKODENÍM V PRIEBEHU DOPRAVY JE VPRAVO HORE OD TANIERA GRAMOFÓNU STRIEBRNÝ PREPRAVNÁ SKRUTKA.
- PRED PREHRÁVANÍM POMOCOU SKRUTKOVAČA CELKOM ZASKRUTKUJTE PREPRAVNÚ SKRUTKU V SMERE HODINOVÝCH RUČIČIEK (SKRUTKA KLESÁ). TÝM ODOMKNETE TANIER GRAMOFÓNU.
- POKIAL' CHCETE GRAMOFÓN OPAŤ ZAMKNÚŤ ZA ÚČELOM PREPRAVY, VYSKRUTKUJTE SKRUTKU PROTI SMERU HODINOVÝCH RUČIČIEK.
POUŽÍVÁNIE VSTUPU AUX IN
natural_image
Hand holding a mechanical component with an upward arrow, no text or symbols present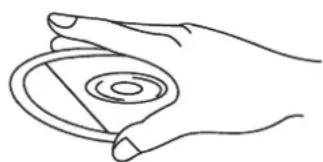
natural_image
Line drawing of a hand holding a circular object with concentric rings (no text or symbols)natural_image
Line drawing of two hands holding a circular object (no text or symbols)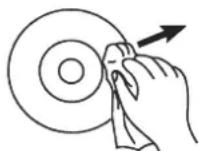

natural_image
Symbol of a trash bin crossed out by two crossed lines, with a solid black rectangle below (no text or labels)natural_image
Line drawing of a front-loading washing machine with bidirectional arrows indicating rotation (no text or symbols)natural_image
Mechanical assembly diagram showing a valve or pump with a downward arrow indicating force or direction (no text or symbols present)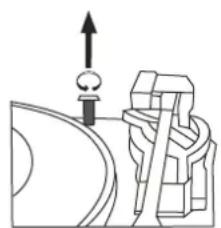
natural_image
Pure mechanical diagram showing a lever and gear assembly without any text or symbols- DO OCHRONY GRAMOFONU PRZED USZKODZENIEM PODCZAS TRANSPORTU, W PRAWO NA GÓRZE OD TALERZA GRAMOFONU ZNAJDUJE SIę SREBRNA ŚRUBA TRANSPORTOWA.
- PRZED ODTWARZANIEM, ZA POMOCA ŚRUBOKRETA CAŁKIEM ZAŚRUBUJ ŚRUBE TRANSPORTOWĄ W KIERUNKU RUCHU WSKAZÓWEK ZEGARA. ODEMKNIESZ TAK TALERZ GRAMOFONU.
- JEŻELI CHCESZ GRAMOFON PONOWNIE ZAMKNAĆ W CELU TRANSPORTU, WYŚRUBUJ SRUBę PRZECIW RUCHU WSKAZÓWEK ZEGARA.
ZASTOSOWANIE WEJŚCIA AUX IN
natural_image
Simple line drawing of a mechanical device with a pencil and screw (no text or symbols)Rys. 2
natural_image
Illustration of a hand pressing a circular component with an upward arrow (no text or symbols)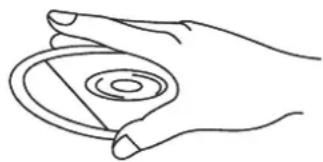
natural_image
Line drawing of a hand holding a circular object with concentric rings (no text or symbols)natural_image
Line drawing of two hands holding a circular object (no text or symbols)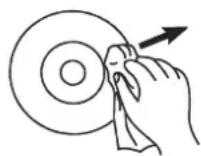

TO PREVENT FIRE OR SHOCK HAZARD, DO NOT USE THIS PLUG WITH AN EXTENSION CORD, RECEPTACLE OR OTHER OUTLET UNLESS THE BLADES CAN BE FULLY INSERTED TO PREVENT BLADE EXPOSURE. TO PREVENT FIRE OR SHOCK HAZARD, DO NOT EXPOSE THIS APPLIANCE TO RAIN OR MOISTURE.

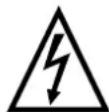
The LIGHTNING FLASH with arrowhead symbol, within an equilateral triangle is intended to alert the user to the presence of uninsulated 'dangerous voltage' within the product's enclosure that may be of sufficient magnitude to constitute a risk of electric shock to persons.

WARNING : TO REDUCE THE RISK OF ELECTRIC SHOCK DO NOT REMOVE COVER (OR BACK), NO USER SERVICEABLE PARTS INSIDE REFER SERVICING TO QUALIFIED SERVICE PERSONNEL

The exclamation point within an equilateral triangle is in-tended to alert the user to the presence of important operating and maintenance (servicing) instructions in the literature accompanying the appliance.
IMPORTANT SAFETY INSTRUCTIONS
- Read, keep and follow all these instructions in this manual.
- Clean only with dry cloth.
- Do not block any ventilation openings. Install in accordance with the manufacturer's instructions.
- Do not install near any heat sources such as radiators, heat registers, stoves, or other apparatus(including amplifiers) that produce heat.
- Protect the power cord from being walked on or pinched particularly at plugs, convenience receptacles, and point where they exit from the apparatus.
- Unplug this apparatus during lightning storms or when unused for long periods of time.
- Refer all servicing to qualified service personnel. Servicing is required when the apparatus has been damaged in any way, such as power-supply cord or plug is damaged, liquid has been spilled or objects have fallen into the apparatus, the apparatus has been exposed to rain or moisture, does not operate normally, or has been dropped.
- This appliance shall not be exposed to dripping or splashing water and no object filled with liquids such as vases shall be placed on the apparatus.
- Do not overload wall outlet.
- Operate controls and buttons as described in the manual.
- Store your CDs, cassettes in a cool area to avoid damage from heat.
- When moving the set, be sure to first disconnect the power cord.
PREPARATION FOR USE
- Carefully remove the unit from the display carton and remove all packing material from the unit.
- Unwind the AC power cord and extend it to its full length.
- Unwind the FM Antenna wire and extend it to its full length.
- Place the unit on a stable, level surface, convenient to an AC 230 V, 50 HZ outlet out of a strong magnetic field.
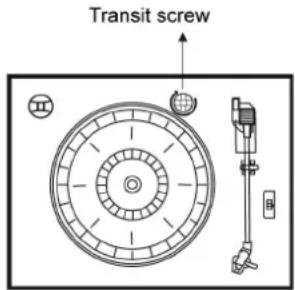
- Raise the lid to expose the phonograph. The phonograph has been secured for shipment with a transit screw. Use a coin or screwdriver to turn the transit screw clockwise. This will allow the turntable to „float“.
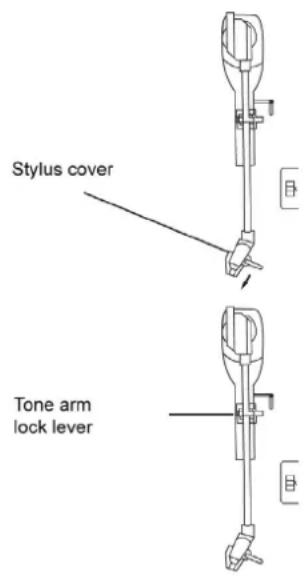
- Remove the opaque white plastic stylus cover from the phonograph stylus by sliding it in the direction of the arrow.
- During this operation pay attention to the stylus, because the stylus damage is not covered by guarantee.
- Remove the twist-tie that was used to secure the tone arm during shipment.
- Release the tone arm lock lever.
- Connect the plug to your AC 230V,50HZ outlet.
POWER SOURCE
This system is designed to operate on normal 230 V 50 Hz AC only. Attempting to operate from any other power source may cause damage to the system, and such damage is not covered by your warranty.
IMPORTANT: Raising And Lowering The Phonograph Lid
To open the lid, raise it as far as it will go until the lid support bracket ,locks' in the open position. To close the lid, Pull forward the lid support bracket to release and then gently lower the lid.
TO AVOID DAMAGING THE CABINET OR THE LID, NEVER FORCE THE LID CLOSED. ALWAYS RAISE THE LID TO RELEASE THE LID SUPPORT BRACKET.
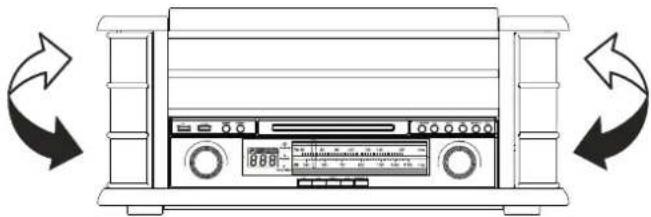
LOCATION OF CONTROLS AND INDICATORS
FRONT PANEL
- Phonograph Lid
- Phonograph Lid Support Bracket
- Speakers
- USB Socket
- POWER button
- RECORD Button
- FUNCTION Button
- VOLUME Control
- Tuner Backlight
- LCD Display
- Remote Control Sensor
- POWER Indicator
- FM ST./REC. Indicator
- FM Dial Scale
- AM Dial Scale
- Tuning Pointer
- AM Button
- FM Button
- CD/USB Button
- TAPE Button
- PHONO/AUX IN Button
- CD Drawer
- Tuning Control
- PLAY/PAUSE Button (▶ II)
- STOP Button (■)
- DN/F.R Button (◀)
- UP/F.F Button (▶)
- PLAY MODE Button (☐)
- OP/CL Button (▲) (CD Open/Close Button)
- Cassette EJ/F.F Button (Eject/Fast Forward)
- Cassette Player Slot
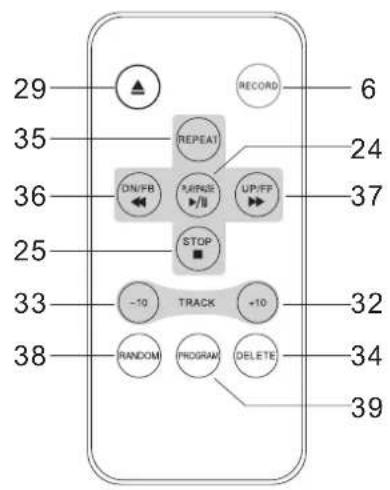
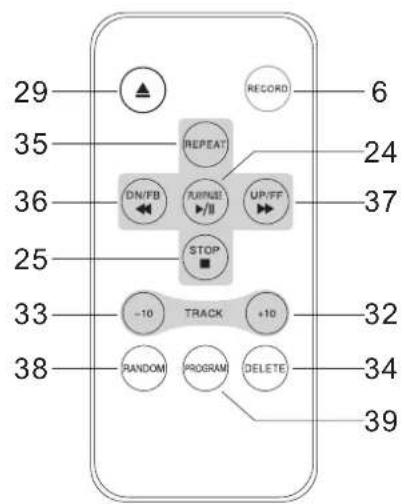
- TRACK+10
- TRACK-10
- DELETE
- REPEAT.
- DN/FB(SKIP REV.).
- UP/FF(SKIP Forward.).
- RANDOM
- PROGRAM
NOTE 1 : All of the buttons on the remote control have the same function as these buttons in the unit. This remote control just used for CD/MP3 and USB mode.
Note 2: Long pressing PLAY/PAUSE on Remote Control for 2 seconds will effect FUNCTION, to change the playing mode between CD and USB. Note 3: Long pressing DELETE on Remote Control for 2 seconds, Deleting will be effective.
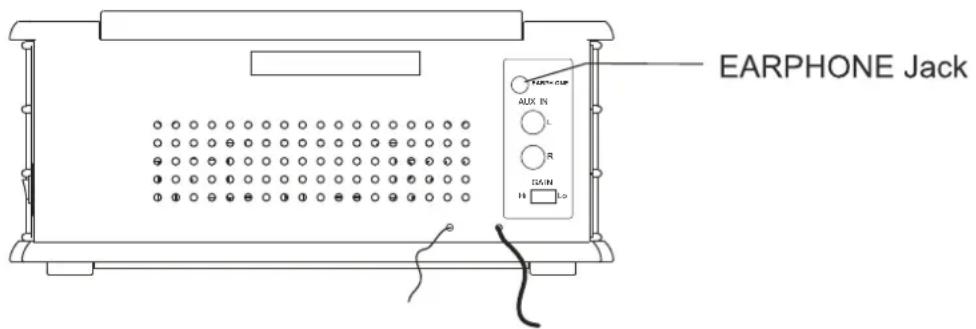
BACK PANEL
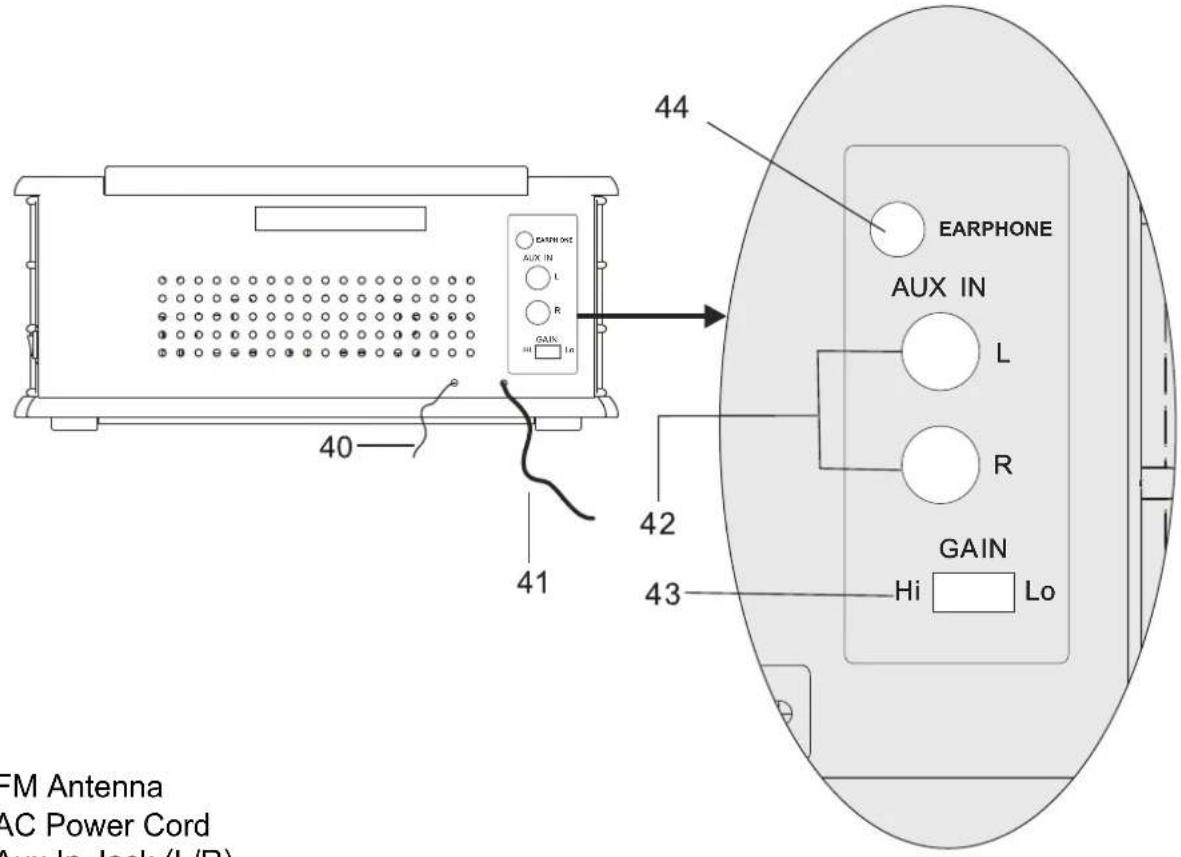
- FM Antenna
- AC Power Cord
- Aux In Jack (L/R)
- Gain Switch
- Earphone Jack
GRAMOFON
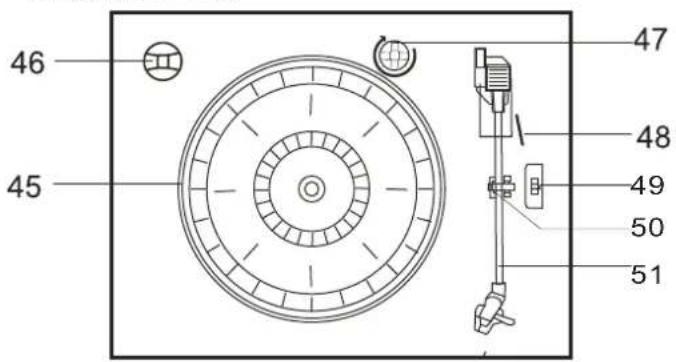
- Turntable
- 45 rpm Adapter
- Transit Screw
- Cue Lever
- Speed Selector(33/45/78 rpm)
- Tone Arm Lock
- Tone Arm with Stylus
OPERATING INSTRUCTIONS
POWER ON
- Press POWER to turn the system on. The power indicator lights up.
- Press the function selector buttons (AM//FM//CD/USB//TAPE//PHONO/AUX IN) to select your desired function.
- Start to adjust the volume by using the VOLUME control.
- When you have finished your listening, press POWER again to turn the system off. The power indicator goes ,off'
USB OPERATION
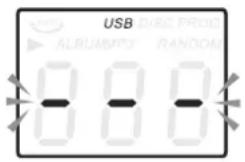
- Press the CD/USB button first and the FUNCTION button second to enter USB mode, the '- - -' and ,USB' icon will be shown.
- Insert a USB device into the USB socket.
-
PLAY/PAUSE, DN/UP and stop functions are the same as CD functions.
-
The USB input is compatible with the data flesh memory key, it is not guaranteed the compatibility with proprietary software MP3 players..
NOTE: You may press the FUNCTION button on panel or long press PLAY/PAUSE button on Remote control for 2 seconds to change the playing mode between CD and USB.
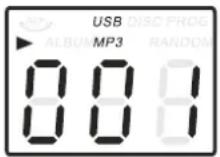
PLAYING IN MP3 MODE(UNDER CD/USB OPERATION)
- Press PLAY/RAUSE button (▶ II) to start or pause playback of the selected track in the CD/USB mode.
- While playing the song, the song number and folder number of your selected track will be shown on the screen. MP3 icon and '▶' icon will be shown.
- You can stop the playback at any time by pressing the STOP button (■).
TRACK SKIP AND HIGH SPEED TRACK SEARCH IN CD/USB MODE
During CD/USB playback, press UP/F.F (◀) or DN/F.R (▶) button on the Unit panel or on the remote control repeatedly will skip to higher or lower tracks. Release the button when your desired track number is shown. To rapidly search forward or backward within a track and locate a specific passage of it, depress and hold UP/F.F (◀) or DN/F.R (▶) button. The player will search forward or backward at a high speed. Release the button when you hear your desired passage and the playback will resume normal from that point. To skip 10 tracks BACKWARDS/AFTERWARDS, press TRACK+10 TRACK-10 buttonon remote control.
REPEAT/RANDOM FUNCTION IN MP3 MODE(UNDER CD/USB OPERATION)
Press the PLAY. MODE button on the panel or REPEAT button on the Remote control will repeat the currently playing track and the 'REP'. icon will be shown on the track number display. Press this button for the second time, will repeat all tracks on the Mp3 disc from the first track and the 'REP' will be shown. Press this button for the third time to
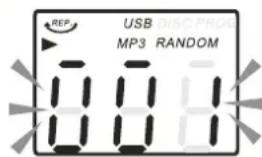
repeat all files in the album, Press this button for the fourth time on panel will cancel both the repeat and random playback function. Press this button for the fifth time on panel will cancel random function. If press REPEAT button on Remote Control for the fourth time, will cancel the repeat playback function; if press RANDOM button on Remote Control for the first time, will begin to Random function, press RANDOM button secondly on Remote Control, will cancel the random function. Press the STOP (■) button to stop playing.
NOTE: There is no folder in the disc if no MP3 is detected.
USB RECORDING
1. RADIO RECORDING
Be sure the GAIN button at back side is on HI position, blue LCD display will light on. Plug U DISK into USB Socket. Then press AM or FM button. Adjust Tuning receive the desired station. Press RECORD button twice to start recording. Press STOP button to stop recording when you finished recording.
2. CD RECORDING
Plug U DISK into USB Socket .Then press CD/USB button. Place CD into the CD drawer, Play the track which will be recorded. Press RECORD button twice to start recording. If whole CD will be played, recording will be effected for all the tracks. Each audio track coincides with its MP3 file, stop recording manually. NOTE: Recording will be fail if press STOP Button during the recording.
Plug U DISK into USB Socket .Then press CD/USB button, place CD into the CD drawer, Play the track which will be recorded. Press RECORD button twice to start recording. If whole MP3 CD will be played, recording will be effected for all the tracks, stop recording manually. NOTE: Recording will be fail if press STOP button during recording.
4. CASSETTE RECORDING
Plug U DISK into USB Socket. Then press TAPE button. Place the cassette into socket. Play the cassette. Press RECORD button twice to start recording. Press STOP button (■) to stop recording when you finished recording.
5. PHONOGRAPH RECORDING
Plug U DISK into USB Socket. Then press PHONO/AUX IN button. Play the phono, and set the tone arm to the right place. Press RECORD button twice to start recording. Press STOP button (■) to stop recording when you finished recording.
6. AUX IN RECORDING
Plug U DISK into USB Socket .Connect the audio system into the AUX IN jack on the rear panel. Press PHONO/AUX IN button. Play the audio system which you want to record. Press RECORD button twice to start recording. Press STOP button ( ■ ) to stop recording when you finished recording.
7. DELETE TRACKS FROM U DISK
Then press CD/USB button on panel or long press PLAY/PAUSE button on Remote control to chose USB model. During playing select the track, press for at least 2 seconds DELETE and track will be deleted.
RADIO OPERATION
- Press POWER to turn the system on The tuner backlight comes 'on'.
- Rotate the TUNING control to tune the desired radio station. If you tune to an FM stereo station, the FM ST./REC. Indicator will light and reception will be in stereo.
- When you have finished your listening, press POWER again to turn the system off. The POWER indicator and the tuner backlight go 'off'.
- If noises during AM/FM reception, put GAIN control on LO positon
INFORMATION
The AM antenna is inside the cabinet. If AM reception is unsatisfactory try repositioning the cabinet slightly until the internal antenna is picking up the strongest signal.
natural_image
Line drawing of a front-mounted electronic device with control panel and buttons, shown in two circular arrows (no text or symbols)The FM wire antenna is located on the back cabinet. If necessary adjust the position and direction of this antenna until you find the position that provides the best reception.

CD OPERATION
-
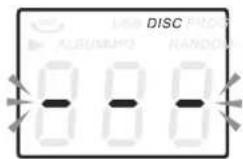
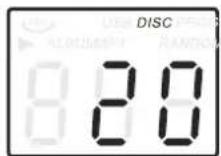
Press the CD/USB button to enter CD mode, the ‘---’ and ‘DISC’ icon will be shown on the screen. The unit can play CD, CD-R and CD-RW.
-
Press the OP/CL ▲ button to open the CD drawer.
-
Place your disc(MP3 is compatible) in the CD drawer with the label side facing up.
-
Press the OP/CL ▲ button again to close the CD drawer. Playback will automatically start from first track.
-
MP3 icon will be shown while MP3 is detected. No icon will be shown when no MP3 file is detected in the disc.
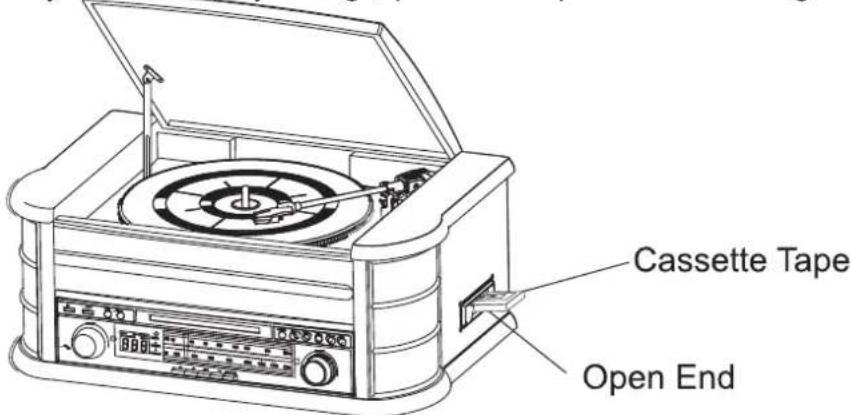
CASSETTE OPERATION
Note: Before inserting a tape in the player be sure that there is no excess slack in the cassette that could become jammed in the mechanism. Refer to the CARE AND MAINTENANCE section for instructions on removing excess slack from the cassette.
- Press POWER to turn the system on. The POWER indicator comes 'on'.
- Press the TAPE button to enter the TAPE mode.
- Insert your cassette into the slot located on right side cabinet, as shown in the illustration, with the side you wish to play facing ,up' and the open end on the right side.
-
Cassette playback begins as soon as the tape is inserted. Adjust the VOLUME control to the desired level.
-
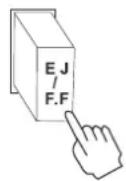
To advance the tape rapidly, depress the EJ/F.F (Eject/Fast Forward) button approximately half way. The tape will move forward rapidly as long as the button is depressed. Normal playback will resume when the button is released.
- When the tape ends, the player stops automatically. Depress the EJ/F.F (Eject/Fast Forward) button completely to remove the cassette from the player. You may press the EJ/FF (Eject/Fast Forward) button to stop playback and remove the cassette at any time.
- Press POWER again to turn the system off. The POWER indicator goes 'off'.
PLAYING RECORDS
This system includes a full-size, 3-speed, belt-drive turntable.
You can play 33, 45 and 78 rpm records.
- Press POWER to turn the system on.
- Press the PHONO button to enter the PHONO mode.
- Make sure that you have removed the stylus cover from the stylus and have released the tone arm lock that secured the tone arm to the tone arm rest.
- Set the turntable speed selector to the appropriate speed 33, 45 or 78 rpm. If you are playing 45 rpm 'singles', place the 45 rpm adapter on the centre spindle.
- Place your record on the centre spindle.
- Raise the cue lever to lift the tone arm off its rest. Move the tone arm to the edge of the record. The turntable starts automatically. Use the cue lever to gently lower the tone arm onto the record.
- Adjust the VOLUME control to the desired level.
- When the tone arm reaches the end of the record it automatically returns to the tone arm rest and the record player stops.
- Press POWER again to turn the system off. The POWER indicator goes, off'.
NOTE: Do not turn or stop the turntable manually. Moving or jarring the turntable without securing the tone arm clamp could result in damage to the tone arm.
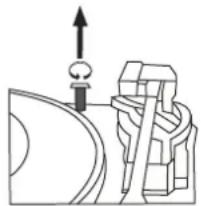
IMPORTANT!!
natural_image
Pure mechanical diagram showing a lever and pivot point without any text, numbers, or symbols• TO PROTECT THE TURNTABLE FROM DAMAGE DURING TRANSPORTATION, A SILVER TRANSIT SCREW IS LOCATED AT THE UPPER RIGHT OF THE TURNTABLE PLATFORM.
- BEFORE PLAYING, PLEASE USE A SCREWDRIVER TO TURN THE TRANSIT SCREW IN CLOCKWISE DIRECTION (SCREW GOING DOWN) COMPLETELY TO UNLOCK THE TURNTABLE.
- TO LOCK THE TURNTABLE AGAIN FOR TRANSPORTATION, PLEASE TURN THE SCREW IN COUNTER-CLOCKWISE DIRECTION.
AUXIN OPERATION
Connect the Audio system into the AUX IN Jack on the rear panel, Press the PHONO/AUX IN button. Play your Audio system. Adjust the volume.
USING STEREO HEADPHONES (NOT INCLUDED)
Connect a set of stereo headphones with a 3.5mm mini-plug to the PHONES jack on the front panel. Before putting on the headphones always set the VOLUME control to a low level. Then put the headphones on and gradually increase the volume to a comfortable listening level. The built-in speakers automatically shut off when headphones are connected to the PHONES jack.
CARE AND MAINTENANCE
CASSETTE CARE
Two common causes of trouble experienced when using cassettes are:
- Tape jamming - Leading to uneven speed in playback, and
- Tape tangling - Where the tape wraps itself around vital parts of the mechanism.
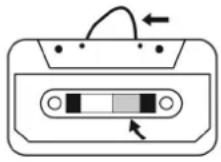
Fig. 1
natural_image
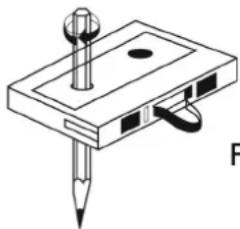
Isometric line drawing of a mechanical device with a base plate and two pins (no text or symbols)Fig. 2
To reduce the likelihood of these problems occurring, the following precautions should be observed:
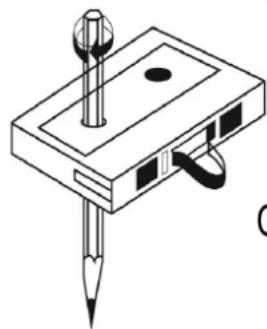
- Check that there are no loose layers of tape visible through the cassette centre window (see Fig.1). Take up any loose layers, using a pencil or hexagonal barrelled ballpoint pen, before inserting the cassette into the machine (see Fig.2).
- If the cassette feels „tight“ while performing operation shown (see Fig.2), the tape may be jamming due to „ridges“ formed in the winding of the tape (visible through the centre window). These may be removed, in most cases, by fast winding of the cassette from one end to the other and back again.
- Use only well-known brands of tape. Avoid use of C-120 cassettes.
Furthermore, do not expose cassettes to direct sunlight, dust or oil, and do not touch the tape surfaces.
COMPACT DISC CARE
- To remove a disc from its storage case, press down on the centre of the case and lift the disc out, holding it carefully by the edges.
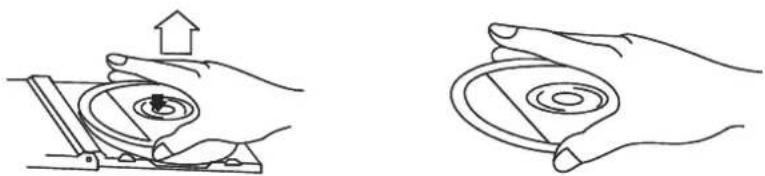
natural_image
Two line drawings showing hands holding a circular device with an upward arrow, no text or symbols present.- Fingerprints and dust should be carefully wiped off the discs recorded surface with a soft cloth. Unlike conventional records, compact discs have no grooves to collect dust and microscopic debris, so gently wiping with a soft cloth should remove most particles. Wipe in a straight line from the inside to the outside of the disc.
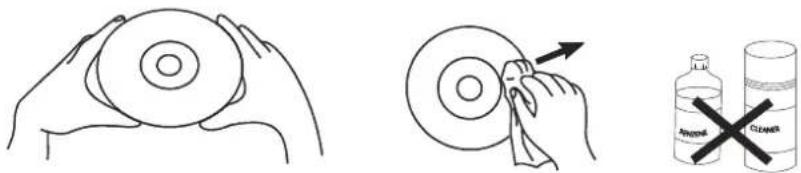
- Clean the disc periodically with a soft, lint-free, dry cloth.
Never use detergents or abrasive cleaners to clean the disc. - Never write on or affix labels to the surface of compact discs.
CARE OF THE CABINETS
You should care for the cabinet as you would care for any piece of the furniture.
When the cabinet becomes dusty wipe it with a soft, non-abrasive dust cloth. If the cabinet becomes smudged with fingerprints you may use any good quality commercial dusting and polishing spray cleaner, however avoid spraying the plastic or metal parts of this system.
We recommend that you spray the cleaner on your dust cloth, not directly on the cabinet, to avoid getting any of the spray on the plastic or metal parts.
TECHNICAL SPECIFICATION
- Radio
AM:526 - 1606 KHz
FM:87.5 - 108 KHz
- Turntable speed: 33/45/78 RPM can play disc size:17.5/25/30cm
- CD can play CD/CD-R/CD-RW/MP3
- USB Connector play MP3
- C60 - C90 cassette player (C120 cassette is not recommended)
- Max consumption power: 19W
- Output power: 2 x 2.5W
- Weight (netto) 8,1kg
We reserve the right to change technical specifications.
WARNING: Do not use this product near water, in wet areas to avoid fire or injury of electric current. Always turn off the product when you don't use it or before a revision. There aren't any parts in this appliance which are reparable by consumer. Always appeal to a qualified authorized service. The product is under a dangerous tention.
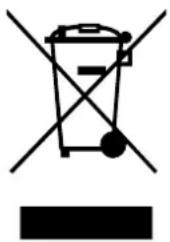
Old electrical appliances, used batteries and accumulators disposal
natural_image
Symbol of a trash bin with crossed lines and a solid rectangle below (no text or labels)This symbol appearing on the product, on the product accessories or on the product packing means that the product must not be disposed as household waste. When the product/ battery durability is over, please, deliver the product or battery (if it is enclosed) to the respective collection point, where the electrical appliances or batteries will be recycled. The places, where the used electrical appliances are collected, exist in the European Union and in other European countries as well. By proper disposal of the product you can prevent possible negative impact on environment and human health, which might otherwise occur as a consequence of improper manipulation with the product or battery/ accumulator. Recycling of materials contributes to protection of natural resources. Therefore, please, do not throw the old electrical appliances and batteries/ accumulators in the household waste. Information, where it is possible to leave the old electrical appliances for free, is provided at your local authority, at the store where you have bought the product. Information, where you can leave the batteries and accumulators for free, is provided to you at the store, at your local authority.
HINWEIS
natural_image
Diagram of a portable electronic device with two curved arrows indicating rotation or signal flow (no text or symbols present)natural_image
Diagram showing a mechanical or electrical component with an arrow pointing downward, no visible text or symbols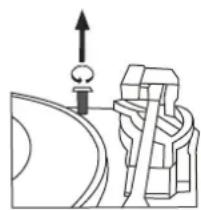
natural_image
Pure mechanical diagram showing a lever and pivot mechanism without any text or symbolsnatural_image
Hand operating a mechanical device with an upward arrow indicating motion (no text or symbols present)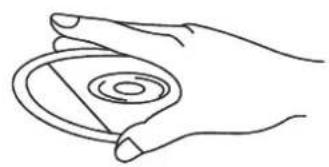
natural_image
Line drawing of a hand holding a circular object with concentric rings (no text or symbols)natural_image
Line drawing of two hands holding a circular object (no text or symbols)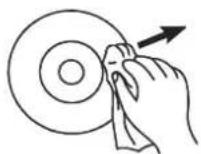

natural_image
Symbol of a trash bin crossed with no text or labels, accompanied by a solid black rectangle below (no text or symbols present)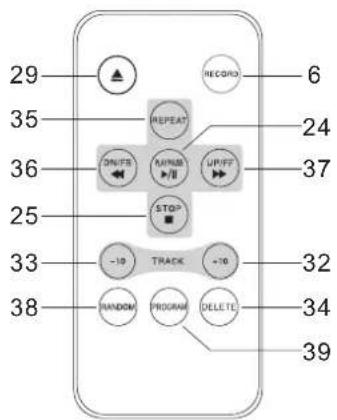
natural_image
Line drawing of a washing machine with bidirectional arrows indicating rotation (no text or symbols)natural_image
Pure mechanical diagram showing a lever and gear assembly without any text or symbols- A LEMEZJÁTSZÓ SÉRÜLÉSEKTÖL VALÓ VÉDELME ÉRDEKÉBEN A SZÁLLÍTÁS SORÁN A LEMEZJÁTSZÓ TÁNYÉRJA FÖLÖTT JOBBRA EGY EZÜST SZÍNÜ BIZTONSÁGI CSAVAR TALÁLHATÓ.
- LEJÁTSZÁS ELÖTT EGY CSAVARHÚZÓ SEGÍTSÉGÉVEL TELJESEN CSAVARJA BE A BIZTONSÁGI CSAVART AZ ÓRAMUTATÓ JÁRÁSÁVAL MEGEGYEZŐ IRÁNYBA (A CSAVAR „LEMEGY“). EZZEL KIOLDJA A LEMEZJÁTSZÓ TÁNYÉRJÁT.
- HA SZÁLLÍTÁS CÉLJÁBÓL ISMÉT SZERETNÉ LEZÁRNI A LEMEZJÁTSZÓT, OLDJA KI A CSAVART AZ ÓRAMUTATÓ JÁRÁSÁVAL ELLENKEZŐ IRÁNYBA FORGATVA.
AUX IN-BEMENET
natural_image
Isometric line drawing of a mechanical device with a pencil and screw (no text or symbols)Kép. 2
natural_image
Hand holding a mechanical component with an upward arrow, no text or symbols present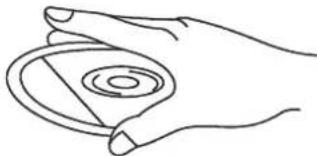
natural_image
Line drawing of a hand holding a circular object with concentric rings (no text or symbols)natural_image
Line drawing of two hands holding a circular object (no text or symbols)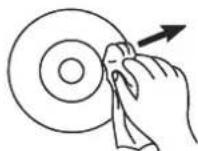

natural_image
Symbol of a trash bin crossed with a diagonal line and a horizontal bar below (no text or labels)


- UPOZORNĚNÍ
- POUŽÍVÁNÍ VSTUPU AUX IN
- DÔLEŽITÉ BEZPEČNOSTNÉ POKYNY
- POUŽÍVÁNIE VSTUPU AUX IN
- ZASTOSOWANIE WEJŚCIA AUX IN
- IMPORTANT SAFETY INSTRUCTIONS
- PREPARATION FOR USE
- POWER SOURCE
- IMPORTANT: Raising And Lowering The Phonograph Lid
- LOCATION OF CONTROLS AND INDICATORS
- FRONT PANEL
- OPERATING INSTRUCTIONS
- POWER ON
- USB OPERATION
- PLAYING IN MP3 MODE(UNDER CD/USB OPERATION)
- TRACK SKIP AND HIGH SPEED TRACK SEARCH IN CD/USB MODE
- REPEAT/RANDOM FUNCTION IN MP3 MODE(UNDER CD/USB OPERATION)
- USB RECORDING
- RADIO RECORDING
- CD RECORDING
- CASSETTE RECORDING
- PHONOGRAPH RECORDING
- AUX IN RECORDING
- DELETE TRACKS FROM U DISK
- RADIO OPERATION
- INFORMATION
- CD OPERATION
- CASSETTE OPERATION
- PLAYING RECORDS
- IMPORTANT!!
- AUXIN OPERATION
- USING STEREO HEADPHONES (NOT INCLUDED)
- CARE AND MAINTENANCE
- CASSETTE CARE
- COMPACT DISC CARE
- CARE OF THE CABINETS
- TECHNICAL SPECIFICATION
- Old electrical appliances, used batteries and accumulators disposal
- HINWEIS
- AUX IN-BEMENET
Brand : HYUNDAI
Model : RTC-513RIP
Category : Uncategorized