
VIN12B - Vitrine à vin HYUNDAI - Free user manual and instructions
Find the device manual for free VIN12B HYUNDAI in PDF.

| Product Type | Wine Cooler (Vitrine à vin) |
| Brand | Hyundai |
| Model | VIN12B |
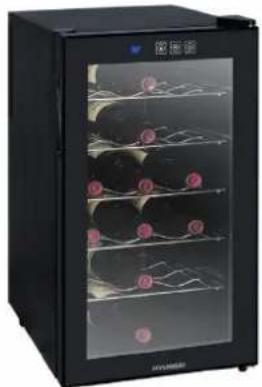
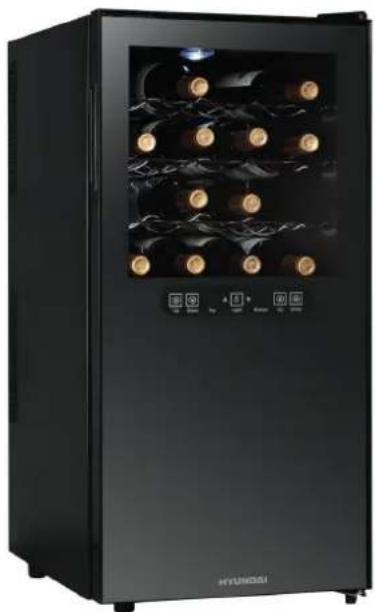
| Bottle Capacity | 12 standard wine bottles |
| Rated Voltage | 220–240 V ~ 50 Hz |
| Input Power | 50 W |
| Energy Consumption | 0.36 kWh/24h (130 kWh/year) |
| Energy Efficiency Class | A |
| Temperature Range | 12–18 °C (adjustable) |
| Climatic Class | SN/N (10–32 °C ambient) |
| Noise Level | 38 dB (approx.) |
| Dimensions (W × D × H) | 25.2 × 51 × 61 cm |
| Net Weight | 12 kg |
| Door Type | Glass door with magnetic seal |
| Interior Light | Yes, with ON/OFF switch |
| Cooling System | Compressor-based with fan (continuous cooling) |
| Temperature Control | Adjustable knob with LED display |
| Shelves | Removable wire shelves |
| Defrost | Manual (unplug to defrost) |
| Installation Clearance | 5 cm sides, 10 cm back |
| Included Accessories | Water box, foot, user manual |
| Intended Use | Household wine storage only |
| Safety Certifications | CE, RoHS (implied) |
Frequently Asked Questions - VIN12B HYUNDAI
User questions about VIN12B HYUNDAI
0 question about this device. Answer the ones you know or ask your own.
Ask a new question about this device
Download the instructions for your Vitrine à vin in PDF format for free! Find your manual VIN12B - HYUNDAI and take your electronic device back in hand. On this page are published all the documents necessary for the use of your device. VIN12B by HYUNDAI.
USER MANUAL VIN12B HYUNDAI
natural_image
Black refrigerator with three shelves full of wine bottles, no visible text or labelsVIN12A
natural_image
Black refrigerator with glass doors and silver wavy shelves, no visible text or symbols on the appliance itself.VIN18
natural_image
Black double-honey refrigerator with glass doors showing wine bottles, no visible text or symbols on the cabinet itself.VIN12B
VIN18DZ
natural_image
Black industrial refrigerator with water bottles and decorative window (no visible text or symbols)VIN32DZ
natural_image
Black Hyundai 3D refrigerator with wine rack and matching door (no visible text or symbols on main body)NÁVOD K POUŽITÍ
NÁVOD NA POUŽITIE
INSTRUKCJA OBSŁUGI
INSTRUCTION MANUAL
HASZNÁLATI ÚTMUTATÓ
MANUAL DE UTILIZARE
- KRYT ZÁVĚSU 7. VYPÍNAČ SVĚTLA
- SVĚTLO 8. OVLÁDACÍ PANEL TEPLOTY
- MASKA VĚTRÁKU 9. MAGNETICKÝ UZÁVĚR
- PŘIHRÁDKA 10. SKLO
- NOŽKA 11. RÁM DVEŘÍ
- NÁDRŽKA NA VODU
HYUVIN12B
- ZOBRAZENÍ TEPLOTY 7. NOŽKA
- OVLADAČ NASTAVENÍ TEPLOTY 8. NÁDRŽKA NA VODU
- VYPÍNAČ SVĚTLA 9. MAGNETICKÝ UZÁVĚR
- INTERIÉROVÉ SVĚTLO 10. RÁM DVERÍ
- KRYT CHLADÍCÍHO VĚTRÁKU 11. SKLO
- PŘIHRÁDKA
HYUVIN18

- KRYT ZÁVĚSU 7. VYPÍNAČ SVĚTLA
- SVĚTLO 8. OVLÁDACÍ PANEL TEPLOTY
- MASKA VĚTRÁKU 9. MAGNETICKÝ UZÁVĚR
- PŘIHRÁDKA 10. SKLO
- NOŽKA 11. RÁM DVEŘÍ
- NÁDRŽKA NA VODU
HYUVIN18DZ

- NOŽKA 8. NÁDRŽKA NA VODU
- SÍTOVÝ KABEL 9. VLOŽKA DVERÍ
- RÁM DVERÍ 10. TĚSNĚNÍ DVERÍ
- SKLENĚNÉ DVEŘE 11. IZOLAČNÍ DESKA
- ZAPUŠTĚNÁ KLIKA 12. MASKA CHLADÍCÍHO VĚTRÁKU
- KRYT HORNÍHO ZÁVĚSU DVEŘÍ 13. PŘIHRÁDKA
- KRYT DOLNÍHO ZÁVĚSU DVERÍ 14. KRYT LAMPY
HYUVIN32DZ

-
SÍTÓVÝ KABEL 8. NÁDRŽKA NA VODU
-
NOŽKA 9. VLOŽKA DVERÍ
-
RÁM DVERÍ 10. TĚSNĚNÍ DVERÍ
-
SKLENĚNÉ DVEŘE 11. IZOLAČNÍ DESKA
-
ZAPUŠTĚNÁ KLIKA 12. MASKA CHLADÍCÍHO VĚTRÁKU
-
KRYT HORNÍHO ZÁVĚSU DVEŘÍ 13. PŘIHRÁDKA
-
KRYT DOLNÍHO ZÁVĚSU DVERÍ 14. KRYT LAMPY
POKYNY K POUŽITÍ
- KRYT ZÁVESU 7. VYPÍNAČ SVETLÁ
- SVETLO 8. OVLÁDACÍ PANEL TEPLOTY
- MASKA VETRÁKU 9. MAGNETICKÝ UZÁVER
- PRIEHRADKA 10. SKLO
- NOHA 11. RÁM DVERÍ
- NÁDRŽKA NA VODU
HYUVIN12B
- ZOBRAZENÍ TEPLOTY 7. NOHA
- OVLADAČ NASTAVENIA TEPLOTY 8. NÁDRŽKA NA VODU
- VYPÍNAČ SVETLA 9. MAGNETICKÝ UZÁVER
- INTERIÉROVÉ SVETLO 10. RÁM DVERÍ
- KRYT CHLADIACEHO VETRÁKU 11. SKLO
- PRIEHRADKA
HYUVIN18

- KRYT ZÁVESU 7. VYPÍNAČ SVETLÁ
- SVETLO 8. OVLÁDACÍ PANEL TEPLOTY
- MASKA VETRÁKU 9. SKLO
- PRIEHRADKA 10. MAGNETICKÝ UZÁVER
- NOHA 11. RÁM DVERÍ
- NÁDRŽKA NA VODU
HYUVIN18DZ
- NOHA 8. NÁDRŽKA NA VODU
- SIEŤOVÝ KÁBEL 9. VLOŽKA DVERÍ
- RÁM DVERÍ 10. TESNENIE DVERÍ
- SKLENENÉ DVERE 11. IZOLAČNÁ DOSKA
- ZAPUŠTENÁ KL'UČKA 12. MASKA CHLADIACEHO VETRÁKU
- KRYT HORNÉHO ZÁVESU DVERÍ 13. PRIEHRADKA
- KRYT DOLNÉHO ZÁVESU DVERÍ 14. KRYT LAMPY
HYUVIN32DZ

-
SIEŤOVÝ KÁBEL 8. NÁDRŽKA NA VODU
-
NOHA 9. VLOŽKA DVERÍ
-
RÁM DVERÍ 10. TESNENIE DVERÍ
-
SKLENENÉ DVERE 11. IZOLAČNÁ DOSKA
-
ZAPUŠTENÁ KL'UČKA 12. MASKA CHLADIACEHO VETRÁKU
-
KRYT HORNÉHO ZÁVESU DVERÍ 13. PRIEHRADKA
-
KRYT DOLNÉHO ZÁVESU DVERÍ 14. KRYT LAMPY
POKYNY NA POUŽITIE
- .ZAWIAS 7. PRZEŁĄCZNIK OŚWIETLENIA
- OŚWIETLENIE 8. PANEL KONTROLI TEMPERATURY
- OSŁONA WENTYLATORA 9. USZCZELKA MAGNETYCZNA
- PÓŁKA 10. SZKŁO
- NÓŻKA 11. RAMKA DRZWI
- POJEMNIK NA SKROPLINY
HYUVIN12B
- WYŚWIETLACZ TEMPERATURY 7. STOPKA
- POKRETŁO REGULACJI TEMPERATURY 8. POJEMNIK NA SKROPLINY
- PRZEŁĄCZNIK OŚWIETLENIA 9. USZCZELKA MAGNETYCZNA
- OŚWIETLENIE WEWNETRZNE 10. RAMKA DRZWI
- POKRYWA WENTYLATORA CHŁODZIARKI 11. SZKŁO
- PÓŁKA
HYUVIN18
- ZAWIAS 7. PRZEŁĄCZNIK OŚWIETLENIA
- OŚWIETLENIE 8. PANEL KONTROLI TEMPERATURY
- OSŁONA WENTYLATORA 9. USZCZELKA MAGNETYCZNA
- PÓŁKA 10. SZKŁO
- NÓŻKA 11. RAMKA DRZWI
- POJEMNIK NA SKROPLINY
HYUVIN18DZ

- STOPKA 8. POJEMNIK NA SKROPLINY
- PRZEWÓD ZASILAJĄCY 9. OKŁADZINA DRZWI
- RAMKA DRZWI 10. USZCZELKA DRZWI
- SZKLANE DRZWI 11. PRZEGRODA IZOLOWANA
- WPUSZCZANA RACZKA 12. OSŁONA WENTYLATORA
- ZAŚLEPKA GÓRNEGO ZAWIASU 13. PÓŁKA
- ZAŚLEPKA DOLNEGO ZAWIASU 14. OSŁONA LAMPY
HYUVIN32DZ
- PRZEWÓD ZASILAJĄCY 8. POJEMNIK NA SKROPLINY
- STOPKA 9. OKŁADZINA DRZWI
- RAMKA DRZWI 10. USZCZELKA DRZWI
- SZKLANE DRZWI 11. PRZEGRODA IZOLOWANA
- WPUSZCZANA RACZKA 12. OSŁONA WENTYLATORA
- ZAŚLEPKA GÓRNEGO ZAWIASU 13. PÓŁKA
- ZAŚLEPKA DOLNEGO ZAWIASU 14. OSŁONA LAMPY
INSTRUKCJA UŻYTKOWANIA
Dear customer, thank you for purchasing our product. Please read the operating instructions carefully before putting the appliance into operation and keep these instructions including the warranty, the receipt and, if possible, the box with the internal packing.
GENERAL SAFETY INSTRUCTIONS
- This appliance can be used by children aged from 8 years and above and persons with reduced physical, sensory or mental capabilities or lack of experience and knowledge if they have been given supervision or instruction concerning use of the appliance in a safe way and understand the hazards involved. Children shall not play with the appliance. Cleaning and user maintenance shall not be made by children without supervision.
- Before replacing accessories or accessible parts, which move during operation, before assembly and disassembly, before cleaning or maintenance, turn off the appliance and disconnect it from the mains by pulling the power cord from the power socket!
- Do not leave the appliance plugged in power supply without supervision!
- If the power cord of the appliance is corrupted, it has to be replaced by the manufacturer, its service technician or a similarly qualified person so as to prevent dangerous situations.
- Never use the appliance if its power cord or plug is damaged, if it does not work properly, if it fell down and was damaged and it is leaking. In this case take the appliance to a special service to check its safety and proper function.
- When the appliance is in operation, prevent pets, plants or insects to get in contact with it.
- The appliance is designed exclusively for private use and for the envisaged purpose.
• This appliance is not fit for commercial use. - Keep it away from sources of heat, direct sunlight, humidity (never dip it into any liquid) and sharp edges. Do not use the appliance with wet hands. If the appliance is humid or wet, unplug it immediately. Do not put it in water.
- When cleaning or putting it away, switch off the appliance and always pull out the plug from the socket (pull on the plug, not the cable) if the appliance is not being used and remove the attached accessories.
- To protect children from the dangers posed by electrical appliances, make sure that the cable is hanging low and that children do not have access to the appliance.
- Do not try to repair the appliance on your own. Always contact an authorized technician. To avoid the exposure to danger, always have a faulty cable be replaced only by the manufacturer, by our customer service or by a qualified person and with a cable of the same type.
- Pay careful attention to the following "Special Safety Instructions for this unit".
SPECIAL SAFETY INSTRUCTIONS FOR THIS UNIT
- Ensure the cooler is unplugged before cleaning or if the cooler is not in use.
- It is not recommended to use this wine cooler with an extension cord or power board. Please ensure that the appliance is plugged directly into the electrical outlet.
- When positioning the wine cooler, ensure that there is at least a 5cm clearance at the sides and a 10 cm clearance at the back of the cooler as this is the main outlet for heat. This will allow for adequate ventilation.
- This cooler is designed to store wine bottles, however, if placing food inside, ensure that there is sufficient airflow between items. Only packet food can be put inside.
- Do not place hot food or drink into the wine cooler before it cools down to room temperature.
- Close the cooler door immediately after putting in any items so the inside temperature will not rise dramatically.
- Keep appliance away from any heat source or direct sunlight.
- To fix stably, the appliance must be placed on a flat and solid surface. It should not be laid on any soft material.
- Do not place any other appliance on top of the wine cooler.
- The Wine Cooler is an electrical appliance. To avoid injury or death from electrical shock do not operate the Wine Cooler with wet hands, while standing on a wet surface or while standing in water.
- Do not use outdoors or in wet conditions.
- When positioned or if moving the appliance ensure that it is not declined less than 45^ or turned upside down.
- Never lift or carry the Wine Cooler by the cord.
- Keep the cord away from heated surfaces.
- This appliance is intended to be used exclusively for the storage of wine.
- The range of storage temperature is from 5^ C to 18^ C, but the test condition for energy consumption is equal to 15^ C or higher at the ambient temperature 25^ C.
Tips for Energy Savings
- Try not to open the door too often, especially when the weather is wet and hot. Once you open the door, close it as soon as possible.
- Every now and then check if the appliance is sufficiently ventilated (adequate air circulation around the appliance).
- Set thermostat from higher to lower settings as soon as possible (depends on how loaded the appliance is ambient temperature etc).
IMPORTANT
DANGER: Risk of child entrapment. Before you throw away your old refrigerator:
• Take off the door.
- Leave the shelves in place so that children may not easily climb inside.
- The appliance must be correctly connected to the power supply. (See: HOW TO INSTALL).
- Do not touch the cooled surfaces while the appliance operates, especially not with wet hands, because the skin may stick to the cold surfaces.
- Do not place power plug, microwave oven or other home appliance on the top of the refrigerator.
- Do not place refrigerator under the direct sun light, high temperature and high humidity
- Do not place any object near upper back of the unit which will affect the cooling of refrigerator.
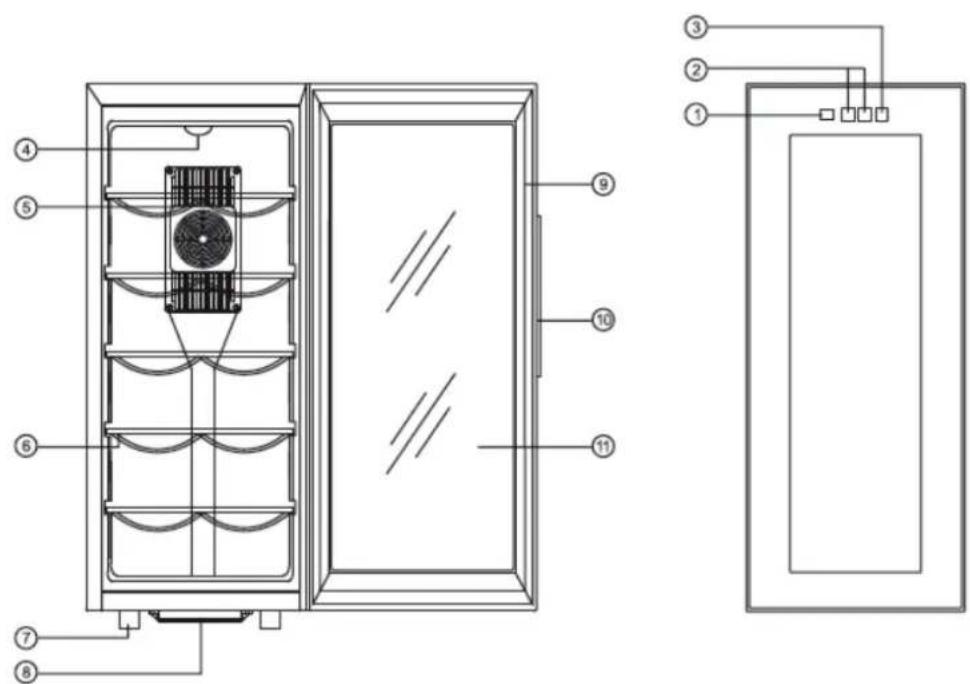
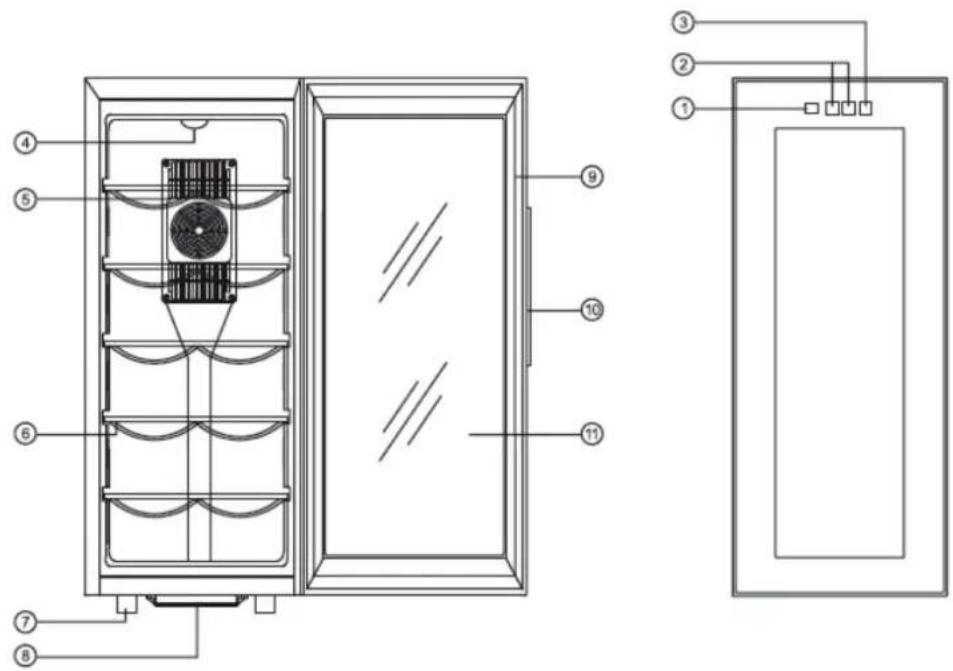
NAME OF THE PARTS
HYUVIN12A
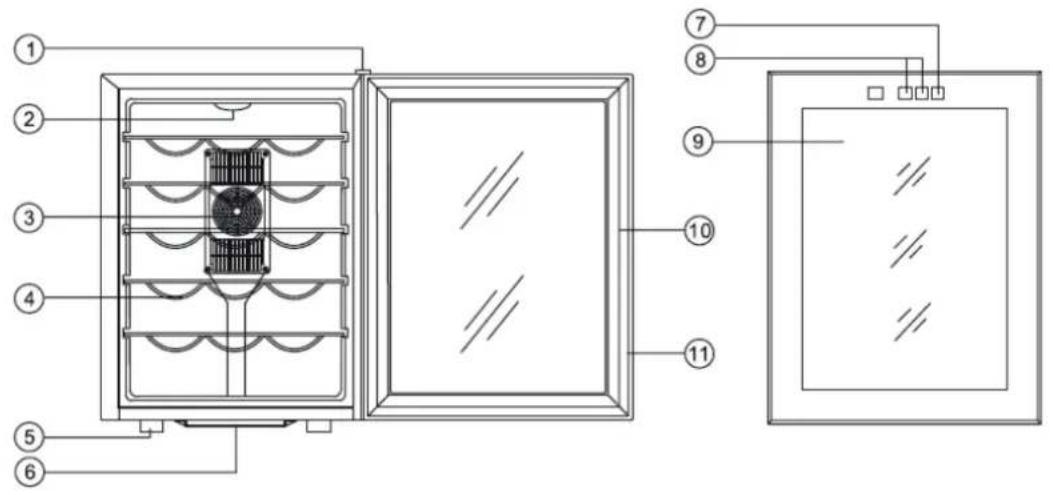
- REAM COVER 7. LIGHT SWITCH
- LIGHT 8. TEMPERATURE CONTROL PANEL
- FAN MASK 9. MAGNETIC SEAL
- SHELF 10. GLASS
- FOOT 11. DOOR FRAME
- WATER BOX
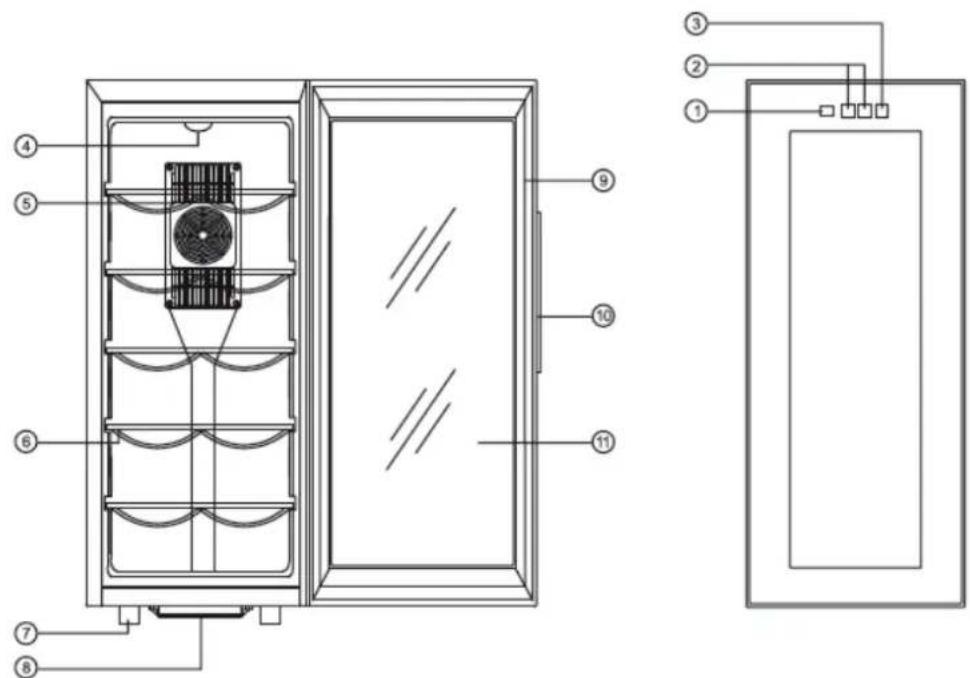
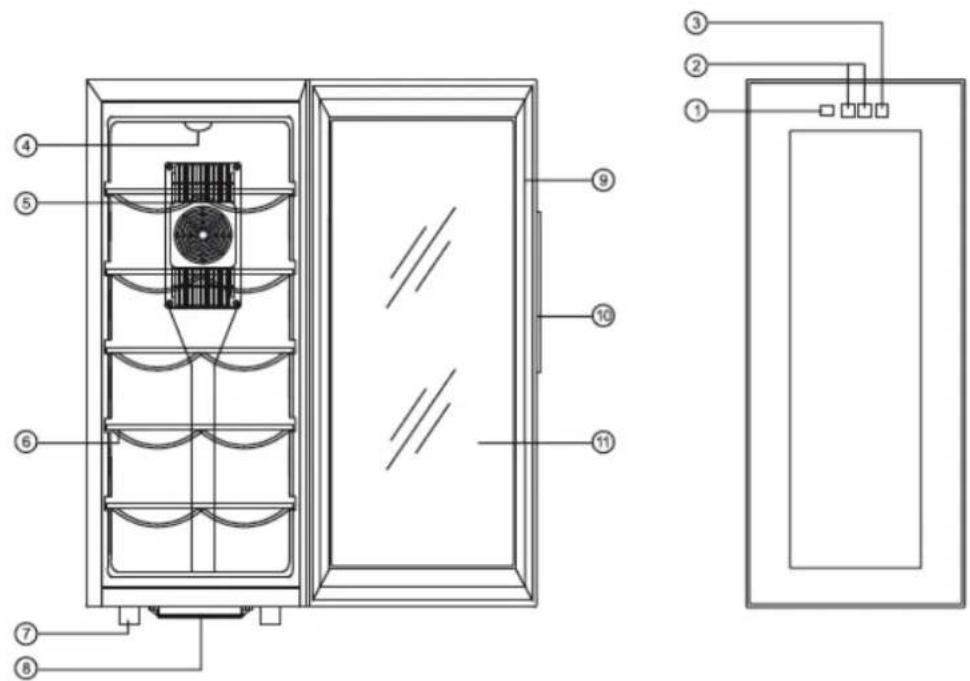
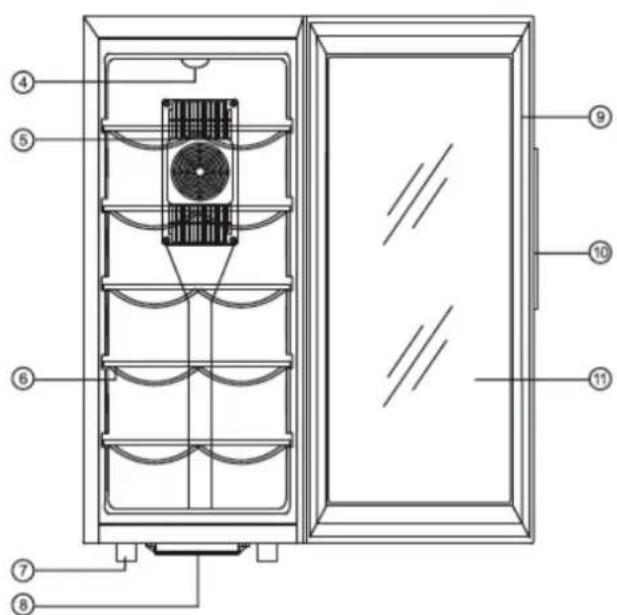
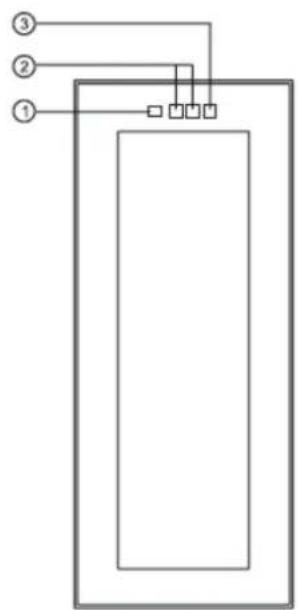
HYUVIN12B
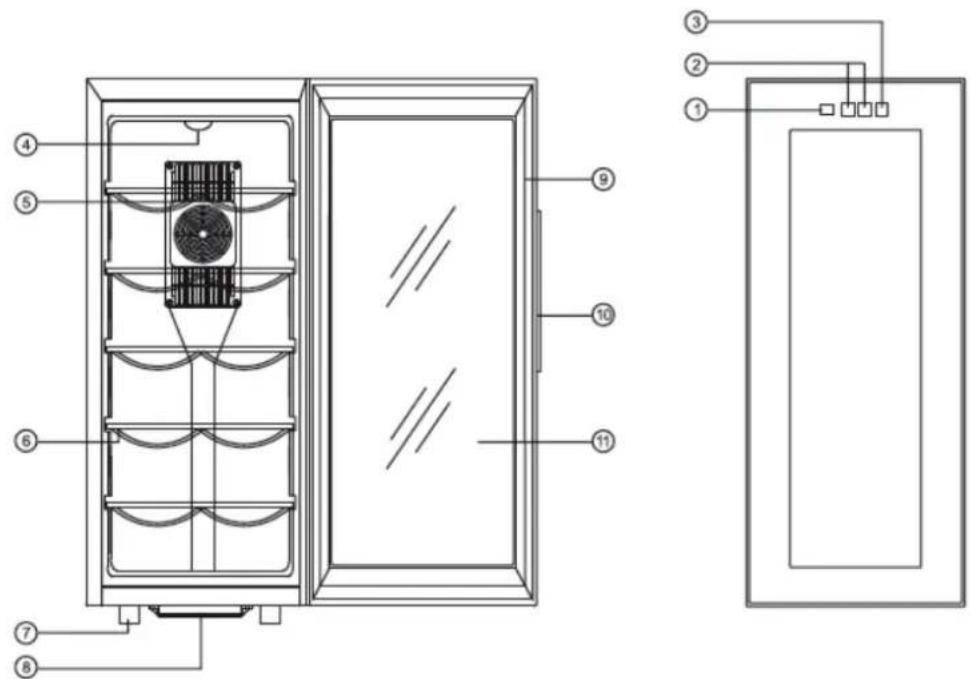
- TEMPERATURE DISPLAY 7. FOOT
- TEMPERATURE ADJUST KNOB 8. WATER BOX
- LIGHT SWITCH 9. MAGNETIC SEAL
- INTERIOR LIGHT 10 DOOR FRAME
- COOL FAN COVER 11. GLASS
- SHELF
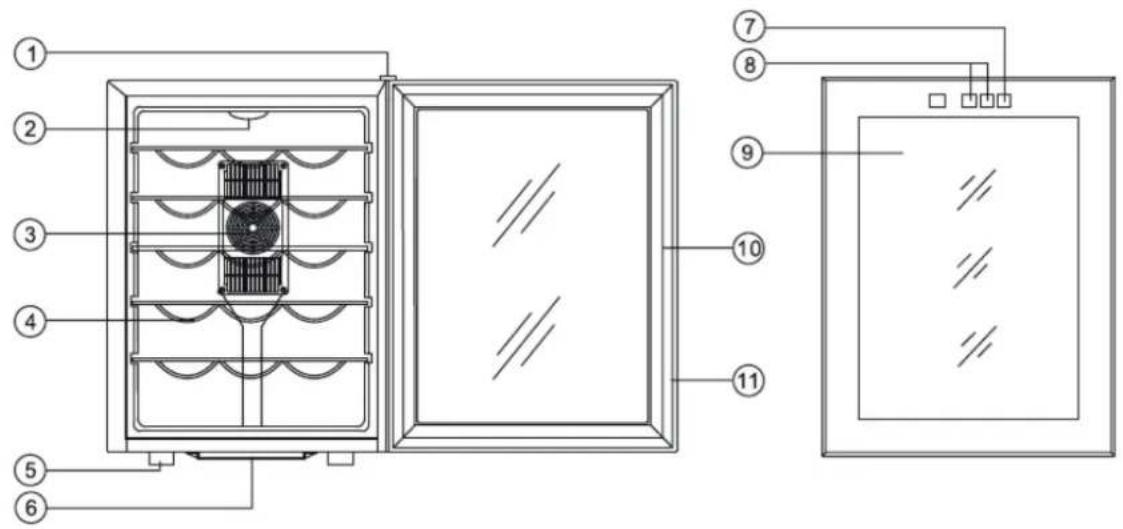
HYUVIN18
- REAM COVER 7. LIGHT SWITCH
- INTERIOR LIGHT 8. TEMPERATURE ADJUST KNOB
- COOL FAN COVER 9. GLASS
- SHELF 10. DOOR FRAME
- FOOT 11. MAGNETIC SEAL
- WATER BOX
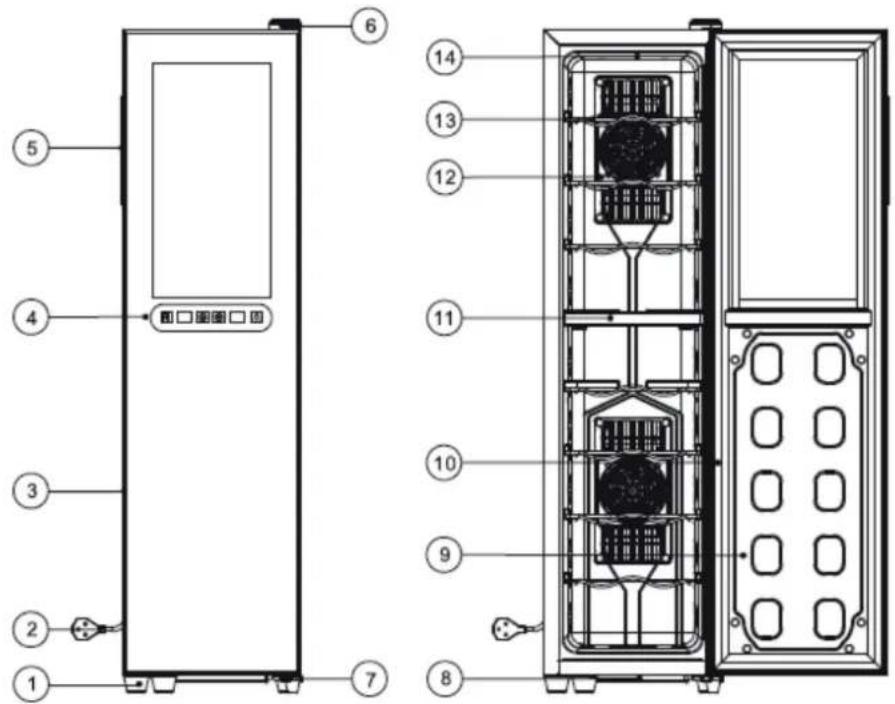
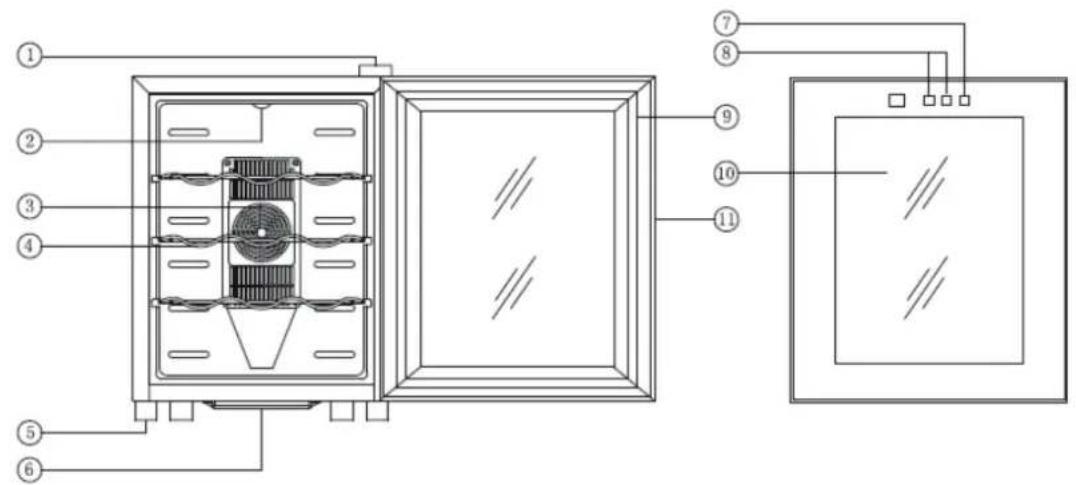
HYUVIN18DZ

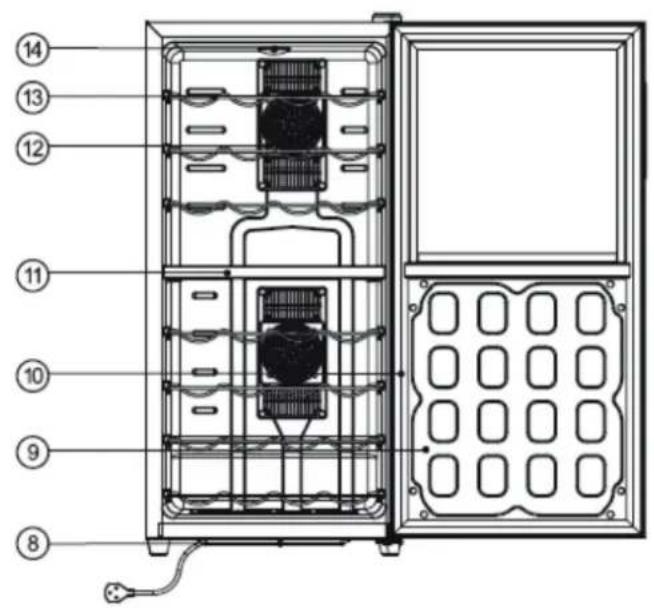
- FOOT
- WATER TRAY
- POWER CORD 9. DOOR LINER
- DOOR FRAME 10. DOOR SEAL
- GLASS DOOR 11. ISOLATED OARD
- RECESSED HANDLE 12. COLD FAN MASK
- TOP DOOR HINGE COVER 13. SHELF
- BOTTOM DOOR HINGE 14. LAMP COVER
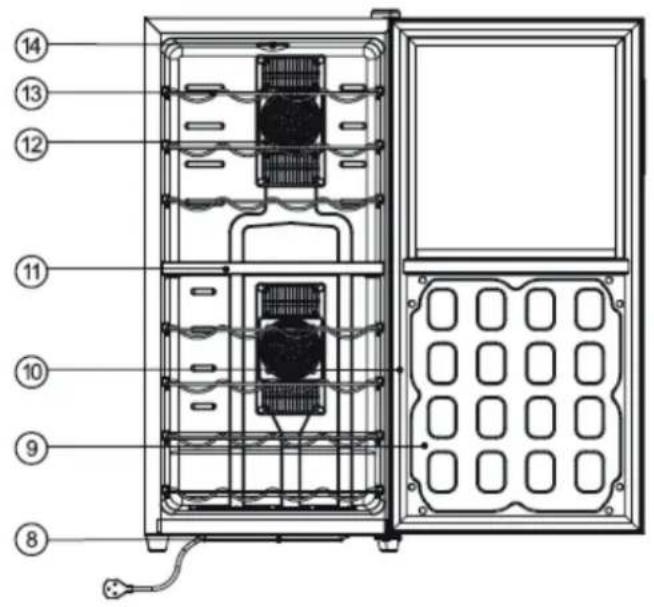
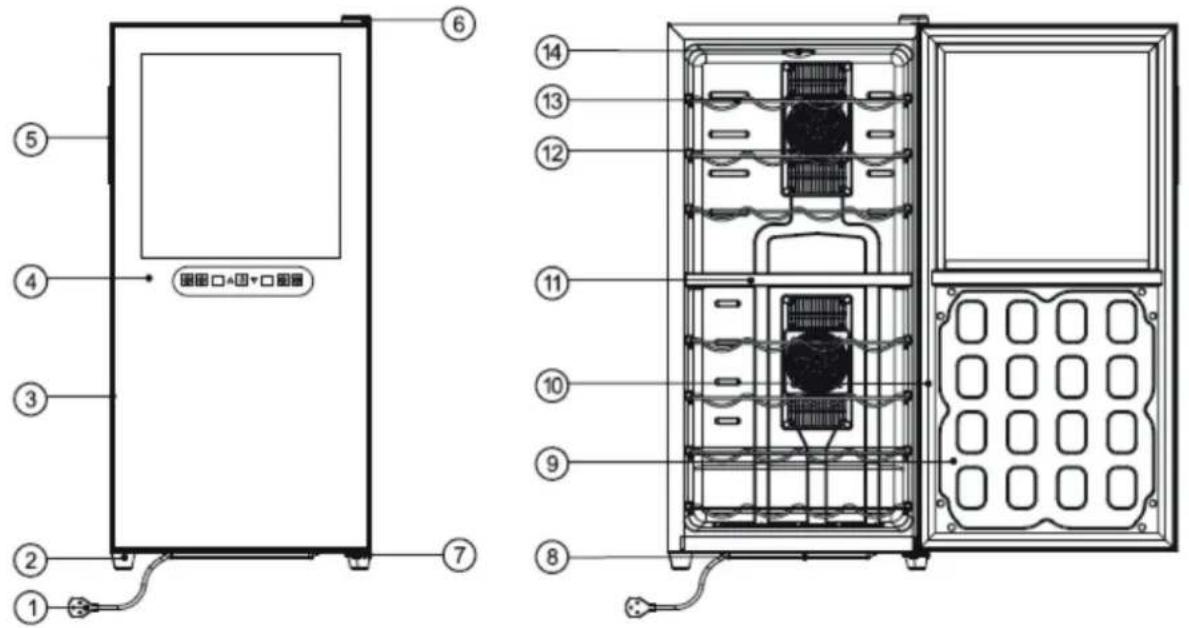
HYUVIN32DZ
-
POWER CORD
-
WATER TRAY
-
FOOT
-
DOOR LINER
-
DOOR FRAME
-
DOOR SEAL
-
GLASS DOOR
11.ISOLATED OARD
-
RECESSED HANDLE
-
COLD FAN MASK
-
TOP DOOR HINGE COVER
-
SHELF
-
BOTTOM DOOR HINGE
-
LAMP COVER
BEFORE PUTTING INTO USE
- Clean the appliance, and be thorough, especially in the interior (See HOW TO CLEAN).
- In case the interior accessories are not correctly placed, rearrange them as described in chapter NAME OF THE PARTS.
HOW TO INSTALL
• Install refrigerator in a convenient location away from extreme heat and cold. Allow sufficient clearance between the refrigerator and side wall so the door will open without obstruction. Refrigerator is not designed for recessed installation.
- Select a space with strong level floor.
- Allow 2 inches (5cm) of space between the refrigerators side & wall and 4 inches (10cm) between back & the wall.
INSTRUCTIONS FOR USE
Setting The Temperature Control
The temperature inside the wine cooler is dependant on the ambient temperature (room temp.) outside the wine cooler. Cooling temperature can be in range from 12 \~ 18 °C (for VIN18DZ and 32DZ temperature range are 12-18 °C upper zone, 8 - 18 °C lower zone).
Ideal temperature for red wine storage is 14 \~ 16°C. White wine is best when served cooled to 12°C.
Set the required temperature with the buttons on the temperature controller.
During setting the chosen temperature will flash on the LED display.

Increase temperature in increments of 1^ C

Decrease temperature in increments of 1^ C
The Light switch - Push ON, Push OFF interior light.
- Using buttons for temperature setting set the required temperature. When setting the required temperature the numbers flash. After you finish, the numbers stop flashing and the LED display shows the current temperature in the wine cooler.
- The temperature in the wine cooler is affected by the temperature of the environment. The inside temperature displayed on display will oscillate.
- Notice: This product has a continuous cooling system, which does not turn off the fan that blows air from the external environment. When the desired temperature, fan reduces the speed.
- Fill the wine cooler with your choice of wine bottles. Allow 10 - 20 hours of operation before the bottles reach the desired temperature.
CLEANING AND MAINTENANCE
Remove the plug from the socket before cleaning.
To clean the cooler use only mild detergents or glass cleaning products.
Never use harsh detergents or solvents.
Exterior:
Wipe with damp, sudsy cloth, rinse and dry. For stubborn stains and for periodic waxing, use silicon wax.
Refrigeration Section:
Wash shelves and other removable parts in warm sudsy water, rinse and dry. Wash interior with baking soda solution (3 tablespoons to 1 liter of water) or warm sudsy water, rinse and dry.
Magnetic Door Seals:
Wash with warm sudsy water.
The Finishing Touch:
Replace all parts and return thermostat dial to desired setting.
WHAT TO DO ...
When the refrigerator is not in use for a prolonged period of time:
- Remove the power plug from the power supply.
- Remove all contents from the refrigerator.
- Dry the Interior and leave the door open for a few days.
When you wish to move the refrigerator:
- Secure all movable parts and contents. (Package them separately if necessary.)
- Transport the refrigerator only in an upright position.
If the refrigerator seems too warm inside:
- Check that the door has not been opened too frequently or for a long period.
- Check that the interior circulation is not obstructed by having too many goods stored. (The refrigerator is overloaded)
- Did you store anything hot, without first cooling it to room temperature?
- Is there sufficient clearance around all sides and above the refrigerator?
If the refrigerator starts making any unusual noises:
- Is it wobbling? Re-level it and check if it now operates normally.
- Have any objects fallen behind the refrigerator? If so, remove them and check if operation is now normal.
- Are any containers inside the refrigerator vibrating or resonating? If so, rearrange them then check to see if operation has returned to normal.
If the inside light flashes:
- Set temperature is higher than inner temperature. The automatic defrost function starting to work. Disposal of the appliance
TROUBLESHOOTING
| Symptoms Possible cause | Solutions | |
| The wine cooler does not work. | There is a power failure. | Ensure the cooler is plugged in and the power socket is turned on. |
| A house fuse has blown. | Replace the broken fuse in your meter box. | |
| Wine cooler is not reaching the desired temperature. | The cooler is placed too close to a heat sources. | Keep the cooler away from sunshine or other heat source. |
| No sufficient ventilation. | Place the wine cooler in good ventilation and keep any items away from the fans. | |
| The door is opened too frequently or for a long period of time. | Close the door tightly and do not open the door too frequently or for a long period of time. | |
| Frost forming in the wine cooler. | Too much humidity.The ambient temperature is too low. | Unplug to defrost, plug again after the frost thaws. |
TECHNICAL SPECIFICATIONS
| Model No. VIN12B VIN1 | 2A VIN18 | ||
| Capacity of bottle 12 12 | 18 | ||
| Rated Wlage 220–240 V | 220–240 V 220–240 V | ||
| Rated Frequency 50 Hz | 50 Hz 50 Hz | ||
| Temperature range (°C) | 12 - 18 | 12 - 18 12 - 18 | |
| Input Power | 50 W | 50 W 50 W | |
| Power Consumption kWh / 24h | 0,36 | 0,28 | 0,51 |
| Size (cm) | 25,2 x 61 x 51 | 35,5 x 48 x 50 | 35,5 x 65 x 50 |
| Weight (NETTO) (kg) | 12 | 12,3 | 15,8 |
| Model No. | VIN18DZ | VIN32DZ |
| Capacity of bottle | 18 | 32 |
| Rated Wlage | 220–240 V | 220–240 V |
| Rated Frequency | 50 Hz 50 Hz | |
| Temperature range (°C) | 8 - 18, 12- 18 | 8 - 18, 12 - 18 |
| Input Power | 100 W | 140 W |
| Power Consumption kWh / 24h | 0,48 | 0,65 |
| Size (cm) | 25,5 x 95 x 51,5 | 40 x 85 x 51,5 |
| Weight (kg) | 18,9 | 24 |
Note: Test condition for energy consumption is equal to 15^ C or higher at the ambient temperature 25^ C.
The manufacturer reserves the right to change the technical specifications and accessories for the respective models.
INFORMATION SHEET
| NAME HYUNDAI HYUNDAI | |||
| Type identification mark | VIN12B VIN12A | VIN18 | |
| Type category of the cooling household appliance | 2 2 2 | ||
| Energy efficiency class | A A+ B | ||
| Energy consumption E | Energy consumption130 kWh a year based on standardized test results for 24 hours. Actual energy consumption depends on the way of use and placement of the appliance | Energy consumption101 kWh a year based on standardized test results for 24 hours. Actual energy consumption depends on the way of use and placement of the appliance | Energy consumption186 kWh a year based on standardized test results for 24 hours. Actual energy consumption depends on the way of use and placement of the appliance |
| Net volume 33 | 33 | 48 | | | ||
| Total volume 34 | 34,5 | | 50 | | ||
| Lowest sustainable storing temperature (°C) | 12 | 12 | 12 |
| Climatic class | SN: surrounding temp. from + 10°C to + 32°CN: surrounding temp. from + 16°C to + 32°C | ||
| Noisiness (dB) | 38 | 38 | 38 |
| This appliance is intended exclusively for storing wine | |||
| NAME | HYUNDAI | HYUNDAI |
| Type identification mark | VIN18DZ | VIN32DZ |
| Type category of the cooling household appliance | 2 | 2 |
| Energy efficiency class | B | C |
| Energy consumption | Energy consumption 176 kWh a year based on standardized test results for 24 hours. Actual energy consumption depends on the way of use and placement of the appliance | Energy consumption 238 kWh a year based on standardized test results for 24 hours. Actual energy consumption depends on the way of use and placement of the appliance |
| Net volume | 53 l | 78 l |
| Total volume | 55 l | 79 l |
| Lowest sustainable storing temperature (°C) | 8 | 8 |
| Climatic class | SN: surrounding temp. from + 10°C to + 32°CN: surrounding temp. from + 16°C to + 32°C | |
| Noisiness (dB) | 38 | 38 |
| This appliance is intended exclusively for storing wine | ||
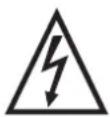
WARNING: Do not use this product near water, in wet areas to avoid fire or injury of electric current. Always turn off the product when you don't use it or before a revision. There aren't any parts in this appliance which are reparable by consumer. Always appeal to a qualified authorized service. The product is under a dangerous tension.
Old electrical appliances, used batteries and accumulators disposal
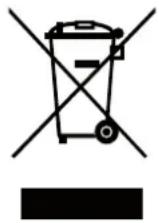
This symbol appearing on the product, on the product accessories or on the product packing means that the product must not be disposed as household waste. When the product/ battery durability is over, please, deliver the product or battery (if it is enclosed) to the respective collection point, where the electrical appliances or batteries will be recycled. The places, where the used electrical appliances are collected, exist in the European Union and in other European countries as well. By proper disposal of the product you can prevent possible negative impact on environment and human health, which might otherwise occur as a consequence of improper manipulation with the product or battery/ accumulator. Recycling of materials contributes to protection of natural resources. Therefore, please, do not throw the old electrical appliances and batteries/ accumulators in the household waste. Information, where it is possible to leave the old electrical appliances for free, is provided at your local authority, at the store where you have bought the product. Information, where you can leave the batteries and accumulators for free, is provided to you at the store, at your local authority.
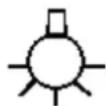
WARNINGS AND SYMBOLS USED ON THE APPLIANCE, PACKAGING OR IN THE INSTRUCTIONS MANUAL:
HOUSEHOLD USE ONLY; DO NOT IMMERSE IN WATER OR OTHER LIQUIDS;
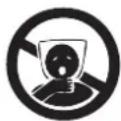
TO AVOID DANGER OF SUFFOCATION, KEEP THIS PLASTIC BAG AWAY FROM BABIES AND CHILDREN. DO NOT USE THIS BAG IN CRIBS, BED
- AZ AJTÓPÁNT BURKOLATA 7. A VILÁGÍTÁS KIKAPCSOLÓ GOMBJA
- VILÁGÍTÁS 8. HÖMÉRSÉKLET-SZABÁLYOZÓ PANEL
- A VENTILÁTOR FEDELE 9. MÁGNESES ZÁR
- POLC 10. ÜVEG
- LÁBAZAT 11. AJTÓKERET
- VÍZTARTÁLY
HYUVIN12B
- HÖMÉRSÉKLET-KIJELZŐ 7. LÁBAZAT
- HÖMÉRSÉKLET-SZABÁLYOZÓ 8. VÍZTARTÁLY
- VILÁGÍTÁS KIKAPCSOLÁSA 9. MÁGNESES ZÁR
- BELSŐ VILÁGÍTÁS 10. AJTÓKERET
- HÜTÖVENTILÁTOR FEDELE 11. ÜVEG
- POLC
HYUVIN18

- AZ AJTÓPÁNT BURKOLATA 7. A VILÁGÍTÁS KIKAPCSOLÓ GOMBJA
- VILÁGÍTÁS 8. HÖMÉRSÉKLET-SZABÁLYOZÓ PANEL
- A VENTILÁTOR FEDELE 9. MÁGNESES ZÁR
- POLC 10. ÜVEG
- LÁBAZAT 11. AJTÓKERET
- VÍZTARTÁLY
HYUVIN18DZ

- LÁBAZAT 8. VÍZTARTÁLY
- TÁPKÁBEL 9. AJTÓBETÉT
- AJTÓKERET 10. AJTÓTÖMÍTÉS
- ÜVEGAJTÓ 11. SZIGETELÖLEMEZ
- SÜLLYESZTETT KILINCS 12. A HÜTÖVENTILÁTOR FEDELE
- FÖLSÖ AJTÓPÁNT BURKOLATA 13. POLC
- ALSÓ AJTÓPÁNT BURKOLATA 14. A LÁMPA BURKOLATA
HYUVIN32DZ

-
TÁPKÁBEL 8. VÍZTARTÁLY
-
LÁBAZAT 9. AJTÓBETÉT
-
AJTÓKERET 10. AJTÓTÖMÍTÉS
-
ÜVEGAJTÓ 11. SZIGETELÖLEMEZ
-
SÜLLYESZTETT KILINCS 12. A HÜTÖVENTILÁTOR FEDELE
-
FÖLSÖ AJTÓPÁNT BURKOLATA 13. POLC
-
ALSÓ AJTÓPÁNT BURKOLATA 14. A LÁMPA BURKOLATA
- Masca balama superioara
- Lumina interior
- Masca ventilator
- Raft
- Picioare
-
Tava apa
-
Buton aprindere lumina
- Buton reglare temperatura
- Magnet usa
- Sticla
- Cadru usa
HYUVIN12B
- Afisaj temperatura
- Buton reglare temperatura
- Buton aprindere lumina
- Lumina interior
- Capac ventilator
- Raft
- Picioare
- Cutie apa
- Inchidere magnetic
- Cadru usa
- Sticla
HYUVIN18

- Masca balama superioara
- Lumina interior
- Masca ventilator
- Raft
- Picioare
-
Tava apa
-
Buton aprindere lumina
- Buton reglare temperatura
- Magnet usa
- Usa sticla
- Sticla
HYUVIN18DZ
- Picioare
- Cablu alimentare
- Cadru usa
- Usa sticla
- Maner
- Masca balama superioara
- Balama inferioara
- Tava apa
- Panou usa
- Magnet usa
- Departajare compartimente
- Masca ventilator
- Raft
- Masca lampa
HYUVIN32DZ

- Cablu alimentare
- Picioare
- Cadru usa
- Usa sticla
- Maner
- Masca balama superioara
- Balama inferioara
- Tava apa
- Panou usa
- Magnet usa
- Departajare compartimente
- Masca ventilator
- Raft
- Masca lampa
INAINTE DE UTILIZARE
Licensed by Hyundai Corporation, Korea.